Welcome back to Goonhammer’s series for aspiring Titan Principes. We here at Goonhammer’s own Collegia Titanica know that Adeptus Titanicus can seem intimidating to players unfamiliar with its particular quirks, but this series aims to equip you with everything you’ll need to play out epic clashes on the battlefields of the far future with your very own Titan Battlegroup. In this series, we’ll be taking a more in-depth look at the various Legios of the Collegia Titanica – exploring their origins and how to use them on the tabletop, from maniple selection and their loadouts, through to how to command them on the field of battle to secure ultimate victory.
In a game of lumbering steel behemoths, movement plays a vital role in deciding the outcome of the battle. This begins with deployment, where poor placement will put you in an uphill battle, struggling to find victory out of the gate. In this week’s article we’re going to look at how deployment works in Adeptus Titanicus and what considerations we make when we rack up.
A big thanks goes out to Vrekais of Ruleshammer fame for making the slick deployment diagrams.
How does Deployment Work?
After assembling your battlegroup, setting up a battlefield,selecting your mission objectives and stratagems it’s time to start the deployment phase. If you would like to brush up on any of these, we would suggest reading our Terrain, Objective or Stratagem articles.
At the start of the deployment phase the player with the lowest Battle Rating rolls a D6 against the below table:
D6 Result
- 1 Lines of Battle
- 2 Chance Engagement
- 3 Stand-off
- 4 Close Quarters
- 5-6 The player with the lowest Battle Rating picks one of the above
While we wouldn’t recommend taking a significantly smaller force for an Underdog bid to get the CP, don’t feel the need to use up every point in the bracket you are playing – it can result in you picking the deployment map ⅓ of the time, which can strongly favour certain objectives or battlegroups. Let’s take a look at when you should consider each one.
Soggy: We’ll be making the assumption that the terrain is relatively balanced and not skewed in one way or another. Check out the terrain article to get an idea what we mean by this.
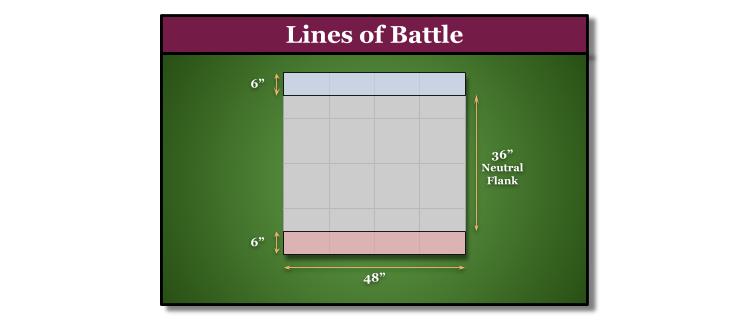
The vanilla of deployment maps due to its simplicity and speed to setup, Lines of Battle favours some Battlegroups and Objectives more than others. This deployment map uses alternating deployment, favouring a battlegroup with a higher number of drops to gain more intel in exchange for a worse die for the first turn roll off.
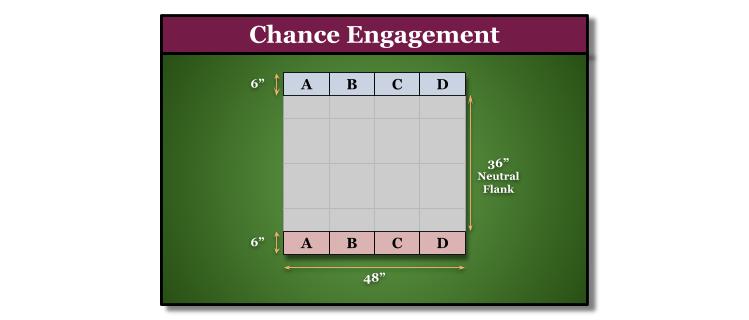
Chance Engagement is similar to Lines of Battle, but with a twist: before starting deployment, you allocate each of your units to a sector. This deployment map requires a good deal of Line-of-Sight blocking terrain for the allocations to be significant and differ from Line of Battle.
The potential for mindgames here is strong, especially if you have a redeploy ability, like Legio Solaria or Vulturum.
Condit: It’s not entirely clear whether redeploy abilities even work normally here (it says you can redeploy to anywhere the unit could normally deploy), but you can probably redeploy to any location RAW – your Titans could be deployed to areas other than the one you chose, you just didn’t choose that in the blind pick.
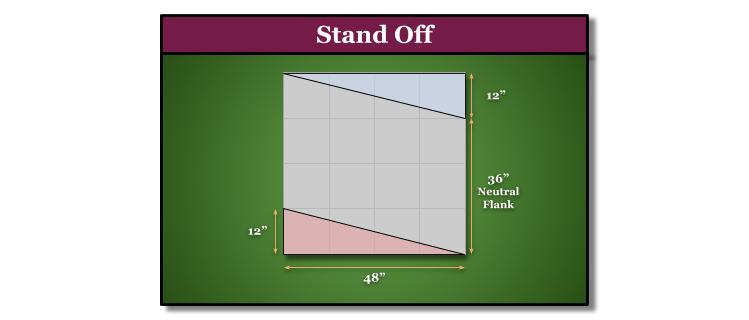
Stand Off is an apt name, as it does favour long range maniples with larger engines. Unlike the previous two maps, deployment involves dropping half of your battlegroup at a time – negating the intel advantage given with more drops. Despite starting 12” closer on one end, this space can’t always be used and almost forces units into the middle or rear of their deployment zone, meaning the effective distance to your opponent is often closer to 40”.
The half-and-half deployment takes away some of the disadvantage from bringing a list with fewer activations, and the longer distance between the forces gives you more room to play with in a list that wants to be shooting at long range. On the flip side, lists that want to get in close will find it harder to accomplish that, so this probably isn’t the deployment to choose if you’ve taken an aggressive Ferrox.
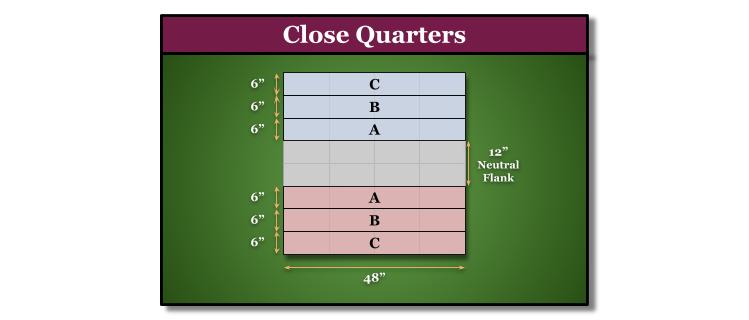
The spiciest of deployment maps, Close Quarters is a gift or a curse depending on your perspective. After deciding on table edges, each side is divided into three sectors. Each player then alternates placing their unit with the smallest scale in Sector A, followed by the next smallest in B, followed by the remaining units being deployed in the back field. Dice advantage for the first turn is given to the player with the smaller scale unit in Sector A.
This deployment favours a number of different factors, while simultaneously skewering others. Be careful not to overextend with the unit in Sector A and B as they will be on their own for a while – unless you’ve opted to drop as a Squadron.
From an objective perspective, this map is a blessing for Retrieval or Vital Cargo. Although in the case of the latter, putting your cargo in Sector A is probably asking for it. If you’re playing Hold the Line you will be on the backfoot, with your opponent gaining a headstart on your table edge.
Battlegroup compositions that include Brawler or Melee loadouts or maniples such as the Ferrox will have a field day, needing less time to get into position.
A Knight Banner in the first sector nearly guarantees advantage on the first turn dice roll and makes Cerastus Knights even more threatening.
This deployment is a godsend for Knight Households, who often struggle to get into effective range – Lances count a single unit for the purposes of deployment and this allows you to drop a significant portion of your force in striking range of your foe.
This deployment can be inherently negative for any Maniple that includes Knights, but the Dominus is the harder hit here of the two available at time of writing. The fact that you’re forced to deploy your mandatory banner of Knights in the A section, leaving all other elements of the Maniple back in B or C hinders the ability of the Dominus since the Knight Banners need to be wholly within 6” of one of the Titans for the benefit to work. If you’ve brought a second banner, your Knights set up into B are at least able to help one, maybe two Titans from the maniple, but the Knights in A are left out in the open since they will not be able to benefit from my negative hit modifiers afforded from cover.
General considerations
There’s an endless supply of variables to consider during deployment, however we’ll cover some of the high level things we consider during deployment.
Deployment Order
Generally speaking, you will want to deploy your most flexible units first so that you aren’t giving away your intentions. It’s quite fitting as this usually results in the Scout Titans and smaller components of a Battlegroup being deployed first. Fire Support Titans with Carapace arcs want to be deployed last, as this gives them the choice of targets to use First Fire on, or failing that, puts them in the best position to avoid return fire.
Posture
Once the map has been picked, start forming a general plan and role for each member of your battlegroup while thinking of what your opponent will be doing with their units. If you’re up against a Melee battlegroup, you probably don’t want to deploy right on the front line unless you have a strong reason to. Plan out where each Titan should roughly go to achieve their role and be mindful of the terrain of the battlefield and how this will impact their ability to perform their role.
Planning Ahead
As you commit each Titan’s rough position and role, consider what they will be doing in the first two turns of the game to achieve your goal. What orders will they be taking? A good example of a unit that needs a two turn plan is a banner of Cerastus Lancers – often taking Full Stride on turn one to get into position, they don’t want to be standing in the open at the start of turn one or turn two as First Fire Orders will remove them from the game. At the same time, they want to be in position to issue Charge orders on turn 2.
One trap we often see new players fall into is using Full Stride orders too aggressively and deploying in a position where they can’t make the most of that second move. Think ahead to where you want that Titan to end up and remember that their second move in the Combat phase cannot include any turns and must only be in a single straight line in the front arc.
Squadrons
Knowing when to squadron can often be a tricky decision due to the number of variables you need to consider. Deployment on its own should not be the defining reason why you squadron or not. Think about your overall gameplan with your squadron of (probably) Warhounds and how they need to be set up together. Deployment is simply when you commit to which engines are grouped together, but realistically you’ve already chosen this while list building.
Consider the composition of the opposing force: you can adjust your number of activations based on what they’re bringing. Activation advantage is key to gaining more intel from turn to turn, and lists with more activations often have less durable models. This frees you up to commit fewer engines to squadrons, since Coordinated Strikes aren’t as crucial to bringing down a Warhound as they are when you’re hunting a Warlord.
The only time you might want to think about changing this could be when you roll up Lines of Battle and want to out-deploy the enemy, giving up the D10 roll for first player in round 1, but ultimately getting to line up your Titans into a better position. Lighter maniples such as the Venator and Ferrox can get a lot of mileage out of this, foregoing initiative in the first round to take a strong positional advantage.
Legion specific considerations
Some Legions of the Collegia Titanica have abilities which take place pre-game or in the first turn which require extra thought to make the most of – or to be aware of if you’re up against it.
Legio Mortis can blitz their opponent via March of the Dead, enabling each of their Titans a pregame unboosted move in exchange for the first player on the first round. This extra movement phase comes at a costly 3SP, but will allow a Mortis player to dominate the field with Melee/Brawler loadouts or jump on objectives if you roll Vital Cargo or Retrieval. Just keep in mind that you have to commit those 3SP before you even know which deployment type it is.
Legios Solaria and Vulturm have tricks which allow them to redeploy after everything else is committed, effectively giving you another drop with more intel. The mindgames potential here is strong. If you’re going to use one of these, drop the units you intend to redeploy first, then move them once your opponent is done.
Legio Lysanda has one of the weirdest abilities in the game, Patience Beyond Measure. To use this ability you forgo the ability to go first and have to deploy all your units at once, giving your opponent maximum intel. For this high price you gain two bonuses for your first turn: +1 to hit and the ability to reroll command checks in the first round. This certainly isn’t something to be used lightly, but in the right circumstances you could unleash a punishing alpha strike – if you weather the storm.
Soggy: Warlords often don’t really benefit from Patience Beyond Measure, as it’s asking to be out deployed and/or reduce their ability to First Fire. If the stars were to align, Warhounds starting in range thanks to Close Quarters could make some good use of this ability.
Legio Defensor is famed for their Righteous Fire ability, which allows you to fire weapons multiple times during each activation if you’re willing to incur a few points of heat. While you probably aren’t going to go for the quad-shot, capitalising on this ability for early engine-kills will require some thought during deployment: you won’t be able to use it if you didn’t deploy in a position that allows you to take the shots.
The Die is Cast
Once the deployment phase is over, it’s time to see if your battle plan survives contact with the enemy. While there are many variables to consider, it’s important to remember not to suffer from analysis paralysis and enjoy your game with your opponent. It may seem daunting at first, but with a few games under your belt, you’ll find yourself making many of these decisions without even realizing it.
