Welcome to another installment of Starting Hex, a series about Warhammer Underworlds. I’m approaching Underworlds with a focus on improving gameplay, building communities, and a maybe eventually painting some models. Today we are going to take a look at the high scoring objectives in the six current rivals decks available and consider how easily one can try and play around them.
What is Counterplay and Why Is it Important?
I can’t remember the exact quote, nor where I heard it, but it was something about there being multiple stages of learning to play competitive games. The first stage is learning the rules of the game itself. The second is learning how to play your chosen deck/faction. The third is learning how your opponent wants to play their deck/faction and attempting to deny them from being able to enact their gameplan. The first two categories get a fair bit of talk, but I don’t think there’s nearly enough discussion centered around how to deny your opponent from doing what they want to do.
Playing around your opponent’s likely objectives is a great way to take the next step in familiarity with the game. Some people have the ability to look at cards and memorize them easily, but my memory is closer to that of a goldfish than an elephant so I will take advantage of any shortcuts or memory aids that I can. One such aid is this list of end phase objectives that are worth 2 or more glory. It’s a fairly small list – only 17 cards currently – so it’s something that hopefully I can keep in mind when playing. Hopefully it’s a resource that you can also appreciate.
Objective denial can be done in a variety of ways. One of the most straightforward is to, in the words of Day9, “Just fucking kill them.” Most of the time, your opponent is going to want to have their models alive and doing certain things to score. If they’re dead, you’re going to make it a lot harder for them to hold treasure tokens or delve or make attacks. The obvious problem here is that your opponent is going to try and prevent this, but an even bigger issue is that killing enemy fighters is reliant on dice. If you roll cold, you’re hung out to dry. As much as I am always tempted into an ABC (Always Be Charging) approach, I’ve realized that it’s highly susceptible to luck and I am more interested in finding ways to both score my own cards and prevent the opponent from scoring their cards without rolling any dice if possible.
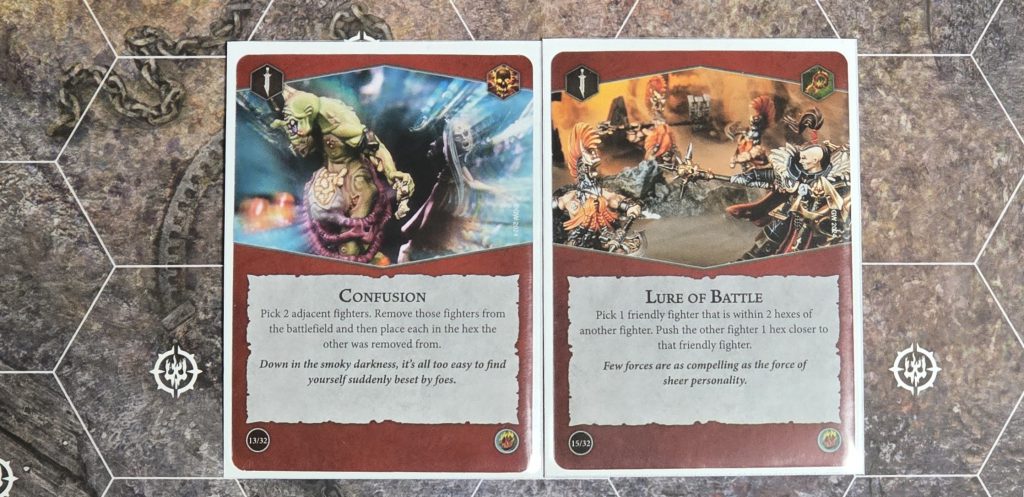
Just behind “kill them” in terms of a common strategy is using pushes to shift your opponent out of position. The easiest example is to use something like Confusion or Lure of Battle to pull an enemy fighter off of a treasure token if that was part of their plan. Other objectives score on similar positional requirements that aren’t about treasures – think about cards like Alone in the Dark that require no fighters to be adjacent, or Stay Close which requires no fighters to be in edge hexes.
Sometimes you can deny scoring just by moving a model. Does your opponent want to score Stay Close? Just have a fighter in an edge hex. Does your opponent want to score Slow Advance? Go stand on the treasure in neutral territory. What about that big fat 3 glory from Unrelenting Massacre? Don’t charge with all your fighters.
It’s rare, but there are also some effects in Underworlds that just let you say “no” to your opponent. Shut It, Pipsqueak! from Morgok’s Krushas is the prime example. Your opponent wants to play a ploy and you have a 50% – 75% chance of saying “nah, that’s not gonna happen” depending on how many of your resources you spend. This is incredibly powerful, but also substantially limited in who can do it. We may see more of these effects as future warbands and rivals decks are released, so keep an eye out for them.
Okay, enough rambling. Let’s look at the cards. They’re going to be broken down by rivals deck, so if you’re playing in the Rivals format you can count on every card listed being in your opponent’s deck. If you’re playing in Nemesis, look at the two decks and be prepared for cards from either one to show up, keeping in mind that of the 24 potential objectives, your opponent only has to include 12 of them so nothing is guaranteed. As a reminder, I’m focusing on the end phase objectives that are worth two or more glory. The other end phases and all surges are currently worth a single glory each, and are typically a little harder to prevent so I’m not going to waste my limited brain power on them at this moment. The ones featured here are also likely to show up in Nemesis decks precisely because they are worth multiple glory, so they’re going to help raise the overall glory ceiling a deck is capable of scoring.
Blazing Assault
This deck is notable for having only a single objective worth more than 1 glory. The rest are fairly reliable, but low scoring objectives.
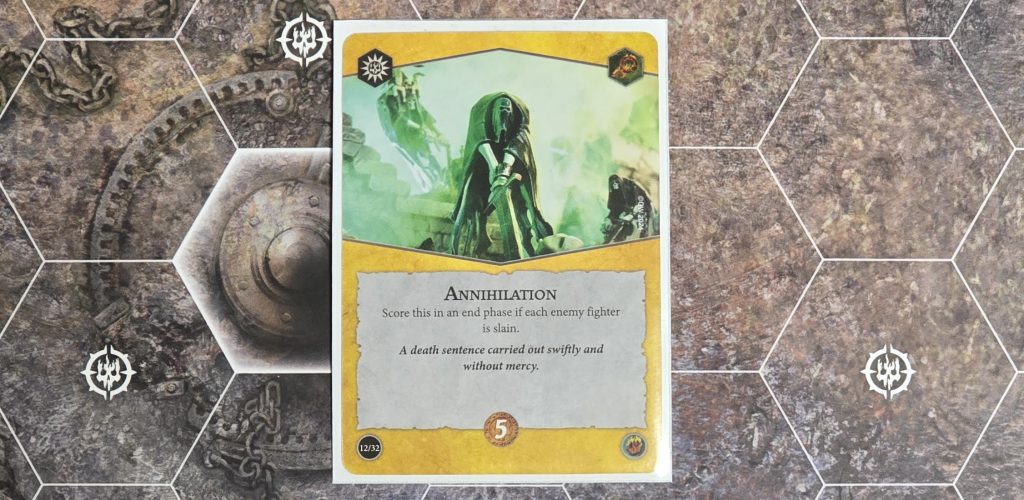
Annihilation carries a whopping 5 glory from the Blazing Assault deck. The plan to counter this card is self evident – don’t let all your fighters die. In practice, if you know your opponent has this card in their deck, you’ll want to be a little more cautious as the game draws to a close. Don’t overextend your fighters. Moving into charge range to score 1-2 glory on your own objectives isn’t going to offset the massive 5 glory that Annihilation is worth, not to mention the bounty of your final fighter being slain. In Rivals, this is such a tremendous portion of the glory available for Blazing Assault, so play cautiously unless your opponent has discarded it earlier in the game. Annihilation doesn’t show up often in Nemesis decks due to how difficult it is to score, so unless you have seen it in a previous game I would generally assume it won’t show up in a Nemesis deck.
Recap:
- Don’t let all your fighters die.
Emberstone Sentinels
This Take and Hold deck features three objectives to consider. Not surprisingly, they are all focused on holding treasure tokens.
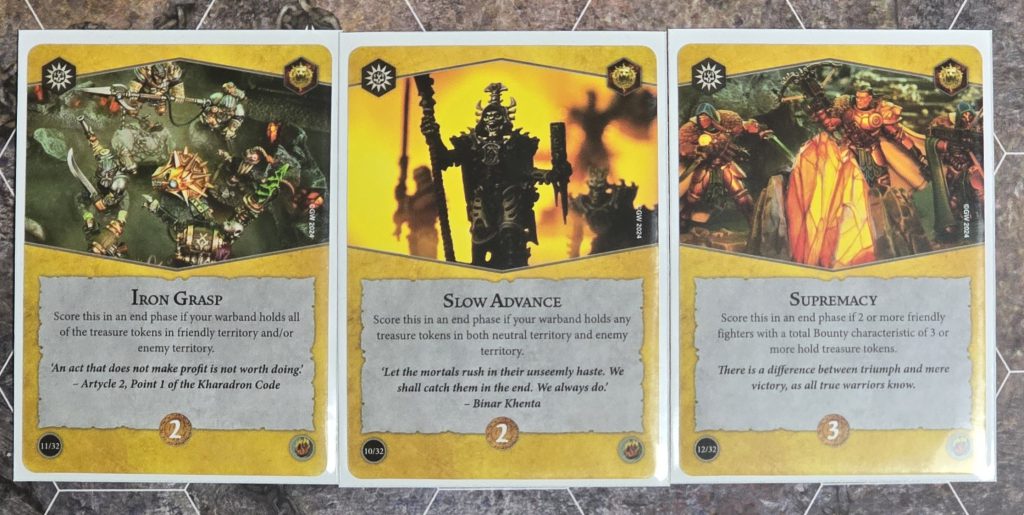
Iron Grasp is worth 2 glory and requires the player to hold all treasure tokens in friendly and/or enemy territory. The easiest route your opponent will have of scoring this is if they only have a single treasure token in their territory, so consider making sure they have two during setup. Keep your eyes peeled for any delving that happens, because that’s going to reduce the number of treasure tokens in that territory and make it easier for your opponent to score Iron Grasp – if they delve a treasure and run off of it, it could be worth your time to get back onto it and flip it right back over. If your opponent has a fast warband or access to movement tricks, be wary of completely abandoning your half of the board as well – they could run a quick skaven over or combine a teleport with a push to take a treasure you thought was safely tucked away in your home territory when you’re not expecting it.
The next 2 glory objective is Slow Advance. This requires holding any treasures in both neutral and enemy territory. The worst case for you being able to deny this is if there are two treasures in neutral territory and two treasures in your territory – this leaves the most open landing places for enemy fighters to secure to score this, and likewise makes them scoring Iron Grasp pretty easy. If you force two treasures into your opponent’s territory, then by using the Power of Math you can see either neutral or your territory will have a single treasure token. If you can castle up on that token and focus your firepower on any enemies that try to take it, you can go a long way in making Slow Advance more difficult to score on you.
The big scoring card in here is Supremacy, worth a mighty 3 glory. Fortunately it has two vectors in which you can engage with it – it requires two fighters holding treasure tokens and they have to have a total bounty of 3 or more. Most of the more traditional hold style warbands are going to require holding three treasures to score this, since their fighters tend to be worth only 1 bounty. The four fighter warbands are going to be the most problematic since it typically means any two of their fighters on treasures can score this. They also tend to be more durable fighters than the swarm warbands, and at four bodies they can reasonably score this even in the second or third rounds of the game. When you have a choice of which fighters to attack or push off of treasures, consider the ones with the highest bounty as prime targets.
Remember you can save your power cards and warscroll abilities that can push enemy fighters until the power step right before the end phase. This gives your opponent less time to react to your pushes and can help you brick these end phase scoring cards in their hand for another round.
Recap:
- Don’t let them take all in friendly or enemy territory
- Find the weak point for Slow Advance and fight over it
- Prioritize high bounty fighters on treasure tokens
Pillage and Plunder
Another three objectives make this list from the delve-focused deck and all three of them are on theme.
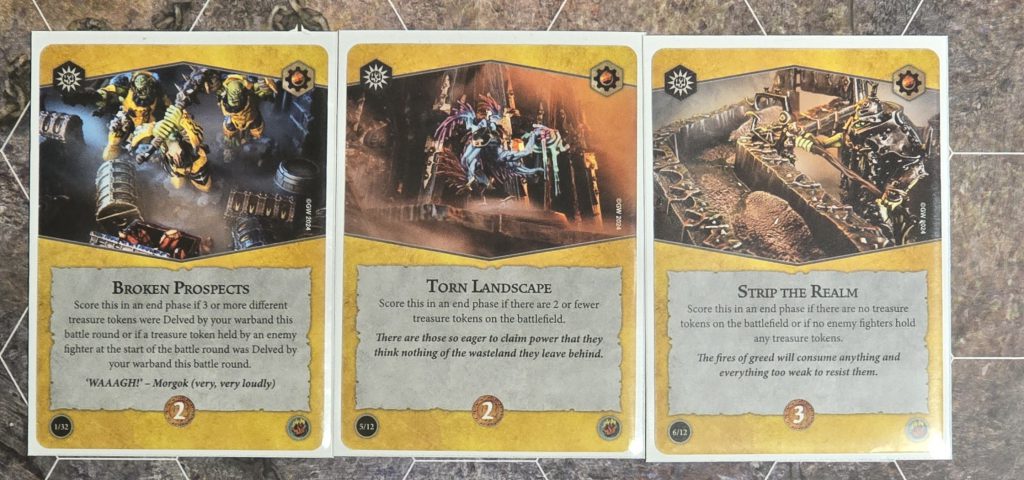
First up is Broken Prospects which scores your opponent 2 glory if they delved 3 or more different treasure tokens or if they delve a treasure token you held at the start of the battle round. This is somewhat annoying to try and prevent because it’s two different angles of attack that you have to consider from one card. You can gain a slight advantage here by delving your own treasure tokens if that doesn’t interfere with your own battle plan – it will slow down the first angle by one turn if they can get onto one of your once-treasure-but-now-cover hexes (the wording requires they delve treasure tokens, and a token that’s cover side up isn’t a treasure token) as well as mean that any of your fighters on the cover tokens aren’t starting the battle round on a treasure token. Even if you later re-delve the cover into a treasure, the window for that battle round has closed so the second method of scoring this card can be prevented.
Do be wary of delving too deeply, though, because you could wind up helping your opponent score both of the next objectives. Torn Landscape scores if there are 2 or fewer treasure tokens on the battlefield. If you’re a more aggressive warband, try to position your fighters so you can hold onto treasure tokens while fighting. If you’re taking a hold approach, you’re already going to want to guard those treasures so park your butt on them. Consider keeping a push in hand for the power step right before the end phase so you can sneak onto a cover hex and flip it back to the treasure side to delay this one.
Strip the Realm lets your opponent pocket 3 glory if you’re not on any treasure tokens. This is a pretty huge incentive to be on at least one at the end of every battle round and the main reason why you want to be careful being overzealous with delving to play around Broken Prospects. Denying 3 glory is a huge swing, so even if you have something in hand that can score from abandoning a treasure token or if you’re just chasing after the bounty from a kill, reconsider the risk vs reward.
Recap:
- Take note of any treasure tokens that you start the battle round on and protect them from delving; after the first one or two treasure tokens are delved, concentrate on holding the remaining ones within reach
- Counter-delve to make sure 3+ treasures are on the battlefield
- Have at least one fighter parked on a treasure token
Countdown to Cataclysm
Coming in at a whopping four objectives, Countdown to Cataclysm also has one that you just flat out can’t play around.
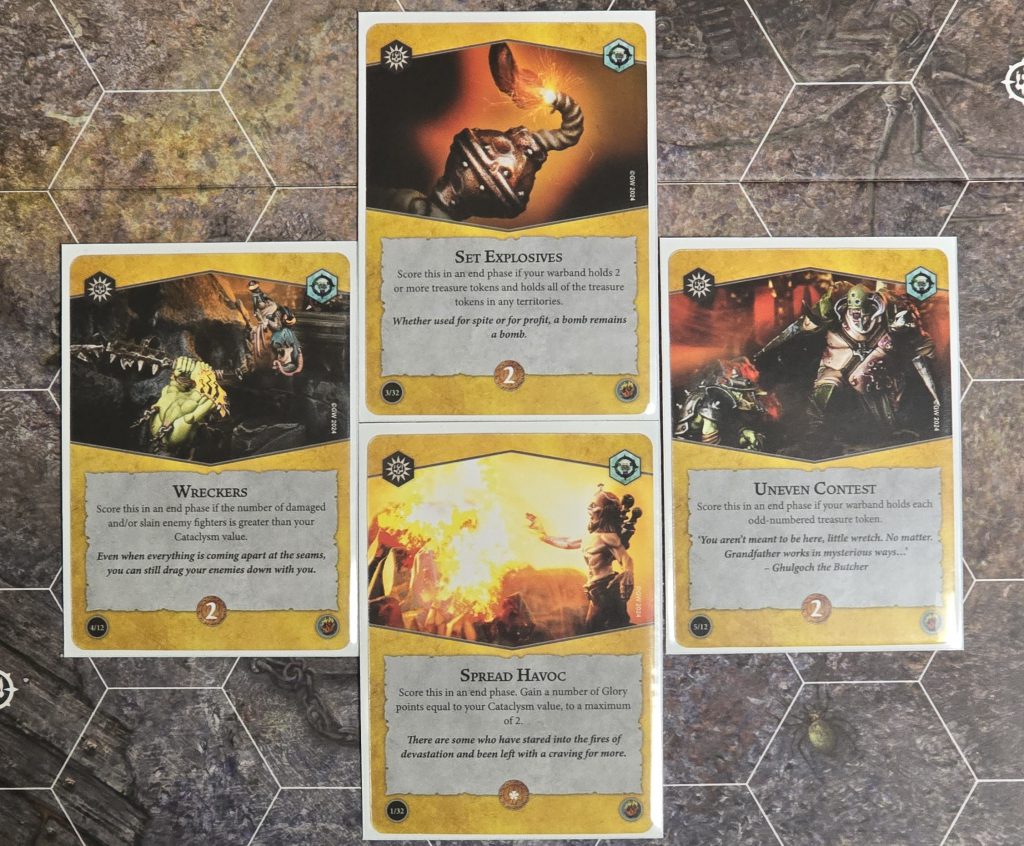
Spread Havoc is a variable scoring objective worth 1 or 2 glory. You literally cannot do anything to stop it from being scored for 1 if your opponent draws it, and stopping it from scoring for 2 later in the game isn’t going to be worth the effort. To get a rough idea of what you’d need to do to prevent it scoring for 2, you would need to be able to hold approximately 4 feature tokens every round and not kill any enemy fighters. Kudos if you can pull that off, but unless that’s already Plan A for your warband and deck, it won’t be worthwhile.
Set Explosives gives off similar vibes to what was talked about in the Emberstone Sentinels section. It scores if the enemy holds 2 or more treasure tokens and all of the treasure tokens in any territory. There are a lot of permutations of how this can play out, but the part I will focus on the most is identifying where the opponent can hold all the treasure tokens in a territory. In a lot of my games, it has been the solitary treasure in neutral territory, but depending on setup it could vary – the solitary token in any territory, two tucked away in the enemy’s territory, two right across the line in your own territory against an invading opponent, etc. Be mindful of the opponent delving here as well, because it cuts down on the number of treasures in a territory when they do.
One I see often in Nemesis decks with this pairing is Wreckers, which is another difficult one to deny as long as your opponent remembers that incrementing their countdown tracker is optional. It’s very difficult to prevent one of your fighters from being damaged, but if you happen to be in this situation with a healing potion in hand, the end phase before the opponent can score this would be a good time to play it. You gain some extra value if you can deny this being scored round 1 because your opponent will have to either hamper any other countdown scaling cards they have by keeping their tracker value low, or they can let it increment up and make Wreckers harder to score.
Uneven Contest is a pretty hefty ask of requiring all the odd number treasure tokens to be held. If you happen to be delving with your own gameplan, keep an eye on where the odd number treasure tokens are and don’t delve all the ones out of your opponent’s reach. It’s always going to be in the deck in Rivals games, but I haven’t seen it crop up as much in Nemesis as the other options here due to it requiring a little more effort and luck in where the odd treasures wind up.
Recap:
- Prevent opponent from holding all treasures in a territory
- Try to time healing effects at the end of round 1 if you can manage to have no injured fighters; otherwise don’t fret Wreckers too much
- Keep at least one odd number treasure treasure-side up and free of opponent’s fighters
Wrack and Ruin
One of the newer decks, Wrack and Ruin also presents four objectives worth 2 or more glory. These are all based on fighters being in certain places, so the value of pushes and out of sequence moves jumps up even higher when trying to counter these objectives.
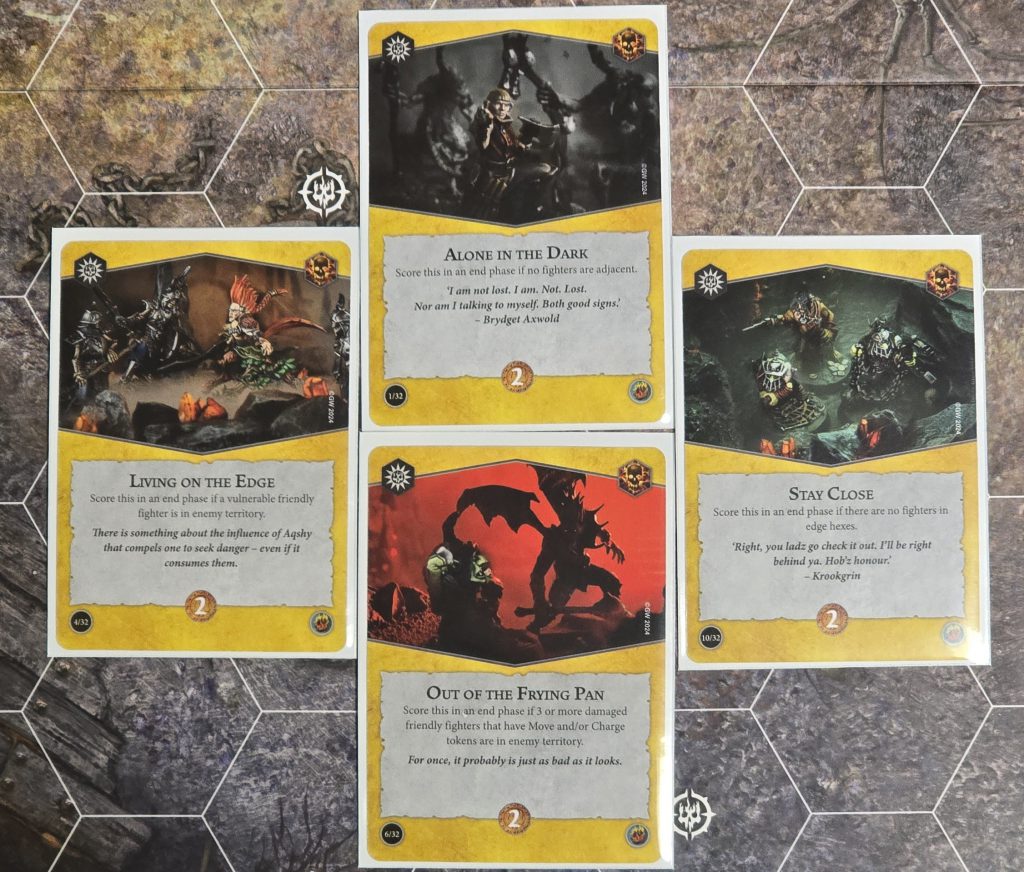
Alone in the Dark is worth 2 glory if there are no fighters adjacent. So… have some fighters adjacent. You can move one of your fighters so they’re next to one of the enemy fighters, or just pair up two of your own fighters as battle buddies to prevent this from scoring. If you have ranged fighters and plan to make some charges, you can position them to have each others’ backs while firing off their ranged attacks. This will usually be easier for your opponent to score as the game goes on and fighters start dying, so make an effort in rounds 2 and 3 to keep it in mind.
Living on the Edge is another 2 glory just for positioning. In this case, your opponent has to have a vulnerable fighter in your territory. Vulnerable fighters should already be a high priority for you to take out, but keep this in mind for any warbands that have 0 bounty fighters either naturally or through raise mechanics. They’re not normally as tempting to target, but this objective gives you a reason to do so.
Next up is Out of the Frying Pan which has some rad art of Ennias looking all creepy. Your opponent will get 2 glory if they can have 3 or more of their damaged fighters with move and/or charge tokens in your territory. You can deny this by focusing on the wounded enemies and not spreading out damage, which is generally a good approach anyway unless your warband and/or deck specifically wants you to do so. Fighters don’t innately get weaker as they take damage, so there’s no difference between a fighter at full health and one sitting on one remaining wound. If your gameplan rewards you for slaying enemy fighters, finish the task before moving on to the next target.
The last objective for Wrack and Ruin is Stay Close. Worth another 2 glory, your opponent can score this if there are no fighters in edge hexes. This can require you to go out of your way to actively thwart, so don’t get yourself out of position in the turns leading to the end phase. Some warbands are particularly adept at denying this objective; for instance, the Emberwatch can use Vanguard Dash to teleport into an edge hex from anywhere, and they can also use Alone I Stand! in every battle round to push one of their fighters 1 hex.
Recap:
- Have some fighters adjacent (any combination of yours or the enemy’s)
- Finish off vulnerable or damaged enemy fighters
- Have one of your fighters in an edge hex
Reckless Fury
This deck has turned out to be quite a menace in Nemesis with a ton of potent tools. It also sports three objectives that make the cut for this cheat sheet.
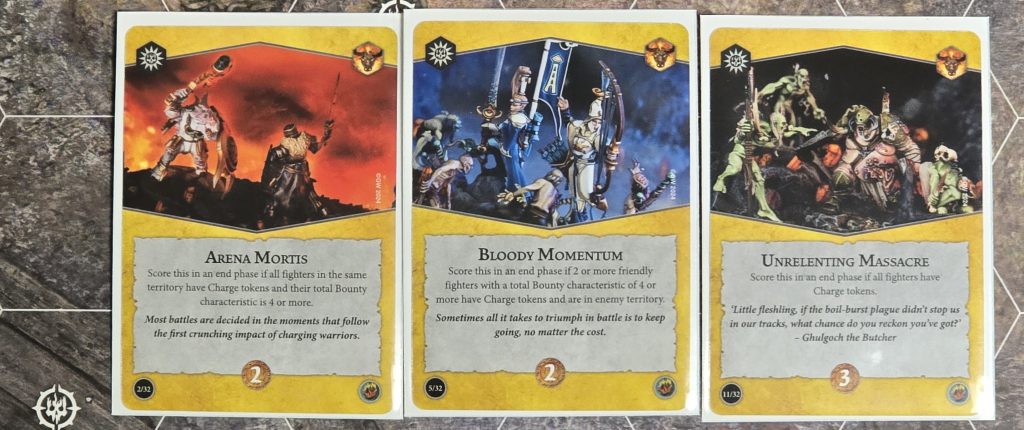
Arena Mortis is worth 2 glory as long as all the fighters in the same territory have charge tokens and their total bounty is 4 or more. If you’re playing an ABC playstyle, you’re going to have to be mindful not to give this away for free. This one is trickier in that it’s harder to come up with a quick rule of thumb for how to play around it – I’m just going to need to consciously be aware of its existence and intentionally play around Arena Mortis in particular, and not just something like “don’t charge too much” while playing. It’s the mix of needing the territory, the bounty characteristic, and the fighters present all having a charge token.
Bloody Momentum is another 2 glory payout if your opponent has 2+ of their fighters with a total bounty of 4+ in your territory with charge tokens. Depending on how many fighters you have in your warband, you could try to play keep away from the opponent so they don’t have places to land their charges in your territory – either by playing back in your territory or invading their territory aggressively. This deck does still have tricks to give charge tokens to their fighters, but if you can deny the actual charge action then that goes a long way in making your opponent have to work for it.
The last objective, Unrelenting Massacre, is worth a hefty 3 glory. If every fighter on the board (yours and your opponent’s) have charge tokens, this is going to score. A large payoff that you can play around fairly easily as long as you know it exists. Simply don’t charge all of your fighters. This gets harder if your warband is smaller and/or it’s later in the game where you’ve lost some fighters, admittedly. It can also affect target priority in some cases – if it’s the last turn in the round and you have the choice between trying to kill an enemy fighter with or without a charge token, Unrelenting Massacre can swing the decision in favor of you attacking the one with a charge token.
Ultimately, a lot of the big payoffs in this deck rely on both warbands charging a lot. If you can craft a gameplan that can subvert that while still scoring well, you can strengthen your counterplay opportunities against Reckless Fury. That’s especially helpful in the current Nemesis meta where Reckless Fury is being chosen as one of the decks a fair number of times due to the bonkers power cards it contains.
Recap:
- Keep Arena Mortis in mind – watch where you charge and where your opponents can charge to
- Aggressively invade the opponent’s territory or stay out of reach of/prioritize killing enemy fighters which have charged into your territory
- Don’t fully charge out your warband and/or don’t kill off all the uncharged enemy fighters
Now What?
That’s it for the six decks currently out for Warhammer Underworlds. Instead of having 72 objectives to try and keep in my head, I’m going to focus on these 18 during my upcoming games. Normally, I will tunnel vision on doing One Thing At A Time and completely disregard anything else. I’ve even caught myself disregarding the objectives in my own hand while chasing down a kill – this is obviously both dumb and bad. I’m hoping that narrowing down the scope of what I’m trying to play around will give me some focus in my games and hopefully I’ll see results by bricking objectives in my opponents’ hands and (maybe) winning more games! With any luck, this list can be a useful tool for you as well.
Have any questions or feedback? Drop us a note in the comments below or email us at contact@goonhammer.com. Want articles like this linked in your inbox every Monday morning? Sign up for our newsletter. And don’t forget that you can support us on Patreon for backer rewards like early video content, Administratum access, an ad-free experience on our website and more.


