
Disclaimer: Let me say upfront that Trench Crusade, for me at least, is ostensibly a narrative game. Using probability curves to min-max your warband is the wrong way to approach this game. Narrative choices and the rule of cool should always be your north star when assembling your warband and should inform the way you play, unless of course you and your mates are playing this competitively, then err.. have at it I guess. Don’t let me piss on your chips.
With all that said, Trench Crusade has some really interesting dice math(s) that can be a little hard to get your head around if you’re really only used to standard D6 design defaults like d6 pools and 2d6s. As a newbie, it feels like you have to do a bit of homework to find what effect +1 Dice and -2 Armour have on an injury roll, or even what those are. So consider this is me doing that homework for you. Lucky you!
The Beautiful Bell Curve
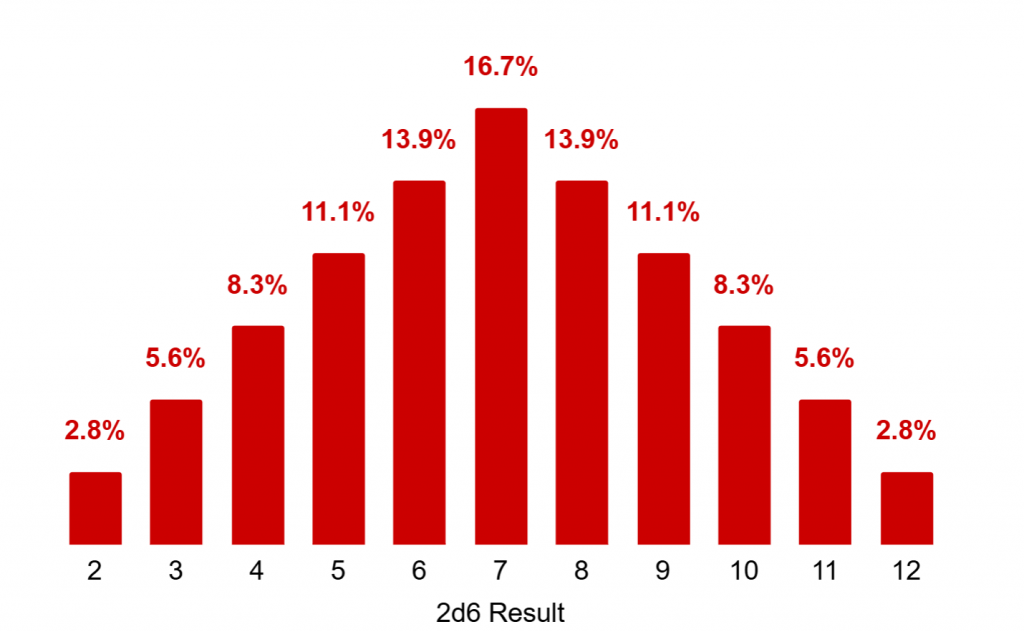
So we’re all on the same page, this game is primarily about the results of a 2d6, give or take a die (literally). Trying to perform an uncertain or Risky action, roll 2d6. Trying to kill someone, roll 2d6. Making sure that horrible hell beast stays dead, you better believe you’re rolling 2d6.
If you’ve played any wargames, RPGs, or hell, even Monopoly, this little bell curve hopefully should be familiar to you; the probability space of a 2d6. Seven is the mean result, 2 and 12 are rare but possible, blah blah blah.
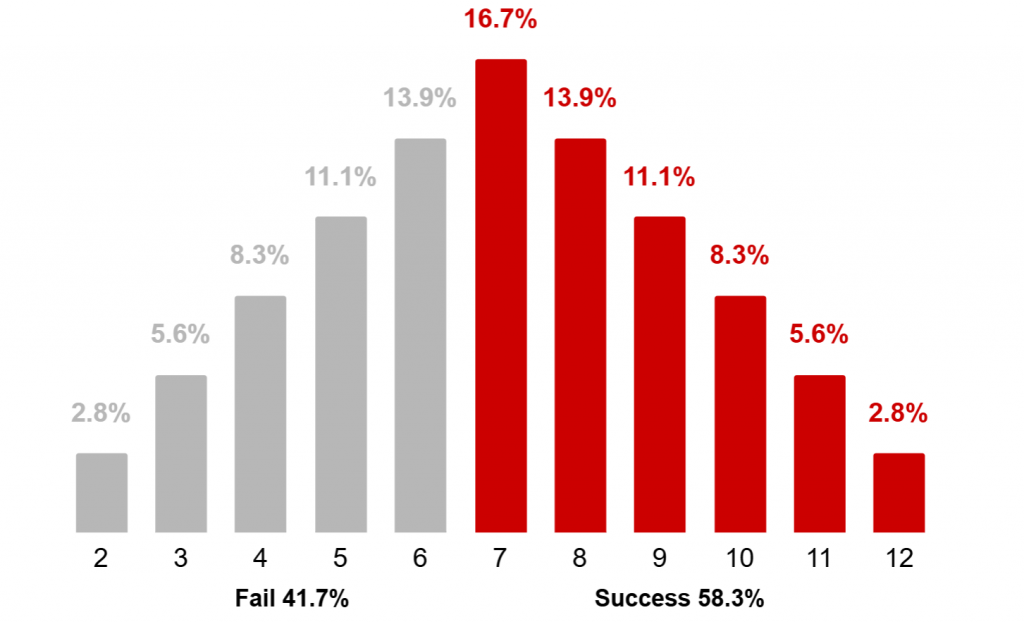
In Trench Crusade, Action rolls can be rendered into a pretty simple binary of pass or fail, with a roll of ≤6 a fail, and ≥7 or higher a success. You can also inflict a Critical Hit on the roll of 12 on ‘killy’ rolls but ultimately that’s just a success with a bit extra so I’m not going to focus on them too much in this section. This is what it looks like after we apply this framework to an unadulterated Action roll:
Success for D6 Brains:
An unadulterated 2d6: Somewhere between a 4+ and 3+
Run for Your Lives!
Most of the time, with no interference, a normal dude is more likely to succeed at something than fail but it’s definitely not a guarantee. Outside of this, the odds on a flat 2d6 roll is an important to remember in two main circumstances, Dashing and Morale. Most of the time in Trench Crusade you’re going to want to move your models as fast as possible, whether it’s towards the enemy, into cover, or cowardly running away. Whilst you can move your model normally around the board without uncertainty with the Move action, you can also attempt to Dash, potentially doubling your movement (or shortening your follow-up charge). This is a Risky Action, which means that not only are you rolling 2d6 to see if it goes off, if you fail (reminder: this is about 40% of the time), the models activation ends. This can really mess you over if you’re in the middle of a crucial activation, leaving shots un-shot and models out in the open. Most warbands can modify this roll with a Musical Instrument (I’m assuming hearing a catchy beat allows the units of Trench Crusade to avoid the embarrassment of tripping), but that requires you to be within 4″ of a model with one, and unless you’ve got a killer strat, it’s probably best to leave the bagpipes at home and just be careful how you sequence your turn.
Morale the other big reason you’ll be rolling a flat 2d6 roll; at the end of any turn, if your warband is more than 50% Down or Out of Action (OOA) you roll a flat Action roll. Depending on what ruleset you’re playing with, one of two things can happen if you fail; either you immediately lose the game (harsh and boring) or your warband becomes shaken (more fun). Shaken means that all of your warbands Actions now count as Risky for the next turn, so every time you roll, you’re risking ending that activation on a fail. Fail a morale check again and it’s game over, for real this time. Clearly this is a pretty important roll if it can immediately lose you the game, so relying on flat 2d6 odds isn’t a great idea. Luckily these rolls can be modified, either through special skills or a Troop Flag, but be warned they normally require the model with them to be standing for this to kick in, so keep your banner bearers out of the line of fire if you’re up for a slugfest.
Okay so that’s 2d6. So far so straightforward.
Confusing Dice Math(s): More or Less
This is where the spice kicks in. Trench Crusade’s main dice modification mechanic is plus (+) and minus (-) dice. You will always be rolling at least two dice, adding extra dice to the pool to the value of the modifier (so both +2 or -2 dice means you’re rolling four dice). To work out your result you either take the two highest (if the modifier is +dice) or two lowest (if the modifier is -dice). These interact and cancel one another out (so a +2 dice and -1 dice modifier becomes +1 die).
Trying to work out the probability on these dice is where most people tend to get a bit confused. Outside of -dice bad, +dice good (a good rule of thumb), working out the exact effect of each extra dice in ‘xd6 keep 2’ probability curves is pretty challenging; it’s not mental math(s), it’s Mentat math(s). Luckily there’s a few easy shortcuts I’ve found that I can share with my fellow smooth-brains that I’ve highlighted throughout the article.
So Where Are These Modifiers Coming From?
Well, everywhere. All Elites and the majority of your roster outside of your basic vanilla troopers will have at least one boost in their stat profile. They may also get them as part of a special ability (roll a Risky Action with +2 dice for example). There’s also a tonne of external sources of dice modification from cover, long range, fighting something that causes fear, most weapons/equipment and, most interestingly, from Blood, Infection and Blessing markers.
The marker system is one of Trench Crusade’s best mechanics. Whilst most of the other modifiers are things you can expect and control for, as your warriors fight they’ll inevitably accrue Blood markers from injury rolls (and from special abilities and Fire/Gas/Shrapnel tags). These markers are explicitly controlled by your foe, being spent one for one to either give a unit -dice on Action Rolls or +dice on Injury rolls, representing the inevitable grinding down of your force in combat.
The Cult of the Black Grail also has an additional source of these in Infection markers, which do exactly the same thing as Blood markers, thus making them incredibly annoying to play against. Some forces also get access to Blessing markers, which you the player control, doing the opposite of Blood/Infection markers (+dice on Action Rolls, -dice on Injury Rolls). These can sometimes be a good counter, but as they’re much rarer they’re much less likely to have a significant impact on the table. So let’s start looking at what happens to probability when we start adding in one die either way:
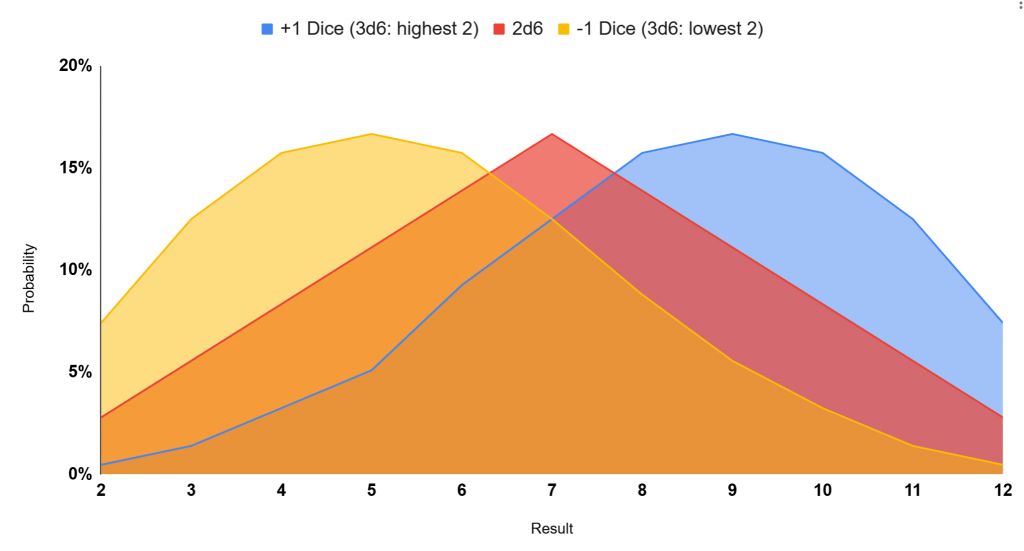
It’s significant. Losing either the highest or lowest dice in a pool concentrates the curve to both ends of the probability space, +1 dice increasing likelihood of higher results (a mean value of 8.5 instead of 7), -1 dice increasing the likelihood of lower results (a mean value of 5.5). Applying the Action Roll’s pass and fail thresholds gives us the following:
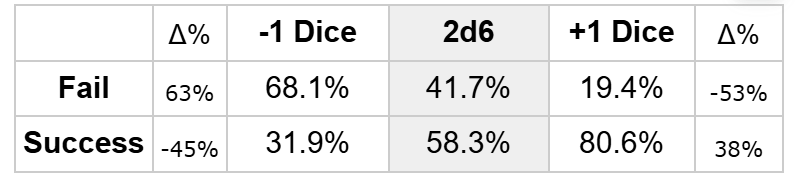
This results in a really interesting effect to pass and fail probability. Firstly, the effect isn’t even. Due to how both probability curves map onto TC’s Action roll, -1 dice results in a more significant change to your probability of success than +1 dice (a relative change of -45% compared to 38%). Roughly you can boil this down to +1 dice roughly halves your chances of failing an Action Roll, and -1 dice increases your chance of failure by more than half.
Success for D6 Brains:
-1 dice slightly worse than a 5+
+1 dice a little worse than a 2+
Let’s see what happens when we keep adding in dice:
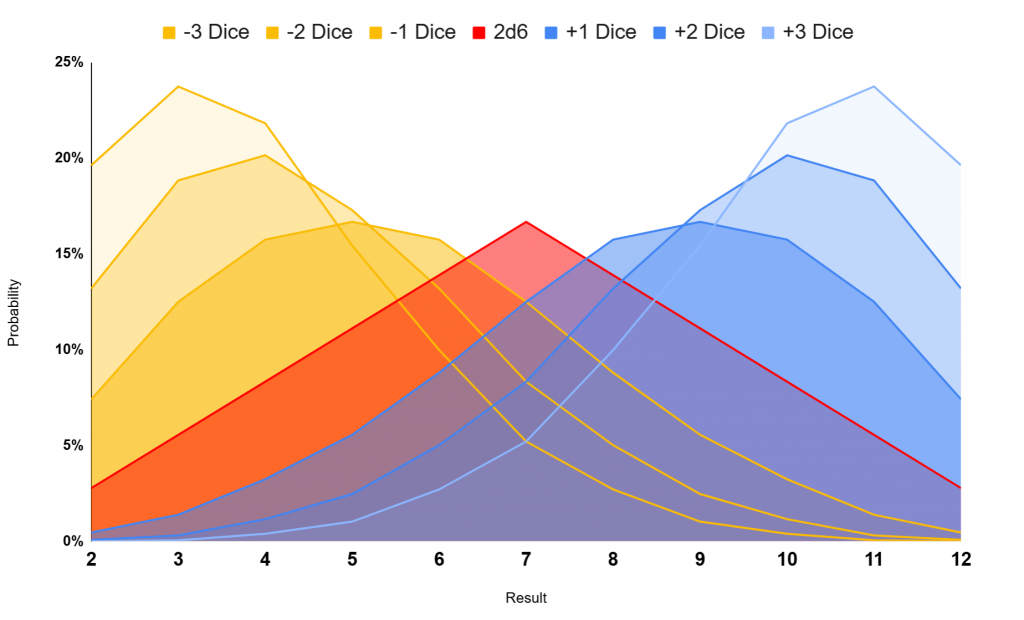
As you can see, the most dramatic shifts in probability are between 2d6 and +1 and -1 dice, but by adding in more dice the curve continues to shift over to either end of the probability space. This incrementally concentrates the results around each end, with +2 & +3 dice shifting the mean roll to 9.3 & 9.9 and -2 & -3 dice shifting it to 4.7 & 4.1 respectively.
Mapping this to Action Roll pass/fail looks like this:
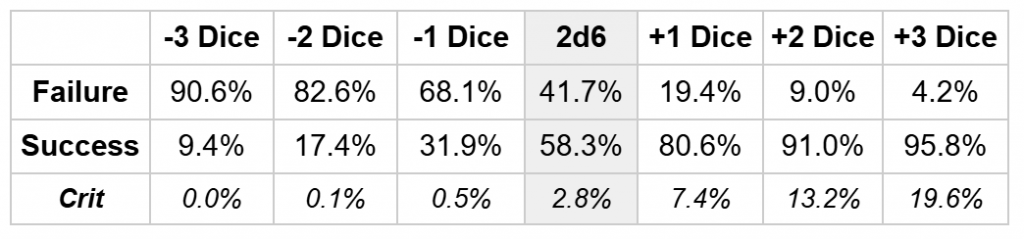
-X dice changes can result in some pretty significant jumps in probability, giving your opponent lots of ways to fuck with your odds when there are Blood markers on the board. This is why some of the strongest weapons in the game are auto-hit and multi-shot weapons. Blood markers explicitly debuff an Action roll, so being able to roll multiple times, as with machine guns, or ignoring the need to roll at all, as with flamethrowers, can be a really powerful way to negate taking on loads of Blood markers on active fighters, which you’re likely to do on your heavily-armoured models (more on that next week).
Success for D6 Brains:
-2 dice is a 6+
+2 dice is better than 2+
In Conclusion
So far, so good right? At the end of the 2d6’s aren’t the most complicated things in the world. And whilst +Dice and -Dice aren’t a brand new concept, getting your head around it can be a little tricky, especially when you’re adding in the uncertainty of Blood Markers. Hopefully this goes someway to illumnating the murk, because oh boy, in the next one we’re getting murkier: Stay tuned for math(s) behind the Injury Roll, Crits, Armour and the ominously-named Bloodbath modifier.
Have any questions or feedback? Drop us a note in the comments below or email us at contact@goonhammer.com. Want articles like this linked in your inbox every Monday morning? Sign up for our newsletter. And don’t forget that you can support us on Patreon for backer rewards like early video content, Administratum access, an ad-free experience on our website and more.
