
Last time we covered the basic 2d6 dice roll mechanic of Trench Crusade and the various ways it’s normally modified. So far so good, right? So let’s complicate things further by talking about the injury roll. An injury roll occurs after a unit makes a successful ‘killy’ action to see what the result of that action is. Whilst it uses the same dice math(s), we can’t 1:1 use the same framework to calculate probability for injuries as it’s a little bit more complex. Firstly, there’s more states to consider than just pass/fail, with three (or four) potential outcomes depending on what you’re trying to knock over. And secondarily we also have to account for more types of modifiers as well as things like Crits and Bloodbath. So let’s start simple.
Getting Serious(ly Injured)
When a ‘killy’ Action roll succeeds you’ll be rolling on this table.
- 2-6: Minor Hit. Allows you to put a Blood marker on the unit.
- 7-8: Warrior Down! Puts both a Blood marker on the unit and unit goes Down (where they take -1 on all further injury rolls until their next activation when they can then stand). They also take two Blood markers if they roll a Down result whilst already Down.
- 9-12: Out of Action (OOA). Blam! They’re dead*.
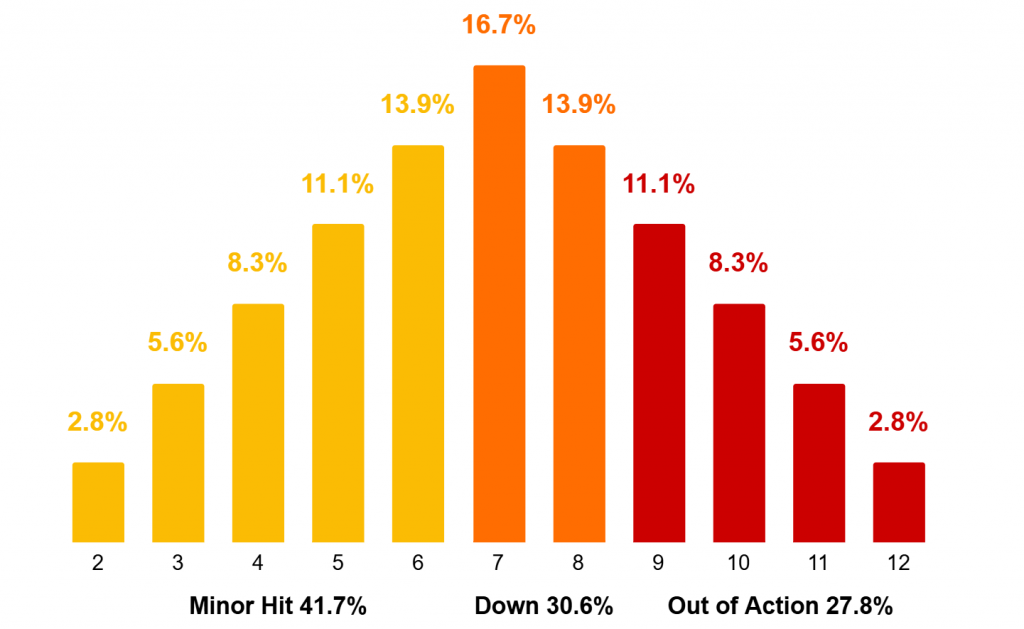
A flat 2d6 injury roll is most likely going to result in a Blood marker, so when you’re really committed to taking something out of the fight you’re going to want to be modifying the roll. So let’s look at +1/-1 again, remembering that Blood markers are spent to give +1 Dice on this table, so we’re looking at this the other way around from the action roll.
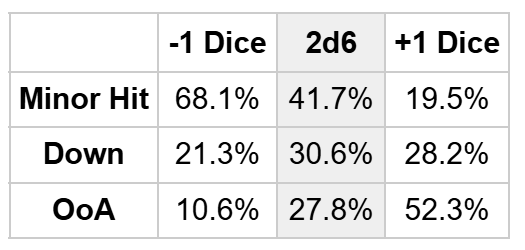
A Blood marker or Crit effectively doubles your chances of taking a unit out, whereas a Blessing marker used by your opponent (or, say, something like the Brazen Bull’s Artificial body) reduces your chances of going out of action almost three times over(!).
Success for D6 Brains:
+1 dice makes an OOA roll effectively a 4+
-1 dice makes an OOA roll less likely than a 6+
Let’s start chucking more dice in.
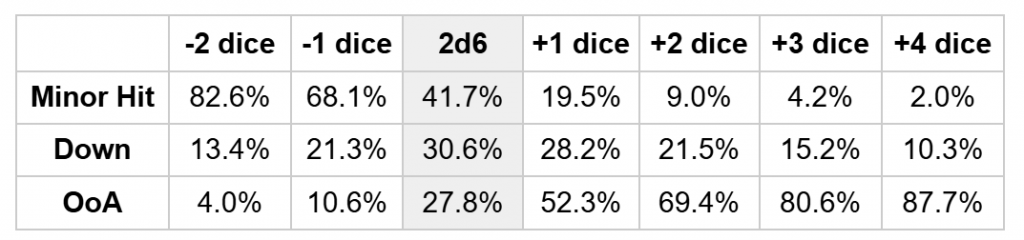
With this one I’ve hidden -3 dice because I think you’re very unlikely to come across scenarios where you’ve got that much manipulation of the injury roll (write in if you’ve pulled this off). Whilst there’s nothing too surprising here, we start to see a bit of a sweet spot emerging for +dice, with significantly diminishing returns for OOA results after +2 dice, as incremental dice only add in fractional parts of the curve into the 9+ bracket. That being said, you can’t use Blood markers on something that’s already OOA so sometimes it’s best to just use them all.
Success for D6 Brains:
+2 dice makes OOA better than a 3+
+4 dice makes OOA a little better than a 2+
Tough Crit
Now you’re seeing how powerful these dice can be, let’s talk about the best ways to manipulate them. Firstly, Crits. Crits give you an extra +1 Dice to an injury roll. These can be pretty rare in most games but generally speaking you’re most likely to see them from models with +2 or +3 Dice characteristics. These are the types of units that tend to benefit most from weapons that also buff injury rolls (like the Heretic Legion Hellblade) or have the Critical tag, which doubles the effect of a Crit (like Swords/Axes). Some weapons, like the Great Sword/Axe or the Anti-Tank Hammer, have both, which make them always a strong choice for +2 melee characters.
Weapon Tags are also an excellent way of boosting your Blood Marker output. Shrapnel, Gas and Fire weapons can all give your target an additional Blood Marker if they’re hit (though it can’t be used on the same injury roll that caused it). This is unless your opponent’s spent points on preventative measures, like Gas Masks, Iron Capirotes or Infernal Brand Marks. Whilst you’ll be unlikely to see these early in a campaign when ducats are tight, if someone in your group starts spamming Gas Grenades, you’d better believe that Gas Masks will start popping up in everyone’s warbands.
At some point you’ll also have to contend with a Tough unit. Tough units are tough to take out; once a model takes its first OOA, it instead counts it as a Down result. Any subsequent OOA results happen as normal. This makes any Tough models very sticky because you effectively have to kill them twice. This can cause a bit of analysis paralysis when spending blood markers as you don’t want to waste the effect on the first OOA roll, when you know you’ll need them for another straight after. This is even more annoying/powerful when combined with Armour. Speaking of which…
Tanking the Hit
Whilst -1 dice on the injury roll are much harder to come by, the main way you’ll be mitigating getting your fighters mulched is with Armour. Either granted by a unit’s profile or purchased as equipment, armour doesn’t affect the amount of dice rolled but rather modifies the final result of that roll (either -1, -2 or -3), resulting in quite a powerful effect.
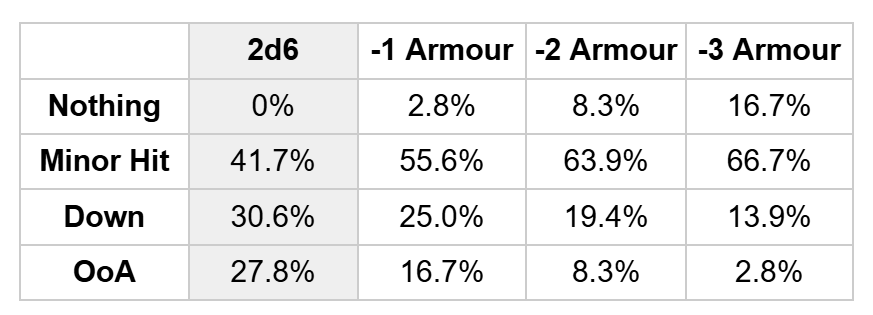
The sharp eyed amongst you will have noticed I left a result off of the injury table earlier. A roll of 1 (or less) does nothing. No blood markers. No impact. Nothing. This means that when you’re firing at a unit with -2 armour, on a flat injury roll, you’re as likely to do nothing as take them out of action. Another way to think of it is:
-2 Armour is like a more powerful version of having -1 Dice on all injury rolls.
-3 Armour is like more powerful version of having -2 Dice on all injury rolls
This basically means that anything with a -3 armour modifier is terrifying (especially if they also happen to be Tough), as you’ll need to expend a lot of firepower and resources to get them off the board.
Success for D6 Brains – Flat Injury Rolls on -3 Armour:
1: Nothing
2 – 5: Minor Hit
6+: Down
6+ on a 6+: OOA
So let’s start chucking in Blood markers, because you’ll be needing them.
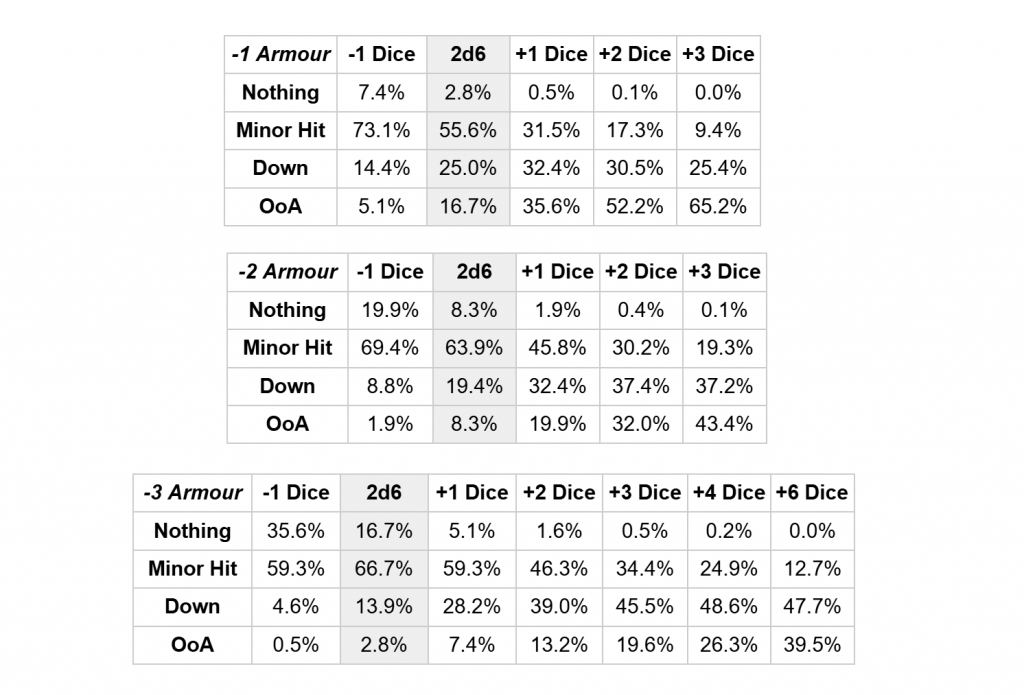
Just one Blood marker can have a massive impact on this table, most times doubling your chances of taking a unit OOA (however fractional), halving the chances of Nothing happening and generally boosting your chances of a Down result. But let’s be real for a second. Even using four Blood markers on -3 armoured units doesn’t give the same probability as a flat 2d6 of taking them OOA (26.8% vs 27.8%). That’s nuts. At this point you might as well save the markers and buy yourself a lovely…
Bloodbath (and Beyond)
The final rule on the injury table. If a unit has six Blood markers prior to an injury roll (or, more importantly, three if it’s Down) you can spend them to instead roll 3d6 cumulatively (with any additional +/- dice as normal). On paper this sounds like you’ll be brutalising anything, but once you account for armour, 3d6 isn’t quite as powerful as it sounds.
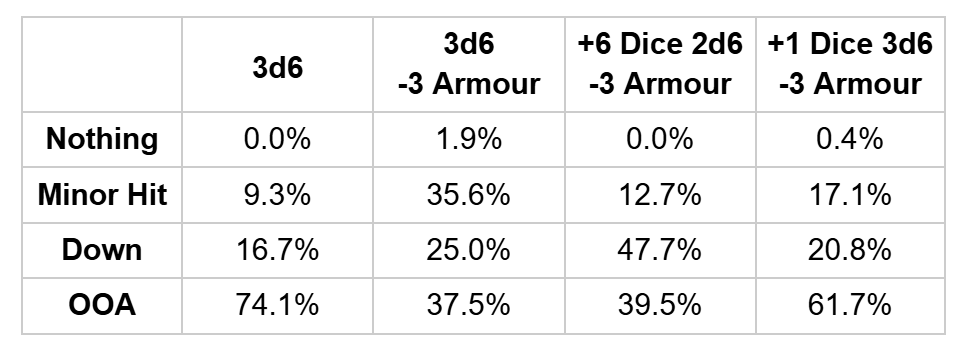
In short, -3 armour really fucks with the 3d6 probability curve, just nudging the crest of the curve into the Down result, meaning that, at least some of the time, if you’ve put six blood markers on a -3 armour model, you’re better off rolling a +6 Dice injury roll instead of bloodbathing for 3d6. HOWEVER if it’s a Crit, you’re attacking with a +1/+2 Dice Injury weapon, or you’ve somehow got seven Blood markers on a model and it’s still not down you should always take the Blood Bath; the impact of +1 Dice on 3d6 is significantly higher than the incremental increase from +6 Dice to +7 Dice on 2d6 rolls.
Most of the time you’ll want to try tactically get these models down so you can get away with just using three Blood markers instead because getting 6+ Blood Markers on a -3 Armour big hitter is pretty action intensive. By spamming shots at these units you leave the rest of your opponent’s warband free to ruin your day. To do this efficiently you’ll want to be using tagged weapons (Shrapnel/Fire/Gas) wherever you can, or simply chuck one of your heavily armoured units in their way and let them wail on each other for a couple of rounds. Strategically it’s probably best to use your actions elsewhere to thin your opponents ranks, then wait for the right moment where you can get these things Down (ideally just after they’ve activated) and then chuck enough shots their way to trigger a Bloodbath with 3+ Blood markers. And if it’s Tough, pray you brought a flamethrower.
In Conclusion
Trench Crusade is a game with a really interesting probability space. It’s simple gameplay really belies the chewy complexity of the math(s) in this hellbeast. And I think understanding some of its intricacies and interactions, not only will make you a more informed player, but I think it’s really key to seeing what a fun game this is.
All that said, at its core, this isn’t a game about min-maxing and meta chasing – it’s a campaign game. It’s about the story of your dudes and their (un)holy quest for glory in the mud hell of Trench Crusade. It’s about the time your Shock Troopers survives a hail of bullets and shrapnel and kill an enemy Chorister one on one, or when your Wretched does anything useful at all and then immediately has to leave your warband. It’s a game about rolling dice and cackling maniacally, regardless of the result, as all good games should be. At the end of the day the math(s) is(are) here to make the chaos more flavourful. So embrace the carnage, the tumult and the horror and let the stories of Trench Crusade write themselves, one improbable roll at a time.
Have any questions or feedback? Drop us a note in the comments below or email us at contact@goonhammer.com. Want articles like this linked in your inbox every Monday morning? Sign up for our newsletter. And don’t forget that you can support us on Patreon for backer rewards like early video content, Administratum access, an ad-free experience on our website and more.
