
Continuing from last week, find out how Wings’s last two rounds went at the London Open as he put his army through it’ paces ahead of the LGT.
Welcome back folks! Now, it probably hasn’t escaped your attention that there has just been the tiniest bit of Space Marine content on the site recently, and for that reason my content-production time has been somewhat swamped. However, I couldn’t leave fans of handsome, sophisticated Space Elves hanging, so today we’re going to blast through my last two games and finish with some summary thoughts.
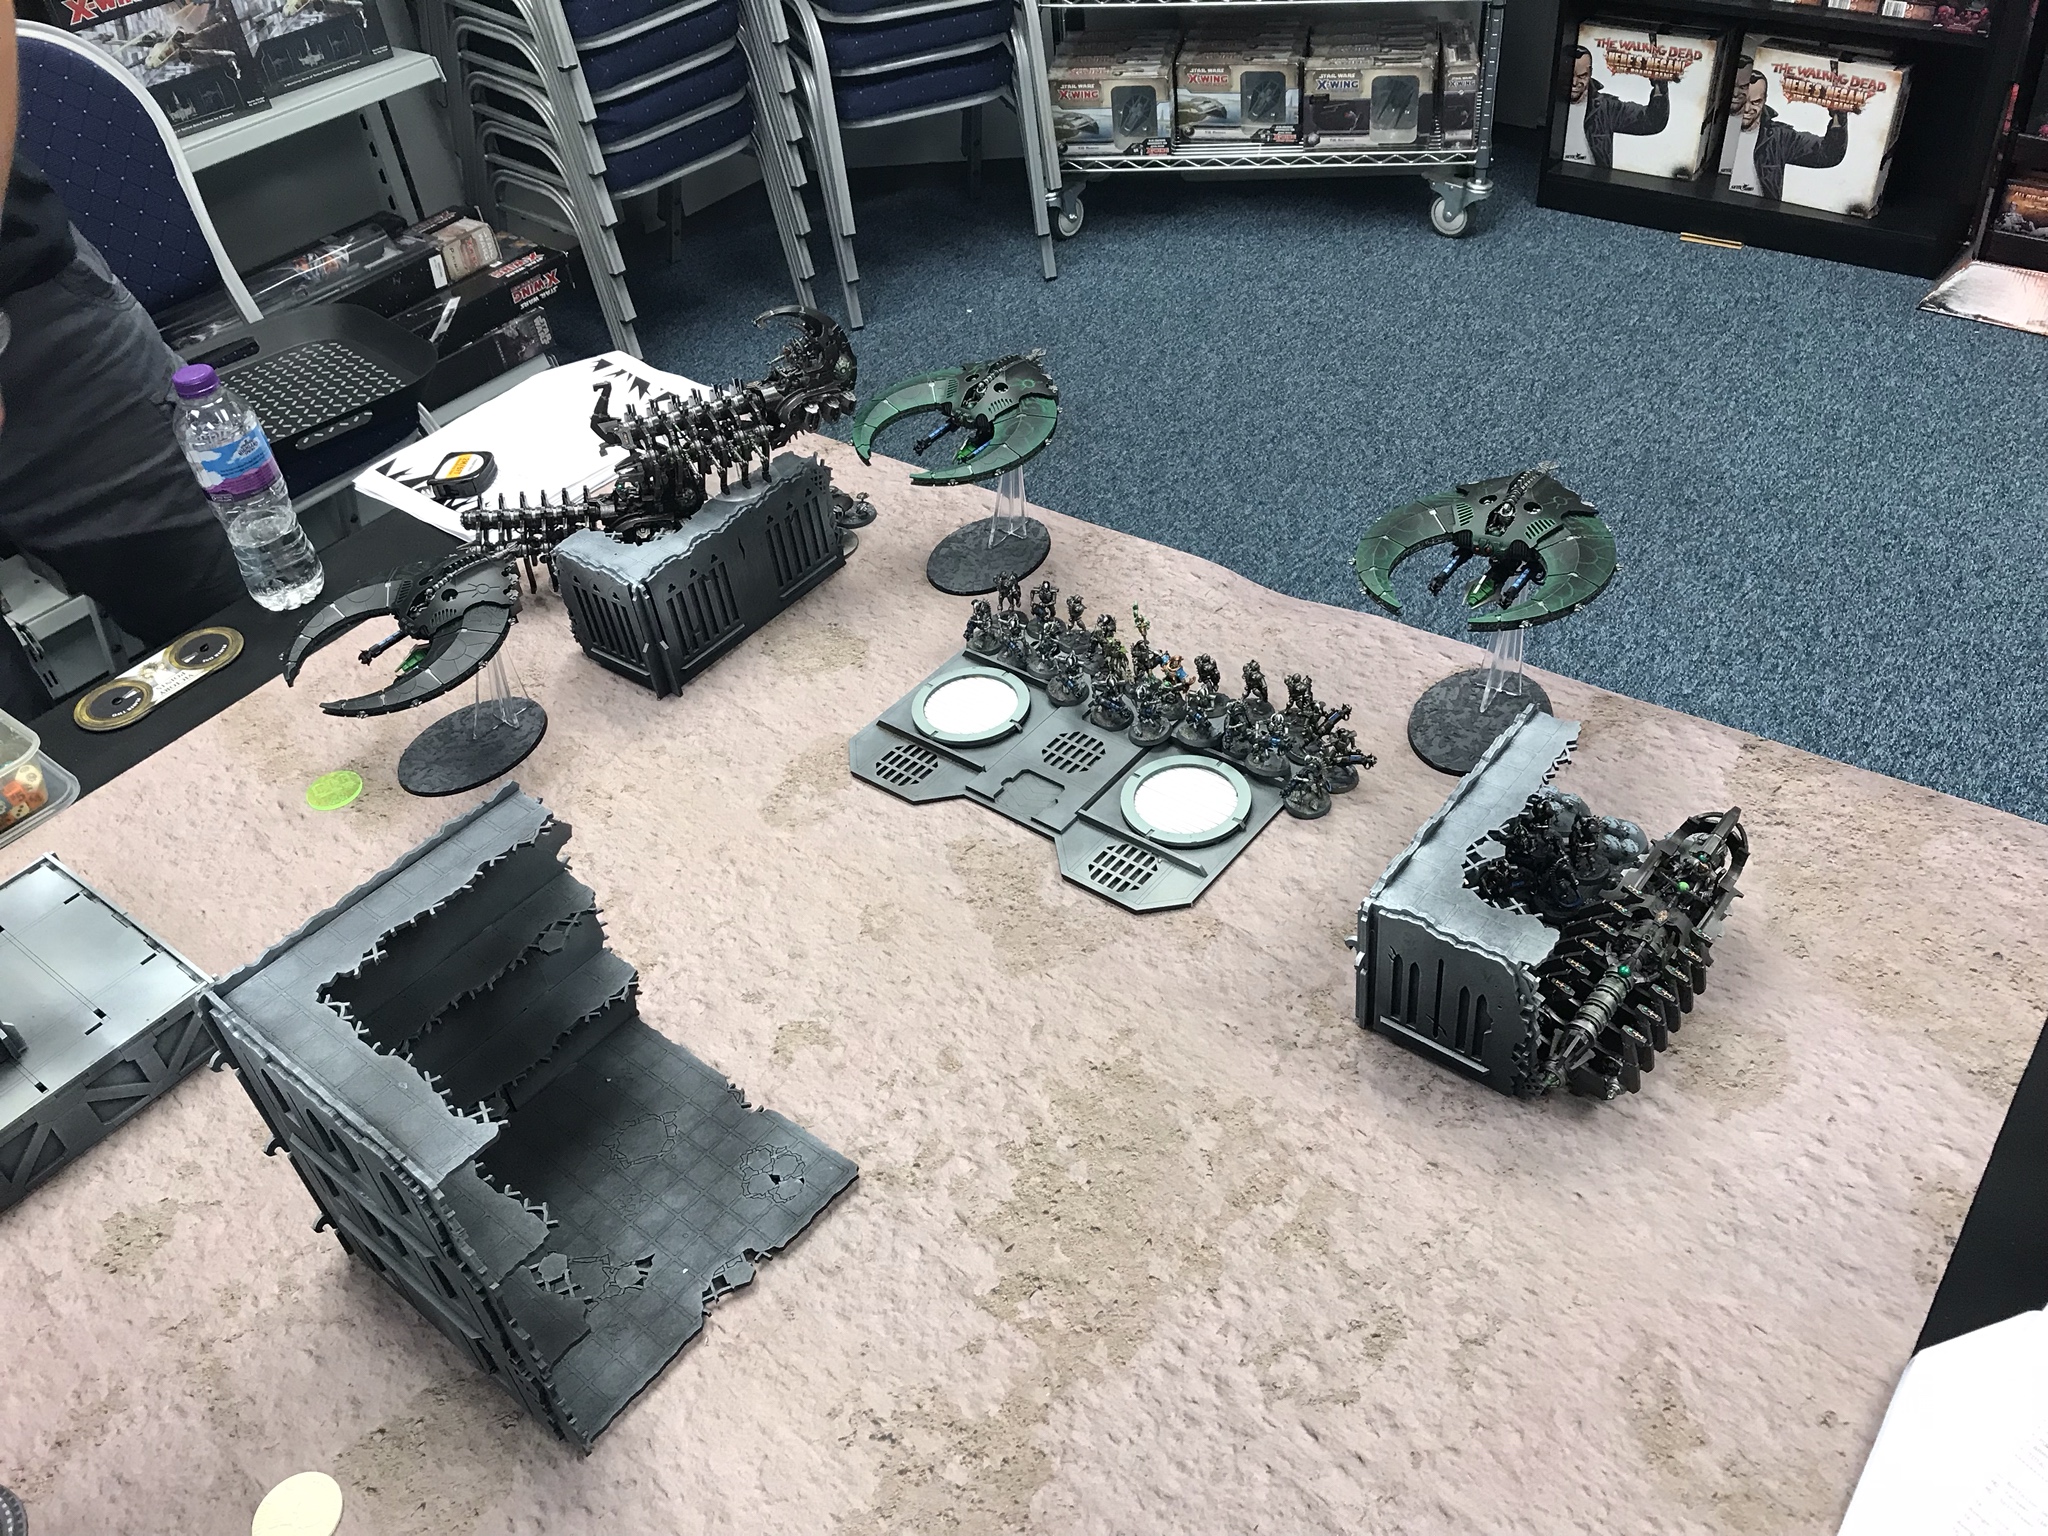
Round 4 – Necrons
The Competition
Army List - Click to expand
This is going to save us some time when we get to “Start Competing – Necrons” – I present exhibit A “the only good Necron list”. Now really I know that isn’t quite true, but permutations on the above are hallmarks of successful Necron lists. It has the long ranged annihilation of the Doomsday Arks (which can also be tough to shift and can murder infantry) combined with the roving threat of the Doom Scythes – the latter of which can also use the stratagem if they go first or survive turn 1 to do horrendous damage to a castle.
The Mission
ITC Mission 4 – What’s yours is mine, Hammer and Anvil Deployment
This is pretty good for me – I’m just way better at controlling range than him, better at holding the centre, and he isn’t going to shift my back-line holders without no-selling something very good for the turn.
The Plan
I won the roll off, so I would be going first. That makes this game a lot easier – thanks to how fantastic Hemlocks are at melting fliers, there’s no way he gets out of turn 1 with all three planes alive.
With that in mind, the plan is to go first and play this very aggressively – as long as I control my distances properly his stuff matches up horribly against mine, and there’s honestly no reason I shouldn’t be able to rack up a big score here. The Destroyers will kill something when they redeploy, but we have to just shrug and suck that up – if they leave the nest to do it then I’ll murder them on the strike back with my Guardian bomb combined with the rest of my infantry. As I’m pushing fast, I’ll be in the mid board by that point and able to hide most of my stuff in the ruins from anti-infantry response. The Storm Guardians and a Wave Serpent are on dedicated “grab the bonus” duty too – this is one of the most achievable.
Finally, I set up a Phantasm trap – I deliberately put the Night Spinner waaay back on the home objective I placed, and the War Walkers somewhat concealed and not in a threatening position. I placed my Rangers on the board too, plausibly hiding near the other objective. The plan was to push him on to the flank away from the Night Spinner, (which is where I wanted to push into some targets), and then swap the Spinner over to there, and bring the War Walkers forward to somewhere they could get shots off, while moving the Rangers onto the home objective, where they would sit on it all game unless he devoted absurd amounts of resources to getting them out of there.
I felt good about this game – winning the dice roll is a huge deal in the matchup, and I felt I had a good plan.
My Secondaries
- Big Game Hunter
- Marked for Death
- Recon
His Secondaries
- Big Game Hunter
- Marked for Death
- Recon
The Summary
This game went exceedingly well. The Phantasm trap went off without a hitch, leaving my War Walkers and Night Spinner in range to get shots off on one Scythe (supported by my Serpents), while my planes went off to go for the other one. Both were duly dealt with.
His retaliation was OK but nowhere near enough. The Destroyers warped in and blew up a Crimson Hunter (I tried Lightning Fast but they still got there), but his other stuff didn’t really fire on all cylinders. I blew up the last Scythe and brought in the Guardians to help pick up all the Destroyers, plus forced him to spend a point on resurrecting his Cryptek. A Wave Serpent also grabbed the bonus.

That left him hugely behind on materiel, and he would need an astounding turn to recover. He didn’t get it, and from there his fate was sealed – an Ark had come forward to start menacing my infantry and was duly Doomed and removed, and my Wave Serpents were now in position to start bully charging Immortals, largely shutting them down for the rest of the game. In the end, the last Doomsday Ark went on a heroic trip up the board to try and take a point of the bonus (which he did get!), but I was able to loop stuff round sufficiently to finish tabling his army on turn 6, having sat on the bonus from turn 2 onwards.
The Takeaways
This was always going to be pretty rough for my opponent if I went first – my army is far too good at reaching out and switching off his lists gimmick. If I go second it’s a bit tougher – I have to deploy my stuff in a way I don’t really like to avoid getting ruined by it. For what it’s worth, If I had rolled up second I had been seriously considering spending two additional CP so that I could deep strike my Warlock as well as the Guardians, as he’s then one fewer thing to try and hide on the board, and the Autarch is a bit less worried about having a few shots popped at him.
Other than that, the main takeaway is to remember that this is potentially the easiest mission to score the bonus on, and this map favours my army making a play for it, so given the pack’s the same at the actual LGT I should be aiming high on this mission.
The Score
Primary: 29-10
Secondary: 12-5
Total: 41-15
Match Score: 3-1
Round 5 – Imperium
The Competition
Army List - Click to expand
This is a great example of how one of the main versions of a powerful Guard list looks – tonnes of CP, the neatest tricks from two of the specialist detachments, a solid core of angry, character-buffed punch-men and two deadly Blood Angels characters to threaten passing planes. I also knew the player by reputation as an extremely skilled Guard pilot (and had also had a nice chat with him over breakfast at a major in the past), so while Guard is generally a favourable matchup I knew I was in for a proper game.
The Mission
ITC Mission 5 – Precious Cargo, Dawn of War deployment.

This is normally pretty favourable for my list, but he does somewhat have the tools to mess with that. I still like it, but not as much as normal.
The Plan
He won the roll off, and obviously picked to go first. He also selected a Callidus. We moved objectives opposite one another, and he put his Scouts right up front ready to grab the bonus T1, and indeed concentrated most of his army at this end, with just the long ranged artillery at the far side.
With that in mind, I was excited to try a plan that has always been a theoretical possibility with this list, but has never come up. I deployed a lovely bubble (with space for my characters) right back on the wall on my side, and put two of the Serpents in front. The plan is, as he moves all his infantry towards me turn 1, to pop out a wall of Dire Avengers in front of the Serpents (leaving one model per unit a little bit back), and then position my Farseer so that I can catch the Avengers, both (stationary) Serpents and the War Walkers in “Runes of Witnessing”, giving them re-roll 1s to wound, while the Autarch does the same for hits. Unless I roll a lot of twos (I obviously try and Guide up the Walkers as well) then that should blow a huge chunk out of his Guard and Scouts, hopefully heavily blunting his screening capability and giving me control of the flow of the game. Unless he high rolls on one of his good things, I have a decent chance of getting my planes through his turn as well. If they’re all up I ideally want to pop his Wyvern with some and aim the Hemlock at whatever he’s left back on his objective (especially as he was doing “Engineers” on it).
Finally, the hero Storm Guardians were going to drive extremely fast towards his Russes in a Wave Serpent and hope to sell their lives effectively by turning off a few turns of shooting.
My Secondaries
- Reaper
- Big Game
- Headhunter
His Secondaries
- Big Game Hunter
- Engineers (two scout squads)
- Recon
The Summary
This game was a blast. He started pretty much as expected by rolling forward and pushing two squads of scouts onto my home objective, scoring him the bonus and taking a surprising chunk out of the Night Spinner with knives. In his shooting phase, he also got one of the breaks he desperately needed- he rolled double six for his relic battle cannon’s shots and cold-cocked a Crimson Hunter.
That made this a real live game, and I started trying to counter attack. I set up the Runes bomb as planned and it was, sadly, merely fine – I did, in fact, roll a lot of twos to hit and wound, and while a healthy number of Guardsmen and Scouts died, it was substantially fewer than I’d hoped. The most annoying part was that having low-rolled while trying to kill the last few Scouts, he managed to keep two within 3″ of an objective while out of sight of most of my stuff – forcing me to dedicate the remaining Crimson Hunter to wiping them out. The Hemlock also low-rolled against the Wyvern, leaving it alive. Finally, my Serpent also missed its 8″ charge (which is fair enough, it was worth a try). I picked up kill more, and had at least sufficiently repelled his stuff such that we drew on holding.
He took advantage of the strong start to put me under lots of pressure, bringing up his Bullgryn and characters to wrap some Dire Avengers. I’d layered them pretty cautiously, forcing him to do some serious pile-in acrobatics, but they did get there in the end (losing a few Guard to punches and shurikens along the way). The tanks on the far flank also blew up the Serpent, but the passengers disembarked into ruins, and the Wyvern then helpfully paid me back for failing to kill it by completely failing to brutally murder them. The Callidus also missed her charge on the rangers, having killed the closest with her gun, and he’d already used the re-roll.
I was under a lot of pressure, but had a better plan to fight back than I think he expected. First of all, my Guardians were now clear to drop in behind his remaining Scout squad, which they deleted, leaving him maxed out on one engineers point and my Guardians with an uncontested run at the bonus from the next turn. I then positioned my Serpents and psykers carefully and unloaded on the Bullgryns with mortals, wasting quite a few, while pulling the rest of my stuff back from trouble behind an ablative Serpent. I also used a neat trick to try and turn the tables of his wrap on him – I chucked Protect on my remaining five Dire Avengers, leaving the Exarch with a 3++, and a small chance of surviving the onslaught of Mephiston and the Captain, which would be a total disaster for him as they wouldn’t be able to charge.
Because his furthest forward Bullgryn was the only one in on the wrap, he also had to take ones out from the middle of the squad as they died – so my Autarch zoomed up, killed a Priest with his guns, then slammed into the back of the squad, taking another down and giving him another target to deal with on his turn. Judicious use of the sacrificial bodies and a CP re-roll did, in fact, let the DA Exarch cling to life through the thunder hammer/Mephiston onslaught, forcing him to dig deep into his remaining CP to fight a second time and unlock them.
Finally, on the other side of the board my Storm Guardians pulled off the perfect wrap charge, getting a nice high roll to take them into the character next to the tanks without having to take overwatch, then slamming in with the perfect bully pile-in, securing hold more to boot. His other Russ also got cut down pretty low by my Hemlock.
Still, he wasn’t done, as his character pile still existed, and they got to work on the Wave Serpents and War Walkers protecting my characters. Luckily, these were sufficient to hold them back for a turn (and the War Walkers honestly got off pretty lightly), leaving me able to bring my full psychic mastery to bear and smite the characters away, then start picking up the remaining Bullgryns.
That finally tipped the game decisively to my favour – while the stuff he had left took a while to go down, I was able to plow through them and gradually repel the remainder, and having two War Walkers and the Hemlock still alive let me gradually bully him out of the game (though it would have been substantially closer had my Hemlock not landed a lucky kill on the Callidus, and my Guardians having one model left after morale to keep holding the objective). I think if both of those had gone his way it could have ended up going his way, though to be fair the Guardians were only at risk of running completely because he managed to land an Astropath smite, but as it is they went mine, and after what was easily the most enjoyable game of the weekend this ended as a win for me!
The Takeaways
This game and the previous one together really hammered home how great having the extra Wave Serpent loaded with entirely expendable Storm Guardians is – it’s a huge extra dimension of controlling the board and messing with an opponent’s plans, and is, I think, going to stay a fixture of the list for a while.
Other than that, going even deeper on having access to mortals paid off again – armies like this that rely on pushing with high value models are very frequently caught out by a volley of mortal wounds smashing into them, and it makes a “fighting retreat” a very effective strategy for this list. The Runes bomb was also good – I definitely low rolled on it, but it still made a nasty mess of a chunk of his stuff, and it also encouraged good play – the very defensive open was a good play, and let the Dire Avengers operate as a speedbump for a turn to let my army do its work.
Overall, this was great – I managed to construct a convincing and well executed plan even after the game started with a high-roll turn from him and a low roll from me.
The Score
Primary: 24-18
Secondary: 10-9
Total: 34-27
Match Score: 4-1
Final Score
I’d started with a couple of low scoring games (including an opening loss), but the ones from round 3 onwards were all excellent scores, and back of the envelope maths we’d done beforehand suggested I was probably in for a podium place – and I did duly get 3rd!
Army Thoughts
What Worked?
Army good. Every component seemed to be working well together, and after winding my neck in and stopping being stupidly aggressive with the Autarch after game one, it started to really motor. The War Walkers in particular were standout heroes and did basically exactly what I wanted for them – they blow games where I’m up against T3 infantry wide open, and in other games they’re still a tough-to-shift backline unit that puts away a decent amount of damage. The other big winner was the addition of the third Wave Serpent – having one “sacrificial” one that I could afford to send flying off to compete for objectives while the rest of my army stuck to the main plan was extremely helpful. Having some Storm Guardians loaded in there was a big part of that, and in general I was liking the dual battalion – it lets me be a lot more generous with buying extra relics for my Autarch, and having him as a Skyrunner.
What Didn’t Work?
Honestly – this list is great, and is pretty closely tuned to an ideal form of this plan. The Rangers were kind of meh, but in multiple games they sat on objectives and racked up points for several turns while being not cost effective to remove – so sure, they can stay.
The Crimson Hunters are slightly on my naughty list for low rolling most of the weekend, but let’s just assume they’re getting it out of their system for the LGT.
Finally, the Spiritseer was great but I’d really, really like to have Yvraine instead somehow – 90% of the time the Spiritseer was smiting, and having more MW firepower really helps against the push lists (as you can see in the last game). Sadly, the only real route to doing it is to take out the Night Spinner, and having access to some indirect shooting is too valuable to miss. If I had the models, I actually plausibly could see myself taking it out in favour of a couple of Shadow Weavers and seeing if I could find the remaining points, but as it is I definitely won’t have those in time for the LGT so the Spinner stays.
The other available route is to swap the Guardian Bomb to a fourth DA squad, which frees up the points pretty neatly. This is honestly tempting – I go up and down on the Guardian bomb and this was definitely an “underperforming” weekend – but that’s except for the last game where they were game-winningly good. Given that was probably the closest fought game of the weekend, I should probably hold off from brain-geniusing myself away from using them.
Right?
So Where Next?
I do have another list that I want to try, but we’ve been so busy with content production (and I have non-40K hobby-writing commitments because I apparently hate myself) that I’m very unlikely to get it done for the LGT. Even if I do, let’s keep it as a surprise – assume for now that I’m very likely bringing the above, with a small possibility that I’ll fall for the lure of more mortal wounds. Until then, if you want to send us feedback (or tell me which list to pick) you can reach us at contact@goonhammer.com or via our Facebook page. For tournament strategy fans, our NOVA Open Mission Primer will be coming out tomorrow, and you can also catch the latest entry in the Start Competing series on Friday.
