Welcome back, Dear Reader, to my ongoing quest to achieve some level of competitive respectability in Warhammer 40,000. Last week I played two practice games against Dan (or “Swiftblade” as he’s known on the Goonhammer Patron Discord), splitting the series. Then this past week Games Workshop dropped a huge balance update for 40k that nerfed Drukhari, Orks, and Adeptus Mechanicus, and improved four other factions. I was already planning to attend the Empire Central RTT south of Houston for some practice this past weekend, but I was delighted to find that the event was using the new dataslate balance changes.
RTTs are already great opportunities for players to tool up and test lists for bigger events and with this being the last weekend before GW’s event in Austin and with new balancing adjustments, players were even more gung-ho to get some last minute tooling in. In the days before the event attendance ballooned up to 30 people, turning it into a mini GT of sorts.
RTTs tend to come in two varieties: Casual affairs where it’s just a bunch of people looking to have a good time, or literal shark tanks where you have 16 players show up and 12 of them are on teams and gearing up for a GT at which they expect to T8. This was one of the latter, with several players in the top 100 and most having been to at least one event in the past few months. Ultimately, this was good – while I was a bit worried about having to face the likes of Colin McDade and his Drukhari list, better competition means better practice reps.
Sometimes when I write these I try to mix hobby and tactics. Today I’m going to be going deep into my tactics, since that’s ultimately what’s most helpful for me in my preparation. I’m going to try to stop things from getting tedious, so let me know in the comments if you found this depth helpful or not so great.
Alright before we dive into the games, let’s go back over my list.
My List
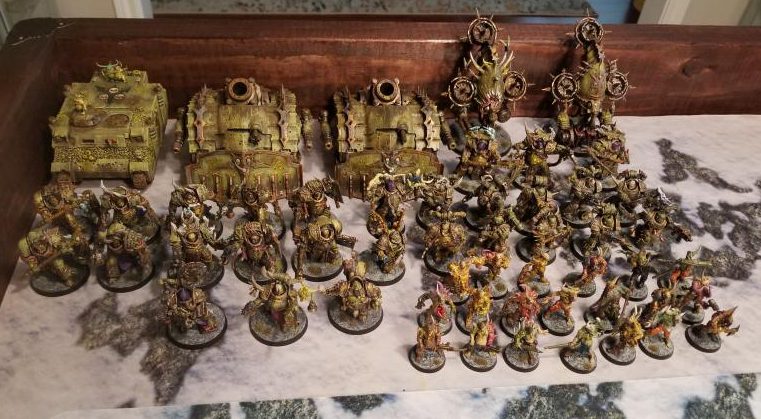
This is the same list I took to New Orleans, and the same list I’ve been running the past few weeks.
My Death Guard - Click to Expand
The plan here is generally to use the blightlords as a kind of death star with character support, using them to hold the middle of the table or secure one side and make opponents regret engaging with them. I split the other half out as needed, and they’re more than capable of spreading out or doing nasty things. Generally the army splits between the death star and everything else, with one unit of poxwalkers on each side supporting them. At this point I’ve been “locked in” to the list – I like where it’s at, and I really want to focus on getting better at playing over trying to make tweaks, so I’m locking it in through Austin.
Alright let’s get to the games.
Game 1: vs. Ryan McGregor’s Necrons
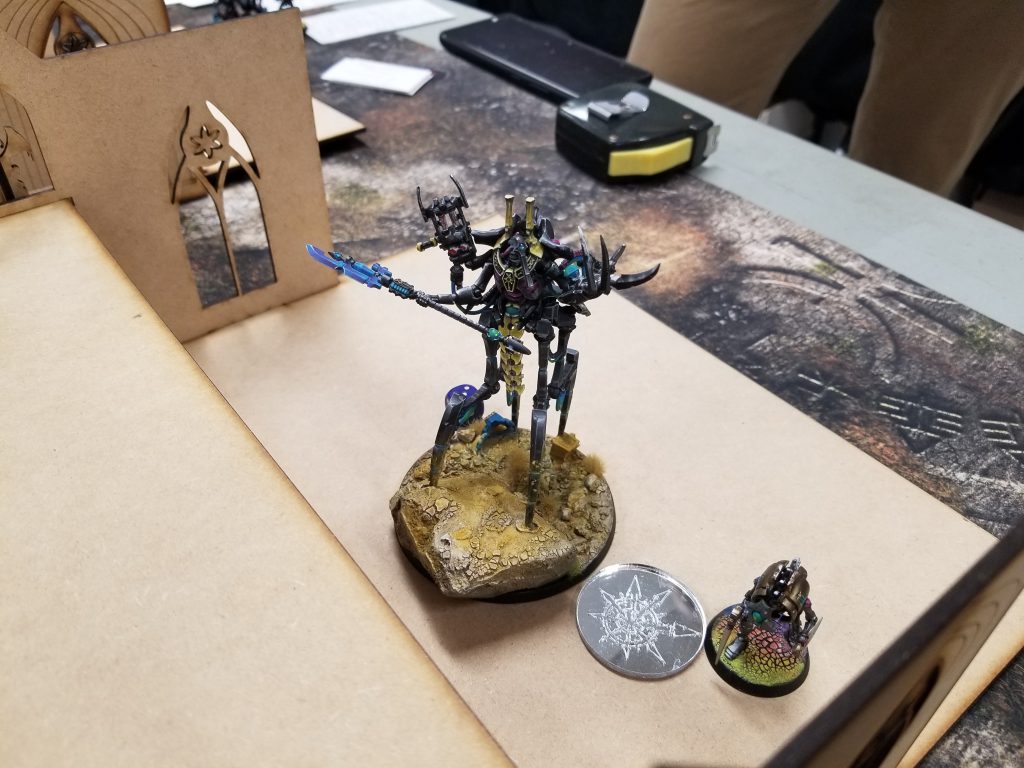
Ryan's List - Click to Expand
Of the three games I’ll play today, this is the most likely to be a lay-up. Necrons got better but Ryan’s not running the best possible list. He’s got a beautiful army with some awesome conversions, but he’s built the best list he can from two Indomitus boxes plus the Nightbringer. His list may be suboptimal but he’s a solid player, and he can give me a run for my money, especially with the Nightbringer and that 20-model blob of Gauss Reaper warriors. But as long as things don’t go horribly pear-shaped, I should have this.
The Mission: Scorched Earth
Scorched Earth again. Last time I said I wouldn’t play it again before Austin but turns out, that was a lie. I’ve played this one many times and I’m very comfortable with it.
My Secondaries:
- Spread the Sickness
- To the Last – PBC/PBC/BLs
- Stranglehold
I’m pretty comfortable with Spread on this map. 3 Objectives is pretty easy to hit, and if I’m doing well I can make that four if I work my way around to either the opponent’s deployment zone or if I manage to control both midfield objectives. Relentlessly expansionist is an issue for Stranglehold, but I have good enough firepower that I think I can wipe smaller units off the objectives and score repeatedly. To the Last here seems like a no-brainer, since there’s only one unit that can reliably damage my PBCs at range and I’m going to use the blightlords to kill the Nightbringer anyways.
Ryan’s Secondaries:
- Purge the Vermin
- Assassination
- Raise the Banners
Purge is solid against Death Guard but not quite as good as Herd the Prey, since it’s much less ridiculous in how it scores. Assassination is a common pick against my list – I need to play more conservatively/defensively when it’s active against me to ensure I don’t give up a crapload of points in one turn to character deaths, which will end up happening in all three games at this event, though it’s only going to be because of egregiously bad play in game 2 – more on that later. Banners isn’t a great pick here for Ryan, but he’ll use his little cryptek helper weirdos (Cryptothralls) to raise two on turn 1 and try and use them to raise more later.
Deployment
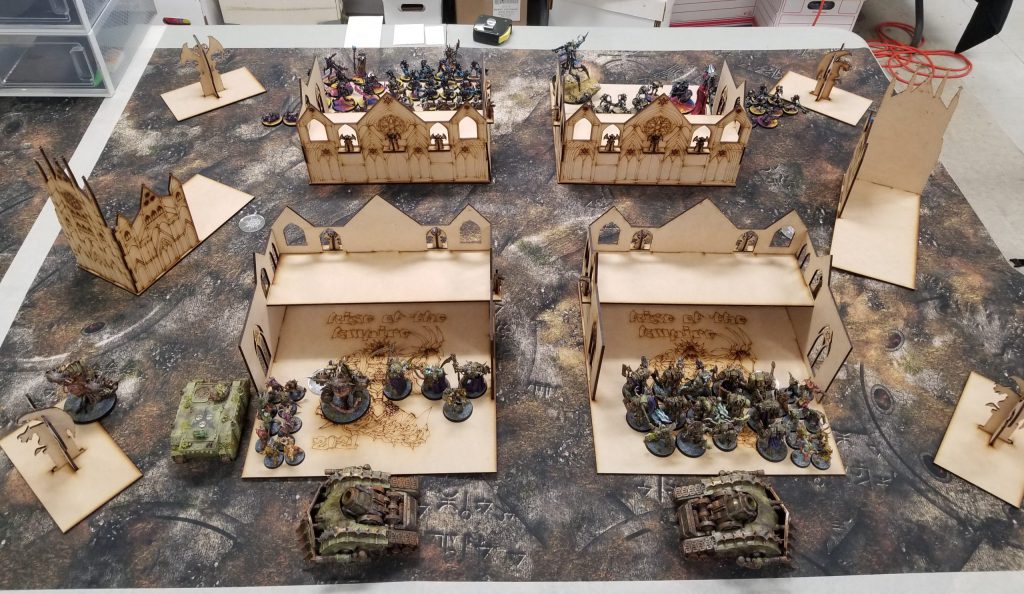
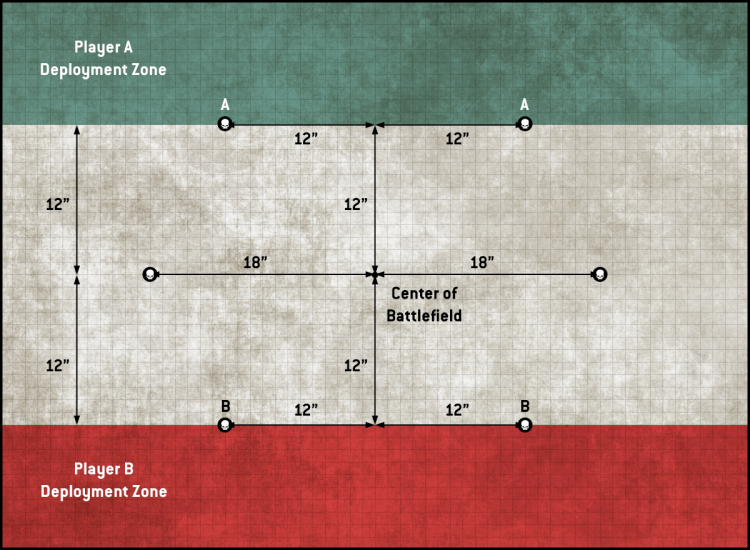
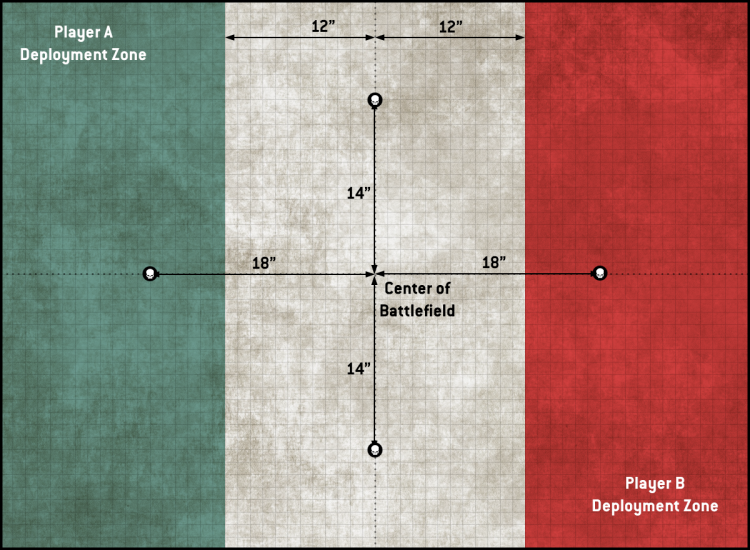
Most – but not all (more on that later) – of the tables at the event are running terrain very similar to the GW layout from New Orleans and Orlando. That’s great news – it’s a great setup, with a lot of good play, and it works very well for my army and other melee-heavy forces. The big difference here is that the pieces are a bit further back, to put more room between them since the GW pieces move the terrain on the large bases and on Dawn of War keep the ruins back about 4″ – you can see photos in part 11 of my series.
The Plan
My biggest concerns here are:
- The Nightbringer, who can absolutely mulch a lot of my units and is difficult to kill in a single turn. Fortunately, I have two key ways to deal wounds outside of the Shooting and Fight phases: The Plaguecaster can drop smites on him, while the Plague Skull of Glothila will easily average 3 mortal wounds every time I lob it. After that I have ample firepower and fighting to remove him.
- The Scarabs, who thanks to Relentlessly Expansionist are little obsec monsters that can steal objectives away from me if I’m not covering them with Poxwalkers or Plague Marines. They’re important to deal with if I’m going for Stranglehold.
- The 20-model blob of Warriors. 40 Gauss reaper shots will kill just about anything that isn’t a Plagueburst Crawler that it gets a chance to shoot at, so I need to be careful about how I engage with those. They’re also ObSec and will be an absolute chore to remove from the table. If I can get a good turn of kills on them with Terminators and use Break Their Spirits I can drop a bunch to morale, though.
First Turn: I Win the roll-off
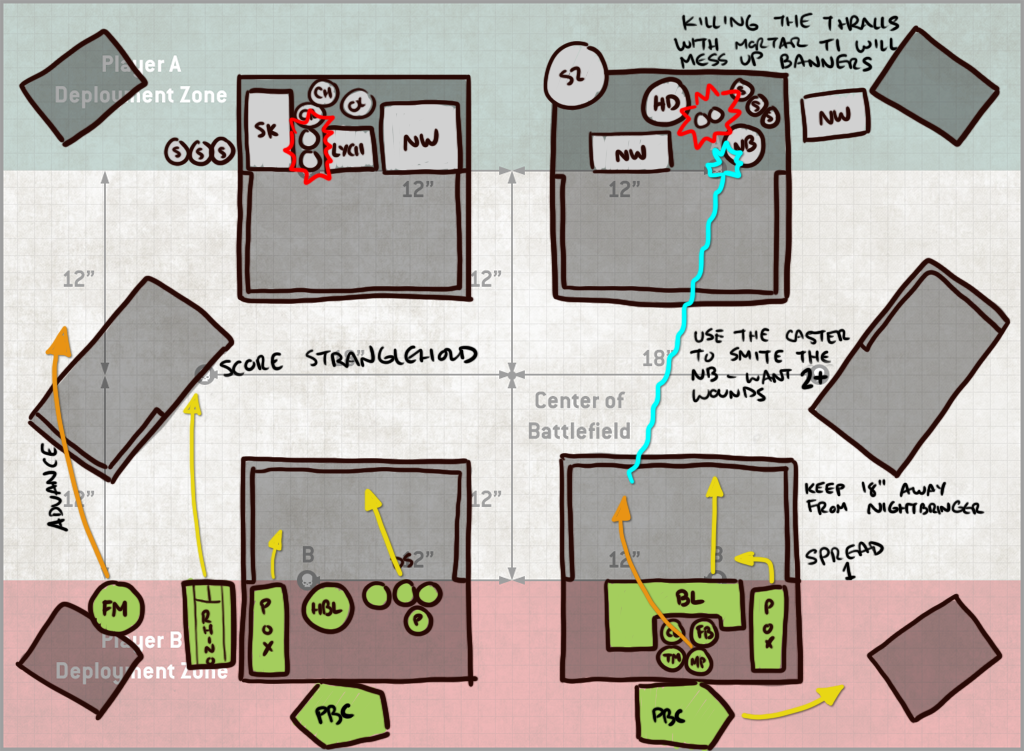
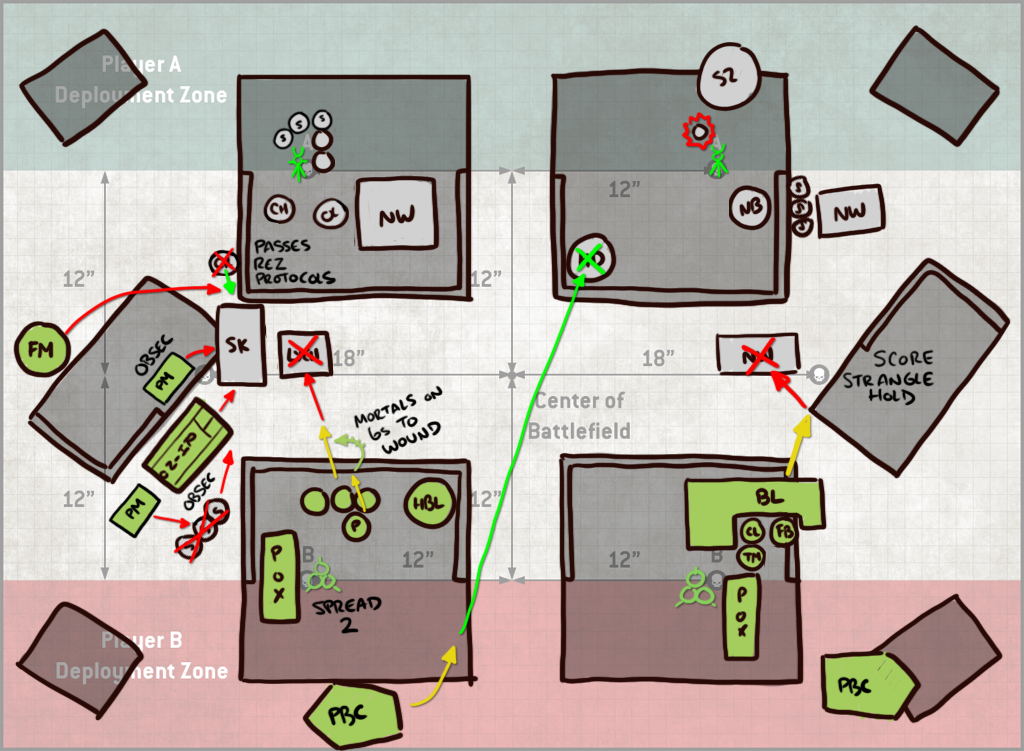
First turn helps me quite a bit here, since it gets me free Stranglehold points and allows me to force Ryan to remove me from objectives in melee, something his Necrons aren’t amazing at. The Skorpekhs and Lychguard can be decent threats, but I’m not super worried about them. I don’t need mortal wound support on my blightlords to deal with anything on the right side of the table so I’ve put my Biologus Putrifier (P) on the left next to the three Deathshroud (DS). In a risky and stupid move that was probably a mistake, I advance the Plaguecaster up onto the second floor of the ruins and have him fire off a Smite at the Nightbringer, hoping to get 2-3 mortals. I end up getting 1 and now my caster is unprotected. This has the advantage of luring out the Destroyer and it’s not a terrible trade, but it isn’t great. I advance the Fleshmower up the left along with the Rhino, using the Rhino to score Stranglehold.
In the shooting phase I take a pair of shots at the Nightbringer with the Entropy cannons but neither hits. I use the mortars on both to try and take out a unit of Cryptothralls – if I can kill one unit it’ll force Ryan to use his warriors to raise banners on that objective, throwing off his tempo. Unfortunately my PBCs are cold this turn so I get just a single model of the unit of two.
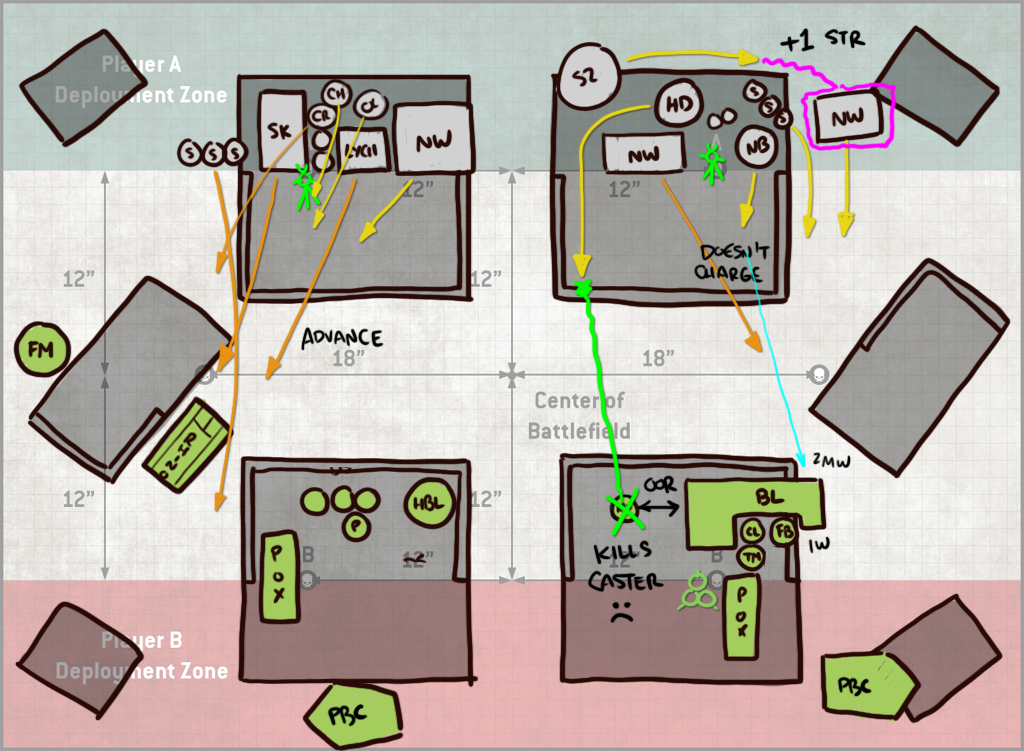
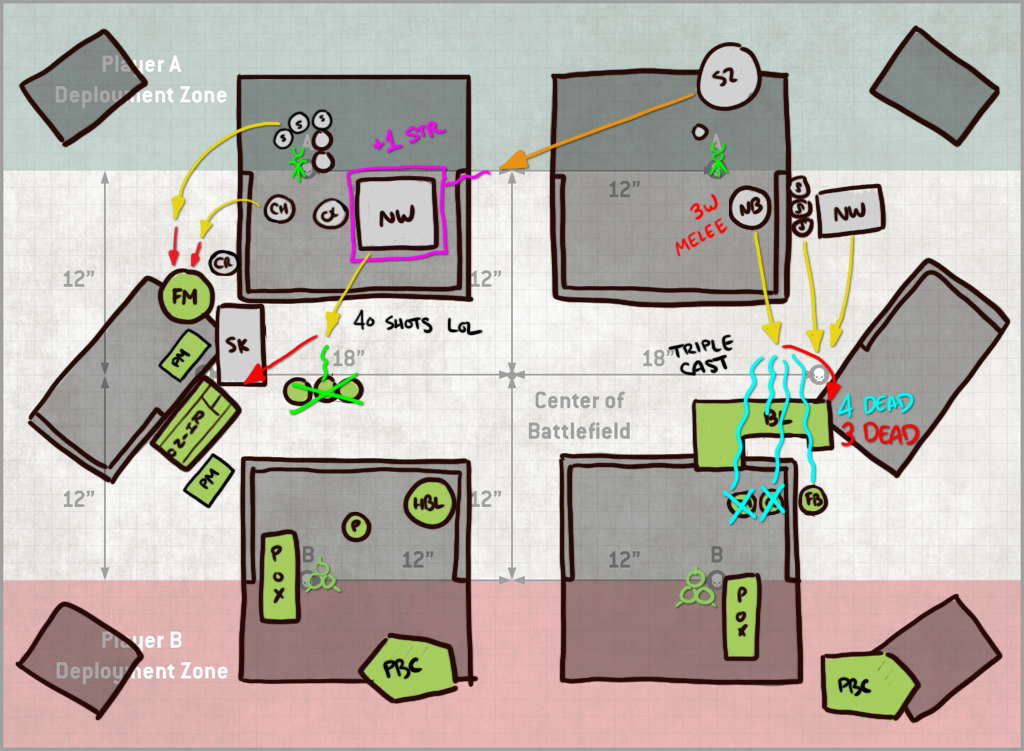
On his turn Ryan punishes my hubris by putting the Heavy Destroy on the second floor and promptly shooting my Plaguecaster off the table for three VP. He moves the nightbringer up but doesn’t advance and uses Transdimensional Thunderbolt to drop some mortal wounds on my blightlords – I had moved them slightly out of the ruin to take shots at some Necron Warriors, and that was also probably a mistake since it opened me up to take some mortals, but it’s only 2 on the unit and 1 on my Tallyman. Ryan also gets aggressive, advancing his Scarabs, Skorpekh Destroyers, and Lychguard up the left side and his Necron Warriors on the right to try and hold objectives while blocking me from scoring Stranglehold. It’ll hold me to 10 next turn, at least.
On my turn I pick up 10 VP for primary, get my first (and last) extra CP from the Tallyman, and proceed to get to work. Losing the Plaguecaster hurts but it isn’t mission critical here. I repay Ryan’s work by having my PBC move up and just remove his Heavy Destroyer, taking out all the anti-tank/long-range shooting Ryan had. Now I can coast to 10+ VPs for To the Last. I don’t want to get closer to the Nightbringer but I need to score Stranglehold and keep Ryan off primary so I charge the Necron Warriors on the right with my blightlords and kill them. On the left I bring up my Deathshroud and use the Putrifier’s mortals on 6s to wound to remove the Lychguard, and I get out both squads of Plague marines and charge the Skorpekhs with them and the Fleshmower, who also tags the Chronomancer. I take out three Skorpekh and the Chronomancer, who uses resurrection protocols to stand back up. I also fail (again) to remove the cryptothrall from the back objective. I score Stranglehold again and I’ve got spread on two objectives.
The longest turn of the game, just from a pure dice standpoint, this is where Ryan almost turned things around, thanks to some very good dice on his Nightbringer and some rough positioning on my part.
The Nightbringer is the real star of this turn, finally coming out of his cage and he’s doing just fine – dropping a Transdimensional Thunderbolt and a Cosmic Fire on my Blightlords and killing 3 of them and wounding all three of my characters on that side. That wouldn’t be too bad except he then dropped Dimensional Destabilization for 1 CP, letting him cast another random power and lucked into a second Cosmic Fire, which then wiped out my Chaos Lord and my Tallyman and left my Blightbringer on a single wound, plus it killed 1 more Blightlord. After that the Nightbringer would charge my Blightlords and kill 3 more, leaving them with 3 models remaining, but they’d do 3 wounds to him in the Fight phase.
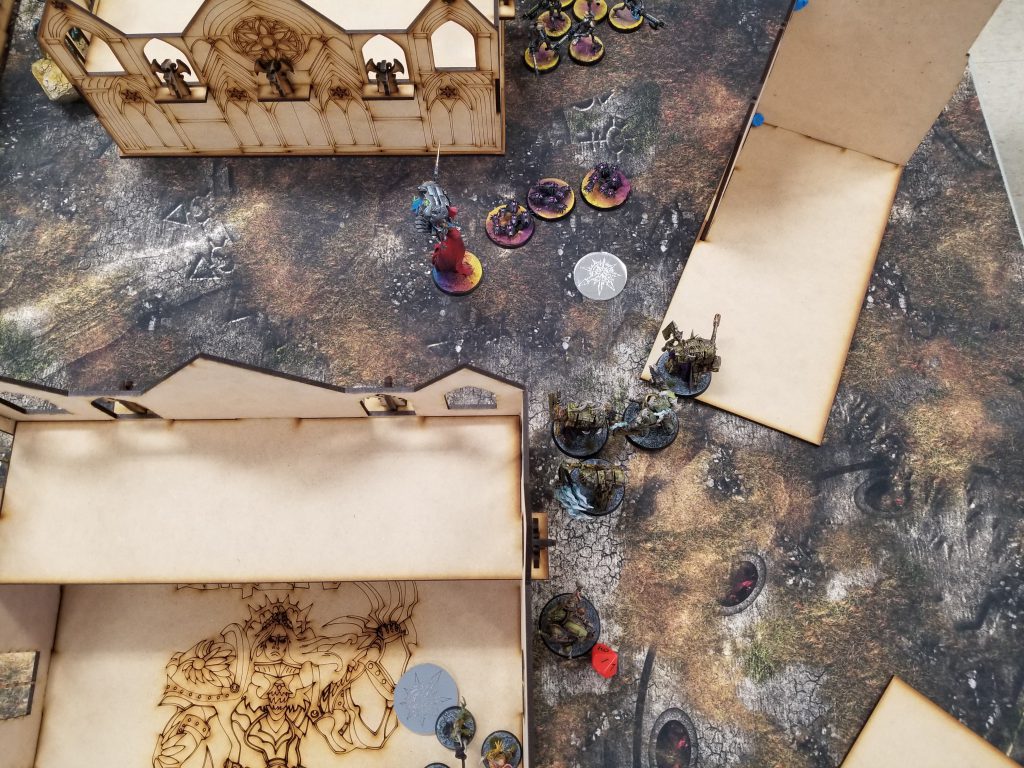
On the other side the Chronomancer brings back a Skorpekh and I have to deal with the wrath of 20 Guass Reaper Necron Warriors. I could potentially have blunted this by moving up my Deathshrouds more aggressively to the wall as a consolidate move, preventing all of them from coming out of the ruin, but even 25-30 shots would likely have wiped me. They kill the Deathshrouds then charge my Rhino and Plague Marines while the Cryptothralls and Technomancer charge the Fleshmower. I manage to drop another 2 Skorpekh and whittle down the warriors but right now Ryan’s got the objective by 1 model until my other plague marines can get in there.
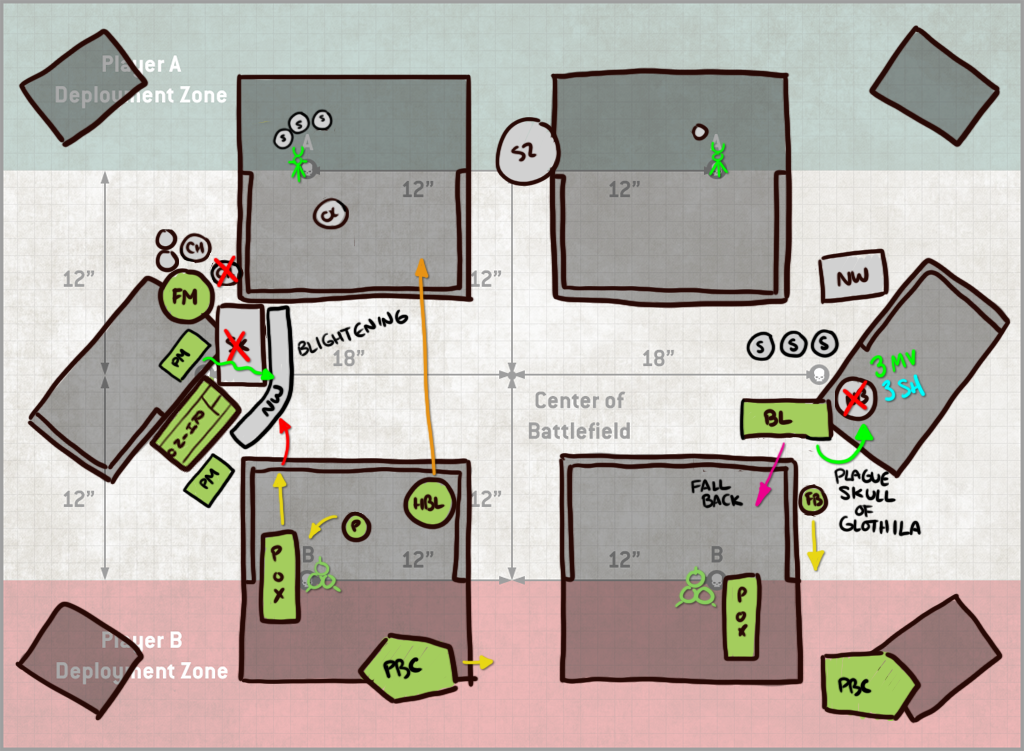
This is pretty much where I turn it around and remove Ryan’s hopes. The Blightlords fall back from the Nightbringer into the ruin and the champion lobs his plague skull for 4 mortal wounds (reduced to 3), then the Plagueburst Crawler and the Blightspawn do the rest. I start to move up my poxwalkers on both sides to contest objectives, and on the left I’m getting stuck in. I’m out of CP to use Mutant Strain, but if the poxwalkers can charge and get 1-2 kills (likely), they’ll be back at 10 models and just tie up the warriors forever. I use the Blightening to lob grenades and remove 10 Warriors (though 5 come back), and take out the Skorpekh and Chronomancer with the Fleshmower. I get aggressive with my Heavy Blight launcher so I can hold a backfield objective next turn. I also make a play on Szeras, but Ryan CP re-rolls his last save to keep him on the table and I once again whiff on that last damn cryptothrall. What the hell?
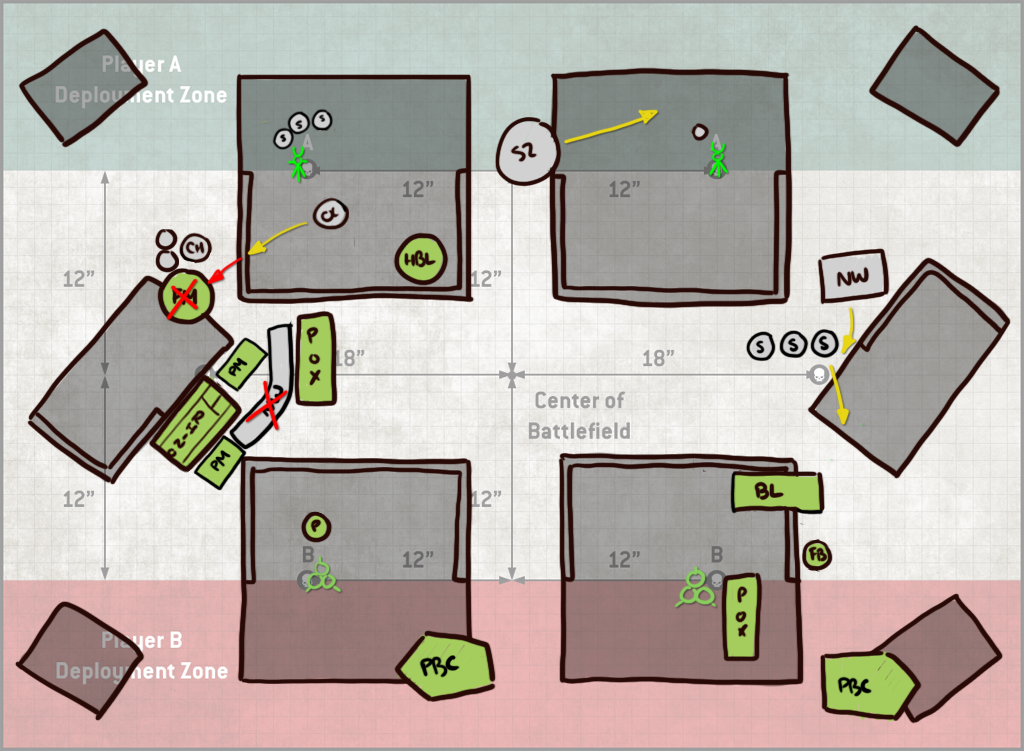
Ryan’s able to kill the Fleshmower with some good rolling from his Overlord, who comes to join the party. That leaves his back objective very poorly defended, and I think I can wipe the scarabs off it and use my bloat drone to take it.
Ryan’s out of gas at this point and while the game is close, the conclusion is essentially foregone. I’m able to take the rear objective and score another Spread the Sickness as well as two more Strangleholds, plus I snag 15 for To the Last. We tie on Secondary objectives, but I pull down one of his banners and I’ve managed to be in three table quarters most of the game so he’s a bit stuck there. I win, 76-73, before paint scores are applied.
Lessons Learned: The Plaguecaster move was probably stupid. Taking out the Destroyer helped, but I probably wouldn’t have lost a PBC to it shooting. The big problem was how little I got out of it. I probably also needed to be more aggressive with my heavy blight launcher earlier. Not sure about shooting the Cryptothralls, but I think my reasoning there was sound, even if the results didn’t go my way.
Result: Win, 86-83
After this we have a one-hour lunch break. That’s kind of insane, given we have 2.5 hour rounds and nowhere to go. I’d rather have 30 minutes and longer rounds, since some of these are very tight given how players are not used to new armies. The store orders pizza though, so I split one with Dan, who’s also here with his Drukhari. He won his first game handily and is matching into Blood Angels round 2. It’s a good start for him and I’m glad to see him win this one.
Game 2: vs. Jason Wood’s Death Guard
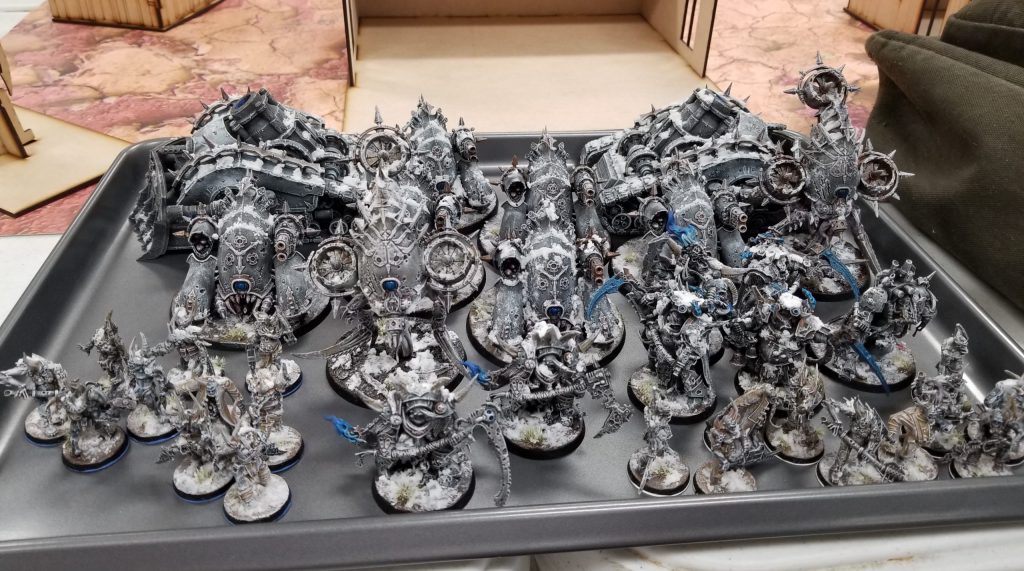
Jason's Death Guard - click to expand
The Death Guard mirror match is an interminable slog, made worse by the fact that many Death Guard abilities, such as explosions, the splash damage on Disgusting Force, and the Inexorable stratagem Ferric Miasma, do not really affect Death Guard units. Plus many of your weapons top out at 2 damage save Entropy cannons, and you’ll be facing the same toughness drops and damage reduction you’re used to enjoying. It’s one thing to play Death Guard; if you haven’t played against Death Guard with your Death Guard, it can be a really hard match-up.
Fortunately, I played against Death Guard at the Lone Star Open and haven’t forgotten the lessons learned there.
The Mission: Battle Lines
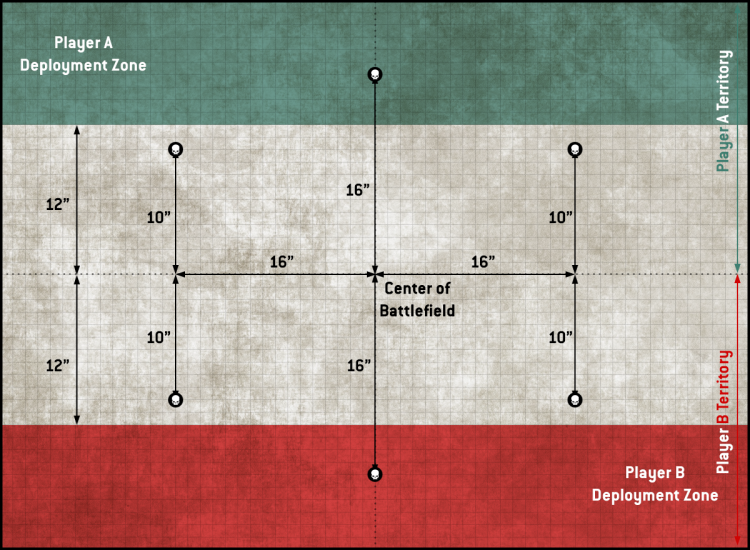
Ah Battle Lines, my old enemy. It’s bad for Jason, and it’s bad for me. 4 Objectives means Spread the Sickness is a dead secondary, and Jason’s list doesn’t give up a lot of points. The good news is, I’ve been here before. So I’m going to take Banners this time and hope to pull 10 points off it.
My Secondaries:
- Engage on All Fronts
- Bring it Down
- Raise the Banners High
My plan here is to raise banners on the home objective and then one – but likely not both – of the midtable objectives by turn 2 and then let those sit all game, if possible. If I can pull 9 on the objective that’s as good as Spread the Sickness in most of my games. Bring it Down here can score me a max of 12 points but it’s also a progressive, goal-aligned objective for me and I love those – any secondary that rewards me for doing what I already need to do to win, i.e. destroy Jason’s vehicles – is one I want to take, even if it’s got a lower ceiling. Finally Engage isn’t my favorite either but I’m not comfortable I can keep my Blightlords and both PBCs all game with the amount of Entropy and Melta floating around – Jason’s going to be gunning for my PBCs all game and I want that to be a mistake so I’m leaving TTL behind here and hoping to pull 10+ on Engage as I run upfield.
Jason’s Secondaries:
- Assassination
- Grind Them Down
- Engage on All Fronts
I see Assassination a lot, so that’s no surprise here. Grind is an interesting one – Ryan is basically banking on having fewer, tough units, but he’s still going to struggle to kill more than 2 per round. Engage also makes sense, given he’s got a faster army with the Blight-Haulers.
Deployment
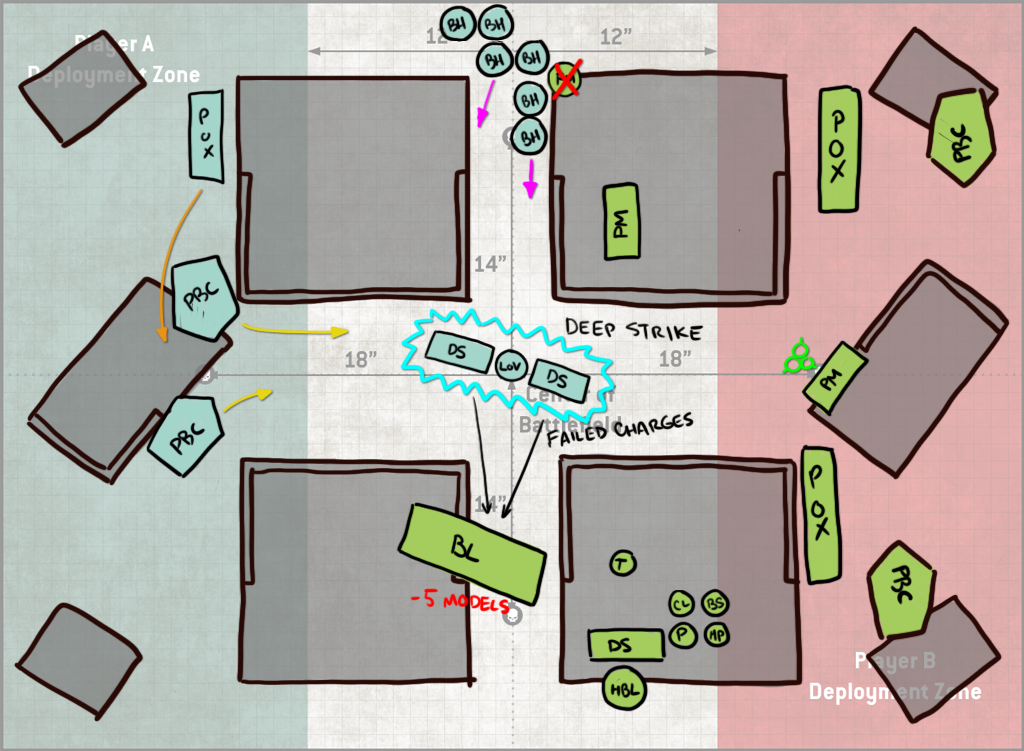
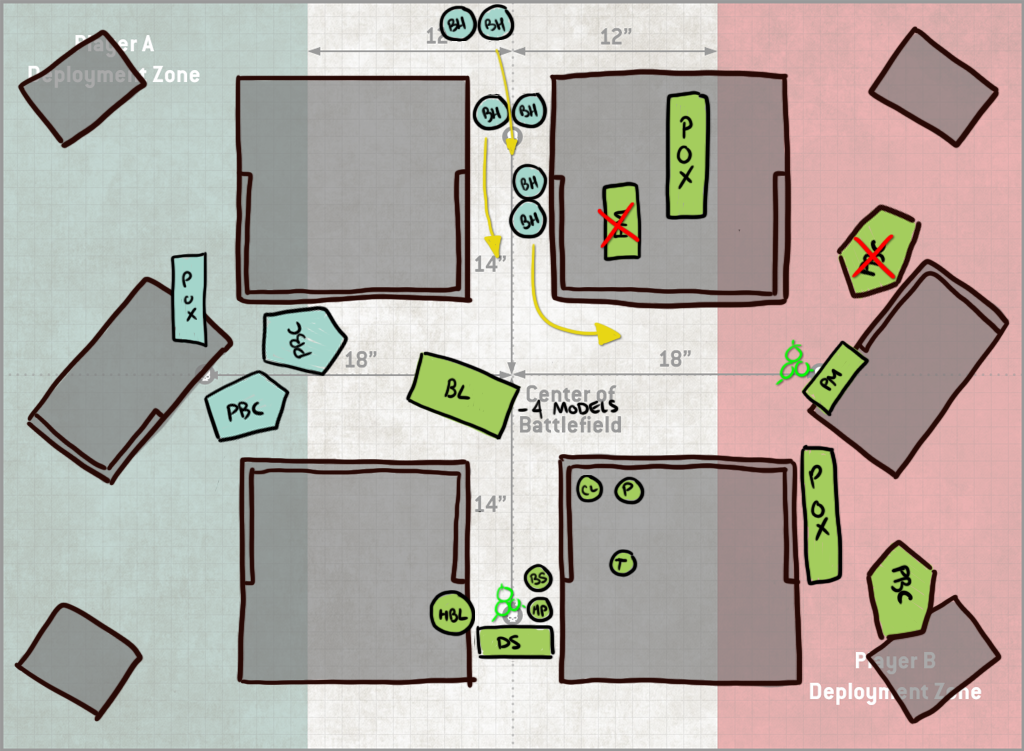
OK this is actually after the first turn but you can get a good feel for where things started. Something to note here: We were in the middle of a row of tables and playing a hammer-and-anvil deployment, so moving units on the far side of the table meant walking all the way around the table next to us to reach those units. This affected deployment for both of us, though I intentionally planned to avoid his Haulers, and would later lead to me forgetting some key unit actions. More on that later.
The Plan
I’ve got two major issues to worry about here:
- The 6 Myphitic Blight-Haulers. They can ruin my day by putting out some very big damage on my Plagueburst Crawlers, and reliably use the frag missiles to take out Poxwalkers. Their big weakness is not being able to fall back and shoot though, so if I can keep bad touching them I’ll be in decent shape. Otherwise they’re more a nuisance than a real threat here, provided I can keep them from shooting my characters.
- The Deathshroud+Lord of Virulence blob. I’m not super worried about this, but the LoV can do some mortals and the group have some decent damage output. I’m not afraid of being charged by them so much as just needing to make sure they don’t do too much damage to me. Jason puts both into a Teleportarium/Deep strike, so I need to keep them off my backfield, where they might cause issues and prevent me from holding the home objective – protecting that one objective on Battle Lines is supremely important.
First Turn: Jason Wins the Roll-off
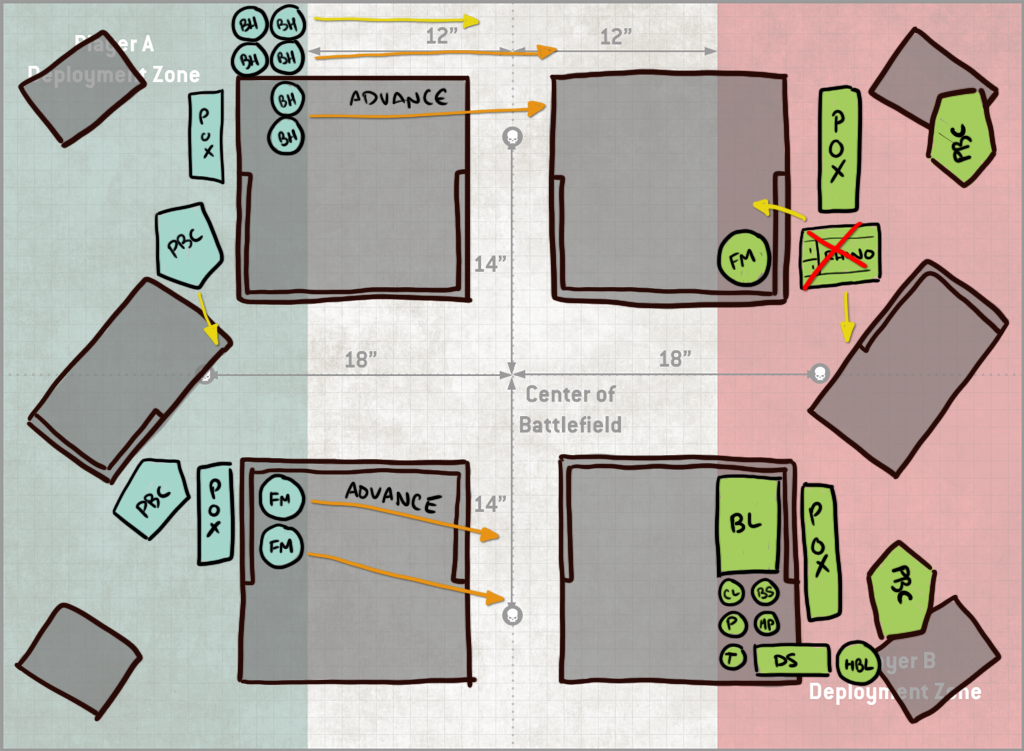 Jason wins the roll-off and starts by rushing his vehicles forward, advancing all but one unit of Blight-haulers, one of which can get line of sight on my Plagueburst Crawler, albeit at a -1 to hit thanks to Dense terrain. He also brings up his fleshmowers, which is… a choice. He’s essentially giving me a free charge on them at this point since I’m only 7″ away after moving. My Rhino can’ t fully hide where with this deployment, and sure enough Jason’s able to use Entropy Cannons and Mortars to shoot it off the table. Two plague marines die, and I put one unit ahead in the ruins and the other on the objective.
That’s only one unit for Grind, and I think I can match that.
 My turn to cause some problems. Here’s what you have to know about the Death Guard mirror: Shooting your PBCs at other PBCs is a waste of time. It’s a bad trade and it takes forever. Instead, take your PBCs and shoot them at Poxwalkers. My goal is to wipe out both squads here as quickly as possible, which will glue his PBCs to the rear objective and allow me to contest it with a small number of units. I’m also trying to tie things up as quickly as possible to stop more shooting. My PBCs take out one unit of poxwalkers, while my Fleshmower charges two units of Blight-Haulers and leaves the third unable to move past them unless they Fall Back. Good times. It drops one way down in wounds.
On the other side of the table I shoot one Fleshmower to death and charge the other one to kill it, giving me a 3-unit tally for Grind and denying those points. It also gives me a ton of free movement, putting me halfway into another table quarter and on my way to scoring Engage. I also get a banner up on the home objective.
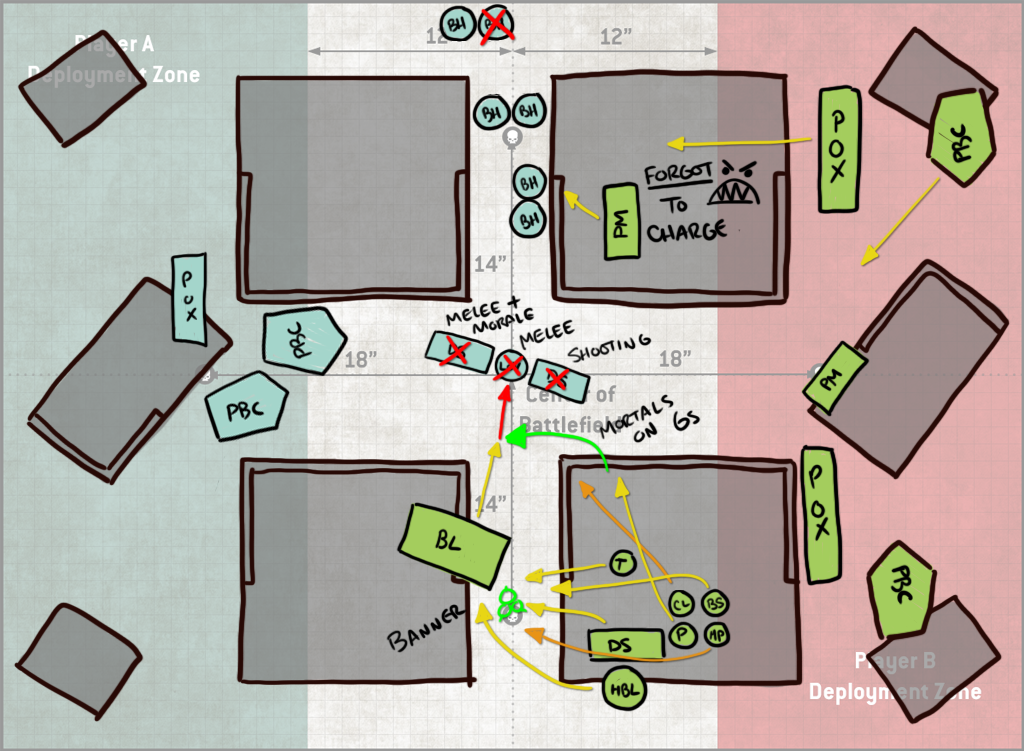
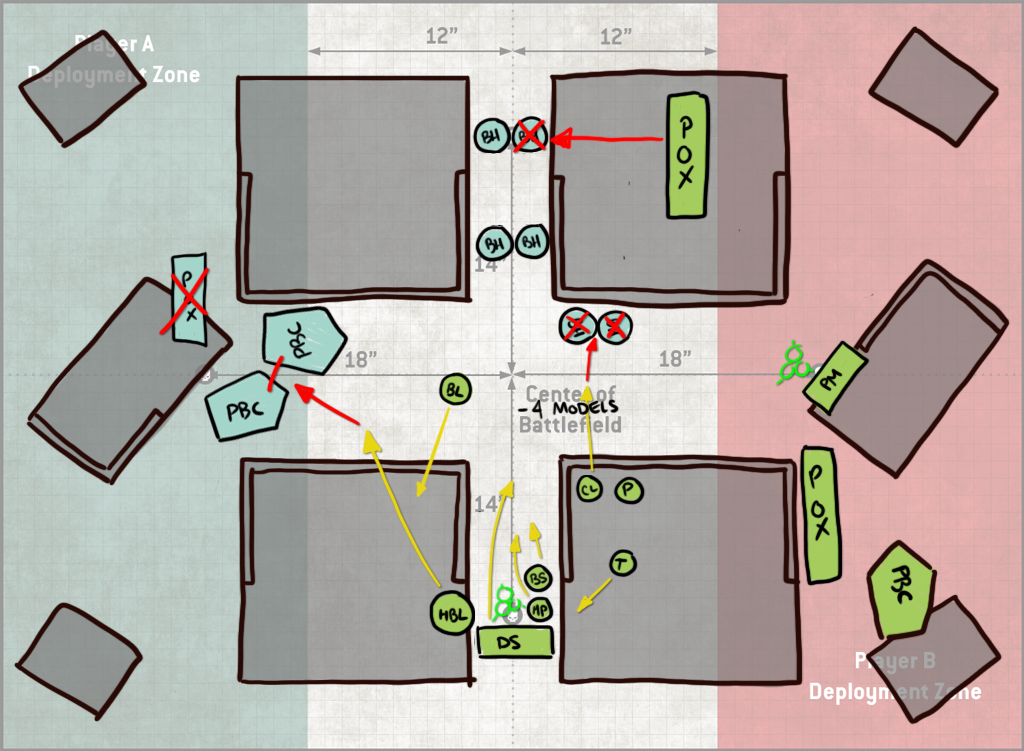
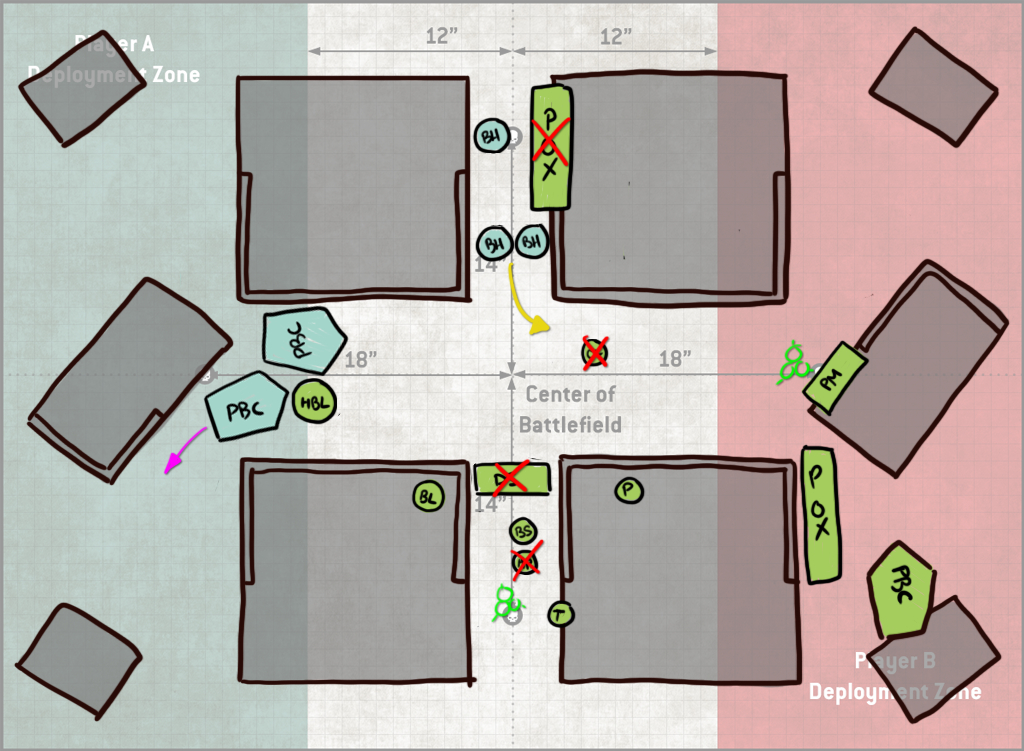
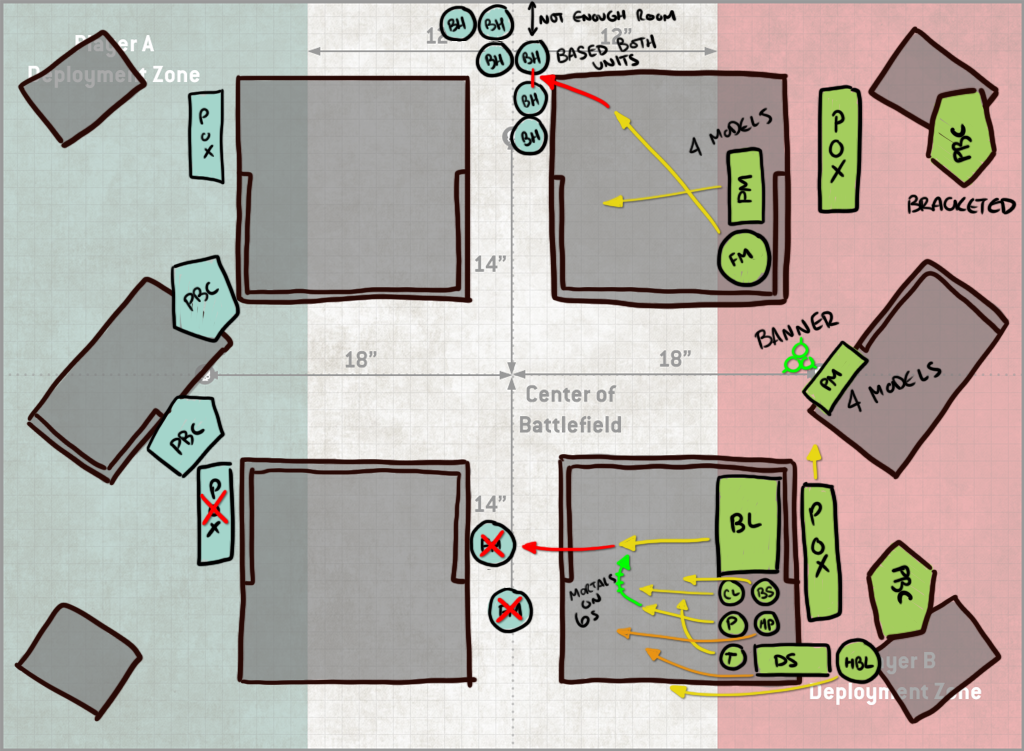
Turn 2 Jason falls back with his Blight-Haulers and uses the unengaged ones to destroy my fleshmower. That still costs him 4 models’ worth of shooting however, and so it’s a trade I’ll take. The PBCs take some ineffectual shots at my rear PBC and poxwalkers moving forward, and the block of Deathshrouds arrives at mid-table. It’s not super-clear on this drawing, but I’ve done a decent job blocking them out – they’d have to be split if they wanted to be in my Deployment zone, and also that would put them where my opponent literally would have been unable to easily reach and so he likely didn’t consider it seriously which, same – I would not be into walking around to that side of the table over and over to do shit with them. It also strands them far away so I get it. He drops them instead in the middle of the table, shoots 5 blightlords off the table and then whiffs his charges with both units of Deathshrouds. This leaves him not even attempting a charge with his LoV. This is a bit lucky on my part, since I’ve left them out of range of the Blightspawn, but even with a re-roll your odds of making a 9″ charge are less than 50%, so it’s not exactly outlandish. Because it’s the mirror, I can’t make that an 11″ charge though – Inexorable Advance ironically counters the Inexorable plague company Stratagem.
OK so Grind count: 1. That’s easy to match. I lob the plague skull at the Lord of Virulence and drop him to 1 wound, then use psychic powers and the bulk of my shooting to kill one unit of Deathsrouds, drop another, and kill one of the Blight-Haulers. I raise another banner on the south objective, then charge my Blightlords at the remaining terminators, charge them up with mortals from the Putrifier, and wipe them out. But I forget to charge with my plague marines, who are all the way on the other side of the table. This is actually a huge mistake, and will cost me somewhere between 6 and 10 VP on Assassination points as those Blight-Haulers get to kill more things.
On Jason’s turn he takes advantage of my mistake and kills my Plague marines, then sweeps the blight-haulers around and uses them to kill my wounded Plagueburst Crawler, and uses his PBCs to drop 4 more models in my Blightlords, leaving me with a single model left on 1 wound. 2 Units for Grind.
I retreat that Blightlord back immediately; he’s in bad shape but I can still use him to tag a PBC and contest objectives. I swing the Heavy Blight Launcher up to tag both PBCs and stop them from bother me for another turn, and pull up with my Deathshrouds while my Plaguecaster and Blightspawn stay on the objective. My PBC finishes off his poxwalkers, my poxwalkers charge his remaining blight-hauler on his north squad, and I charge the other squad with my Chaos Lord and manage to kill the remaining unit in it. That’s bad, since it means he’ll just be shooting my Chaos Lord off the table with ease.
…and he does, while also taking out my plaguecaster. I think he actually got my Deathshrouds, but I don’t remember what happened to them. By this point, the game was basically over. I managed to hold him to primaries on turns 4 and 5, and while he finally scored Grind on turns 4 and 5, he only net 6 points there, but was able to pick up 13 on Assassination picking off characters left out of position. He pulled 6 on Engage, giving him 55 total points before battle-ready scores.
On my end, I’ve got 9 points for Raise the Banners – I kept both up all game, plus I scored 10 for Engage on All Fronts, pulling 3 on turns 4 and 5 by consolidating my Bloat-Drone into the NW quarter. And I scored 8 for Bring it Down, managing to kill one of the PBCs. I probably could have made that 9 or 10 but I didn’t bother going through the motions on this – I’m going second and I can easily pull off 15 on the final turn with my Blightlord helping take Jason’s home objective. That gives me 72 before battle ready.
Lessons Learned: Forgetting to charge with that unit of Plague Marines was stupid and cost me bigtime. I also probably overextended with the Blightlords, but otherwise I think I played this very well. I got some decent saves and a little lucky with Jason’s charges but overall I didn’t have exceptional luck and managed to just take advantage of knowing the mirror match and how to play it.
Result: Win, 82-65
Two down, one to go. At this point I’m feeling pretty good. McDade’s at the event, but I’m not matched into him – I’m on Table 2. That comes with its own problems, though.
Game 3: vs. Koushaun Zaarrae’s Imperium Soup
 Koushaun's Imperium - click to expand
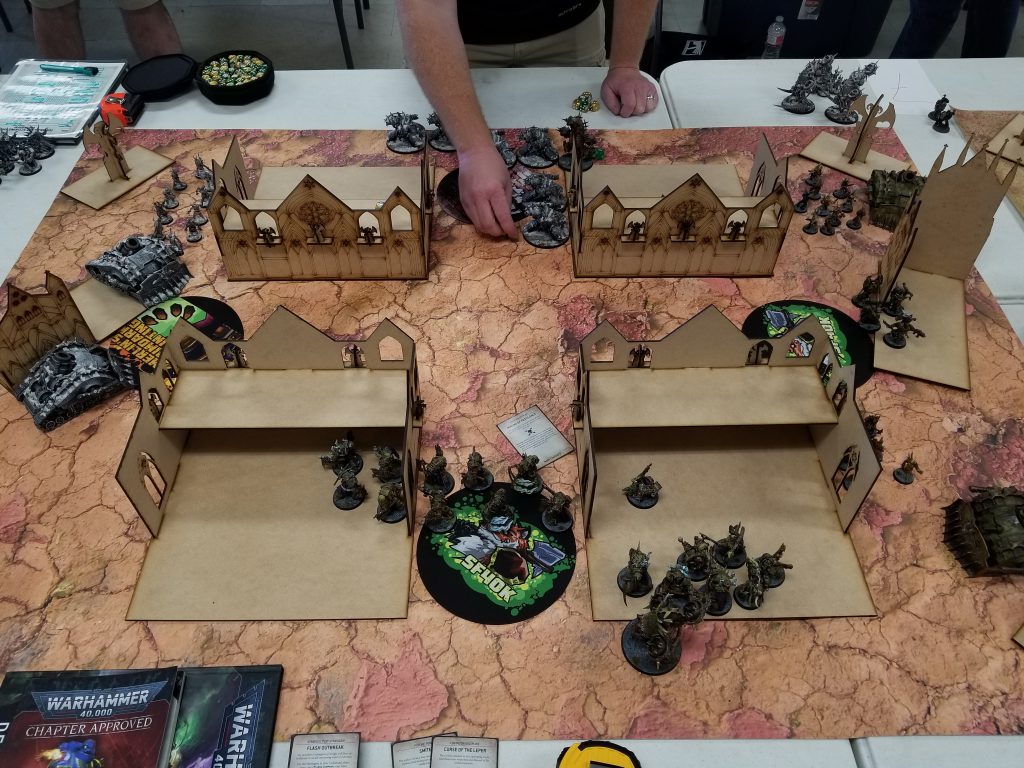
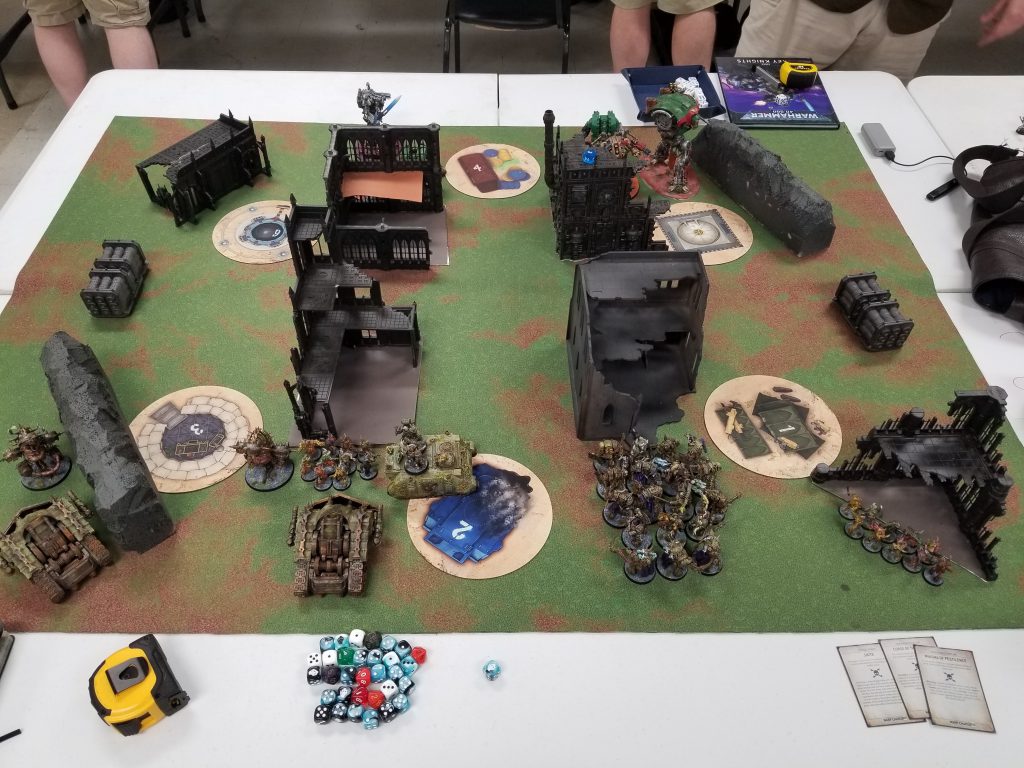
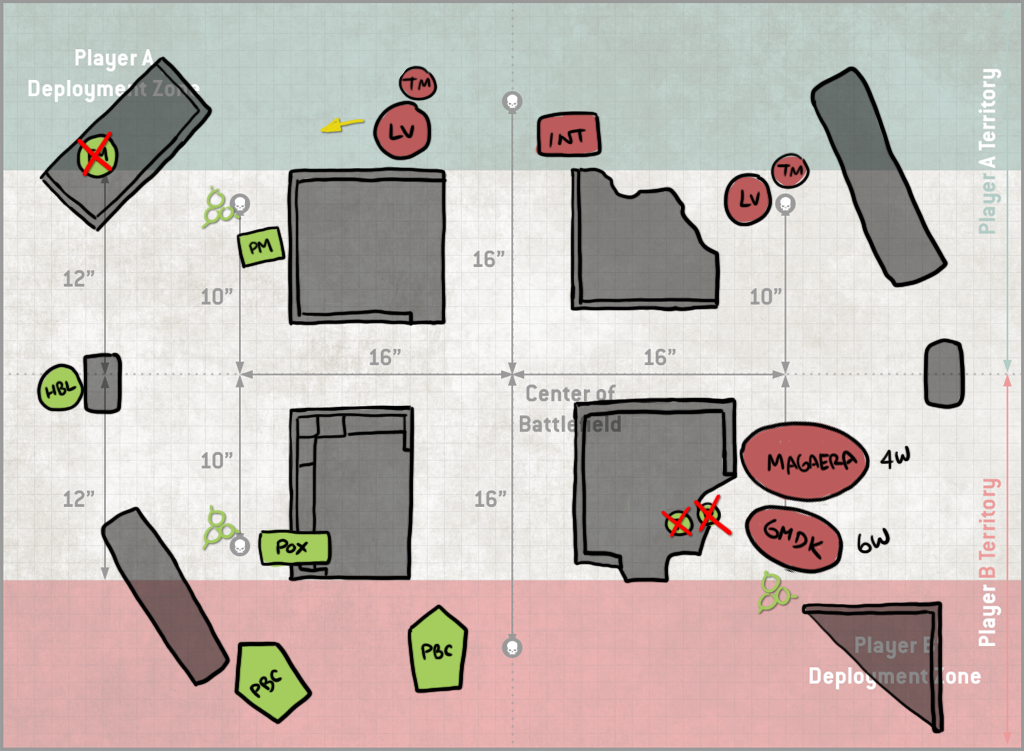
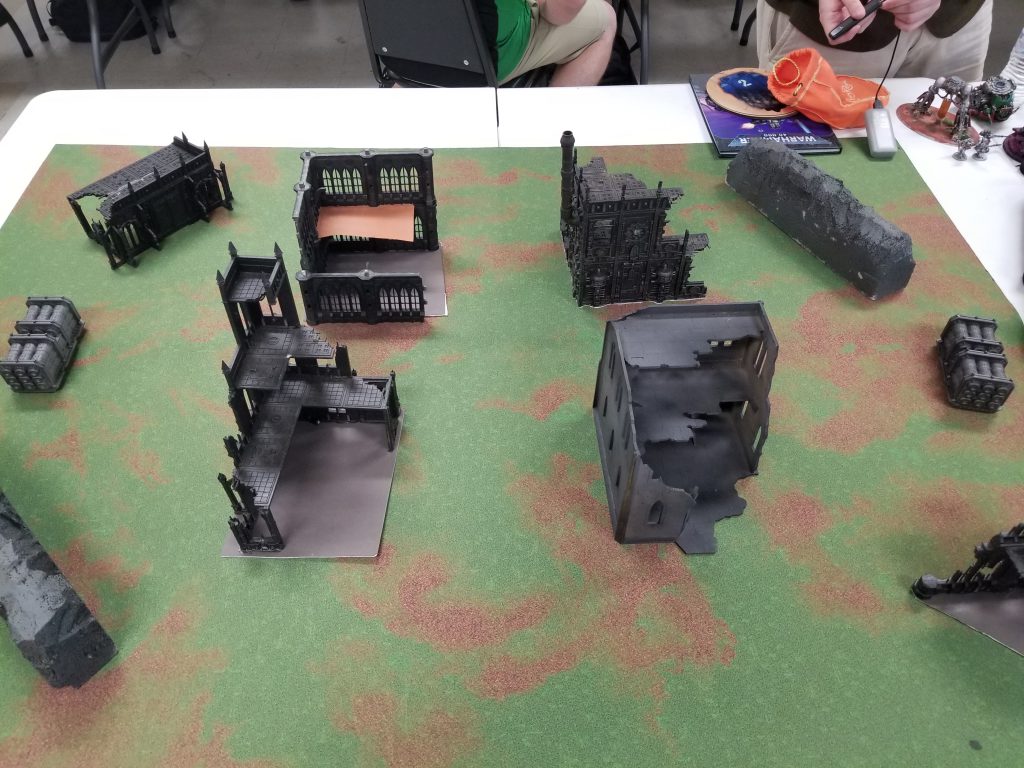
You may notice something different about this table. For some reason that I will never understand, tables 2 and 3 at this event – two of the top three tables – had shitty terrain on them. These pieces are awful. They’re too small to hide models behind, they lack good walls, and on top of that, they’re too far forward, so you can’t start with units in actual cover. And of course, this happens on the mission where I’m up against an army sporting a Magaera, 3 Dreadknights, and 2 Leviathans. I’ve already consigned myself to a loss, but whatever, may as well make an attempt.
The Mission: Overrun
This mission especially sucks on this terrain – sitting on the objectives will mean being completely visible and open to getting shot.
My Secondaries:
- Spread the Sickness
- Bring it Down
- To the Last (PBC / PBC / Blightlords)
I think I can keep the PBCs around all game and Grind is out anyways since there aren’t enough enemy units to make it work. Spread here is fine with six objectives to use it on. Bring it Down is probably the best of my remaining options, with up to 13 points available for it.
Jason’s Secondaries:
- Assassination
- To the Last (Leviathan / Leviathan / Magaera)
- Overrun
Assassination again and this is as bad a map as possible to have to hide on. To the Last is a fine pick against me – it’ll be hard to kill three T8 models at range. Overrun is a bad pick.
Deployment
This sucks. I can’t hide any of my units and if I don’t get first turn I have no change whatsoever. Even with first turn I’m likely to lose.
The Plan
I need to kill the Knight as quickly as possible, but he’s going to heal every turn and trying to chip away at him won’t get me anywhere. I also don’t have good line of sight to him on turn 1 despite Obscuring not applying. Also, everything I’m shooting at has a 4+ invulnerable save. This sucks ass.
First Turn: I Win the Roll-off
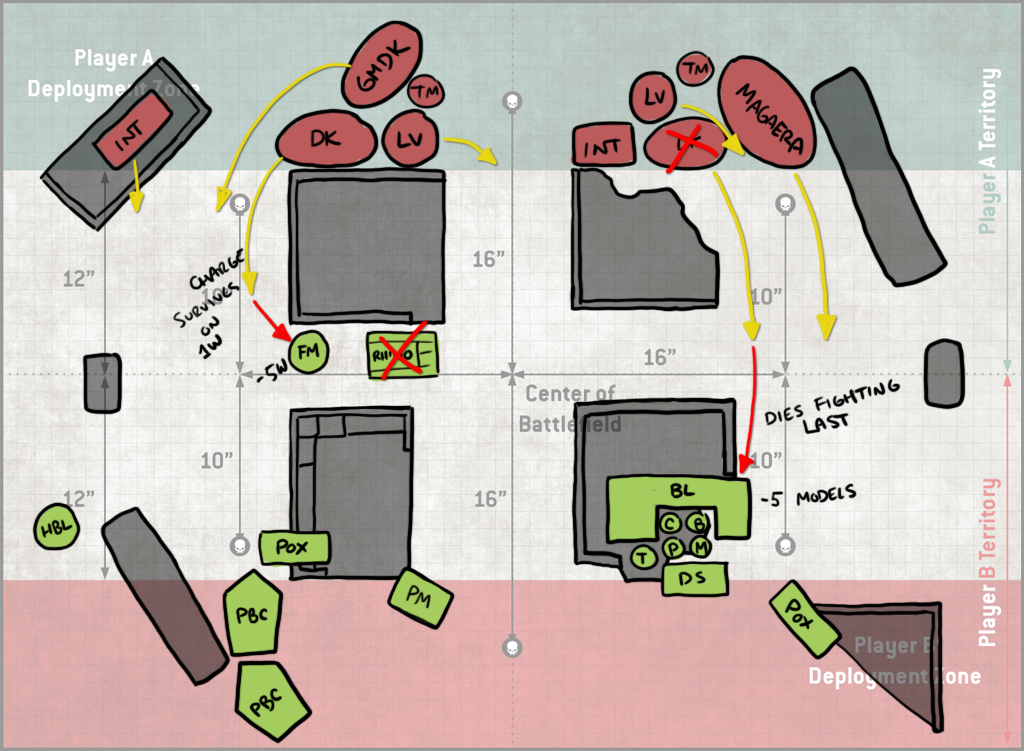
I need to get on all three objectives, so I let out a unit of Plague Marines and put them on the bottom middle objective. That bottom right objective is going to be contested all game so I spread the sickness there first. I move up as best I can with the Blightlords and get ready. The Fleshmower and Rhino advance up the left side, while the two PBCs get angles on the regular Nemesis but only hit it for 5 damage.
The bottom of T1 goes pretty well for me. Koushaun destroys my Rhino but all five Plague Marines make it out and into the ruins. The Dreadknights both charge my units – one charges the Fleshmower and manages to CP re-roll its last save to stick around on 1 Wound, while the other charges into my blightlords after the Magaera kills 5 of them. I had already warned Koushaun about the Blightspawn so at this point he gets to find out and his Dreadknight dies fighting last.
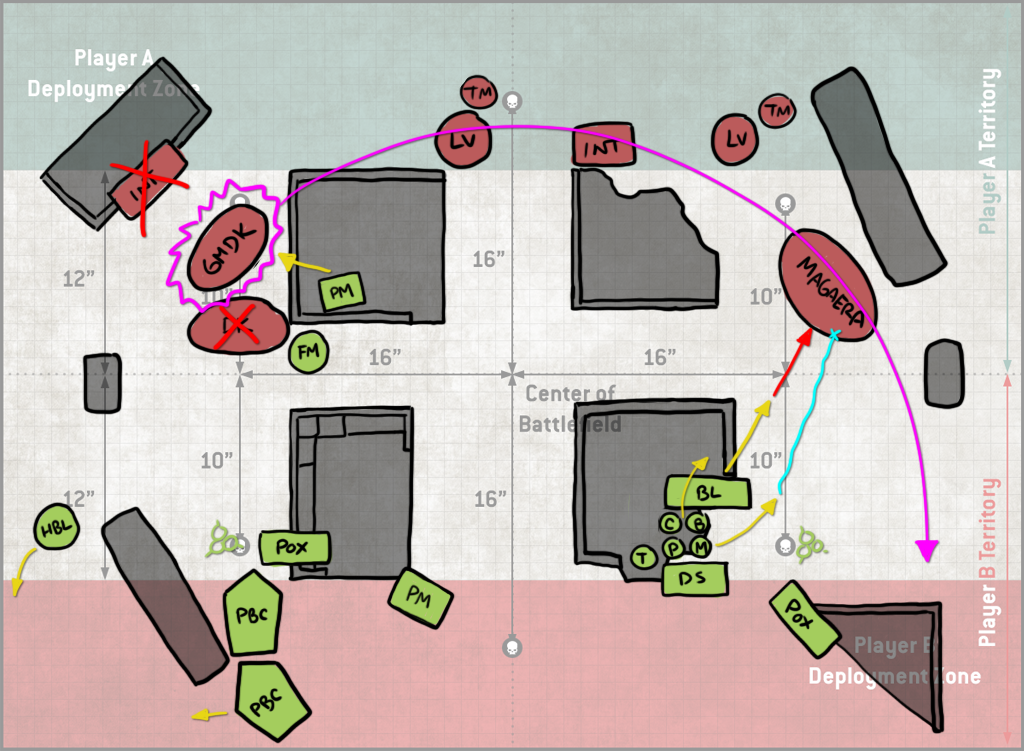 Turn 2 is where things go bad. I need to make a play on that Magaera and I have nowhere I can run to. My plan is to try and fish for mortal wounds and kill it. I bring out the Plaguecaster, who gets 1 smite wound, lob a 3-mortal skull at it, then charge in with support from the Lord and Blightspawn, hoping to get a bunch of mortals and wounds through. This goes horribly, and on their 21 hits I end up with only 1 mortal wound and dropping the Magaera to 10 wounds overall. I manage to kill the other regular dreadknight, but shooting the Grand Master causes him to teleport across the table. This I don’t mind – that’s a losing battle and my chance to win involves holding the left side now. I clear off that objective.
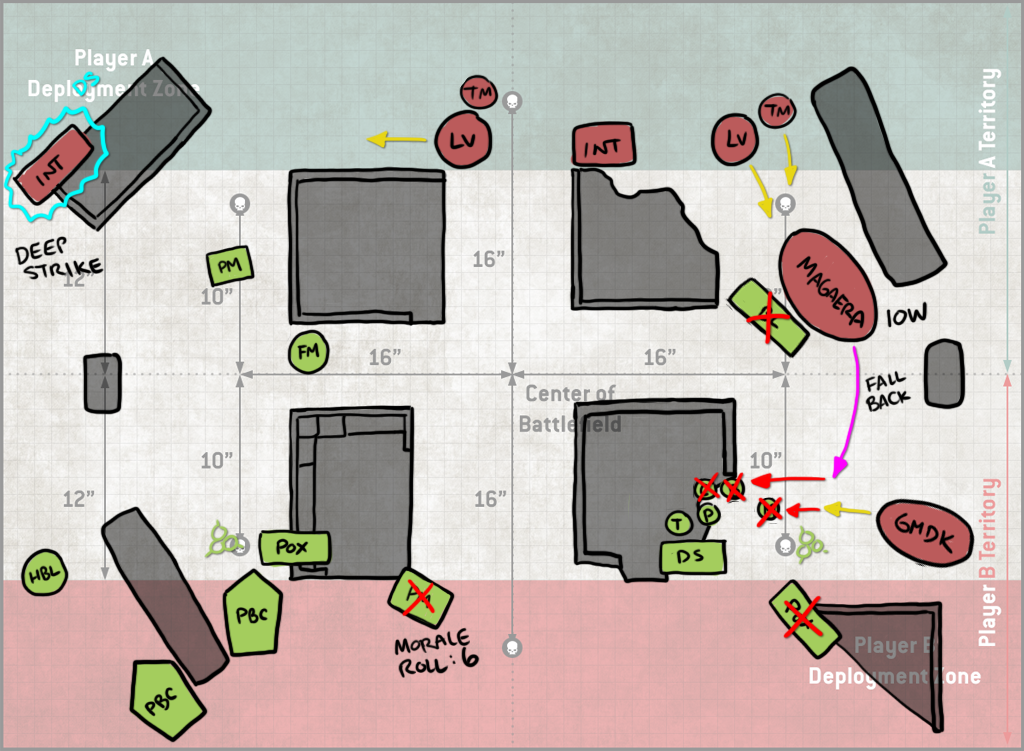
Bottom of 2, the Knight promptly falls back, spends 1 CP to act at full profile, and kills my Blightlords while the Grandmaster and Leviathan kill my poxwalker and score an easy 10 points picking off characters. A Strike Squad teleports in.
I wipe out the Strike Squad, eating two models with my Fleshmower to bring him back up to 6 wounds. The Deathshrouds try the same trick as the blightlords, but also get incredibly bad rolls on their mortals and end up dropping the Magaera to around 4W remaining. I spread the sickness again to get 9 off that one. I’m going to try to get my Poxwalkers to the middle home objective for t5 for a final spread.
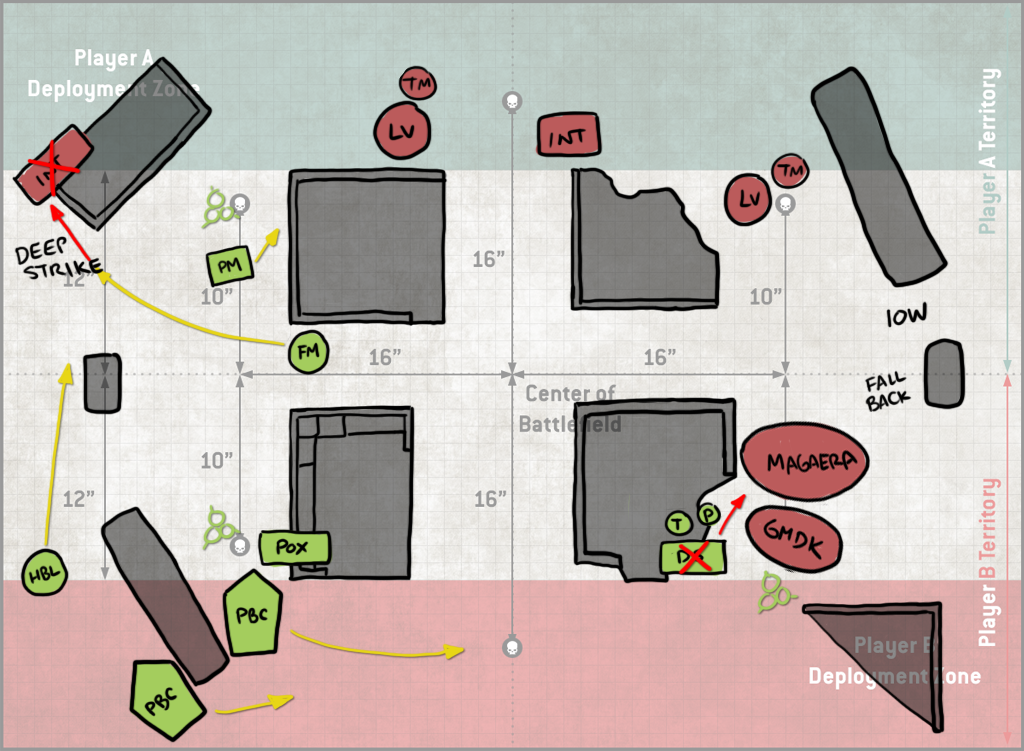
Things continue to not be great. I lose most of my remaining characters – the Putrifier survived until the next turn – and the Fleshmower fails a lot of saves to die that turn.
At this point we’re running out of time in the round and while there’s still a little time, I don’t want to win on an extra turn so we end up calling it. I think I could have pulled this dog shit game out despite all this; on my next turn it wouldn’t take amazing luck to kill the Magaera and the Grandmaster, and the Heavy Blight Launcher could hold one objective while the plague marines tie up a Leviathan. Doing that would swing the game for me big and allow me to grind out a low scoring win against an opponent unable to do much. As-is I lose 48-55 in a game that where my opponent got a huge advantage from the terrain.
Lessons Learned: Honestly I’m still bitter about the terrain. If you’re going to have bad tables, why make them top tables. What’s even worse is that McDade and his opponent didn’t even play their game – there was some kind of weird pissing match/concession situation going on over there that I didn’t dig for details on – so there was a table with legitimately good terrain that just went unused. Meanwhile I got to play with the ruin that a had a floor made from construction paper.
I may have over-extended with the Blightlords but honestly I had no other choice there – the Magaera kills me if I don’t charge and it’s just loaded with 3-damage weapons that ignore cover. I likely should have tried hitting it more with the mortars early but on the whole I’m not sure that mattered. A good 2/3 of my ranged shots bounced of 4+ invulnerable saves.
Result: Loss, 55-48
After the game I stick around for a bit to talk with Dan/Swiftblade. He also went 2-1, losing in game 3, which is a great result for him. I’m salty about the last game but still happy with the result overall. And I win Best Painted for my army, which is a good consolation prize and nets me a Sergeant Castus model, which is pretty cool. I’m going to put a Chaos marine on that base, anyways. I’m let down after the event by the scoring however, which is just Wins > Battle points, and so I finish 9th, behind the player I beat in Round 2. This sucks shit and I hate it. Why do people do this?
That bullshit aside, this was great practice for Austin. I played against three armies I rarely go up against and I’m more comfortable with how my list plays than ever. I still need to watch myself and avoid getting to aggressive and out of position, and I need to be better about remembering my Plague Skull and focus firing down enemy targets, but I like where I’m at.
Next Time: GW’s Austin Roadshow Event
Generally, I’m hoping to go 3-1 in the first four rounds at Austin. That will probably be easier if I lose game 1, but there lies the coward’s path. While in the back of my mind I worry that I’ll have a worse showing than New Orleans – 6-2 is a damn good record – if I can start 3-1 and make that upper bracket I’ll be pretty happy, even if I go 1-3 afterward.
Anyways, next time you hear from me in this column will be after Austin. Wish me luck!
Have any questions or feedback? Drop us a note in the comments below, or email us at contact@goonhammer.com.
