White Dwarf 461 surprised the hell out of us by reintroducing Maelstrom of War missions for 9th edition, albeit in beta format. The Maelstrom rules have always been somewhat divisive; they were first introduced in 7th edition and later revamped for 8th. The Maelstrom rules have been typically derided by competitive players in the United States, who felt that the random nature of the objectives added too much variance/randomness to the game. And while that was certainly true for Maelstrom of War missions in their base format, European players – particularly those in the WTC – enjoyed them when played in a special format that combined a limited, player-constructed deck of maelstrom objectives with more traditional take and hold objectives from the 8th edition rulebook to create a hybrid format. Games Workshop would build out a similar idea to this later on by introducing Schemes of War in White Dwarf. This format saw Maelstrom decks reduced to 18 cards with no duplicates, making Maelstrom play significantly more tactical. If you never played with Schemes, they were quite good – but never got the support they needed as a format.
Those were quickly abandoned when 9th edition hit, and it seemed like GW had forgotten about Maelstrom… until this month’s White Dwarf, which introduces new Maelstrom rules. But are they any good? And even if they’re good, are they strong enough to be used in competitive play? We’ve been reading through the rules and testing them all week, and we have some thoughts.
The Rules
Like other supplementary missions that have been released in 9th, the Maelstrom of war rules come as a “mission pack”. This means they fully outline the process of playing a game, from army construction all the way through to deciding a winner at the end, in a series of numbered steps. Many of these steps are going to be familiar to players used to the GT missions – army construction and everything from “Declare Reserves and Transports” onwards are pretty much identical (other than using the pre-FAQ first turn rule, nor surprising given when these were probably finalised). However, in between those lie the things that make preparing for and playing a Maelstrom game unique, and that’s what we’re going to talk through in this section.
Tactical Objectives
When playing Maelstrom of war, the only way to score points (and thus achieve glorious victory) is by achieving tactical objectives. At the start of each battle round, players will generate one or more of these (how depends on the mission), and each objective generated will give you a goal to achieve in order to score it, and a number of points it awards if you pull that off (some of which scale in difficulty for game size). Come the following battle round, a new set of objectives is generated, and your old ones are lost to the warp.
You generate tactical objectives by rolling a d6 on one of six category tables, and for most missions you select three of these categories during the pre-game procedure (similar to selecting secondaries in a normal game). The mission will then instruct you how to pick between these categories each time you need to generate an objective. Each objective can only be achieved by a player once per battle round, and if you end up with a duplicate generated, you generate a new one instead. There are four stratagems available to players in these missions to manipulate this process, which we’ll cover shortly.
The objectives themselves are mostly some spin on “hold a specified objective”, “get stuff into a specified position” or “kill/damage something specific/under specific conditions”, again not massively surprising if you’re used to Secondary objectives (though there aren’t any Action-based ones). The categories all have a rough theme, and are:
- Brought Low: Destroy big targets like VEHICLES, MONSTERS and high PL units, or achieve hold-more style objective conditions.
- Raid: Hold objectives/attack positions within your opponent’s territory (half of the board).
- Territory Seizure: Achieve positional goals relating to the centre of the battlefield and table quarters.
- Holding the Line: Protect your territory.
- Heroic Deeds: Take out enemy CHARACTERS or achieve cool things with your own.
- Eradication: Kill lots of stuff or specified targets.
There’s generally a pretty good mix of specificity in the objectives in the category, and that matters because the rules include, up front, a solution for the “unachievable objective” problem (i.e. an objective tells you to destroy a unit with a keyword your opponent doesn’t have any of in their army). When you roll up an unachievable objective, you get to choose an objective within the same category to replace it, which paradoxically makes rolling something you can’t achieve actively helpful. As a consequence of that, when building armies for this format it’s plausibly helpful to try and cram in all of MONSTERS, VEHICLES and PSYKERS if you can, because that makes it more likely that your opponent will be stuck with something hard to achieve in the moment rather than taking their pick of the best options from the category!
It’s also notable that many objectives check their conditions at the end of the Battle Round, meaning that going second can be a real advantage in achieving them, especially the ones concerning objective control. On an initial read it looks like going second can prove very advantageous in this format, and even more than normal you want to make sure you have some durable objective grabbers, so that if you end up going first you can make a resilient push into your opponents territory if they roll up a stack of objectives related to keeping you out of it.
The majority of objectives give out five VP each, but each category has a “hard” objective attached to a roll of a 1 that gives you 8VP instead. Some of these are tricky but still very doable, and when you think you can potentially pull one off you have the option of using the Standing Orders strategy to change one of the objectives you roll up to the “hard” objective for the category.
That brings us on to stratagems, and you have three more you can use besides Standing Orders, all of which cost 1CP. Fixed Determination lets you hold on to an objective from the previous round, New Intel lets you switch out one of your categories, and Quick Thinking lets you add or subtract 1 from your roll on an objective table. All of these feel helpful and are competitively priced, and proper use of them is likely to be key to success.
The final thing about objectives that diverges from other mission types is that, in Maelstrom, objective markers are both player placed and numbered – and that deserve its own section.
Deployment and Objectives
For anyone feeling nostalgic for 8th Edition, this is for you (even more than the rest of the rules here). Maelstrom missions don’t use fixed maps or objective placements. Instead, after rolling up which mission you’re playing, you randomly determine one of three deployment maps. No massive surprises here – the three choices are the old standbys of Dawn of War (long edges), Hammer and Anvil (short edges) and Search and Destroy (quarters). Nothing revolutionary, but it ensures there are a lot of possible combinations of mission and maps.
The other thing that spices stuff up is player-placed objectives. In a Strike Force mission, after determining the map, and who will be Attacker/Defender, players alternate placing three objective markers on the table each (starting with the Defender). These cannot go in deployment zones, within 3” of the battlefield edge or within 12” of any other objective, and a maximum of three can be placed in each player’s “territory”, which is their half of the table (obvious for H&I and DoW, and split by a diagonal line corner-to-corner for S&D). Once all the objectives are down, the defender picks a deployment zone, then each player numbers the objectives in their territory 1-3 (some Tactical Objectives refer to specific numbers in a specific player’s territory). Incursion shrinks these numbers down to two objectives per player.
In 8th there was a reasonable amount of strategy in how to place objective markers, but here this may be one of the areas where some revisions are needed before these rules leave beta. While objectives cannot be in a player’s deployment zone, there’s nothing stopping you placing them right on the edge, and even on Hammer and Anvil the 12” gap isn’t enough to stop you just lining the border of your deployment zone with them.
“Aha!”, you say, “but can’t you place one in the other half of the board miles away from the deployment zone?”. Technically yes – but because the defender both places the first objective and chooses their deployment zone, there’s no way to be sneaky about it. If you’re playing an army that wants to fight for the mid board you certainly can force some of the objectives to be more mid-table, because by placing one far from a deployment zone you can essentially force the opponent to mirror that at some point or get an inferior table half. However, the way things hash out the Defender ends up with the double whammy of having more agency to “force” this than the Attacker, but also therefore a stronger motivation to just build themselves the perfect deployment zone border castle. We’ll see how this ends up playing in practice, but some stronger curation for a future version of these (e.g. “one objective in each deployment zone, all others 6”+ away”) might be needed to make things more interesting. This could also feed in to the varying objective scores – you could scrap the numbering in favour of having some higher/lower scoring objectives for holding your deployment zone objective/taking your opponent’s.
Ultimately, having this flexibility of setup does help contribute to every Maelstrom game feeling different, and while there’s some optimisation that could be made, preventing objectives from going in deployment zones at all does at least ensure they’re always at least somewhat accessible, and you won’t end up with games like those that sometimes arose in 8th where one player had two deep home objectives, and the other got to weep into their dice tray!
Missions
The final piece of the Maelstrom puzzle is the missions themselves, each of which has a mechanism for determining how many tactical objectives you generate, and from which categories.
Four of the six missions follow a similar pattern – at the start of the game you assign one category each as your “alpha”, “beta” and “gamma” categories, and randomly roll between these whenever you need to generate an objective. Each of these then has an additional conditions as follows:
- Territorial Control lets the player who controls more objective makers generate an extra objective each turn. This is OK – it can lead to some snowballing, but gives players a reason to be aggressive and dynamic even when their specific goals don’t otherwise require them to, so it’s a net positive.
- Ambitious Surge forces you to nominate one of your opponent’s objectives that they can score double on each turn. This is cool, and you love to see it, because it often gives players an incentive to gamble on making big plays for big points, exactly the kind of excitement Maelstrom should generate.
- Subterfuge and Interference lets you pick one of your opponent’s objectives to be unscorable each turn. This is not cool and you absolutely do not love to see it – several iterations on this kind of mechanic were tried in the 8th missions and it mostly lead to extremely dull, low-scoring games.
- Never Surrender gives the player who’s behind an extra objective. The random nature of Maelstrom tends to make a light touch of rubberbanding pretty positive, so this is nice to see.
EDITOR’S NOTE: You do generate four objectives each turn for Subterfuge and Interference before making one unscore-able so it’s not as bad as it looks. This is something we got wrong in our second playtest game.
The remaining two missions mix up the formula a bit. Complex Front still has you pick three categories, but you always just get one from each per turn.However, at start of the battle you secretly choose one of your categories, and objectives from it give you an extra five points (revealed the first time you score one from it). This gives some decision-making depth, though it feels like it could potentially be quite oppressive if very mobile armies choose the Territory Seizure category.
Last of all, we have the apparently mandatory ~Chaos Mode~ mission, wherein there are no gods, no masters and no pre-picked categories – every objective is randomly generated from the full list of 36. While some of us are scarred by encounters with previous incarnations of this kind of flavour (you know what you did Tactical Cascade), this one isn’t actually too bad because the other half of the mission is that Fixed Determination is free, so while your initial set of objectives is random, you can start to exert some control over them in subsequent rounds. This is honestly a good design combination – Maelstrom works best when elements that increase randomness are offset by those that mitigate it!
Overall, the mission set looks mostly fine, with the exception of Subterfuge and Interference, which feels likely to be a bit of a fun vacuum. Having to roll two dice (a d3 and d6) to generate each objective is a minor quibble with most of them, but five of the six missions looking good is a strong hit rate (and better than any of the Maelstrom sets printed in 8th).
Rob: Yeah, the D3, then D6 mechanic is entirely to replicate the effect of drawing at random from an 18-card deck and should be replaced by physical cards as soon as possible. Also I’ll say this about Complex Front: Because you always get one from each category, it’ll happen much more often that you get the same objectives as your opponents, which can be a good balancing factor – you will only see 15/18 objectives in any given game but you know you’re going to see 5/6 of each category, instead of potentially doing 6/6/3.
Wings’ Hot Tactical Takes
Momentarily, we will bring you not one but two battle reports fought with these new rules so you can see how they play out. However, it wouldn’t be a review without some spicy-hot first impressions, and based on a read-through of the rules, the following jumps out:
- Going second feels very strong. Many of the objectives are vastly easier as the second player.
- Having a good mix of keywords in your army is an active upside defensively, and in particular if you have some sneaky VEHICLE like a Thunderfire cannon you can hide behind a wall all game you make your opponent’s life way harder. The only reason not to do this is if you think you’re going to take Heroic Deeds or Eradication, which sometimes ask you do do things with specific units from your own army (which you can dodge if you don’t bring them).
- Mobility is even more powerful than normal, because the “positional” objectives feel like they’re a little bit easier than the kill ones. In particular, the Eradication category feels a little steep in what many of the objectives ask of you, with a particular lowlight being Break Their Will, which in Strike Force you can only score if six enemy models flee in morale. I literally cannot think of a game of 9th where 6 models have fled in a turn. Not one. Ever.
- Build your lists on the assumption that you need to be able to win when two objectives are right on the border of each deployment zone, as when the Defender wants this to be true, they can force it.
Is this accurate? Read on and find out!
How Do They Play? The Battle Reports
OK so we’ve talked about the rules, but how do these actually look when applied to a game? We played a couple of test games using the new Maelstrom rules to test things out.
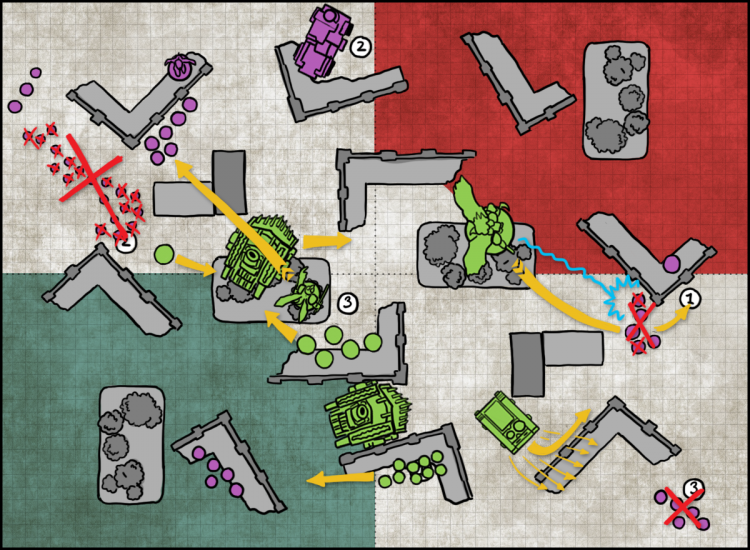
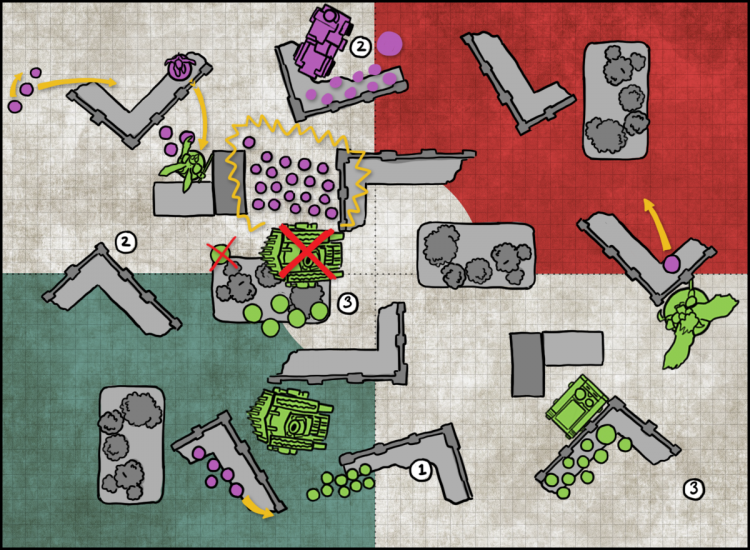
BATTLE REPORT: ROB vs. CONDIT
For our first test game I took my Death Guard up against Warlord Wednesday author Condit, who was bringing his Iron Hands. Condit’s list is attempting to make a Gladiator work. It’s a noble goal, but a doomed one.
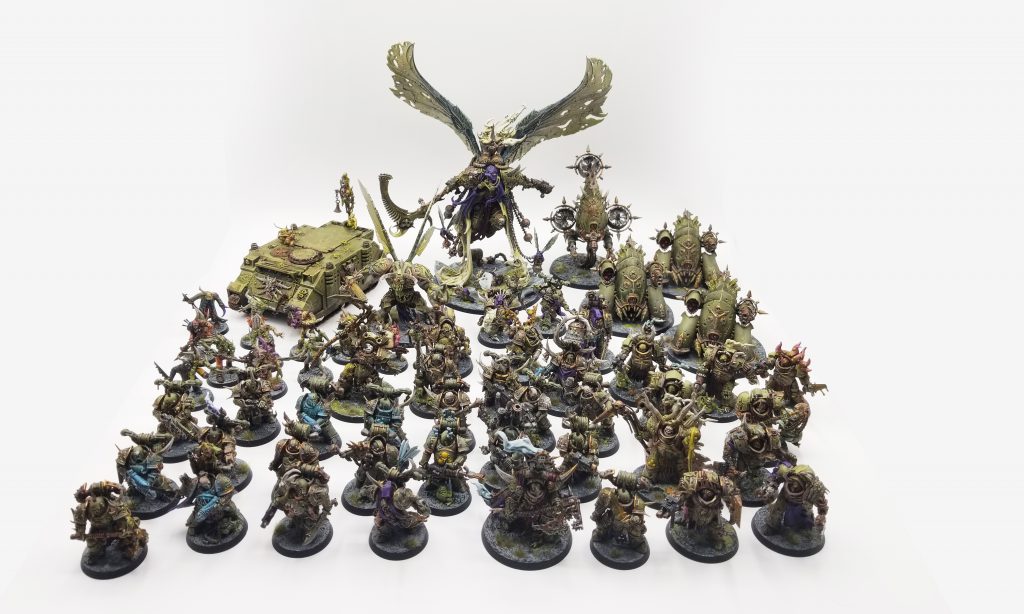
Death Guard by Rob - click to expand
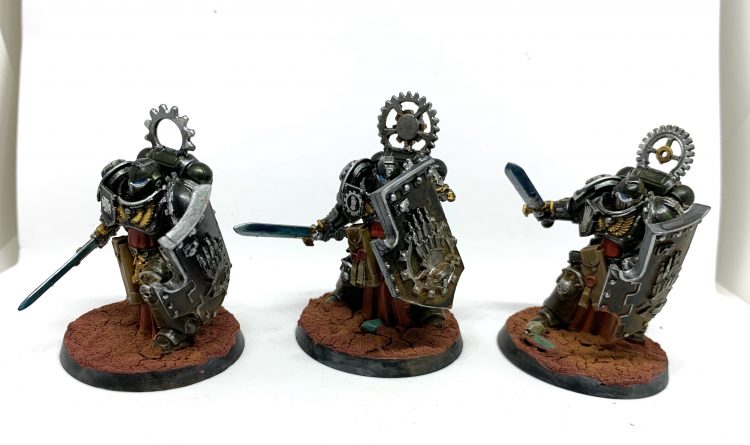
Iron Hands by Condit - click to expand
THE MISSION
For this game we rolled the Complex Front mission. This one seems like one of the higher-scoring missions; it has players generate one objective from each selected category per battle round (something that will be a little awkward with cards). At the start of the game, each player secretly chooses one category that, every time they score an objective from that category, they score an extra 5 points (you reveal which category you picked the first time you score an objective in that category). Condit and I both chose Holding the Line as our Overriding Orders for these extra points.
DEPLOYMENT
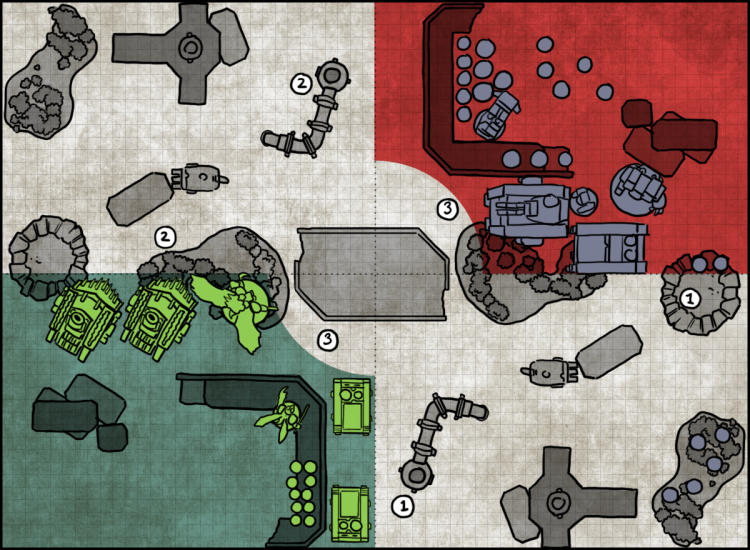
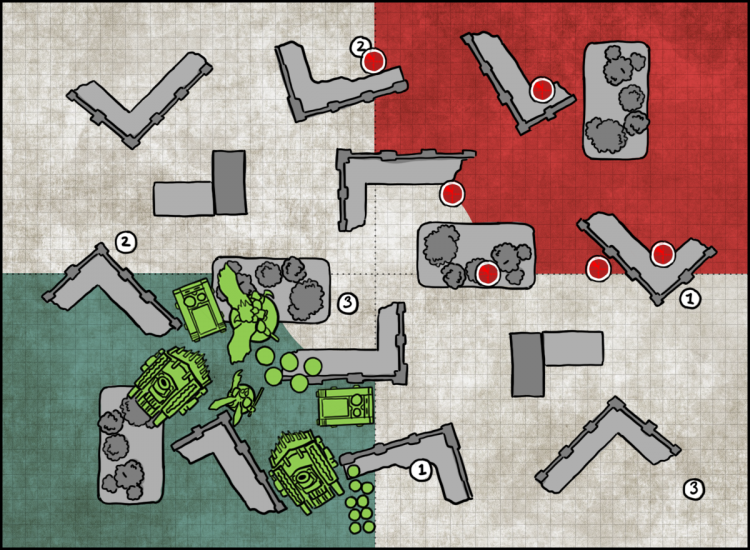
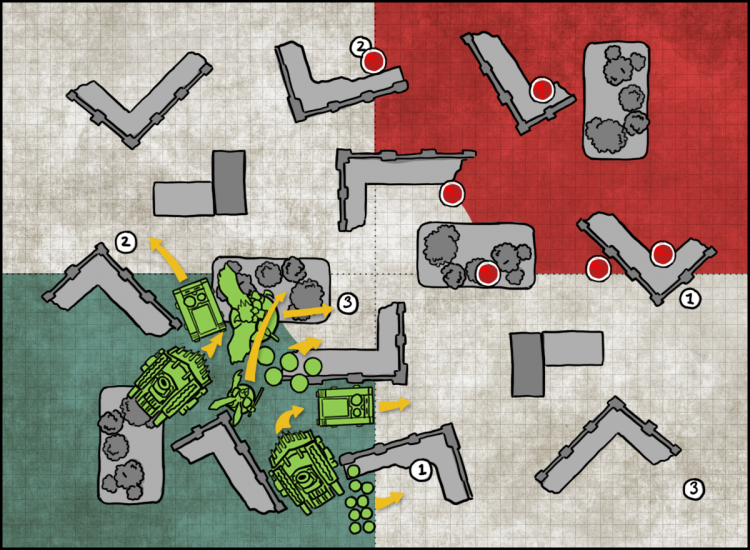
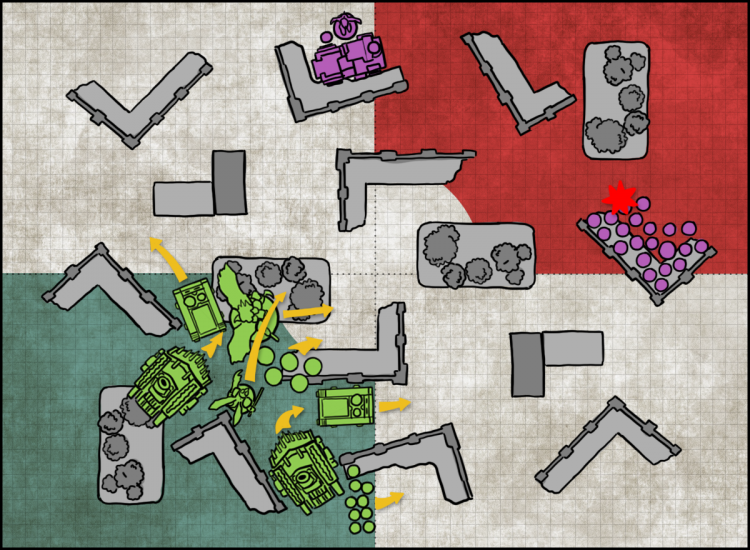
We roll and end up with Search and Destroy Deployment. My categories were Holding the Line, Eradication, and Heroic Deeds, while Condit chose Holding the Line, Eradication, and Brought Low.
There isn’t anywhere for Mortarion to hide on this table but my experience so far is that it’ll take more than Condit has to take him out unless he’s really lucky and even then it’ll leave him stuck leaving the PBCs untouched and they’re more than capable of cleaning up eradicators and other vehicles.
BATTLE ROUND 1
OBJECTIVES
Rob
α – Holding the Line: Push Them Back (score 5 VP if you destroyed an enemy unit had any models in your territory that turn)
β – Eradication: Decimation (score 5 VP after any phase in which you killed 20+ models)
γ – Trading Blows (score 5 VP if a character destroys an enemy Character)
Condit
α – Holding the Line: Push them Back
β – Eradication: Decimation
γ – Brought Low: Coordinated Strikes (Score 5 VP at the end of a phase if an enemy Monster/Vehicle was destroyed and lost wounds from attacks by 3+ units)
Welp, this looks like a 0-point turn one for me and likely Condit as well – neither of these is real achievable, though Coordinated Strikes might be if Condit gets lucky and kills Mortarion on T1; he has the firepower to just barely get there.
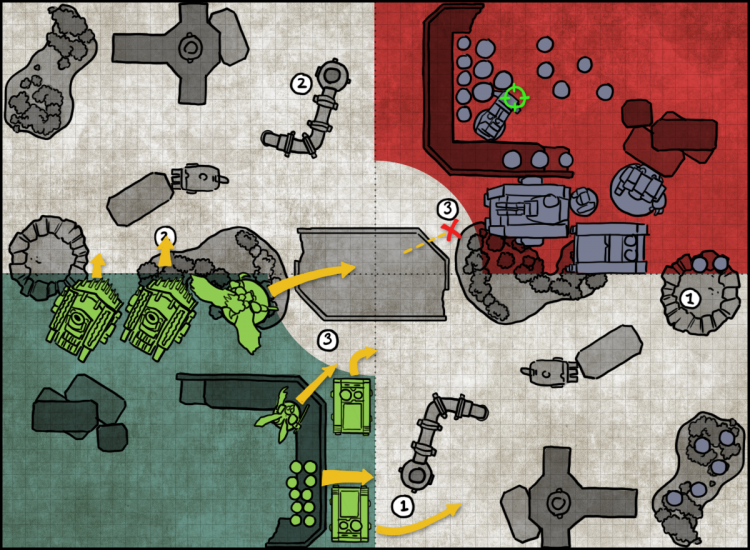
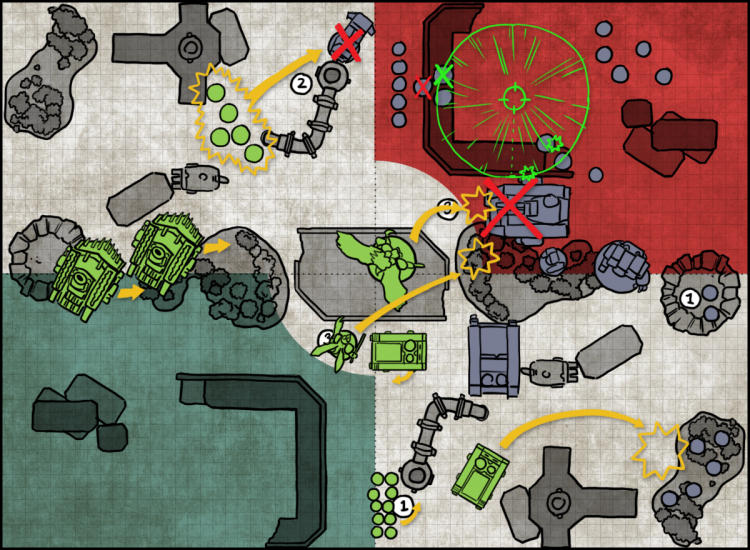
I win the roll-off and opt to go first. Hell yes, this is exactly what I wanted. I can fly across the middle of the table and get off a fairly short charge with Mortarion to hit Condit’s Gladiator, and in doing so, I’ll wipe off a major chunk of his army and leave him crippled when it comes to responding. I also opt to take The Droning as Mortarion’s extra plague, as this will mean I can essentially trap Condit’s army in his deployment zone if I can get off Gift of Plagues with Mortarion, and prevent him from spreading out to capture more objectives.My dastardly plan is to drop a Blight Bombardment in Condit’s deployment zone and use the Droning to pin units in place, forcing them to Advance if they want to avoid mortal wounds. This will screw over a lot of units and help protect Mortarion and other units in my army.
Rob’s Turn 1
Of course it all goes to shit when Mortarion fails to cast both Miasma of Pestilence and Gift of Plagues, then whiffs on a 6” charge twice, rolling a 3 on the frist attempt and snake eyes on the CP ro-roll. God dammit. Well, at least I can still force him to move a bit with his units, and I’m able to pick off an eradicator with a PBC. The Blight Bombardment isn’t going to be nearly as nasty with only 9” of Droning range.
Condit’s Turn 1
Condit’s Turn 1 and his big considerations are trying to kill Mortarion (possible, but likely a mistake), and getting his guys out of the way of the Blight Bombardment. He advances his Infiltrators to get them out of range, but leaves the Eradicators moving normally so he can fire the 3 surviving ones at Mortarion, and he opens up with the Gladiator. The good news for me here is that Morty survived with 6W remaining. Now I am definitely going to kill that stupid Gladiator.
Score: 0-0
BATTLE ROUND 2
A scoreless first battle round (I think those will still be common in Maelstrom), but things are gonna heat up now.
OBJECTIVES
Rob:
α – Holding the Line: Hold Your Ground (score 5 VP if you control Objective Marker 2 in your territory)
β – Eradication: Crushing Strike (Score 5 VP if a vehicle or monster destroyed 1+ enemy units that phase)
γ – Heroic Deeds: Trading Blows (Score 5 VP if a character makes any attacks that destroy an enemy character)
Condit:
α – Holding the Line: Hold Your Ground
β – Eradication: Crushing Strike
γ – Brought Low: Crippling Blow (Score 5 VP if you bracket a vehicle or monster)
The first two objectives are layups for me; I’ve already got Objective 2 and so that’ll net me 10 points, plus Morty’s in great position to kill the Gladiator this turn. Condit is also in good position to score it on his end however, as even if I destroy that Land Speeder on his objective 2, those Infiltrators can just snake it from my Terminators with ObSec on his turn. He’s also very likely to bracket one of my units this turn and he’s likely to take out Mortarion with a Dreadnought to complete the trifecta. Let’s see how it goes.
Rob’s Turn 2
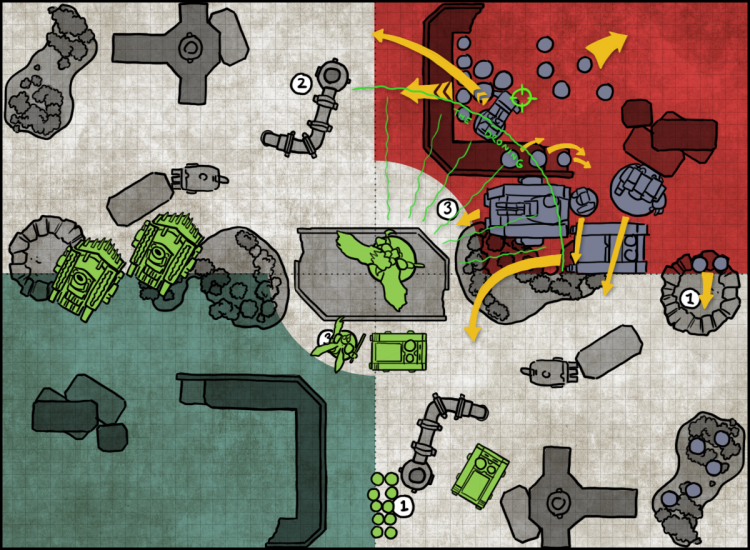
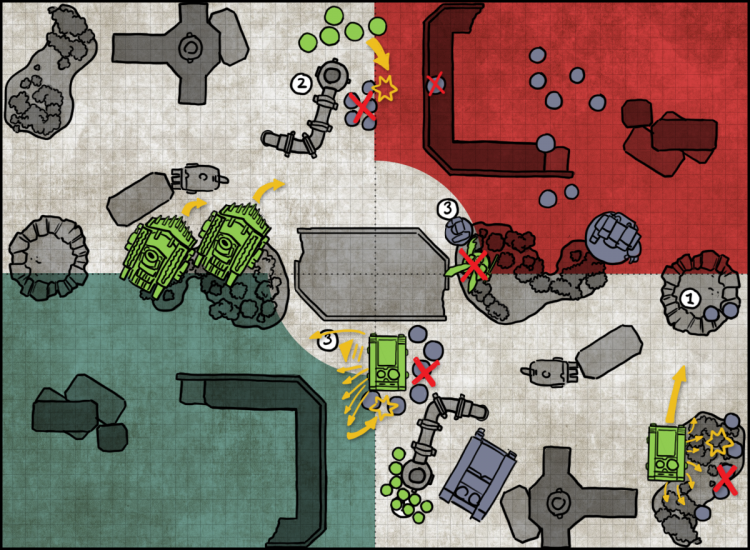
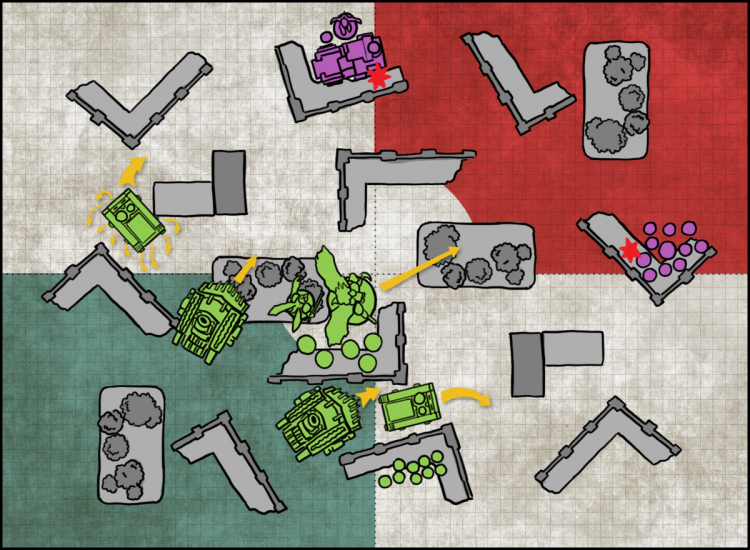
The Blight Bombardment hits and it’s… a bit underwhelming. I get D3 = 2 mortals on the Eradicators, killing another one, and 1 on the gladiator and a character. This is where having 12” Droning would have really paid off. Morty fails to cast Miasma and gets denied on Gift of Plagues but gets to live the dream of hitting three targets with Lantern by shooting the Redemptor, then charges the Gladiator alongside the Daemon prince and wipes it out. My Blightlords also arrive this turn and get off a lucky charge that lets them kill Condit’s land speeder while my Rhino charges his Infiltrators parked on the southern forest.
Condit’s Turn 2
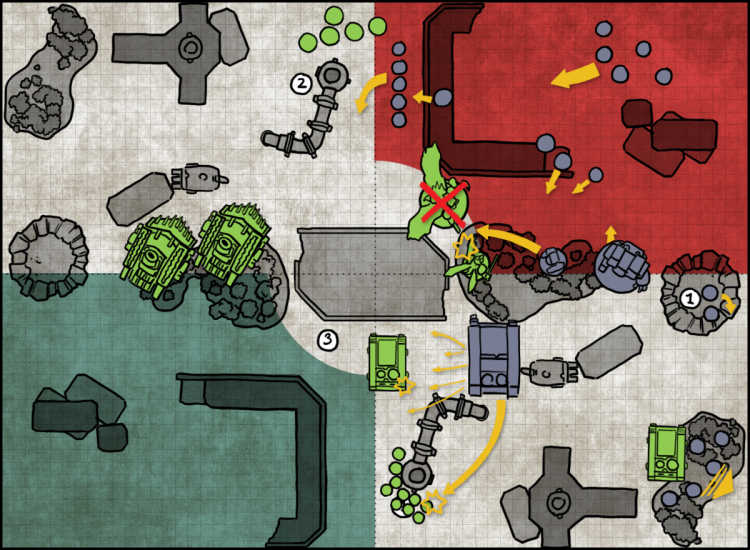
Condit’s Turn 2 sees him firing everything he has at Mortarion with the Dreadnoughts and dropping him to 1 Wound, forcing him to finish Morty off with fire from his Eradicator, meaning he won’t score 5 points for Eradication this turn. He still claims Objective 2 in his territory by moving the Infiltrators (10 points), and brackets Morty in the process of killing him (5 points), so at the end of T2 we have a 15-15 tie. He also disembarks his Bladeguard Veterans from his Impulsor and throws them at my Rhino, but isn’t able to kill it. He also charges the Daemon Prince with his Contemptor but isn’t able to kill it, denying him the final 5 points for Crushing Strike.
Score: 15-15
BATTLE ROUND 3
Now we’re talking. I’m in a great position here despite losing Mortarion. The biggest threats Condit has left on the table are the two dreadnoughts and while they’ll be stupid hard to kill, I’m confident I can wipe out everything else and really just outpace him on scoring. Condit decides to use the Fixed Determination Stratagem to keep the Crushing Strike secondary objective from last round, since destroying something with one of his two dreadnoughts seems like a layup.
OBJECTIVES
Rob:
α – Hold the Line: Never Give In (score 5 VP if you control Objective Marker 1 in your territory)
β – Eradication: Hit Them Hard (Score 8 VP if 3+ enemy units were destroyed that turn)
γ – Heroic Deeds: Leading the Charge (Score 5 VP if your Character kills any enemy units and made a Charge move or Heroic Intervention that turn)
Condit:
α – Hold the Line: Fall Back Position (score 5 VP if you control objective marker 3 within your territory)
β – Eradication: Crushing Strike
γ – Brought Low: Outmaneuvre (Score 5 VP if you control more objective markers in your opponent’s territory than your opponent).
Two of these are very score-ble for me. I can wipe out three units pretty easy, the Poxwalkers already hold Objective Marker 1 in my territory, and Leading the Charge is possible if I can kill the Primaris Apothecary with my Biologus Putrifier after charging.
Rob’s Turn 3
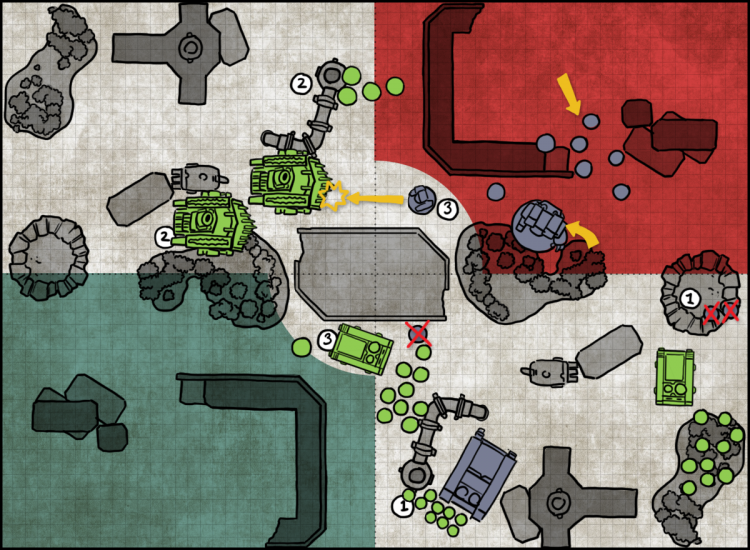
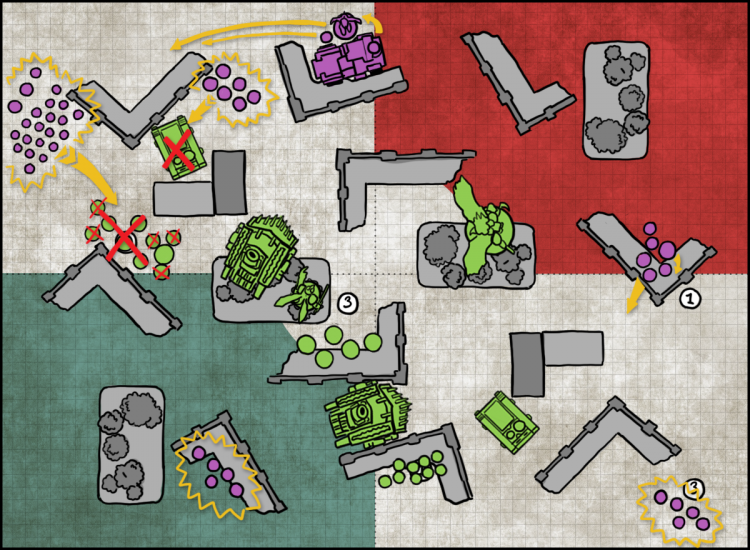
Bladeguard Veterans can be really nasty, but Plague Marines are more than equipped to handle them with the ability to put out a lot of low-AP attacks and extra mortals. I Fall Back with the Rhino and use the plague marines to drop one BGV in shooting, then I kill the rest on the charge with help from the Putrifier, who unfortunately fails his charge on the Apothecary. The Daemon Prince gets mulched by the Contemptor, scoring Condit 5 points for Crushing Strike. Meanwhile, I’m able to wipe out the Infiltrators and last Eradicator with my Blightlords and Plague Marines. I score 10 points for Never Give in and between killing the Eradicators, Infiltrators, and BGVs, I’ve notched 4 units for Hit Them Hard and another 5 points.
Condit’s Turn 3
Condit retaliates on his turn but it’s a losing battle. I’ve left a PBC too close to the Contemptor and its able to charge in and turn off some of my remaining shooting. Meanwhile, his two company veterans open up with plasma at my damaged rhino, both fully engaging bravery mode, and… both die to supercharging. Woof.
Score: 33 – 30
BATTLE ROUND 4
OBJECTIVES
Rob:
α – Hold the Line: Fall Back Position
β – Eradication: Expunge the Witch (Score 5 VP if an enemy PSYKER was destroyed that turn)
γ – Heroic Deeds: Savage Duel (Score 5 VP if you had a character do 1+ wounds to the enemy warlord).
Condit:
α – Hold the Line: Enemy Repulsed (score 5 VP if there are no non-AIRCRAFT enemy units in your territory that aren’t in engagement range of a unit from your army)
β – Eradication: Hit Them Hard
γ – Brought Low: Overwhelm (Score 5 VP if you control more objectives than your opponent).
Coming into battle round 4, the writing was on the wall. Although I’m technically able to score Expunge the Witch and Savage Duel, neither seems likely given where Condit’s Librarian is, but I’m definitely scoring 5 points for Fall Back Position, plus another 5 for scoring a Holding the Line objective. Meanwhile, Condit’s able to kill my Plagueburst crawler and my Blightlords with help from his Repulsor, but it isn’t enough to make up the gap.
FINAL SCORE: 63-40, Rob Wins
BATTLE REPORT: ROB vs INNES
For my second game I decided to take on Innes Wilson, a stellar 40k player and all-around good guy who’s always been a fan of the WTC format and was eager to test out the new Maelstrom missions as well. For this game I brought the same Death Guard list as before, and Innes brought a pure GSC army built around trying to accomplish the new objectives. Unfortunately, this meant he’d have almost nothing that could deal with Mortarion, and even taking out a PBC might be a stretch.
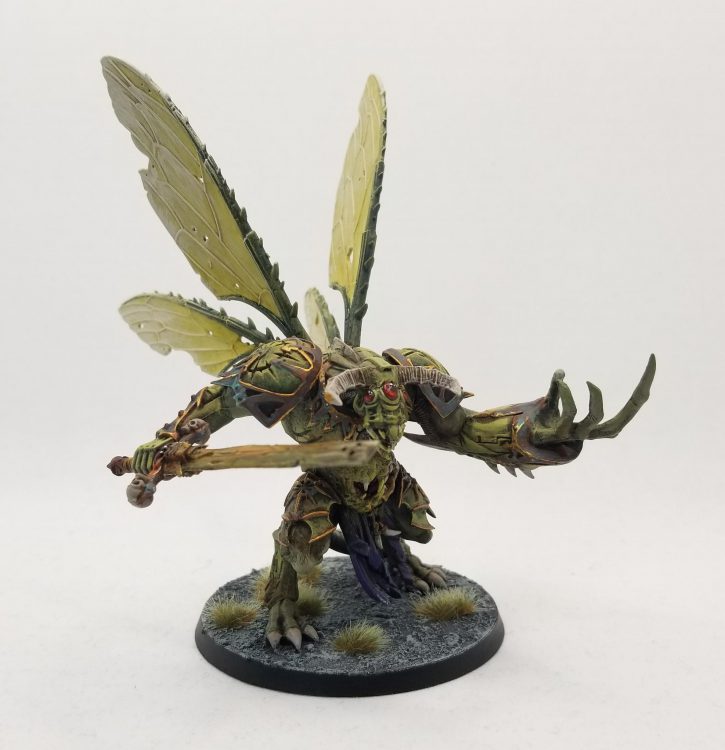
Death Guard by Rob - click to expand
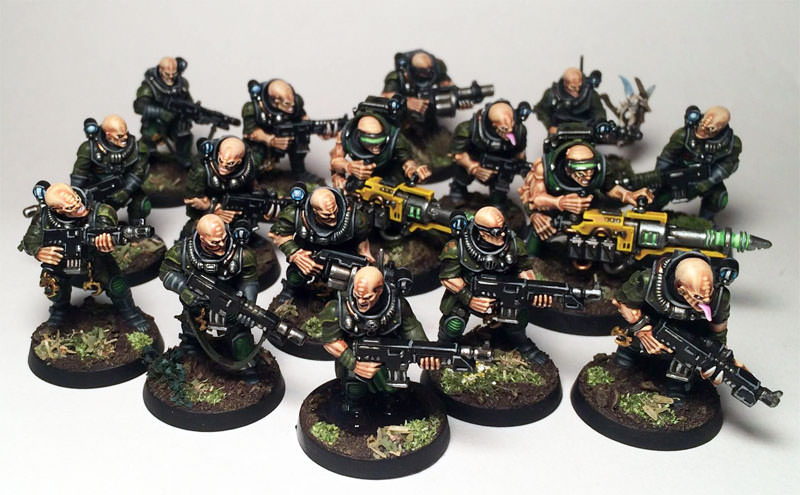
Genestealer Cults by Innes - click to expand
For this game we rolled the Subterfuge and Interference mission. This is almost the complete opposite of Complex Front, since the ability to just deny one of your opponent’s objectives each round means you’re going to have a very low-scoring game. Most rounds that’s going to be whatever is imminently score-able, which means your army needs to be able to score 2+ objectives per round to reliably end up scoring one.
DEPLOYMENT
We roll and end up with Search and Destroy Deployment. My categories were Holding the Line, Eradication, and Heroic Deeds, while Innes chose Raid, Territory Seizure, and Holding the Line. There’s literally nothing in Innes’ army that can deal with Mortarion and even the PBCs will be a stretch, so I’m not shy about pushing my guys up front. Innes wins the roll-off for first turn and not surprisingly, chooses to go second after dropping some extra blips on the table and putting some units in deep strike reserves. He’ll force me to push forward into nothing and hope to kite Mortarion all game.
BATTLE ROUND 1
OBJECTIVES
Rob
α – Holding the Line: Fall Back Position (Hold objective marker 3)
α – Holding the Line: Targets Held (Score 8 VP if your opponent does not control any of the objective markers within your territory)
γ – Leading the Charge
Innes
α – Raid: Storm the Line (5 VP if you control objective marker 2 in your opponent’s territory)
β – Territory Seizure: Take it Back (score 8 VP if you control an objective your opponent controlled at the start of the turn)
β – Territory Seizure: Lines Breached (Score 5 VP if 2+ non-Aircraft units from your army are wholly in your opponent’s deployment zone)
Innes quickly scratched Targets Held for me, which would have otherwise been a massive, easy slam dunk. I nix Take it Back but none of these are really score-able for Innes.
Rob’s Turn 1
I push forward with most of the army and scream at Innes’ army to show themselves, cowards. He puts his forward blip units back into reserves and deploys some acolytes, a Patriarch, and a Goliath. Welp, not much I can do with this. The PBCs shoot the acolytes, taking out 10 of them between shooting and morale. I also move toward some objectives to ensure I’ll be able to score those if they come up, and try to spread out a bit to mitigate the damage from some arriving units on T2.
Innes’ Turn 1
There’s really not much for Innes to do – he moves his Acolytes and then passes turn after he makes sure he’s out of charge range with most things. I end up scoring 5 points for holding objective marker 3 with Fall Back Position.
Score: 5-0
BATTLE ROUND 2
I’m already up 5 points in a game that will likely end 20-15. Good times.
OBJECTIVES
Rob:
α – Holding the Line: Enemy Repulsed (score 5 VP if there are no non-AIRCRAFT enemy units in your territory outside of engagement range)
α – Hold the Line: Hold Your Ground (Score 5 VP if you control Objective Marker 2 in your territory)
β – Eradication: Crushing Strike (5 VP if you destroy a unit with a vehicle or monster)
Innes:
α – Raid: Slay the Defenders (Score 5 VP if an enemy unit was destroyed that had any models in your opponent’s territory that turn)
β – Territory Seizure: Dominate (score 5 VP if there are 2+ quarters of the battlefield with 1+ units of your army wholly within them and outside engagement range of enemy units)
γ – Holding the Line: Push Them Back (score 5 VP if you destroy an enemy unit that had models in your territory)
Crushing Strike is easy for me so Innes kills it. Likewise I drop Push them Back, but I have to worry about both that and Slay the Defenders and I suspect Innes can get either if he wants. I’m slow as hell, so making him come to me seems like a better option.
Rob’s Turn 2
There’s still not a lot for me to do on this turn, thanks to the lack of viable targets and most being too far away. I take out a few more cultists with shooting and put some wounds on the Goliath. This is a lot bigger deal in a game where leaving the table like this for me would mean an automatic 15 points. Instead, best-case I’m scoring 5 points if I can hold on to objective 2 through an acolyte bum rush. I get out of my rhino and push the vehicle up to help spread out against the incoming deep strike assault.
Innes’ Turn 2
So much for that plan. The Acolytes drop in with an assload of hand flamers and push forward another D6”, easily wiping out the plague marines as they move onto Objective 2. The Acolytes make their charge into the rhino and wipe it out, but not before I use Putrid Detonation to put mortal wounds on them, the Patriarch, and the Acolytes (as well as 3 on my own PBC). Innes also puts two smaller units of acolytes in my territory and each table quarter.
Most importantly, Innes captures my Objective Marker 2, denying me 5 points, while he scores 5 for killing a unit in my territory.
Score: 5-5
BATTLE ROUND 3
Ok we’re tied, which isn’t ideal, but things are about to go my way.
OBJECTIVES
Rob:
α – Holding the Line: Push Them Back
β – Eradication: Decimation (5 VP for destroying 20+ enemy models in a phase)
γ – Heroic Deeds: Burn Them Out (5 VP for doing 5+ mortal wounds with psychic powers)
Innes:
β – Territory Seizure: Expelled (Score 5 VP if 2+ table quarters have no non-AIRCRAFT enemy units in them)
β – Territory Seizure: Dominate (score 5 VP if there are 3+ quarters with 1+ units from your army wholly within them and outside engagement range of enemy units
γ – Holding the Line: Enemy Repulsed
This is really bad for Innes – I can easily score all three of these. He opts to strike Decimation since that one’s the easiest, and I nix Dominate, since that’s the only one he seems likely to score.
Rob’s Turn 3
Between Curse of the Leper and Smite on the Daemon Prince I’m able to power out 7 mortal wounds and secure Burn Them Out in my psychic phase, as well as putting some hurt on the Aberrants. The PBCs and Blightlords make short work of the big squad of Acolytes on my Objective marker 2, while the other squad of plague marines piles out of my rhino and eliminates the small acolyte squad on my objective marker 3, helping reduce the footprint of Innes’ army on the table. I’m a little apprehensive about the Aberrants’ ability to wreck things, so I charge in with my Daemon Prince. His ability to ignore AP-1/AP-2 means he can tank a lot, and he lives up to it, taking only 4 wounds back after killing all but 3 Aberrants.
Innes’ Turn 3
Innes’ Nexos wants no part of Mortarion and falls back, while his other big squad of Acolytes arrives and makes me realize I’d gotten a bit too cocky about the PBCs’ toughness and I lose one to hand flamers along with my Biologus Putrifier. Meanwhile the Patriarch charges in to help the Aberrants, but bounces harmlessly off the Daemon Prince, who manages to tank a stupid number of wounds before finishing off the Aberrants.
I score both of my objectives to net another 10 points.
Score: 30-10
BATTLE ROUND 4
At this point, the game is firmly in hand for me. I’m easily able to wipe out the remaining Acolytes with the other PBC and the Blightlords, Mortarion will have two turns to make it back north, but mostly there just isn’t anything Innes has left to score with. I pull an easily score-able Holding the Line objective plus I can potentially score another 5 using the Blightlords Stratagem to give Innes -4 to Ld after losing a model in melee. Innes has nothing score-able on his end and Turn 5 yields another set of score-able objectives for both of us, leading to a final score of 30-10.
FINAL SCORE: 30-10, Rob Wins
Our Thoughts on the New Rules
 Robert “TheChirurgeon” Jones
I too have always had a soft spot for the Maelstrom rules, which is why I jumped on the opportunity to test the new rules out. Here’s the big thing: Rolling for objectives sucks. It’s time-consuming and the hoops they have to jump through to make them work aren’t great. I’d much rather try this with decks of cards, where generating random objectives and not having replacements will be trivial.
On that note, one thing that irks me is that it’s still very possible to choose objectives that you can’t score – any Necron or T’au player picking Heroic Deeds is essentially playing with a 17-card deck because they’ll automatically discard Burn Them Out every single game. I’d rather see these lists expanded to 7-8 objectives per category and then let players pick the 6 from each they want and if you draw something that you can’t score, you don’t replace it. This is only really possible when you’re using physical cards instead of rolling but I am not convinced anyone ever played Maelstrom without cards and if they did, they almost certainly didn’t enjoy it much. I think this would also make the objective selection aspect feel more tactical without the need to add in a bunch of faction objectives that will almost certainly be ignored.
I’m not as convinced as Wings that going second is a massive advantage. I think it helps, but I’m of the mind that it balances things much more evenly toward a 50/50 skew, which is important given how valuable going first tends to be in 9th edition already. If the skew for Maelstrom is even 48/52 going first vs second, that’s pretty fine by me.
Overall these feel much more tactical than 8th edition Maelstrom missions and I like the way they played, though I wasn’t a huge fan of either specific mission I ended up playing. Of the two Complex Front felt much swing-ier, though the mechanic of generating one objective from each category every turn was interesting. Subterfuge and Interference probably needs some tweaks because it feels like it’s very hard to come from behind on and there were too many turns where nothing was scored.
One thing I think it’s worth noting is that I’ve already seen the casual players in my groups chafe at the prospect of choosing secondaries in 9th edition games. While I urge them to try playing with secondary objectives, I think Maelstrom definitely has the opportunity to be a better middle ground for them, letting them have some control to make them feel as though they’re tailoring objectives to their army while simplifying the decision from “I need to take these three specific objectives” to “I’ll probably want to do these three kinds of things.”
Innes Wilson
Having been a big fan of previous versions of Maelstrom, it was interesting to see a format that took some of the better aspects of the end of 8th maelstrom missions with a much more cut down deck, being effectively only 18 cards in 5 of 6 missions with a lot of selection options. The objectives tend toward either killing, or end of battle round scoring, and I think the split is about right for first and second turn, with each having an advantage in one of the categories. The player going first is going to have an easier time getting to objectives and gets to have a bit more of an alpha, while the second player doesn’t have to survive a turn to score the end of battle round missions.
I played Genestealer Cults with the hope that their shenanigans and easy objective stealing would work out, but due to the forcing of objectives to all be in neutral territory there was no real incentive to stay in deployment zones, or to defend your own and most of the action is going to happen in the middle. This is exactly what GSC doesn’t want so I don’t think they come out as ahead on the missions as I thought going in. The objectives all being forced to the middle is the biggest criticism I have of the format and I think it would benefit from something like requiring you to place 1 objective in your deployment zone, 1 objective in your territory and 1 in your opponent’s deployment zone to spread where the game happens a bit. In Deployments such as Hammer and Anvil or Dawn of War I could see the game becoming very compact and heavily favouring close ranged assault armies as it forces your hand significantly.
The objectives themselves are interesting, on balance I thought that having options like [Raid/Territory Seizure/Holding The Line] as a set of 3 objectives would allow you to play a very non engaging game, but the objective placement and some of the missions requiring you to clear the center, table quarters etc does mean you have to have a non-trivial damage output element (and GSC really suffer on this, another reason the missions aren’t ideal for this army!). It’s still a concern I have though as a more powerful mobile army like Harlequins may really be able to abuse this set of options.
Finally there’s an old classic of “include a vehicle with a damage table” to make sure your opponent isn’t able to auto discard that objective which can lead to some odd design choices in list building. A backfield Whirlwind or Nightspinner in an otherwise vehicleless list can make scoring a real pain for your opponent. I like this mission driven list design but it’s definitely something to be cautious of overloading on such as if there were similar objectives for fly.
Overall, it’s a very different feel to the original missions and I’d like to have seen something a little more true to the original, although I think that may just be down to my feelings on objective placement and having to roll dice for objectives instead of using cards, which was a little clunky.
 Wings
Wings
I’ve always had a soft spot in my heart for Maelstrom, as the ITC format didn’t really fully conquer the UK till 2019 so I’ve played a lot of games with them competitively, and I’m glad to see them back. My overall take on these is that they’re a promising start, with definite space for improvement. What I like about them is that they’re a pretty clean set of rules that definitely generates playable and reasonably dynamic games out of the gate. Bluntly, 8th Edition Maelstrom had some real problems with rules jank where it felt different designers and missions had very different expectations of how games would play out, and the faction-specific objectives (mercifully not present here) only made that worse.
This time around there’s a clear, coherent design at play and thought has been given to ensuring this is a functional, competitive format. Where it currently doesn’t quite get there is on the balance – I think the objectives as they stand are tilted too hard towards positional play, and that means that a mobile army that gets to go second is going to be outrageously advantaged a lot of the time. Heroic Deeds and Eradication both need some of their objectives re-written, and I’d be keen to see some sort of curation in which categories you can pick – specifically, I don’t think it should be possible to take all three of Raid, Territory Seizure and Holding the Line. Also, Subterfuge and Interference should be staked through the heart and buried at a crossroads at midnight. If you must have that mechanic, I would modify it so that the player who is behind can choose whether it happens each round or not – as it is it tends to let a dominant player steamroll.
Ultimately these are modest quibbles at best, and I’m keen to see more done with these rules – while I’m not convinced they’ll supplant GT missions, there’s definitely the seed of something good here.
 Garrett “John Condit” Severson
One of the things I’ve always liked about Maelstrom is the changing priorities turn to turn, and these do a pretty good job of making that happen while still giving you some control over what’s going to come up from turn to turn. That allowed me to try to mitigate the downsides of playing with a less mobile force by focusing on objectives that didn’t require me to push hard into Rob’s side of the table. I do agree that there needs to be a different way of generating the objectives once you’ve chosen your categories, though – being able to game your scoring by just not bringing units necessary to score certain objectives seems weird.
I’m looking forward to playing these missions again, this time with a different list. Not only do I need to drop the Gladiator – as cool as the model is, it just doesn’t get there from a rules perspective – there are a few choices in there that are really there to do things like sit on objectives or deploy scramblers in my opponent’s deployment, which are useful in the GT mission pack. But since the Maelstrom objective sets give me a degree of control over how I score points over the course of the game, I think I probably have some room to lean a little further into the core ideas behind the list. So while I agree that these rules aren’t quite fully baked yet, I am curious to see what new directions people decide to go when building lists to play these missions.
Final Verdict
We’re on the whole happy to see Maelstrom rules return. They’re a dynamic set and many of us like the idea of combining mission tactics with a bit of deckbuilding. At their best, Maelstrom rules create a dynamic game where your priorities shift turn-to-turn, making things more like a puzzle with lots of different risk-reward choices to consider. These rules are a big step in the right direction and with the right tweaks could make for a tactical, balanced alternative to the GT missions in competitive play while offering a game mode that’s a bit easier to step into for casual players who find the objective selection of 9th edition missions daunting.
At the start of the White Dwarf article on the Maelstrom rules, they present three scenarios:
- The missions are good to go and will form the foundation of a new mission pack
- The missions are decent but need some generally accepted modification before appearing in a mission pack
- The rules aren’t ready for prime time and need a rework
We’re solidly in the “2” camp right now as things stand – these are a good foundation to work on, but they need a bit of testing and further tweaks to really make them something special. Wings is a bit more bullish – 1.5 for him.
They’re worth testing with your group and once you do, let the GW team know what you think about them!
That was a lot! That wraps up our review of the Maelstrom missions, but we’ll likely have more thoughts and battle reports about them in the future – stay tuned! Also if you have any questions or feedback, drop a note in the comments below or email us at contact@goonhammer.com.
