Note: This Article was written for the 8th edition of Warhammer 40,000 and has yet to be updated. While many things may still work, the rules have changed fundamentally in 9th. As such, we recommend that you proceed with caution.
Do you know what’s terrible? Your models dying. It is said that the Emperor sheds a single tear whenever a brave solider of the Imperium dies, which is an admirable show of restraint because losing models sucks, especially when it’s that brand new unit you just finished painting and your grinning opponent makes a point of blowing them off the board first.
Jerk.
Unfortunately, while losing models sucks it’s also inevitable – there’s almost no amount of cunning that will get your army through a game totally unscathed, and a few among your loyal plastic legions are going to have to be sacrificed to ensure victory for the Greater Good/Greater Bad/Greater Bug (delete as applicable). That isn’t going to stop it stinging a bit though, and it’s only natural to try and mitgate that pain with most soothing balm there is – screwing over your opponent. Luckily, tactically removing casualties, specifically from multi-model units, provides you with a surprising number of ways to do that. This is one of those areas where getting it right can hand you little bits of incremental advantage that will build to an increased win rate over time, so today we’re going to blast through the key ways you can squeeze some upside out of your losses.
The Rules
Obviously to plan out our tactics we have to know what’s actually allowed. Luckily, the process here is relatively simple. When a unit suffers a wound, you have to allocate it to one of your models. If your unit contains any models that have already lost one or more wounds, you have to allocate it to them. Otherwise, you can allocate it to anyone – it doesn’t matter if only some of your models were in range of the shot or attack, you have free range to put it on whichever model most suits you.
Once you’ve assigned the wound, you make a saving throw and then take damage if you fail it. If that reduces you to zero, the model is gone. Dead models can leave a unit no longer in unit coherency (i.e. every model within 2″ of at least one other) and that’s allowed – but it does mean that from then on a unit can only move (including pile-ins and consolidation) if they can re-establish coherency.
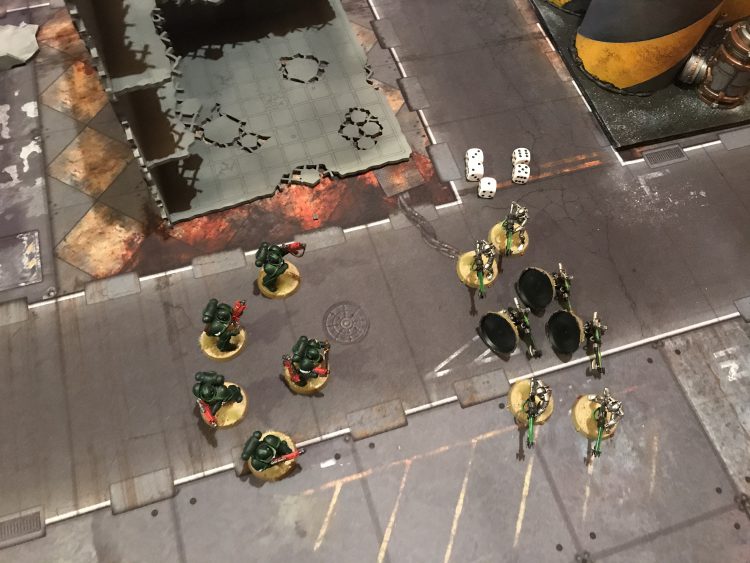
For entirely homogeneous single-wound units this allows casualty pulling to be done as part of fast dice rolling – just work out how many failed saves and take out that many models, as in 99% of cases it’s a safe assumption that you would have just assigned the wound to whichever model was the most advantageous for you to lose in turn.
The complexity goes up very slightly when you have some special models, like a unit sergeant. For units where a sergeant’s defences are the same as everyone else’s, most players still just fast dice roll it and assume the sergeant would be the last model pulled, unless there’s a specific reason why you might want to lose them first. When playing with a unit like this, it’s important to try and make sure your better models (sergeants, anyone with a special weapon) are in the positions where you’d be inclined to take casualties from last – it always sucks to realise that it’s tactically correct to pull a lovingly converted veteran to pull off one of the tricks we’re going to cover.
There are a few more considerations when dealing with either multi-wound or mixed save units. Multi-wound units have to lose wounded models first, but will sometimes get a chance to move between the point where they become wounded and eventually expire. In this case you want to do the opposite to what you do with sergeants – when moving, position the wounded model so it’s in the ideal position to die first.
Finally, with mixed save (or more rarely, mixed wound count) units the fact that you technically pick a model to assign the wound to before rolling a save, and then lose that model when you fail becomes way more important – so consider the kind of save you’re likely going to want to roll first when doing your positioning.
Our takeaways here are:
- For units where every model is the same, pull whoever you like as long as you can re-establish coherency.
- For units with a few special models, make sure the ones you want to keep alive are in the positions you’d want to lose last.
- For units with mixed defences, make sure the ones with the stats you most want to use are in the positions you’d want to lose first.
- For multi-wound units, manoeuvre wounded models into the positions you want to lose first.
Moving Defensively to Maximise Your Options
Before we talk about specific ways you can use casualty removal to your advantage we should cover a critical point that’s going to help with everything that follows – how to move in such a way you have the most options available to you.
For all intents and purposes, removing a model from a unit moves it. Any sort of hostile interaction with your units require your opponent to reach one of the models in it in some way, whether that be getting them in range of a gun, or charging in and attacking them in melee. Taking a model out of a unit removes a place where your opponent can do this, and so in terms of it being a target it moves the unit. Like any movement, the more of this you can do the more you can achieve with it, and you want it to be in the right direction. You can set yourself up for this in the movement phase by doing three things:
- Put the minimum number of models possible into hostile space to achieve your goals.
- When you have a good reason to entire hostile space, put your models as low a distance into it as you can while still allowing them to operate.
- Space out your models as much as possible when they’re in hostile space (as long as that doesn’t expose you to wraps).
Hostile space, here, is a term I’ve decided to invent (patent pending) to describe any part of the battlefield where it would be advantageous for the models to no longer be once your turn is over – usually because it puts them in danger from enemy attacks. During your turn you may well want to move to certain positions, whether it be to get your own attacks into range or to grab an objective. Once your opponent starts acting, however, close range can start to feel like a dangerous place to be, and the fewer models you need to remove to get back out of there, or to pull off some of our tricks, the better.
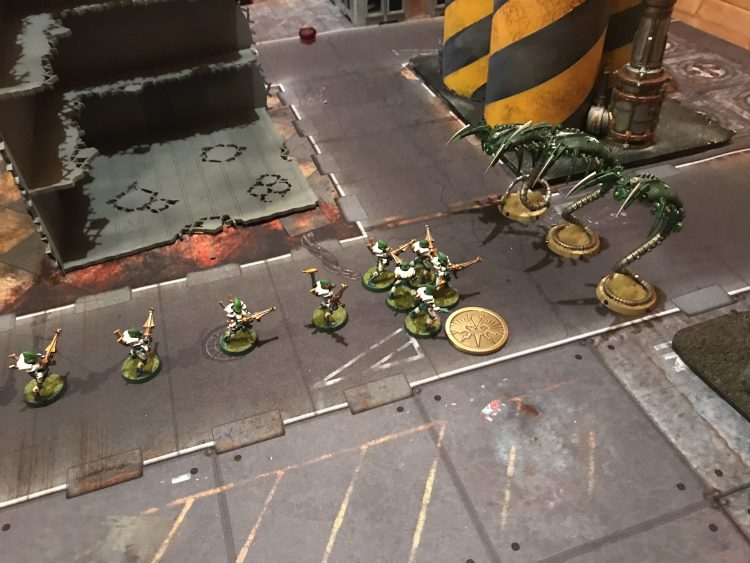
The easiest configuration to visualise (and often use) these principles is the “daisy chain” – a single-model wide line extending out from the main body of the unit with maximum coherency between each model. This is often used with objective-secured troops to reach out and grab an objective at the end of the turn or battle round, as it provides a lot of reach and can also be very quickly retracted once models start dying – even with 25mm bases, every model that dies allows you to pull the chain back by nearly three inches, allowing you to rapidly make a dramatic change to where the unit is on the board.
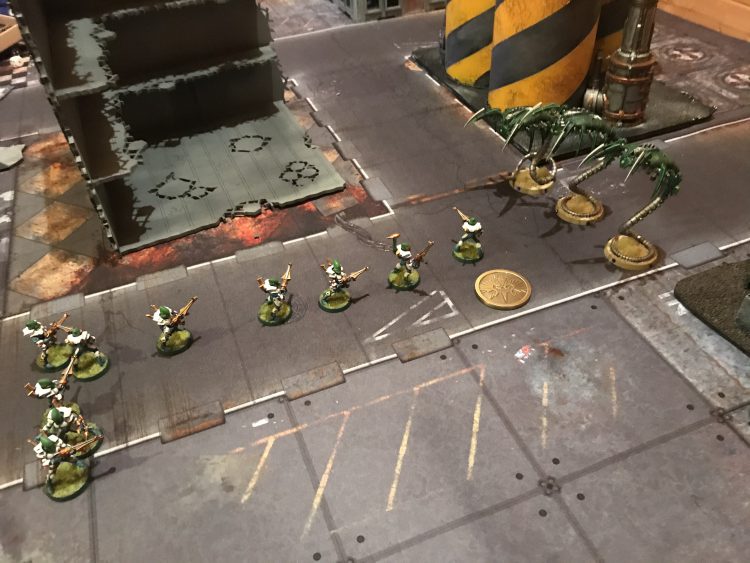
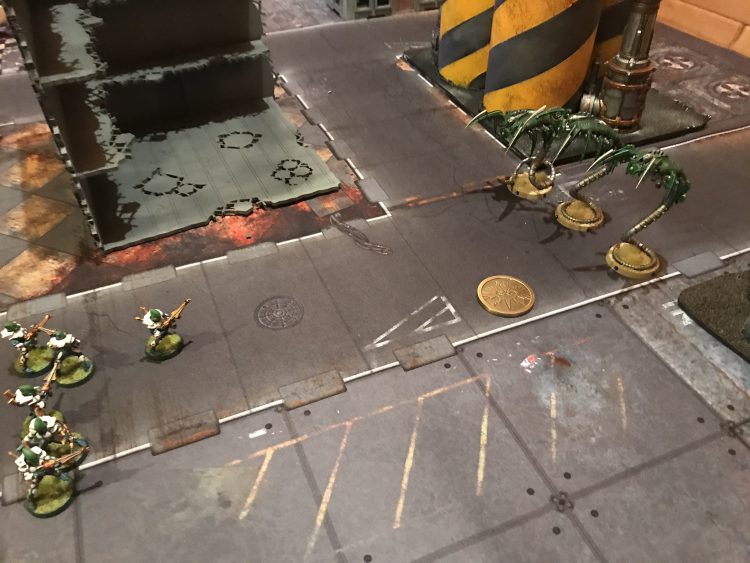
You can’t do this nearly so easily if you’re sloppier about positioning your models and cluster them up in dangerous places. This can substantially increase the damage you have to take before you can meaningfully alter a unit’s position, which can lead to pointless additional casualties. This is, remember, a very bad thing that you do not want. Just so we’re clear.
Now, important caveat for this section before we move on – this advice does not apply all the time. In general, the rules of thumb above are aimed at ranged threats or screens that are trying to operate relatively defensively while still either shooting with their own weapons or grabbing an objective. Board control units or push threats derive some of their value from pushing into hostile parts of the board, and they’ll often need to disregard some of the above – as can any army when a close-range slug fest looks likely to favour them. Even then though, keep an eye out for how you can use some of the tricks to shut down specific options your opponent might have, or set up a defensive flourish that takes advantage of the terrain.
TheChirurgeon’s Note: Sometimes you can move offensively as well — a common trick with Pink Horrors is to leave yourself a few reinforcement points so that when an opponent fires Overwatch at your unit and kills a horror, you can place the new blue horrors that spawn within coherency (2″ of the unit of horrors), allowing you to get 2″ closer before rolling your charge roll.
With all that done on to the tactics themselves!
Removing Ranged Casualties
Range Dodging
The original, best and largely pretty obvious casualty trick is using the removal models to pull yourself out of range of other units in your opponent’s army. The weapons in a given unit have to be in range of your models at the time the unit is chosen to shoot, so if your opponent has multiple units with short-ish range that all want to open up on your models, and you’ve been careful to position your models as above, there’s a good chance that when the dust settles from the first unit firing you’ll be able to keep the survivors out of range of the second.
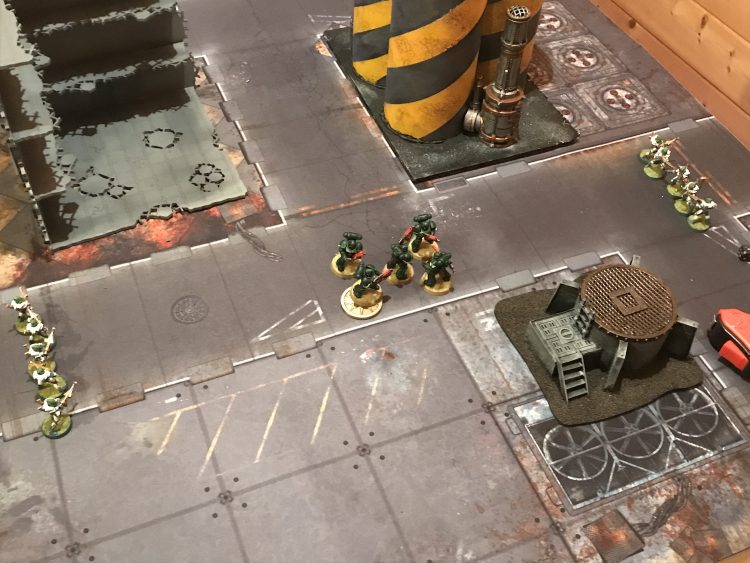
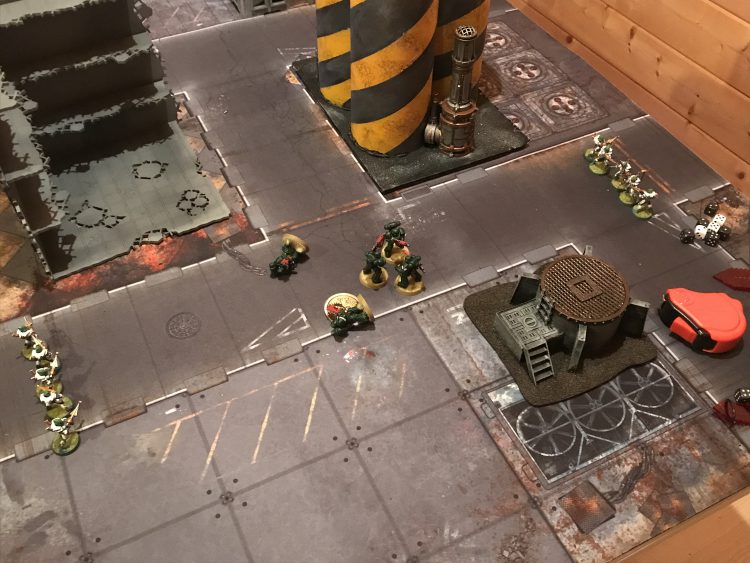
The extra, habanero spicy version of this is using casualties from the psychic phase to pull your units out of range for the subsequent shooting phase. Smites are a lot harder to control than shots because they have to go into the closest target, so if your opponent doesn’t plan ahead this can be a huge punish.
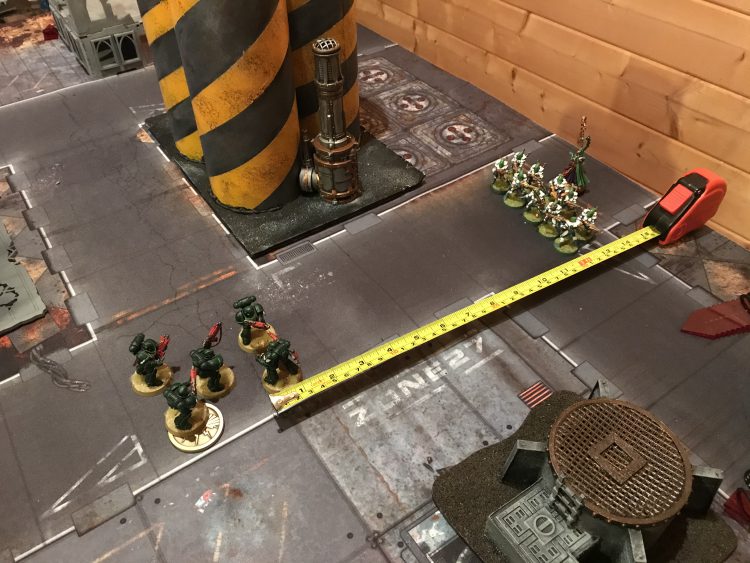
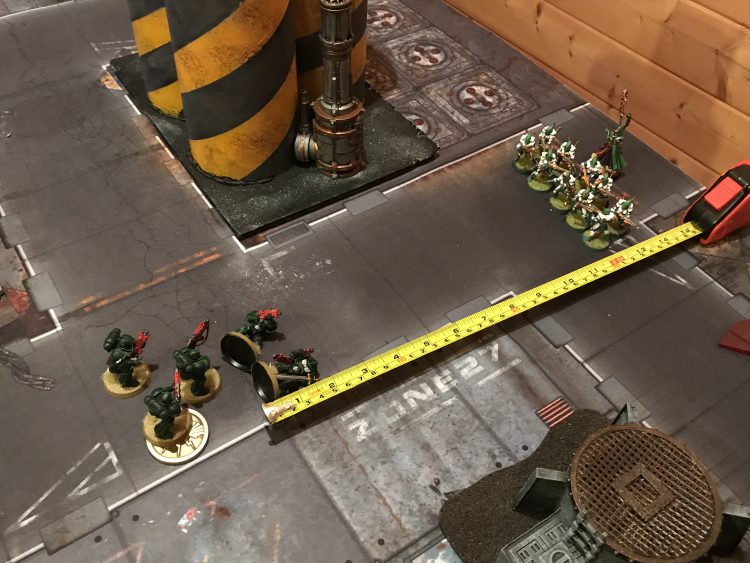
From the other side of the table, if your opponent is setting up cagily then plan your shooting ordering out before you start rolling. Lets imagine you’ve got a 5-shot unit, a 10-shot unit and a 20-shot unit, all planning to shoot the same target, and all with no other options. Unfortunately, your opponent has set up so that as soon as they take six casualties, your units will all be out of range. What should you do? In that case, it’s correct to fire the five-shot unit first, then fire the 20-shot unit. No matter how well you roll, the five-shot unit will definitely still leave a target in range for the 20-shot unit. If you fire the ten-shot unit first, however, you risk rolling well enough to kill 6 models – at which point your 20-shot unit is wasted. Firing the 5 and then the 20 gives you the highest guaranteed number of shots, and will be the best option most of the time.
Target Manipulation
We hit on the psychic phase just now, and because so many powers have to go into the closest target it’s a place where careful casualty removal can have a big impact. If you have multiple strung out units near your opponent, judicious removal of casualties can force your opponent to alternate these between different targets, reducing their ability to focus fire.
Alternatively, if you’ve got a daisy chain extended from a cheap unit and screening a valuable unit, you can take the psychic casualties from the “body” of the unit to keep the screen active rather than let good models die.
Terrain Dodging
Very few things provide as reliable protection in 40K as a good, solid wall, and we talked extensively in our previous article on ruins about how to use these. One of the examples from that which bears repeating is using the removal of casualties to dodge behind a wall. If a juicy, tasty objective is sitting just more than 3″ away from a ruin wall, you can set up most of the models behind the wall with just a single one on the far side. Then, as soon as a single model dies the squad can no longer be targeted, so unless your opponent had a single unit within enough firepower to wipe yours out, they get to live and (hopefully) grab the objective again on a future turn.
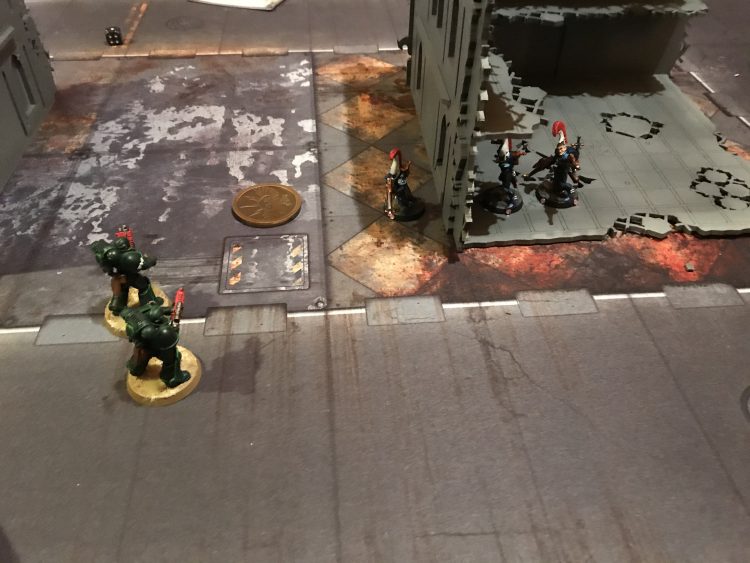
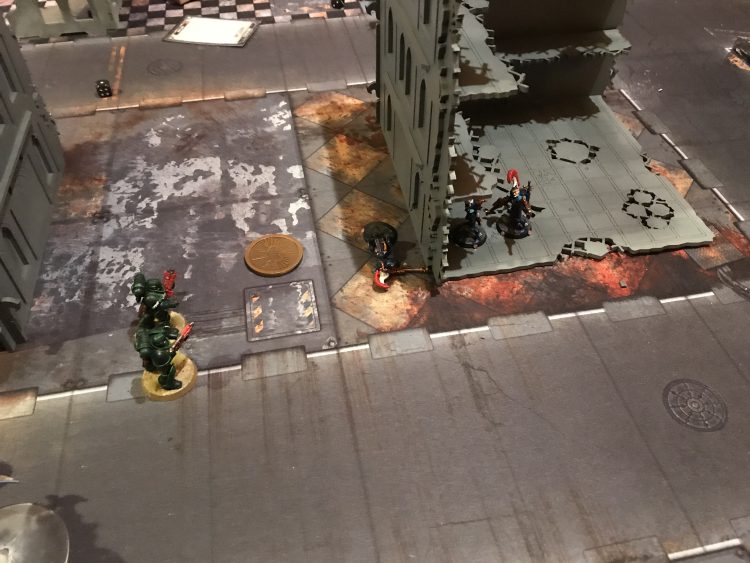
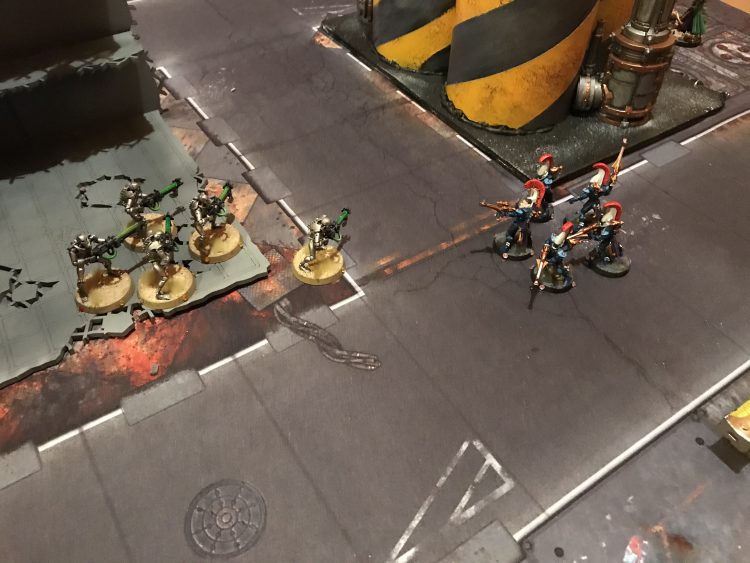
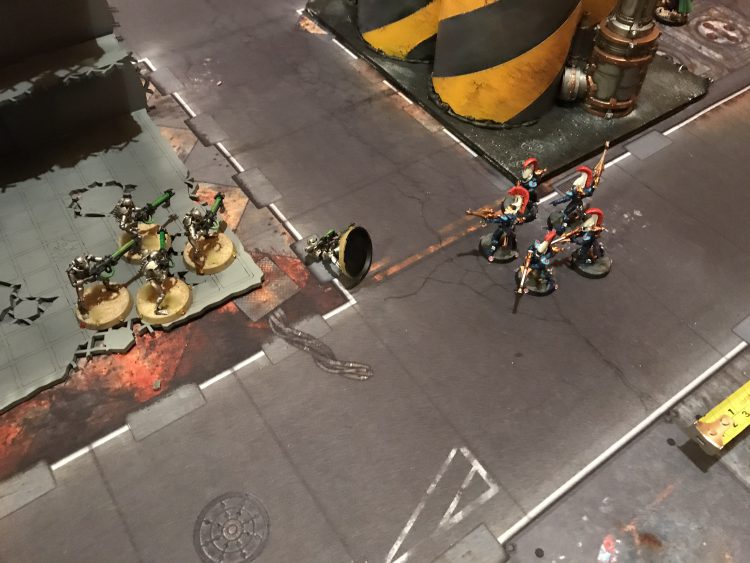
If you don’t have a wall, but do have a handy crater, removing models who are not in the cover first can increase the resilience of those that remain. As soon as all your remaining models qualify for cover you can start adding it to your saves, so remove those doomed fools/brave heroes standing in the open shouting defiance first!.
Charge Dodging
Usually a combination of range and terrain dodging, but worth talking about separately because charging is very binary – if they ain’t within 12″, or can’t fit within 1″ of you, they ain’t coming in. Removing models so that your opponent can’t make a charge, or it at least becomes harder for them, can swing a game. It’s especially relevant if they have deep striking threats, as these already have a tough 9″ charge to make, and any increase on that makes it very dicey. Most opponents are going to be wary of this, and will not shoot at a unit where this is a risk, but look out for fringe chances to pull it off. An example of this is if one of your vehicles explodes – that can provide you with a “source” (they’re stylistic scare quotes Corrode leave them alone) of dead models in this case that your opponent might not have anticipated.
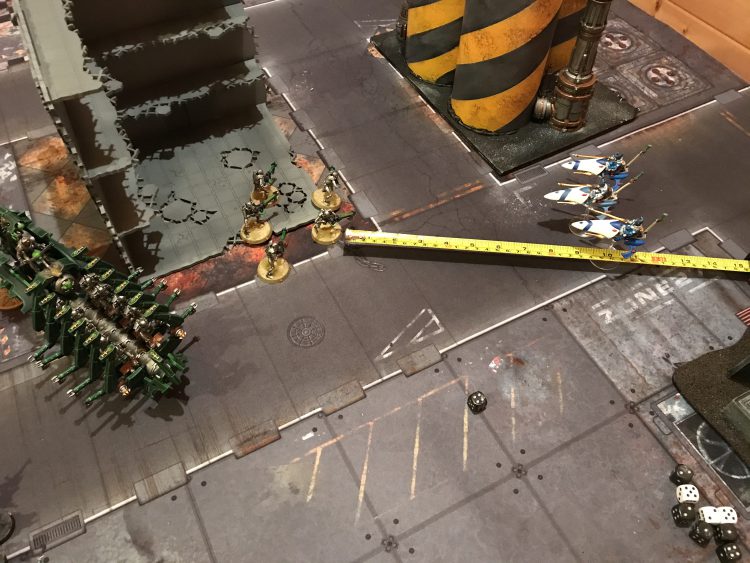
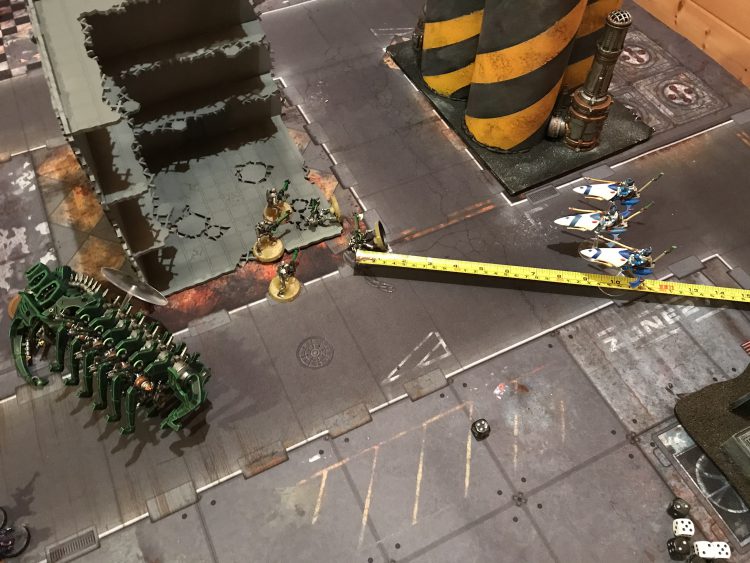
Entirely preventing a charge isn’t the only thing you can do here either. Multiple units close together can be very juicy charge targets, as they allow enemies to rock in to both with ease, then make whatever attacks are most profitable at the time. Using casualties to split up two units can make this drastically harder – it can make tagging both outright impossible for a character, and force multi-model units to spread out, reducing their options in how they allocate attacks, and sometimes forcing them to use a few models to “bridge” the cap. Controlling how your opponent can charge in this manner, in combination with careful casualty removal in the fight phase itself, is especially impactful against enemies that can fight multiple times via stratagems, stopping them carving a swathe through your army.
Removing Melee Casualties
Avoiding Attackers
Units that charge always get to pile in, and part of the reason this rule exists is to stop you ending up in a situation where you charge with two units, fight with the first, then find that the second can’t make it to within 1″ any more. If you’re on the defensive in this situation, you might occasionally be able to pull enough models to stop a charging unit fighting, but it won’t come up often.
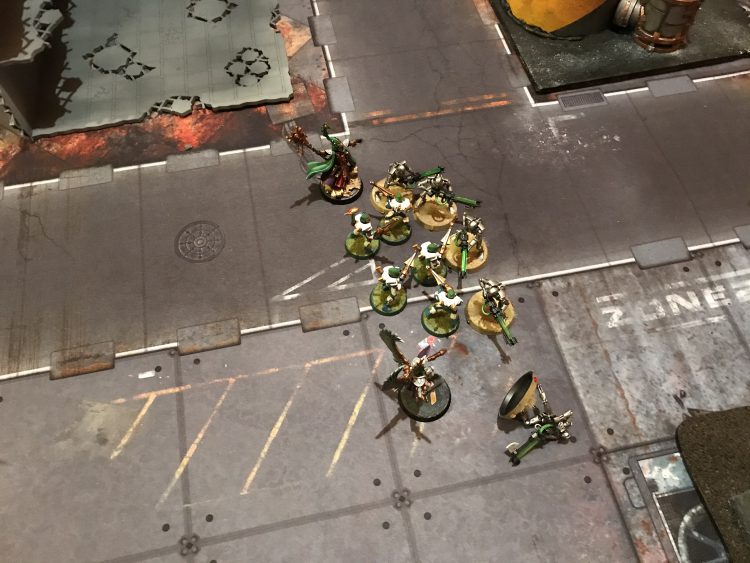
However, in other situations it can be much easier to use casualties to stop an enemy unit fighting, especially characters. Chargers always get to pile in, but the same courtesy isn’t extended to unit that were charged or heroically intervened. For the former, it’s most like that if you charged them you want to fight them, but the latter can be annoying thorns in your side, and if multiple enemy characters have Heroically Intervened into you it’s often possible to shut some of them out after the first one has fought.
Doing this can reduce the impact that inconvenient characters have as counter-charge units, and can keep your important threats in the game longer.
Controlling Consolidation
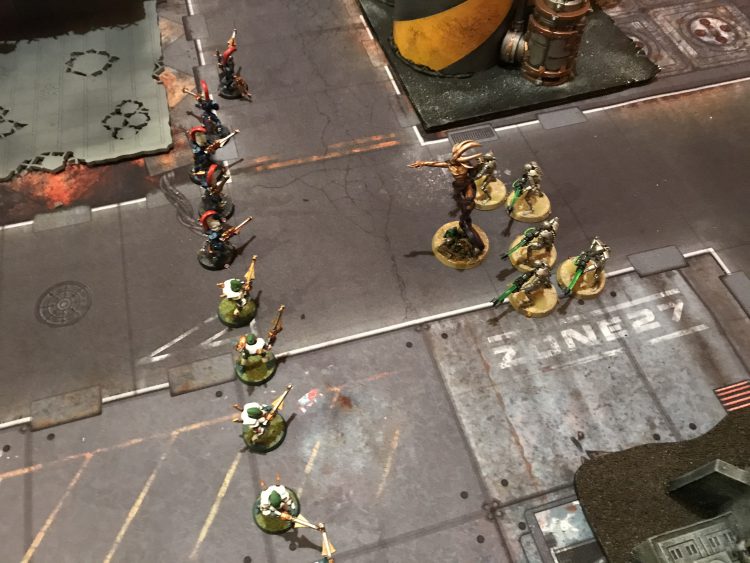
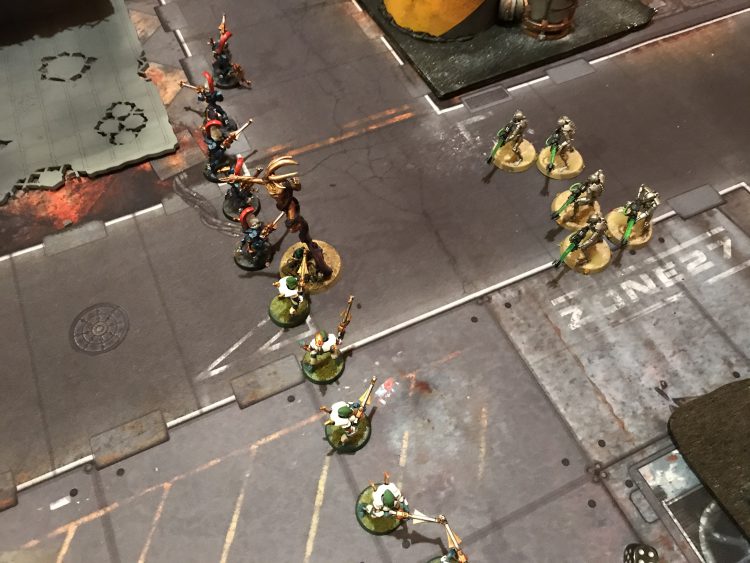
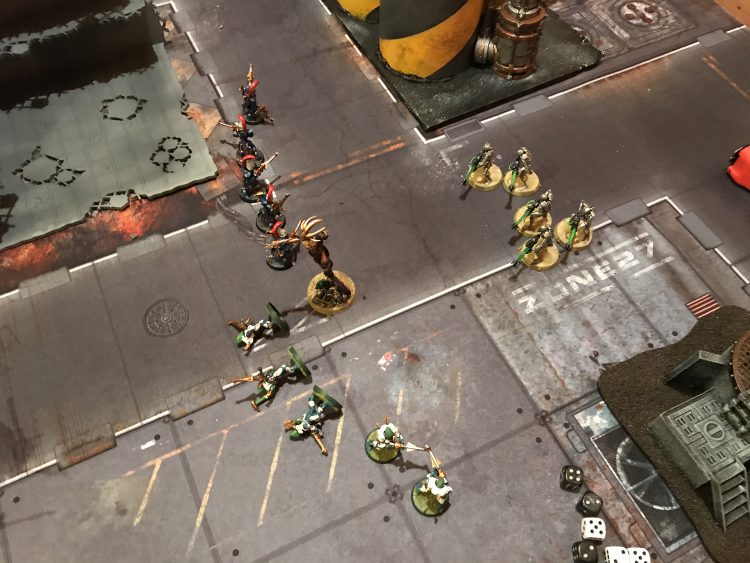
Making good use of movement is very powerful, and one of the big upsides of the fight phase for powerful attackers is the extra mobility that piling in and consolidation can provide. If an opponent is looking to do this but fails to fully wipe your unit out, you can use casualty removal to significantly control their options. This works especially effectively against things with large, unwieldy bases, but can be applied to smaller models as well.
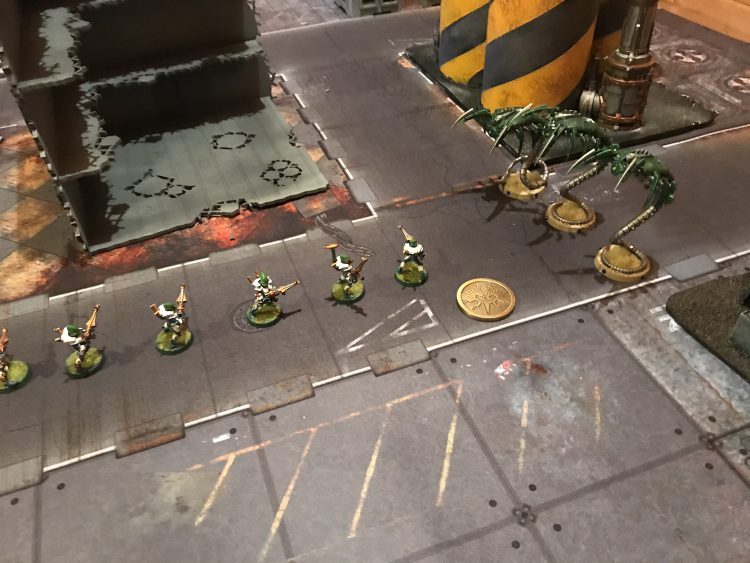
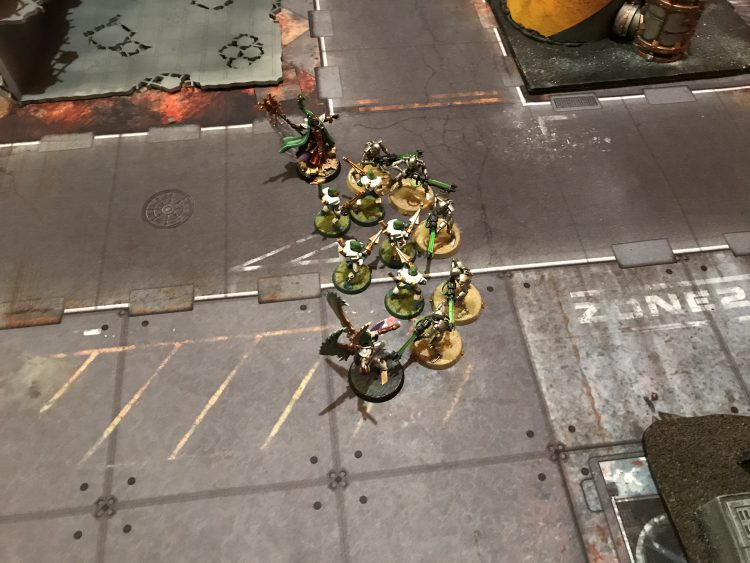
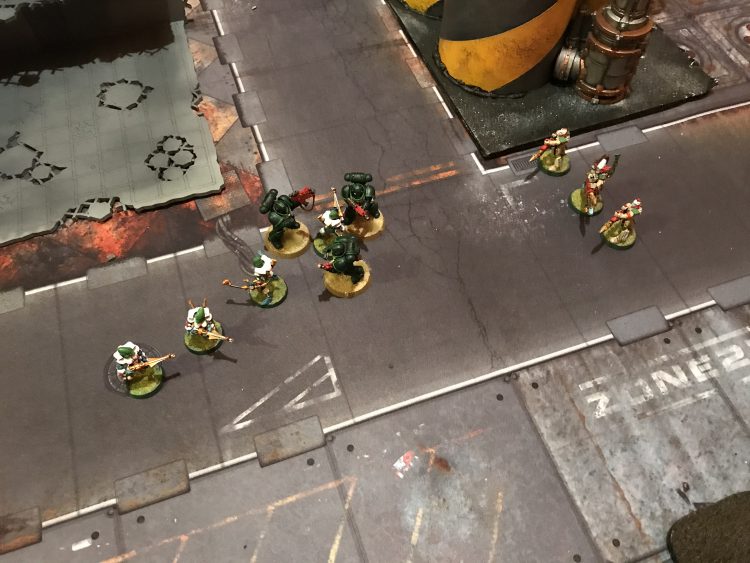
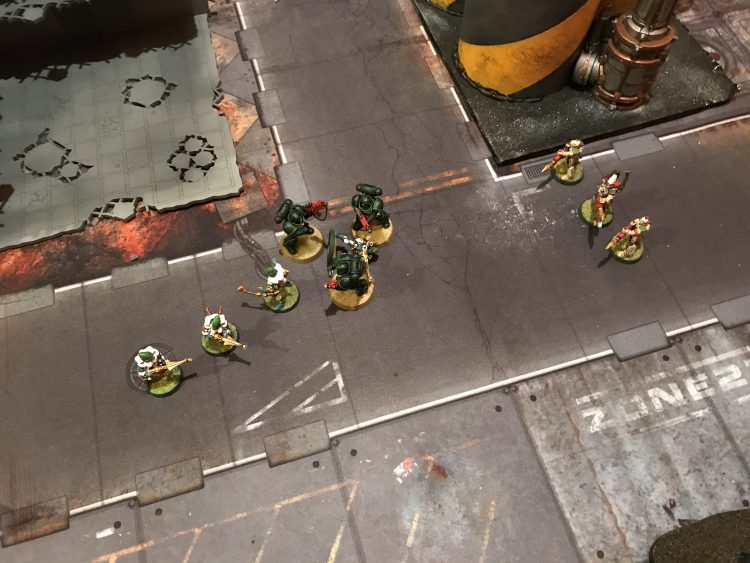
When a model consolidates, it has to end the move closer to the nearest enemy model, and the move must be completed with the squad in coherency. Thanks to this, units that are consolidating get the most additional movement if the nearest enemy model is in the same direction for all of them. If it isn’t, they might not be able to move nearly as much, and sometimes not at all if some of their models are “trapped” by having nearer models in another direction. This is illustrated below.
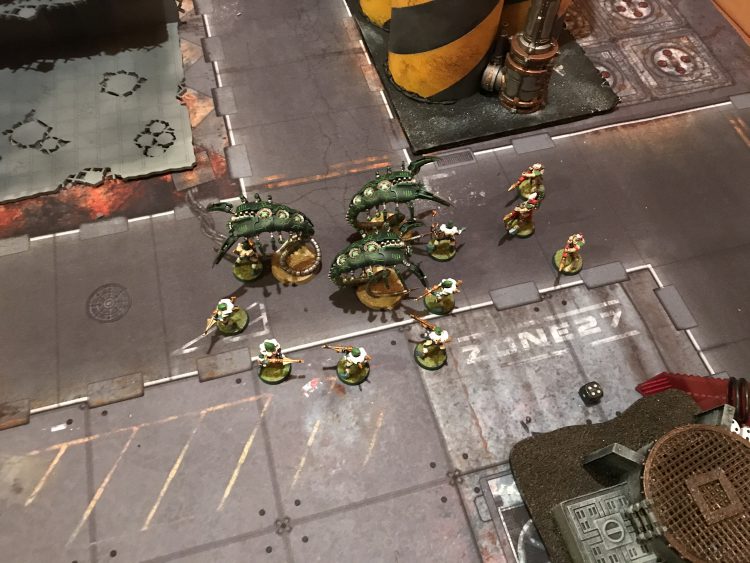
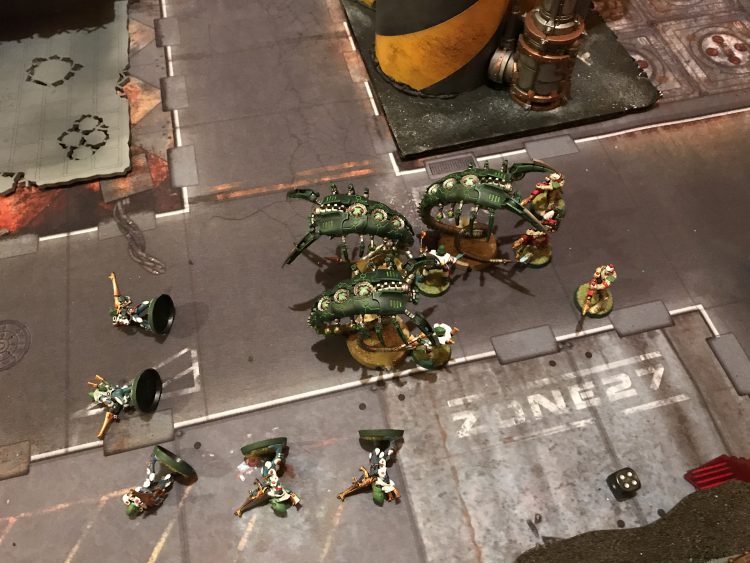
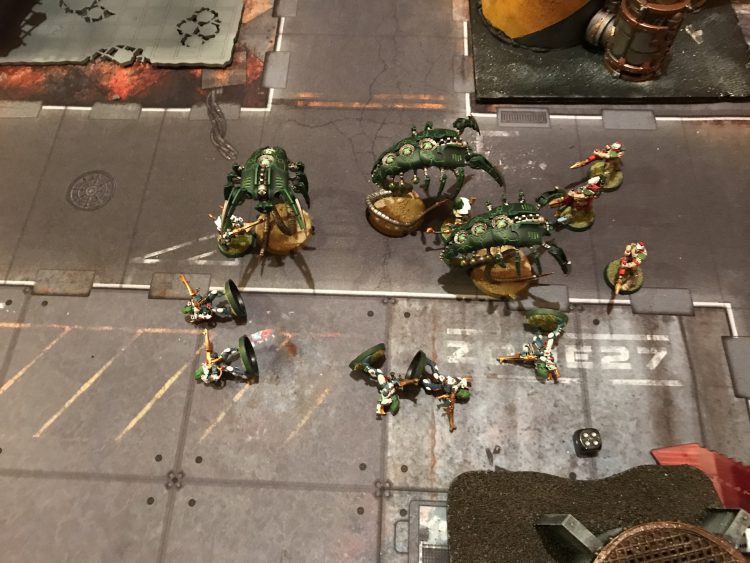
Now, obviously the above pictures are an extreme example designed to show off how this works, but by carefully reviewing the relative positions of models it’s often possible to find opportunities to work with this. Look in particular for individual models away from the main body of your unit that are basing the enemy – leaving these in place can significantly mess with their plans. You do need to also consider what impact this will have on your opponent’s ability to wrap you, but generally when you’re in a situation where this will work you’re reasonably likely to be vulnerable to a wrap anyway. Still, limiting which direction each enemy model can go will sometimes limit their ability to lock in the wrap, and making their life more difficult is almost always a plus.
Defiant Last Stands
This one’s pretty simple and covers when not to remove a model. If your opponent has charged your objective-holding objective-secured unit with a non-objective-secured one, and as they make their attacks it’s looking like they won’t wipe you out, it can often be worth leaving one of the models that has the objective tagged alive till last, as if you’re playing in a format where scoring happens at the start of the turn or end of the battle round (which at this point most have some elements of) that’ll be a few extra juicy points for you that might swing the game.
Removing Morale Casualties
Getting Out of a Wrap
Really only one here, but sometimes it’s huge. If your opponent has put a lot of effort into wrapping your unit in the fight phase, but only has one or two models surrounded, failing your morale test and pulling those models out can be game changing. Sadly there isn’t an auto-fail stratagem for morale to mirror the auto-pass one, but you can opt to not use any optional leadership boosting abilities (such as Mob Rule) and in an extreme situation where it really matters you can choose to use a CP re-roll on a successful morale test to try and turn it into a failure.
Melee armies frequently live and die on pulling off wraps, and when it works out having your models pull off an extreme cowardly eject at the right time is perhaps the most powerful way to use casualties of all.
(Un)Wrapping Up
There are, inevitably, plenty more ways to use dying models to your advantage than just these, but the above are some of the most common ones and learning to use them will equip you with the right mental tools to spot additional ones on your own. If you think there are super critical ones we’ve missed drop us a note in the comments below or email us at contact@goonhammer.com, or if you want to discuss in detail, head over to r/competitivewh40k. Otherwise, we’ll see you in the next article!
