Note: This Article was written for the 8th edition of Warhammer 40,000 and has yet to be updated. While many things may still work, the rules have changed fundamentally in 9th. As such, we recommend that you proceed with caution.
Everywhere you look in 40k art, you’ll see scenes of two opposing forces toe to toe, engaging in the cut and thrust of melee combat. Space Marines battle Orks, knife to choppa. Daemons and Harlequins twirl in a deadly dance. Tau…. get cut to pieces by someone, because they’re Tau and they’ve hit melee, and even the artists know that a Bad Time is about to be had by the fishmen. Despite all that, and the longstanding tradition of character models being defined by being better personal combatants than the troops they lead, many people view Warhammer 40,000 as primarily being a shooting game. If you look at some tournament lists, you can be forgiven for this – Imperial Fists castles full of Whirlwinds and Thunderfire Cannons hiding behind a wall of stalker bolt rifle-toting Intercessors, Tau armies consisting primarily of Riptides and Shield Drones to protect them, and even Ork armies where the primary use of the Boyz is to form a screen for the pile of Mek Gunz and Big Meks blasting away from extreme range all suggest that this is a game based on having the biggest guns and firing them most effectively.
The truth is a little more complicated. Shooting attacks certainly do have a ton of advantages – they’re effective at a much greater range, they expose your models to less danger, and it’s much easier to line up things like auras when you know for sure where your models are going to be instead of having to work around one half of them suddenly shooting 12″ off into the distance. That said, to be ignorant of the Charge and Fight phases (taken together here because they’re complementary) is to play with one hand tied behind your back. The movement options available to you are extremely powerful, and can be game-changing when used effectively. If you’ve ever played against a White Scars or Genestealer Cults player who knows what they’re doing and found yourself pinned into your back corner unable to shoot anything because all your units are tied up or have no targets, you’ll know what I mean.
To begin, we’ll briefly review the rules of the two phases, then discuss what this means for you as a player and some effective techniques for getting the most out of them.
The Rules
Charge Phase
The Charge phase does what it says on the tin – it’s when charges happen. Also, importantly, it’s when Heroic Interventions happen, but we’ll come back to that in a minute.
The Charge phase sequence works like this:
- Choose a unit to charge with. This is any of your units within 12″ of the enemy. You cannot choose a unit that Advanced or Fell Back nor one that started the Charge phase within 1″ of an enemy unit.
- Choose a target. You can select any unit (or indeed units) within 12″ of the charge. Each target unit can attempt to fire Overwatch.
- Overwatch. Your opponent shoots at your charging unit, but only hits on unmodified 6s.
- Make charge. Roll 2D6. Your unit can move that number of inches. The first model you move must finish within 1″ of an enemy model in the unit, or one of the units, that you targeted. Note that you cannot move within 1″ of an enemy unit you didn’t target. If you can’t move within 1″ of an enemy unit you targeted, then the charge is failed and the unit stays still.
Once you complete this sequence, you can select another unit and start again.
As mentioned above, the Charge phase is also when Heroic Interventions happen. If it’s your opponent’s Charge phase, then after they have completed all of their charge moves, any of your CHARACTERS which is within 3″ of an enemy unit can move up to 3″ as long as they finish their move closer to the nearest enemy model. There are two important things to take note of here – firstly, that your opponent’s Charge phase still happens even if they declare no charges, so if your character is in a position to heroically intervene they can still do so. Second, despite a common misconception, there are no further restrictions on this move other than those above – it doesn’t have to be made against a unit which charged this phase, it doesn’t even have to be on the same side of the board, and indeed as per the first point your opponent does not need to have made any charges of their own. As long as your CHARACTER is within 3″ of an enemy unit, they can Heroically Intervene.
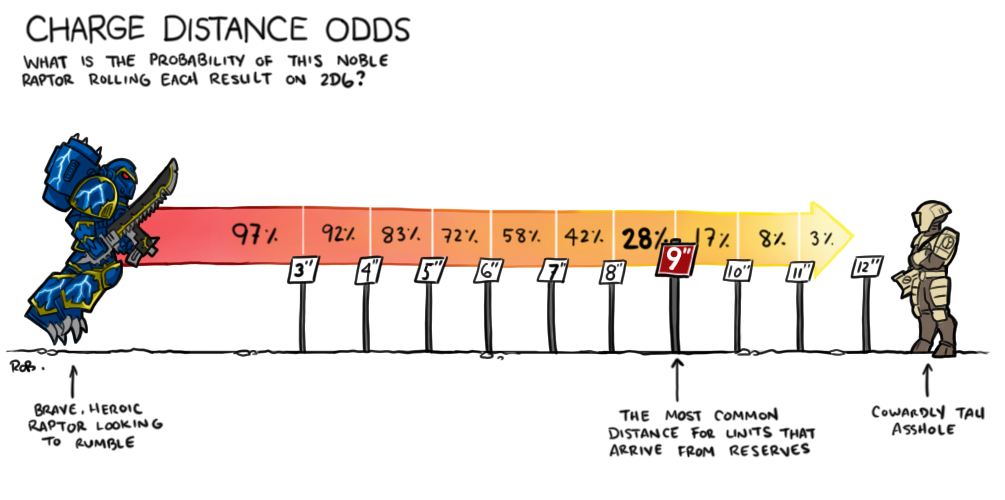
We’ve also talked in detail about the probability of making charges with different re-rolls here in our probability article. Keep in mind that without significant help, a 9″ charge is very likely to fail.
The Fight Phase
That’s charging, so what about the next bit, fighting? The sequence here is in 6 parts, as below:
- Choose unit to fight with. Any unit which charged this turn can fight, as can any unit within 1″ of an enemy unit. As clarified in the FAQ, if they are able to units must fight, and chargers must fight before other units. If both players have units which are legal to fight at the same time, then they alternate, starting with the player whose turn it is. This effectively means that if they charged this turn, the player whose turn it is will always get to fight first with at least one of their units (except against Adeptus Custodes players using the Stooping Dive stratagem). Also note that it is perfectly possible to start the phase within 1″ of an enemy unit but end the phase not able to fight because e.g. you have removed casualties so that your unit is no longer within an inch
- Pile in. You may move each model in the unit selected up to 3″ – this move can be in any direction as long as the model ends the move closer to the nearest enemy model. Note that as per the FAQ, “skating” around a base you are already touching is not allowed – if you are in base contact you cannot finish your move closer than you started it, so you’re stuck. Also, there is no restriction on moving within 1″ of enemy units – if you can do so while legally piling in (i.e. by finishing closer to the nearest enemy model as at the beginning of your pile in move) then you can move within 1″ of another unit, even if you didn’t charge it.
- Choose targets. Models in a unit which charged this turn can only fight units that they declared their charge against – basically, if you want to fight, you have to suffer the overwatch on the way in. Models in a unit which didn’t charge this turn can fight any unit. A model can fight if it is within 1″ of an enemy model, or if it’s within 1″ of one of your models which is itself within 1″ of an enemy. This means that models on 25mm bases can effectively fight in 4 ranks, as a 25mm base is slightly smaller than 1″ – and so if two of them are touching they are both within an inch, and then a further two behind will both be within 1″ of the second guy. This is also achievable via staggering your models with 32mm bases, but it’s a little harder to pull off effectively. Units are not all required to fight the same target, and indeed individual models can split their attacks into different units if they want to.
- Choose melee weapon. Your models may have several different melee weapons to choose from, with different purposes – for example, Talos have macro-scalpels for taking down tough, high-value targets, and chain-flails for clearing out hordes. All models are also equipped with a generic close combat weapon which is Strength User, AP0, and this can be a handy tool in the right circumstances. You can split your attacks between different weapons if you want to.
- Resolve attacks. Roll your dice and hope to slay all before you. Or, possibly, not to.
- Consolidate. You may move each model in the unit up to 3″ – this move can be in any direction as long as the model ends the move closer to the nearest enemy model. This is much the same as the pile in step, with the same caveats.
An important clarification to make here is that Heroic Intervention does not make you immune to being targeted. Very often it is the case that a heroic intervention will happen by a character intervening to make combat with a unit which charged, but did not declare a charge against that character, and so cannot attack it. However, if you heroically intervene anywhere else – into a unit elsewhere on the table for example, or into an ongoing combat, or even just into a unit which declared its charge against the character but didn’t manage to reach it with its charge move – then they’re fair game. Many players confuse these two things – don’t be one of them.
Getting the Most Out of It
That’s a long sequence up above! 8th edition mostly reduced the complexity of the game, taking away clunky systems like vehicle facings or bikes vs. cavalry, but it left in quite an intricate set of rules for the Charge and Fight phases, which means there’s a lot of power to be had from using them correctly.
Firstly and most importantly – do not just push your models forward to the limit of their charge distance and then start rolling your attacks. This is a great way for your killer unit to charge in, murder 8-10 Guardsmen, and then get shot to death in your opponent’s turn, prompting you to take to the Internet to complain that melee is a total waste of time in 8th ed and Games Workshop hates you, personally, for daring to write the words “thunder hammer” on your list.
The Bad Touch, or: why FLY is the best special rule in the game
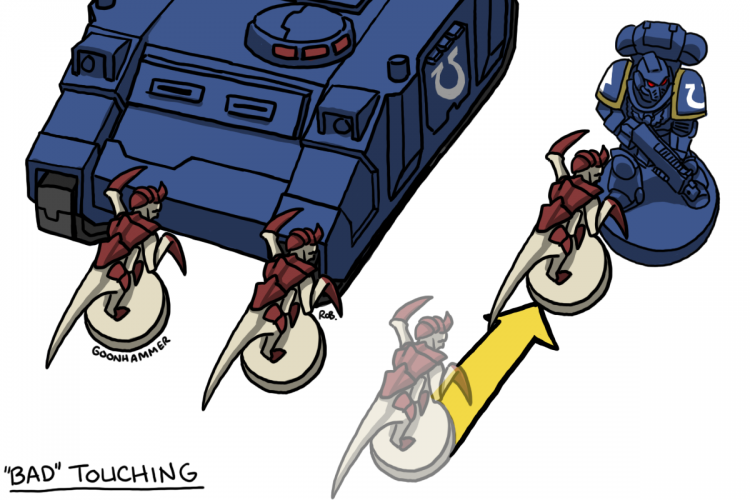
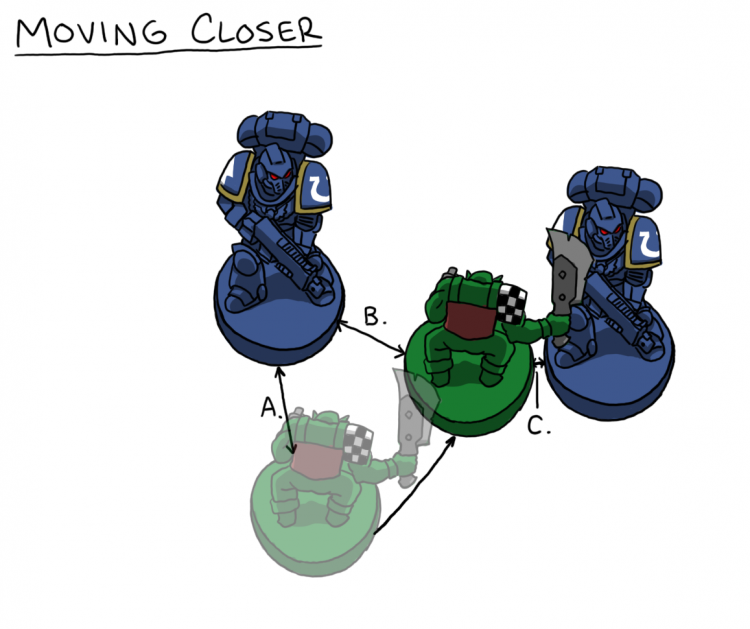
Let’s start with the simplest use of pile in and consolidate moves – to mess with your opponent’s units. As specified above, you can only fight units you declared a charge against, but you are not at all restricted from moving within 1″ of others if you want to. What this means is that if your opponent has unwisely left his erstwhile screening unit too close to something like his Leman Russ, you can charge the infantry and take their pitiful lasgun fire in overwatch, make your charge, and then use your pile in move to come within 1″ of the Russ. As long as your unit survives the ensuing melee, your opponent will be forced to Fall Back with his Leman Russ in his next Movement phase, and therefore miss out on a turn of shooting. This is a great result for you, as that’s now one less tank shooting at your army.
Closer Does Not Mean as Close as Possible
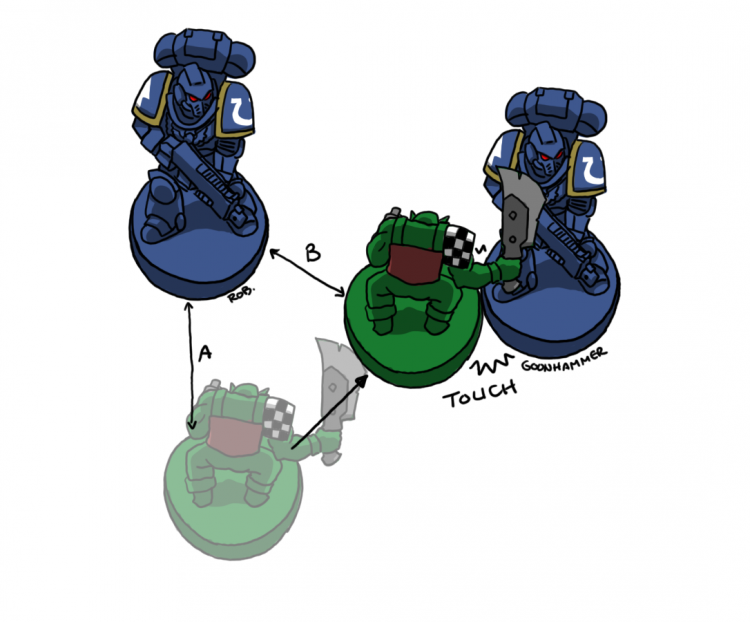
The above is explicit rules text – you are not required to move as close as possible, just “closer.” The important thing to remember here is that “closer” is a very broad term. Your model can be precisely 1″ away, pile in 3″ around the enemy’s base to finish 0.99″ away, and then consolidate a further 3″ to finish 0.98″ away, achieving a full 6″ of movement in the process. Your real-life measurements will never be this precise, of course, but as long as you are provably closer than when you started, you will be fine. On a single model with a small base you may struggle to get too far away from your starting position, but of course not all units are created equal. I once ran a unit of Wracks their maximum possible 6″ move around an enemy Lord of Change which had foolishly charged them and then failed to kill any, stealing an objective from him in the process and taking away the Domination card he was attempting to score – literally a game-changing move.
We Go Where We Want
There is a very important caveat in the “Make Charge Move” step of the Charge phase. The first model you move must finish their charge within 1″ of an enemy model in a unit you targeted. None of the others have to, as long as they maintain unit coherency (a charge move is still a move). You can’t come within an inch of a unit you didn’t charge right now, but you can use this movement for a number of different ways:
- You don’t have to finish within an inch of the closest enemy model. If you’re 4″ away and you roll a 9 to charge, you can go around the side. Is there an objective which you’d be miles away from if you went crashing into the front of the unit, but within touching distance of if you moved around them a bit first? Do that. What about if there’s an objective somewhere completely different that you couldn’t reach in your Movement phase? Well, you rolled a 9 now, you have the movement to do it. As long as you get a model within an inch, and can maintain coherency, you go grab that objective way out on your right flank.
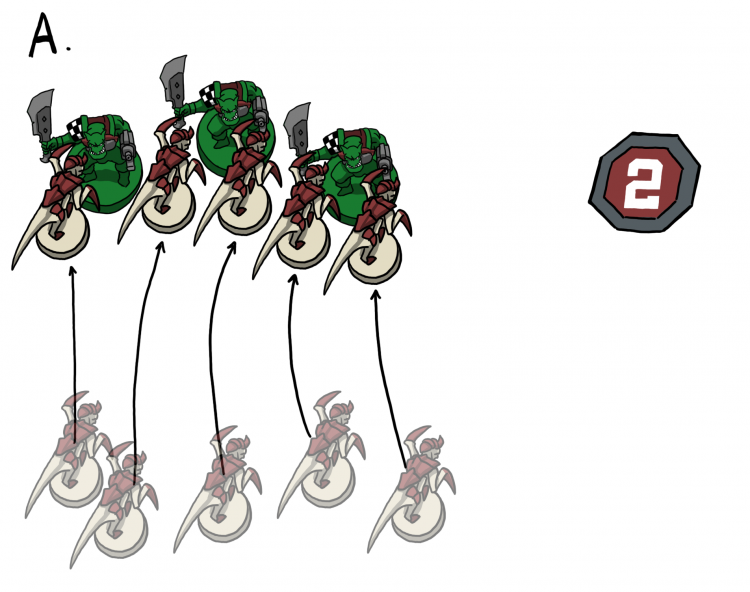
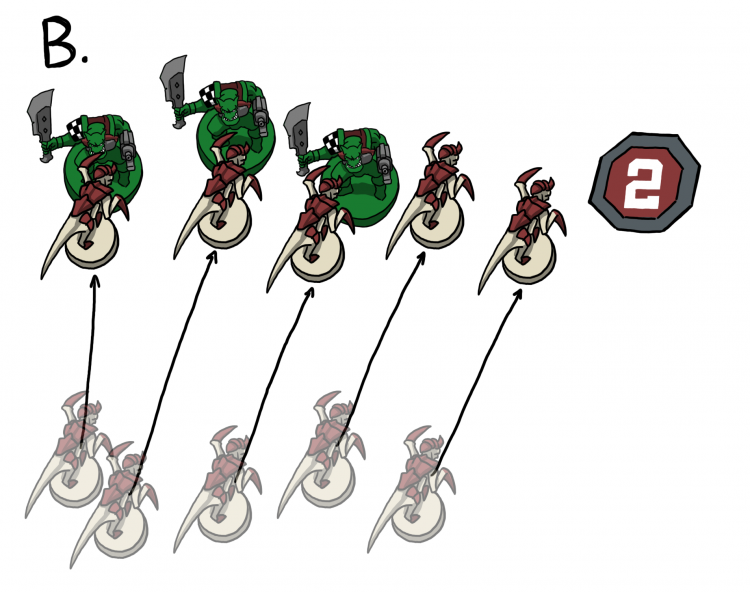
- You can choose which model is going to be the closest. Let’s say you want to tie up an enemy tank as described above, but it’s off to one side. If you run directly towards the unit you charged, you’ll be required to finish closer than them, and unable to pile in to it. What if you used your charge move to place a model so that its nearest enemy model is the tank itself? When the pile in step arrives, you’re free to run up and touch it and turn off its shooting. Even in a single model unit like a Solitaire, you can use your movement so that you can come in at an angle and finish closer to both the nearest enemy model in your target unit, and also within an inch of your a unit you didn’t target, but want to tie up
- You can keep your auras. Let’s say you have a character within 6″ of your melee unit giving out a powerful aura. If you blast your guys forwards on a big charge into no-man’s-land, it’s easy to lose out on the aura if your character subsequently fails to charge (especially if you’re charging out of deep strike, for example, where your probability of making a successful charge unaided is pretty low, and only gets worse if you’re trying to manage multiple). However, you are not actually required to move the whole way, or even at all. String a model or two backwards to stay within the bubble – as long as it makes sense to do so. Especially good placement can allow you to hedge your bets, keeping one or two models back to maintain the aura in case your character fails their charge, but allowing them to pile in and contribute if your character does make it.
- You don’t have to contact every unit you charged, and you don’t have to finish charges closer to the nearest model. You only have to finish within 1″ of one unit you targeted with your charge. This means that if, for example, you have a risky charge to make, you can use another unit in the middle to slingshot yourself forwards. Let’s say you’re 10″ away from unit A and 4″ away from unit B. Unit A is your priority, but 10″ is a pretty long charge – you have just a 17% chance to make it without modifiers. Unit B, however, is a mere 4″ away, which offers you great chances – 92%. If you can stand to suffer the overwatch, then what you can do here is charge both units, giving you insurance against failing your charge. If you roll a 10+ then great, you go into unit A – but if you don’t, you can always fight (or just wrap, see below) unit B. You can also achieve something of a slingshot effect – let’s say you roll something like like a 7″ or 8″ charge which would fail against unit A, but doesn’t against unit B. Move your unit so that you contact unit B at its farthest point, and you may be able place the rest of your models so that when they pile in, they contact unit A as well. Since you declared against both, you can still fight both in the Fight phase.
The Wrap and Trap
Sometimes, it’s more important to stop a unit running away than it is to actually kill it. Maybe this is because you’re using a unit which is crap in combat and can’t reasonably expect to kill what it’s charged, or maybe your unit is valuable and you want to keep it alive by preventing it being shot in your opponent’s turn. This is where the “wrap and trap” comes in. This means surrounding the enemy unit, so that it’s unable to leave combat via Fall Back move.
You can achieve this in a couple of different ways. The most obvious is to simply wrap their entire unit up – surround their models with your models. Between your charge roll, your pile in move, and your consolidate move, you have a lot of options to achieve this.
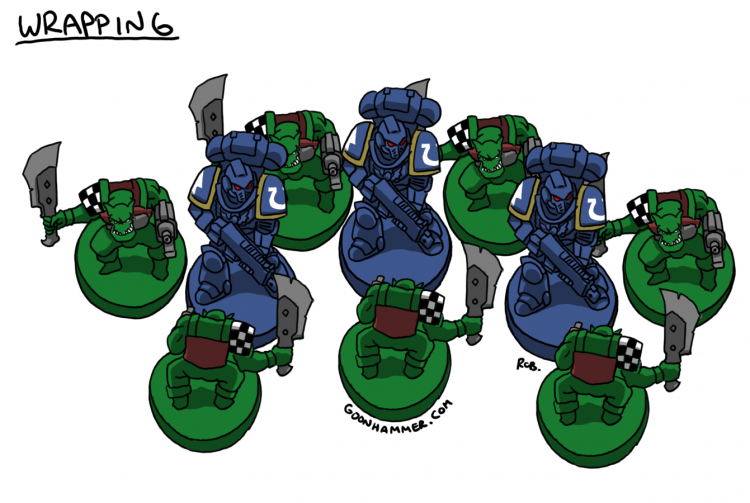
Sometimes, surrounding a whole unit won’t be feasible. This is where tri-pointing comes in. Effectively what you do is to create an equilateral triangle surrounding one of your opponent’s models. Done correctly, this means that they cannot move in any direction without moving through one of your models, which is not allowed, and consequently cannot fall back – meaning that their shooting cannot target your models. Obviously this doesn’t work on models which can FLY! This can easier to pull off than fully surrounding an enemy unit. Just be careful when doing it – if you have caused casualties to the unit, and you’re entirely reliant on a single tri-pointed model to prevent your opponent falling back, then the first thing they’re going to do if they fail a Morale test is remove that model and leave you flapping in the wind.
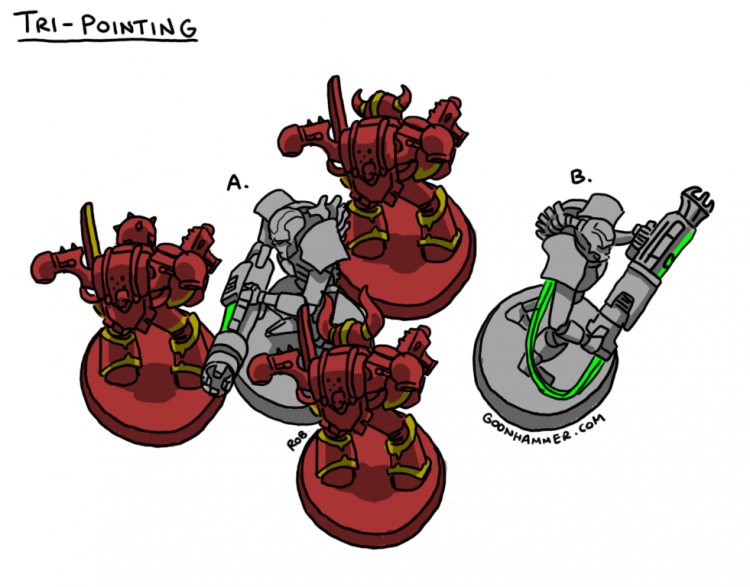
To defend against this, there’s two techniques you can utilise. First, remember the generic close combat weapon everyone has? You are not allowed to skip making attacks at all, but you are allowed to choose to fight with your generic melee weapon. It might be a poor narrative choice, but sometimes the sensible thing is for your unit of raging Khorne Berzerkers to charge into combat and choose to eschew their whirring chainaxes and crackling power fists for a simple dagger, making the worst possible attacks and killing the fewest enemy models, in order to guard against accidentally wiping out the unit you were counting on taking hostage and protecting yourself with. Secondly, remember again that only the first model in the unit must come within 1″ of the enemy – the rest don’t have to, and indeed can be placed anywhere at all. Consider keeping them back outside of an inch of any enemy models, so that they are unable to fight. Pile in around the edges, staying over an inch away, then consolidate even further and wrap them up. When doing all this, do make sure to take care that you haven’t accidentally charged something which can actually hurt you, making all this pointless as they scythe down your surprisingly pacifistic chargers.
Some armies have more specific tricks in this regard – Wyches can just flat stop opponents falling back, as can others, and the Slaanesh Contorted Epitome can do that at range as well.
Order, Order
Something not made especially clear in the Fight phase rules is that there is a quite rigid order in which units fight, and utilising it correctly is important. Broadly, the order is:
- Units which used Stooping Dive this turn
- The first charging unit chosen by the player whose turn it is
- Alternate between all other charging units and any other units which have a rule like “always fights first.”
- Alternate between units which are within 1″ of an enemy but did not charge, starting with the player whose turn it is
- Alternate between units which must fight last – for example the target of a Vexator Mask
Point 1 here is an edge case, since it applies to one army in the game, but it’s worth being explicit about it. Outside of that context, you basically always start with step 2, which is that the player whose turn it is picks one of their units which charged, and that unit gets to pile in, make its attacks, and consolidate.
Past this point, things get a bit Wild West. This is because of the Counter-Offensive stratagem found in the core rulebook. For 2CP, a player can use this immediately after a charging enemy unit has fought, and pick one of their own units to fight with. This is effectively a sub-step that we might call 2a, which explicitly happens outside of the normal sequence. This is a very powerful stratagem. Let’s say your unit has been charged by two enemy units, and your opponent fights with their first unit and isn’t able to kill it. Before they can pick another unit, you can spend 2CP and fight with your unit. This has a multitude of uses. Maybe you want to destroy the first unit that fought, because your opponent will wipe your unit out with his second unit before it gets to fight. Maybe you want to fight the second unit before it gets a chance to strike, hoping to damage it enough to stop your unit from dying. Maybe you just want to make base to base contact with your opponent to stop him piling in to you (see below for more on this).
The really interesting thing about this being a step 2a rather than a step 3 is its interaction with the “always fights first” ability and the “must fight last” requirement which is otherwise relegated to step 5. Let’s say you have something like a unit of Daemonettes which always fights first. Your opponent charges a couple of your units, and fights with his first unit. You slam the Counter-Offensive button and one of your units fights. Per the rulebook FAQ, this happens outside of the normal fight order, and so once the unit’s attacks are resolved, you go back to the normal order. Since the last unit chosen was your opponent’s charger, the alternating sequence now falls to you, and so your unit of Daemonettes gets to fight next. At the other end of the scale, Counter-Offensive straight up trumps “must fight last” – if you’ve been cursed with a Vexator Mask screaming at you or a Space Wolf showing off his particularly flashy and distracting armour, never fear, because for 2CP you get to immediately fight anyway. Maybe you’re already locked in combat from a previous turn, and now you want to break out at the earliest opportunity – you can pick one of your units waiting for step 4 and swing with it right now.
Although it falls outside of the Fight phase itself, the other stratagem worth mentioning here is Strike First, For Ultramar! This allows a unit in an Ultramarines Victrix Guard Specialist Detachment to fight at the end of the Charge phase if it was charged or performed a heroic intervention this turn. They can still fight in the Fight phase, too. This one isn’t too likely to come up, but watch out if you see it the detachment on your opponent’s list – it can make for a really nasty surprise.
So what does all this mean for you? Here’s a few points to consider.
- If you charged with multiple units and you’re relying on them to fight unimpeded, keep an eye on your opponent’s CP. If they have 2 handy, then make sure you’re not about to lose a critical part of your plan to a cheeky Counter-Offensive which wipes out one of your chargers before it swings.
- Chargers still get to pile in and consolidate even if the enemy unit is dead. This means that if you wipe out an enemy unit before one of your units fights, you get a free 6″ move (as long as you finish closer to the closest enemy model). This can be hugely powerful, particularly if the nearest enemy is some distance away and basically any forward movement means finishing closer. Make a free 6″ move onto an objective. Block up a gap to protect a weak unit with a tough one. Zoom 6″ forwards and tie up an unwary unit in front of you.
- With the right units, you can get two fights in before your opponent gets their second. Watch out for opportunities to do this.
Fighting Round the World
There are a number of ways for models to fight multiple times in a phase. Some have inherent abilities to do so – Drazhar, Khorne Berzerkers, etc. – while others rely on stratagems, such as Honour the Chapter for Space Marines or Adrenaline Surge for Tyranids. This is a very powerful ability, both for the capability it offers in terms of destroying units, but also because multiple fights give you even more movement to work with. Per the rulebook FAQ, when you a stratagem or ability says you may “fight an additional time” or “immediately fight again,” you get the full sequence – pile in, resolve attacks, consolidate.
There’s a couple of important caveats here. First, the unit must be legal to fight in that phase. That means it must either be within 1″ of an enemy unit, or it must have charged. The latter case is the more interesting one, because it maximises the amount of movement you get. Consider a unit of Khorne Berzerkers – they charge, fight and destroy a unit, consolidate, and then fight again to move another 3″-6″. Secondly, if your unit has charged this turn, it can only fight units that it declared a charge on, even if it can make contact with them, and it can only legally declare a charge on a unit within 12″. Sometimes this won’t matter – what you want is just to reach out and touch something, maybe a tank that was too far away or too scary on Overwatch to charge, but can still be stopped from shooting – but it’s important that you make sure to get this right if you do want to try and fight multiple things in the same phase.
The possibilities here are very wide, and really depend on the situation you’re in. Perhaps one of the broadest is in the Tyranid faction, which can otherwise be lacking in exciting options. By combining the Overrun stratagem with Adrenaline Surge, you can destroy a unit with one of your chargers, move and advance as if it were the Movement phase, and then fight again to move further – a great way to bash through a screen and still reach something on the other side, and potentially wrap it to stop your vulnerable Genestealers getting shot to death.
These Walls
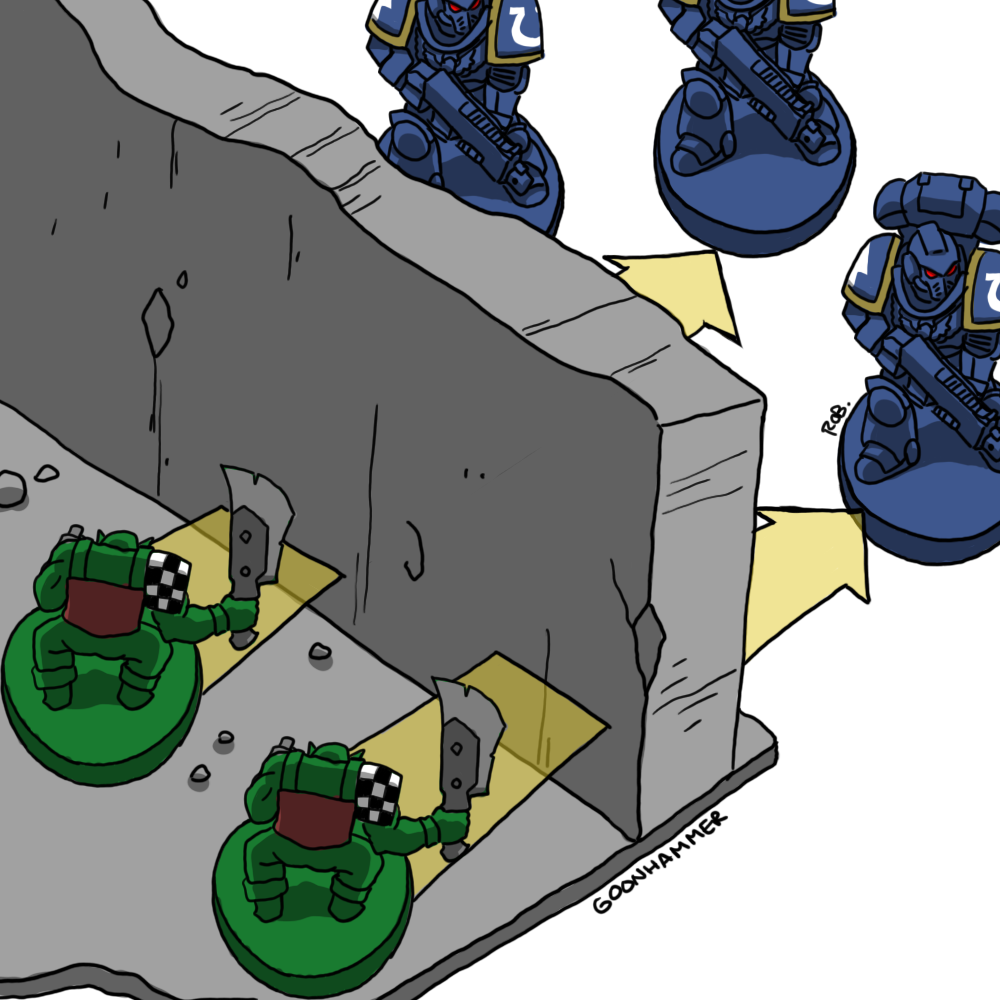
Ruins are a great piece of terrain for melee armies to utilise. The obvious usage of them is to prevent line of sight so that your opponent can’t use Overwatch against your infantry – just bust through the wall Kool-Aid Man style. It’s even narratively appropriate when you do it with siege drill Centurions! Remember also that you can fight through them as long as you can get within an inch, so if a careless opponent has left his models within an inch of the edge, even a Knight can fight through it. If your opponent has melee threats on large bases like the aforementioned Centurions, you can often thwart them by placing your models 1.01″ back from the wall – your opponent can’t fight through it, but they also don’t have space to place their models on the far side!
Practicing Self-Defence
So that’s a lot of talk about things you can do offensively. What can you do to defend against some of this? In this section, we’ll talk about a few techniques you can use to prevent melee units from tearing through your lines.
Restrict chargers’ options.
The first thing is creating a net around a potential charger to restrict its movement. Let’s say there’s a line of Lord Discordants aiming to thrash their way forwards and come thundering into your Guard tank line. They’ll be extremely murderous if they hit, but first they have to get through a gap between ruins – maybe some central LoS blockers like you find at NOVA or the LGT. You can zoom some Guardsmen up and form a line blocking their way through, so that in their Movement phase they’re restricted from coming forwards, and forced to charge you – and not get very far when doing so – in order to clear the Guardsmen out. Forming up in a crescent shape will also mean that it’s difficult for them to take advantage of pile in and consolidate moves which require them to finish closer to the nearest model. I once did this twice to someone’s Knight, which upset him greatly as it shuffled around moving a couple of inches a turn, unable to get at the line of tanks it really wanted to attack. If doing this, be careful not to get too close to an opponent who can heroically intervene – I tried it on a different Knight and ate 12 stomp attacks for my trouble because I forgot to measure the 3″.
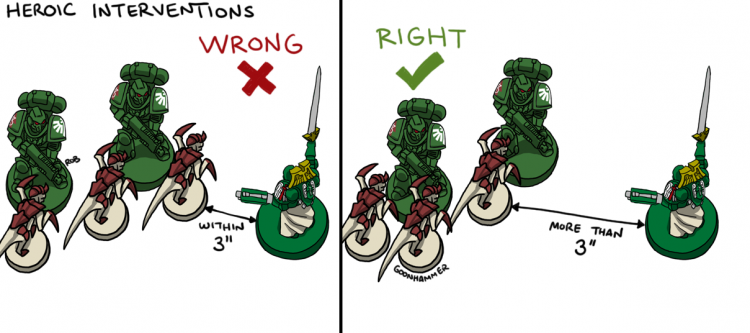
Heroic Intervention can be a great deterrent and limiter.
Speaking of heroic intervention, this can be another great tool for limiting what your opponent can do. Let’s say your opponent charges one of your units, intending to utilise the tricks above to make the most out of pile in and consolidate moves. If there’s a character nearby who can make a heroic intervention, you can prevent this by using your heroic move to make base to base contact – meaning that the models cannot legally move any further. This even works if they charged the character itself without making base contact – you can still use your heroic intervention, and catch them out by coming into base contact.
It’s worth remembering that several regular non-character units can utilise heroic intervention as well. A few examples include Harlequins, who have a stratagem to allow any unit to make a heroic intervention (and do so up to 6″ rather than the regular 3″), Genestealer Cults where the Focus of Adoration Warlord trait allows INFANTRY and BIKER units to do so when within 6″ of the Warlord, and Deathwatch where Veteran Squads which include a Blackshield must heroically intervene if able to do so. As the defensive player, this can be a great way to establish this kind of base to base contact to stop an opponent springboarding forwards. As the offensive player – watch out! What seemed like a safe charge can become deadly when a whole pile of Genestealers leaps to the defence of what you thought was a soft target.
Don’t forget the Counter-Offensive Stratagem.
The Counter-offensive stratagem can have similar utility. If an opponent has made multiple charges in a turn, there’s every chance they have competing priorities for what to attack with first. They may well pick a unit which matters more for another reason – say a unit which they want to make sure won’t be killed by its charge target – but leave another open to being hit with Counter-offensive and tied up in base to base contact, preventing it from moving further around. You can even potentially counter-wrap this way, if your unit is large enough, which can help prevent your models being wrapped in turn and allow you to fall back.
Avoid leaving isolated units within an opponent’s charge range.
On the subject of wrapping, try and avoid leaving isolated units hanging around, or individual models standing off to one side ready to get tri-pointed. The Recon secondary in ITC can often lead people to bad habits in this regard, encouraging players to deploy squads of Guardsmen or Scouts far out in front of their army in order to rush for a turn 1 score. These are fantastic targets for something fast to make a turn 1 charge, take them hostage, then kill them on your turn and look threateningly at your army from very close by. Sometimes this is necessary, of course – such units are often there to screen out deep striking threats, where creating some distance to the core of your army is the whole point – but it can also be a lazy habit that doesn’t help. On that same subject, think about what you remove from the squad. The natural instinct is to preserve your unit and to preserve the most valuable models within that unit, but sometimes you just have to accept that your Scouts are going to die this turn or next, and that passing their Morale check means not getting to take bloody vengeance as soon as possible – so you should pull the Sergeant out to reduce their Leadership and maximise your chances of the squad dying and leaving your opponent high and dry.
There’s More Than One Way to Unstick Your Units.
What about if your unit has gotten stuck? Sometimes the best defence is offence. If it’s available to you, a volley of Smites can be a great way to clear out something which has touched one of your tanks and prevented it from shooting. Removing the unit from the game this way means that you don’t have to Fall Back, and since you come to the Shooting phase with no models within 1″ of your tank, it’s free to fire.
It’s worth also having an assessment of the terrain.
Your unit may well be wrapped on the bottom floor of a ruin – but can it Fall Back vertically? Infantry may well be able to float their way up to the first floor, escaping the wrap by way of rope. It should be noted at this point that you can’t achieve the same thing by getting into a transport from inside a wrap – this was FAQed against in the rulebook FAQ.
Think about your Deployment.
A serious mistake I made in a game at LGT was to screen my army with my War Walkers, reasoning that my planes were vulnerable to my opponent’s jump-pack equipped Captains who were deep striking. I set up with the War Walkers at my extreme left, with my planes floating inside to defend against the drop. My opponent then brought in his Aggressors, wrapping up my War Walkers with them and a helping unit of Scouts. During the Aggressor charge, he carefully placed some of the models that they could simultaneously complete an effective wrap on the Walkers while also touching other parts of my army, including Eldrad, and wrap him too. In my turn, I had basically his whole force in front of me – and absolutely nothing to shoot at, since everything was either a) a character hidden away behind other units or b) in combat. He hadn’t actually killed much of my stuff at this stage, but my ability to project force was paralysed, because I was relying on shooting and shooting wasn’t an option. It was a very important lesson (and, to some extent, the inspiration for this article!) I would have been much better off exposing my planes to danger, which would have prevented him wrapping anything and left his units open to be shot, than keeping them safe and losing the rest of my army’s shooting in return.
Go Crush Your Enemies
That’s a lot of words about a complex area of the game. We hope you’ve enjoyed this write-up, and take mercy on us for inevitably having forgotten something critical. As ever, if you have any questions or comments, drop us a line in the comments below, hit us up on Facebook, or shoot us an email at contact@goonhammer.com. Otherwise, happy hunting, and here’s to more productive melee!
