
I’ll admit it, I was not a fan of the Star Wars show Rebels when it first aired. I have, however, given it another chance, and now the story of the Spectres is one of my favorite stories in all of Star Wars lore.
When these characters were announced for Shatterpoint, I was very excited because first and foremost, I couldn’t wait to put some paint on those minis. The sculpts absolutely blew me away. I will have a How to Paint Everything article dedicated to each box soon enough, but in this article I will be reviewing the squad pack Stronger Than Fear and in a separate article I will be reviewing its companion squad pack Make the Impossible Possible.
Kanan Jarrus
Kanan is the Primary Unit in this squad pack, and is honestly one of the coolest Jedi characters I’ve encountered in the lore of Star Wars. Do yourself a favor and watch the Bad Batch TV show and Rebels as companion pieces to really understand Kanan. For Shatterpoint, Kanan brings 8SP with him and 3 Force for squad building, as well as 10 Stamina and 3 Durability. He also has the tags Force User, Jedi, Rebel Alliance, Scoundrel, and Spectre, which give him a ton of flexibility for fitting him in a squad.
Stances
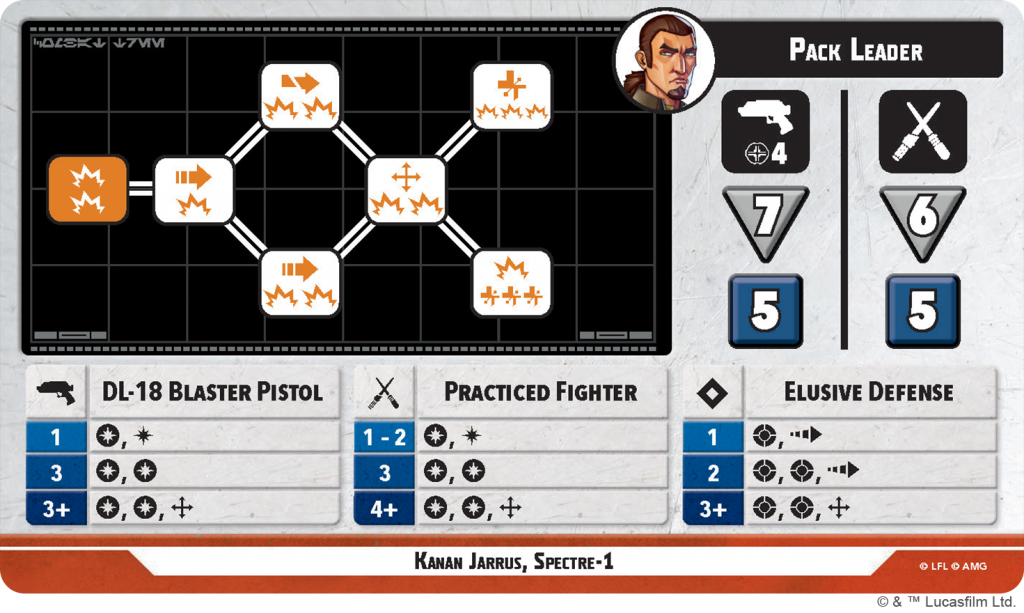
Pack Leader is the stance that you will want Kanan to be in for the majority of the time because he has a Range 4 attack with his Blaster Pistol with a whopping 7 attack dice. He also has 6 melee attack dice and only has 5 defense dice for both ranged and melee. His attack expertise for both ranged and melee attacks have three tiers and are identical. One expertise gives him a Crit and a Strike, three expertise gives him 2 Crits, and 3+ expertise gives him two crits and a reposition. For one defensive expertise he gets a block and a dash, two expertise give him 2 blocks and a dash, and 3+ expertise gives him 2 blocks and a reposition. The combat tree in this stance is also fairly straightforward. Five successes gets you all the way through his tree, and follows a zig-zag pattern throughout. Both paths deal 7 damage through the fourth success, and you have choices on whether to give your opponent Strain or Shove. The final choices of his tree are inverses of each other. You can either deal 3 damage and give yourself one recover, or you can deal one damage and give yourself 3 recovers. I really like the versatility of this stance, and I love how the combat tree is fairly easy to get far in. The difference in good and great Kanan players will be how they manage changing his stance from this to his second stance, Form III Soresu.
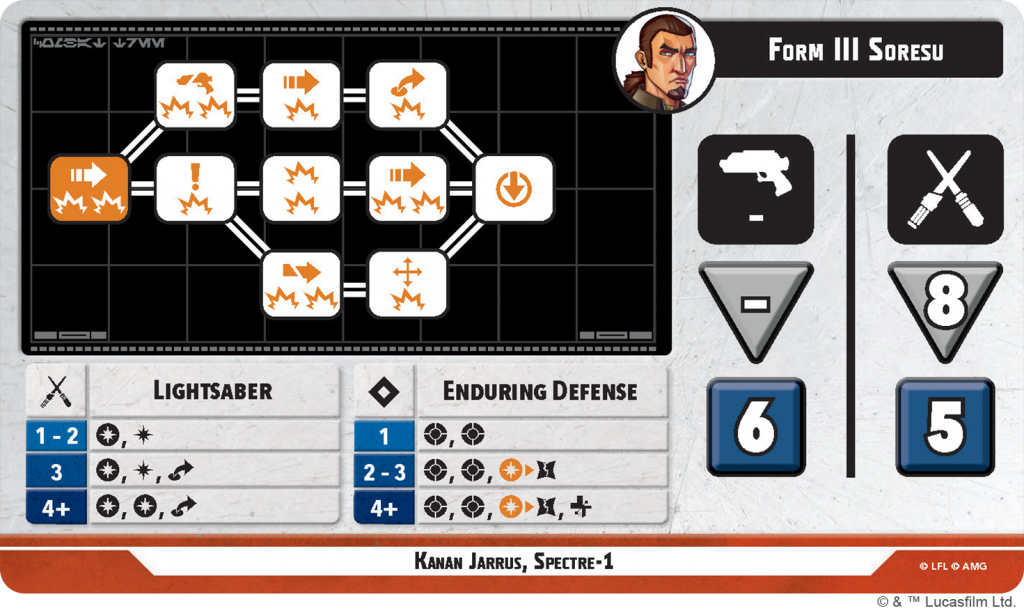
Form III Soresu has no ranged attack, so if you want Kanan hanging back a little bit, you may not want to keep him in this stance until he gets up close. However, once he does get up close and engaged, this stance does have a ton of damage potential. His defensive stats are increased slightly, as he now has 6 ranged defense instead of 5. I guess it’s meant to represent him deflecting blaster shots with his lightsaber, which I am totally okay with. He also has 8 melee attack dice, which can really help him get far on his combat tree. His melee expertise gives him a Crit and a Strike for 1-2 expertise, a Crit, Strike and Jump for 3 expertise, and two Crits and a Jump for 4+ expertise. Each of his defensive expertise tiers builds on the one before it. One expertise gives 2 Blocks, 2-3 adds changing an opponent’s Crit to a Failure, and 4+ adds a Recover to all of the previous effects. His combat tree is fairly straightforward in this stance, too. This tree has a lower, middle, and upper path that all end with Kanan using his active ability Force Push. The lower path deals 6 damage, as well as an Exposed, Pin, and Reposition. The middle path deals deals out 7 damage as well as handing out an Expose and a Shove. The upper path deals 6 damage, Disarm, Shove, and Jump. With 8 attack dice before any Focus actions or buffs from other units in his Strike Team, you should be able to make pretty far down this tree, too, because it only has 5 spots.
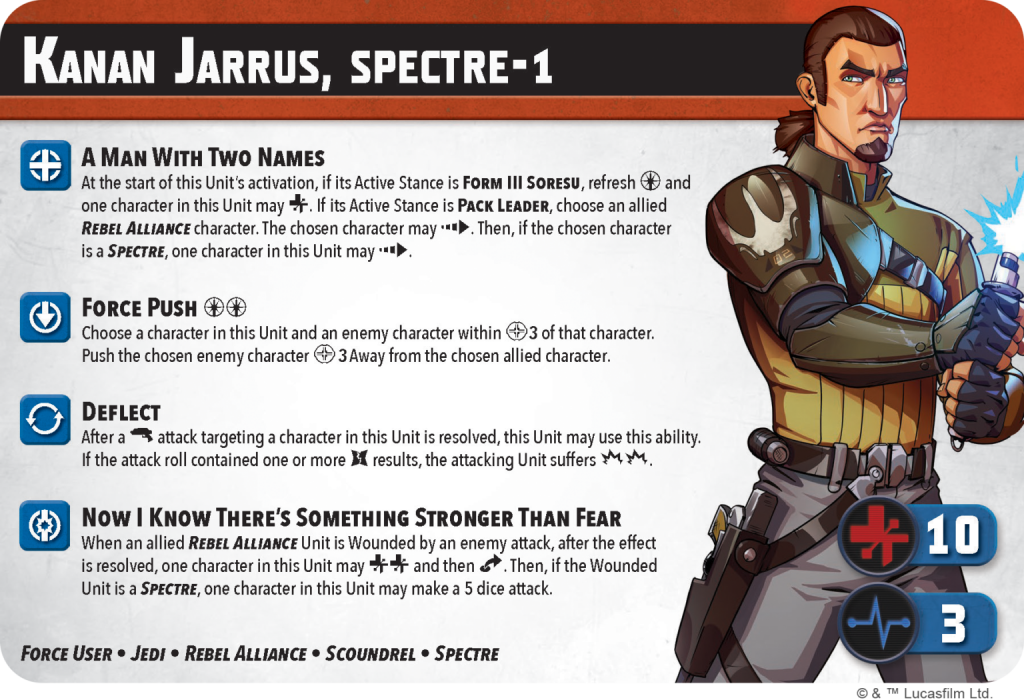
A Man With Two Names
Kanan’s Tactical Ability is very interesting. If he is in Form III Soresu, you can refresh one Force and Recover. If Kanan is in Pack Leader, you can choose an allied Rebel Alliance unit, and that allied unit can Dash. If that allied unit is also a Spectre, Kanan can dash as well.
Force Push
This active ability has a Force cost of 2. Kanan can pick an enemy unit within Range 3, and then push them away Range 3. This has a high Force cost, but can potentially swing a struggle.
Deflect
Kanan can use this Reactive Ability after he has been targeted by a ranged attack and the effect is resolved. If the attack roll contained any failure results, the attacking character suffers two damage. I’m a big fan of revenge triggers, and this is a pretty solid one to make your opponent really consider whether they want to target Kanan or not.
Now I Know There’s Something Stronger Than Fear
This identity adds another decision point for your opponents. If they wound an allied Rebel Alliance character, Kanan can Recover twice and then Jump. If the wounded unit is a Spectre, Kanan can make a 5 dice attack in addition to the Recoveries and Jump. You don’t have to target the Unit that made the attack, so you’re opponent may have thought they were safe on the opposite side of the board from Kanan, but nope, in fact they may have just caused serious damage to one of their allied units.
Ezra Bridger
An orphaned child on Lothal when we first meet him, Ezra Bridger grows into one of the most compelling protagonists in Star Wars lore. He is the Secondary Unit in this squad pack, and has a cost of 4 for squad building. He has 8 Stamina and 2 Durability and the tags Force User, Padawan, Rebel Alliance, Scoundrel, and Spectre. The tags alone offer some really interesting possibilities for who you can match Ezra with, especially as the game continues to expand.
Stance
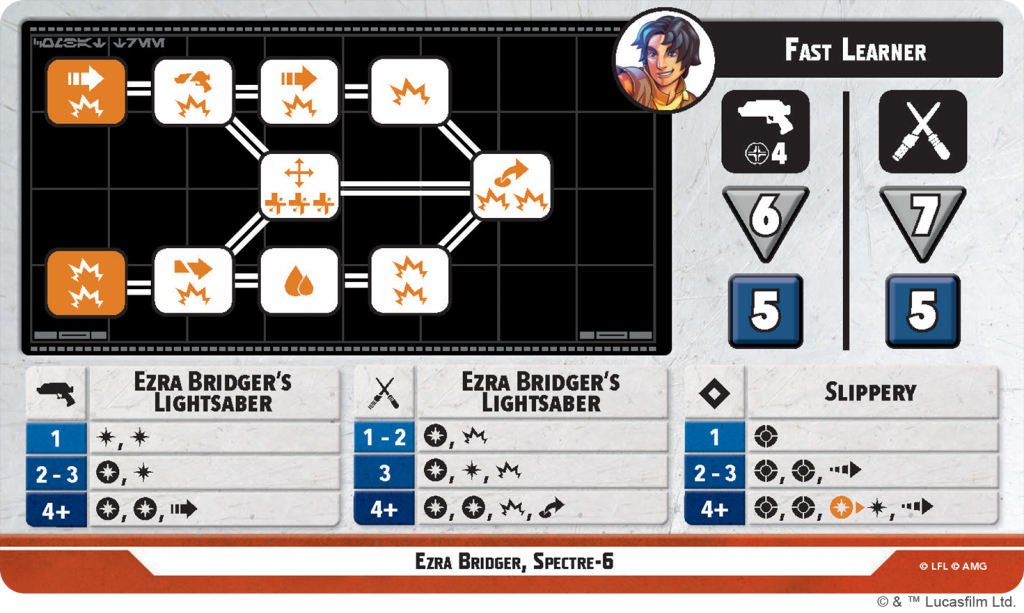
Ezra’s stance, Fast Learner, has a fairly straightforward Combat Tree. You have two starting points to choose from, and then can proceed straight ahead from either one of them, and proceed to the end of the tree, or jump to one spot in the middle that both paths have in common. The upper path of his Combat Tree maxes out at 6 damage, and hands out a Disarm, Shove, and Jump along the way. The lower path offers 7 damage if you get to the end, and gives out a Pin, Strain, and Jump. The middle space that you may choose to cross over into from either path gives Ezra 3 Recovers and a Reposition. With 6 Ranged and 7 Melee attack dice, you can pretty reliably make progress down this tree. In addition to those attack dice, he has 5 defense dice for both as well. I like his defensive expertise because at the second and third tier, it grants Ezra some extra movement with a Dash. One expertise grants a Block, 2-3 gives 2 Blocks and a Dash, and 4+ expertise allows Ezra to change a Crit to a Strike in addition to the Dash and 2 Blocks.
Ezra’s melee expertise chart is really strong, and can really help him go far on his Combat Tree. One expertise gives him a Crit and a damage, 2-3 gives a Crit, Strike, and damage, and 4+ gives him 2 Crits, a damage, and a Jump. That is a lot of additional Crit results to move through his combat tree.
His ranged expertise chart isn’t terrible, either. One expertise gives 2 Strikes, 2-3 give a Crit and a Strike, and 4+ give 2 Crits and a Dash. More movement, and more unblockable Crits always have utility.
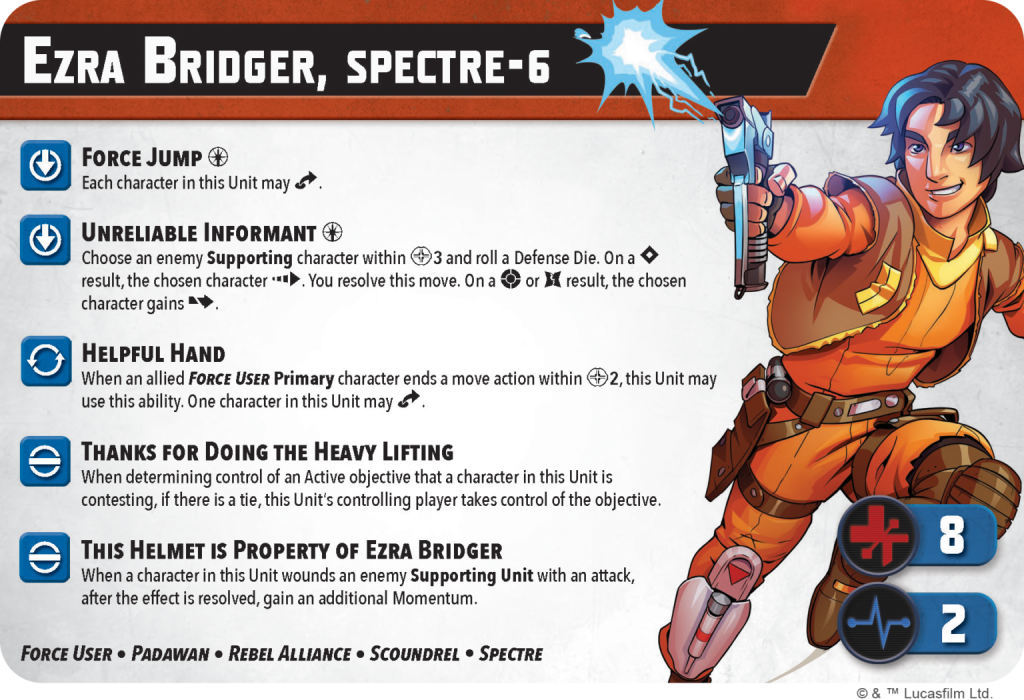
Force Jump
Ezra’s first Active Ability costs one Force and lets him make a Jump. Really good way to get to an objective on a different elevation that your opponent thought was safe.
Unreliable Informant
Ezra’s second Active Ability also costs one Force to use. Ezra chooses an enemy Supporting character within Range 3. You then roll a Defense dice. On an Expertise result, the chosen character can Dash, and you get to resolve this move. On a Block or Failure result, the character you chose gains Disarm. I’m not a huge fan of random results, but if you find yourself in a situation where any of these results can be beneficial, it may be worth the Force cost.
Helpful Hand
Ezra can Jump if a friendly Force User Primary stops a move action within Range 2 of him. A free Force Jump if you have a Force User for your Primary Unit.
Thanks For Doing The Heavy Lifting
This Innate Ability is where I really think Ezra has a ton of value. Ezra breaks ties on contested objectives. Controlling objectives is how you win the game, so being able to win objectives where your opponent has units can be the difference in winning or losing.
This Helmet Is Property Of Ezra Bridger
This innate ability allow you to gain a momentum if Ezra wound an enemy Supporting Unit. Between this and breaking ties on objectives, Ezra can really alter the scoring in a game on his own.
“Zeb” Orrelios
This Lasat warrior is about as subtle as a sledgehammer. He is a Supporting Unit with a cost of 4 and the tags Rebel Alliance, Spectre, and Warrior. He also has 9 Stamina and 3 Durability. His Durability makes him a prime target for abilities that allow him to lose a Wounded token and gain an injured token. There just aren’t that many Support Units with 3 Durability. He can also soak up a lot of damage from opposing units with those stats.
Stance

Zeb’s stance, Honor Guard Captain, is all about brute force and dealing damage. He has 4 and 5 Defense dice against Ranged and Melee attacks, respectively. He also has 6 Ranged attack dice and 7 melee attack dice. His defensive expertise chart has two tiers, with 1-2 expertise adding two blocks, and 3+ giving two blocks and two recoveries. His ranged attack expertise gives two strikes for 1-2 expertise, a Crit and a Strike for 3 expertise, and two Crits for 4+ expertise. His melee expertise gives out the same benefits, but the rewards are at 1, 2-3, and 4+ expertise rolls.
Zeb’s Combat Tree has three levels for you to choose from. If you follow the bottom path, Zeb will deal a total of 6 damage along with a Strain, Dash, and a Reposition. The middle path deals the same amount of damage but instead gives your opponent a Pin and a Shove. The top path deals 5 damage and two Shoves. A variety of possible conditions to hand out to your opponent and a fair amount of damage if you make it far down the tree is not bad, but his Combat Tree is not the only way Zeb can deal damage to enemy units.
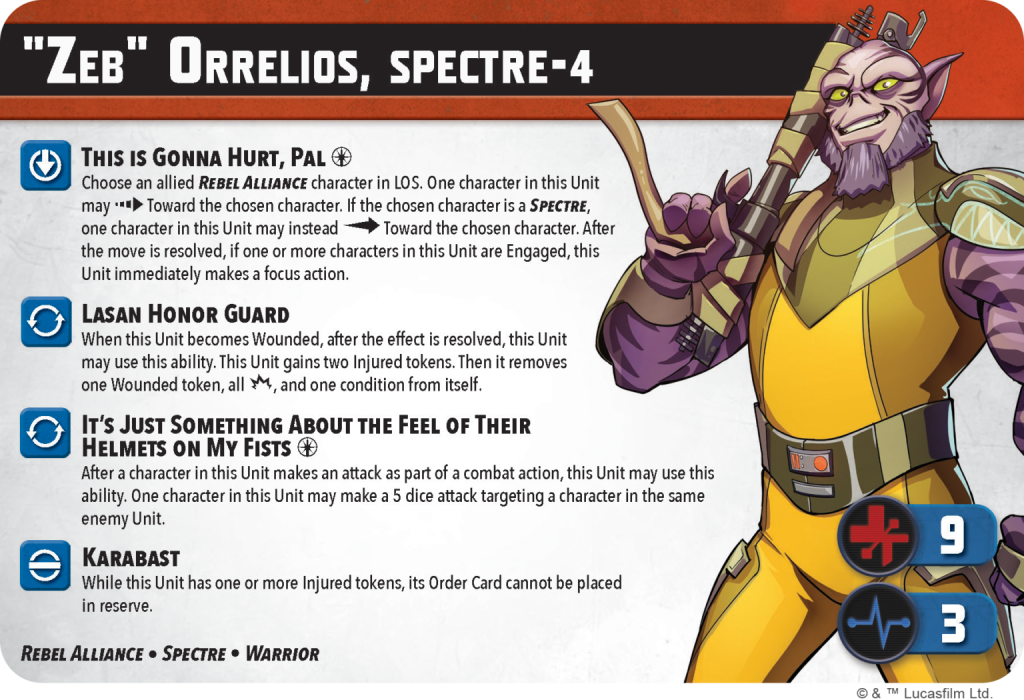
This Is Gonna Hurt, Pal
For one Force, Zeb can use this Active Ability and choose an allied Rebel Alliance unit in line of sight, without a Range requirement. Zeb can Dash towards that unit. If the unit he chooses is a Spectre, he can Advance instead of a Dash. If Zeb ends this movement Engaged with an enemy unit, he also immediately makes a focus action. Zeb wants to be up close and personal with enemy units, and this is a great way to not only get him quickly up the board, but also add to his attack dice pool.
Lasan Honor Guard
This Reactive Ability has a fairly steep cost, but it can also mean the difference in winning or losing a struggle. When Zeb becomes Wounded, he can use this ability and lose that Wounded token, all damage and one condition and gain TWO Injured tokens. It can be difficult to give him that many Injured tokens, but if you need him to score an objective, sometimes you have to take drastic measures.
It’s Just Something About The Feel Of Their Helmets On My Fists
This Reactive Ability costs Zeb one Force, but it is absolutely worth it. After Zeb makes an attack action, he can spend a Force and immediately make another 5 dice attack against the same Unit. Action economy is a huge advantage, and the ability to make two attacks with one action immediately jumps out to me.
Karabast
With this Innate Ability, whenever Zeb has an Injured token, his Order Card cannot be placed in Reserve.
Gameplay Tactics
Strike Team 1:
Hera Syndulla, Sabine Wren, Chopper
Kanan Jarrus, Ezra Bridger, Zeb Orrelios
It’s hard to break up a family. This Strike Team is specifically designed to maximize the benefits of every unit having the Spectre tag. Also, I am a sucker for staying on theme with a Strike Team, and it doesn’t get much more on-theme than this currently in the game. Turn them loose and let them do Spectre things. Bonus points if you can build a themed table to represent a mission on Lothal!
Strike Team 2:
Kanan Jarrus, Ezra Bridger, Zeb Orrelios
The Mandalorian, Sabine Wren, Rebel Commandos
This Strike Team has some really interesting synergies between the Spectre, Mandalorian, Scoundrel, and Rebel Alliance tags. Din Djarin is one of the best Primary Units in the game, and I like to get him on the table as often as I can. Additionally, the extra movement provided to the Rebel Commandos from your Spectre Units can really give you some flexibility and get them into advantageous positions all over the board. Finally, both Primary units in this Strike Team have abilities that trigger when allied units get Wounded. This increases their Action economy and really improves their impact on the game.
How are you running the Spectres? What did we miss? Let us know in the comments below!
Have any questions or feedback? Drop us a note in the comments below or email us at contact@goonhammer.com. Want articles like this linked in your inbox every Monday morning? Sign up for our newsletter. And don’t forget that you can support us on Patreon for backer rewards like early video content, Administratum access, an ad-free experience on our website and more.
