Hey, it’s Summer again. Oh, the coolant leak alarms? They’re supposed to be ringing. This article is about defence in Armada, and what we can do to facilitate a healthy separation between ship and space.
Stayin’ Alive – “I’m positive that if I die, I’ll be very upset.”
Wargamers know that there are a lot of scary plastic things out there trying to make us dead. Not being deaded by any hostile that advances in your direction is the first step to accomplishing your objectives. Consequently, survival in Armada is one of the most important things you can do.
Standard games of Armada always have deathmatch rules in play. Each ship and squadron and its point cost is noted down. Whoever earns the most points wins at the end of the game wins. Always. The game’s mandatory Objectives spice up these deathmatch rules by giving you other ways to add points to your tally, or speed up your opponent’s transition from warship to wreckage. That’s not to discount the importance of objectives – Armada is an objective-based game, and playing them is key to your fleet’s success. But underneath every objective is a kill-all game where every sinking counts, and tabling the opponent grants instant victory.
Today, I’ll explore being on the receiving end of the ruthless arithmetic of plastic spaceship combat. With special regards to your ships. The majority of your fleet’s points (two thirds, rounding down) will be sunk into ships, and they have by far the most complex suite of upgrades and defensive options available to them. Your fleet command, ordnance deployment, and force projection happens from the ships. The good news is, you have lots of options for keeping them alive.
The Integrated Survivability Onion – “I like the glass onion, as a metaphor.”
“I love the onion fried in oil,
I love the onion when it’s good,
I love the onion fried in oil,
I like the onion, I like the onion.”
– Translated from a French marching song
What does the continued existence of a Star Destroyer have in common with an onion?
They have layers.
I’m going to introduce you to the integrated survivability onion. This theory of defence outlines the steps between being acquired as a target and dying, as well as providing suggestions on what to do at each step. The further away from the centre you are, the greater your margin of safety. It’s a piece of real-world military theory that’s condensed into something that regular people can understand.
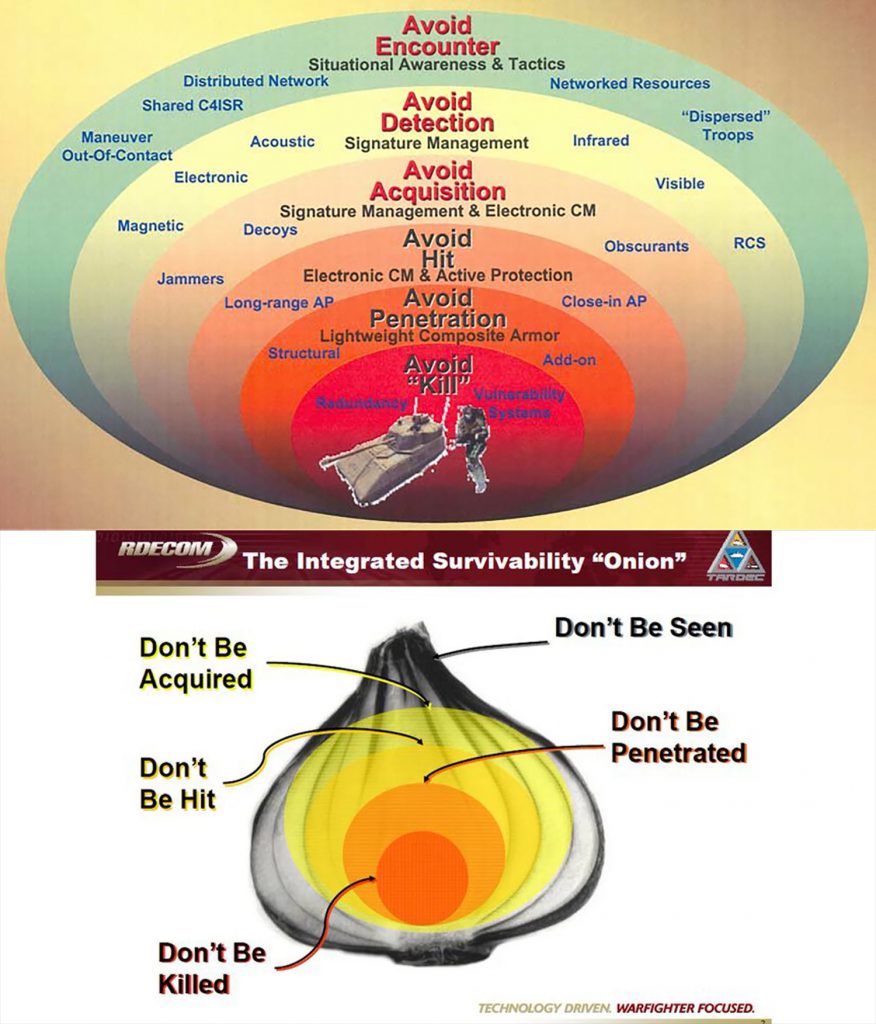
To make things even more fun, I’ve adapted the integrated survivability onion into a diagram that can be applied to Star Wars: Armada. Because we’re not dealing with C3, jamming, and networked battlefield management. This isn’t the Pentagon. It’s Star Wars.
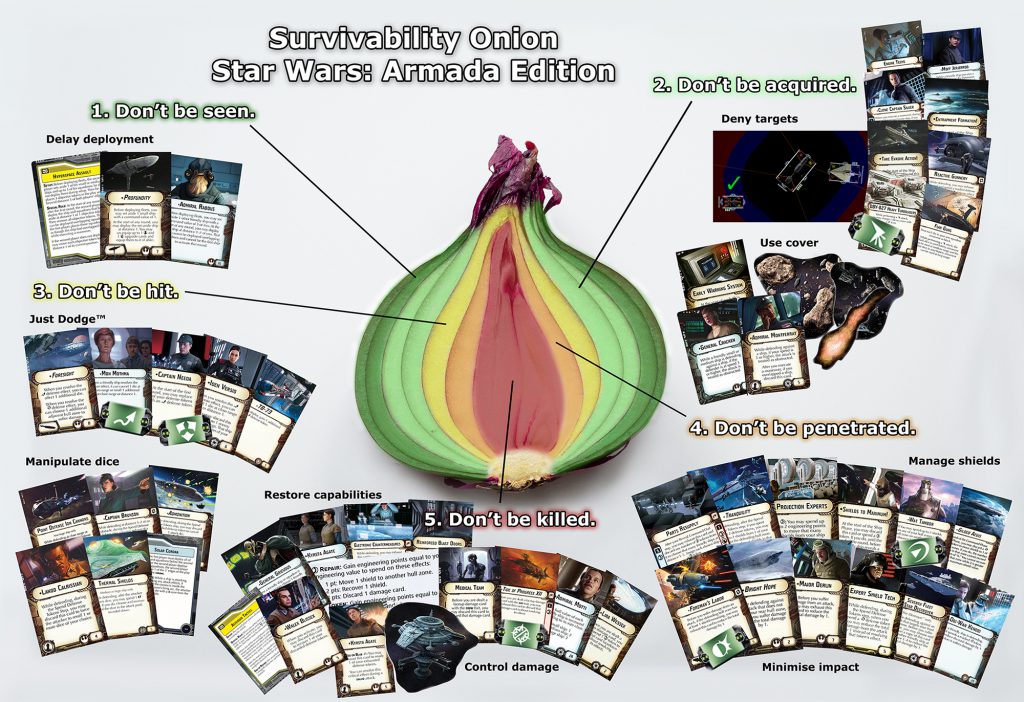
The onion is actually pretty easy to read (albeit not very delicious). The survival of your warship can be visualised as a multi-layered system where the ship’s hull is the last line of defence. At every stage before that, there are means and technologies that you can use to mitigate enemy efforts. Anyone who’s ever played Armada knows that the ‘theory’ of survivability usually collapses by Round 3 and it devolves into a boxing match. Which is some of the most fun you can have this side of narcotics use.
The integrated survivability onion encourages us to stop fixating on armour protection and taking hits as the main mode of survival. Instead, it identifies the numerous opportunities for defence that present themselves before we take a hit. Contrary to onscreen depictions, tanking enemy laser fire with your command bridge is not something to aspire to.
In the next sections, I’m going to separate the layers and discuss some of the more important ones, while also presenting examples from each layer of how you can protect your ship. This isn’t the in-depth, tactical discussion of other articles. Rather, it’s about thinking of defence in a holistic and systematic manner.
Layer 1: Don’t be seen.
In real-world examples, the top-most layers of the survivability onion can refer to non-violent and pre-emptive conflict resolution. In tactical situations this includes pre-emptive strikes and concealment. Unless you count showing up to the game to be a valid form of ensuring your ships’ safety, Layer 1 only has limited application in Armada.
Delay deployment
Delaying a unit’s arrival to the table keeps them in a limbo state where they are functionally immune to harm, but make no material contributions to the battle. Armada has a few mechanics that allow players to delay the deployment of ships and squadrons. These can be used to make surprise attacks from an advantageous position, or deny board control and comfort to the opponent. Note that any units not deployed by the end of the game or before the ability’s owner is destroyed, are considered destroyed.
Delayed deployment is a strategy you decide on in the fleet-building stages. You decide whether to commit, and how deeply to commit. Armada’s standard rules make no allowance for reserves or reinforcements, so every delayed deployment mechanic has a cost: the point cost of an upgrade or the opportunity cost of upgrade slots and objectives. There are scaling degrees of commitment. Anyone can take Hyperspace Assault and deploy a small/medium ship with a squadron group later, but it relies on your opponent being the first player and picking that objective from your hand. The commitment can escalate to building your whole fleet around it: Admiral Raddus is the strongest form of delayed deployment, but he requires a flagship of his own, a ship to deploy, and a defined strategy. For the benefit of dropping a battlecruiser on the opponent at your leisure, you basically have to build your entire fleet around the strategy and pay a steep price in opportunity costs and shortcomings.
As far as I know, the ‘Don’t be seen’ layer of survivability of Armada is entirely occupied by simply not being present. Once your ship is on the table, it can be threatened, whether by long-ranged fire or planetary ion cannons. For a ship on the table, there is never a position of absolute safety. There are only degrees of vulnerability.
Examples of delayed deployment
Hyperspace Assault allows the second player to set a small or medium ship up in hyperspace with up to three squadrons. That player can then designate three potential arrival points on the table, which adds stress and area denial to the opponent. This objective is frequently used with an assault-oriented ship like the Gladiator or MC30c that can operate independently and is not tied to a crucial support role. Its other benefit is that it allows you to deploy a squadron group alongside the ship, increasing its flexibility and providing escort. Independent squadrons like Rogues are preferred, as the ship you drop is typically not a carrier.
Unfortunately, it relies on the opponent choosing this objective for you, leaving us with catch-22: if Hyperspace Assault is the best objective you and your opponent knows this, they’ll never pick it. If it’s not your strongest objective, then it may be chosen at the expense of better alternatives. Since it’s reliant on your opponent picking it, Hyperspace Assault is never something players rely on – consider it a supplemental option, rather than the heart of your strategy.
Profundity is a title upgrade for the MC75. Once you get past the requisite cost of the MC75 and its cargo (a small ship with Command 1), the ability is fairly cheap at 7 points. It also has an interesting lifeboat ability that allows you to transfer a commander or officer to the smaller ship prior to deploying it, a la Rogue One. This title can be used to drop a single flotilla of GR75s, a Corellian Corvette, or a Hammerhead. Corellian Corvettes are excellent officer platforms and are a novel way to transfer an officer over while providing light fire support. Hammerheads normally fly in groups with their Task Force titles, but Garel’s Honor was almost purpose-built for a lone Hammerhead with a deathwish. Fitting External Racks to Garel’s Honor adds a potent close-quarters threat that your opponent must respond to. GR75s should only be dropped with Rapid Launch Bays – a questionable pick, since you compromise on the carrier’s effectiveness and miss out on activations for this gimmick.
Profundity doesn’t surprise your opponent: the small ship emerges from its mothership and your opponent knows exactly where it is. It also forces you to take an MC75, the title, and its cargo. Until the smaller ship deploys, it’s also not contributing to your battle. As with any delayed deployment, the costs can be substantial and must be carefully managed.
Admiral Raddus is the largest investment anyone can make into delayed deployment. His ability allows the player to set aside a ship of any size (not his ship), and deploy near his flagship. This makes great use of the Rebels’ remarkable range of large ships to maximise the impact of his ability. Dumping a star cruiser on the opponent can tilt the entire battle in your favour.
The costs of this are steep. Your commander and commander slot are set in stone. The ship you’re dropping is normally a heavily-geared large ship. Before you make the big drop, the list has a single failure point: Raddus. If he dies and the ship is not deployed, it’s destroyed. That’s a game-ender. Investing into Raddus defines your entire fleet strategy. He’s not something you just sprinkle in.
An honourable mention goes to Rebel players who stack delayed deployment abilities. You can run a Raddus fleet and load Profundity with a small ship that has Rapid Launch Bays, which in turn carries fighters. Raddus could then drop the Profundity, which drops a small ship, which drops a fighter complement. If your Hyperspace Assault gets picked, you can even add another ship to the drop. Smart? No. But funny.
Layer 2: Don’t be targeted.
A valid target is not necessarily a preferable target. Deterrence can prevent an attack before it occurs. Layer 2 is about deterring attacks. If done right, you can prevent those attacks entirely. If not, it’s a roadblock before the attacker cracks your ship open.
Deny targets
Target denial is achieved through manoeuvre and counterfire. A ship’s speed (or lack thereof) can keep it at such a long range that attacking it is futile. Likewise, if you pincer an opponent, a lower priority target is less likely to be shot.
Manoeuvre relies on good deployment, Navigate commands, speed changes, and the aforementioned delayed deployment. Players should prioritise deploying in a manner that supports their upcoming turns while minimising risk. This is much harder than it sounds.
Inexperienced players tend to discount the value of Navigate commands in favour of Concentrate Fire, but Navigate is often the best command. Navigating a tight turn to place a superior arc onto a target is better than adding one die with Concentrate Fire. Navigating so that you’re not in an enemy’s best arc is a proactive defence, whereas Repair commands are in reaction to damage you’ve sustained. The only command that Navigate can’t supplant in the right situation is the Squadron command. Even so, carriers still need to Navigate and keep pace with squadrons or remain in formation. Navigating often and intelligently is a foundational skill in Armada. I wish it was easier to grasp.
The second aspect of target denial is counterfire. The introduction of the Salvo token changed how we approach defence. The Salvo defence token allows a defender to make a low-strength attack against an attacking ship. Its benefit to your survival is wholly preventative. Salvo changes the cost-benefit calculation that attackers make before initiating an attack because they must consider the risk of return-fire. Small ships that would normally make opportunistic attacks against a large ship run a risk of eating more damage than they deal. Even large ships suffer under piecemeal Salvo attacks.
Counterfire requires a Salvo token and can be upgraded to enhance Salvo attacks. I covered this topic in depth in another article, so I won’t repeat the details here. The benefits of counterfire are realised when your opponent declines an entire attack due to the mere threat of return fire. Even if Salvo doesn’t prevent an attack, it makes attacking you costlier and forces your opponent to act more cautiously. At the very least, return fire allows you to take chunks out of the target’s future in exchange for damage you suffer in the present.
Examples of target denial
Engine Techs can redefine your ship’s capabilities by giving you an optional extra move attached to your Navigate command. Ships capable of fitting Engine Techs have an invisible top speed one level higher than their default configuration. More often, the upgrade is used at lower speeds to provide a sprint option. The flexibility is extraordinary and costly.
Moff Jerjerrod allows any ship in the fleet to suffer a point of to maximise turning at the first speed of its manoeuvre. The damage suffered can be against a low-relevance shield to minimise its effect. Imperials feature good shield values and excellent hull values at expense of their mobility. Jerjerrod essentially counteracts one of the Empire’s core weaknesses by leveraging their core strength. He’s excellent.
Clone Captain Silver allows a ship to make an extreme speed change if it doesn’t use a Navigate command. The ability is normally used to break contact, but can be used to dive on an unprepared enemy ship or make an emergency speed reduction. Pairs with the Republic’s Mercy Mission fleet command to ensure the success of your final sprint and claim a stack of victory points.
Entrapment Formation and Take Evasive Action are fleet commands that improve mobility across your entire fleet when activated. Entrapment Formation rapidly flexes the fleet into new speed brackets of their choice. Take Evasive Action improves manoeuvrability to bring those key arcs on targets. Both of them need coordination, as they get maximum value out of being used on as many ships as possible.
If your ship doesn’t have a built-in Salvo token, then Reactive Gunnery, Local Fire Control and Commodore Agate can provide it to you. The threat level of your counterfire can be greatly increased with upgrades like Flak Guns (range), DBY-827s (damage), and officer Agate (defence). Salvo and its many applications are covered in depth in a previous article of mine.
Use cover
Putting something between the shooter and your ship can reduce fire or cancel an attack entirely. This mainly works through the Obstruction mechanic, which is the Armada equivalent of cover. Obstruction removes a die from the opponent’s hand before they roll, and it cancels the entire attack if their last die is removed.
Obstruction is binary – it’s active or it’s not, and it can’t be stacked. Nevertheless, it’s a great way to reduce inbound fire. A three-die attack loses 33% of its teeth when obstructed. A one-die attack doesn’t even happen. Just remember that adding dice to a pool due to special rules happens after the initial pool is rolled.
Obstacles are the universal source of obstruction. They have different special rules, but they all obstruct fire. I’ve stated the benefits of obstruction to ships, but it’s also profoundly valuable to squadrons. Most ships have an anti-squadron attack of a single die. A squadron that is obstructed is functionally immune to one-die attacks from ships. Learning to use obstacles to your advantage is a fundamental rule of Armada that cements it as a game of manoeuvre over firepower. What separates a good Armada player from a great Armada player is the ability to drive into obstacles and make it work to your advantage. Most of us are not great Armada players.
Examples of cover use
If you don’t like where the obstacles are, you can bring them with you. Ezra Bridger and the Interdictor’s Grav Shift Reroute allow you to shift obstacles to nefarious ends. Mobile obstacles can be used offensively to strike or reroute enemy ships, and defensively to protect yours. Some objectives attach victory conditions or special bonuses to terrain, so manipulating it can contribute directly to victory.
Admiral Montferrat gives you the benefit of obstruction if his ship is moving at Speed 3 or higher. But he gets knocked unconscious if your ship ever hits an obstacle, so be careful. He used to be a mainstay on aggressively-flown Demolishers, but the requirement for maintaining a high speed has pushed him out in favour of others.
Early Warning System gives one hull zone the benefit of obstruction. It’s an excellent use of your Defensive Retrofit slot if you expect to face swarms of ships or fighters where removing a single die is very useful. If your Early Warning System is blocking the direction of a bombing run, single-die bombers like the TIE can’t even attack you. Just remember to activate it during its timing window.
General Cracken is for Rebel players who gotta go fast. He’s like a fleet-wide Admiral Montferrat, with the accompanying perks and downsides. Still, a swarm of small ships can remove a lot of fire under his command.
Intermission
My articles are long and dense. If you got this far in a single sitting, I implore you to take a break before going on. I’m an acquired taste and your brain will get mushy if you don’t take breaks from me. This loaf of cat and I both wish you a pleasant break from reading.
Layer 3: Don’t be hit.
We all dislike being shot at, but sometimes, it just happens (lol I’m South African). You can reduce the pain by evading and being an annoying prick. Both are valid. This layer of the onion is concerned with removing damage before it reaches your defences. We’re now firmly in the realm of being reactive rather than proactive, but many of the abilities here can still remove a lot of damage.
Just Dodge™
The match has barely started. An Onager is landing accurate fire from across the map and enemy torpedo bombers have latched onto you. Also, you’re on a collision course with a friendly destroyer.
One adage can tackle all of these problems.
Just Dodge™
That saying was inflicted on World of Warships players long ago and I’m bringing it here. In Armada, ‘dodging’ is represented by the Scatter and Evade defence tokens. Scatter is the most powerful defence token in the game. When used, it just cancels every die in the attack and nullifies it. It’s balanced by scarcity: only flotillas and a limited selection of squadrons can Scatter. Evade is more common and has a much lower impact. An evading ship cancels one of the attacker’s dice if the attack was made along range. At close and medium range, the evading ship may force the attacker to reroll one die.
Both Scatter and Evade use dice modification mechanics that fit under the manipulate dice section further down. They only get their own section because of their association with a ship’s in-built defences.
Scatter’s purpose is straightforward: it gives ships that would otherwise not survive a single attack a lease on life. GR-75s have 1 shield and 3 HP. It takes more applied damage to kill some squadrons than GR-75s. Scattering is the only reason that flotillas can survive more than one round of shooting, and it’s balanced by the fact that it can be disabled by a single accuracy icon. Scatter is a defence token of extremes. Your opponent will do their best to disable it, and your ship’s continued existence depends on it. There is no way to modify how a Scatter token works – you have it, or you don’t. But it’s incredibly powerful when used.
Evade tokens are more interesting. Every small ship can evade, even the chunky Pelta. Particularly nimble ships get two Evades. The largest ships with in-built Evade tokens are the medium Assault Frigate and large Rebel Alliance Providence. There are also ways to improve or modify the Evade token’s effect, which makes it far more versatile. If you’re feeling feisty, it can even be turned to offence.
Examples of just dodging™
Captain Needa is the Empire’s ticket to Evade tokens. He is remarkably cheap considering that he lets any Imperial ship replace a token with an Evade. The lacklustre Contain usually falls victim to Needa, and he can even make a Super Star Destroyer dodge like a Hammerhead. He’d be an auto-take on many ships if the Imperial officer roster wasn’t so strong in respects.
Commodore Agate is the Rebel answer to Needa. She gives her ship a non-Scatter defence token, which can be an Evade. She’s normally used on medium or large ships to maximise her value, and a bonus Evade on a chunky cruiser can provide phenomenal survivability at long ranges.
TB-73 gives your Republic Pelta a second Evade. Good value if you can spare the points.
Mon Mothma is the god of dodging given corporeal form for any nimble fleet. She vastly improves every Evade token in the fleet. Her fleets are exclusively filled with nimble ships that can take advantage of this devastating ability.
Iden Versio is my long-running Imperial crush, and improves the Evade’s close-range potency. She strongly encourages Raider and Gladiator aggression, which suits their hulls beautifully.
Foresight is an amazing Rebel title on its own, but it can stack with Mon Mothma. Losing your two best results from a medium-range salvo fired at Foresight is infuriating.
Manipulate dice
Dodging isn’t the only way to mess with an attacker. You can always twist the results before being stuck with them. This sub-layer of Don’t be hit is about twisting dice results into useless ones to mitigate damage. Screwing with incoming dice is one form of defensive agency a ship has. The attacker gets to manipulate their results against you, so why can’t you?
Dice manipulation itself is discussed in greater depth in my Dice 102 article, so I’ll refrain from covering it again. Let’s go straight into examples.
Examples of dice manipulation
Lando is a favourite defensive officer for the Rebels. He forces an attacker to reroll any dice of the defender’s choice. That is to say, you make the attacker reroll all of their good results and keep the bad ones. The outcome can save a small ship from death, although large ships prefer upgrades that can be applied repeatedly.
Captain Brunson encourages risky piloting in exchange for the ability to cancel a die. Her high cost can be difficult to justify, but she can be extremely valuable in a fleet that leans on obstacle-based gameplay or obstruction.
Admonition calls for discarding a readied defence token to cancel a die. The ability to cancel dice is potent and usually quite costly (see: Captain Brunson), but Admonition sees a lot of use in emergencies, or when one of your Redirect tokens is no longer useful.
Thermal Shields… exist. They let you spend a Brace to gamble on reducing damage before it happens, rather than reducing the guaranteed damage in the pool. Conventional wisdom argues that halving guaranteed damage is better than maybe reducing damage, but that’s not the point here. Thermal Shields are for reducing damage and denying force multipliers to the opponent. If their attack needs an accuracy icon, remove their blue and red dice to flush those accuracies down the toilet. A sledgehammer black dice attack relying on a powerful upgrade can be neutered by pulling out black dice. Anyone who thinks the Clone Wars featured elegant weapons for a more civilised age hasn’t faced Thermal Shields.
Point Defence Ion Cannons are another branch of the Clone Wars’ incivility. This is the first defensive upgrade to grace the Ion Cannon slot. It’s simple. Be close to the attacker and you can make them reroll a die. Stick this in for 4 points and you always have the short-ranged part of an Evade token. It can’t be disabled by accuracy icons, nor does it cost anything to use, making it better than an Evade at close range. It even stacks with Evades. A staple on aggressive warships that aren’t otherwise using the highly specialised Ion Cannon upgrade slot.
Layer 4: Don’t be penetrated.
You’ve taken the hit and have to resolve its effects. Layer 4 of the survivability onion is firmly in the don’t panic step of keeping your ship alive. The priority here is to prevent damage from reaching the hull proper. It’s okay, because you’ve had plenty of opportunities before this to soften the blow, and there are still options after this.
Thinking of survivability in terms of the mighty onion is seeing how deep survivability actually goes. Conventional models would have started here at Layer 3 or worse, here. But we’re actually at layer 4 out of 5 and hostile fire has finally impacted our ship. This is how defence should be conducted.
Manage shields
Every ship in Armada has energy shields that need to be breached before you crack into the hull. Shield damage is less harmful than hull damage. For one, your ship doesn’t explode when the shields vanish. Shields also protect your hull from numerous critical effects, and can be restored much more cheaply than hull points.
The skill of shield management (no, not like EVE Online) is about keeping damage focused on the shields, rather than the hull. Shields are ablative protection that delays damage to your hull. Any ship that is destroyed with shields remaining has not utilised its shields to their full potential.
Shield management hinges on the Redirect token, which lets you shift damage to adjacent shields. It doesn’t stop damage, but it spreads the pain around. After the shields drop, you can use repair commands to restore them or transfer other shields over. Repair commands can also repair shield damage at a fair cost.
Examples of shield management
The Shields to Maximum fleet command regenerates shields across the entire fleet. It’s not a first pick, since the Fleet Command slot is very valuable and you can’t guarantee that all of your ships will benefit from it when it activates. It does find a place in shield-focused fleets that plan to eat a lot of fire, though.
Projection Experts is about friendship. Ships with this upgrade can donate their shields to nearby friendly ships. This upgrade normally goes onto support ships with a supply of repair tokens, like those from…
Parts Resupply. This upgrade can spread a large number of repair tokens around. On most mid-sized and larger ships, a single token is sufficient to restore a point of your shields. Smaller ships may need to pair the token with a full-sized Repair command for effect. Still, Parts Resupply goes onto support ships very cheaply and can shore up the defences of many ships at once.
Tranquility was designed with Luminara in mind by providing a fake Redirect to a commander who is desperate for durability. Abilities like this that allow you to mimic all or part of a defence token’s capability are really powerful. Aside from boosting your defences independently of defence tokens, they can’t be targeted by accuracy icons or effects that disable defence tokens.
Barriss Offee is Luminara’s apprentice and can spend a Redirect to divert an entire attack to another hull zone. This is best used to shift the fire from one side of your ship to another that is not under threat.
Aspiration is an MC75 title that can punch a high-risk hull zone beyond its base shield value. This is excellent for confronting mono-directional threats. It can’t recover any shields while one of its shields is buffed beyond its base value, though. Risk versus reward and all that.
Gilded Aegis is the Separatists’ more intense answer to Aspiration. It discards your precious Redirect token to elevate one of its shield facings beyond the base value. Unlike Aspiration, Gilded Aegis can still recover shields while its ability is active – just not on the boosted hull zone. If played well, you can have a beastly assault cruiser that is very difficult to bring down before it does its gruesome work. If you want to be a dick about it, you can even recover the Redirect token with Grievous. That’s hot.
Minimise impact
Damage that reaches your ship can still be POOFed out of existence. It’s infuriating for the attacker, which means you should do it whenever you can. Under the Don’t be penetrated maxim, you’re taking hits but trying to lessen their effect. Reducing damage helps accomplish this whether or not your shields are still up. Damage reduction abilities also come at a premium cost, but are generally cheaper than dice cancellation. If your ship can get reasonably priced damage cancellation, it should, but damage reduction is okay.
The main source of impact minimisation is the Brace token. This token is found on all medium and larger ships, as well as hardier small ships. It halves the damage pool (rounding up) when resolving damage. In the ideal situation of an even-numbered pool with no critical effects, it halves the damage your ship takes. In less-than-ideal situations, it still shaves off a lot of damage. Brace only lags behind Scatter in its raw effectiveness, but is vastly more common. It scales linearly with the size of the attack, unlike the Evade and Redirect which can be overwhelmed with heavy fire.
The sheer power of the Brace token and prevalence on the more dangerous ships in Armada makes it a premium target to disable. Defence token disruptors like Admiral Sloane, Intel Officer, and accuracy icons are mainly used to attack Brace tokens. If you have a Brace, your opponent wants it gone.
There are also other ways to reduce damage – most of them are just not as singularly powerful. Some of these are detailed below.
Examples of impact minimisation
Bright Hope gives GR-75s a layer of protection above its Scatter and Evade tokens. It’s practically an auto-take at 2 points for a damage reduction ability. If this upgrade spares the life of its ship, then it’s made back its value many times over.
Foreman’s Labor is the Hardcell’s defence-oriented title. It’s restricted to one use per round, and the defending hull zone must have shield HP remaining to benefit. Foreman’s Labor isn’t positioned to save the ship from monster salvos, but it handles opportunistic attacks quite well. It’s made for shaving off squadron attacks or combining with Evade to negate a weak, long-ranged attack. In the world of damage reduction abilities, 5 points with restrictions is considered a good deal.
Major Derlin is one of the simplest damage reduction cards in Armada. Exhaust him to reduce inbound damage by 1. It’s a once-per-turn damage reduction ability with no other conditions. 7 points isn’t a bad price, but any decision about him must be weighed carefully against the Rebels’ other excellent defensive officers. Lando and Walex are cheaper and can cut down more damage than Derlin, albeit less consistently.
Expert Shield Tech modifies the Redirect token so that it can be spent to reduce the total damage you suffer by 1. It occupies the valuable officer slot, but it’s not faction-locked so anyone can benefit from it in the absence of something more specialised. Expert Shield Tech performs best against weak attacks and in the absence of shields. If someone is pinging you with 1-3 damage attacks, reducing the pool by 1 is incredibly valuable. One oft-cited example is that a 4 damage attack can be Braced down to 2, then Expert Shield Techs can reduce it to 1 damage. That’s transforming a decent salvo from a CR90 into something laughable. Expert Shield Tech also shines when your shields aren’t available to protect you. In that situation, you can still squeeze damage reduction out of an otherwise useless Redirect token.
Obi-Wan Kenobi is a premier defensive commander who acts like a fleet-wide Expert Shield Tech. You only benefit from his ability when spending a readied (green) Redirect, but every ship in the Republic roster has a Redirect and can benefit from him. Best of all, he stacks with Expert Shield Tech and using them together can shave off 2 points of damage. In the example of a 4 damage attack, Bracing it down to 2 and using Kenobi and Expert Shield Tech’s abilities will evaporate it into zero damage. General Kenobi also excels against piecemeal attacks, but he risks being overwhelmed due to not being usable with exhausted (red) Redirects.
Seventh Fleet Star Destroyer is the Empire’s only generic title. It can be slotted into any number of ships with ‘Star Destroyer’ in the name, which gives you many options. Once fitted, you can exhaust copies of the card on nearby ships to reduce incoming damage – a way to simulate collective defence via formation flying. You don’t see this card in competitive play because the opportunity cost is astronomical. Imperial ‘star destroyers’ have phenomenal titles already. Demolisher and Harrow are auto-takes for their respective hulls. Imperial-class ships have awesome specialist titles. There are only niche uses for this title in the Onager and Venator. The tragedy of the Seventh Fleet was that it was priced reasonably for the effect, but opportunity cost killed it. Having to sacrifice such great titles and building your entire strategy around this card means it’s forever relegated to narrative play.
My Team Player of the Year award goes to Task Force Antilles. This generic title for Hammerheads stretches the definition of impact minimisation by making your friends eat the damage for you. It’s cheap – something that the Seventh Fleet could learn from. If you can grasp the formation flying necessary to make it work, your Hammerheads will be really annoying to kill once they start spreading the damage out. The purpose of Task Force Antilles isn’t to make Hammerheads indestructible. They’ll still die. The idea is to spread the damage around so that they all live longer. After all, a ship at 1 HP still deals full damage.
Intermission
Another intermission. This one is happy corgi themed.
Layer 5: Don’t be killed.
Your hull is buckling and groaning. The shield officer is screaming/crying/throwing up, and that last breath of recycled air tasted metallic. We’re in the uh-oh stage of defence.
Layer 5 is red in the diagram because it is threatening and scary. We’ve lost the initiative. All of our remaining options are reactive. Everything here is a last resort, but it can save the ship and that’s what counts.
Control damage
Damage control is about staying alive. That’s it. There’s definitely overlap between this section and minimise impact. In my view, they differ because damage control is about maximising hull HP and reducing critical damage whereas minimising impact was about removing damage. The subtle distinction between taking less damage, and taking damage and remaining effective.
The defence token dedicated to damage control is Contain. Spending it prevents resolution of the standard critical effect (but not its HP damage). The standard critical effect is repeated below for reference:
“If the defender is dealt at least one damage card by this attack, deal the first damage card faceup.”
Every ship always has access to the standard critical effect, and it triggers when a critical effect impacts the bare hull of a ship. Contain cannot be used to prevent other critical effects unless you have a Damage Control Officer. Contain is widely considered the weakest defence token, but is still very useful because it can be replaced with better defence tokens. I address this topic in depth here.
Contain gets a bad rap (including from me), but it’s better than nothing. A successfully resolved Contain can prevent any of the face-up damage card texts from occurring. This might save your ship if you stop Structural Damage. It can save a lot of shield HP if it prevents a Projector Misaligned result. Contain is not useless. It’s just less useful because it’s limited to one critical effect, and it’s the last option after all others are exhausted. Viewed through that lens, you can see why people replace Contain using Captain Needa or Local Fire Control. Other defence tokens are closer to the exterior of our delicious onion and are more proactive in nature.
Damage control can be achieved through ways other than Contain. Let’s have a go at it.
Examples of damage control
Tide of Progress XII is a Munificent title that can be exhausted to discard any face-up damage card labelled ‘Ship’ without resolving any of its effects. That means the HP damage and critical effect associated with it never touches your hull. Awesome. This ability does cost a repair token to refresh the ability, but a single use is great value for 2 points. 69.2% of the damage cards in the deck have the ‘Ship’ label, so this upgrade has a high chance of stopping a point of damage and a critical in its lifetime.
Medical Team is the cheapest upgrade in the game at 1 point. It’s a single-use card that lets you chuck a face-up damage card labelled ‘Crew’ crit before it is ‘dealt’ to you. Just like Tide of Progress XII, this means the effect never happens. 30.8% of the damage deck cards are ‘Crew’ cards. It’s a filler card with limited potential and is priced to match. Amusingly, it can be fitted to Tide of Progress XII so that the first face-up damage card you’re dealt always goes out the window. Not bad for a ship with 6 HP.
Admiral Motti gives every small, medium, or large ship in his fleet extra HP correlated to their hull size. He’s a dead simple way of making your fleet more durable. Strangely, Admiral Motti’s bonus HP is added to the ‘bottom’ of a ship’s HP. If his ship is destroyed, any ships on the table that are down to their bonus HP also explode. Your Gladiators at 1 HP and your Imperial-class Star Destroyers at 3 HP just explode if he dies because his ability is the last thing holding them together, rather than a bonus that is stripped away first. Weird, right? I personally think he could use a buff to put the bonus HP ‘on top’ of a ship, and to get a benefit to huge ships so that he’s not useless in an Executor.
Lira Wessex spends a repair token to flip a face-up damage card face-down without resolving its effect. This still leaves you with the HP damage, but no critical effect. She’s a Contain ability that can’t be disabled like other defence tokens and is not limited to the standard critical effect. Conversely, she costs points, an officer spot, and a repair token to use. She was made for the Super Star Destroyer, especially Executor. This outrageously large ship has 3-4 officer slots each, which negates the opportunity cost of taking her over other officers. She plays best with the Executor because it can be assigned multiple tokens of the same type to maximise the number of cards she can flip. Her value can be questioned in light of the two Contains that the ship already has, but Executor is only posting she should be seriously considered for.
Restore capabilities
Any fool of a captain can keep a ship flying. It takes a fantastic captain to keep a ship barely flying. In this final stage of survival, remember these words:
I didn’t hear no bell.
Restoring your ship’s capabilities and functions is the other role of damage control crews. Once emergency firefighting is done, the ship needs to be returned to usefulness. This final part of the survivability onion extends beyond ‘surviving’. Reaching this stage means you’ve already survived, but you have to keep fighting.
In Armada, restoring your ships from the brink is usually accomplished by removing applied damage cards and restoring defence tokens. Damage cards dealt to your ship represent HP damage and a sufficient number of them will blow up your ship. Removing these cards is saving the ship in its most literal sense. Face-up damage cards impose dangerous critical effects can also be removed when the card is tossed out. Spent or discarded defence tokens can also be returned in a variety of ways.
The Repair command is the foundational way of restoring ship effectiveness. I discussed its use in managing your shields back in Layer 4, but it shows up again. Repair commands can discard damage cards and replenish your shields to keep a ship alive for longer. When discarding damage cards, players typically prioritise their face-up cards first, since those have nasty critical effects. Removing a damage card is expensive, but can restore a ship’s key functions or secure its survival.
There are a few niche situations where you’d discard face-down cards over face-up cards. There may be a scenario where you’re dealt an irrelevant face-up card, but your opponent is fielding Boarding Engineers. If activated, the Boarding Engineers could swoop in and flip your face-down cards up and really ruin your day. There. An edge-case example of why it’s not always optimal to remove face-up damage cards first.
More examples of restoring your capabilities follow. We’re almost done. Stay with me.
Examples of capability restoration
Reinforced Blast Doors are the easy Defensive Retrofit. They’re a once-off that discards 3 facedown damage cards. That is, it restores 3 of your lost HP. They’re usually fitted to medium and large ships that take damage during battle and live long enough to need repairs. Smaller ships run the risk of being one-shot, so they may never get to use this upgrade. Reinforced Blast Doors are a well-regarded, middle-of-the-road upgrade for ships that aren’t sure what type of defence to mount.
Electronic Countermeasures used to be the premier defensive retrofit, but it’s been nerfed to normal levels of usefulness. This upgrade could go way earlier in the onion due to its timing window (during an attack), but I think it fits the theme of restore capabilities quite well. While defending against an attack, Electronic Countermeasures can be exhausted to spend a defence token that was targeted with an accuracy result. This is almost always used to return a Brace to action and halve the damage pool, but there are arguments for any other token. It costs a repair token to reset. For a long time, this was the only way to ‘restore’ the function of a defence token that was disabled, but we have more options these days.
Commodore Agate makes another appearance. The second part of her two-parter rule allows her ship to discard a defence token to resolve its effect. The rule is tightly worded to bypass anything that can disable a defence token. Like accuracy icons. As with Electronic Countermeasures, her effect will vary depending on the targeted token, but Brace is a popular candidate.
General Grievous turns mass-casualty events into longevity. Anytime a friendly ship or squadron is lost, a ship or squadron with defence tokens in a certain range can recover a defence token (but exhausted), or ready an exhausted defence token. Playing Grievous competently involves feeding just enough of your forces to the enemy to fuel your defence without losing more than you can handle.
Walex Blissex is a one-use that recovers a discarded defence token for your ship. There’s not much else to say besides the fact that his timing window is quite narrow. He’s Commodore Agate’s best friend, because she keeps throwing those defence tokens out the window and it’s his job to drag them back.
No conversation about defence would be complete without a double-Agate event. Kyrsta Agate can have an officer posting aboard a ship. She gives the ship a critical effect that triggers on red or blue crits that allows the ship to ready an exhausted defence token. This is also the only critical effect that can be resolved during a Salvo attack.
The Space Station obstacle appears in most games of Armada. Its default rules are friendly to both players. Any ship that overlaps it can discard a damage card. Any squadron that overlaps it can repair 1 damage. Some objectives remove this repair function, but that only happens on a case-by-case basis.
Asteroid Tactics is an objective based on extending your endurance on a dense battlefield. Both players benefit from overlapping asteroids, but the second player gets the better end of the stick. The second player’s ships and squadrons suffer no effects from overlapping asteroids and can recover a non-Scatter defence token or ready an exhausted token. The second player also gets to control the hungry Exogorths to deny territory to their opponent. Asteroid Tactics is a niche objective, but it handily demonstrates the sheer number of options players have to keep their ships running.
Intermission
This final intermission is brought to you by a bunny cat.
J’aime l’Oignon – “I see a defense without honor.”
That’s my rendition of the Integrated Survivability Onion. Peeled apart and pinned to a display case for everyone’s perusal. An hour-long Powerpoint presentation from my favourite YouTuber convinced me to write this article. I feel like producing this article has made me a better Armada player, and I hope anyone who reads this far feels similarly.
The qualities of onions
Besides its fragrant qualities, I consider the survivability onion to be a superb way to explain warship survival in Armada. Survival is complicated – it’s not just rules interactions or individual mechanics. It’s the layering of many rules, mechanics, and thought processes that align into a cohesive system – a theory of defence.
The thing about theory is that it should never be applied uncritically. Theory is carefully composed, but always has room for change and exceptions. The survivability onion is no different. Quite a few examples I cited cross over layers, or could fit neatly elsewhere. Despite this being quite comprehensive, it’s not a total account of ship defence in Armada. It doesn’t account for the interactions between squadrons and ships, and makes some pretty severe assumptions about how battles play out. This is not a book of principles to be applied verbatim, but a guideline and thought process that can be used to improve your approach to defence. It’s a starting point and a fallback point, but the player’s critical mind bridges the two ends and makes the fleet sing.
Still, I think there’s a lot to be said for its usefulness. If the most important contribution of this article is that it changes the way you view defence in Armada or any other setting, then I have succeeded. Defence should be viewed as the co-operation of interrelated factors that contribute to a common goal. Those individual aspects can exist in completely different parts of the game, but they all work toward the same goal.
This theory of defence also allows players to evaluate the strengths and weaknesses of a given build. That could be a ship, a formation, or an entire fleet. The next time a reader theorycrafts a ship loadout, they can evaluate their ship’s defences against the layers of the onion. They may find that the ship leans heavily on certain layers, or that it simply doesn’t have enough protection. And lastly, we underestimate the value of visualisation. I’m dead proud of being able to combine a real world theory of defence with Armada and produce a digestible visualisation of the concepts. The diagram of my onion is very dense, but the underlying principles are straightforward, and there’s plenty of room for a player to add their own knowledge and experience.
Using onions in your recipes
This theory of defence is new, even to me. I concocted it on the basis of a Powerpoint slide that’s been repeatedly mocked. But I think I know enough of it by now to make some suggestions of how you can use it in your next wargaming jaunt.
Evaluating your fleet-building against theory
The next time you’re fitting out a fleet, consider which layers of defence the ships are using and how that ties into your strategic goals. This is similar to a SWOT analysis, wherein you critically assess your situation against environmental characteristics and reach a conclusion. Theory is imperfect, but it’s better than not having one. During your evaluation, you may find that your ships/fleet lean hard into one aspect of defence and not into others. You’ll also become a better theorycrafter and ‘reader’ of ship stats at a glance by identifying which layers a ship arrives with, and how to use them. This can be re-integrated into your fleet-building process for iteration and improvement.
Using theory as a reflective tool
Post-mortem analysis of games is important. Especially if you lost. Once the grumpiness of defeat wears off, it’s time to become a better player by reflecting on the processes that led up to it. Theory is a supportive framework for reflection (gods, don’t I know that…). Reflecting alongside theory is easier because you can check your knowledge against a set of guidelines. If your Imperial-class Star Destroyer handled long-ranged fire well, but was nailed to a wall by a torpedo frigate, what does that mean for your strategy and gameplay? If your opponent drew you into a battle of attrition in dense terrain using squadron tactics, how could you have dealt with it better? These kinds of questions have to be answered by you, but a colourful diagram of a bisected onion can assist you.
Inversion into a theory of attack
This article is about defence and how Tabletop Spaceships are Serious Business™. In fact, I use the word ‘defence’ over 60 times in an incredibly dense article. But the hilarious/agonising thing to me is that halfway through, I noticed that you could invert everything and develop an Integrated Attack Onion. The Onion Strikes Back, if you will. Whether I write that monstrosity is still up in the air, but there’s nothing stopping you from inverting it in your mind and starting to think about attack in the same way. You just have to adjust the wording. ‘See. Acquire. Hit. Penetrate. Kill.’ And that is the basis for a theory of offence. You can quickly see how Linked Turbolaser Towers, Advanced Gunnery, and Admiral Ackbar fit into a successful attack. You can then repeat the evaluative and reflective steps with a focus on killing.
You can make it your own.
Conclusion – “Not to worry, we’re still flying half a ship.”
What a titanic article. I could have split this into three and taken a triple-paycheque, but I didn’t. This article is a labour of love. A denser and more meaningful contribution to gameplay strategy in my favourite wargame than anything I’ve ever written. It’s a single piece that needs to stand on its own. This is what Goonhammer is about.
Coming from an academic background (intersectional feminism and social constructionism, for those wondering), I’m accustomed to the burden of theory. My personal rule is that anyone who cannot explain a theoretical premise in a few thousand words plus one key diagram needs to study it harder. I’m extraordinarily proud of the fact that I was able to meet my own standard and produce something novel in the process.
I’m going to spend a long time playing Warhammer 40,000: Darktide now. I need a break from this thing before I edit it. But hot damn, do I feel good.
Yours in silencing the cabin pressure alarm,
Summer
Have any questions or feedback? Drop us a note in the comments below or email us at contact@goonhammer.com.
