This article is part of a larger series on How to Paint Tyranids. To return to that series, click here.
If you’ve been following along on Goonhammer or on Warhammer Community, you’ve likely noticed that Rockfish is an incredibly prolific painter. We’re often awed by how quickly they can paint models to a high standard, and today he’s finally revealing his secrets to us.
A beautiful and terrifying box of wonders
So, you’ve come home with a huge box emblazoned with a Terminator and a Tyranid, after months of hype and excitement it’s finally here! You lift the lid and are greeted with sprue after glorious sprue of new kits, eagerly you sift through them seeking your favorite – is it the Psychophage? The Terminators? Maybe one of the characters? Once your plastic-seeking quest is complete and you have rifled through the big book having already confirmed to yourself that the missions are looking pretty fun you find yourself faced with a reality that brings a pit to your stomach.

That’s a hell of a lot of grey plastic.
Before we go any further, we would like to that GW for having sent us preview copies for the purpose of review.
Facing a dragons hoard prepared
OK, so you’ve gotten yourself into yet another edition launch box or maybe this is your first. Either way, we all know the stories of people getting one or two models done and then shoving the rest into a dark corner never to see the light of day again, but we’re built different so that’s not going to happen to us!
If you want to make this a reality you should first sit down and really think about how you are going to approach this, I’m pretty used to planning this sort of thing out between my short attention span and a stream of preview models over the last year so I applied the questions I usually ask myself when starting a new army or one of the smaller box sets.
How many details am I going to differentiate using distinct colours?
Most GW models have a million little details and textures, even if you were to go pretty far back they’ve been packing them in for the last decade or two, but you don’t actually have to use a different colour on each. While this has obvious implications for speed, not having to switch colours or being able to use a bigger brush are obvious time-saving opportunities after all, but this can also help legibility. If there are too many distinct colours and details visible it can cause your eye to jump around and have difficulty knowing where to settle, but that sort of thing is a bit out of scope for this article!
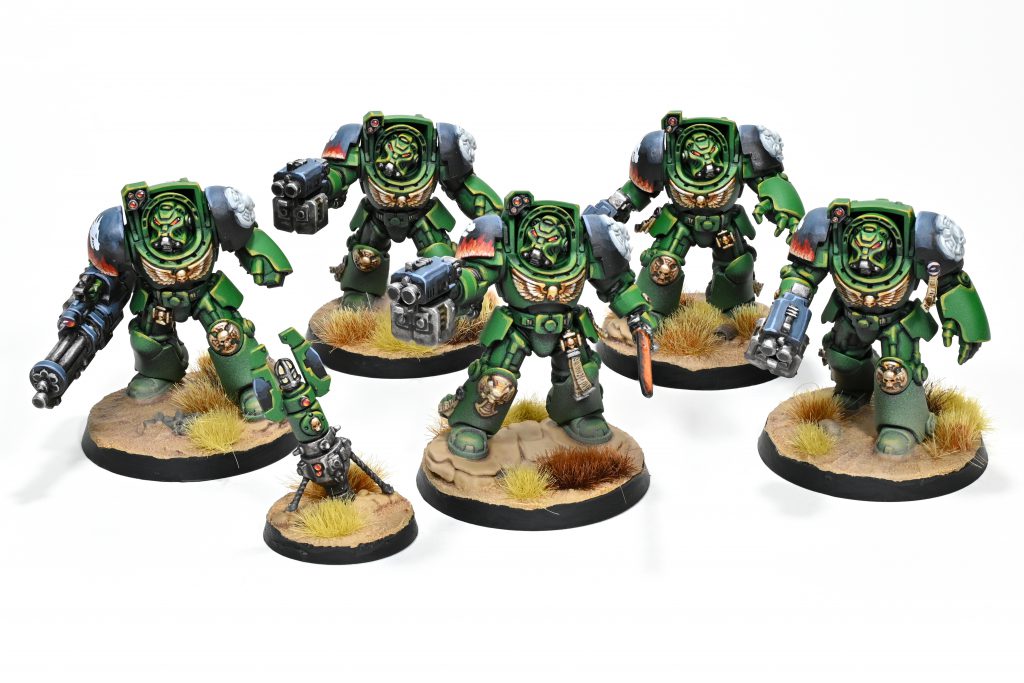
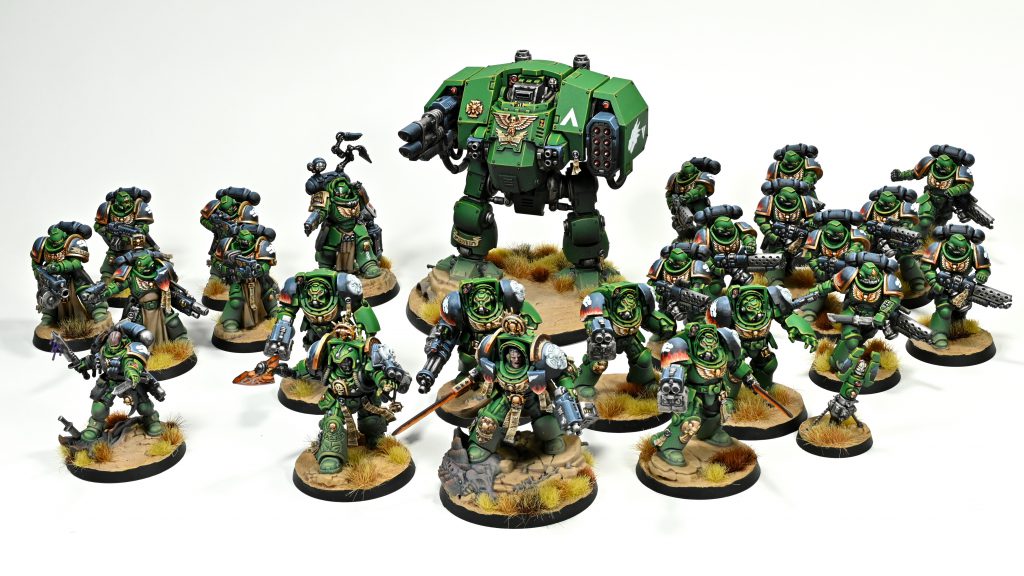
For a practical example of the time-saving aspect of this question, the marines I painted from this box had almost every detail starting with the same black before getting highlighted differently. This saves a ton of time, as basecoats tend to be one of the longest processes for me so deciding what to cut here is a pretty key step, I think I’ve probably saved fifteen or twenty percent of the time my salamanders used to take a year ago just from this. After a few years of doing this to my schemes, I’ve gotten in the habit of always asking myself how I can differentiate a material through faster means the next time I paint a model. Just a minor thing like having the exposed ribbed fleshy bits on Tyranids just being the skin scheme skipping the highlights has something that is still easily identified among the rest of the skin while cutting maybe an hour or two off the contents of the boxset.
What are the characteristics of each paint I’m considering using?
This is pretty straightforward and not something you have to think that much about usually, some colours go over each other easier than others with white is ever a classic for things not to do over black for example. This can mean compromising on what colours I choose however, Morghast Bone might be great looking for a bone texture but I find the coverage is terrible so it gets skipped in favor of another colour that saves me a base coat or two on a detail, like Zandri Dust.
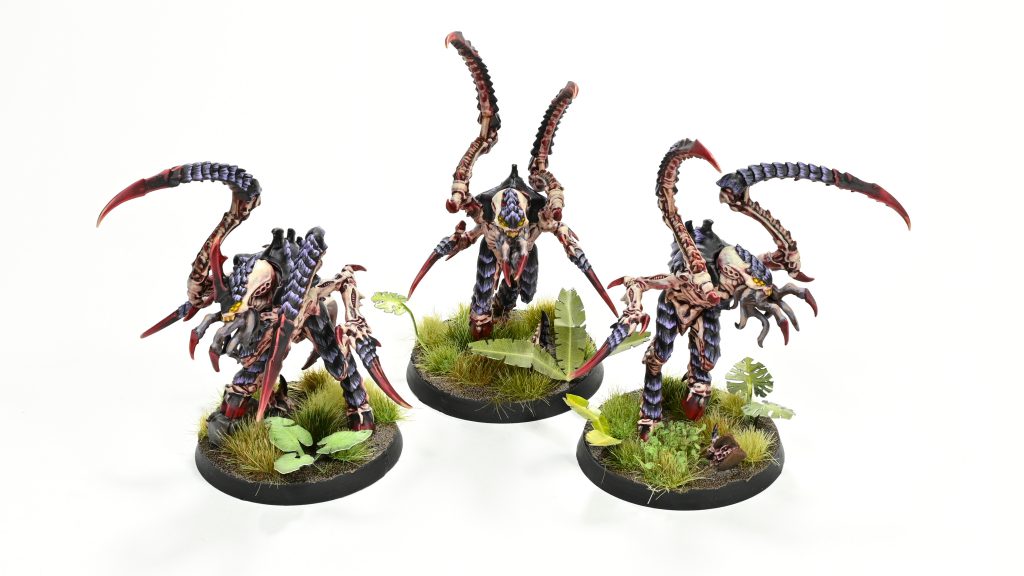
Often this can crop up in ordering of colours with excellent coverage as an edge case, in my Tyranids I’m using both Flesh Tearers red and Shyish Purple. Both cover the Ushabti Bone undercoat easily, but I know that Shyish can go over Flesh Tearers almost without any difference in tone but the other way round will tint the carapace red, so I can start with the red and be a little messy wherever it meets the carapace without worrying about it.
How far am I going to go with highlights and of what kind?
This is very much a personal thing I have found; some people are super quick at bashing out a million edge highlights and others are super-fast with their blending technique of choice. I usually like a mix of techniques, glazing is fast on smooth surfaces or organics but with a model that’s all hard surfaces and edges like marines I want to get away with just a bit to punch up otherwise boring sections, hence why the black is glazed in while I lean on the zenithal undercoat for the green. My nids have almost no edge highlights for contrast, only the blade and sort of the striations there!
Beyond technique, you really have to consider how long you will be spending on any given material and how much it actually will be recognizable in the final product, you know that getting the sheen of light reflecting off the little computer on the apothecaries belt just right would look great if you’re looking for it, but realistically it’s not something a normal viewer is going to be looking for. So you instead prioritize the focal points of the model, when your eye bounces across something the brightest points will stick out and this applies to highlights too. I like to focus highlights on the features that differentiate the model, the region around the head, what it’s carrying or is armed with, dramatic decorations, and stuff like that.
How much time am I budgeting for a model or unit and how do I feel about ‘cheating’?
You can both choose to do five highlights for each panel and get a tank done in two hours, but if you are doing that then your budget to use on each highlight is tiny. Something people are really reluctant to admit is that this can be fine!
Just to grab an example from outside the box, I did this Sentinel in an hour and a half despite it having a ton going on, and that’s because I made the choice that individual details just don’t really matter. If the paint job gets the impression you want and your colours dazzle the viewer into not noticing the messy work and underdeveloped parts of the painting then you don’t actually have to be particularly technical! Everyone loves an exquisitely executed model with every highlight smooth and clean, but if you get 90% of the effect for 20% of the effort then that’s perfect for getting an army or box done!
Going back to the chopping block a second time
Having given yourself a set of practical limitations, optimized your paints, and set your expectations, it’s time for the last thing before you really get into the project of smashing out that box in record time!
It’s time to get really minimalist, there are no sacred cows to be found here.
Whatever your initial planning process, there will always be some things that you were on the fence about that you let slip through that you can knock off without too much of a loss, and here is where you do it. If you aren’t making hard decisions then you need to cut closer to the bone if you are looking to rush the models out, if you save a few minutes here or there then you can cut hours off the box.
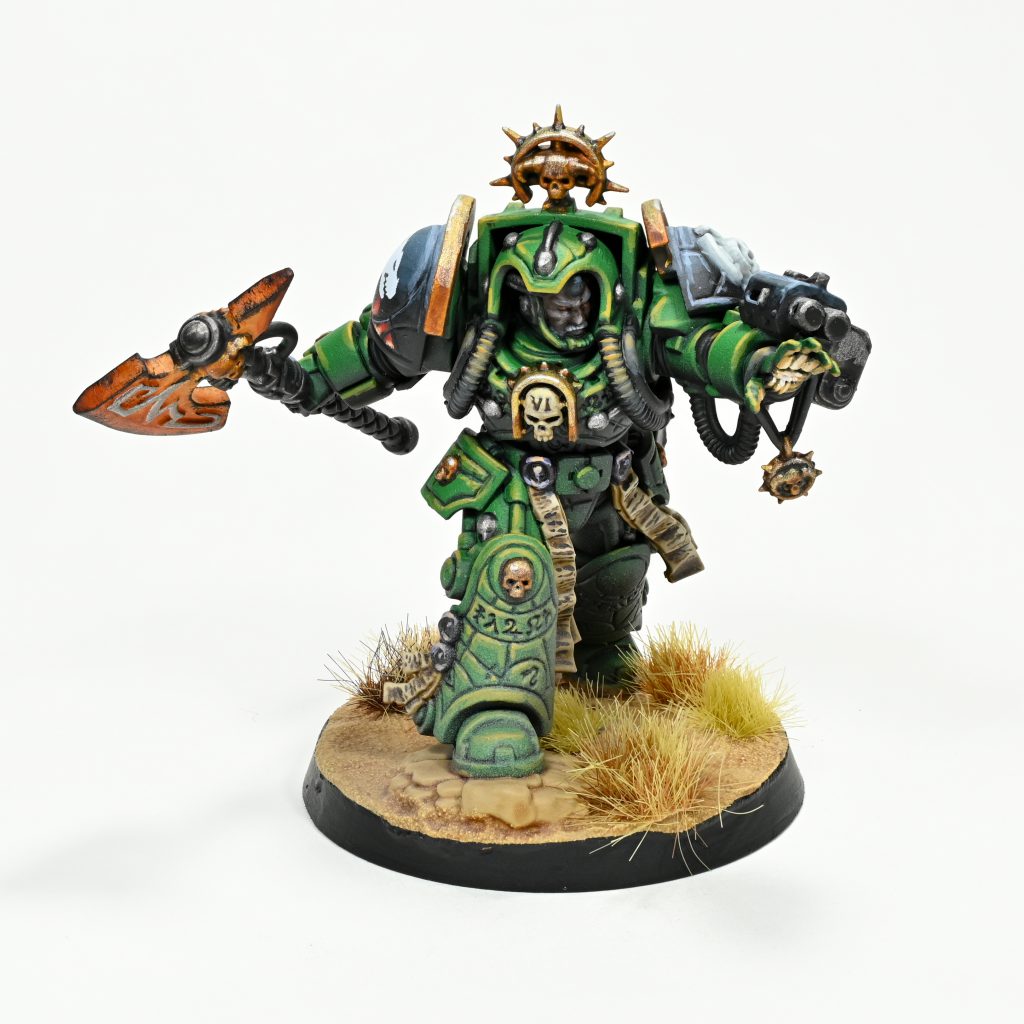
Can Plastic and leather be the same colours on a marine? Hell yeah, go for vegan synthetic holsters. Do those eyes really need anything past a contrast over the skin highlights on Tyranids? Hell no! It’s places like this you really have to be aggressive about and aware of the timeline you are setting yourself, if this is something you are a bit more relaxed about then you won’t be touching too much here but if this is for a deadline – get to work hacking away at your plan!
A couple of key overriding rules
I’m presenting this like you are working to some hard corporate deadline where you’re whipped to get the project before the ravenous beast customer calls, but it’s still supposed to be a hobby for your enjoyment to some degree so I wouldn’t skip over the chance to find something fun to try out in every unit as it helps keep your motivation up! Maybe it’s a different way of doing a psykers glowing hand or playing with washes on a brain bug. Whatever it is, I like to budget the time to do something fun and new on any given project, if nothing else it’s one of the better ways to find opportunities or techniques to do something a little faster next time!
Remember as well that whatever planning you do needs to adapt to the realities you encounter while working through the army, be it resource availability or just deciding that a faster technique looks worse to you and thus where it’s worth the project stretching a bit to get things right. This means that I often will change colours as I am going along, either adding or dropping steps where things to suit the project.
The schemes
Enough on the planning process then and on to the results, here’s where my schemes ended up at after having gone through a tempering process in pursuit of finishing the box, this might not be quite the same sort of balance of complexity and speed you settle upon but that’s A-Okay!
Marines
If you’ve seen my older HTPE there’s going to be a lot of familiarity here, though the differences tend to be pretty important!
As before I start with a zenithal green over the models, this is partially a time-saving thing too! By priming black and then doing a wide-angle zenithal of Nocturne green I can do far fewer coats of the final Warpstone glow and I automatically get a lot of definition to the model along with being able to skip any edge highlight that wouldn’t be ‘lit’ by this lighting.

After that we go wild with Black Legion, everything that ends up metal or black gets gone after with this paint. There are a few little time savers here whose mileage may vary for you, like by doing the metal first in black I can often get away with just a single coat of metallic like Iron Hands Steel without any hint of green popping through. I often find that when I do metal on its own it might take 3-4 coats to get as good coverage, although the Retributor still usually needs a couple of coats over black and I do two coats of metal on larger surfaces always. (I’ll sometimes drybrush metal on very large surfaces like repulsor plates!)

For most of any given model, those three major colours and then the odd detail is all the base coating! I’ll mention a few notable details at the end, as I haven’t talked about the most common things like seals, iconography, and cloth but they are straight-forward so I want to keep to the main scheme for now. Thanks to black not needing it, the washes for this scheme are relatively limited, Basilicanium for steel, Snake Bite for the gold, and then an ever so time-consuming recess shade of Drackenhof Nightshade.

On to highlights, I usually like doing all the glazes first just because it lets me be messy and quick. Believe me when I say that too because I limit myself to about 3-5 minutes per marine for the Thunderhawk blue glazed onto the black armour panels, this means each coat is super quick and rough mostly being hidden by the next. The number of coats I do in these quick glazes is usually something like three to five layers depending on how big or notable the surface is, large visible panels get a bit more attention than a random small widget on a marine. The plastic/leather follows the same idea, getting a few glazes of stormvermin fur than a bit of tau light ochre mixed in for the last coat.

Metallic stuff gets a layered approach where I do one to two quick areas of the steel base coat and Liberator on the gold before a quick edge and area pass with Storm Host. Then it’s on to the few but high-volume remaining highlights which are all edge highlighting, Tau Light Ochre finishes off the plastic, and black is sharpened up with Russ and Fenrisian. The green armor is probably the slowest bit where it’s a lot of Elysian green than key points of Zamasi, I tend to take a break after this step as I tend to feel a little like death warmed over.

With the highlights done, the detail that you find a constant across basically every salamander model is lenses and flame details, these are a bunch of paints but I find that they fly by pretty quickly at this point. I can do all the lenses on a repulsor-sized vehicle in fifteen to twenty minutes with an individual marine usually not being more than one to three minutes depending on the number, but your milage may vary here! Following the usual lens pattern, we start on Khorne red then quickly slam through Wazdakka, Wild Rider, Fire Dragon, Flash Gitz, and then finally a reflection of Monument hobbies white.
The flames are kept quick and simple too, I start by sketching in the first few shapes in a coat of Mephiston then the rest are progressively smaller rough ‘c’ shapes of evil suns, Fire Dragon, Ungor, and Pallid Wych. Placing the little ‘c’ shapes in various directions gets the idea across enough while still keeping it down to a minute or two a model total.
That’s all the core stuff! There are a few common details I slip into the various stages I’ll list out here but otherwise we are keeping to a minimum of main textures, so we aren’t shifting between things all the time. In no particular order the other details are:
Bone: Zandri Dust -> Agrax Earthshade (Thinned) -> Ushabti Bone
Cloth: Steel Legion Drab -> Agrax Earthshade (thinned) -> Steel Legion Drab -> Baneblade Brown
Iconography: Grey Seer -> Apothecary White -> Ulthuan Grey -> White
Parchment: Rakarth Flesh -> Skeleton Horde -> Flayed One Flesh -> Wyldwood (For the text)
Plasma: Baharroth Blue -> Ultramarines Blue -> Baharroth Blue -> Bold Titanium White
I usually do a few glazes of the ultramarines over the initial coat to get a colour transition.
Forged Weapons: Tau Light Ochre -> Ungor Flesh -> Gryph-hound Orange -> Abaddon Black
This is a little more involved than some other parts but still surprisingly quick and simple, you base coat with Ochre then layer a bit of Ungor towards the center after that I do a sequence of glazes of Gryph-Hound towards the edges then drybrush on the black.
Purity Seals: Rakarth -> Shyish Purple -> Dechala Lilac -> Kislev Flesh

The bases are pretty simple too, Zandri dust over Vallejo grey sand washed sepia, then while I am varnishing, I apply a filter of Vallejo Model Air Yellow Brown that helps to smooth out the texture of the base and also helps tie the marines into the desert basing scheme. After that it’s just tossing clusters of plants on, as ever with me these are from Gamers Grass, Burned 6mm, Beige 4mm, Dry 6mm, and Brown 4mm.
Tyranids
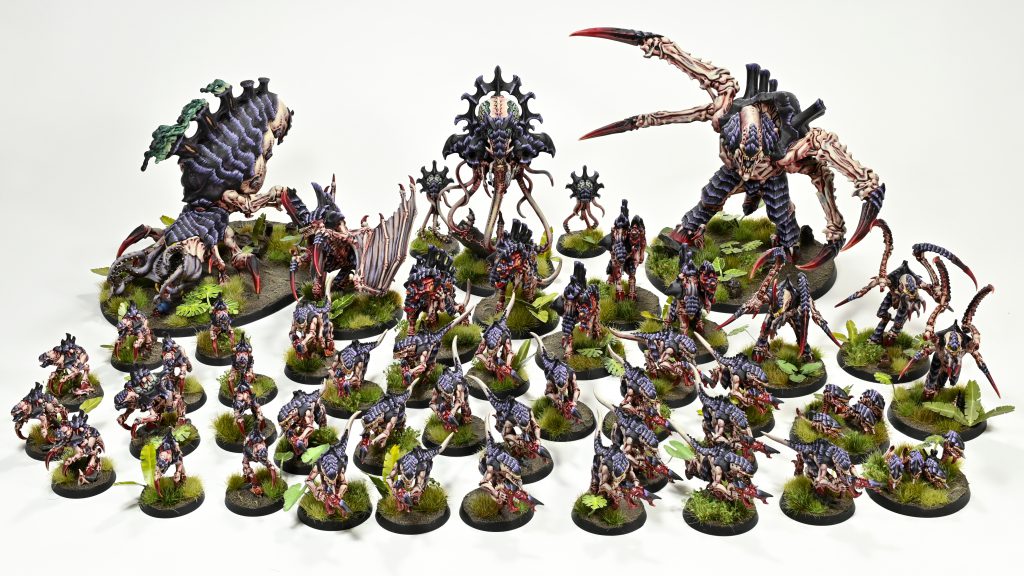
If marines seem to whip by quickly then Tyranids are jumping into warp speed, everything here is supposed to be fast and maximizes the use of washes, contrasts, and dirty glazes or layers to smash through this side of the box ASAP.
All right let’s slam out all the base coats in one go, base coat the whole model ushabti then coat with Carroburg, there’s the skin ready for highlights. I swipe the claws with Flesh Tearers Red before coating all the carapace in Shyish Purple, then moving on to our one conventional base coat of Daemonette Hide for the tentacles, wing membranes, and things like that.

Phew, that’s the base coats done, like all of them. On to our remaining primary washes! The purple flesh is washed in Guilliman Flesh and the major claws get three or four coats of thinned Black Legion in a sequence to crudely glaze in the Claw colour transitions.

Highlights time! For big bugs the skin gets a couple of thin layers/glazes of Ushabti Bone and then the same of Screaming Skull, but I usually cut it down to one of each for smaller bugs. At this point, I tap a bit of Screaming Skull on the eyes and teeth before using Imperial Fists and Skeleton Horde on the two respectively to finish them off.

The weapons get an edge highlight of Sazdakka, Squig Orange, Bestigor, and then Kislev on just the tip of the biggest ones. For the carapace, I go along the ‘outside’ edge of each panel with streaks of Genestealer Purple and then Dechala Lilac to build up a nice striation to define the shapes in sharp relief. Our last common highlight is the purple flesh with Slannesh grey and Cadian Fleshtone glazed on, often in a few more layers than most of the other colours, perhaps five or six glazes.

That’s the core scheme! There’s a few more details that sometimes pop up, but they are pretty quick too. Brains and Psyker stuff is just a bunch of coats of Coelia Greenshade moving denser towards the parameters of the brains over the normal skin highlight, then where there’s the odd muscle texture I want to pick out I’ll do in Fire Slayer Flesh highlighted Cadian and Kislev, if there’s a small gland thing I’ll do it in Gryph-Hound orange and then highlight it with glazes of Ungor. But that’s it for the models themselves!

The bases are super quick here, Vallejo Dark Earth washed Agrax then drybrushed Zandri dust and Ushabti along paths between Gamers Grass tufts is enough to sell the theme I am looking for! You can find a list of the specific tufts I used below:
6mm Dry Green Wild Tuft
4mm Green Wild Tuft
4mm Light Green
6mm Mixed Green Wild Tuft
6mm Strong Green Wild Tuft
Dark Green Shrubs
Monstera
Elephant Ear
Banana Leaf
A last word
Remember this is all just my approach to figuring out how to get a lot of models done on a time budget, it’s not some rigid one-true way situation. This has a lot of elements of project management that I’ve absorbed from others, so it’s not like I’ve been training in a cave on my own or something, it’s always great to see how other people approach getting a pile of stuff done and then pick and choose what works for you! Hopefully you found something useful here, even if its just a colour choice or two!
This article is part of a larger series on How to Paint Tyranids. To return to that series, click here.


![[AOS] Competitive Innovations in the Mortal Realms: 2025-12-4](https://d1w82usnq70pt2.cloudfront.net/wp-content/uploads/2020/01/AoS_Analysis_Banner.png)
