Welcome to the Terrain Showcase, where we share table setups for Star Wars Shatterpoint. Our aim is to help fuel your creativity, find ideas, and get useful tips for creating your next battlefield adventure.
Introducing Esk

Terrain Used: 2 Core Set and High Ground Expansion
Playmat Used: Terminus Wayland Games
Mission Pack: Shifting Priorities
Color Scheme: Blue Racing Stripe
Creator: Rian Swart
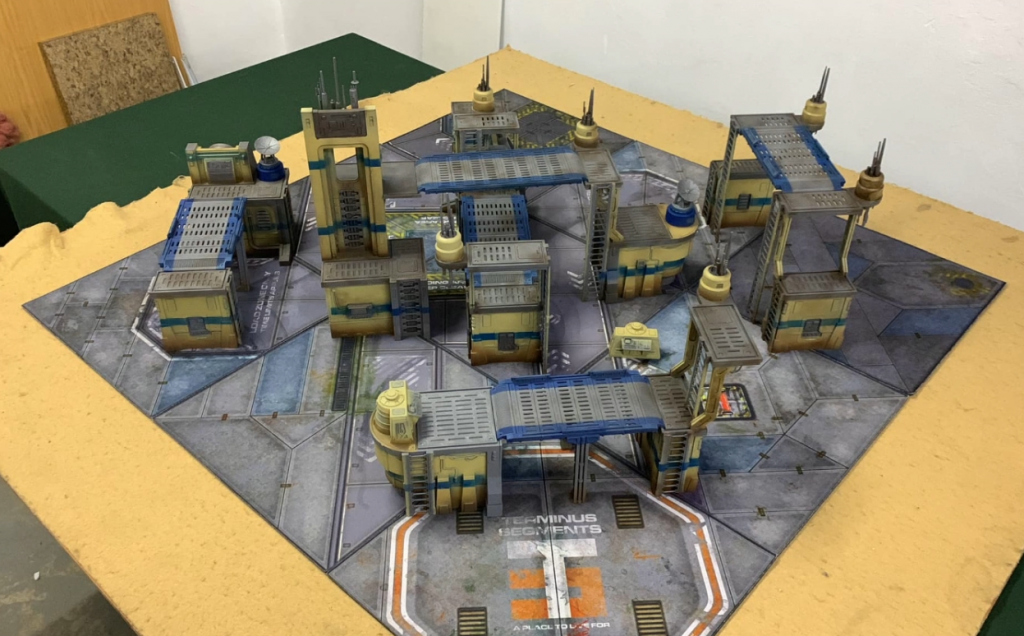
Setup Notes: Esk has unique terrain pieces. Two of the towers do not have any height attached. The columns and top were attached to a tech shed and vent building.
Esk has the most unique terrain construction in our series so far. The optional height of the Tech Shed and Vent building adds an extra layer and hopefully inspiration for future builds. Utilizing the terrain in a new way will create some unpredictable interactions. You will use ALL your ladders.
Rian describes his design inspiration: “I simply went with what would look cool. My philosophy on map design, in general, is that the map itself should be like a silent third player… it should be invited to play with but at the same time give you some interesting problems to solve
Ideally, it should almost be telling a story too. You will see for example on my connecting platforms that I opted for the splash of colour to be on the outside of the walkways instead of in the middle (like some folks have done) because my thinking was that “the story” it should be telling is that it serves as a warning to those walking on those sections, that they are near the edge where the danger of falling off would be higher.
I didn’t want to make it too harsh like black and yellow chevron lines or bright red but I did consider those as viable options. I could see either of those working on a Mustafar-themed mat, for example, where falling into hot lava would almost certainly mean death – or at least the need for a lot of replacement mechanical body parts.
I looked at a lot of stills and battle reports to see what folks have done and to get a feel for what looked the best to me and I ended up going with a relatively neutral colour scheme with a splash of blue to tie in with the colours of my current mat but to also have the option to go with a desert or even jungle themed map in future.”
Strategic Considerations:

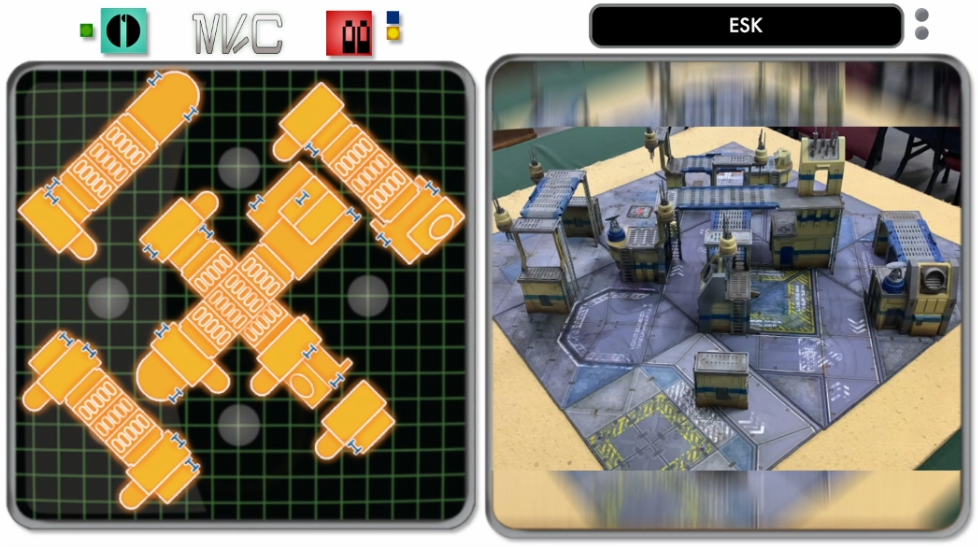
21 (!) Ingress Points (a few towers have half ladders connecting them) are located throughout the map; at first glance, it is bustling and complex. However, looking at the overhead view, you see a pattern emerge. It has a middle and high ground gantry system crossing with modular height pieces butted up against each X end.
Four objectives on the ground in every angle of the X around the middle and five objectives on variant heights. The middle point sits atop the center of the X. You will have no problem traversing back and forth between these points. Move fast and with purpose.
Starting Position
The south starting position has access to the tallest tower system outside the middle. Players can also access a lone middle tower in the southeast corner. Since there is only one way up on this single-level tower, it may help to hold it. Giving cover if you stay off around the back or sandwiched between the tower and the vent building in front of it, waiting to strike. If you start in line with the south vent building, make a run for it, and hit the ingress point, you can sneak under the middle point and grab a few opponent objectives.
The north starting position has a slight advantage due to the ability to get to the Array and the Array’s ingress points quickly and get up to the highest point. Take advantage of holding the center point and heading in any direction you would like. A few extra ingress points are in the direction of the north starting position. They could lend to some round-one advantages.
While the map is dense and does not look symmetrical, the middle point being raised and ingress points near each starting position does not give much of an advantage to either side. However, the southern gantry has one single ingress point compared to the north starting position one ingress> gantry> second Array ingress point.
Unique Terrain Builds
Some creative builds flourished since two starter boxes were used in this map. Rain modified both the tech shed and the vent building by adding the pylons and the upper deck of the towers. This allows for more versatility among pieces and layout.
Terrain Talk with Rian
In your opinion, do you find asymmetrical or symmetrical map layouts more suitable for the dynamic gameplay of Shatterpoint? Why?
Rian: Personally, I prefer setting up asymmetrical maps. I feel that not only does this aid the look of realism but it also gives the decision of choosing a map side a bit more weight and it engages the players’ tactical minds right from turn zero.
How does the modularity of the terrain components in Shatterpoint influence your design process?
Rian: I’m a big fan of modularity because it keeps things fresh in my opinion. It is part of the reason why the modular mat I use is a favourite of mine. In fact, none of my games have been set up the same way twice. Thankfully, my friend shares my excitement at doing something different every time too. The Shatterpoint Terrain pieces themselves are also very modular and I enjoy designing the battlefield almost as much as I enjoy playing the game. It scratches my creative itch in a very good way.
Typically I try to arrange the map tiles in a way that makes some form of sense and then the terrain pieces add to the story being told by the mat layout.
What elements or features do you believe make a terrain layout more engaging and immersive for players in the Star Wars Shatterpoint game?
Rian: Fully painted terrain makes the world of difference in terms of my own engagement and I’m sure it would be the same for other players too. I find that, especially if the colours are consistent amongst the different pieces, it really sucks you into the world and battlefield that the skirmish is taking place on.
In terms of immersion, I feel that the Shatterpoint terrain is extremely well designed because it somehow has a very “Star Warsy” feel to it. I wouldn’t be surprised at all to learn that the designers drew inspiration from or possibly even directly referenced actual Star Wars movie sets.
Seeing fully painted Shatterpoint mini’s amongst fully painted Shatterpoint terrain, on a mat where the colours are complimentary, makes it feel like it could genuinely be a scene from one of the Episodes.

What advice would you give hobbyists and players looking to create their own custom terrain for Star Wars Shatterpoint?
Rian: Invest in an Airbrush if your budget allows and try to get the biggest air compressor that fits your budget and workspace. Watch a few YouTube tutorials so that you don’t wreck your new investment.
Rattle cans can also work but they are less precise and you need to know that it’s not going to look as premium – unless you are prepared to spend a lot of time using your brushes.
Do some research and try to get an idea of the colour schemes that you like and the story that you want your terrain to tell and then… get it done!
Are there any exciting developments or plans for expanding the terrain design for Shatterpoint in the future?
Rian: Yes actually; I have a Desert map on my Christmas wish list and I’m keen to see what new layouts that will yield – especially since there will be little to no “roads” to work with. I’m also looking for a small space ship that would be to scale of the Shatterpoint minis – something like a Jedi Fighter or A-Wing or a TIE Fighter to add some interest and help the Star Wars narrative along.
*note that the visual representations provided in these images are intended for illustrative purposes and should not be considered exact measurements. We recommend adhering to the measurements provided by the AMG mission cards. The rules state that you should always strive to have the objective points on higher ground, adjust the terrain accordingly. For more information on the visual representation and examples check out this article.


