Welcome to Ruleshammer! This week is the 9th “episode” of a series I’m calling Ruleshammer Battle. A step by step explanation of a small game of warhammer 40k. Remember the banner below will take you to the Ruleshammer 9th Edition Compendium, for all the questions I’ve answered for the last few months!
 The keen-eyed readers amongst you might notice that this episode is titled conclusions, but the 8 episodes prior have only gotten through a single round of Warhammer 40k 9th edition in frankly, pedantic levels of detail. Since May this year this series has covered Building Armies, Understanding the Mission, Creating a Battlefield, Picking Secondary Objectives, Deploying Armies, Pre Game Abilities, Moving Our Armies, Psychic Powers, Shooting, Charging, Fighting (not necessarily in that order), and analyses the very basics of Tactics be in Planning your Turn, or making the best use of Charge Movement. It’s quite a lot, and there’s still a few more facets of this game I’d like to explore, though in a slight change of pace I’m going to be skipping parts of the game we’ve already covered.
Table of Contents
Scoring Primary Objectives
Missions since the GT Nachmund pack have expanded on Primary Objectives compared to earlier mission packs. There’s now two parts to each mission’s primary.
The Objective Control Part
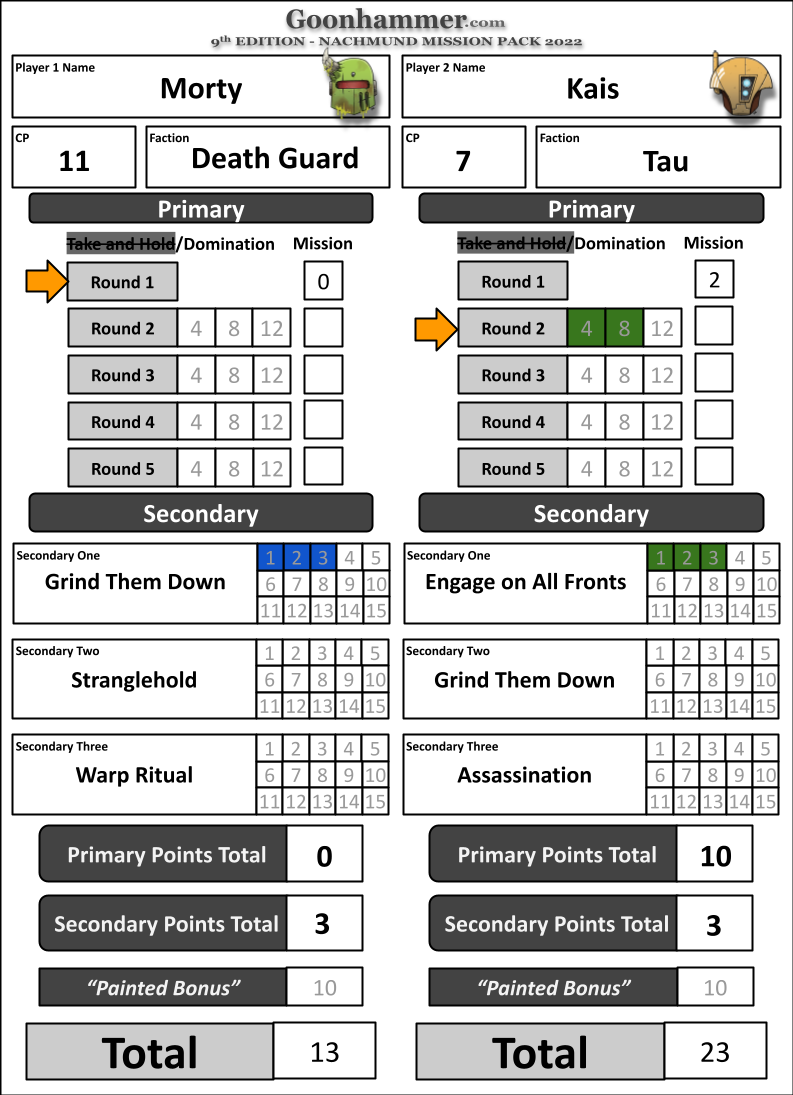
There’s two variants of this Take And Hold, or Domination. The only difference between them is about the specific number of objectives need to be controlled for each threshold. The mission in this game uses Domination, this means that starting from Battle Round 2 at the start of each players turn they will score;
- 4VP if holding 2+ Objectives
- 4VP if holding 3+ Objectives
- 4VP if holding more objectives than their opponent
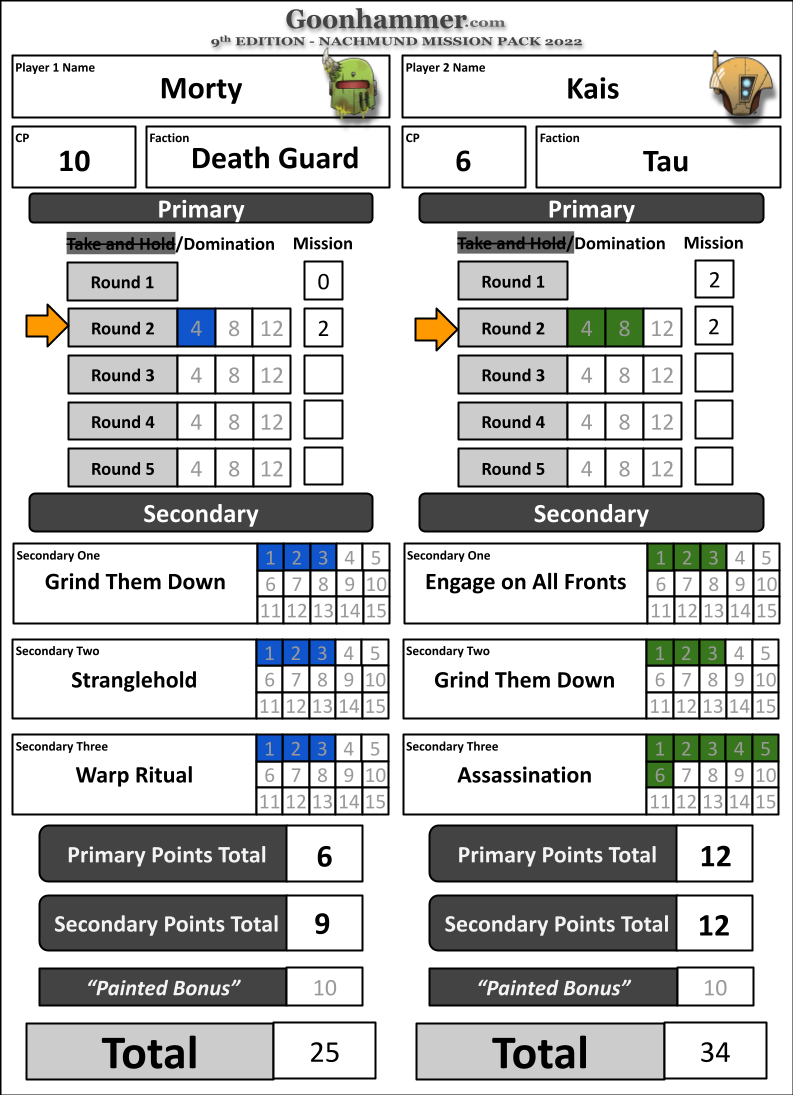
So the Tau player at the start of their 2nd turn would score. 8VP: 4VP for controlling 2 objectives and another 4VP for controlling 3 Objectives. They are however tied with the Death Guard at this point in the game for objective control so they would not score that last 4VP.
The Mission Objective
Every mission also has another primary objective that they can score at any time. This one is called Overrun and The Tau player managed to score it in their first turn.
- 2VP at the end of their turns 1, 2, 3, and 4 if they control any points in Enemy Territory
- At the end of the battle they can score 4VP for controlling the point in Enemy Deployment zone, and 2VP for each Objective controlled in Enemy Territory (to a max of 8VP)
It’s worth noting that these extra objectives, despite being primary objectives, can typically be scored during the first battle round.
Setting Up Reinforcement Units
Skipping forward slightly to the Death Guard Turn it’s time to bring in some more reinforcements.
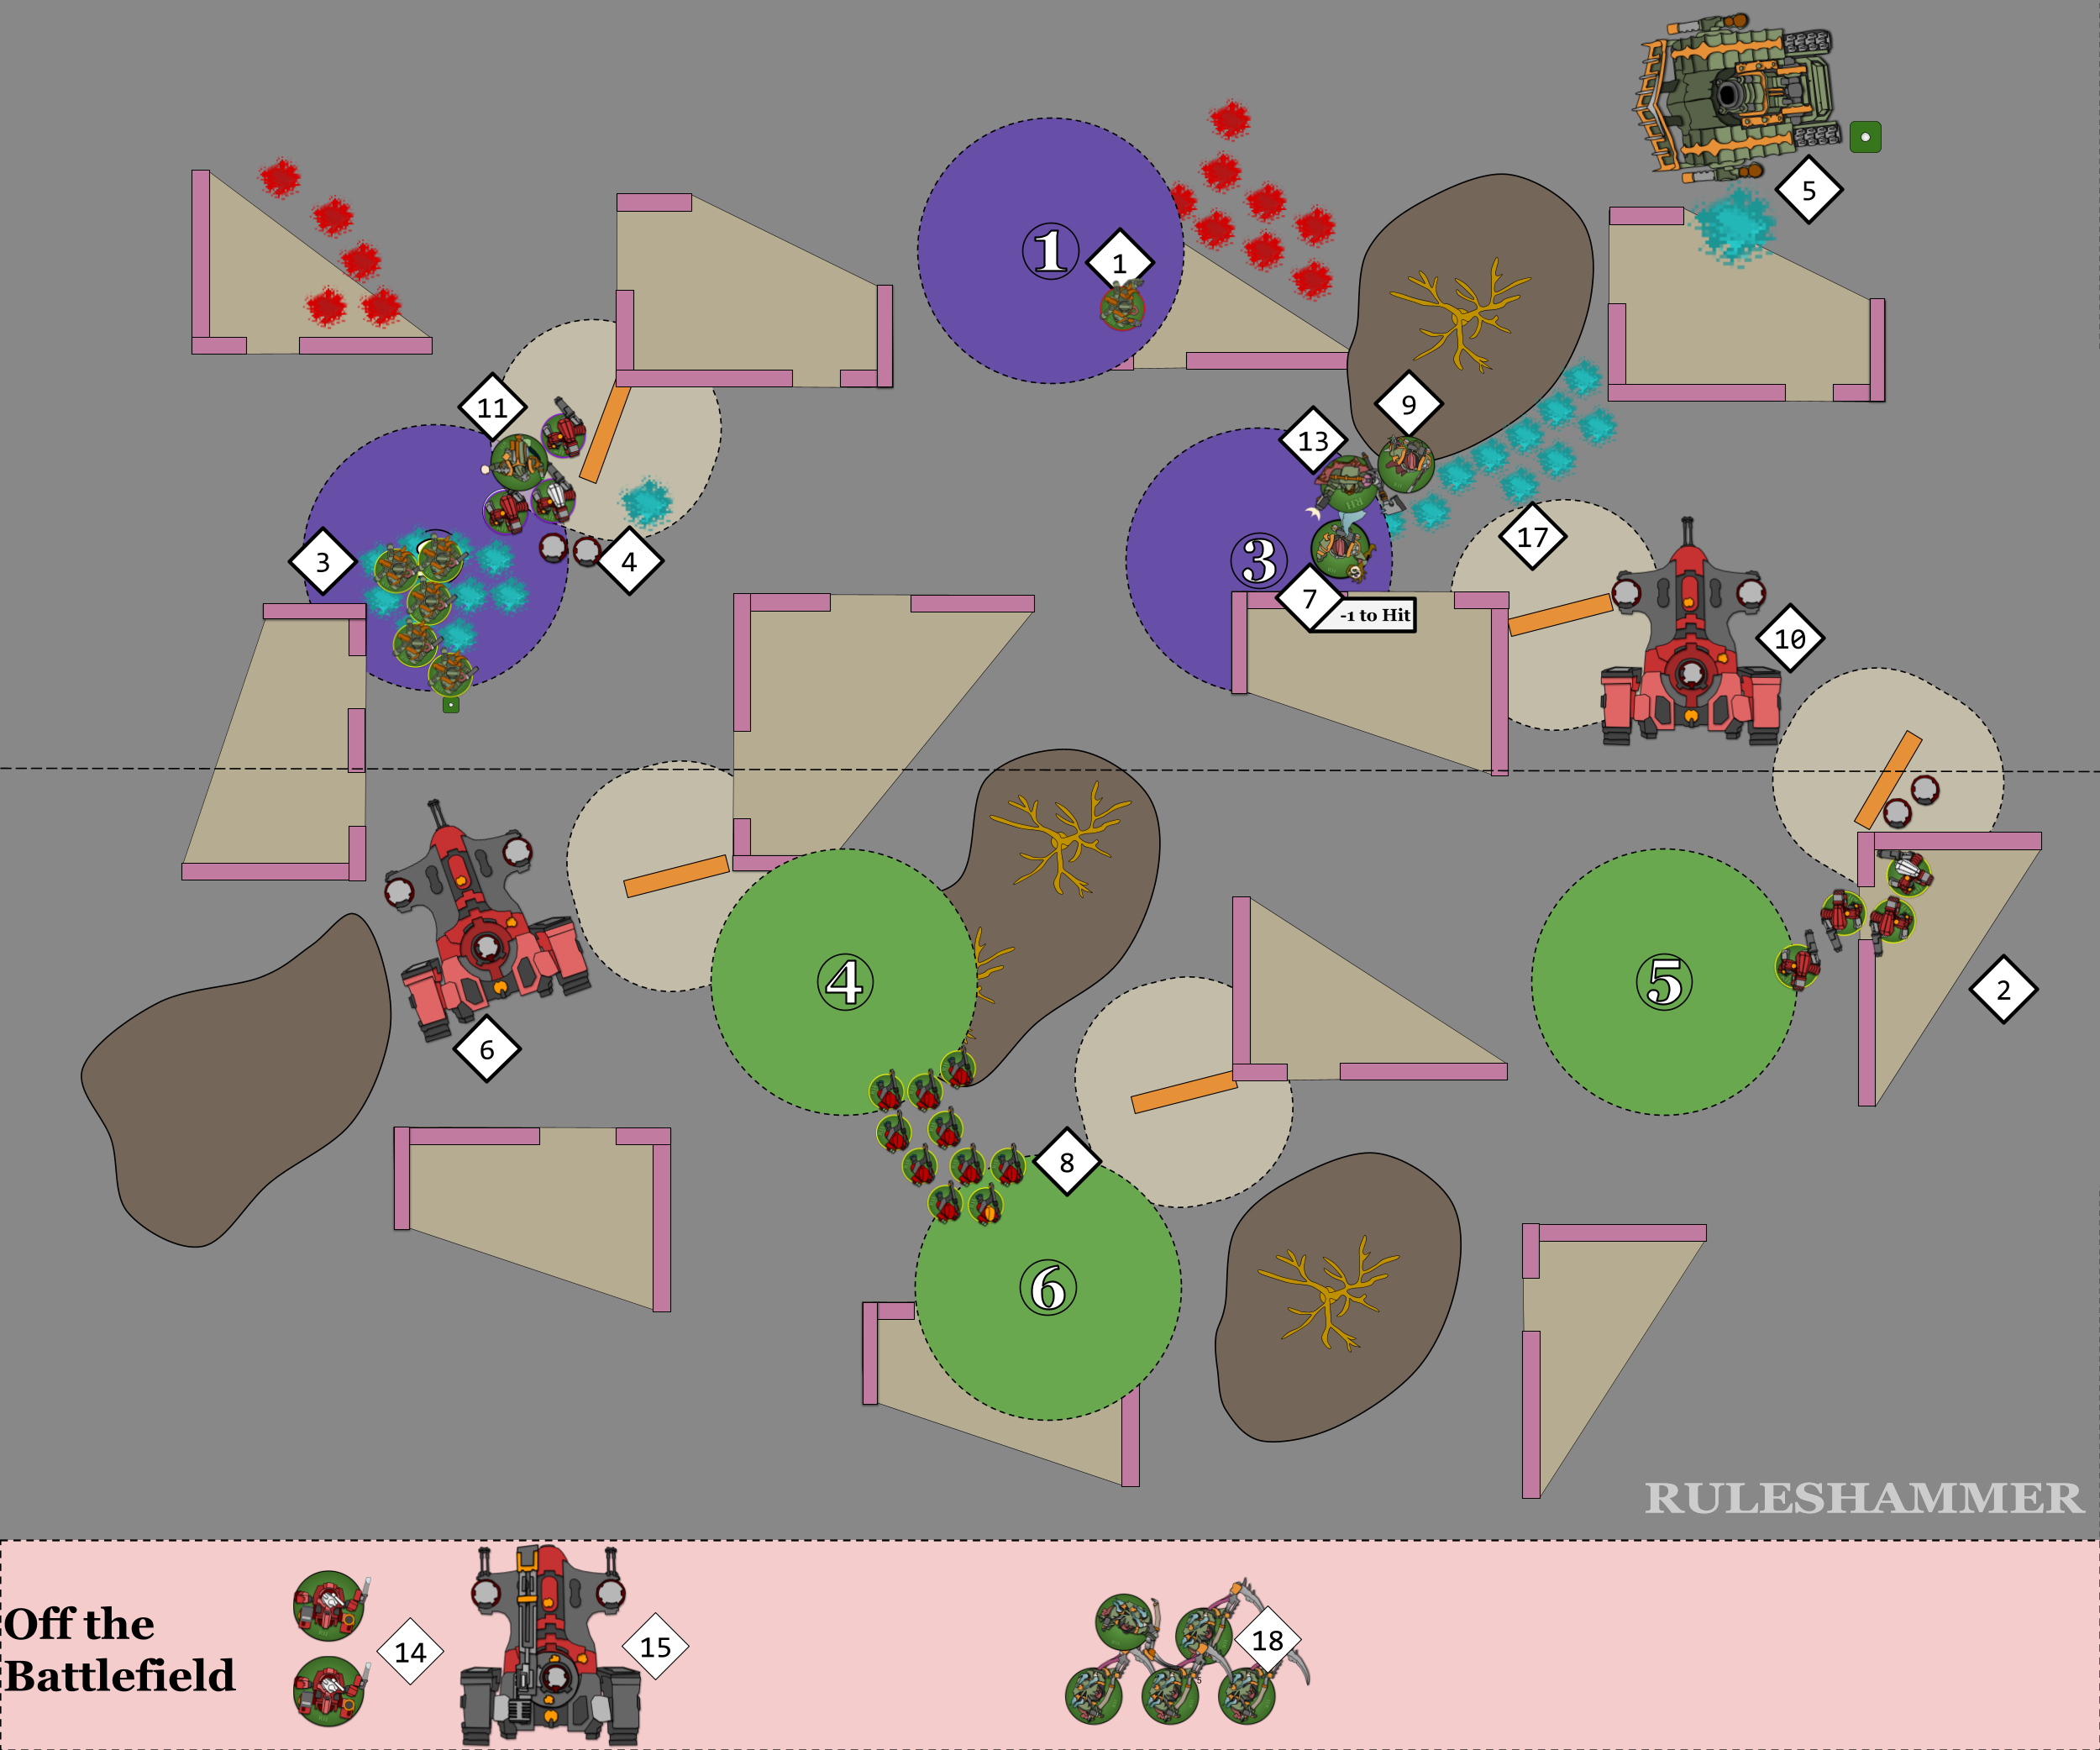
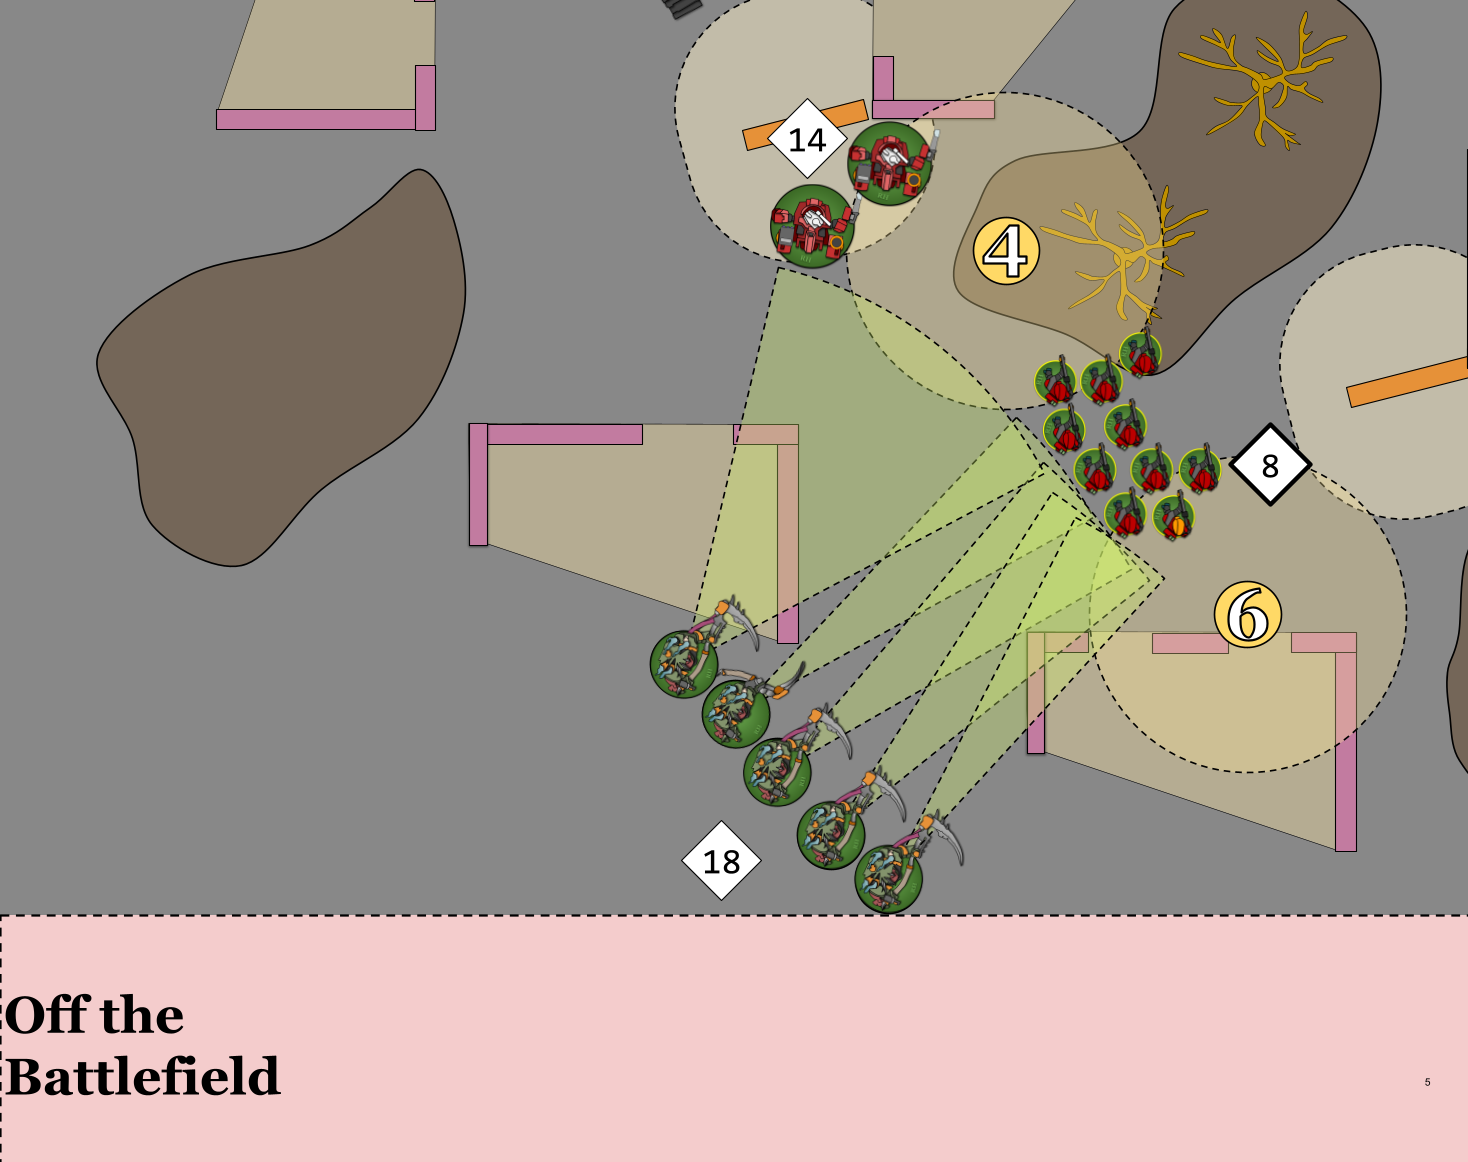
After losing the Plague Surgeon (9), Chaos Lord (13), and Plague Marines (3) to the Tau’s shooting. The Foul Blight Spawn hung on with 1 wound, and the other remaining Death Guard have tried to move out of sight as much as possible. Their best hope now is to charge with their arriving Death Shroud (18) and even up the battlefield again.
Death Shroud, like many reinforcement units, must set up more than 9″ away from an enemy unit when being set up. GW have an FAQ entry on this that specifies this distance is a horizontal measurement unlike other measurements in the game. This prevents charge distances required being less than 9″ because of being more than 9″ apart point to point, but being less than 9″ away from a spot below that unit but within Engagement Range. Essentially it’s a pythagorean technicality that has been ruled against.
Teleport Strike
During deployment, if every model in this unit has this ability, then you can set up this unit in a teleportarium chamber instead of setting it up on the battlefield. If you do, then in the Reinforcements step of one of your Movement phases you can set up this unit anywhere on the battlefield that is more than 9″ away from any enemy models.
Unlike the Hammerhead (15) that was used the Strategic Reserves rule to enter the battlefield in the preceding turn. The Death Shroud ability lets them arrive anywhere on the battlefield that meets the distance from the enemy criteria.
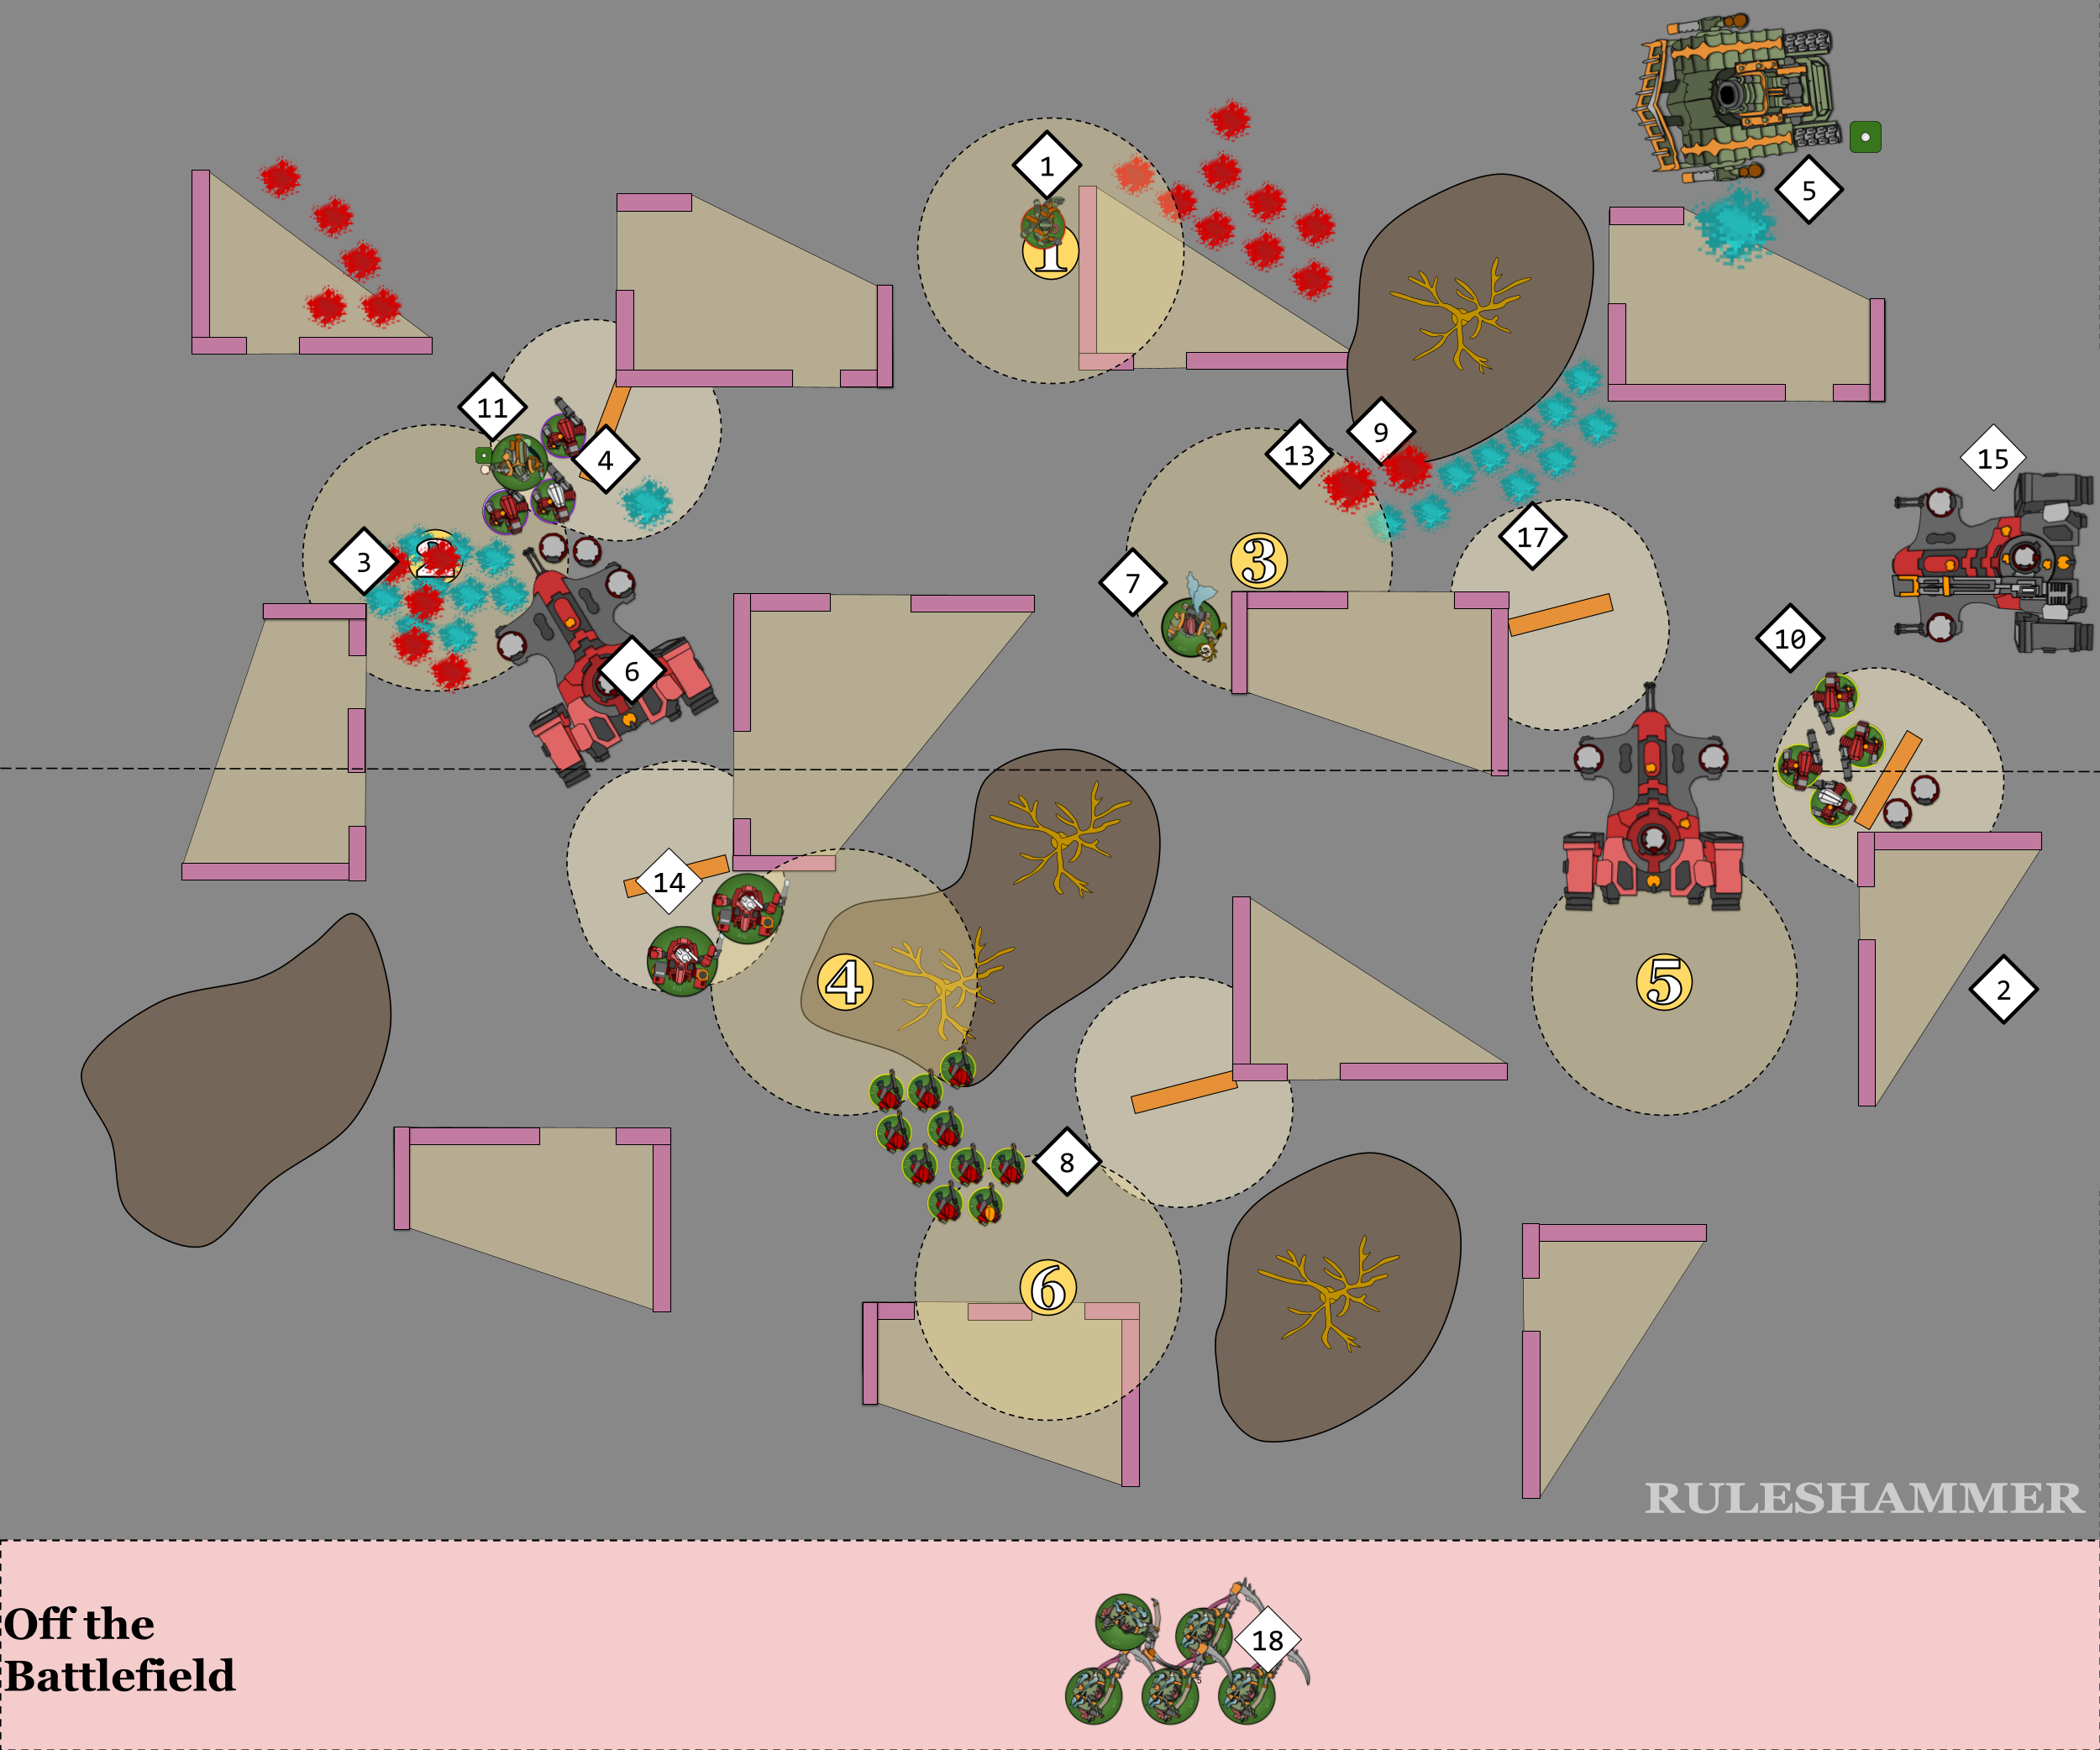
Because these units are always arriving more than 9″ away from any other unit, you need at least 9″ to successfully charge with them. This is because you need to get within the 1″ engagement range and if a unit starts more than 9″ away from a target, and move 8″ close to it then the unit is still more than 1″ from that target. Luckily these Deathshroud rolled 10″ for their charge!
When Does the Game End?
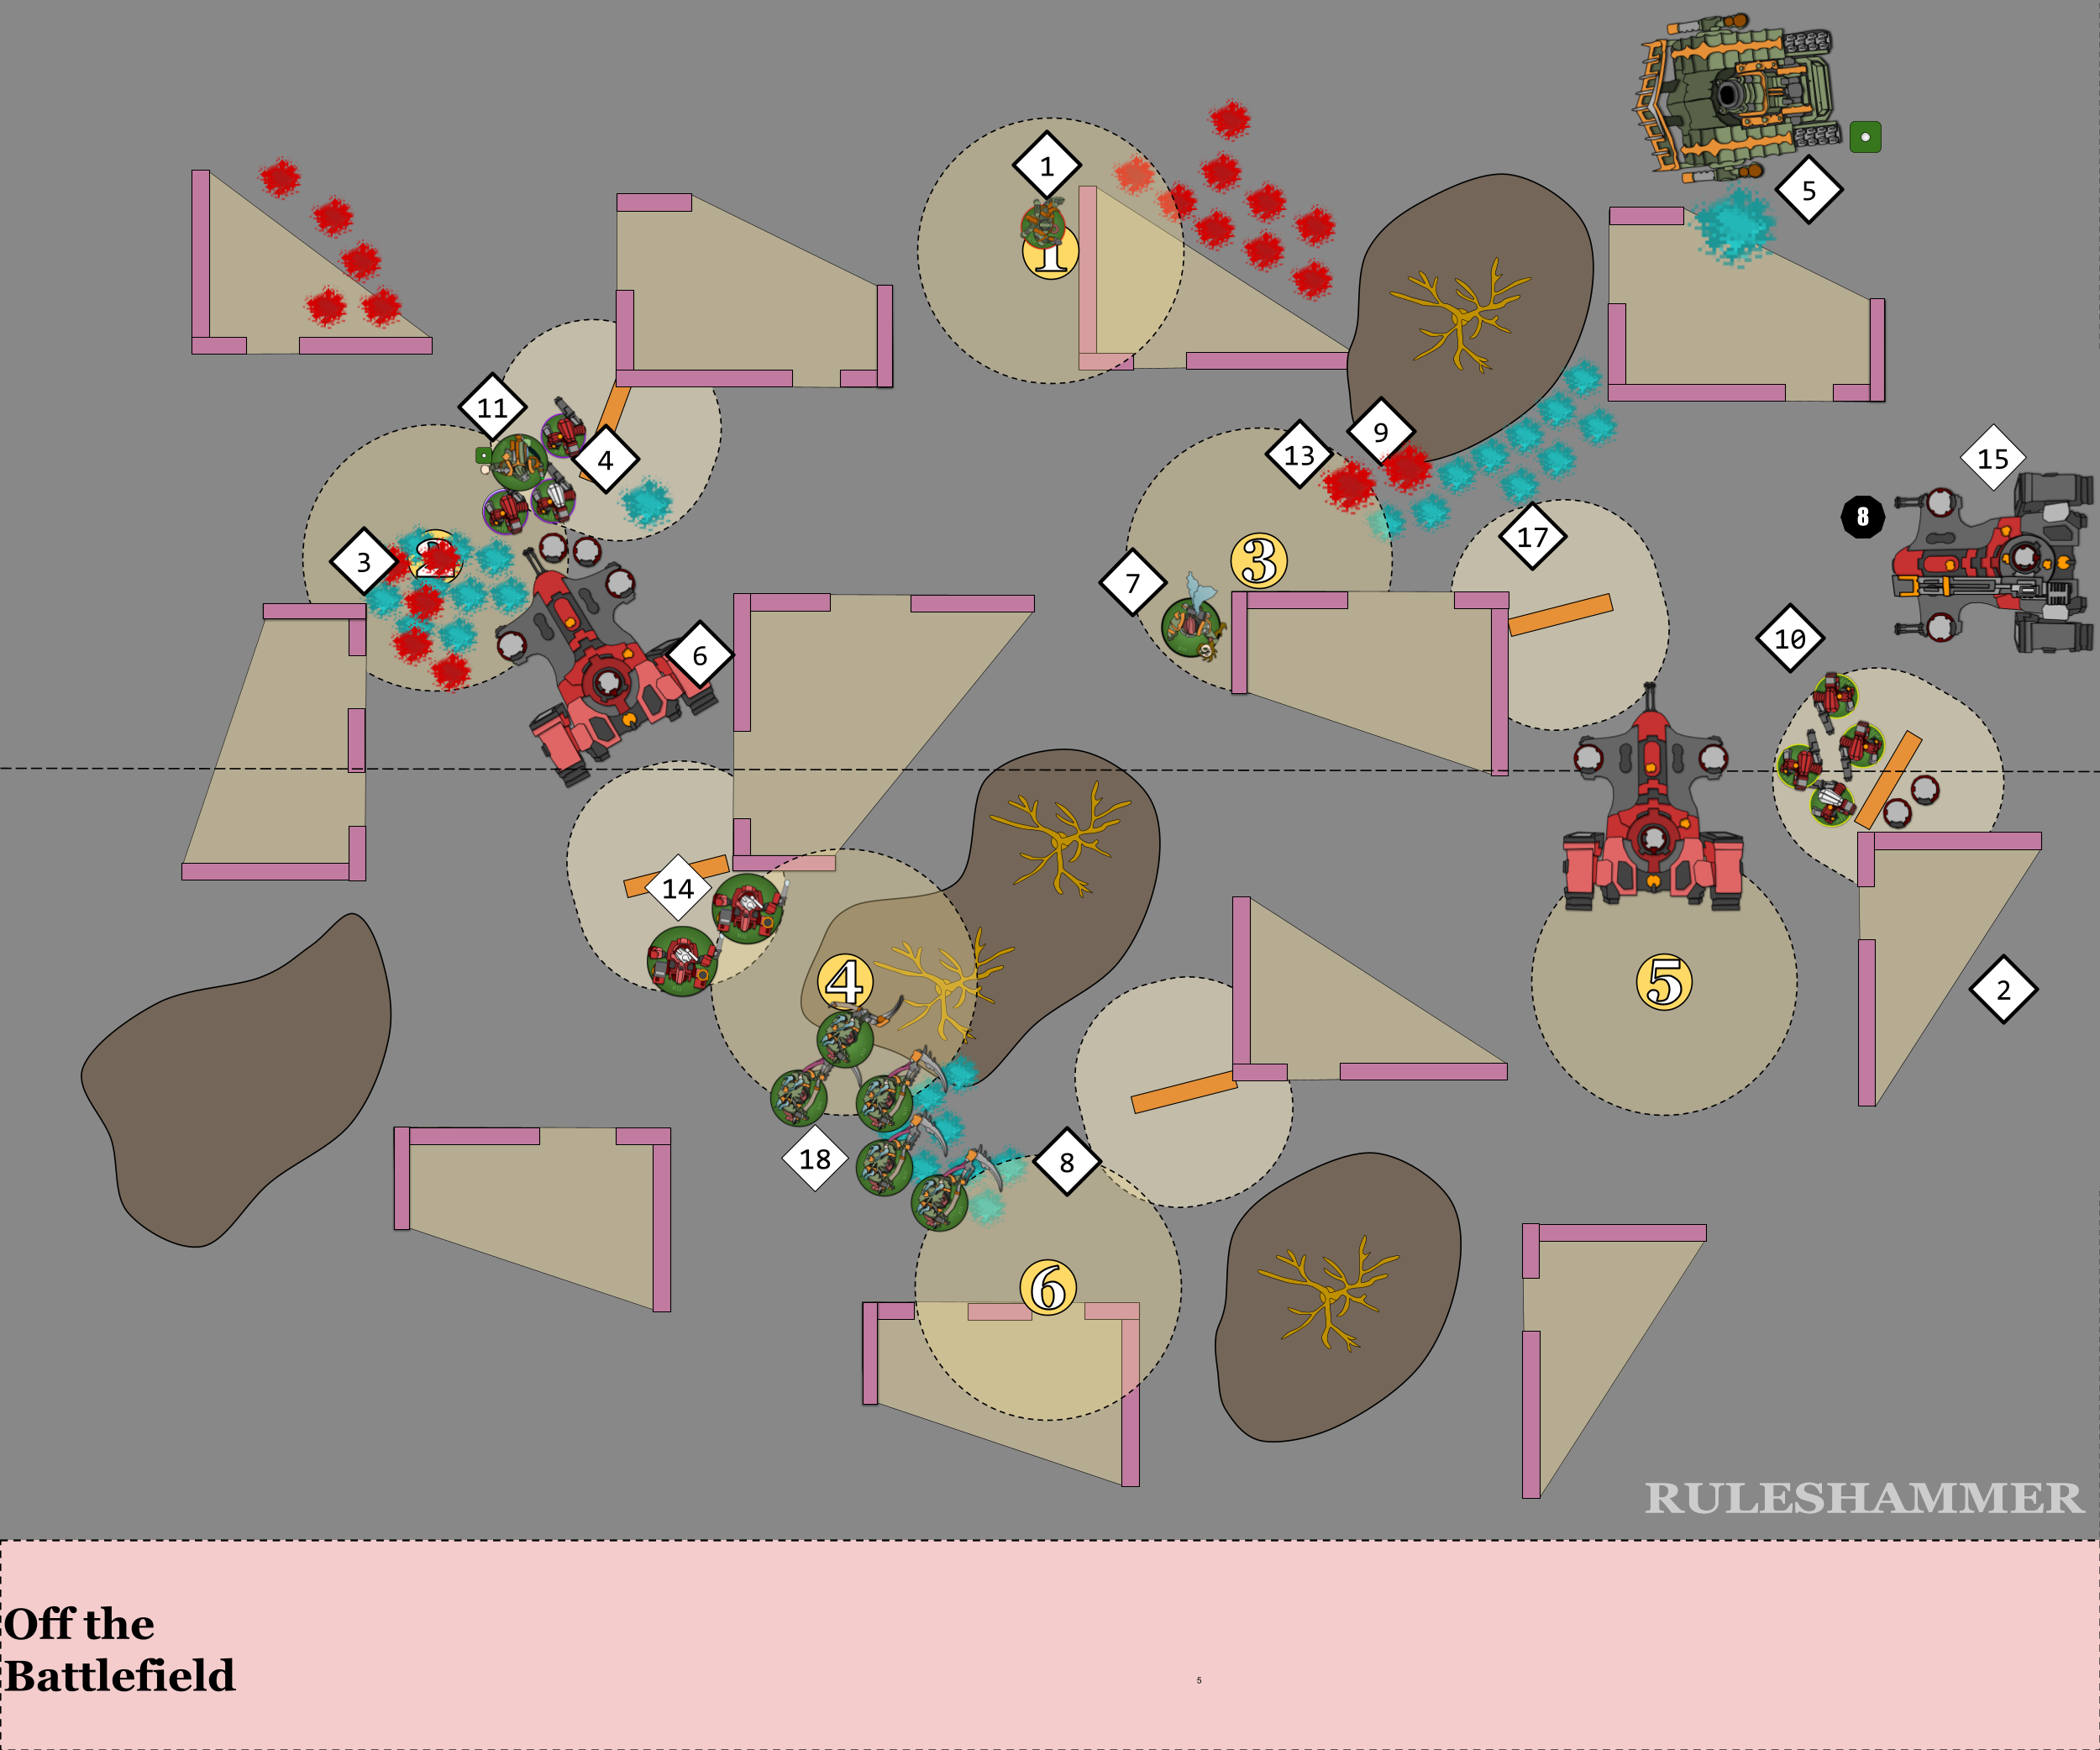
After two full rounds of battle the board looks like this!
But what about the score?
Games of 40k 9th edition technically always last 5 wounds, even if both sides have no models left on the board. If one side has no models left before the other that’s not an automatic loss in 9th edition (though it has been in previous editions), and it doesn’t end the game there.
Is this game a forgone conclusion? It’s hard to be sure. The score gap isn’t as wide as the killing gap has been. There are still 6VP of Death Guard Characters left on the board, but can the Tau kill them and scramble back to their Deployment Zone to kill the Death Shroud? As this is the last episode of the series I’m going to leave it on a bit of cliffhanger but I’d be hesitant to say the game is definitely going to the Tau at this point.
Last Notes and Any Questions?
One aspect I’d like to highlight before ending this series is that this game obviously has it’s quirks and differences from what you’ll play in real life. First of all it’s now using CP and missions and Missions several months out of date. Secondly it highlights some of the imbalance that can be introduce when playing smaller games of Warhammer 40k, units in small games don’t get less deadly but each loss is far more significant.
If you have any questions about the Ruleshammer Battle I do intend to include them in future Q&A articles, so please do send them in! The usual methods are at the end of this article.
Ruleshammer Battle Index
Episode 1 – Game Set Up Part 1
Episode 2 – Game Set Up Part 2
Episode 3 – Pre-Battle Abilities, Tau Turn 1 Command, Movement, and Psychic Phases
Episode 4 – The Tau Turn 1 Shooting, Melee, and Morale Phases
Episode 5 – Tau VP and Death Guard Turn 1 Begins
Episode 6 – Death Guard Turn 1 Shooting Phase
Episode 7 – Death Guard Turn 1 Charging and Fighting
Episode 8 – Some Tactical Alternatives
Have any questions or feedback? Got a rules question you want answered? Drop us a note in the comments below, ask a question in our Ruleshammer form, or head over to r/ruleshammer to discuss.
