
Welcome to Ruleshammer! This week is the sixth “episode” of a series I’m calling Ruleshammer Battle. A step by step explanation of a small game of warhammer 40k. Remember the banner below will take you to the Ruleshammer 9th Edition Compendium, for all the questions I’ve answered for the last few months!

Welcome back! If you missed Episode (6), I’d recommend having a read of that first to get caught up! Last episode we went through the tactically tricky Death Guard shooting phase, this week… some stabbing and stomping.
Death Guard Charge Phase
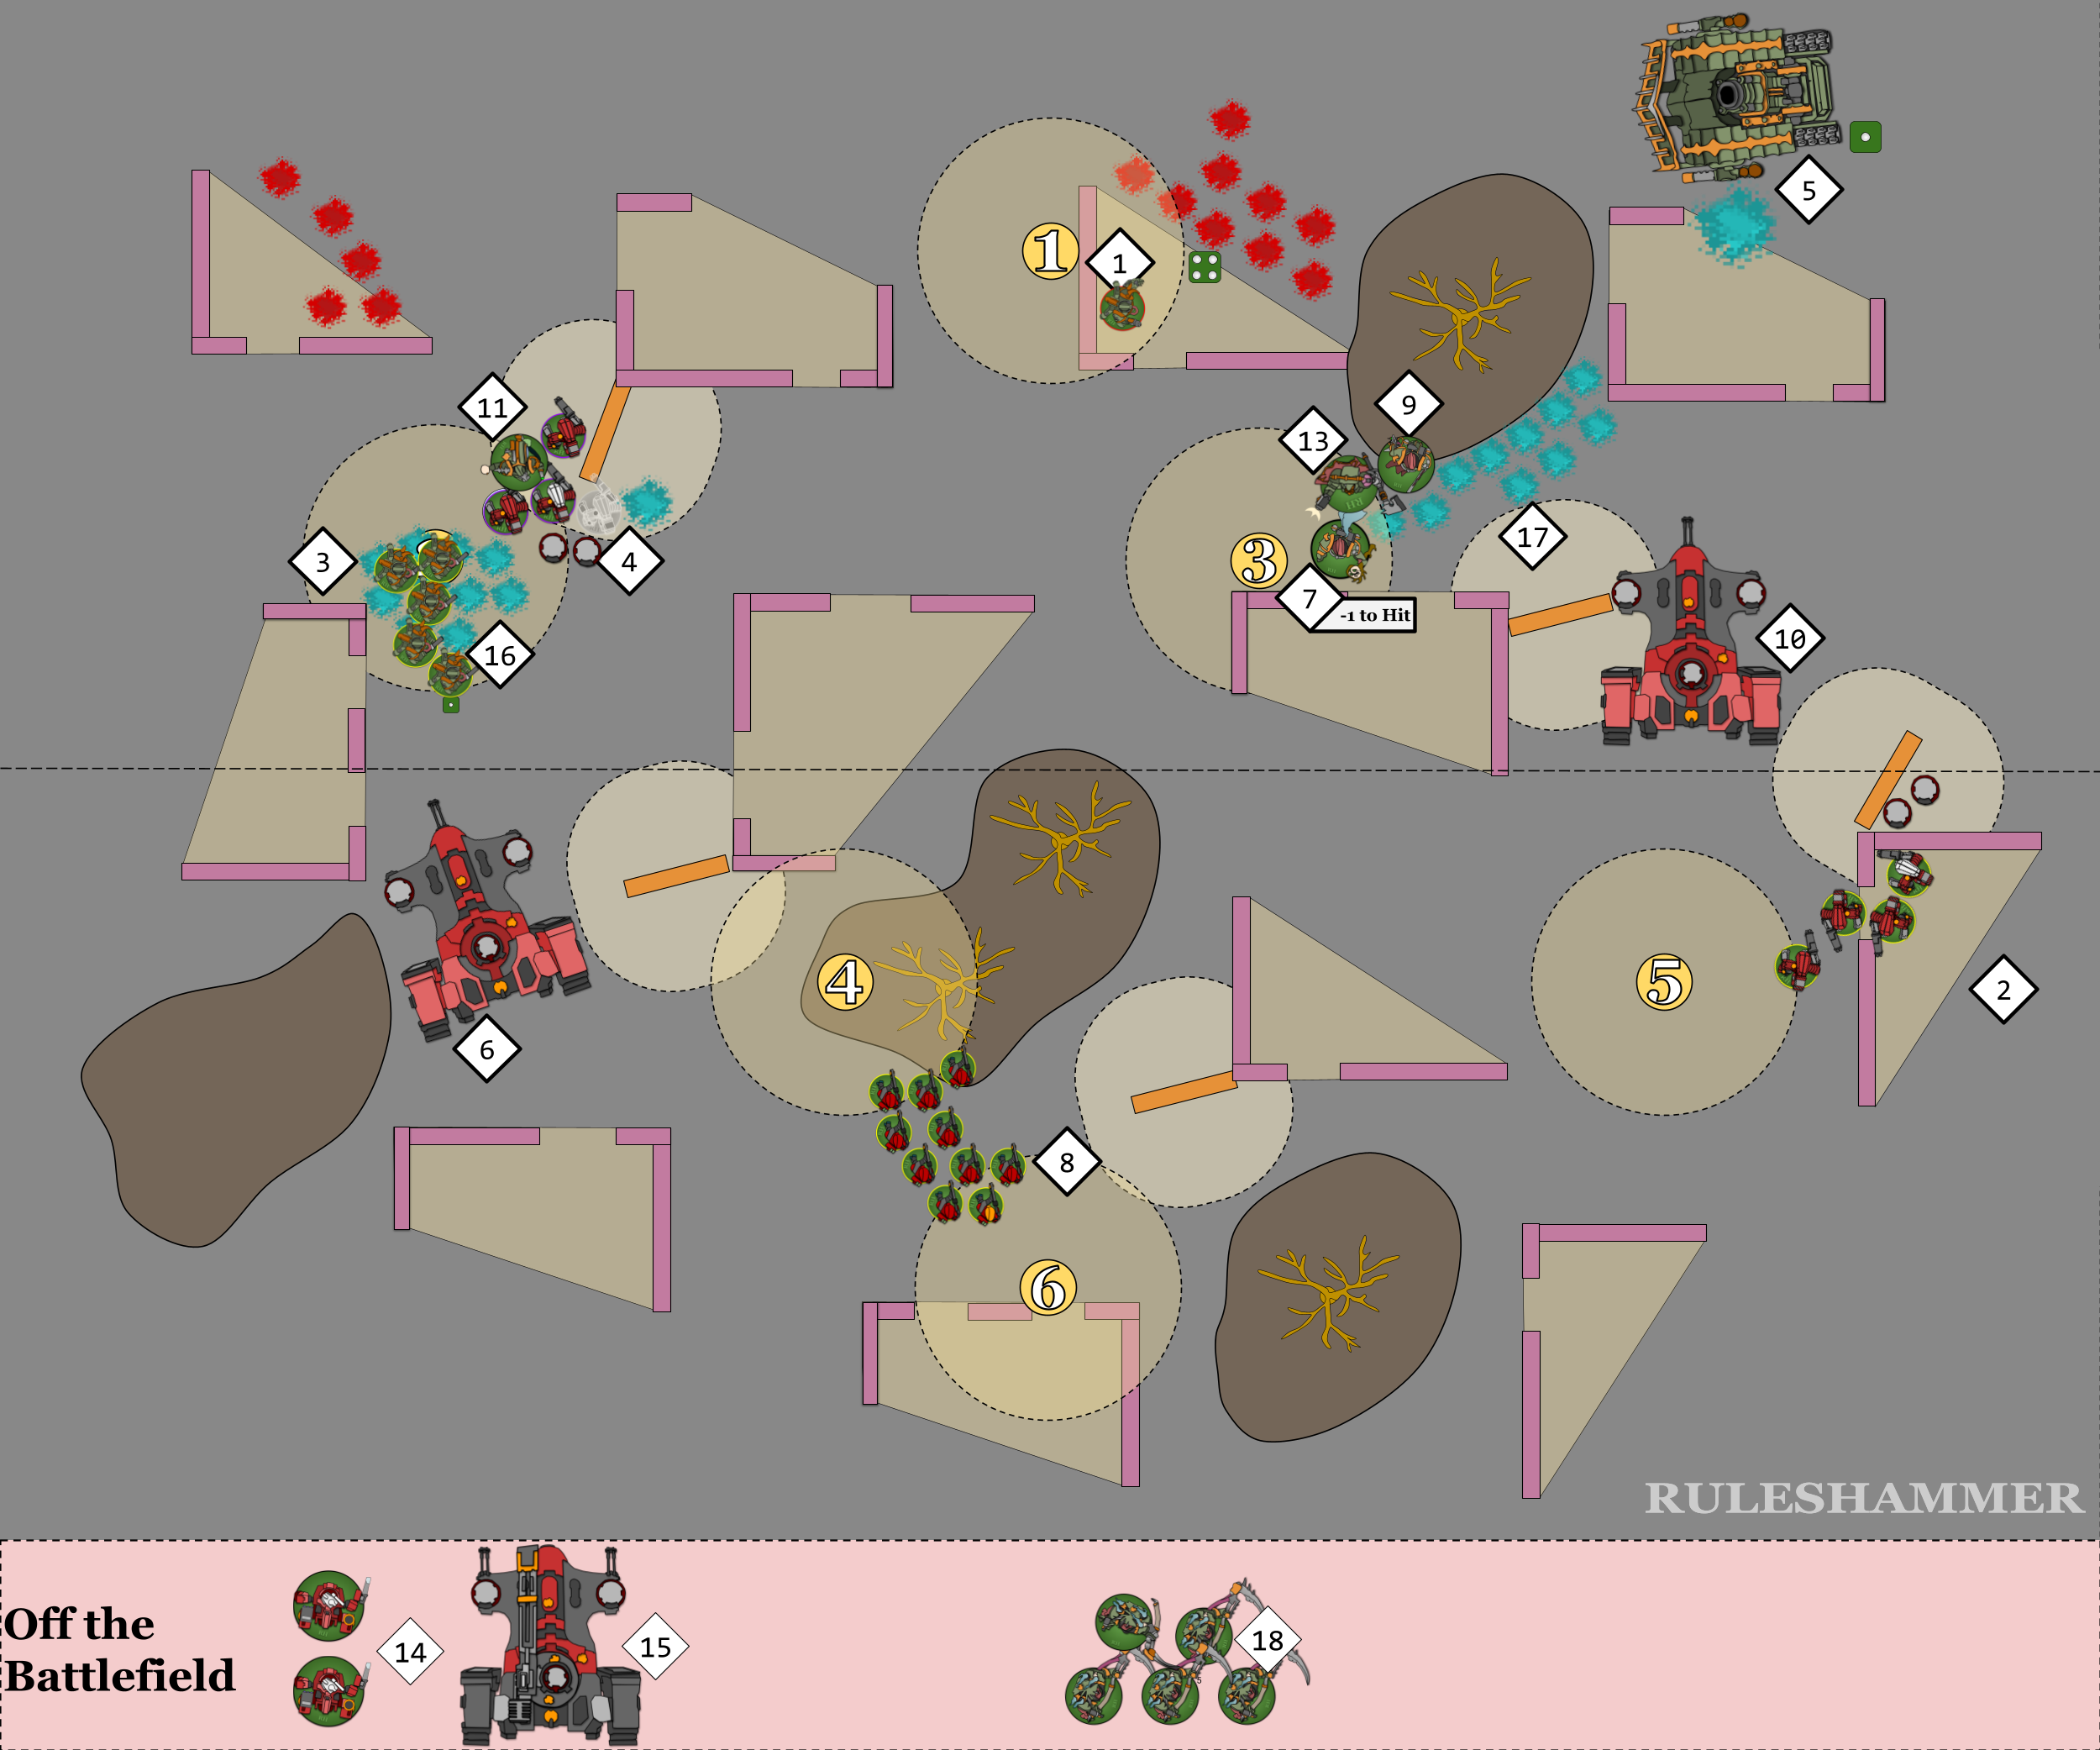
So at the start of the charge phase the board looks like this:
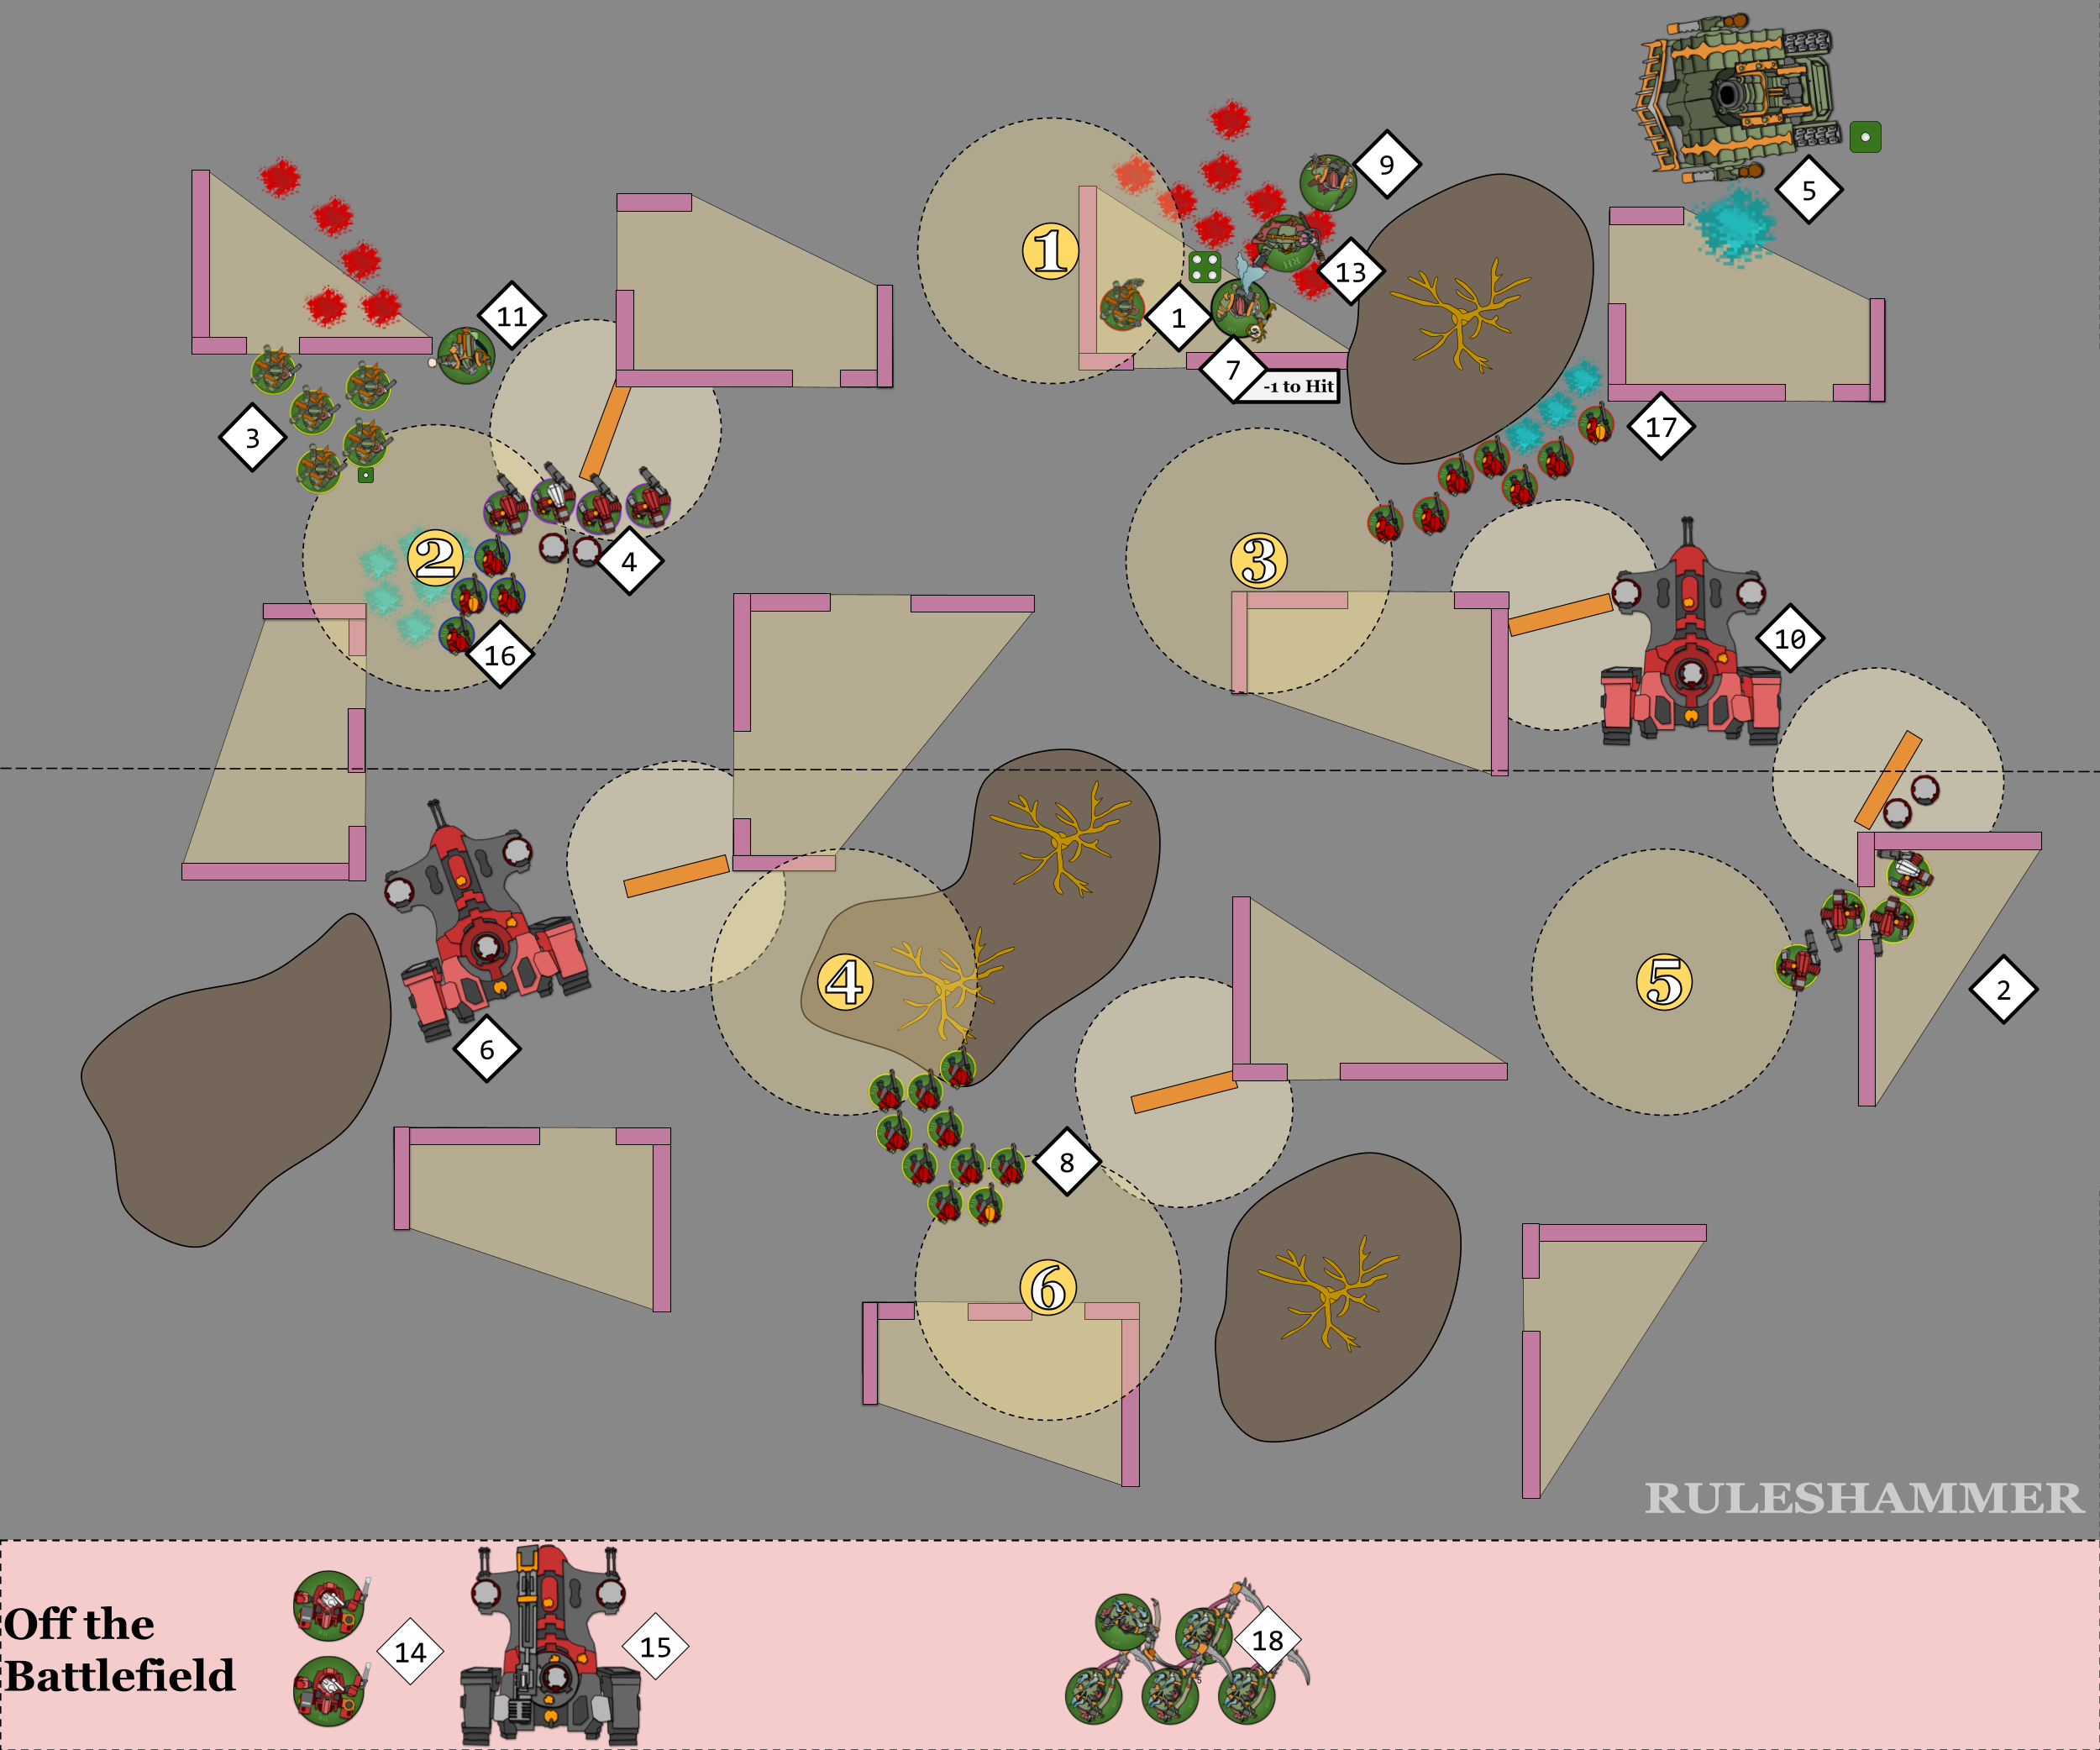
And we have some key charges to make numbered on the diagram below.
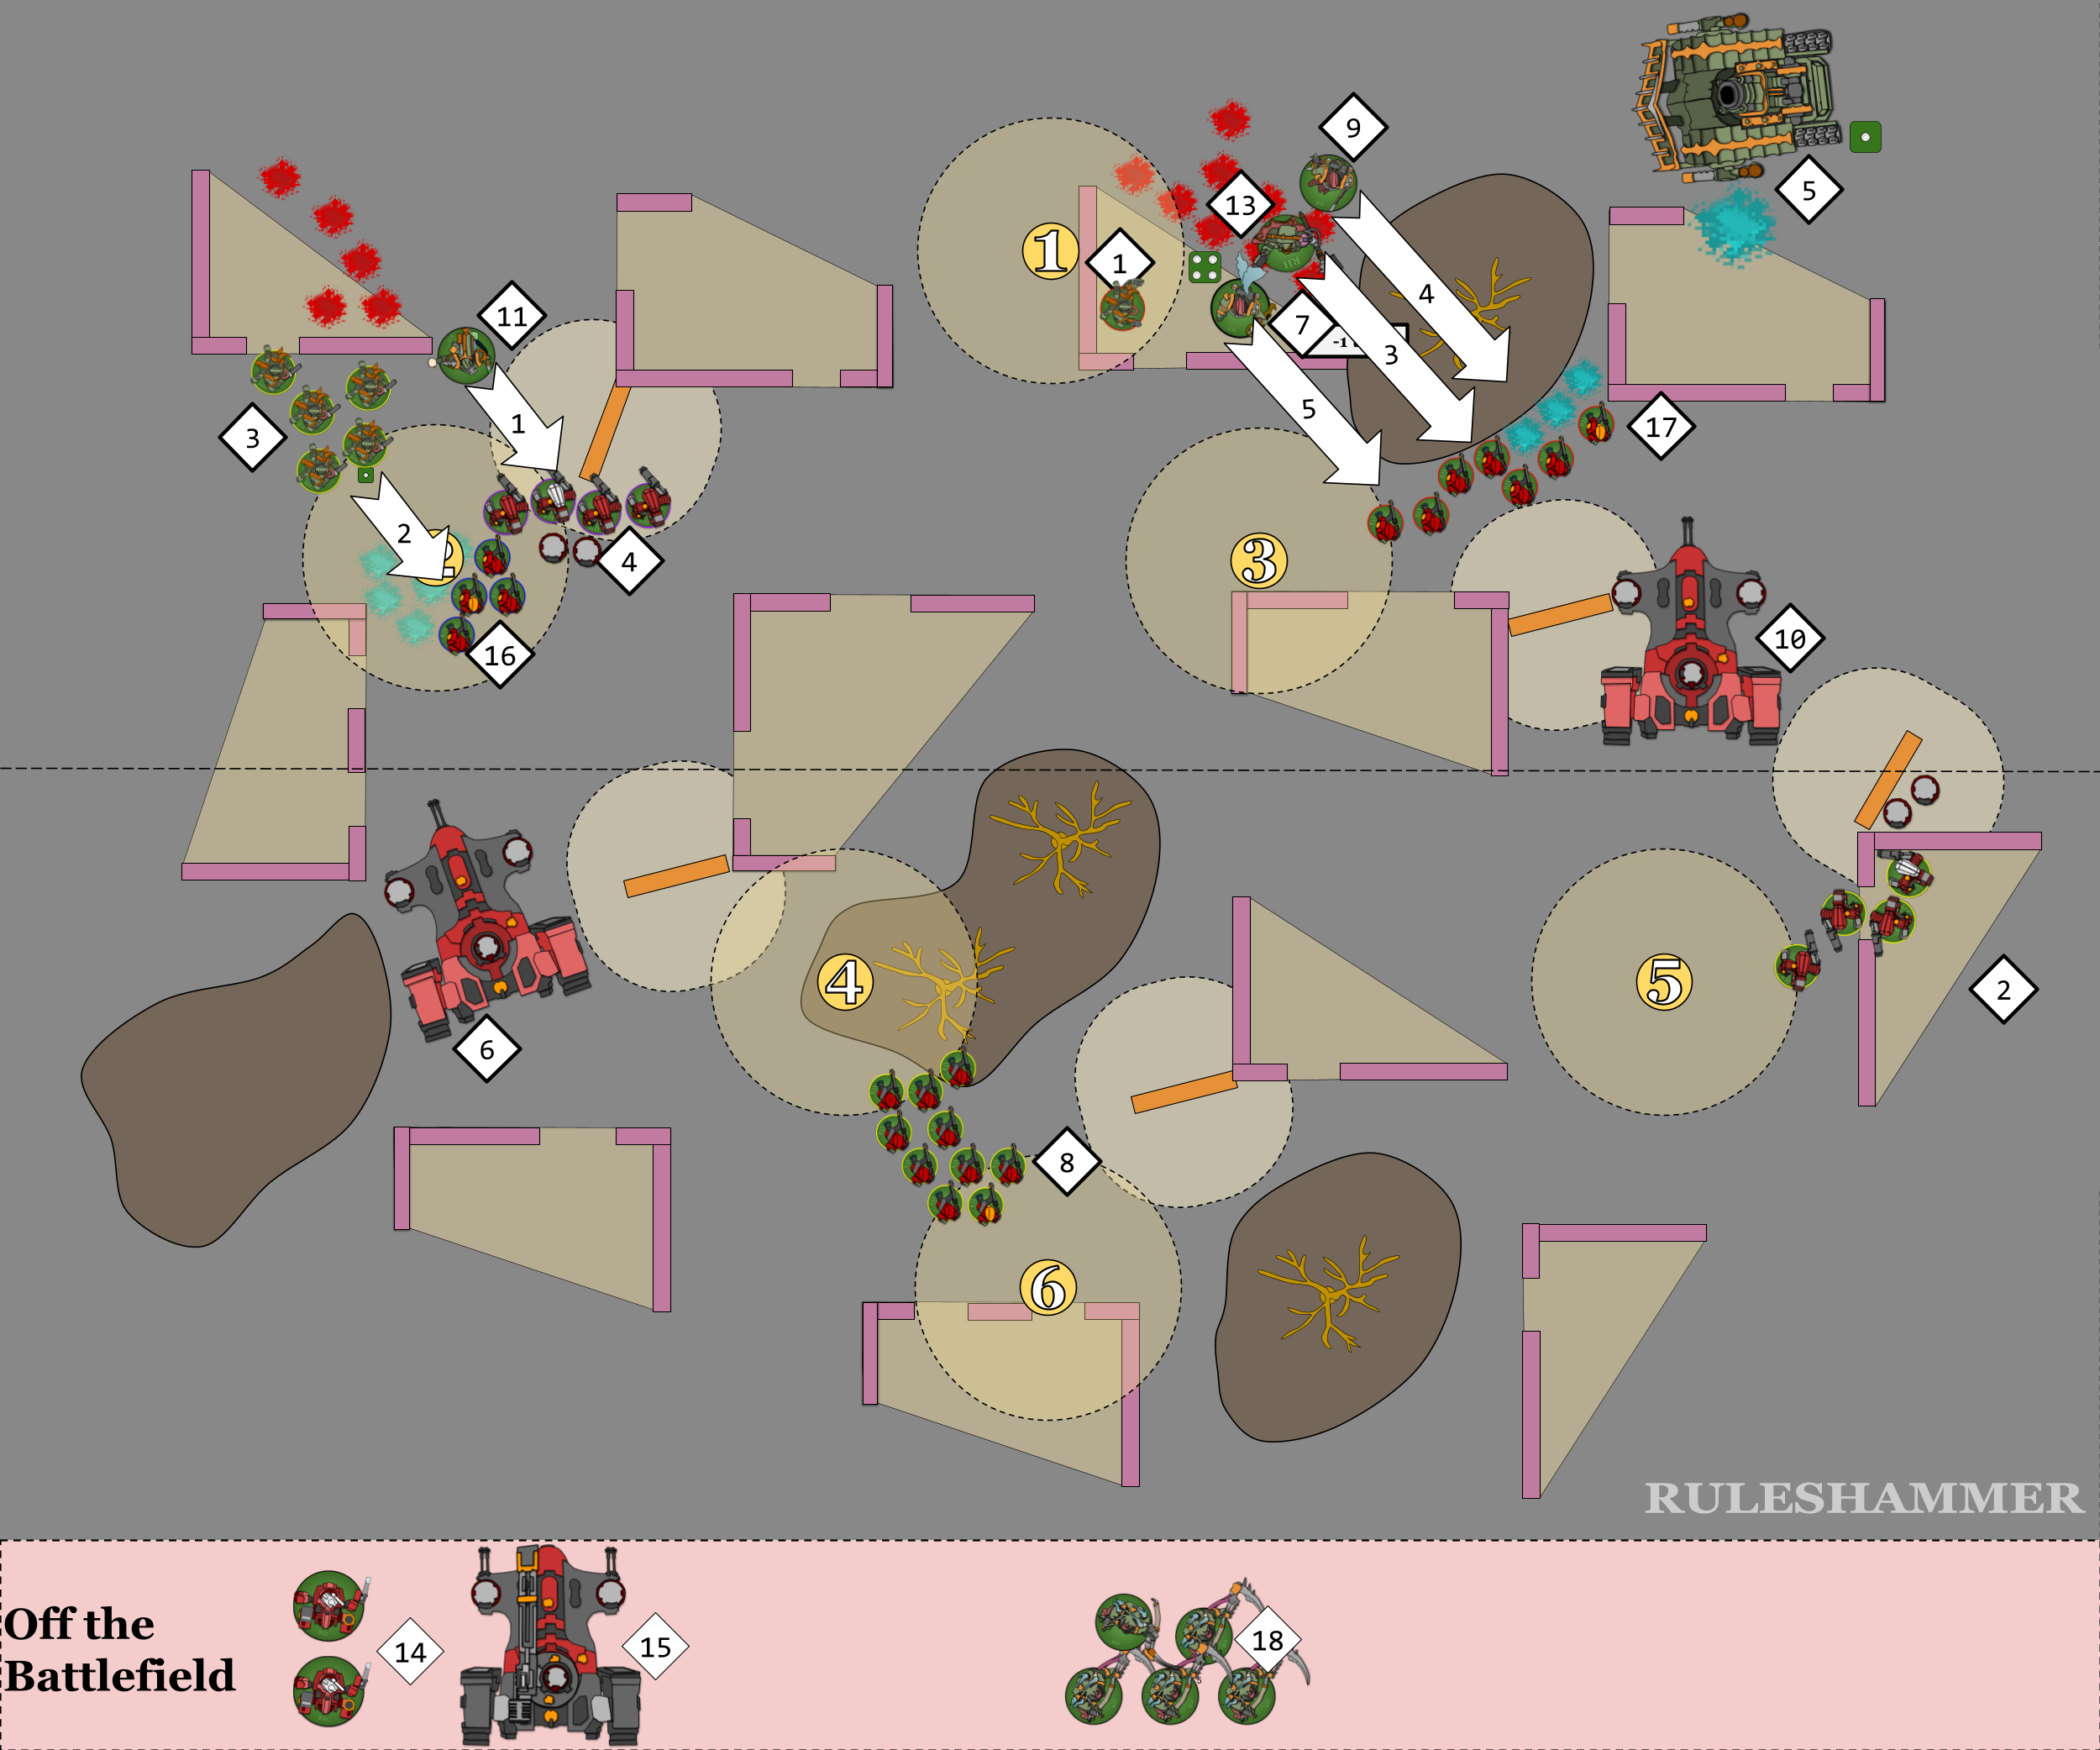
Importantly, charges are not all declared at once; that doesn’t mean the Death Guard player shouldn’t be think of an optimal order though. Things to consider are how far a charge is, what anti charge abilities such as Overwatch the enemy player might have to use, and what spacing you need for other units to also make their charges. The order above might change as units as units succeed or fail.
The Tau player usually have two significant anti charge abilities that they might use during this phase.
PHOTON GRENADES 1CP
Use this Stratagem in your opponent’s Charge phase, when a PHOTON GRENADES unit from your army is selected as a target of a charge declared with an enemy unit (excluding VEHICLE and MONSTER units). Until the end of the turn:
-
-
- Subtract 2 from that unit’s charge rolls.
- Each time a model in that unit makes an attack, subtract 1 from that attack’s hit roll.
The charge roll modifier incurred via this Stratagem is not cumulative with any other negative modifier to a unit’s charge roll.
-
and
REPULSOR IMPACT FIELD 1CP
Use this Stratagem in your opponent’s Charge phase, when a BATTLESUIT unit from your army is selected as a target of a charge. Until the end of the phase, subtract 2 from charge rolls made for any unit that declares a charge against that BATTLESUIT unit. The charge roll modifier incurred via this Stratagem is not cumulative with any other negative modifier to a unit’s charge roll.
However these abilities both modify charge rolls, the Death Guard infantry units all have Inexorable Advance which makes them immune to charge roll modifiers. The -1 to hit portion of Photon Grenades however would still work.
There is also of the course the Overwatch Stratagem from the core book that they might use.
TheChirurgeon: Yeah, I’m back with more tactical advice. When you’re making charges like this, the two big things you want to consider are first – who can charge from outside of line of sight? INFANTRY can move through terrain with the BREACHABLE keyword freely, allowing you to walk through a wall that blocks line of sight. This will let you charge an enemy unit without worrying about Overwatch fire from most units. The other thing to consider is Order. Generally, a unit can only attempt to fire Overwatch once (and only one unit per phase), so if you can you want to “soak” or deter Overwatch by charging with a unit that either isn’t a good Overwatch target or is guaranteed to survive, or both. In games where I have a Rhino Transport with Plague Marines, the Rhino makes an excellent first charging unit to tie up enemies and eat Overwatch.
Lets go through some charges then.
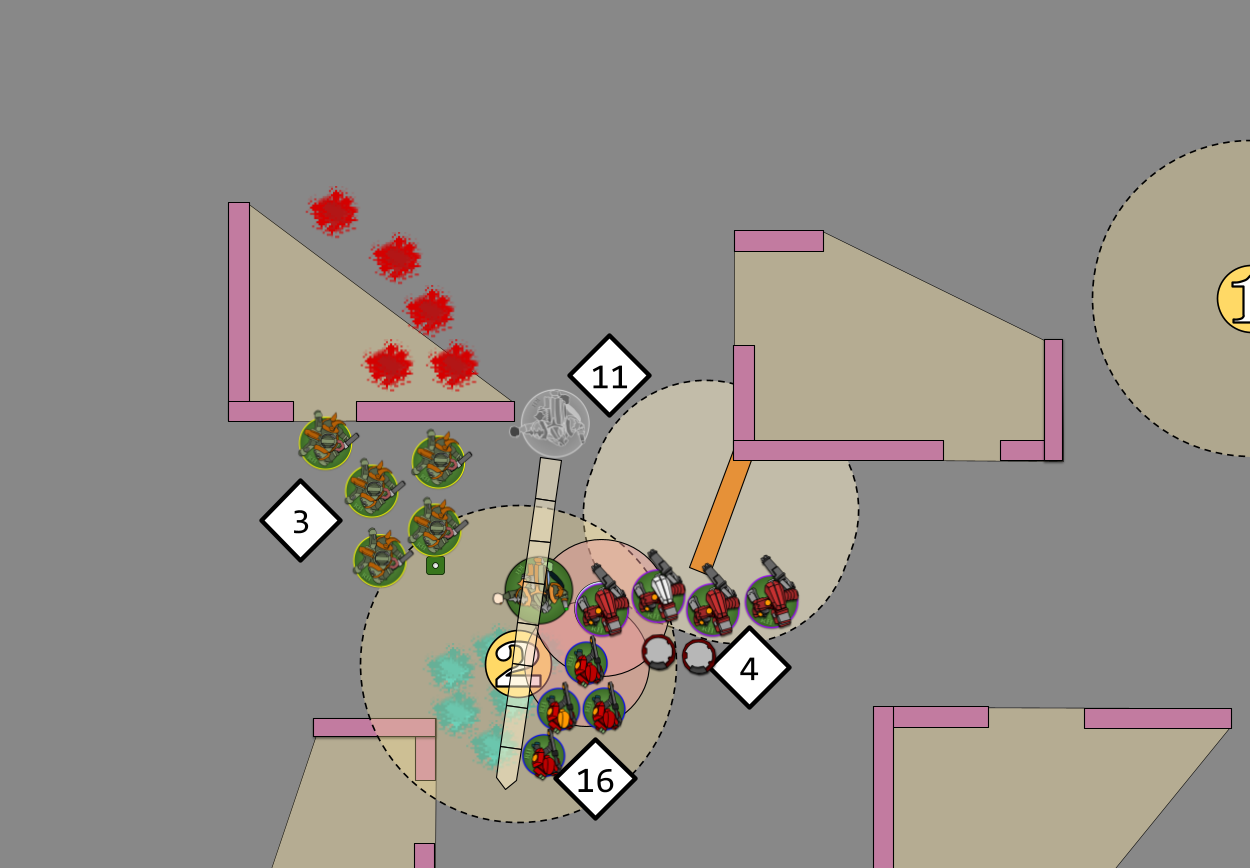
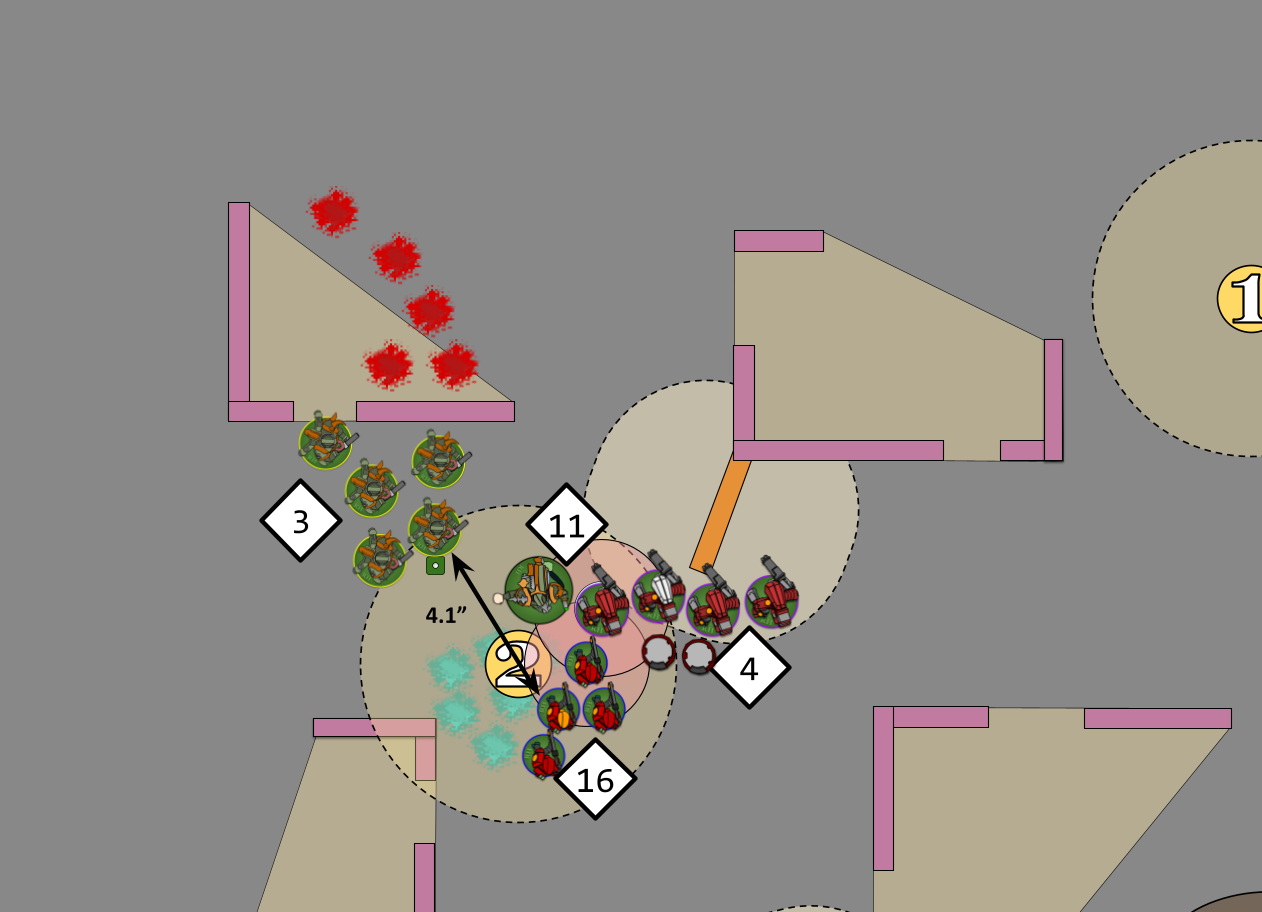
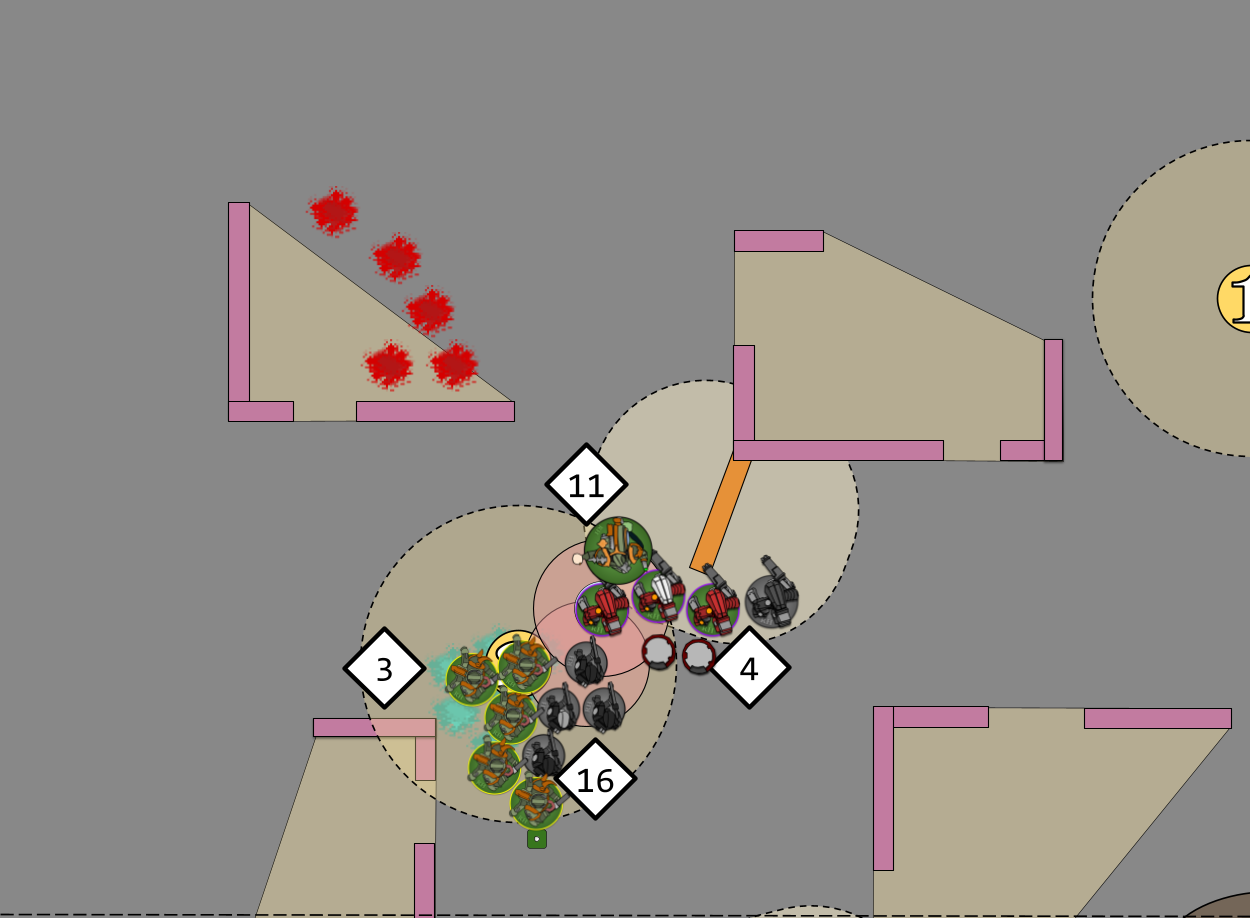
Charge 1 – Foul Blightspawn (11) into Stealthsuits (4) and Fire Warriors (16)
The Death Guard player is starting off with this charge as both targets are a reliable distance away and as the Tau player hasn’t used any of their stratagems and would rather they be used on this unit than lose any models in the important Objective Secured unit of Plague Marines (3).
The Stealthsuits (4) are going to use Overwatch. Overwatch is like any other shooting attack except it only hits on 6s. The terrain they are near does have the Defensible terrain trait however the Stealthsuits are not in a position to use it.
If every model in an INFANTRY unit is within 3″ of an Obstacle terrain feature with this trait, then it can either Hold Steady or it can Set to Defend (see below) when an enemy unit declares a charge against it if, were you to draw a straight line, 1mm in thickness, between the closest parts of the bases (or hulls) of the two closest models in the two units, that line would pass over or through that terrain feature.
CP Update!
Tau: 7 – 1 = 6
Death Guard: 11
Unfortunately for the Stealth suits no damage is inflicted from their attacks. The Foul Blightspawn has declared both units as charge targets to to succeed to it must end its charge move within Engagement Range of both units. The easiest way to figure out what the require roll is going to be is to measure to the furthest model and then round down that distance to whole inches.
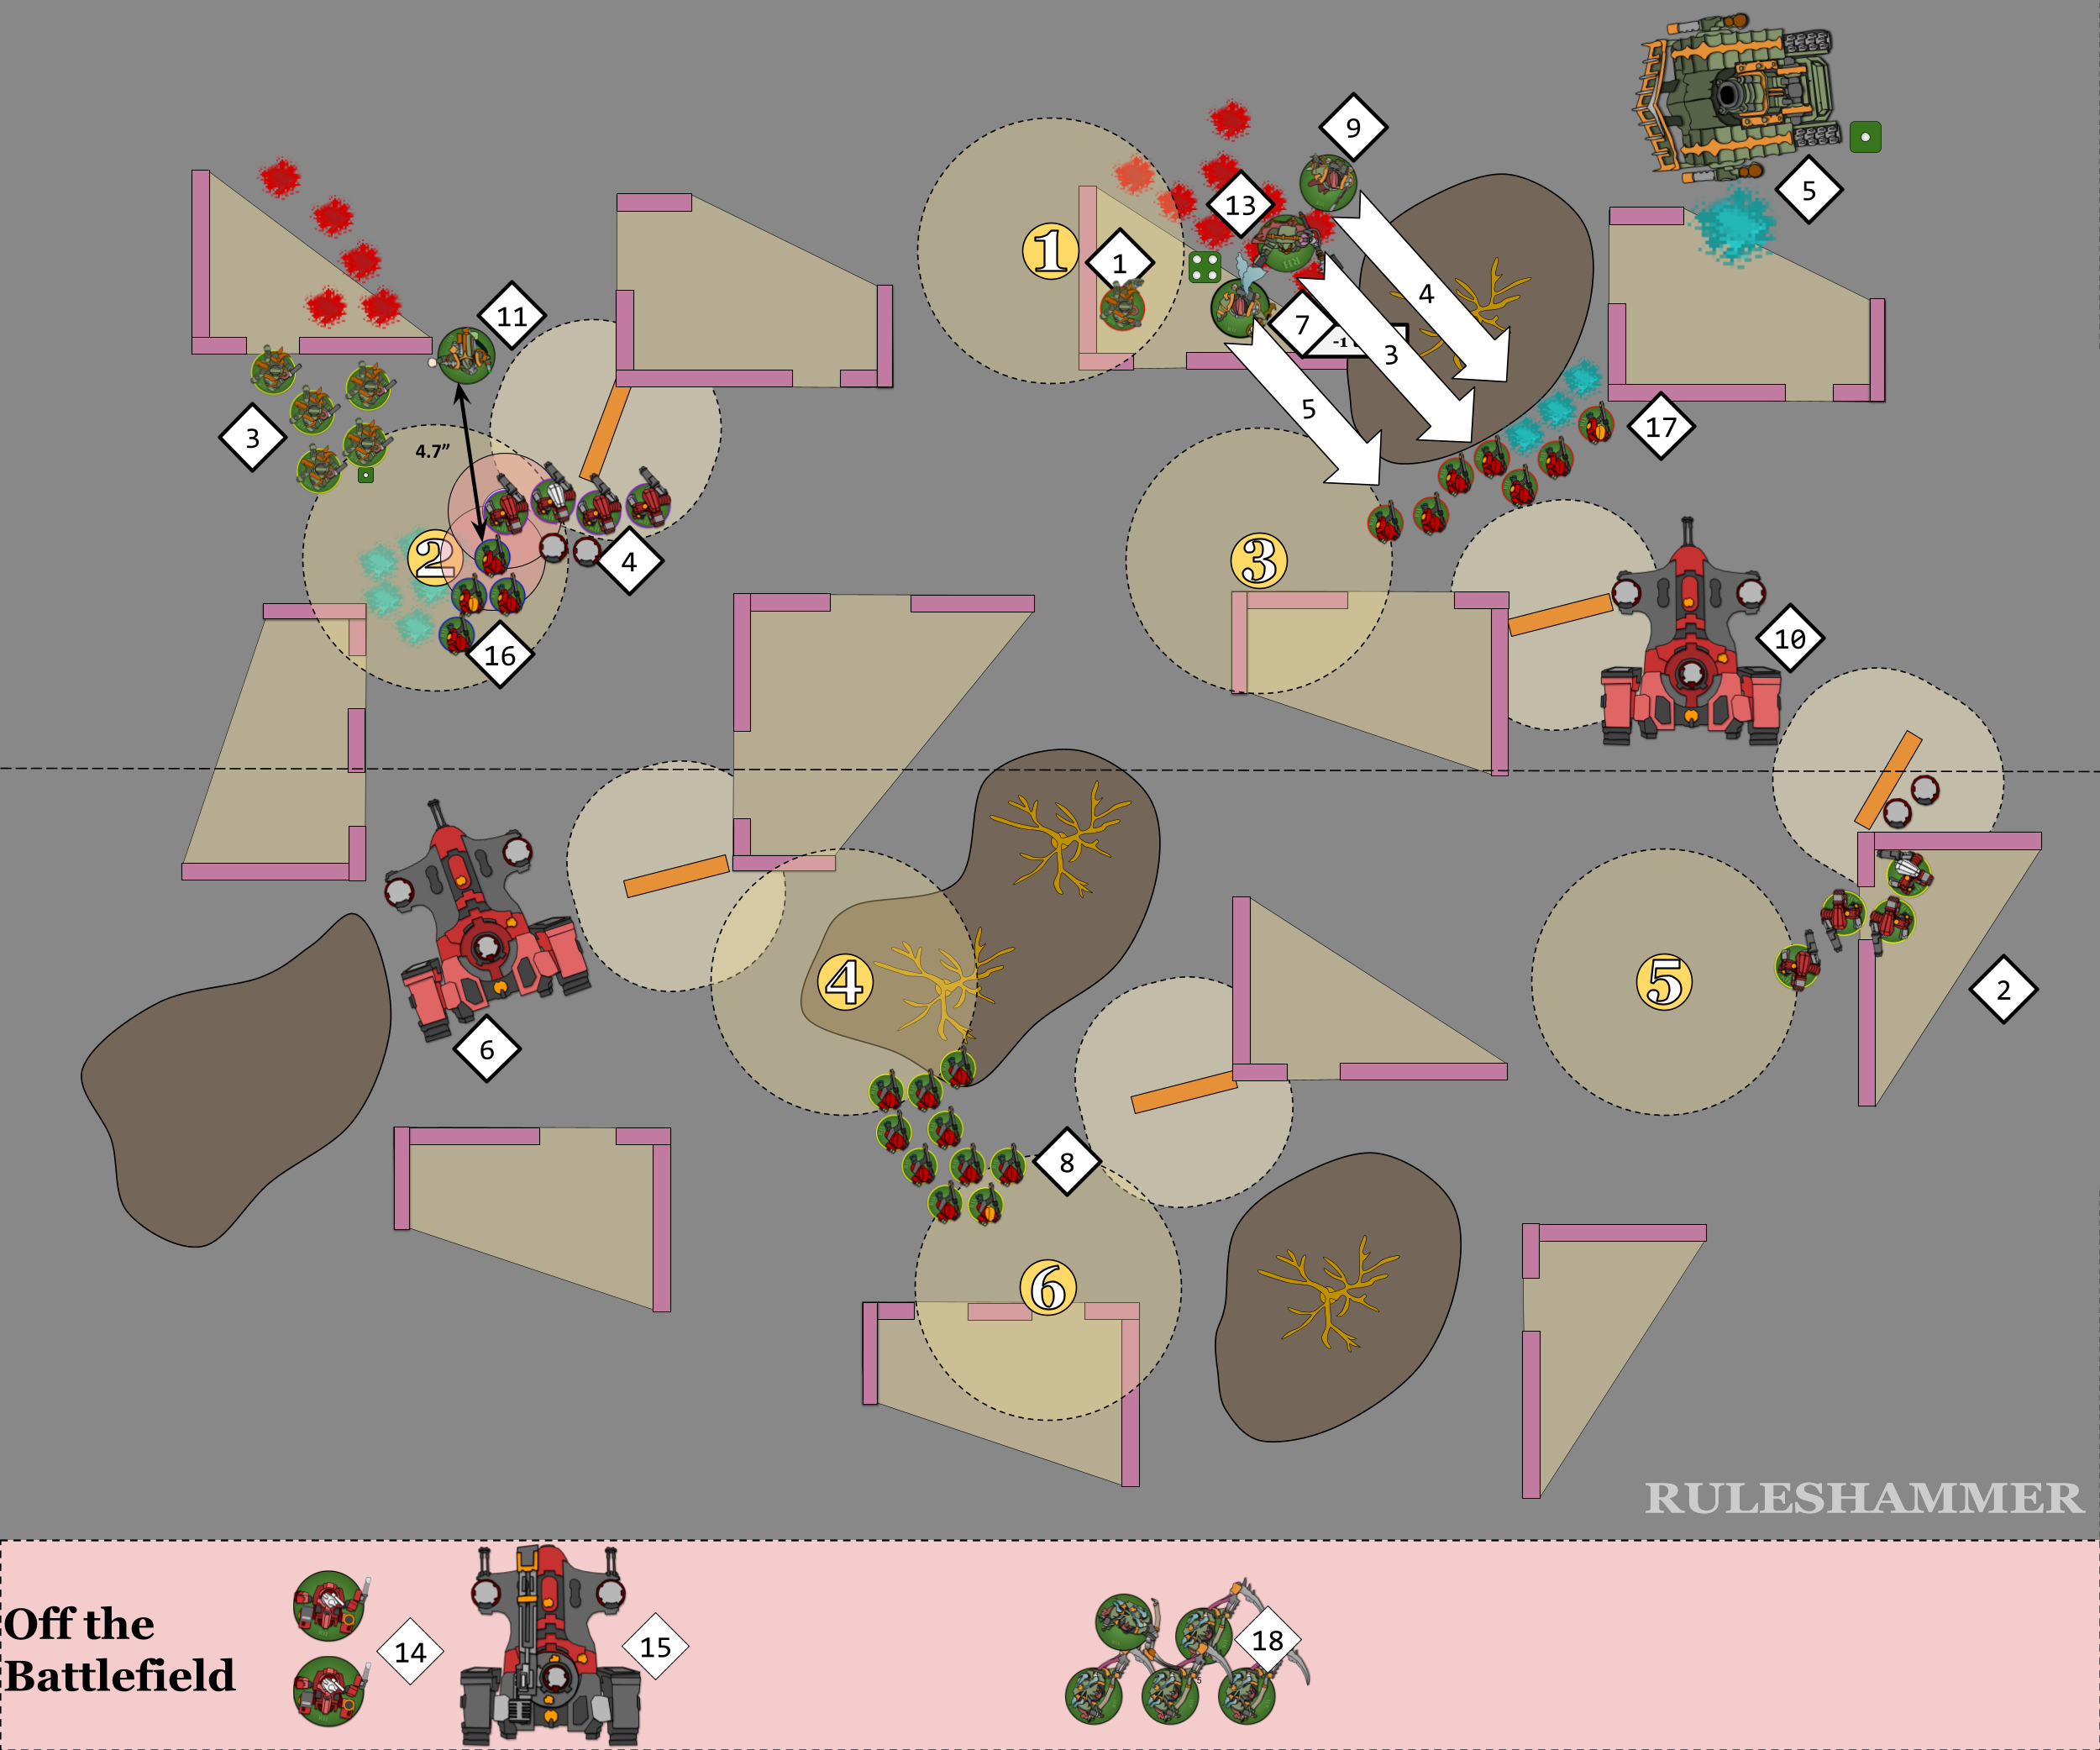
In this case the Fire Warrior is 4.1″ away, so a 4 will be sufficient to end within 1″ of it. Sometimes intervening terrain may complicate this though, so keep that in mind. The Foulblight spawn charges, rolling a 8″.
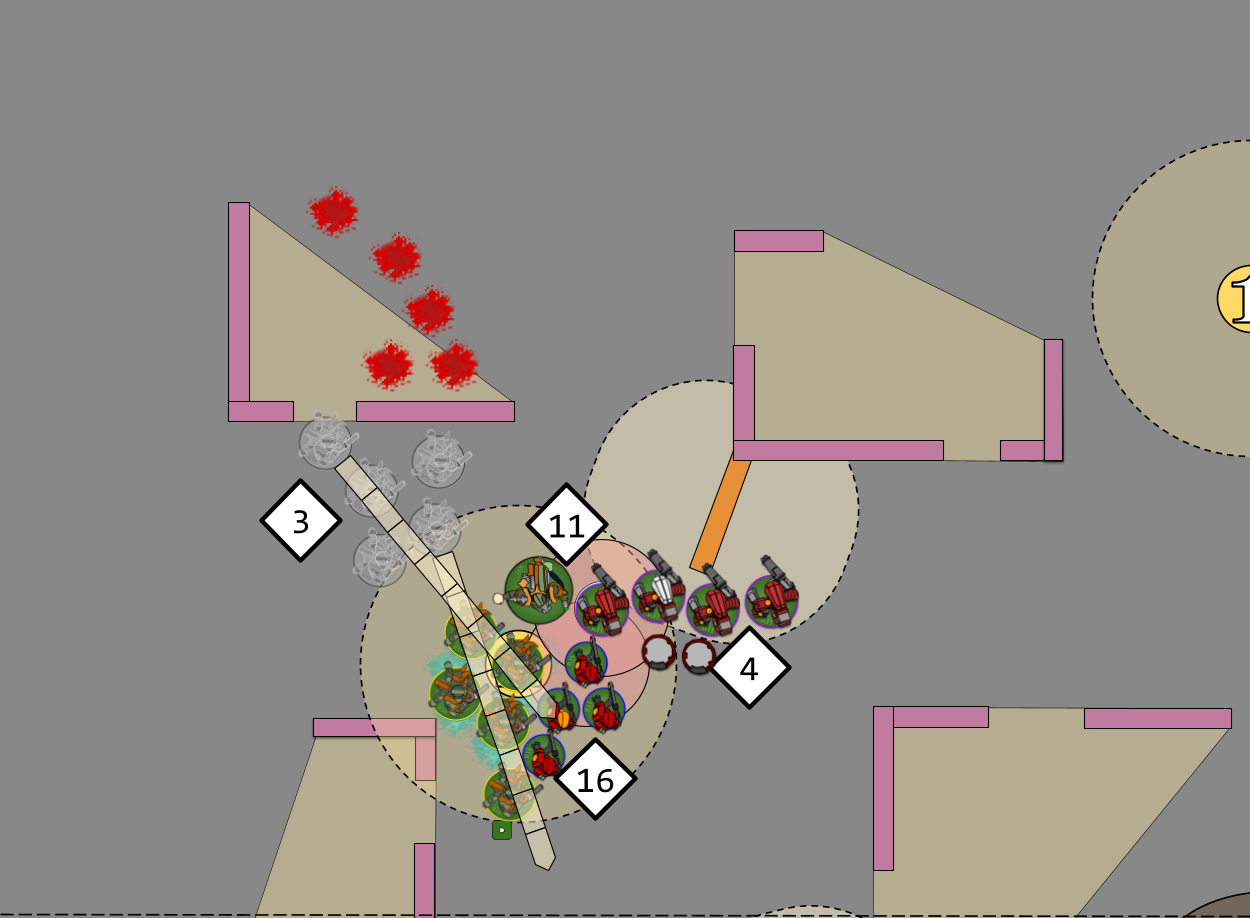
The Foul Blightspawn has now moved, but notice its precise position. It has ended its move as close to the Stealthsuits (4) as it can be within touching the base, and only just within Engagement range of the Fire Warriors (16). This will give it a bit of freedom to move when it piles in and leaves space for the Plague Marines (3). Who will charge next.
Charge 2 – Plague Marines (3) into Fire Warriors (16)
A far more straightforward charge as there’s no terrain to check, the Tau player decides to not spend the 1CP for the -1 to hit effect of Photon Grenades.
This time our target is 4.1″ away so we need 4″. Notice that the measurement isn’t between the closest two models though, this is because the Stealthsuits are not a target of this charge, so the Plague Marines can’t end their charge within Engagement Range of them. They roll and get another 8″!
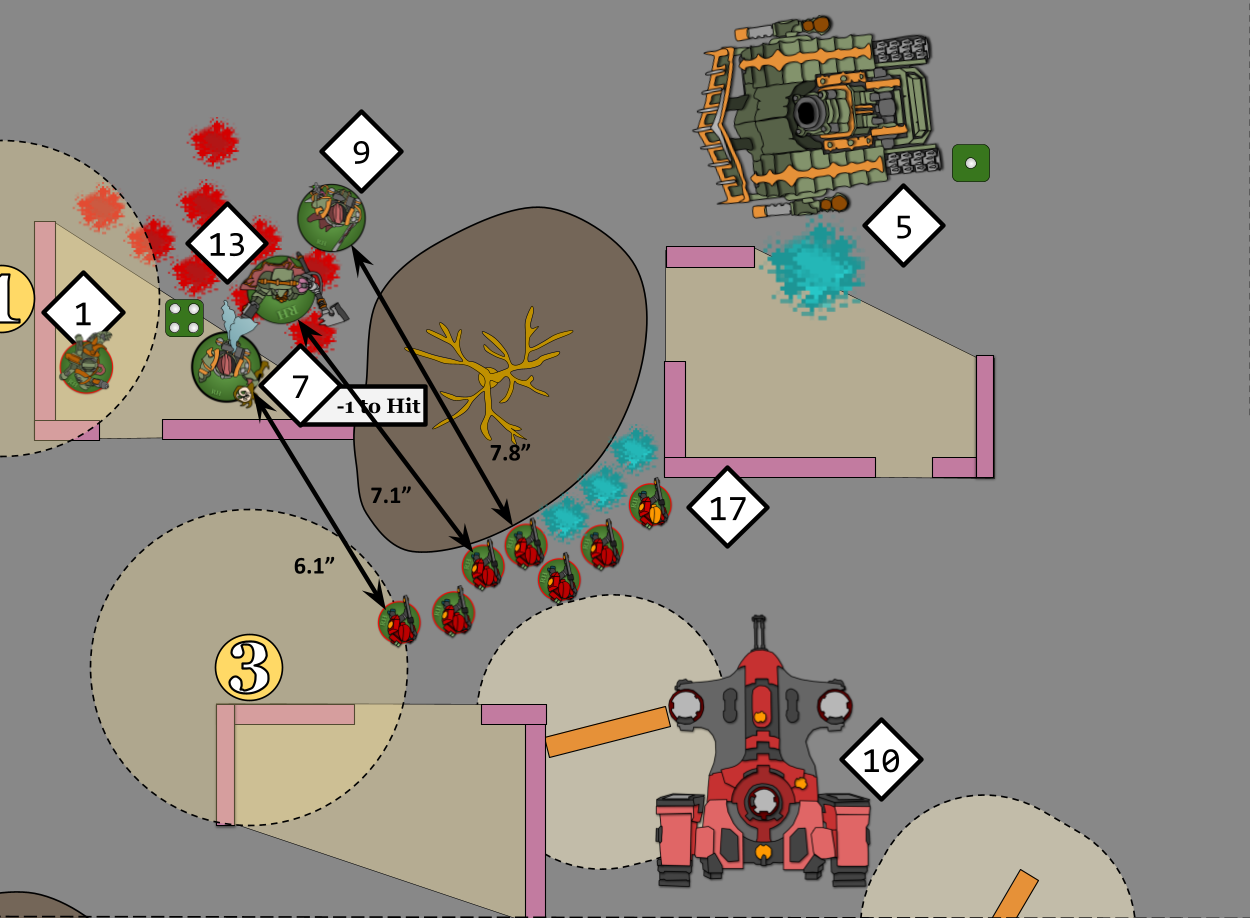
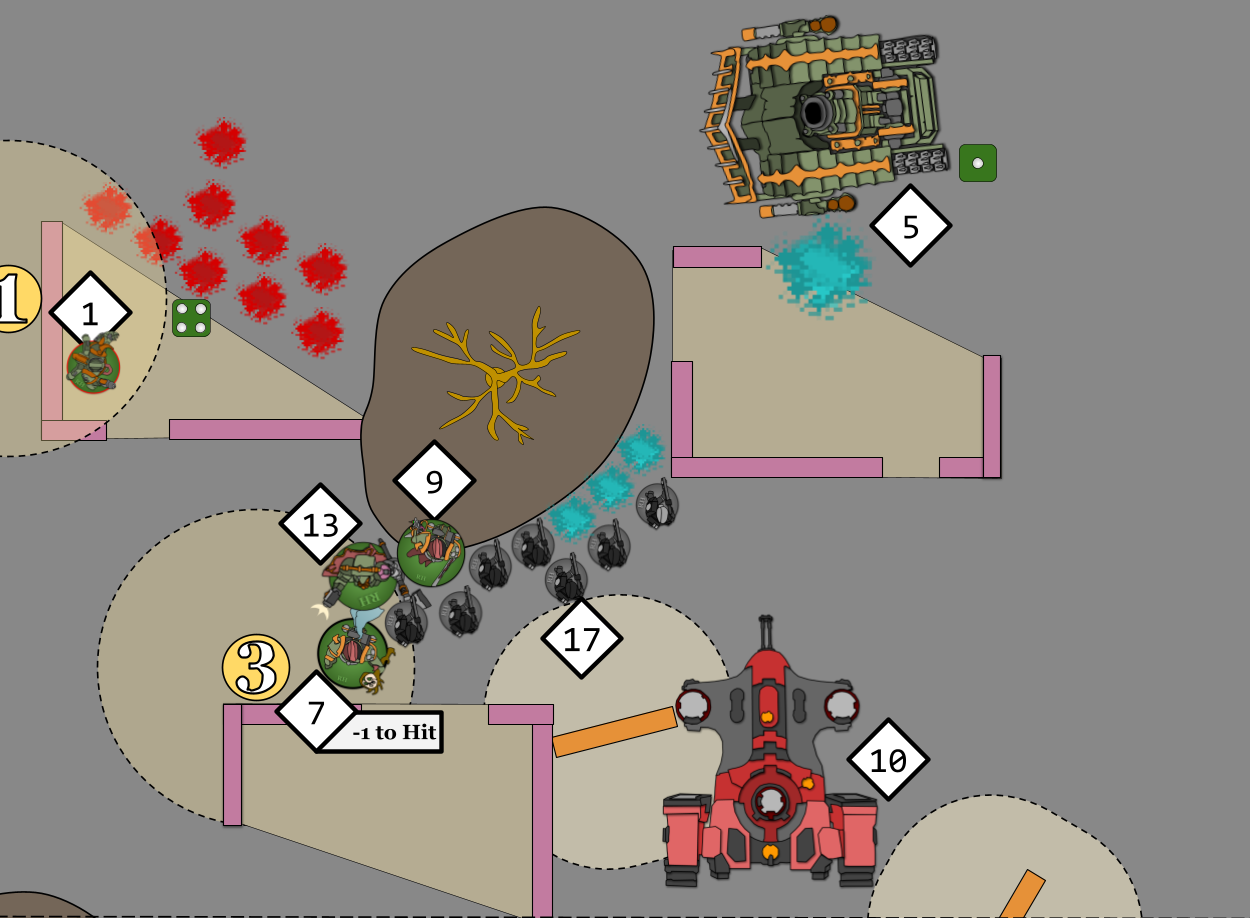
Remaining Charges – Malignant Plaguecaster (7), Chaos Lord (13), and Plague Surgeon (9) into Fire Warriors (17)
Zooming on ahead we can sort these charges out fairly quickly. The Tau player for our game isn’t going to use Photon Grenades on any of these units, since its impact will be negligible. The Difficult Ground of the Forest area terrain also doesn’t present a challenge for our Death Guard either, thanks to Inexorable Advance. We checked charge distances in the previous episode as part of the reason that the Death Guard player didn’t do any shooting.
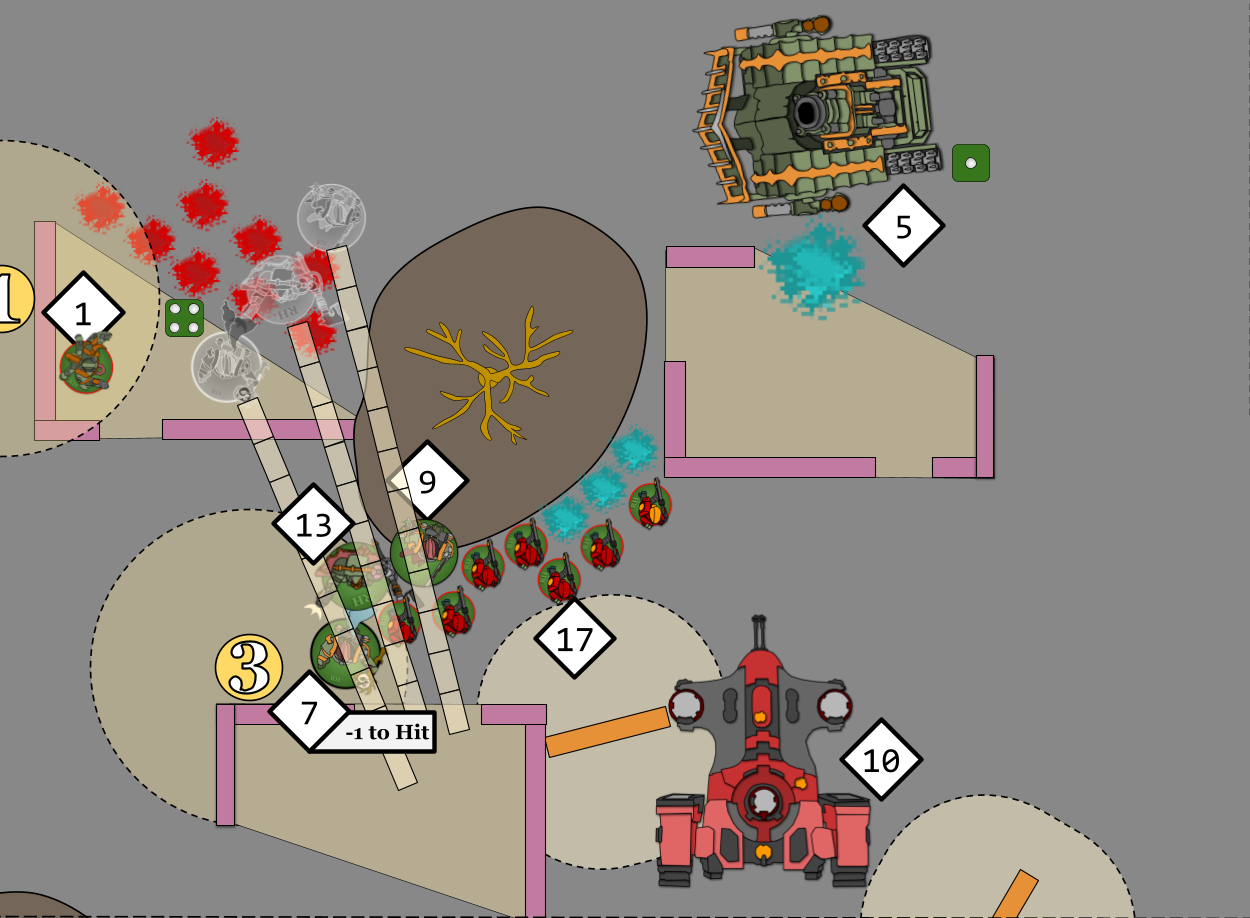
So all there is to do is make some charges. Remember though that I’m just summarising sequential events, each charge must be completed before moving on to the next one.
- Plague Surgeon (9) rolls a 12″!
- Chaos Lord (13) rolls 10″.
- Malignant Plaguecaster rolls 7″.
Here’s the results of those charges then.
With Charges complete we move to the fight phase.
Death Guard Fight Phase
First of all there’s the order of fights to consider.
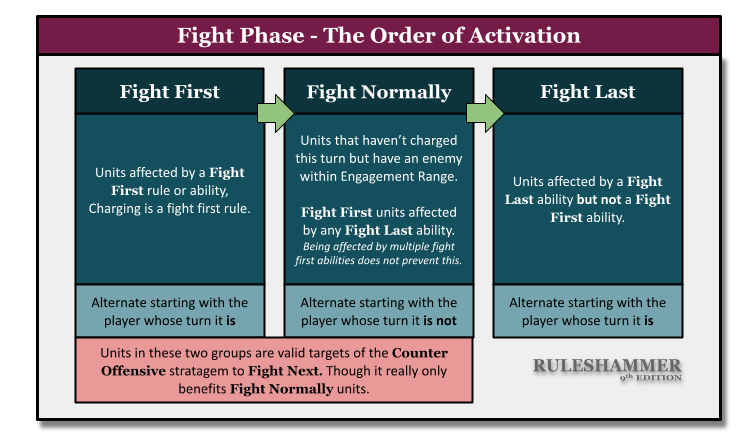
Charging is a Fight First rule, so the Death Guard units will all fight before the Tau units. There is a stratagem to interrupt after an enemy unit has fought, however three things make this a poor CP investment for Tau:
- It’s 2CP.
- Tau units generally are very bad at melee, other than that Commander, who is already dead.
- The best units that might have wanted to use it are the Stealthsuits; however they are not going to be Eligible to do do because the Foul Blightspawn will use its targeted ability on the Stealth Suits at the start of the Fight Phase, making them a Fight Last unit.
Putrefying Stink: At the start of the Fight phase, you can select one enemy unit within 3″ of this model. That unit is not eligible to fight this phase until after all eligible units from your army have done so.
One last thing to mention before we resolve any combat is that Contagions will come into play this phase as the Tau are now within the 1″ range for Contagions to be in effect during the first battle Round. This will reduce the toughness of the units in combat by 1.
Let’s resolve some fights then. Fighting is made up of 3 parts: Piling in, Making Attacks, and Consolidating. The first and last parts are moves units can make, but they are usually only 3″ unless affected by an ability and the models must end that move closer to the nearest enemy model than they started. This is why when charging it’s often best not to reach base-to-base contact as if you’re already that close, you can’t end a move any closer and therefore can’t Pile In. Don’t give up free movement like that!
TheChirurgeon: The reverse is also true – if you move your models into base-to-base contact, you’ll stop an opponent from moving as well. This can be helpful if you want to block an opponent from moving around you onto an objective, or piling in/consolidating into a nearby enemy unit.
The attacks bit is generally the same as shooting, except you use melee weapons and the models that can fight and what they can target have some specific rules.
- All units that have either charged or are within Engagement Range of another unit can fight this turn. If, during the fight phase a unit becomes within Engagement Range of another, then it can fight (this can happen as a result of Piling in or Consolidating into unengaged units).
- Units that charged can only target units they declared a charge against.
- Models in a unit can only make attacks if they are within Engagement range of a valid target, or within 0.5″ of a friendly model from their unit that is also within 0.5″.
I’ve covered this in more detail here. As well as how these rules changed between 8th and 9th edition.
Let’s resolve some fights then:
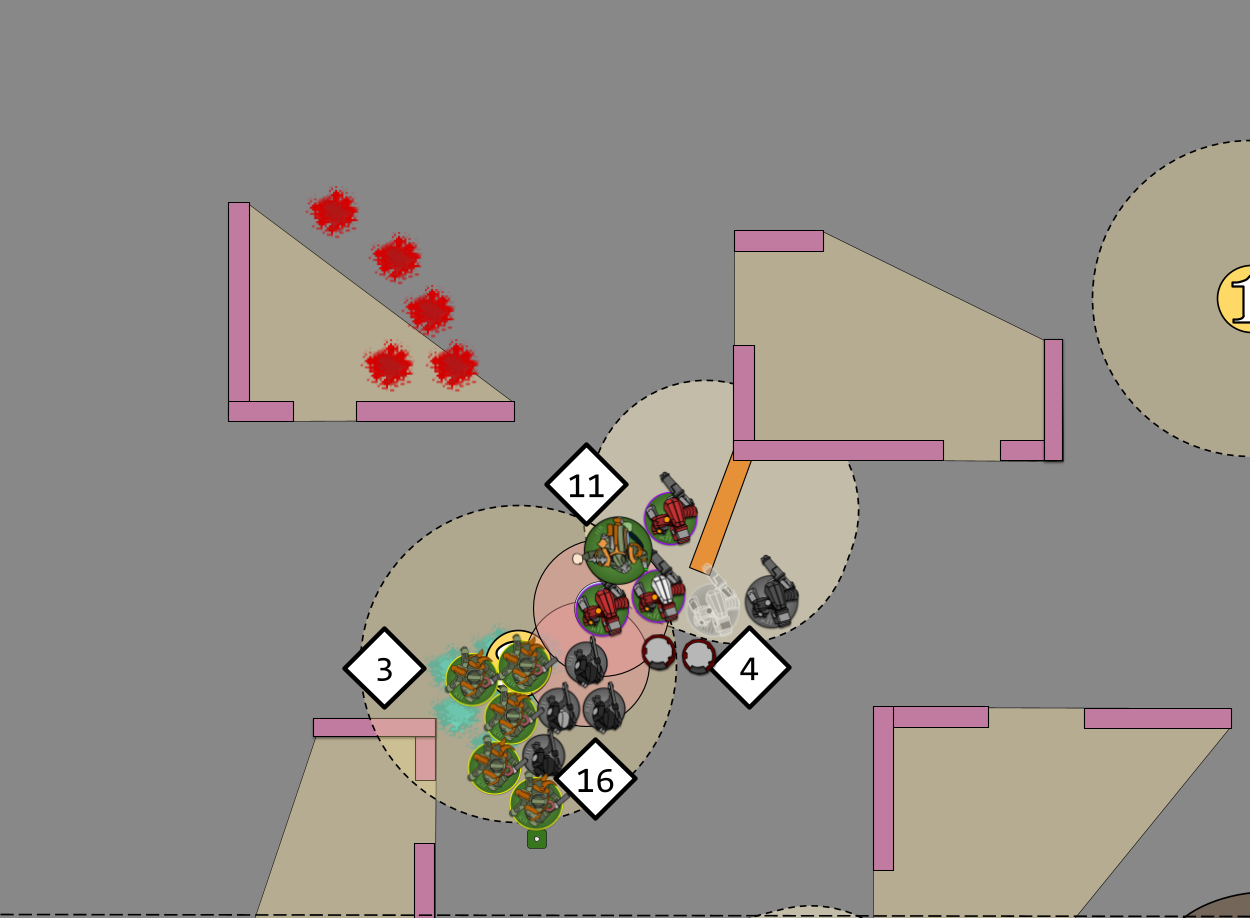
The Foul Blightspawn (11) will Pile in and attack the Stealthsuits (4). Their -1 hit ability works even in melee so need to factor that in. Foul Blightspawn don’t have any melee weapons so they use the standard Close Combat Weapon, but they are S4 and because of contagions the Stealthsuits are T3 right now.
The Blightspawn makes 4 attacks, getting 3 hits, 3 wounds, and the Stealtsuits decide to allocate to a Stealthsuit and fail two of theire 3+ saves. These do 1 damage each, killing one Stealthsuit. The Blightspawn can’t move for Consolidating as it’s in base-to-base contact with two Stealthsuits.
The Plague Marines (3) will Pile in and Attack the Fire Warriors (16). Note that you can Pile In to units you didn’t charge, but still can’t target them with attacks. They don’t want to do that this turn due to being attacked back or being shot at by those Stealthsuits next turn. Plague Marines are armed with Plague Knives which have the Plague Weapon special rule allowing them to re-rolls 1s to wound. They will also be using the 1 CP stratagem Trench Warfare to increase their attacks per model with that weapon by 1.
The unit makes 15 attacks, scoring 10 hits, 10 wounds, the Fire Warriors fail 7 of their 5+ saves. The unit is destroyed. Rather than move closer to anything the Plague Marines decide to remain where they are, having taken control of the objective.
CP Update!
Tau: 6
Death Guard: 11 – 1 = 10
Lastly the three Death Guard Characters (7), (13), and (9) will be attacking the Fire Warriors (17). These fights happen one after the other.
- The Plague Surgeon (9) kills 2 Fire Warriors, 5 remaining.
- The Chaos Lord (13) kills 4 Fire Warriors, 1 remaining.
- The Plaguecaster (7) would kill 3 Fire Warriors, getting the last one controlling the objective.
Due to the order in which the Fire Warriors died, very little Piling In or Consolidation movement was possible.
Finally we have some fighting back!
Stealthsuits (4) will Pile In and attack Foul Blightspawn (11). They inflict no damage, though.
Morale Phase
With fights over we finally reach the Morale phase. The only unit that lost any models this turn that wasn’t destroyed is the Stealthsuits (4). They have an LD of 9 and lost 1 model so even a 6 won’t cause them to fail Morale this turn (6+1=7, which is less than 9). Let’s move into to scoring for the end of the turn.
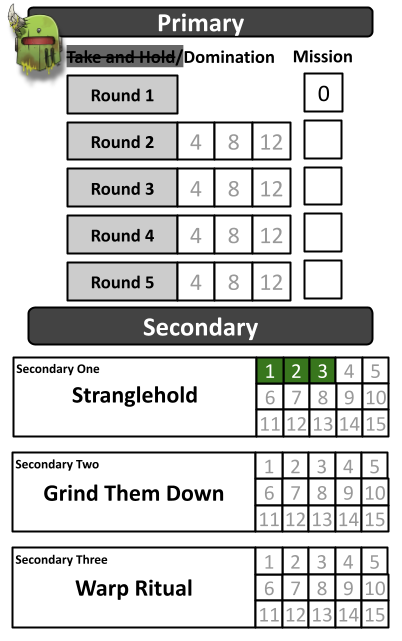
Scoring the Turn
Here’s the board at the end of Death Guard Turn 1:
- Death Guard were trying to prevent the Tau from holding more in their next turn, that is achieved but doesn’t score any VP for the Death Guard directly.
- The Death Guard were trying to take control of Objectives 1, 2, and 3 to score Stranglehold at the end of their turn. However they didn’t mention this intent to their opponent when planning their turn, and when they go to score the VP for it now they are reminded that the objective is Hold 3 AND Hold More. Sadly at the end of the turn both sides are tied at 3 objectives each so they fail to score this. If they’d talked about this earlier the mistake might have been noticed earlier, certainly in my opinion informing an opponent about this kind of oversight would be good practice. Regardless, holding more was not an easy task either so it might not have changed much.
- The Death Guard did kill 3 whole units this turn, the Crisis Commander and 2 units of Fire Warriors, so they do score 3VP for the Grind Them Down Secondary.
- The Mission primary was out of reach this turn, scoring 0VP.
Whilst not a high scoring Turn a good chunk of Tau firepower was killed and it has limited what the Tau will score as we go into Turn 2.
Next Time: Tau Turn 2 Begins!
Another eventful phase! In episode 7 we’ll finally get stuck in with proper Death Guard Melee
Ruleshammer Battle Index
Episode 1 – Game Set Up Part 1
Episode 2 – Game Set Up Part 2
Episode 3 – Pre-Battle Abilities, Tau Turn 1 Command, Movement, and Psychic Phases
Episode 4 – The Tau Turn 1 Shooting, Melee, and Morale Phases
Episode 5 – Tau VP and Death Guard Turn 1 Begins
Episode 6 – Death Guard Turn 1 Shooting Phase
Episode 7 – Death Guard Turn 1 Charging and Fighting
Have any questions or feedback? Got a rules question you want answered? Drop us a note in the comments below, ask a question in our Ruleshammer form, or head over to r/ruleshammer to discuss.
