
Wyrd recently (well, June) wrapped up their Fractured Futures organized play campaign. This campaign featured Nia, a newcomer to Malifaux, whose fate was split between 8 factions – the results of the campaign dictated what Keyword she would be joining.
Surprising nobody, the best faction of all – the Bayou – won out Fractured Futures, so Nia will be joining the Tri-Chi keyword. Wyrd has taken the opportunity to give the ol’ Booze Boys a bit of a glow-up – well deserved, in my opinion.
Cruisin’ for a Boozin’
Tri-Chi has always been a bit of an odd Keyword. The idea of a Keyword that uses a negative condition positively isn’t new, but the execution on Tri-Chi was, well, a bit messy. Some models, like Fermented River Monks, really wanted to be poisoned. Others, like Popcorn Turner, wanted the enemy to be poisoned. It didn’t really gel, and it didn’t help that most of the Keyword’s models ranged from difficult to use (Fermented River Monks) to outright awful (Cooper Jones, Whiskey Gamin, Moon Shinobi…)
Then Malifaux Burns hit and brought its own problems. Shojo was bad enough – she could trivially print 3+ Pass Tokens each turn, one of the most abusive mechanics in Malifaux. But Brewmaster, Moonshiner – while a lot of fun to play – was incredibly overtuned. He pushed enemies around and dealt lots of ping damage in a totally unresisted fashion while supercharging Fermented River Monks to the moon.
In November 2022 he was nerfed, and while it was deserved, the nerf basically nuked him from orbit, taking his two strongest abilities and removing 90% of their utility, then also slashing his Shockwave’s power in the bargain. Tri-Chi, briefly among the top tier of Keywords, sank back into irrelevance.
This rework is relatively light – hitting only six cards – but it’s extremely impactful, fundamentally changing how the crew plays. Is it enough to get the Master of Mixology out from behind his bar and into the game? Read on and find out.
The Brewmaster
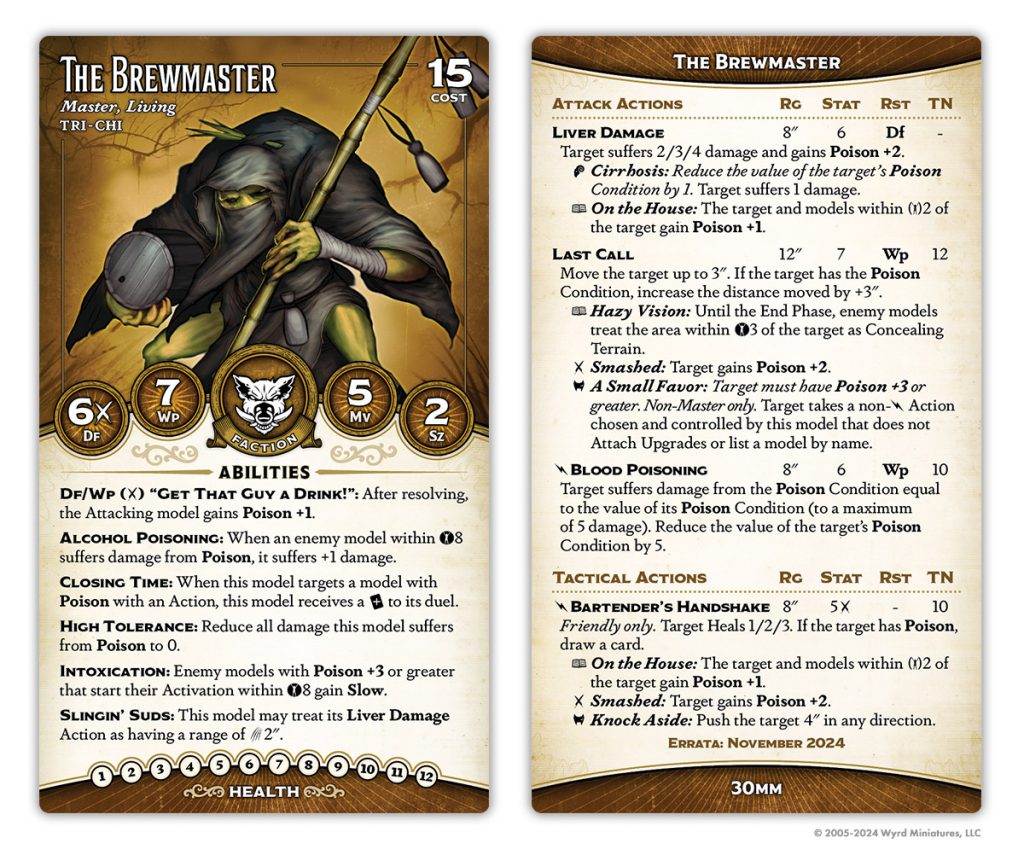
Ol’ Brewy was never really bad, but he suffered from a poor Keyword and a rather linear playstyle. That’s all changed – let’s see how.
He’s gained a point of Df, although he has lost the old Closing Time, his ability that pumped his stats in opposed duels against Poisoned models – so the net effect is that he’s a bit easier to hit than before, most of the time. Still, 6/7 is an impressive defensive statline, and his After Resolving trigger (built in on Df) will cost enemies who take potshots at him (unfortunately, he has lost the extremely silly and clunky You’re Drunk, Go Home trigger). The new Closing Time is much more of an offensive buff, and it’s binary – either the enemy is poisoned or they aren’t, which makes the single poison they might get from “Get That Guy a Drink!” much more of a downside than it at first appears. Note that Closing Time isn’t Enemy Only, which is a big deal – as you’ll see, this guy will be targeting friendlies a lot. The rest of his front of card is familiar. So far, not much has changed.
The new Liver Damage is also pretty similar to the old one, although now it’s an 8″ range attack that you can also treat as a melee attack – a welcome change. He no longer has Drunken Strength for huge beatdowns, but he does have Cirrhosis, which has half of the effect and requires the enemy to be poisoned instead of you. On the House replaces Shower of Booze, but with almost identical effects.
Last Call has replaced Lure, and here is where the changes start. For one thing, Last Call is an impressive Stat 7. For another, it doesn’t require the enemy to move towards you, and isn’t locked to their Mv – it’s just 3″, 6″ if they’re poisoned. This is huge, and makes this probably the action you’ll take the most often. Push friendlies into position, enemies away from objectives… there are a million uses for an ability like this. And that’s just the start of it.
The triggers here are the real money. Headlining is, of course, A Small Favor, which can now be set up with a single Liver Damage with its tome trigger. Hitting this is effectively tagging a model with an Ensorceled Obey, with a 6″ movement replacing the first action – except it’s not once per turn. You can of course just make the Whiskey Golem punch three times during your activation with this, moving a total of 18″ along the way, but Stat 7 is high enough to conceivably tag enemies. Smashed gives the target more poison, and Hazy Vision is ideal for keeping friendlies safe as you push them into position, but this is largely an ability you’re hoping to hit those masks on. The TN is relatively low and targeting Poisoned friendlies gives you a built in +twist to the action, so it’s not out of the question to just Small Favor three times – and of course, you can Soulstone for it.
Blood Poisoning is the same as it was, but I think I’m more likely to be using his new bonus action, Bartender’s Handshake. This is a respectable heal at a decent range, comes with a card, and has three great triggers. On the House is a good way to splash unresisted Poison onto enemies to get the train rolling, but don’t sleep on Knock Aside. This doesn’t say other friendly only, so you can shake your own hand, heal, draw, and scoot 4″, all for a bonus action… a bonus action you have a +twist to if you have a single poison.
Brewie is a support master now, feeding AP to friendlies while debuffing enemies with Slow and pushing them out of position. If they don’t respect him, though, he can charge right in, deal some respectable damage with Cirrhosis, then burn someone out with a powerful Liver Damage (which, remember, benefits from Alcohol Poisoning). Maintaining Poison on your team is key here: you only need one, but it does decrement each turn, so you should find ways to splash a little around without spending too many AP doing so.
The Brewmaster, Moonshiner
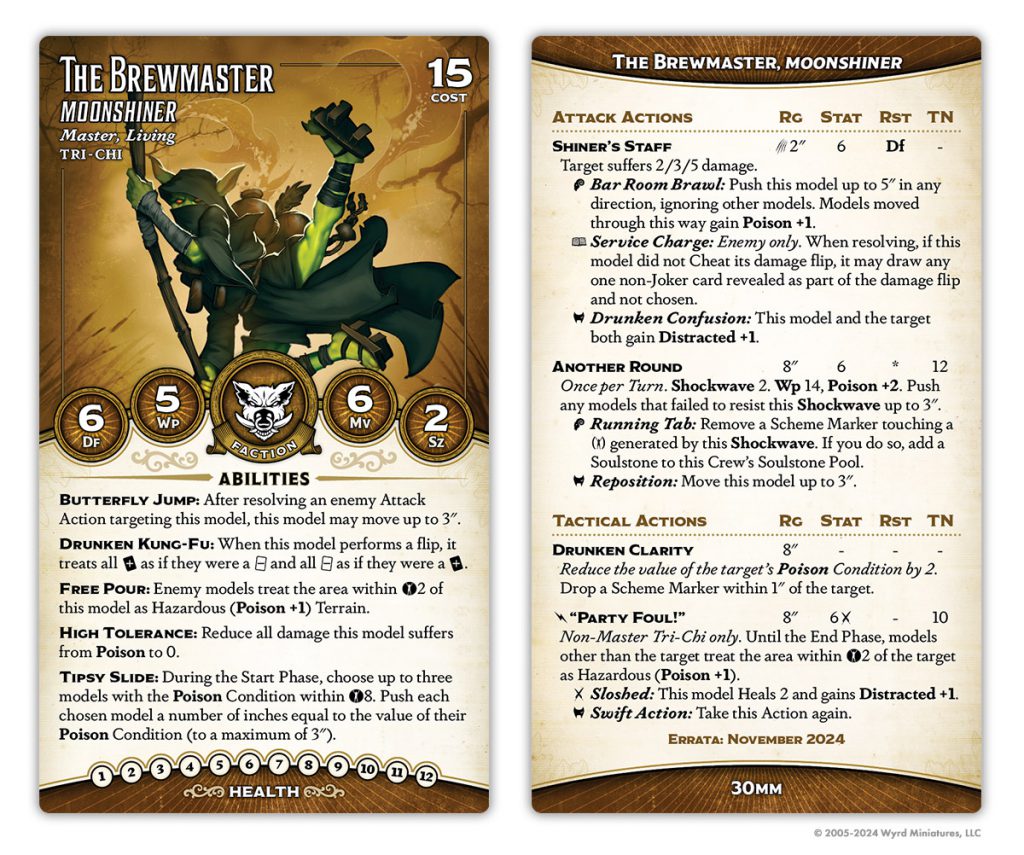
Poor ol’ Brew2 flew too close to the sun. Or brewed too close to the sun. Whatever he did, it got his wings clipped, but now he’s back and… frankly, pretty scary.
He’s gained a point of health, but lost Lasting Liquor and Bar Room Brawl. His Tipsy Slide has been normalized a bit – now it pushes equal to the total of the pushed model’s Poison condition, but caps out at 3. He’s also gained Free Pour, a neat always-on Hazardous (Poison) aura, although this one only affects enemies.
Moving to his back of card, the biggest change is a simple one: His Shiner’s Staff now does Severe 5 damage. This is massive, much bigger than you think. The reason has a lot to do with how Drunken Kung Fu works. A short primer:
Drunken Kung Fu reverses all bonuses and penalties. Focused? You’re at a negative. Distracted? That’s a positive. Serene Countenance makes enemies easier to hit. Hard to Wound makes them easier to wound. (Luck Thief still screws you over due to the timing of the ability’s resolution). Most importantly of all, accuracy modifiers on damage flips are reversed. Beat someone by 4? You’re at a +twist to damage. Match their defense total exactly? You’re at double positive to your damage flip.
That makes cheating first into Brewmaster a nightmare. Normally, cheating high as a defender is beneficial, because even if the attacker cheats high enough to hit you, they’ll be at a -twist to damage. With Brewie, if you cheat high, he might just have the card to match you and wallop you for a double positive to damage off a Severe 5. But you can’t not cheat, because if he’s hitting you he can just cheat down to match you, get that single or double positive, and get the trigger of his choice. The only real hope is to make him cheat first, but it’s very easy for Brewmaster to get a lot of Distracted on himself, which means most of his attacks are at a positive to hit out of the gate (making it more likely he hits off the initial flip and forces the defender to cheat first).
This is without factoring defensive abilities into the equation. You know what’s a really common piece of defensive tech on high-value models? A rule that gives attackers a -twist to hit, to damage, or both. Molly Squidpiddge has Serene Countenance AND Hard to Wound, so every single Brewie attack into her not only ignores all of her tech but effectively get a free Focus… forever. And he has a Severe 5 into her 10 health. If she leaves her deployment zone he will almost certainly tear her head off.
His triggers are great, too. Drunken Confusion is a classic, debuffing his target’s offense while buffing his own, but the other two are both powerful in their own right. Bar Room Brawl gives him extra mobility and a tiny bit of damage, while Service Charge synergizes extremely well with the damage flip mechanics I just talked about. You get to flip 2-3 cards, pick one, and draw one. That’s nasty.
Brewie still has Open the Gourd, now named Party Foul, and with its targeting restrictions relaxed. The TN is slightly lower and it now inflicts Distracted on him with the built-in trigger, a much more high-value condition. Finally, Another Round has gone to once per turn – a nerf, and one that will make you think a little more about what your Turn 1 looks like. But overall, this guy is still an absolute terror. Drunken Kung Fu is a hell of a rule to put on a Master.
Apprentice Wesley
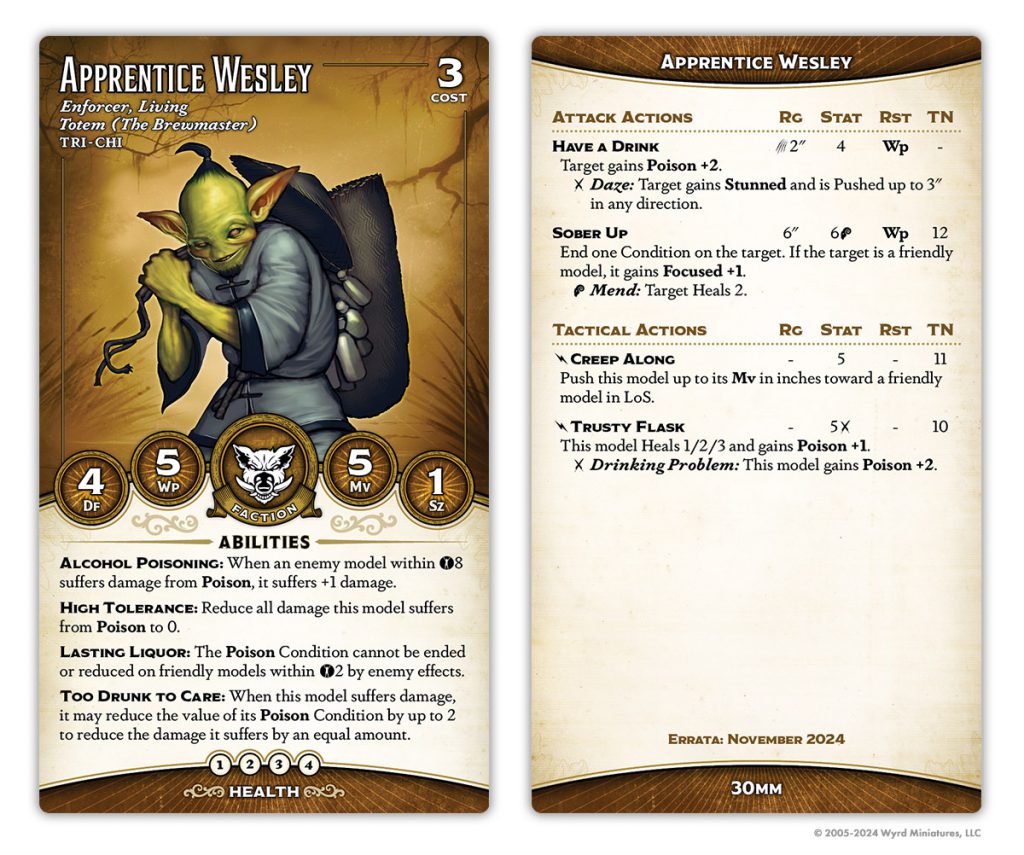
Brewie’s Totem has, unfortunately, lost the Pour One Out rule, which made him a mini-Brewmaster when his boss died. But the trade is to his benefit. He has gained a point of Wp and Lasting Liquor, letting him bodyguard your precious Poison stacks. More importantly, he has gained Too Drunk to Care, which means that if you can keep his Poison stacked he effectively has Armor +2 that’s immune to most Armor piercing effects. Sure, he only has 4hp, but if you can tank a couple of 3 damage hits, you can heal the damage off with Trusty Flask, which now has a built-in trigger to add 2 more Poison (and thus keep him alive longer).
His Sober Up has also gained +1 stat, making the TN much more achievable. This is a super strong ability and adds to the general pile of healing that this crew has. And, when he doesn’t need to heal or get drunk, he has Creep Along, a great rule for a Significant totem that wants to spend his AP healing friendlies and handing out Focus.
Wesley is super strong, a very useful Totem that can score or support your crew, and won’t die easily as long as you can keep Poison stacked on him.
Moon Shinobi
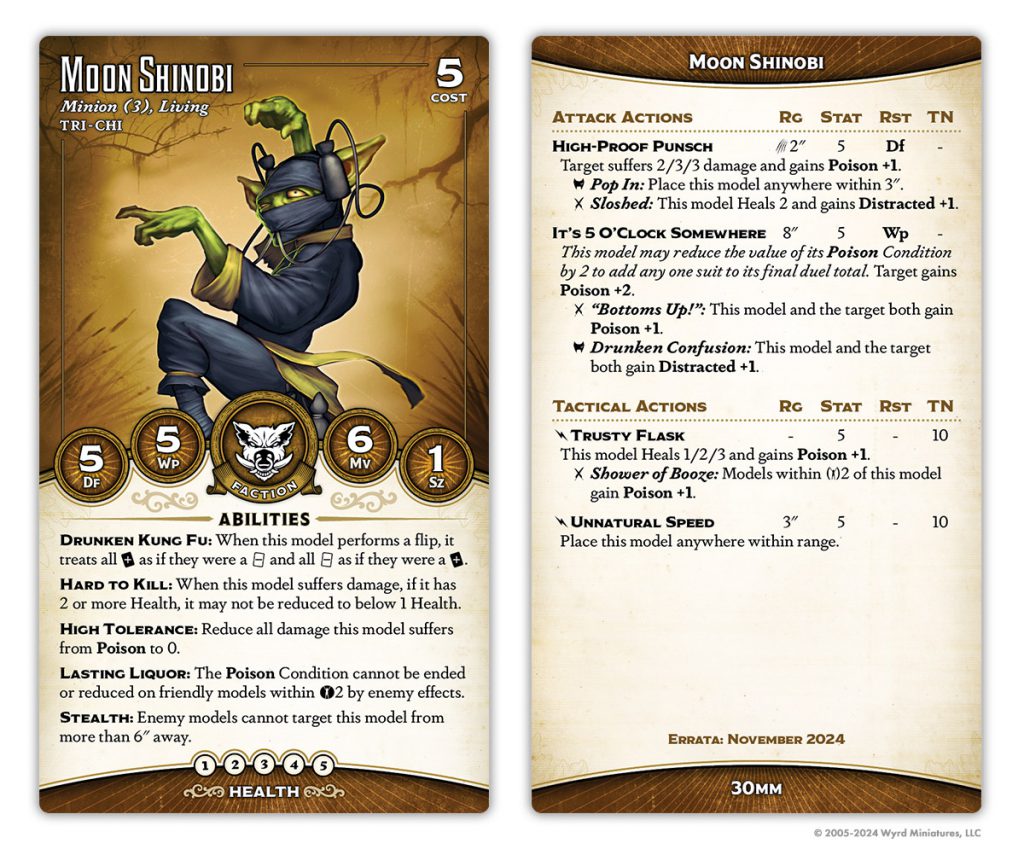
Never has there been a model with a greater gulf between coolness of concept and quality of rules than the Moon Shinobi. They were cursed to compete with Fermented River Monks and never quite got there. Now, though…
They’ve lost a point of HP, but gone down a stone, making them extremely cheap and still pretty cheerful. They’ve also lost Squeal, but gained Hard to Kill, making them extremely frustrating to remove; Stealth functionally limits the number of attacks the enemy can make into them, so Hard to Kill is more likely to keep them alive. And they have a ton of self-healing, so leaving them alive feels awful.
Their Staggering Punch and Have a Drink actions have effectively been combined into High-Proof Punsch, which loses a point of damage on the high end (probably necessary, given Drunken Kung Fu) and a point of Poison inflicted. They can’t hand out Staggered or Stunned or Distracted, or steal Soulstones, but they can give themselves Distracted and heal 2, thus putting them back above Hard to Kill. And Pop In is a great trigger, effectively a mini-leap.
Speaking of mini-leaps, they’ve got Unnatural Speed to run themselves up flanks, in case you don’t need the healing from Trusty Flask. Finally, they have the odd It’s 5 o’Clock Somewhere attack, which I’m still figuring out. It’s a way to cash in your own Poison, which they don’t otherwise benefit from. I think you will almost always be targeting friendlies, but this is a great way to stack lots of Distracted on Brewmaster, Moonshiner before he goes in for the kill, and it stacks it on the Shinobi, too. If you can afford to, spending a turn shooting booze into Brewie’s mouth leaves you with several very dangerous melee attackers who get as many +twists to hit as they want.
Moon Shinobi are great scheme runners now, being quick and just hard enough to remove to give your opponents fits. Give them a Ghillie Suit and really watch the pain unfold; not only does that give them the infamous Disguised and Stealth combination, but it gives them a third attack using the Sidearm. Sure, it’s only Severe 3, but it’s not super unlikely to go “shoot you for three, charge you, hit you for three, hit you for three.” Damned? Blessed of December? Necropunk? That sequence will put all three of them in the ground.
Cooper Jones
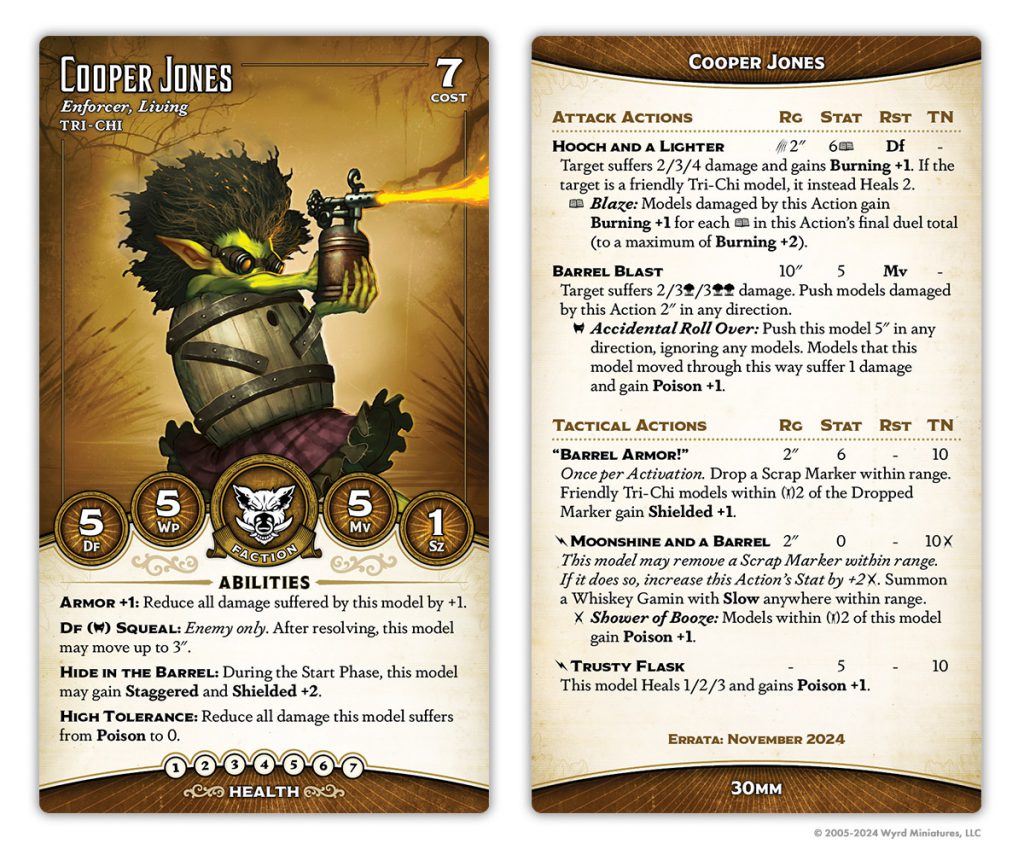
Cooper never really found her place. Released at the tail end of Second Edition in a box set with Popcorn Turner and Whiskey Gamin, she had a weird scrap-marker-summoning playstyle that didn’t mesh with what the rest of the crew was doing. So what’s changed?
Nothing on the front end. Literally nothing. The back side is where the action is (waggles eyebrows suggestively).
Her old Blow Torch was kinda thematic, but not particularly synergistic. It’s gotten a glow up to Range 2″, but more importantly, it can now heal Tri-Chi models instead of dealing damage, giving her some mobility (you can charge friendlies to heal them) and utility (healing beefy players like the Whiskey Golem is high value). She’s also gained the Barrel Blast ranged attack, which is really good. I mean really. Good range, no Projectile limiter, targets Mv (so the Stat 5 matters less than you’d think), not-embarrassing damage and, most importantly, moves anyone it damages. Add to that the Accidental Roll Over trigger and you have a deceptively quick and maneuverable, not to mention deadly, ranged attacker.
Her summoning is still there, but it’s been revamped. First, she can drop a Scrap Marker for a suitless 4, handing out a little Shielded (always useful). Next, with her bonus action she can eat that Scrap Marker and then summon a Whiskey Gamin on a suitless 8. That’s about the price where a summon becomes worth it, and Whiskey Gamin are a real summon. Sure, their actions are crappy and they die to anything that can target Wp… but at 5hp with Armor, they don’t die instantly, and their Driving While a Drink rule makes them hard to pin down. For the unfamiliar, at the start of their activation they get to push a number of inches equal to their Poison condition, with no limit. It is not hard at all to get them to 10-12+ Poison on the turn they’re summoned, and from there, away they go! You can even clear the Slow they come with with Wesley. And, as if that wasn’t enough, summoning one splashes a little poison on your team!
Once she has two Gamin out, Cooper can just heal herself with Trusty Flask, and she’s likely to survive between her Armor and Hide in the Barrel. You can’t spend Soulstones to keep her safe, though, and canny enemies will hunt her down, so beware.
Shojo
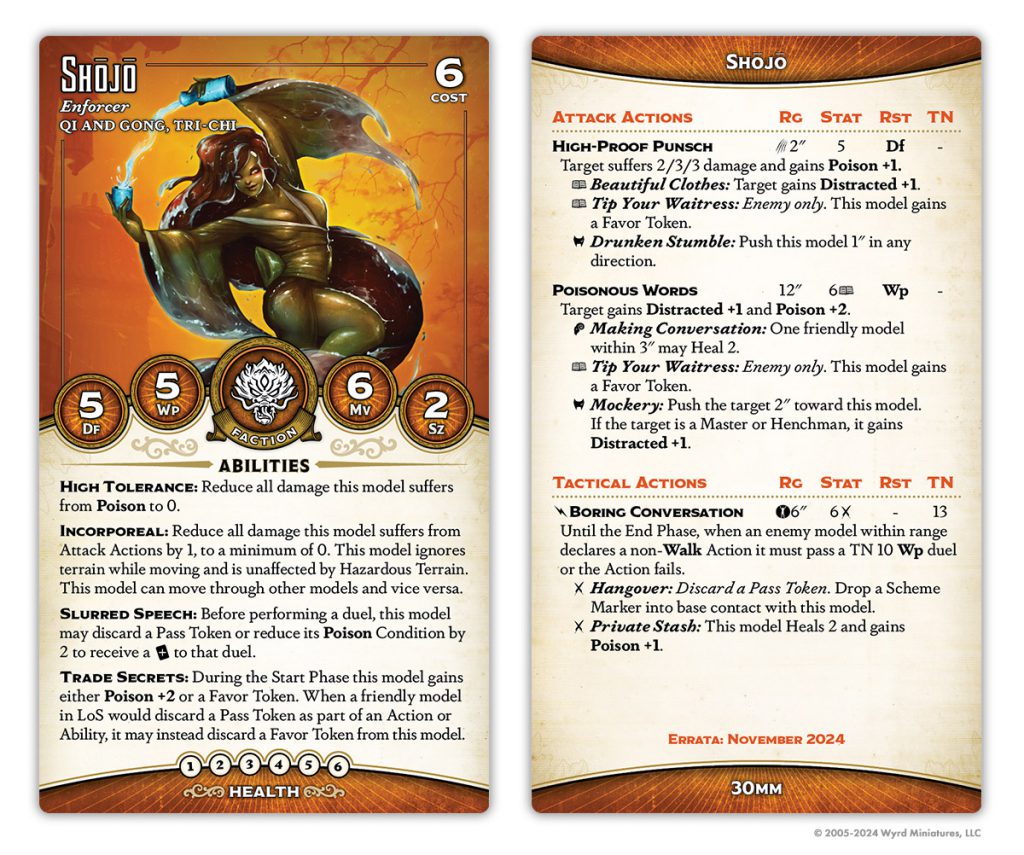
Look, it can’t all be good news. We knew something like this was going to happen. Shojo’s Pass Token generation was far too degenerate to be allowed to stay.
She’s gained a point of Wp, but Trade Secrets now generates Favor Tokens… you know, those things that are kind of like Pass Tokens, but aren’t useful for actually passing. This might be interesting in a Qi and Gong crew but is basically useless here. Slurred Speech does let her spend them for +twists to duels, but you don’t really care much about her actions, and she’s lost Red in the Face for it (not that useful given the required proximity to enemies, but it wasn’t a straight upgrade.
She’s traded Have a Drink for High-Proof Punsch like the Shinobi, and it’s a lot worse here, both because you don’t have Drunken Kung Fu and because you used to like to Have a Drink your own team. She’s even lost the Fussy Company trigger that gave her a free Boring Conversation.
Likewise, Biting Insult (her other method of Pass Token generation) is gone. The new version has a longer range, giving her something to do from the backfield, but again, it seems like something you want to target your own models with. I guess you can use Mockery to give Moonshiner 2″ of movement and 2 Distracted? Does not seem exciting to me.
Finally, she’s lost the Slurred Speech action, which kept her safe by penalizing cheating. Not that it matters at this point, but that was also another source of friendly healing gone.
I cannot imagine ever hiring Shojo now. She is too fragile and too low impact, and doesn’t do anything your other models don’t do better. Sorry, lady – model’s gorgeous, maybe I’ll take it down from the shelf in 4th edition.
Akaname
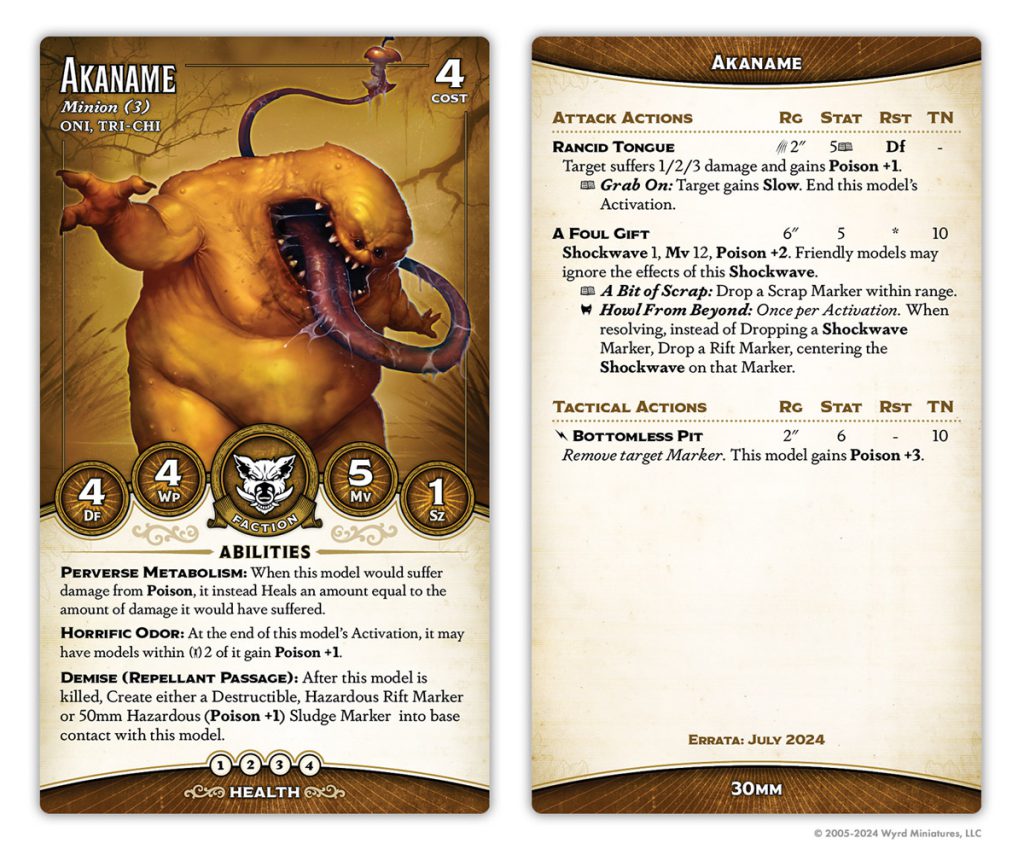
As recently discussed, Akaname got a little touch-up recently, just in time to join the party. I’m not totally sure that you want these guys in Tri-Chi, but… they’re cheap as hell.
Horrific Odor is good at gooping poison onto your team, but if you can contrive to get this guy killed, the Sludge Marker is the real money – it stacks with other sources of Hazardous (Poison +1), so in Moonshiner lists you can engineer truly horrific amounts of poison self-stacking. I am not sure that it’s worth it to hire one of these guys and immediately kill him, but… maybe?
Other than that, his shockwave can drop Scrap to turn into Whiskey Gamin, although it’s not like Cooper can’t do that herself. Bottomless Pit is a genuinely great action, a bonus that removes any kind of marker for value, so I’d say if you run into a marker crew an Akaname might be a good way of keeping them honest.
Last Call
Overall, how did the Tri-chi fare? Early to say, but I think the crew is very strong now. Maybe too strong – a lot of people are complaining about Moonshiner. I think he punishes the Resurrectionist faction a bit too hard, but I don’t really know how to fix it; without Severe 5, he doesn’t really do enough to be worth it.
This is a keyword with defined weaknesses – it doesn’t do that much damage and relies on self-healing rather than potent front-end defenses. But it has a ton of tools for fighting and scheming, and Moon Shinobi and Cooper Jones are a fearsomely efficient core to work with. You can build in several directions, hiring the Golem for a traditional “obey beaters” crew or going Full Shitters with three monks and three Shinobi. Fingers, Hoochdini, and Popcorn Turner (and, to a lesser degree, Hopscotch) are all cool role players you can flex into as well. I’m a big fan of new Tri-Chi and will be running them a lot at Captaincon, I think – tune in for my Captaincon summary columns to see how they performed!
Have any questions or feedback? Drop us a note in the comments below or email us at contact@goonhammer.com. Want articles like this linked in your inbox every Monday morning? Sign up for our newsletter. And don’t forget that you can support us on Patreon for backer rewards like early video content, Administratum access, an ad-free experience on our website and more.
