
Goonhammer Patron Oliver brought his T’au Empire army to the recent GHO UK for another round. How did they fare this time? Let’s find out!
This is my first big tournament of the year after a succession of RTTs across Jan-Feb. I continue to be a T’au ‘faction specialist’ (i.e. I only have time to own one army – though hopefully I can bring Emperor’s Children to the next GHO UK) and have been sitting very happily at basically a flat 50% win rate across events since early 10e.
My list was always going to be Mont’ka – I gave up on Kauyon after a couple of fairly frustrating tournaments where I realised the best way to run Kauyon was to lean on datasheets I don’t love taking – Riptides and Ghostkeels. Instead, I pivoted to a much wider Mont’ka list that couples early game aggression with volume fire and lethals to deal with a wide range of targets. It has the potential to put a huge amount of board presence out and also do massive shooting damage, though I knew from experience that I really had nothing particularly tough other than a couple of Devilfish to protect my Breachers. Hammerheads and Broadsides aren’t soft targets but they can’t stand up to any dedicated damage output.
My List
Army List - Click to Expand
The Plan
This list fits how I like to play the game – trade resources aggressively, disrupt scoring and put opponents under pressure. My aim is to have games decided by turn 3 so that the downside of Mont’ka never really comes into play either way – though obviously that isn’t always going to be possible.
The goal: to match my 3-3 record from my last two GHOs but I had a cheeky stretch wish to finally break into a winning record at an event – though I knew that was going to depend on pairings at least partially and ultimately I mostly want to feel like I am playing at the limit of my ability.
So I packed up my army, my gaming tools and my pinkest shirts and made my way up to Leicester for two very full days of hams.
Round 1: Tom Godfrey’s Orks
![]()
![]()
Matchup
Mission J – Linchpin/Raise Banners/Search & Destroy
List
Army List - Click to Expand
The Game
So Tom is a good mate of one of the Tau players I know and chat to and who was at this event as well. I had been warned that he’d been stomping RTTs with War Horde in the lead up to GHO. I like playing Orks – they are tough due to their pace and hitting power but they are predictable outside the Waaagh and die fairly quickly too so I always feel like I’m in the game. We have a quick chat where it immediately becomes clear that Tom is a great guy, we get on well, and that he’s quietly confident into Tau.
This mission is basically take and hold with minor complications so my plan was – either go first and try to put pressure on him with all my chaff or go second and stall him out with said chaff to create a safe flank I could pivot off.
I’m going first.
This is what I really wanted. It’s one thing to hear “oh this Tau army has loads of scout” and another to watch your opponent move 10 Kroot Hounds, 10 Pathfinders, 10 Kroot Carnivores, two Piranhas, a Devilfish and a pair of Broadsides directly forwards before the game has even started. Kroot jail time. Ten Pathfinders made a wall of bodies from the top of the board down just outside his castle ruin wall; five Hounds either side of a Piranha around the L. The Hounds get just far enough with an auto-6” advance that the Trukk there cannot go forward though a few Orks can fit through the gap.
My one mistake was that I initially tried to make the jail with the Carnivores but rolled a 1 for the advance and couldn’t get them close enough. So I used the second Hounds instead but left the Carnivores too close to the Hounds – if I had simply started with the Hounds, I could have reserved the Carnivores to use next turn. Behind everyone else, the Devilfish down bottom nosed onto the bottom right objective, Stealth Suits held the top left from behind the wall. All my other guns raced forwards to be roughly 12” behind my Jail where possible while still screening for Stormboyz.
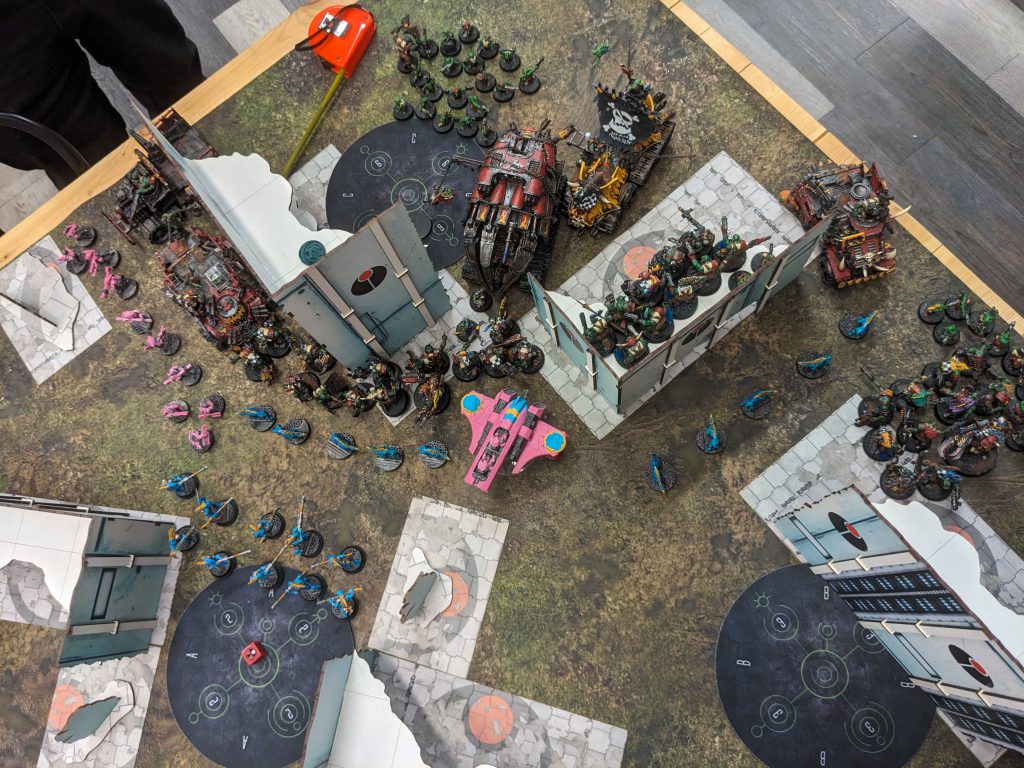
Tom had to try to break out and drew Engage on All Fronts and Secure No Man’s Land so decided to call a turn 1 Waaagh. The Nobs and Warboss, one unit of Boyz and two Trukks all pushed towards the top and centre of the jail line. The Beast Boyz and Beast Boss got out of the far right Trukk and tried to advance and charge to the Devilfish which is just touching the bottom right objective. He gets a 1 on his advance roll so CP rerolls it – into a 1. The only charge that matters this turn is the Beast Boyz and needing a 10, they can’t do it even with another CP reroll. Boyz, Nobz and a Trukk clear the rest of the jail, allowing the Nobz to touch the central objective and un-sticky it.
Turn 2 has to be huge for me. The Waaagh invulnerable save is on and I’ve banked a 13 on Primary. I draw Assassination to go with No Prisoners and set to work. All my guns move up to the diagonal line running across the No Man’s Land objectives, Breachers get out on both the central and bottom right objective to see the two big units threatening those zones. The Crisis team jets in from deep strike up top left, and I block a Trukk in with the surviving Piranha and start blasting. I kill the Beast Boyz and Beast Boss, Nobz and Warboss, a Trukk and the Breaka Boyz that fall out of that Trukk and a smattering of random Boyz. I’ve scored 10 on secondaries and nabbed 2 Raise Banners points.
Tom is in a very bad spot now. The Grotz bottom right manage to not only charge the Breachers but pile in enough to successfully tie OC on that objective and the Flash Gitz in the centre slam into the Broadsides sitting centrally as well. But then a succession of 9” and 10” charges completely whiff – Beast Boyz into Crisis suits, Breaka Boyz into Hammerhead, second Flash Gitz into Broadsides and Boyz into Broadsides. Some of those are more impactful than others but collectively it’s no bueno for the green team. The Breachers and Grotz engage in a meaningless slap fight while the Flash Gitz drag down one Broadside.
I am now 16 points up and score an 8 thanks to those pesky Grotz. I keep the pressure on by moving the gunline forward further and I pick up the last unit of Beast Boyz, the Breaka Boyz, the Flash Gitz in the open and 4 of the 5 Flash Gitz fighting the Broadside. All Tom has left at this point are 4 Trukks, 35 odd Grots, one Flash Git, two handfuls of regular Boyz and a lone Storm Boy. He draws Assassination and Sabotage and tries to finish off the Fireblade sitting with the Breachers to the bottom right but falls exactly 3 wounds short and has no one to Sabotage with.
It’s all over now bar the shouting. I get a better set of secondary cards to finish the game, getting to max Area Denial, Secure No Man’s Land, Behind Enemy Lines and Engage on All Fronts and picking up 8 and 13 Primary over 4 and 5. Tom does manage to ensconce enough OC, all tagged up in fights to keep the bottom right objective and score some strong secondaries to finish but it’s a clear T’au win to start.
Result: 85 – 62 win
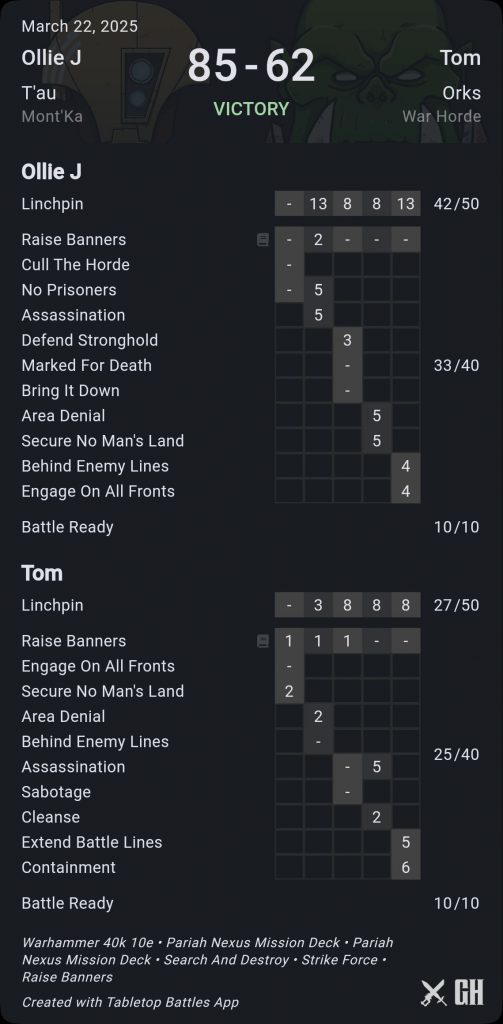
Tom was kind enough to describe this as “a humbling” – really I think he had never encountered Mont’ka T’au; and had not teched enough for a ‘jail mirror’ – a single unit of Kommandos would have saved him a lot of bother in this specific game though I appreciate Ork list building is always a real balancing act of ‘stuff wot can kill fingz’ and ‘stuff wot grabs good bitz’. If I simply don’t get the first turn here, it’s a way harder game but I had enough screens that I think I could have baited out a Waaagh and still punched back very hard. My list fundamentally relies on volume of decent quality shooting in a way that a 5+ invuln, while being better than a poke in the eye with a sharp stick, doesn’t always matter that much against (e.g. Nobz with a 4+ save against all my AP-1).
Round 2: Ben Read’s Necrons
![]()
![]()
Matchup
Mission M – Purge the Foe/Rapid Escalation/Crucible of Battle
List
Army List - Click to Expand
The Game
When I saw ‘Necrons’, I had a bit of a panic. I was run over very comfortably by a Starshatter list at an RTT a few months back and had PTSD from Doomsday Arks (DDA) rolling 4+ saves against Broadsides. But once I read the list, I realised this was a very different proposition. Yes, this has some of the hallmarks of ‘tanky and hard to kill’ Necrons – the Transcendent C’Tan, Silent King and pair of DDAs – but it also has about 12 units and three of those are Flayed ones and Doom Scythes who will die to stiff breeze. I have a big action economy advantage here if I can make it stick.
Purge the Foe might seem like a bad match-up for me then but if I can create 1-2 turns where I go big and get a tie on kills or kill more: not only will that be points, but I will have created a resource disparity for secondaries and contesting primary. So overall, I feel good about this. I set up in a pretty typical Crucible – lots of resources in the central castle with one unit of Broadsides, one Hammerhead and a Devilfish towards the top of my zone.
I’m going second.
This is great for Purge. I scout most of my stuff to safety bar a Piranha (that’s bait). Ben drew Establish Locus and Secure No Man’s Land and scores both with Doom Scythes and one Flayed Ones. He also sticks the nose of a DDA out to try to snipe the Piranha. I had assumed the Piranha would evaporate but wildly, it did not and I hadn’t even had to give up 4 kill points to draw out a major resource.
I pulled Assassination and Recover Assets – beginning a trend of getting very poorly timed secondary cards throughout this game. I used one unit of Hounds and the wounded Piranha to make an anti-Flayed One wall in front of my guns and put the other Piranha on the top left objective. The Broadsides popped off massively and the DDA bit the dust, so the Hammerhead picked up the Doom Scythes.
Ben gets his C’Tan sat on middle, the other DDA behind his big L but not tucked in – visible from both corner objectives, the Skorpekh Lord is sat on the bottom left with Flayed Ones ahead of him sitting partly in the open. I had lost both Piranhas and one unit of Hounds, allowing him to max No Prisoners and Area Denial. I drew Defend Stronghold and Establish Locus for 5 points – which, ugh. I dropped Breachers on the middle and bottom right objectives while Kroot did Establish midboard from behind the ruin while trailing back to be on the top left objective. I was able to kill the C’Tan with a single Breacher activation (love those little idiots) but had to use Broadsides, Hammerhead and Breachers to down the DDA. I cleared the Flayed Ones and put the Skorpekh Lord in the dirt for the first time (he got better) and charged him with the Devilfish. I got kill more and had now removed half of his units including two very real shooting activations.
Ben now had Assassination and Overwhelming Force so he slammed the Silent King forwards into the centre to kill the Breachers and Fireblade, pushed Szeras out towards the bottom right objective and brought the second unit of Flayed Ones out there, killing the Devilfish but failing to reach the Breachers behind it with pile-in and consolidate. But he had heaps of secondary points and was finally killing at least some of my real units.
I drew Area Denial and Overwhelming Force. I at least had Hold More but had to get at 3 kills to prevent giving up kill more. I started by shooting the Missileknives and Broadsides into the Silent King and managed to kill 2 Menhirs and get him down to 8 wounds. Great! One Hammerhead activation later and he was on 5. Uh oh. I put the Breachers and other Hammerhead into the Skorpekh and Flayed Ones, killing them both. So I had to give up on Area Denial and settle for a 3 on Overwhelming while giving up kill more. I was way ahead on material but starting to sweat about how the points were not shaking out for me (49 – 57 at bottom of 3 despite an 8 point primary advantage to me).
Thankfully, the resource advantage finally started to tell. Ben scored hold one and drew Sabotage and Bring it Down and had no way to score Sabotage. Szeras charged the Hammerhead and the Silent King indirected my War Shaper to death to deny my hold more, killed a wounded Devilfish and the three Crisis. Szeras bounced off the Hammerhead. I hold one, draw Storm Hostile and Sabotage. I get the Kroot out onto the middle objective to make sure I hold that, keep the Breachers on the bottom right and walk the Krootox Rider onto my home. A combo of Kroot grenades and Hammerhead shooting kills the Silent King and I get my Storm and start Sabotaging with a very safe Stealth team.
Ben finishes with 77 points, hiding everything as best he can. I finish my Sabotage to start turn 5 with 64 points. I know I will get hold one and more for 8; so it’s down to secondaries and whether I need to make a run at killing Szeras. I pull Extend Battlelines and No Prisoners and decide it’s worth redrawing No Prisoners just in case; and get a very useful Engage on all Fronts. Finally my board dominance pays off and I lock in 9 secondary points to win a nailbiter.
Result: 81-77 win
![]()
![]()
Phew. I was a sweaty mess after this. I think I played this well and would have been more comfortable had the card draws simply been a little different. But that’s how the cookie crumbles with tactical objectives. We had a chat after and agreed that Ben had been too respectful of my shooting. His Lychguard with Imhotek spent all game sitting in his home when he could have used them as a threat saturation element as part of his turn 3 push. But I had intimidated him with the ease by which I was picking up his DDAs and C’Tan and he never used a very expensive chunk of his army.
Round 3: Josh Roberts’ Adeptus Custodes
![]()
![]()
Matchup
Mission E – Take and Hold/Prepared Positions/Hammer & Anvil
List
Army List - Click to Expand
The Game
Taking the players out of it, this matchup has points in favour of both sides (for those not in the know, Josh is one of the top players in the world). For the T’au player, Hammer and Anvil on GW Layout one leaves all three midboard objectives very exposed. The Custodes cannot stage on their expansion objective in relative safety and push from there. They also have a fairly low unit count which, as we’ve already seen, can be a real issue in close games. For the Custodes player, Wardens are particularly brutal into mono-phase damage armies as they can just slam the 4+ Feel No Pain the moment the shooting phase rolls around. Overall my plan was to either go first and try to put a lot of bodies in the way of the wardens to try to keep them back for a few turns or to go second and focus on picking up the non-warden stuff to try to reduce his activation economy.
I’m going second
This is fine – I scout all my relevant units to safe positions slightly further forward where possible. Josh has a typically understated first turn, putting two bikes on the top midboard objective (one on, one off), staging one brick of wardens and the bikes with Captain midboard and exposing the bare minimum of his army necessary to score his secondaries (Secure No Man’s Land and Containment). I decided I would try to block him off as much as possible and set up for a bigger turn 2. One Hammerhead stuck a nose out to see those bikes and I flew out one Piranha to sit on that objective and tie OC if I couldn’t kill both. I ran forward Kroot Hounds and the Pathfinders to prevent the central Wardens and Bikes getting too far towards me. The other unit of Hounds pushed all the way out to stand in front of his home castle to slow his home Wardens. Sadly, Josh’s saves were rolling hot and I couldn’t even kill a single bike so he reactive moved on the point and held it. SMS killed off most of his central squad of Sisters and that was about that.
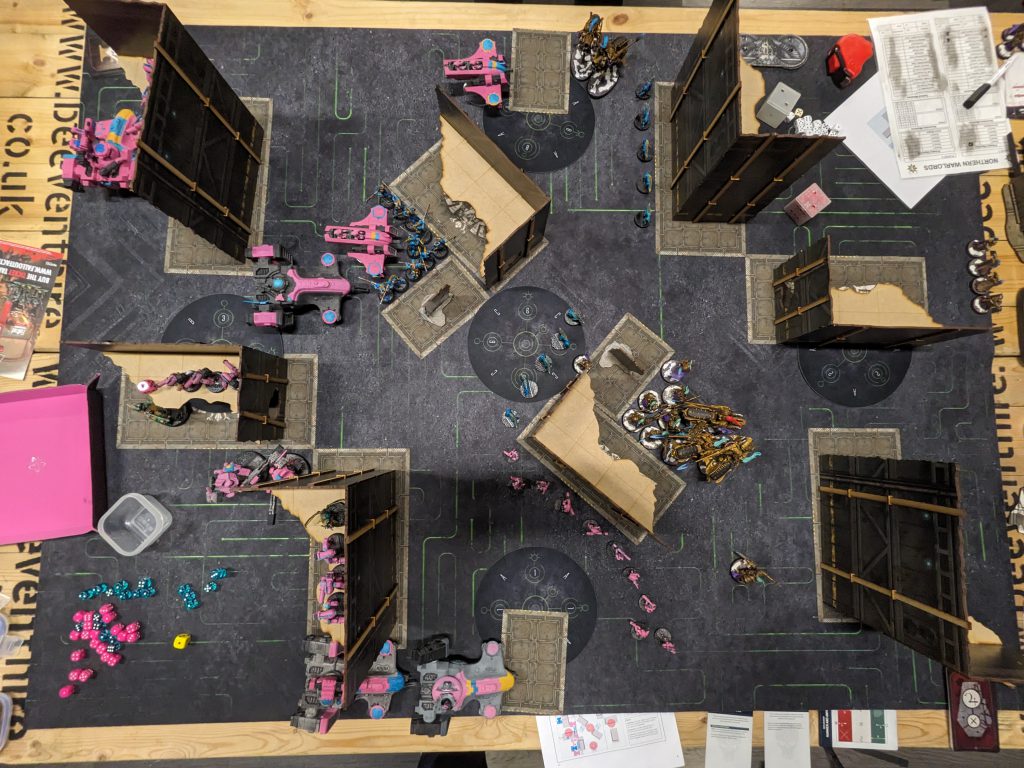
Turn 2 was when Josh decided to put the pressure right on. He basically pushed right out with two squads of Wardens and both squads of Bikes – he didn’t kill any damage dealers but chewed right through the chaff: Pathfinders, both Hounds, both Piranhas and the Carnivores. This was a direct result of me exposing too much for not enough gain and failing to kill the top bikes. So – I had to decide how to push back knowing that the Wardens sitting on the central and top objectives would be on their 4++ and 4+++ all shooting phase; while also my Breachers and Missileknives were going to be on AP-1 into 2+ saves outside of one/two uses of the AP strat. So – not ideal! I pushed forward hard and unfortunately my sum total of kills was: all four regular bikes, three wardens. As you can imagine, at that point, it’s game over. The surviving Wardens, (and the unit Josh had Rapid Ingressed into his big central L in my turn) and Bike Captain swept into my lines and cleared up the majority of my army. I scrabbled a couple of secondaries on my turn 3 and promptly conceded as turn 4 would have involved Josh just rolling dice to completely table me. We totted up his secondaries and primary and that was that.
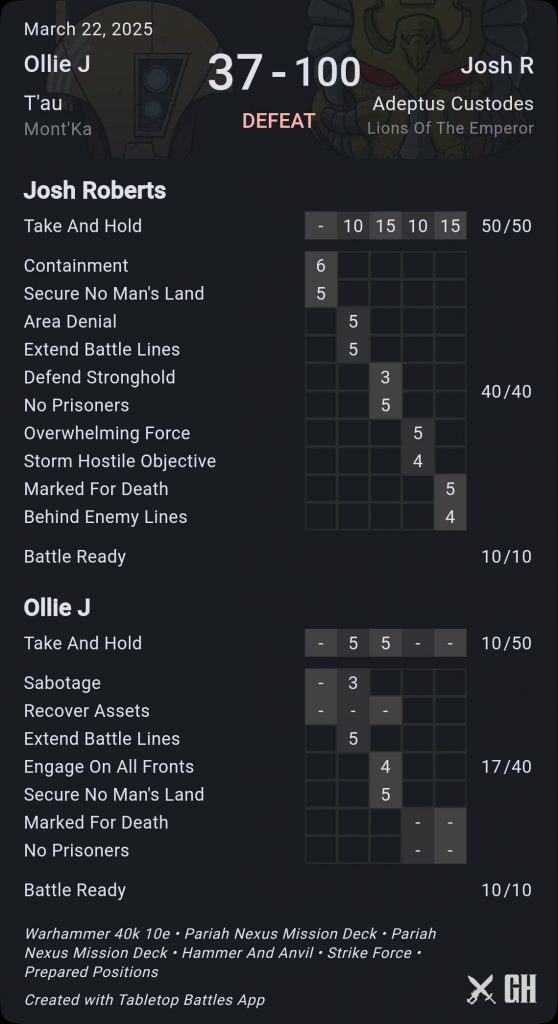
Result: 37 – 100 loss
A huge loss but one I don’t feel bad about. I can definitely see things I could improve on playing this again; and with that and a little more dice luck I may only have lost by 30-40 points! Seriously I think this is a tough game – one issue I find with this list is pushing through a saturation of 2+ saves; and dealing with truly dual-phase armies that can move at pace. When you pair that with a pilot who is going to make no silly mistakes and understands the game inside and out; I think this was always a bridge too far for me. But it was a lovely game and I can already point to specific things I can do next time I play into Lions of the Emperor or Custodes more broadly.
Round 4: Greg Chamberlain’s Leagues of Votann
![]()
![]()
Matchup
Mission D – Scorched Earth/Swift Action/Tipping Point
List
Army List - Click to Expand
The Game
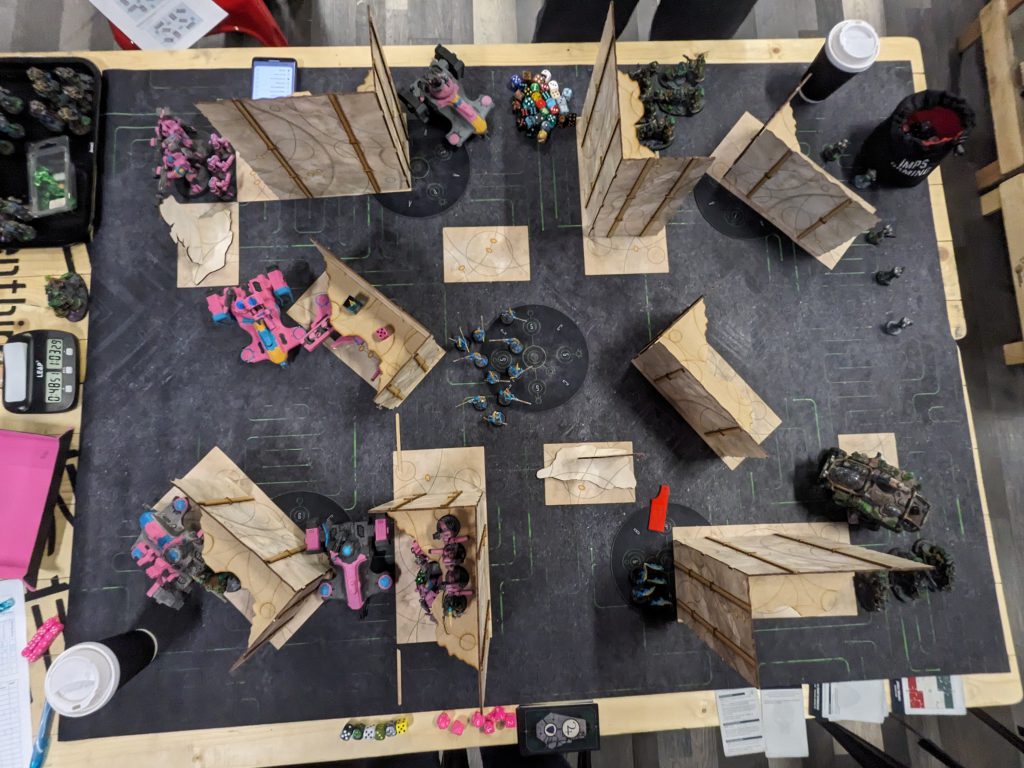
I was originally paired into an AdMech list which would have been another very new and unfamiliar game for me, but a few drops meant a last minute re-pair into Greg. So the reward for taking on and losing to Josh Roberts in round 3 is somehow to pair into one of the UK’s most consistent top 10 players of the last few years? Cool cool cool cool cool cool. Fortunately, I knew Greg from round 1 at Northampton last year and he’s a pleasure to spend time with. Votann are tough to chew through but he’s not running the Yaegirs so I should be able to dominate mid board deployment and if I get turn 1, push very hard into him to try to slow him down.
I deploy with all my dual resources split across my flanks, Devilfish on the outer flanks, Hammerheads on the inner flanks. The Hounds and Shaper sit near my home and the Crisis team is in the sky.
I’m going second.
I scout into some safety and prepare for another proper David v Goliath. Greg starts slowly – his Hearthguard up the top move up to the wall to stage towards the top left objective; he sticks a single Beserk out onto the central objective to get Secure No Man’s land and moves the Sagitaur into the ruin on the bottom right to sit on that objective. I draw Establish Locus so I push one Piranha out centrally to do that, put three Kroot Hounds with on the bottom right objective with one trailing back to stay in range of the Shaper to contest the Sagitaur and run Pathfinders out top to partially block in his Hearthguard. The Hammerhead down bottom stuck a nose into the firing lane and annihilated the unit of Beserks and the rain of SMS shots killed a single Hearthguard.
Greg drew Establish Locus and Storm Hostile Objective start of round 2 and realised he was struggling to score these even after redrawing Storm into Cleanse. So he continues to play fairly safe – he gets the Hearthkyn out of the Sagitaur to add more OC, gets the slimmest line he can to my Pathfinders and the Kroot Hounds with the Hearthguard and Land Fort respectively and picks them both up, and lifts his unit of 6 bikes into the sky to give him options for next turn.
I drew Cleanse and Overwhelming Force and proceeded to do nearly a very good turn but for one key mistake. Knowing his bikes were in reserve, I pushed the second unit of Hounds out on the bottom flank to push back his iIngress/reserve options as far as possible. The Carnivores walk out in the middle to do Cleanse, the Breachers disembark from the devilfish to get OC on the objective and Cleanse and then I mess up. I want to push my now empty Devilfish as far forward as possible to screen the bikes and get in the way of the Hearthguard. So I measure out where it can get with a 1” advance, think “ok that’s decent, I don’t need to auto-6” this” and promptly roll a 1 on the advance. When I put the fish in place, only then do I realise that A) I haven’t actually pushed his bike Rapid Ingress back far enough and B) I’ve left enough space for the Hearthguard to charge the Devilfish, kill it and then tag the Breachers. Whoops. AB6A. Always be 6” advancing. Greg rapid ingresses the 6 bikes on that flank to immediately take advantage. I try to barrage his Hearthkyn with SMS but fail to make a dent.
Greg knows what’s up and goes in for the kill – 20 Hearthguard land on the top left objective and murder the Devilfish; the 6 bikes get enough of an angle on the Breachers hiding in the ruins to kill 9 of them; the second unit of Hounds gets Land-Forted and the 5-dwarf unit of Hearthguard clear the Carnivores from the centre. I do get Area Denial and Storm Hostile from the deck to help me out but I mess up a bit on positioning and then my dice go a little cold (I have to respect when my dice refuse to bail me out of my mistakes) and I have to dedicate basically all my shooting resources to kill the 6 Pioneers and the 5 Hearthguard in the centre. At this point, it’s completely over. Greg can slam the Land Fort, 20 Hearthguard and the rest of his chaff into my exposed face and push me off the board.
Result: 53-81 loss
![]()
![]()
As per my previous encounters with Greg, this was great fun. The score is both fair in that it reflects the turns 4-5 dominance that Greg had to score at will while I was basically tabled but a little funny in that it all hinges off a single key mistake. But that’s the name of the game against the very best players. I’m happy that my strategy for this game was correct, I just failed to fully execute it at a key moment which is the next step for me.
Round 5: Dale Watts’ Chaos Daemons
![]()
![]()
Matchup
Mission O – Terraform/Stalwarts/Crucible of Battle
List
Army List - Click to Expand
The Game
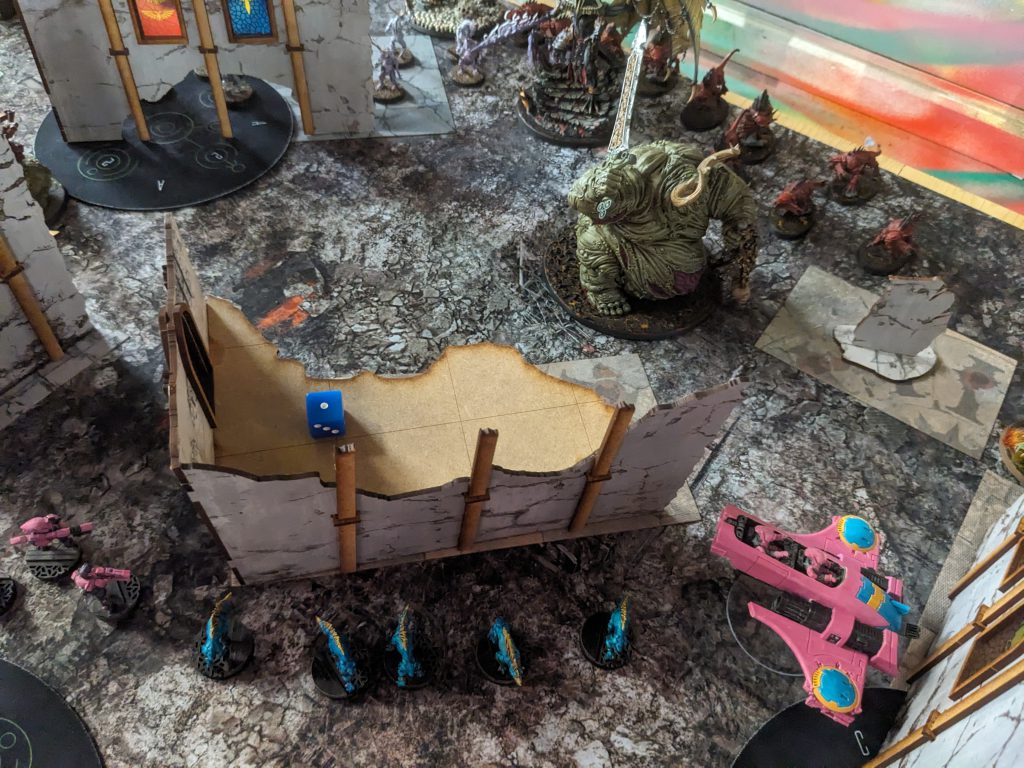
I’ve not yet played into new and improved Daemons but I have experience into their previous incarnation. The big trap is the GUO with Endless Gift. Do not try to kill it. Accept that it is where it is, control where it can go and deal with everything else which is quite squishy. Be’lakor helps give out the 18” lone op effect which hurts the ability of my Hammerheads and Broadsides to pop Skarbrand and the Bloodthirster but I don’t plan to spend this game in my deployment zone so it shouldn’t be too big a problem.
I love Terraform – controversial opinion but I really enjoy that it favours early game board control if you can make it work but can turn into a more classic Take and Hold game in a lot of match-ups. What’s that? Why yes I am playing a list that can do extreme levels of early game board control. Why do you ask?
I know if I go first, I can guarantee two terraforms and have a decent chance of sneaking a third. So camped on my line from centre bottom up to the top are: Piranha, Devilfish, Hounds, Hounds, Carnivores, Piranha, Devilfish. My Pathfinders were up around the top left objective, Broadsides and Hammerheads sitting each near the horizontal firing lanes towards the centre and my Krootox Rider screening the backfield. Dale is obviously both slightly scared of my shooting aggression and willing to lean on his uppy-downy so puts a Bloodthirster and Bloodletters in reserves and otherwise deploys fairly deep into his zone with just the Blue Horrors infiltrating on the bottom right objective tucked into the ruin.
I’m going first.
Hell yeah.
There was no real downside to me losing that roll-off but the upside. Oh the upside. I scouted everything straight forward as far as possible; then drew Area Denial and Overwhelming Force. Perfect stuff. The Pathfinders, both Hounds and one Piranha created a wall of bodies along the line of Dale’s deployment zone but staying my side of any buildings where possible. Sadly the Piranha rolled low for its advance (I had to use the 6” auto on the bottom-most Hounds) so the GUO would be able to kill it and get a toe on the bottom objective but that was ok. The Devilfish down bottom advanced and dumped Breachers onto the objective looking straight at the Blue Horrors. Up top, the other Devilfish advanced and dropped Breachers onto the top left objective to Terraform, Carnivores and Broadsides walked onto middle to do the same and my Breachers down the bottom blew straight through the Blue Horrors and started a Terraform thanks to the Stalwarts mission rule.
Dale immediately realised his peril but had limited options – Assassination and Overwhelming Force were theoretically what he needed to do (kill my Breachers and Fireblade down bottom) but would prove to be unachievable. He killed 9/10 Pathfinders with Be’lakor shooting, uppy-downied Skarbrand in front of the bottom most Kroot Hounds and moved up Flesh Hounds to charge past them once they were flamered to death. The Flesh Hounds hit the charge into the Breachers, Skarbrand did not. They killed enough Breachers that between them and the GUO they were able to prevent that Terraform but he could do nothing about the middle and top. He also failed to score either secondary.
From here, it was just about making off with enough points by turn 4 that I couldn’t lose. I had 15 on Primary, drew Establish Locus and Recover Assets, reset my screens as best I could between moving my empty Devilfish to sit directly in front of the unkillable GUO, the Kroot Carnivores and using the lone surviving Pathfinder to run as far forward as possible. Dale scored 8 primary and started a Terraform, but had Bring it Down and Recover Assets to do. He could only murder the Devilfish directly in front of his GUO and the Stealths I had sacrificed to block Skarbrand down the bottom. The big problem he had was dropping his Bloodletters onto his home objective to get a 6” charge into the Kroot Carnivores – except because I was standing directly behind a wall, it was really a 7” charge. Which he failed with a CP reroll.
I had another 15 as a result (likely would have been a 12 with the 6” pile-in and consolidate from the Bloodletters) and kept going on my goal to keep him pinned in and reduce his action economy. Basically I focused down his Bloodletters, Flesh Hounds, Skarbrand and Be’lakor over the next 2 turns as they came forward; kept a good rate of secondary scoring up thanks to my control of mid-board and denied Dale any scoring momentum until turn 4. He was able to effectively finish off all my damage pieces with the Bloodthirster and wrack up 42 points over those last two turns – but by then I was already in my getaway Piranha and zipping off with more than enough points to win.
Result: 98 – 77 win
![]()
![]()
I feel for Dale on this one. I am confident that I had a strong gameplan going second here, which was to disrupt his Terraform on the bottom right in a more piecemeal way over turns 1-3 while achieving mine top left and then trading more conventionally in mid-board to build to a strong resource advantage. But it would have been a more balanced game. Instead, winning turn 1 allowed me to simply slam on the accelerator and lock in a win that was, also in fairness, compounded by some woeful charge rolls at key moments.
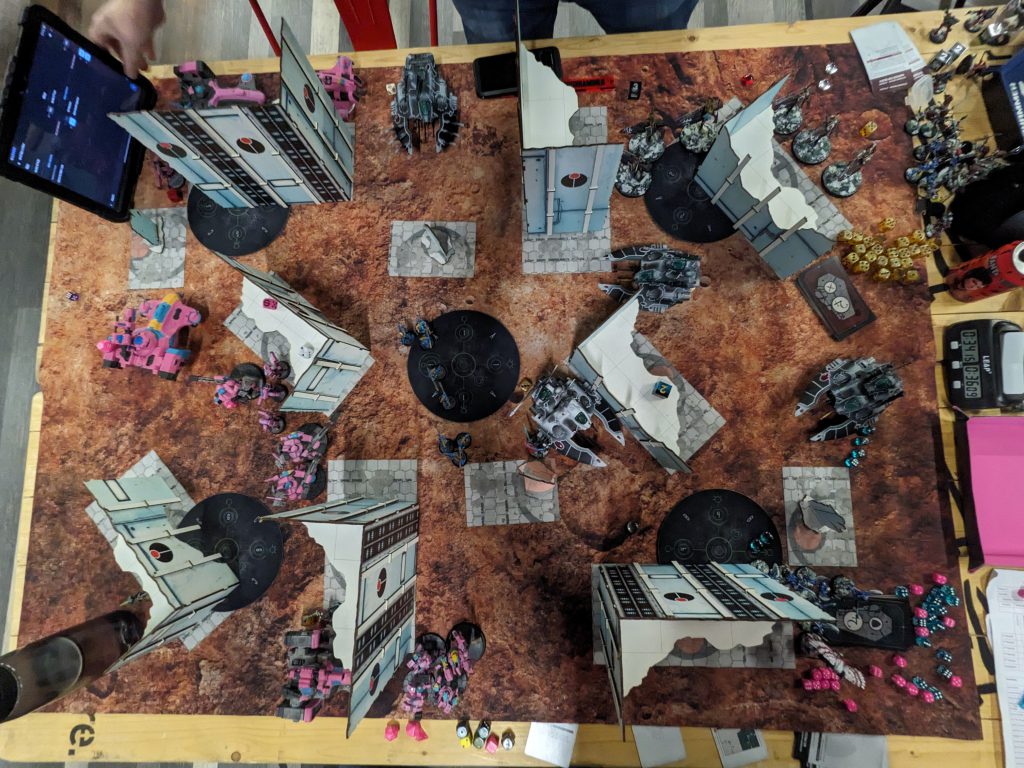
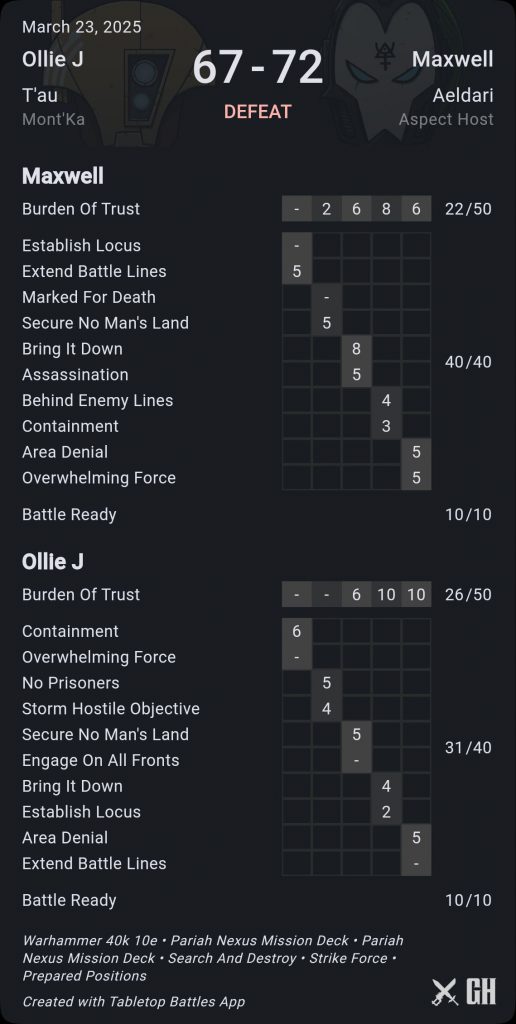
Round 6: Maxwell Koch’s Aeldari
![]()
![]()
Matchup
Mission I – Burden of Trust/Prepared Positions/Search & Destroy
List
Army List - Click to Expand
The Game
Round 6 is always a challenge. I was feeling pretty decent but I knew that was an illusion and the fatigue and drifting focus would come into play. Unfortunately, I was paired into Aeldari having only had a single previous game into the new codex and that a different detachment. So I was woefully unfamiliar with key things like threat ranges, likely output and defensive profiles. Put a pin in that, we’ll come back to it. Fortunately, I had packed plenty of SMS and volume AP-1 shooting which I understand elves of all sorts hate.
The mission is also a bit of a problem in that I don’t like it and I don’t like search and destroy on this GW layout. It’s really hard to get across this map to project threat onto the bottom right objective and the firing lanes are actually quite constrained in many ways while still having few places to hide early on. I had a vague plan if going first which was to try to pressure the Aeldari into a mid-field brawl that I thought I could win; and if I go second I think I just try to disrupt primary and hold out for a late game primary swing.
I’m going second.
The first turn is very quiet. The Aeldari stage up on their half and stick a single falcon onto the bottom right (from my pov) objective. I decide to therefore do mostly the same – running out Kroot Hounds and the War Shaper to contest bottom right, putting a Piranha on the top left objective and lining up some shots into the objective holding Falcon to try to get a 3 on Overwhelming without exposing too much. Two Broadsides should do the trick and indeed I got 3 wounds through with railguns only to whiff the damage roll so badly that it wasn’t worth a CP to try to fix. Still, I had disrupted primary and thought I was fairly well screened for another cagey round.
Reader, I had not screened well. Max was spooked by my SMS barrage killing 3 Warp Spiders and decided to full send. Thanks to trying to prevent both flying Warp Spiders and footslogging Howling Banshees from getting into my lines, I managed to fail at both jobs by fairly slim margins. So Lhykis tied up a Hammerhead and two Broadsides, a unit of Banshees got in and killed a Stealth team and tagged the other Hammerhead and a unit of Breachers (disembarked from a blown up Devilfish). Jain Zar and her 10 Banshees killed the Pathfinders and stood on my top left objective. I dropped the Crisis team into my castle in rapid ingress to try to fortify and push back but I was underwater in a big way.
On my 2nd turn, I drew good secondaries – Storm Hostile and No Prisoners were perfect. I cleared Jain Zar with the top Breachers easily enough, killed Jain Zar by rolling a perfect 6 damage dev wound railgun from point blank and managed to once again whiff at killing a Falcon with the other unit of Broadsides. The Crisis team killed the foot Autarch and 5 Banshees but pistols and Hammerhead secondary weapon fire failed to clear the Banshees inside my castle. He also rapid ingressed Asurmen’s Falcon midboard (this is the one I failed to kill this turn).
It devolved badly from there. The Broadsides held out longer than they had any right to, killing Asurmen and finally downing a Falcon but succumbing in the end. I held my top left objective throughout thanks to Breachers which kept my primary scoring ok; but ultimately I ran out of resources to defend my home and the big unit of Swooping Hawks were able to … uh… swoop in and take it out from under me.
Final turn, I could still bank 10 primary and needed 10 on secondaries to secure a draw. Normally Area Denial and Extend Battlelines would have done the job but obviously without my home objective, there was nothing I could do.
Result: 58-63 loss
This one stung. Not because it wasn’t the right result but because I really feel like with a few minor tweaks, this game completely flips. But – as I’ll say a little more about below – fundamentally I think I have a few core things both I and my list can improve on and this game definitely exposed a few of them.
Wrap-up and Reflections
Despite my initial goals, I ended the event quite conflicted. On the one hand, this is the third GHO in a row where I have been in the 3-2 bracket and lost the final game. I have still not hit a positive win record at a GT (three 3-3s and a 2-2-1) which is absolutely an arbitrary hurdle but one I would like to tick off at some point! On the other hand; my run here in terms of quality of opponent was an absolute slog (in terms of experience of opponents, it was, as always at GHO, wonderful). My opponent’s game win percentage was over 70% (none of them worse than 3-3 finish); and my path to 3-3 this time meant I was sitting in the top half of the draw every round. This has to count as improvement over my previous 3-3s (both of which involved an element of submarining) but I’m sure those of you who are of a similarly competitive mindset to me understand why I don’t find this a perfect salve. When you add in that the final game was a five pointer that could have flipped off a single dice roll or card draw, well, I didn’t sleep very well that Sunday night!
But I also had six wonderful games (and five that I was competitive in!). I got some fantastic moments of good fortune and got to express some of the player skill I have developed over the last 24 months. Now that I’m a few days out of the event, I feel a lot happier about it and can acknowledge that part of chasing the high of competitive success (even the relatively lower bar of success I am aiming for of just trying to reach an overall positive win record) means risking the low of missing out to another player, trying to do the same thing and just executing a little better when it counts. And last, and most pleasingly, I did win (in a very funny 8-way tie) a share of the ‘best opponent’ award by popular vote. This does mean a hell of a lot and I’m delighted that a good number of my sparring partners felt like putting my name on that list.
On the list briefly – I noted a few issues: killing multiple 2+ save units in one go, very fragile chaff that multi-phase armies can remove efficiently, problems with getting tagged by very mobile opposition. Sadly all of these are problems that are addressed by Riptides – but then I lose all the upsides of this army! So I’ll tinker around the edges and maybe find room for a third Hammerhead or look for alternatives to Broadsides but I don’t want to radically alter it when I think T’au are currently just a bit of a short blanket faction – we have solutions for everything but you can’t pack them all at once.
On my own play – this army gives me a clear go first plan. I am way less confident going second; and I am far less confident against fast armies with fly. I need to develop clearer plans for how to play in those situations with this list and on a variety of layouts – where to scout, how to stage and how to screen more effectively.
I’m all fired up to keep playing when I can (hoping to get to 4 more GTs this year alongside a few more RTTs and local league games), to push Mont’ka to as good a level as I can pilot it and, hopefully, finally figure out how the fight phase actually works when I get an Emperor’s Children warband onto the table. ‘Til next time, happy hunting all.
Thanks for the report Ollie, and we look forward to seeing how the Emperor’s Children fare next time around. Tickets for the September GHO UK will be going up soon, so if this sounded like fun, make sure to keep an eye out!
Have any questions or feedback? Drop us a note in the comments below or email us at contact@goonhammer.com. Want articles like this linked in your inbox every Monday morning? Sign up for our newsletter. And don’t forget that you can support us on Patreon for backer rewards like early video content, Administratum access, an ad-free experience on our website and more.
