Surprise!
Rise and Grind, Let’s Gain That Ground
Gaining Grounds is Malifaux’s equivalent to War Zone: Whatever – a tournament pack with missions, objectives and rules tweaks for competitive play. Wyrd updates Gaining Grounds annually; typically it launches in spring alongside the errata, but this year the errata was very early (way back in February) and the new tournament packet didn’t drop until this Wednesday. It was a bit unexpected, but certainly not unwelcome; Gaining Grounds 2 was showing its age, and we were all ready for something new.
Comparing GG to War Zone doesn’t really do it justice, since the objectives vary wildly between tournament packs. This isn’t just a matter of moving where the primary objectives are, or how many points you get for them; games played under GG3 are going to be fundamentally completely different than games under GG2.
As of writing time I haven’t played a single game under GG3, but I am going to play some this weekend before you read this, and I’ll probably do a followup in a month or two to reflect on how the new missions are settling in. But you people are addled by television and smartphones and you demand INSTANT GRATIFICATION. You want my hot take NOW! You demand it!
Fine. I aim to please.
What’s Changed?
Three things, really. First, there are rules tweaks – for instance, the changes to Summoned models to make them unable to Interact with strategy markers came through in a Gaining Grounds packet. Second, there are new Strategies. These are the primary objectives that both players are driving towards. Third, there are new Schemes – the secret secondary objectives that are truly asymmetric. Keen students of ‘Faux will remember that a Scheme pool consists of five Schemes; each player picks two secretly. Each Scheme has a Reveal condition, which you can trigger midgame for a point, and an Endgame condition that will score you a second point if you have it done when the last card flips.
Rules Changes
We’ll start with the minor (but still impactful) rules updates. Nothing earth-shaking here; there are some minor tweaks to optional tournament formats, but the “standard” play format hasn’t changed.
What has is the “secret info” rule. Many Schemes require you to secretly nominate models at the start of the game. Previously, you did this upon selecting your Scheme. Now you do it after Deployment. This is a little tweak, but a significant one; having to pick your Hidden Martyrs or your Vendetta target before deployment made deployment awkward, especially if you went second. You don’t have full information on where your opponent’s models are before you deploy (remember in Malifaux the first player deploys half their Crew, then the second player fully deploys, then the first player finishes) so you had to make sub-optimal deployment choices to make sure your schemes were achievable. Now both players have more information when making the selection of which models to designate, which should lead to more engaging gameplay.
Strategies
Here’s the real meat of the changes. This is what you came for. Oh baby.
Cursed Objects
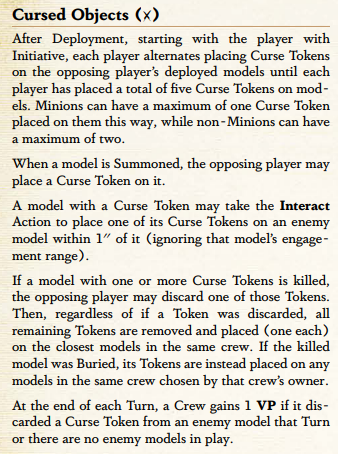
Cursed Objects is a bit like Reckoning from the old GG0 packet, but, you know, interesting. Each Crew starts with five “cursed” models. (Technically you can double up tokens on a single model, but since you pick where your opponent’s tokens go, there’s no reason to ever do that). When a cursed model dies, you discard one of its tokens (spreading the rest to the other models in the same Crew). End of the turn, you get a point if you killed a cursed model. Simple, straightforward, and effective.
The fun comes in when you start passing the love around. A cursed model can use the Interact action to pawn its token off on a nearby enemy. This operates both defensively (taking points off the board for your opponent until they can give the curse back) and offensively (giving you another target ripe for killing). I’ve never seen them use the Interact action this way before, and it’s frankly really cool. There are a lot of ways to play this scenario: you can hang back with a ranged crew and blast, confident that your opponent can’t hand their curses to you from downrange, or you can run up and give them all your tokens quickly so they have to go through the trouble of marking you for death before they kill you. But you also don’t need to Interact at all to cap the Strategy, not even once. It depends on what your opponent is doing.
Activation control is helpful here, too, because if an opposing model has already activated you can step up, mark it for death and kill it right then and there. And there are a few random models that shine in this game mode: the Journalist crew, for example, can never be passed a Curse Token because of how Exclusive Interview works, so you can just fob all yours off on the enemy and zero them out on the strat. And Summons always show up with a Curse Marker, meaning there’s a big fat target on their heads from the word go.
I’m a big fan of Cursed Objects. It definitely favors crews with long engage ranges (so they can prevent opponents from passing the tokens off – you only ignore the engagement range of the model you’re handing it to) and ranged crews generally, but I think every crew has some play, and it’s a nice bloody strat that has a bit more creativity and flex to it than Reckoning did.
Guard the Stash
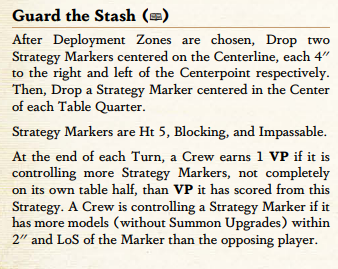
Guard the Stash deploys immobile Strategy markers of the kind we’re used to, but in a new configuration. There’s six, four on the four table quarters and two on the Centerline. Your mission? Control these markers by having more non-summoned models near them than the enemy does. The wrinkle? Markers fully on your side don’t count.
This Strategy involves no interacting at all, which is pretty unusual if not completely unheard of. More interestingly, it radically changes based on deployment type. In Standard and Wedge, you can score on four of the six markers, which means in order to cap out the strat you must control all four – including both of the center markers. In Corner and Flank you can score on five, not four, which means you have a lot more flexibility, and it’s harder to lock your opponent out entirely. I don’t think I’ve seen a strat yet that changes quite so radically between deployment types, and I really like it.
Because there’s no interacting, this is a purely positional strat, and because it forces you to fight over markers there’s gonna be a lot of blood in the streets. You can deny your opponent’s scoring, but it’s not that easy; if they commit two models, you need to commit two as well. This rewards crews who can take a lot of non-Insignificant models, since a three-stone Wicked Doll counts as much towards control as an 11-stone Rider, and so it affects your crew construction pretty significantly. You want durable, cheap models that can avoid being moved around. Waldgeists and Botanists, this is your time to shine!
Carve a Path
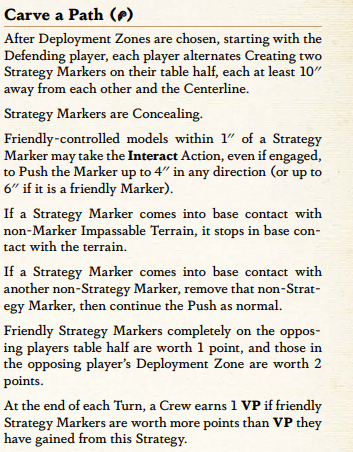
Finally, we get a payload scheme. Carve a Path has two payloads… on each side, so four total. You can Interact with a payload to push it (6″ for a friendly, 4″ for an enemy) and you score by having payloads on the opposing board half/deployment zone. Like Guard the Stash, there’s no room for error here – to cap out you must have both of your payloads in the opposing deployment zone.
Remember how I said the last two Strategies don’t require you to Interact much? Well, this one’s the opposite – you’ll be walking a lot and Interacting a lot. In fact, the Strategy really favors models that can Interact – move – Interact… so models with Leap, models with Onward, Fast models, and weird ones like Catalan Riflemen. The more you can Interact, the more you can force your opponent to Interact, too, since you can push their payloads backwards. Going wide is also strong here, since you are going to spend a lot of AP pushing your carts and you might as well have cheap dudes doing it.
The fourth paragraph above is also worth a mention. Moving payloads eat every Marker they touch. This incidentally hoses some Crews, as it gives every model in your crew a version of Parker Barrows/Cornelius Basse’s Chaos in the Badlands/Order in the Badlands. Titania with her Underbrush? Mah Tucket with her Pit Traps? Mei Feng with her Scrap? This Strategy hits them where it hurts (and to forestall anyone saying it: the Rock Hopper does not save your Scrap here, since it only prevents enemy effects from removing it, and the effect of the Strategy isn’t an enemy effect; it’s neutral). It’s kind of unusual to have a line of text like that on a strat, since it definitely gut-punches some Masters in particular, but Markers have been kind of proliferating a lot lately and it’s nice to see them reined in a bit.
There are a lot of different ways to approach this Strat – do you try to converge your Markers so you can push them up together? Do you form two fireteams? Is it better to spend AP denying your opponent? You can push them forward quicker than your opponent can push them back, but the deployment zone is a long way away… especially on Corner.
Covert Operations
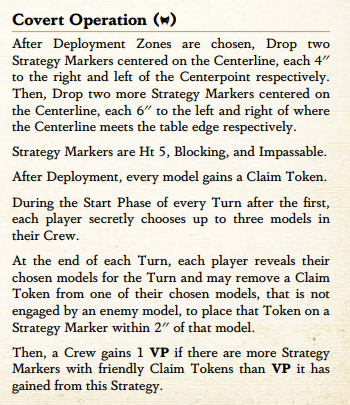
Covert Operations, our last Strategy, is a bit like Corrupted Ley Lines. There are four markers on the board. Each of your models has a Claim Token that can be used once, to claim one marker. Both players can claim a marker, but you have to claim all four to cap the strategy. The catch is that not everyone in your crew is eligible to claim a marker – at the start of each turn you secretly pick three to be your “scoring” models, and at the end of the turn one of those three that’s not engaged by an enemy to claim a marker within 2″ of them.
This is another Strategy with zero room for error. Unlike Ley Lines, you can’t claim a marker turn 1. You have exactly four chances, and each one you miss costs you a point. There are also only four markers to claim, so you can’t skip the least convenient one. At least they’re all on the Centerline…
This Strategy requires a lot of planning ahead. You have to plan ahead each turn, to see who will be the most effective scorer, but you also have to plan ahead at the start of the game; overcommit to one side of the board, and sure, you’ll score both of those markers, but you won’t be able to score the other half… and your opponent can ignore your models that have already dropped off their marker, or who are just out of position, because they can’t contribute to your victory. Of course, that means they’re free to harass and deny the enemy.
There are also interesting questions of kill priority, since you need to target models that haven’t dropped off their token yet; once a token is gone, there’s no way to get it back. Again, this encourages you to take a larger crew and have some redundancy built in. But with both people scrimmaging around the Centerline, there’s going to be blood.
Thoughts on Strategies
I love all four of these Strategies. I think they’re four hits. Time might prove me wrong, but they seem to really be mixing things up: there are Strategies that reward the ability to interact, Strategies that reward the ability to kill, and Strategies that reward clever positioning.
I think Summoned models are quite a bit weaker here than they were in GG2; they can’t meaningfully contribute to three of the Strategies (though I suppose they can deny in Covert Operations) and while they can kill in Cursed Objects, they’re also big liabilities due to arriving with a curse on them.
Activation control is also going to be an even more powerful strategy than normal; Covert Operations and Guard the Stash can both be swung pretty radically by an end of turn “walk, walk, leap” or similar. You’ll want to keep your opponent’s most slippery models pinned down if you can.
Schemes
Finally, we come to the Schemes. There are a few returning, a few returning with tweaks, and a few brand new ones.
Returning Schemes
Assassinate, Spread Them Out, and Breakthrough are back with no changes at all. Not a problem in any case. Those are all winners; Spread’s a bit harder than the other two, but with the Strategies pushing people to go a bit wider than in GG2, it might be taken more commonly, while Breakthrough and Assassinate are workhorse Schemes that saw a lot of play and probably will continue to.
Leave Their Mark from GG1 also returns; this Claim Jump variant requires you to have a Scheme marker within 1″ of the centerpoint while your opponent does not, and scores its endgame point if you have three scheme markers within 4″ of the center. I always liked Claim Jump, and this scratches the same itch; it says “control the center of the table,” basically.
Returning With Tweaks
Vendetta, Hidden Martyrs and Catch and Release return from GG2, with two changes. One is the rules change I mentioned above – nominating your Martyr or your Catch minion after crews have deployed will make it easier to score. There’s another change to all three Schemes: now you cannot Replace your chosen model with a more expensive model. Thank God for that. It wasn’t that common a strategy, but nominating an Abomination as a Martyr and turning it into a Desolation Engine, or doing something similar with a Coryphee, was very tiresome.
Sabotage returns from GG1, with a minor tweak. The Scheme requires you to drop two Scheme Markers within 2″ of a chosen terrain piece on the enemy table half, and not have any enemy models within 3″ and LOS of one of the markers at the end of the turn. At the end of the game, you just need one marker within 2″ of the terrain and no enemy markers within 2″ of that terrain. What’s changed? Well, now the terrain piece can’t be within 4″ of the Centerline. The old version required it to be within 3″ of the enemy Deployment Zone, which was very restrictive; now you have a lot more freedom choosing your sabotage site. Just don’t pick a piece of destructible terrain.
Brand New
There are five brand new schemes in the pool, and four of them are big winners. Let’s take them one at a time.
Load ‘Em Up
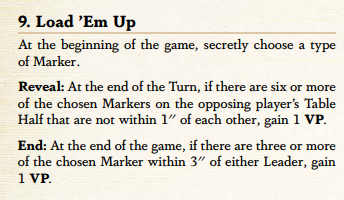
You don’t wanna be the guy who cleans up the loads. This scheme is a bit like Research Mission, trading quality for quantity; you need to drop six Markers of the same type on your opponent’s board half, and also spread them out a little. This Scheme is weird. Some crews will ace it; Zipp can score the whole thing with 2 AP. Some crews just can’t do it at all. Pro tip: do not try to do this with Scheme Markers; it’s technically possible, but there is no way that that is the most efficient use of your crew’s AP. There will always be a better option.
For crews that want to puke out Markers, though, this can be a lot of fun… just don’t try it into Carve a Path unless you want to see your opponent gleefully steamroll their cart through your carefully constructed forest of Pit Traps or whatever.
Public Demonstration
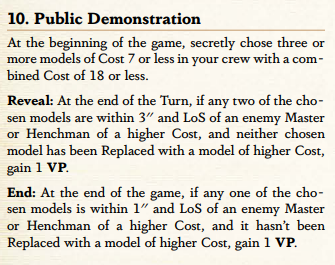
This is kind of Super Catch and Release. Upside: three models instead of one! Downside: must be cost seven or less. Upside: You only have to be within 3″ of the enemy Master or Henchman! Downside: the Henchman must be higher cost (although, frankly, there aren’t that many Henchmen that cost 7, and only one that costs less). Upside: only two of your three chosen models need to survive to reveal the Scheme! And only one needs to survive to endgame! Downside… not much, actually, this is way easier to score than Catch and Release. TOs: don’t put them in the same pool.
There are edge cases, like if you’re playing Nephilim or Amalgam, but generally this is just “better Catch and Release” and should be treated as such.
Set the Trap
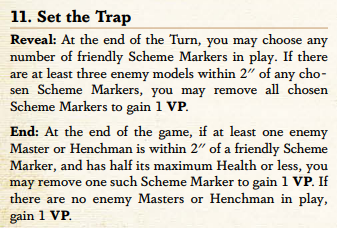
This one’s a bit like Inverse Detonate Charges. You can theoretically score the reveal condition with a single Scheme marker, which is what I call AP efficiency. In practice, with this in the pool, your opponent won’t dare bubble up. It’s a scheme that really rewards ranged scheme-marker dropping and activation control, since you want to be able to safely flip a pancake in their faces after they’ve activated. It also kind of punishes the “lots of significant models” crew builds I discussed above, since it’s easier to catch three of them out. I like Set the Trap quite a bit, but maybe that’s because I play Austera and Twigge and Merris LaCroix, both of whom love this Scheme.
In Your Face
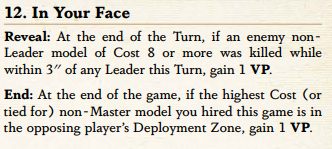
This is about an unsubtle as Schemes get. Are you playing Lady Justice? Do you want your Master to kill people? GET IN THERE! You can snipe out your opponent’s lieutenant while they’re standing next to the boss, but in practice 90% of the time you’ll score this by decaffeinating someone with Lorelei, the Living Blade or aging them to dust with Death Touch. The endgame condition is worth considering; you don’t secretly nominate the model, your opponent knows exactly who it is once you reveal, and if they die you don’t renominate. Zipp is not half bad at this, but picking this scheme means you basically can’t hire Mancha Roja. (The First Mate is great at it, though). You can play silly games by hiring a bunch of 8s rather than any 9s or 10s, and then any of them are eligible to score the endgame point.
Secret Meetup
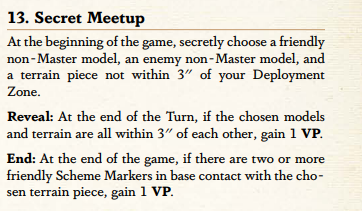
And now, sadly, we get to the one miss. This is just far too conditional. You secretly pick two models? And they both have to live? And you secretly pick a terrain piece? And they both have to go to it?
Flavor win, Wyrd, but mechanically this one’s trash. There are just too many conditions, and too much reliance on what your opponent is doing. If it was any terrain piece, maybe, but having to pre-pick just makes it far too likely that you’ll never be able to reveal this without your opponent even realizing they’ve screwed you over.
Thoughts on Schemes
I mostly like the new ones! I will miss Claim Jump and Research Mission (though I know the latter had to go, it was way too easy to score). The new Schemes seem a bit polarizing, to be honest. Both Load ‘Em Up and In Your Face heavily depend on your crew comp, with some crews being able to trivially score them and others basically having no chance at all. Still, I think there are enough general-purpose schemes in the pool that there will always be something to do… and the quality of life changes to Martyrs, Catch and Vendetta will make them less frustrating to play and to play against.
Do you like the new tournament packet? Hate it? Have no opinion because it’s been out for less than a week and you haven’t gotten the chance to play it? Sound off in the comments! And if you liked this column and want to see the video version of it, with jokes, check it out here:
Have any questions or feedback? Drop us a note in the comments below or email us at contact@goonhammer.com.


