
Introduction
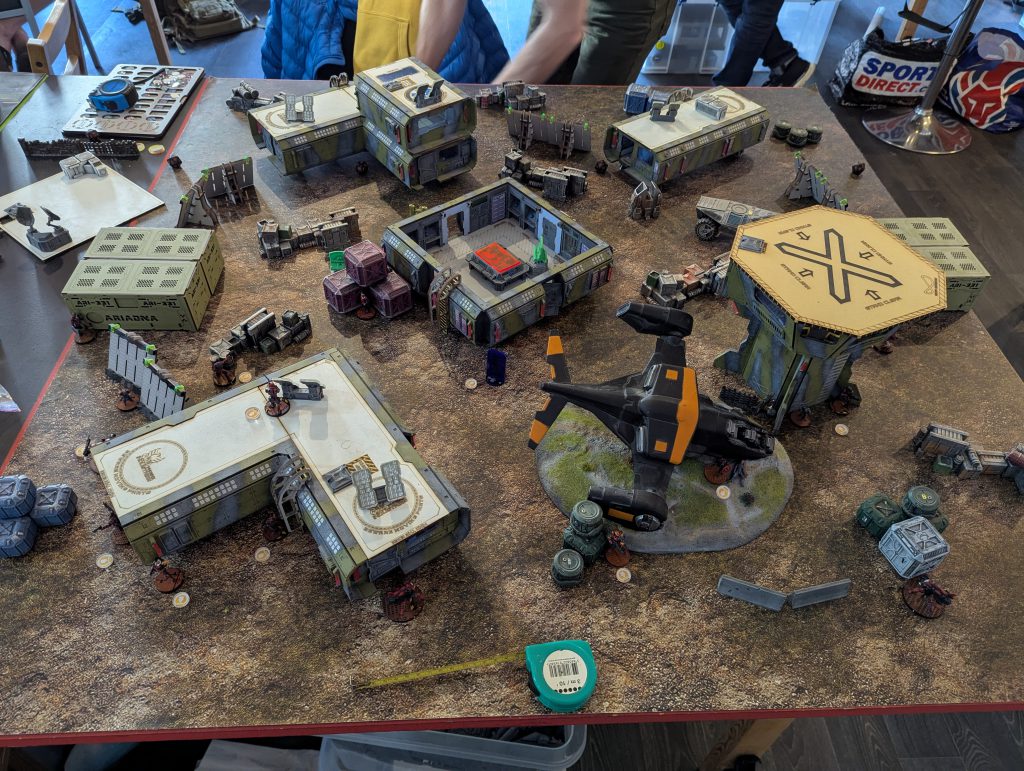
I had the opportunity recently to attend my first in-person N5 tournament (I have also been playing in the Infinity Global League on Tabletop Simulator). This was another iteration of Infinite Nerd in Shrewsbury (England, for anyone not familiar), which is quite near where I live. It’s a small tournament, we only had 12 players, but still a competitive field, several of the top players in the UK were there. I was definitely keen to get stuck in with some new-look Corregidor. They’re my original Sectorial, they didn’t exactly get the refresh I wanted in N5, but they do still have some strengths.
Missions & Lists
This event would include two classic missions, Unmasking and Countermeasures, with a final round of Resilience Ops (on the day, ResOps was played as Round 2, to better accommodate its set-up time). This was an easy snap pick for list planning, both ITS missions have Exclusion Zones but still need specialists to go forward and operate in the midfield, with a strong incentive for hackers (they get a bonus in Unmasking and they have a disproportionate amount of cards in Countermeasures). ResOps, conversely, doesn’t require any Specialists at all, so a list is free to simply concentrate on movement, offense and defence. I did have a lot of issues due to never having actually played a game of ResOps before – I play almost exclusively in events, where it isn’t as common – but the list building was the easy part.
List 1: Unmasking / Countermeasures
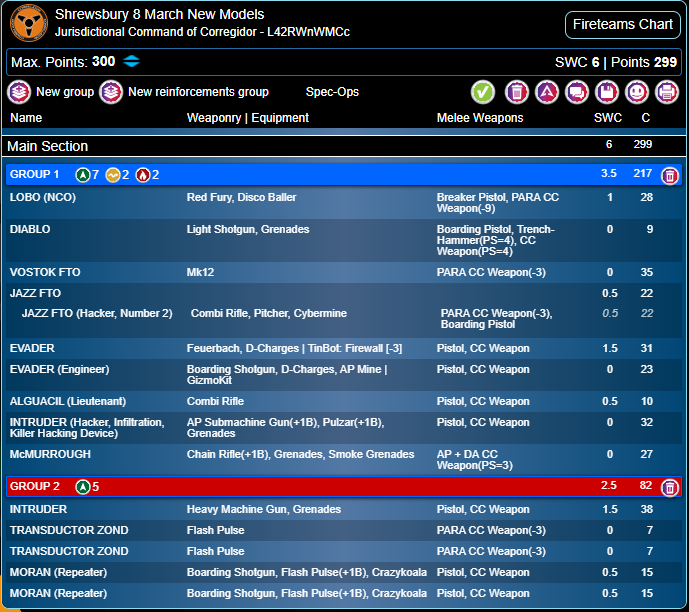
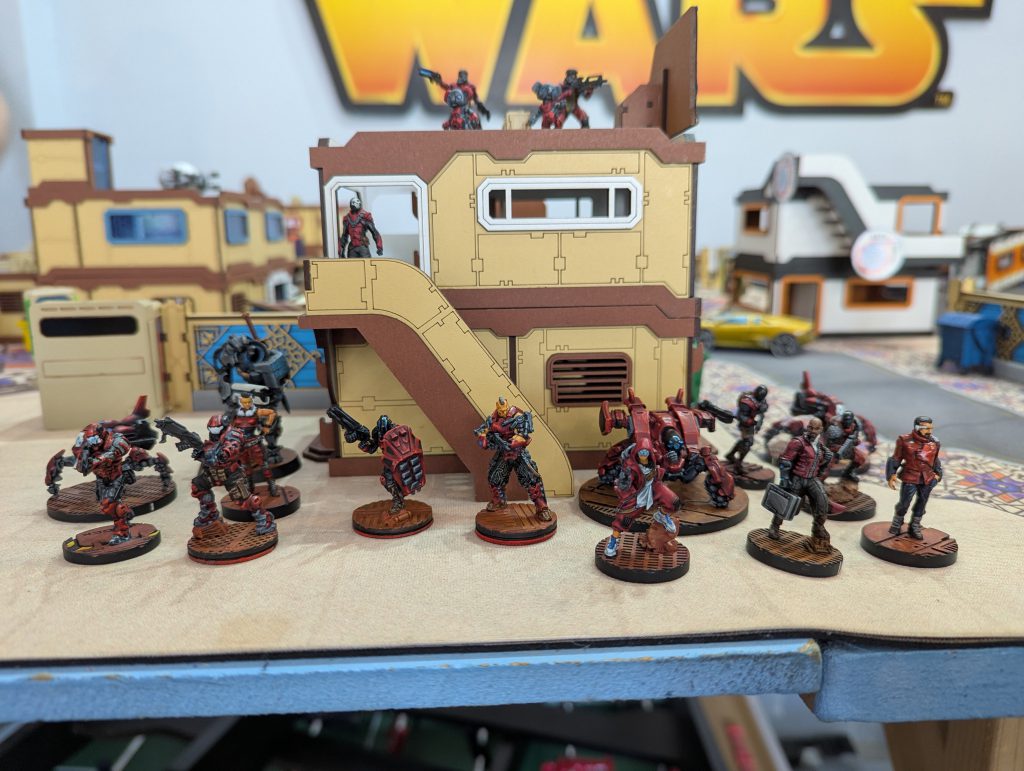
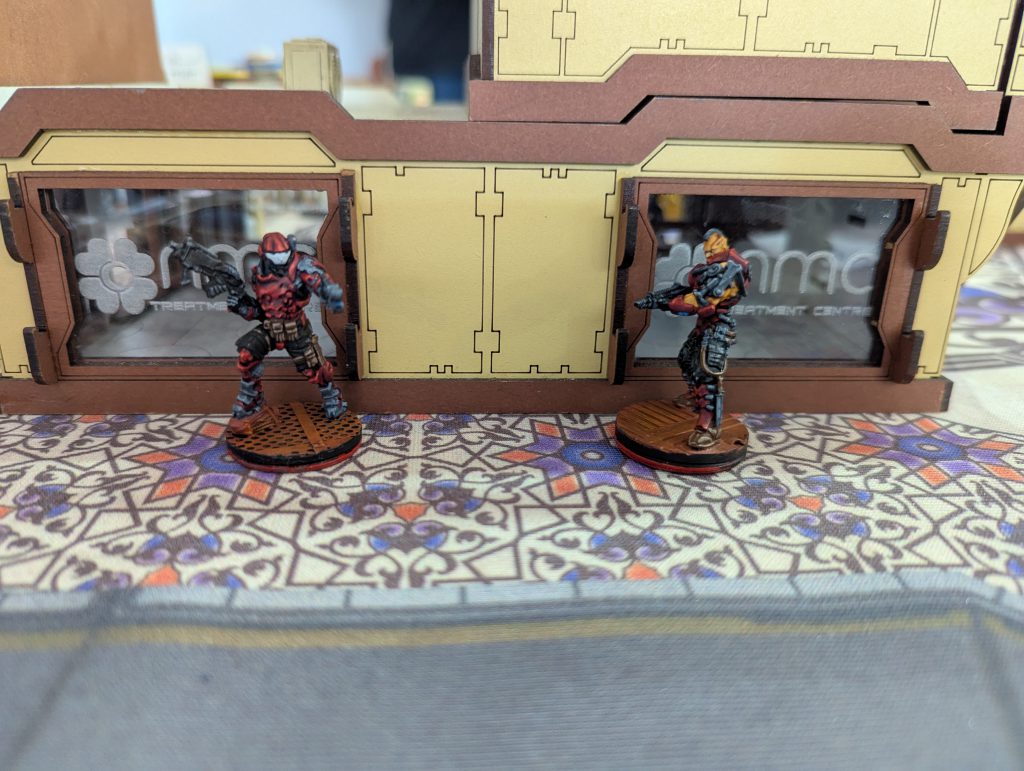
My first picks for Unmasking/Countermeasures were mostly shaped by what I’d been painting recently, and that worked out. I had done a converted Lobo (I can’t stand the official models, which don’t share much design language with other Nomads) and a pair of Diablos, and it made sense to include this team, not so much for pure assault but to leverage Discoballer to access objectives and targets if needed. I’d also done some alternate EVAder loadouts and a Vostok, so this was as good a time as ever to try out that team, which can get engineering cards and are generally tough Specialists. Climbing Plus isn’t what it was in N4, but it can still be good mobility. Jazz FTO folded in with them to benefit from a Tinbot Firewall, and to ensure I could drag a hacker where needed. My next priority was to ensure I covered all the Countermeasures cards, so I threw in the new Intruder KHD profile. I’ve been playing on Tabletop Simulator with both this piece and a Hellcat hacker (my normal go-to pick for Countermeasures/Highly Classified) and really prefer the Intruder. He’s fearsomely expensive and fragile, and I wish he had a 16” gun, but a camo state hacker is invaluable for some Classified Objectives, and being an elite MI trooper with a visor just expands his functionality. He can’t use Spotlight, but that’s ok, because I brought a pair of Morans (how original). I normally favour the combi rifle version, not least because they have D-Charges, but here I had to cut them down to shotguns for cost, taking it on risk that the EVAders could accomplish Sabotage if I drew it.
The list was mostly full and still focused on objective units with middling firepower, so I threw in McMurrough for the larger group and the Intruder HMG for the smaller. This is one of my favoured set-ups to remove AROs and then get in amongst the enemy. It also gives me another camo elite MI for the Classifieds, and McMurrough is the best option for Predator. I won’t say this is an uber-competitive all-rounder list, it doesn’t have great mobility, its primary gunfighter, the Intruder, is a fragile point of failure, and critically it lacks much defence. Once an opponent is past the Morans (which many competitive lists and players are easily prepared for) they can do terrible damage. I compounded this by cutting out my decoy Lt while fighting for slots, but I figured that an assassination hit was less likely in Countermeasures, and I could use my other list in Unmasking if I faced a faction with Impersonation or similar scalpels.
List 2: Resilience Ops
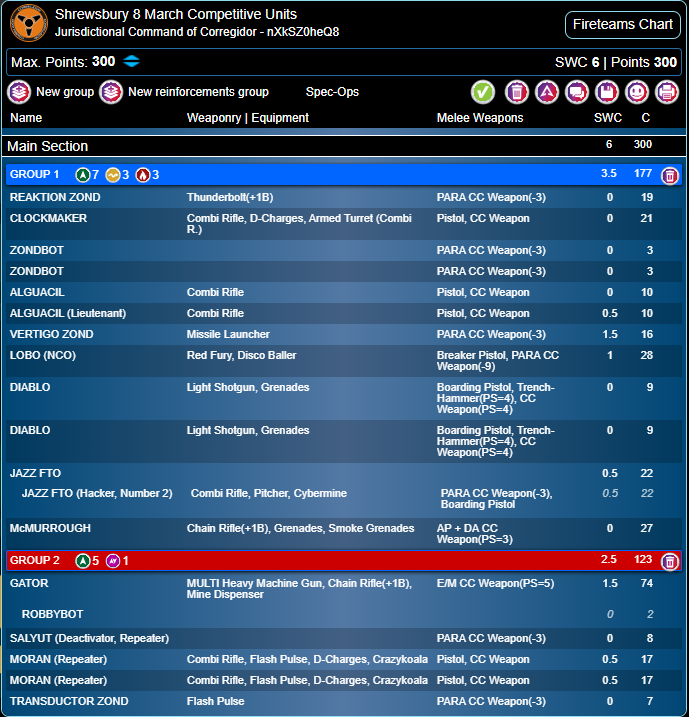
My aim here was to make a list that included all the most competitive units in Corregidor, with the Guided system built in. Not only do I think Guided is one of the faction’s best tools, as boring as that is, but it can be a solution to certain factions which are otherwise very oppressive. It would be nice to have the option of this list if I drew certain match-ups. I wanted this list to be different to the first, but also capable of winning Unmasking (less so Countermeasures) so I could default to it if needed.
Jazz, McMurrough, the Moran Masai and the Vertigo Zond went straight in as a matter of course, as did pairs of Transductors and Alguaciles – I definitely needed a decoy Lt here. The Gator was the obvious choice as a straightforward firepower pick, and I decided to lean into N5’s new Baggage rules by including a plain unarmed Salyut Zond. I love using the Gator’s Mine Dispenser and this was a chance to abuse it multiple times. Since I clearly needed an engineer for the Gator, and was running short of points for an EVAder or Tomcat, I went for a plain supporting Clockmaker, but with an armed turret (combi rifle). Not exactly turret spam, but maybe a chance to lay 2-3 important turrets over the game. I put in a final defensive piece with the new thunderbolt-armed Reaktion Zond. I’m a huge fan of these since they save SWC (a massive constraint for Corregidor, due to costs of the Guided missile and Morans) and their range bands are exceptional. They do 99% of what an old-school HMG bot does, for much less. Ultimately I don’t take a Reaktion Zond to reliably win FtF rolls, I take it to present a risk to opponents, and the thunderbolt still handily achieves that. To support the bot and the TAG as well as take a position to potentially lay turrets, I made sure the Clockmaker had two Zondbot servants.
All these individual units meant I only included one Fireteam, getting the efficiency and beefiness of a pair of Diablos linked to a Lobo. That was once again the red fury NCO, which I don’t think is always the best profile, but I’m not comfortable running a Fireteam without some sort of active turn gun. Jazz went into that team as an FTO – pitchers are super important for good infowar strikes and that’s the only way to make hers hit reliably. The way this list turns out kind of exemplifies my issues with Corregidor – the Fireteam units aren’t the strength of the faction. That is a shame both because I really like those models, and because it raises the question of why players should field Corregidor over generic Nomads. McMurrough is great, but if you’re taking one Moran, Jazz, a Vertigo Zond and a Gator, a lot of the list is available to Nomads, with some very strong complementary picks. The second Moran isn’t that big a deal!
I’m getting sidetracked into a Corregidor faction focus here – let’s get on to the games.
Round 1: Countermeasures
Pre-Game and Deployment
I drew against OSS, played by a chap I’ve faced in many good tournament games over the years. I lost the Lt roll and he picked the first turn, so I took an even or very marginally advantaged table side. Now the first turn isn’t necessarily too critical in Countermeasures, what determines the tempo of the game is which cards get drawn, and here the flop wasn’t too bad (from my perspective as the player who wouldn’t get an immediate crack at it): Data Scan, Mapping, Nano Espionage. Now the latter is a pain, and Mapping is a hard gear check for forward-deploying hacker/FOs, ideally in a marker state. So I was principally thinking he’d be likely to get Data Scan, and discarded any ideas of over-infiltrating a Moran.
My opponent placed a Deva-led Dakini Core in the centre; this is the classic OSS build of a Dakini sniper in a team with the top level bonuses, supported by an Apsara Remdriver and a Servant remote for a Posthuman engineer. On his left he fielded a Haris team of an Asura spitfire, a Yadu HRL and Yadu hacker. That seemed like a team which could do lots of cards, but was a bunch of points and power to commit to bringing forward. Beyond those teams he really just had some cheap unarmed Orders. His holdback was clearly Posthumans, and that added up to 14 choices so I did suspect a Garuda (it could have been a Dasyus).
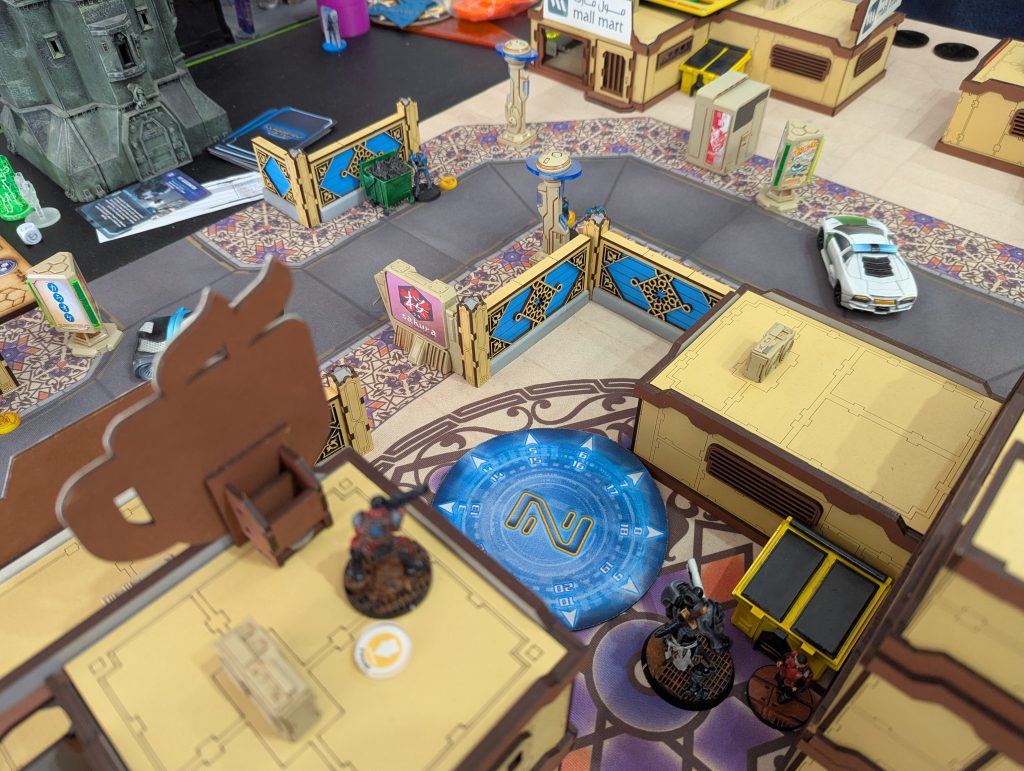
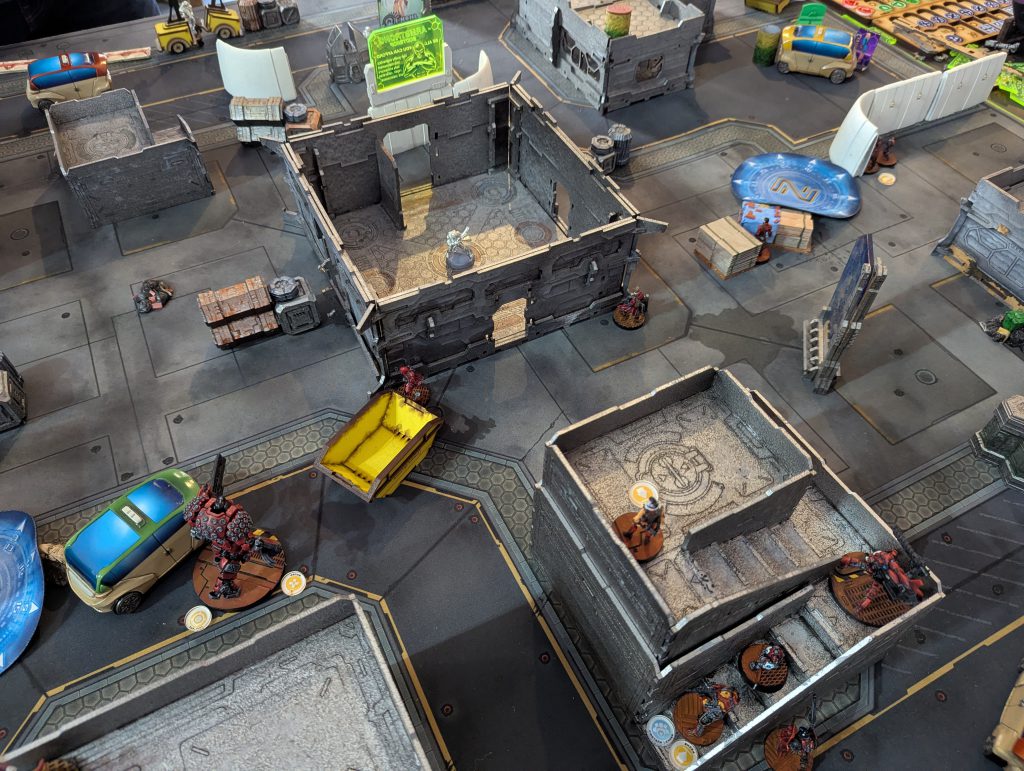
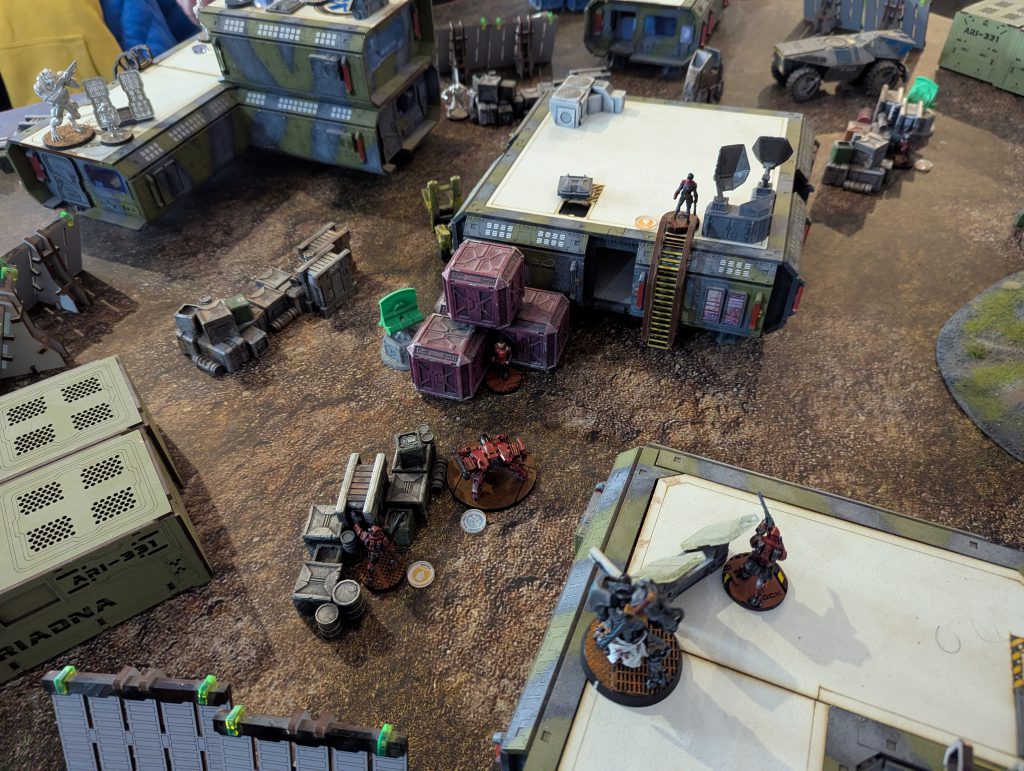
Since I didn’t see any immediate need to protect my HVTs or contest movement, I deployed quite far back, with both 3-model teams (I stuck the Vostok with the Lobo/Diablo, although close to the EVAder engineer) in the centre, offering diagonal AROs into the midfield from the EVAder feuerbach, Vostok and flash pulses. My Morans went centre-left and centre-right, almost completely covering the approaches into my DZ. My Intruder HMG went prone on a roof, with McMurrough behind the same building, and my flash bots were watching the flanks.
Round 1
I did dock my opponent of two Orders, rather surprised he didn’t have a Shukra Consultant to mitigate that, and he discarded Mapping – not having an Infiltrating or airborne model to achieve it – and drew Assassination. Which can be terrible, but it turned out he intended to get it with his Deva Lt. He brought the Dakini Core right into the midfield, knocking out a flash bot before approaching my left HVT and getting the card – a good start, but he was really moving a lot of models into a vulnerable position.
He then nudged into LoF of my right hand Moran, but we realised there was a Koala lurking close by. I offered my opponent a take-back, but we’d already missed 1-2 Orders where the deployable should have gone off, so he sportingly said he’d declar Dodge. Unfortunately both rolls went against him, and that downed his Dakini sniper. Not only did this reprieve my Moran, his engineer was too far back to recover the model and preserve any momentum. My opponent decided to bring on his Garuda, but this turned out to be a shotgun bot, not the combi rifle FO I was expecting (if he’d had that profile, he could have scored Mapping). With such a short range weapon, it tried and failed to attack my EVAders from my left flank, despite getting them out of cover, and it went down. This was not a great play by my opponent, I think perhaps he saw his main thrust had run out of steam and wanted to do something which would get kills before passing the turn. As it was, I wasn’t really touched and his Dakinis were in the wind . . . while my Intruder looked at them from his rooftop, salivating.
With the wider table state looking favourable, I burned Nano Espionage and drew HVT Identity Check and HVT Designation (using a visor model on, and Spotlight/Forward Observing, the HVTs). I got Designation with my Intruder KHD on my right, and then pushed him on to kill the Yadu hacker in two FtF rolls – I thought that was supportable given how important hackers are in the Classified deck, and my opponent’s only other one, the Probot EVO bot, was far back, almost out of the game. McMurrough had thrown Impetuous smoke, so the Intruder HMG on my centre left was able to stand up and schwack 3 Dakinis in succession, then wound the Deva Lt, and end up back in Prone. Balm to my soul.
While the fighting was going well, I then had a disaster on the objective rolls. I maneuvered the EVAder/Jazz Haris into the midfield, and spent 3 unsuccessful Orders trying to Data Scan an unconscious Dakini. Didn’t even get to try HVT Designation! This was risky, although I had killed 6 models over the Round, and lost one very minor one myself, we were still level on cards, and I had failed to build the score. On an immediate tactical level, it also meant I vainly spent the Order I’d earmarked to re-camouflage my Intruder KHD, who was left swinging in the open.
Round 2
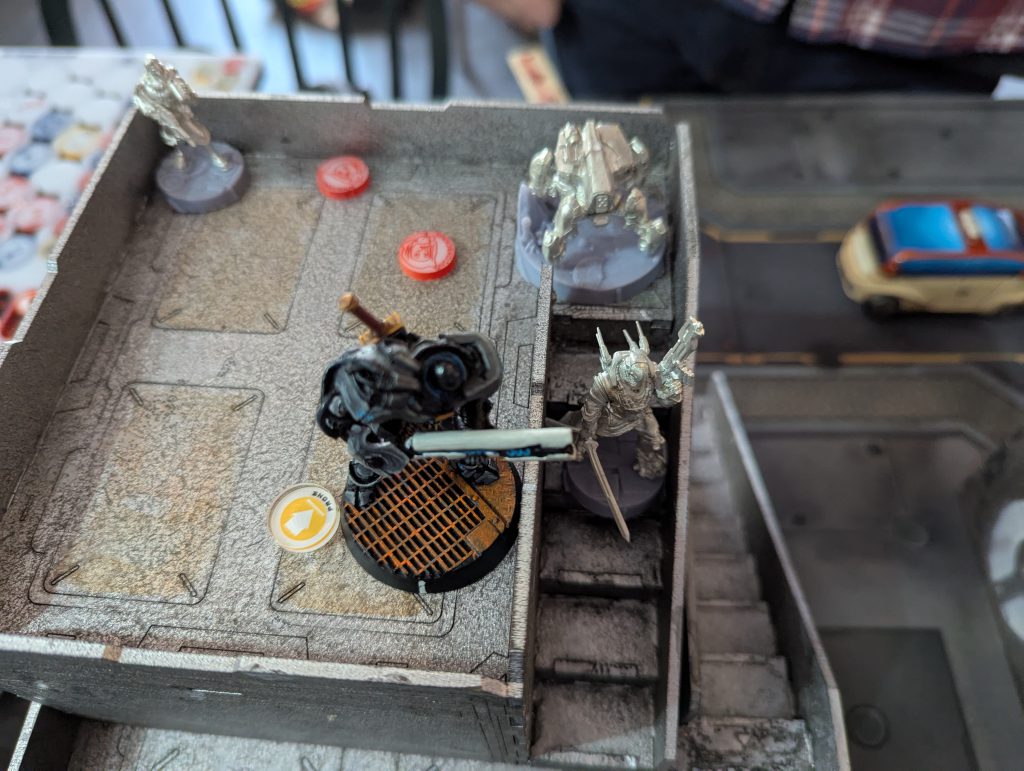
My opponent drew Follow-up, literally the best possible draw. His Deva was in position to immediately roll for it on 15 with her Lt Order (she failed, but got it with a single Regular Order). He discarded HVT Designation, which was a fair move, replacing it with Industrial Espionage – bit of a challenging one, my Remotes were all far from Silhouette Contact. I internally bemoaned my luck, which is the classic Countermeasures fallacy. His Asura killed my Intruder KHD easily and carried on towards my right flank, just missing a Moran thanks to a crit Dodge.
I drew Kidnapping after discarding Industrial Espionage, and the other replacement was Suspected Infiltration. I did think that was possible and sent my Lobo and Diablo against his Asura on my left. They Berserked into close combat, and that bit worked great. The whole point of the manoeuvre was to get into melee and achieve Suspected Infiltration. I figured I could safely use the Lobo’s Para CCW(-9), freeze the Asura, and have a go at the card, then beat her down afterwards. Well, it turns out Lobos are Spec Trained troops, not Veterans. Womp womp. I adjusted my expectations and and with a crit, the Diablo forced her to make 5 rolls at PS2 with his trench hammer! However, an Asura with a Vitapack effectively needs to take 4 wounds to die, and my opponent also rolled well, only taking two. My other aim this turn was to kill a Yadu HRL which still held his centre, with my EVAder Feuerbach. The Intruder killed his Deva Lt, but the EVAder wounded, didn’t kill, the Yadu, so the Aleph lackey still offered an ARO that stopped me getting HVT: Kidnapping! I did finally get Data Scan, Jazz passing her 4th normal roll attempt of the game.
My last Order and decision of Turn 2 was to use my Intruder to kill the Yudbot (serving a Posthuman engineer) which was developed out into the open towards the Unconscious Dakini team. I reasoned that not only could reviving models bog down my final turn when I really needed to make some cards, there was the possibility of drawing Combat Support, and that would be an easy point for my opponent. This was an interesting balance point in the game – my opponent was massively on the back foot in terms of models lost, but I simply hadn’t achieved enough Classifieds, we were 2-2 at the end of the Round.
Round 3
Well, my opponent immediately Drew Combat Support to replace the achieved card, so I was very proud I’d remembered to target that Yudbot! I think he burned Kidnapping, presumably because it looked very achievable for me. Despite being in Loss of Lieutenant and not having many models left, my opponent really surprised me by simply activating his Asura (in melee with my Lobo and Diablo) and declaring the WIP roll for Suspected Infiltration, on an 18. Predictably he scored the point, and in fact his Asura rolled very well on survival and didn’t die. I had my head in my hands at this point, not only had I poured away Orders on a play that didn’t lead me to a card, I’d practically handed that card to my opponent.
His other, final play, by converting an Irregular Order with his last Command Token, was to get his Posthuman engineer into LoF of an Unconscious flash bot and try a gizmokit shot to grab Combat Support. This meant the Posthuman dissolving from feuerbach and HMG AROs, but in a good cause. He made the shot, but failed the PH roll – thank the lord. As it was, I started my Turn 3 down 3-2 in the score, if he’d been that bit luckier, I would have absolutely needed to make 3 cards to win.
At this point, having really struggled against the cards previously, my luck came in. I drew Predator, easily achieved by the Diablo against the Asura in the Impetuous phase, and McM against an Unconscious Dakini. HVT Espionage, Jazz was already in position for, and achieved on the second attempt. That gave me a 4-3 lead. Finally we still had Combat Support, and I thought my EVAder engineer could score that off my Unconscious flash bot. In fact I failed the WIP roll and the Command Token reroll, removing it from the table. I had one last chance, since Diablos are STR units. The EVAder and Diablo ran to each others’ arms from separate flanks. They were not quite able to meet in the middle as my Orders ran short, so the EVAder got a short range Gizmokit shot, and I did manage to hit and pass the PH12 roll.
Summary
Well, that made the cards 5-3, and since Countermeasure has 2OP on offer for scoring more cards, it was a 7-3 victory to me, putting me on track with a major win. This was a very lopsided game in terms of killing – I had 260VP to his 45 remaining – and I place a lot of that on the shoulders of the Intruder HMG, who really showed off how devastating smoke-shooting can be. My opponent, if I can be critical, definitely exposed a lot of his models in his rush after cards, but that is the name of the game. I do think his list let him down slightly – a Garuda FO, and/or some more mobile active-turn hacker, could have really scored well for him. From a combination of some bad luck and prioritising the wrong things, I really didn’t score as many cards, or as early in the game, as I think is good tactics in Countermeasures. If I’d not had such a strong hand show up in my final turn, I could easily have ended up with a 3-3 draw.
Round 2: Res Ops
Pre-Game and Deployment
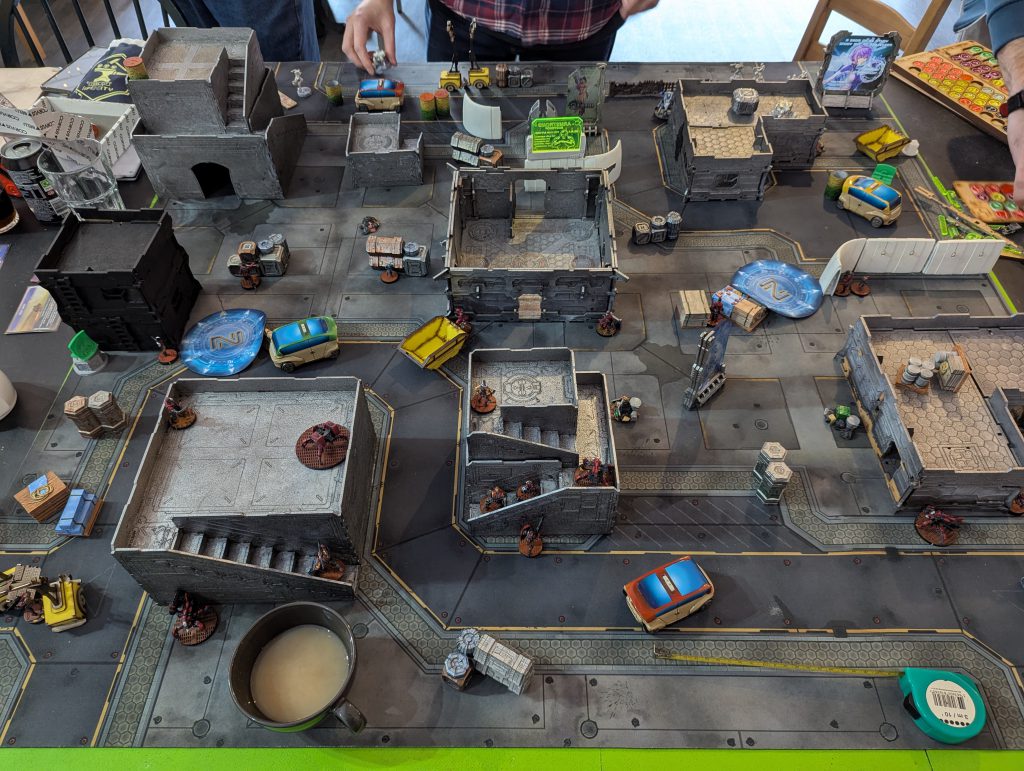
Having managed to win, I then got to face a real top player, who I think had made 9 cards in Countermeasures. We have played in the same fixture (Round 2 of Infinite Nerd) before, where he’d kicked my backside with Steel Phalanx against Military Orders. This time he was using generic Yu Jing – they are a very strong army, especially at killing and resilience, more than deploying Specialists, so Res Ops was exactly the match up I didn’t want against them. My opponent wasn’t very experienced in Res Ops either, and we both found the process absolute agony. In the middle of a tournament, when you are trying to stay with it mentally for a full 3 games, a long interlude of picking random objectives you’ve never read before, deploying four types of objective onto the table, and generally asking how things work, is exactly what you don’t want, and we both found it super frustrating.
As it happens, the two conditions we generated were one minor/manageable option (couple zones of Desert terrain which didn’t play a big role in the game) and one absolutely infuriating one. All enemy HVTs were considered hostile, essentially meaning we each had 4 free stun pistol AROs to deploy in the midfield. This was a massive cluster and threw us for a loop. The table was quite sparse, so I was very lucky to win the Lt roll and naturally picked to play first. He chose the table side I actually think may have been weaker, but it wasn’t too big a disparity.
The real unknown was the random objectives, which were brand new to me (a smarter man might have looked them up before the event). I ended up with tasks to deploy Beepers (Triangulate the Signal), kill army points (Decimate the Enemy Forces), and WIP roll against a chosen terrain piece in his table half for 2OP (Cybersiege) – I could have picked one entirely in his DZ for 3OP, but those were not very accessible so I picked the easy option. In retrospect this was the wrong choice, I am used to the context of symmetrical, open information ITS missions, where locking in 2OP is quite good. But here, I was hard-limited to 8OP when I chose that target, while my opponent could still shoot for 9OP – and as I might expect of such a good player, he certainly had a plan to do that. In fact, although I didn’t know at the time, he also had to deploy Beepers, and had two zone-control objectives, for the centre and zones either side on his table half. Perhaps a slightly more synergistic and forgiving spread than my own, which I was happy enough with at the time.
Now while both of us actually had achievable objectives in the end (we both burned a Command Token to re-draw one), my main impression, as with several of CB’s recent game mechanics, is how big a role random chance plays. The cards I discarded were to hold the three objectives outside the enemy DZ at the end of the game and to kill 3 models which my opponent would get to pick. Those are both nigh impossible unless you completely roll over your opponent, which clearly isn’t likely against strong opposition. I can’t imagine any path to victory if stuck with either of those. In theory, I do find the asymmetry and secrecy to be interesting mechanics, but in this exact game, while mentally overloaded with the other aspects of playing in a tournament in a new edition, I didn’t really click with it.
In any event, since I was playing first, I held back my Gator and McMurrough, spreading everything else in total cover around the DZ, with both Morans quite far forward, and my HVTs in a skirmish line across the midfield. I don’t really know in retrospect why I didn’t believe my opponent would have the objective to kill HVTs (which I would have made very easy for him) but that’s another wrinkle of Res Ops. My opponent had the classic Yu Jing format of very cheap supporting models, a completely secure Daoying Lt, a pair of Long Ya minelayers with engineering support, and all his important stuff in camouflage or Hidden deployment. While I correctly guessed the presence of a Hact Tao NCO HMG, I did misread his deployment, assuming some of his camo was the new Gu Dans, very strong defensive troops. In fact they were a much more expensive (and offensive) Zhencha hacker and Daofei AP spitfire. That should have been obvious to me since Gu Dans lack Mimetism-3, but I either didn’t ask or didn’t notice. Silly of me. My Gator went down in the centre and McMurrough I placed very aggressively, in full view of one Long Ya, seeking to Impetuous forward even against a strong ARO, since that would force it out of camouflage. The one thing I didn’t want was to be paralysed by failing to Discover-Shoot against those things.
Round 1
My opponent stripped Orders from McMurrough’s group, and I went for my Impetuous move, despite turning out to have misjudged placement, deploying too close to my Salyut baggage bot. So the Long Ya shot a flamenspeer, failing to hurt McMurrough but burning the Salyut off the board. My opponent did kindly offer me the chance to decline the offer, but aside from wanting to own my mistake, I hoped to pass at least one of three ARM rolls, which would have let me revive the bot with my Clockmaker! There went my chance to spam mines by reloading the Gator’s dispenser. With the Long Ya on my left flank revealed, I used the Gator and knocked it out on the second FtF, allowing me to advance McMurrough again. At some point he was checked by the second Long Ya, so I tried a Discover-Shoot with my thunderbolt TR bot, needing a 10 to try the shots; I was lucky there and knocked it out in a single Order. I tried to stack the deck for McMurrough by dispensing mines to pin what I correctly guessed to be a Beasthunter, then forcing it to Dodge by chain rifling it along with a hostile HVT.

The Beasthunter Dodged everything and went into melee combat with my Moran Masai, which was only a temporary reprieve, since McMurrough chased after him, and with a +1B bonus, squashed him flat. But I was very lucky here again, as I tanked not just a mine but a stun pistol hit as well. I had enough reach to jump McMurrough up onto a building and scrag the engineer lying Prone waiting to revive both Long Yas – this was a real blow to my opponent, and I also managed to WIP roll against the building and score that 2OP.
So far, so good, in a very aggressive first turn – I had killed 4 models, scored one of my Objectives and McMurrough was in a totally secure position in my opponent’s DZ. But in retrospect, nothing I removed was that expensive, McMurrough didn’t have very quick ways to leave that building, and my opponent’s very strong Order pool would function as intended. Most of all, I hadn’t grasped the nature of his Objectives and achieving a partial objective of my own gave me a false sense of confidence. It still could have been alright, but I made a grievous error, leaving my Gator in suppression fire just outside my DZ. This was unforgivably poor practice, I should have remembered how vulnerable such models are and pulled it back to my own DZ in a spot where it could Guts Roll into total cover. I think I was over-focussed on that Hac Tao HMG, and thinking that although it was hardly at risk from my suppression, my TAG was also relatively secure from non-AP HMG rounds. I also rather wasted an Order deploying a combi rifle turret, choosing far too exposed a position.
After developing a Shaolin Monk with its Impetuous Order, my opponent immediately used his Hac Tao and removed my turret. He then went after my Gator with a Daofei AP spitfire which I completely failed to anticipate. This wasn’t too dangerous a FtF for me – we were inside 16”, so I was on 3x 5s (rising to 3x 8s once Surprise wore off) and he was on 4x 10s – but I would survive hits on 13s while he needed 9s. Honestly, I could still have gone down, but I was lucky and the Gator held firm – I might have taken one wound over an Order or two. Looking to gain a real advantage, my opponent took a calculated risk. He moved out of cover, into a hidden position behind the central objective room. He took two wounds in this Order and would have fallen Unconscious, but we discussed it and realised that he could, should, would have tried to Speedball his Vitapack before moving, and allowed that retroactively. From this new position, the Daofei managed to put down my TR bot it 2-3 Orders, and that brought him into a position to blast my Gator without any cover (he did have to risk some HVT stun pistols to achieve this). Here my luck couldn’t save me and the Gator went straight off the table.
This was massive, and fair play to my opponent for seeing the opportunity to manoeuvre instead of just slogging it out. He still had a very healthy number of Orders, and moved the Hac Tao onto the tall building, against McMurrough. Despite having to shoot his HMG at short range, he was quite advantaged here, because McMurrough dare not smoke Dodge – he’d picked up a wound somewhere and the Hac Tao has a nanopulser – so was repeatedly Dodging on a 16 against 4x 11s. The fly in the ointment was that although I could pass my Dodges, I wasn’t able to move 4” at a time and threaten melee combat as McMurrough normally would. The Hac Tao had taken a position on a narrow stairway which didn’t have enough space for the larger base. He was thus able to blaze away free from real risk. In the last play of Round 1, the Shaolin Monk on my left killed a Moran cleanly.
Round 2
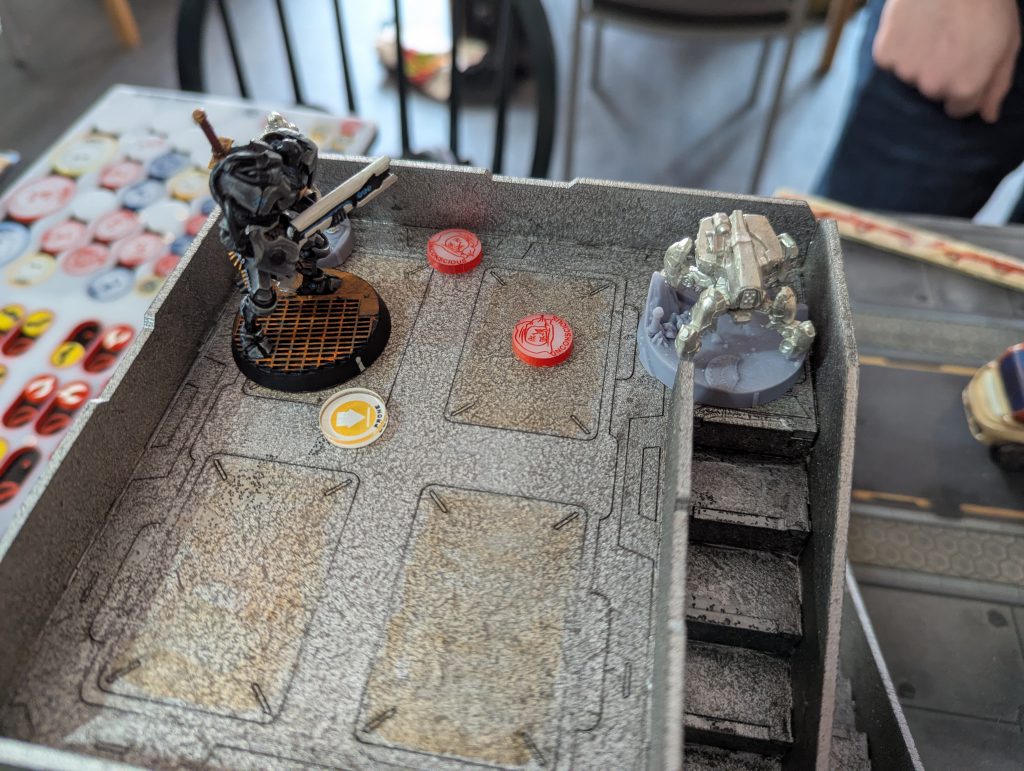
I started this Round with the developing feeling that I’d completely messed the game up. After a decent start, I had lost a surprising amount of combat power, McMurrough seemed totally trapped, and the overall control of the board (rather than my own Objectives) seemed to be slipping away. Since I didn’t have enough Command Tokens to want to convert his Irregular Order anyway, I used McMurrough’s Irregular Order to try and chain rifle the Hac Tao, which simply proved that was a bad idea. I got away with the mistake by passing my survival rolls against the nanopulser ARO, but my opponent passed both his rolls, so the Vitapacked Hac Tao was in no danger. I did correctly identify the main line of play I had to avoid being swept up, which was to neutralise that Hac Tao and the wounded Daofei with a combination of hacking and melee combat. Accordingly I used my Core team, walking them around the building in the centre of my DZ, clearing away a hostile HVT, while Jazz stayed prone on the roof – she was pinned down by the Hac Tao’s ARO. This let me use the Lobo red fury against the Shaolin running free on my left flank, and in a very irksome stroke of luck, he crit his smoke dodge, becoming effectively invulnerable. That would cost me later. But I was able to use a Discoballer (for the first time!) to block the Hac Tao, and then stand Jazz up to fire a pitcher. This is where I lost the plot.
Basically, I’d blocked my own obvious pitcher shot against the Hac Tao with my Discoballer. Idiocy. I dithered and shot the pitcher into the central room, where it would affect the Daofei, but at the same time, my Lobo and Diablos were so close that I could assault and kill it equally efficiently.
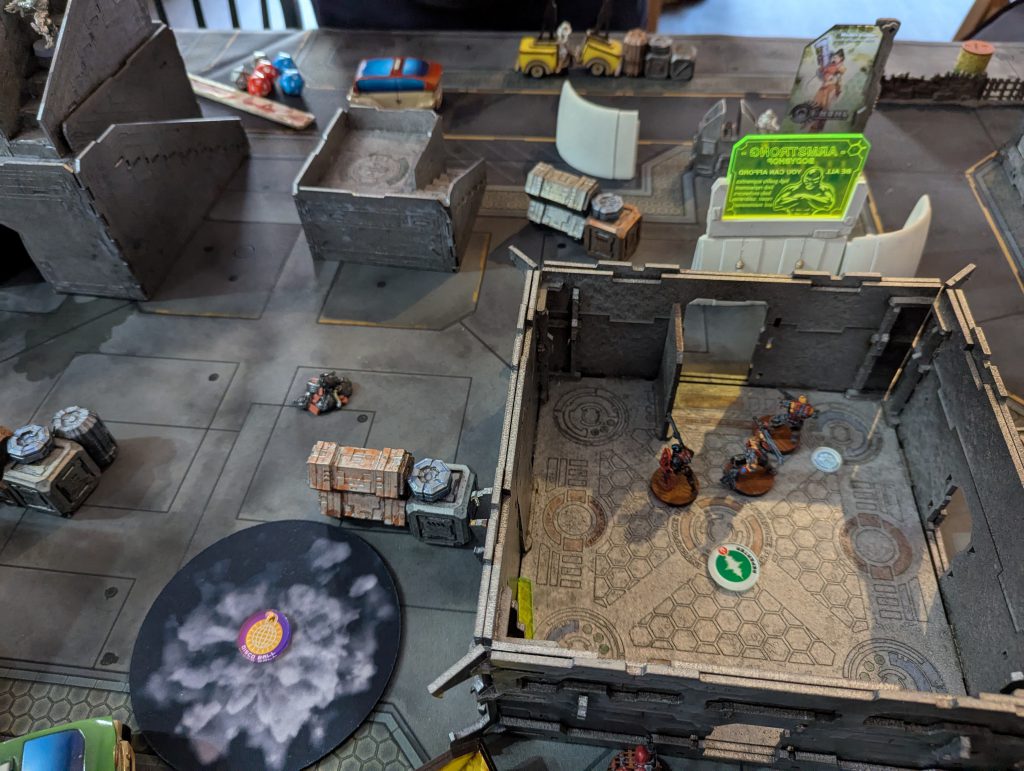
So I basically wasted the Order, and even more gallingly, I realised, after a Diablo had obliterated the Daofei with a flung trench hammer, that there was LoF to a spot, past my Discoballer, where Jazz could have placed her pitcher, I’m sure it would have been in ZoC of the Hac Tao, and I would have had an Order or two to rescue the game. I still had a chance to try, but at this point, Jazz had been left behind by the Fireteam so had to fire at Burst 1 (on an 11 or 8, I forget) and predictably missed. Having completely stuffed my chances, I tried a vain shot at the Hac Tao’s back with the Lobo, bouncing off Mimetism-6 and ARM5 in cover. I also redeployed my Diablos incredibly badly while doing so. I should have tried to tuck them in corners where they couldn’t be shot from range, although empty objective rooms are very unforgiving for that. Instead I put them where they would easily get knocked down by HMG fire.

The only actual achievement in this turn was to lay a couple of Beepers with the Moran on my right. I’d seen at deployment that I could place him on my 24” line, with space just in front of him, behind a solid wall, to place Beepers inside the enemy table half. So I’d confirmed a couple more OP, but the overall game state was dire.
In my opponent’s Round 2, the Hac Tao simply rolled me up like a carpet. Deftly manouevring between firing positions with 6-2 movement, it took out a flash bot at over 32”, spent a few Orders blasting at the Lobo, who was very lucky and escaped into total cover, and easily killed both Diablos.

This cleared the way for a Kuang Shi to assault into the room and get the Lobo with his pistol – a classic Yu Jing experience. This was a just punishment for my terrible reactive positioning and wasted opportunities. To add insult to injury, the Shaolin Monk who’d escaped earlier was now unchecked by AROs (I hadn’t had time to revive, let alone reposition, my TR bot) and went straight into my DZ. My opponent made it clear that his objective was also to place Beepers, and checked with the TO that you could indeed place them as an ARO – genius!
Round 3
I was fairly aware by this point I’d lost the game, unless my opponent made a most uncharacteristic mistake in his own objectives. My first play was to use my Alguacil Lt, but he completely failed to kill the Shaolin, who laid his Beeper in ARO and tanked two PS rolls. Here my confusion and inexperience with Res Ops hurt me. Even if it did mean eating chain rifle to the face, I should have activated him again and shot the Beeper – the Shaolin only had one, so couldn’t replace it, and the Beeper, not the trooper, was my target. As it was I gave that play up, which locked those 2OP in for my opponent. This did at least remind me that McMurrough was in the opposing DZ, so I used his Irregular Order to lay his Beeper and ensure the full 3OP for my own Beeper objective.
In retrospect, I think my only, very slender, line of play towards victory (I still would almost certainly have lost) was to push McMurrough and kill more stuff. He was in a bad position to efficiently leave his tall building, but with a speculative smoke throw or two he could still have had an effect. Instead, I made another bad call and spent my remaining Orders engineering Remotes and a Diablo, which was irrelevant to my objectives, and trivial for my opponent to reverse. I wanted to walk a Vitapack to my Lobo and revive him, but my opponent insisted that Vitapacks couldn’t be used to heal models from Unconscious state – I do believe that’s wrong on looking it up, but that’s how we played it, and it wouldn’t have saved the game.
His Turn 3 was more or less just talked out. We looked at his objectives and realised he was already controlling the necessary zones, or could with unopposed movement, and he could easily kill what he needed to get into position to drop one more Beeper in my table half. Having plenty of Orders and that Hac Tao, my opponent honestly probably could have reduced my score further by destroying my Beepers if he’d cared to, as well as maximising his own OP.
Summary
So my opponent comfortably scored 9OP, fully achieving all 3 of his objectives. Players score 1OP in Res Ops for completing (to any extent) more objective cards than their opponent, and I had partially completed all of my cards as well, so he didn’t get the full 10. I had 3OP for placing Beepers, 2 for ‘Cybersiege’ (rolling against a terrain piece), and a measly 1 for killing army points, since my opponent had a comfortable 182VP remaining (I had 165VP). I really nose dived here after a decent start. That was partly due to a strong opponent with a list archetype that is very resilient against being struck first, partly due to some very poor decisions, but also due to unfamiliarity with the Res Ops format, how to think about its objectives, and the random nature of those objectives. I can hardly describe how stressful it was trying to read the rules on the fly, under time pressure, understand the objectives, and then deal with multiple HVT AROs from every angle as soon as the game began. I was so wound up I ended up yelling “FFS” at my opponent when he declared a perfectly ordinary ARO shot in Turn 1, and had to apologise profusely. ResOps. Never again.
Round 3: Unmasking
Pre-Game and Deployment
As sometimes happens, despite my mixed record I still drew against probably the other strongest opponent there, playing Kosmoflot. I’d not played them in N5, they were a common top-table sight in N4, and maybe comparatively worse in emergent N5, but still scary on the attack. I won the Lt roll, debated with myself over picking deployment – there’s one 2OP objective in Unmasking, having more activated consoles, which favours the second player – but sensibly went first. That’s good since I’d forgotten Uxia McNeill exists, she’d have punished my obvious Lt for sure!
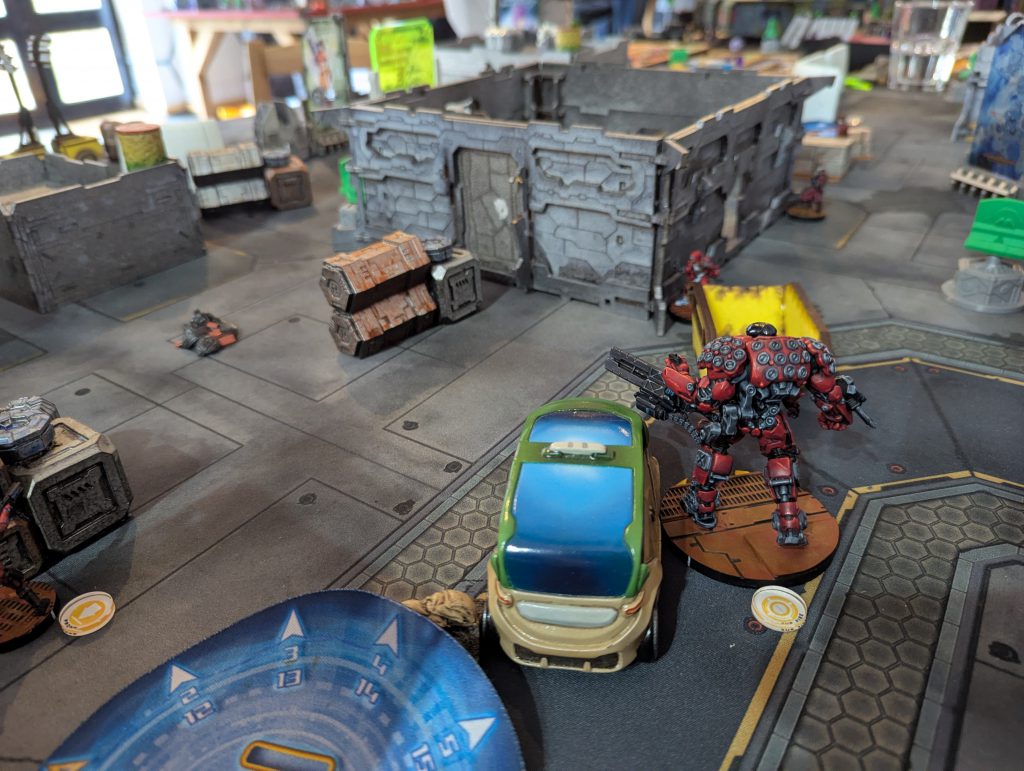
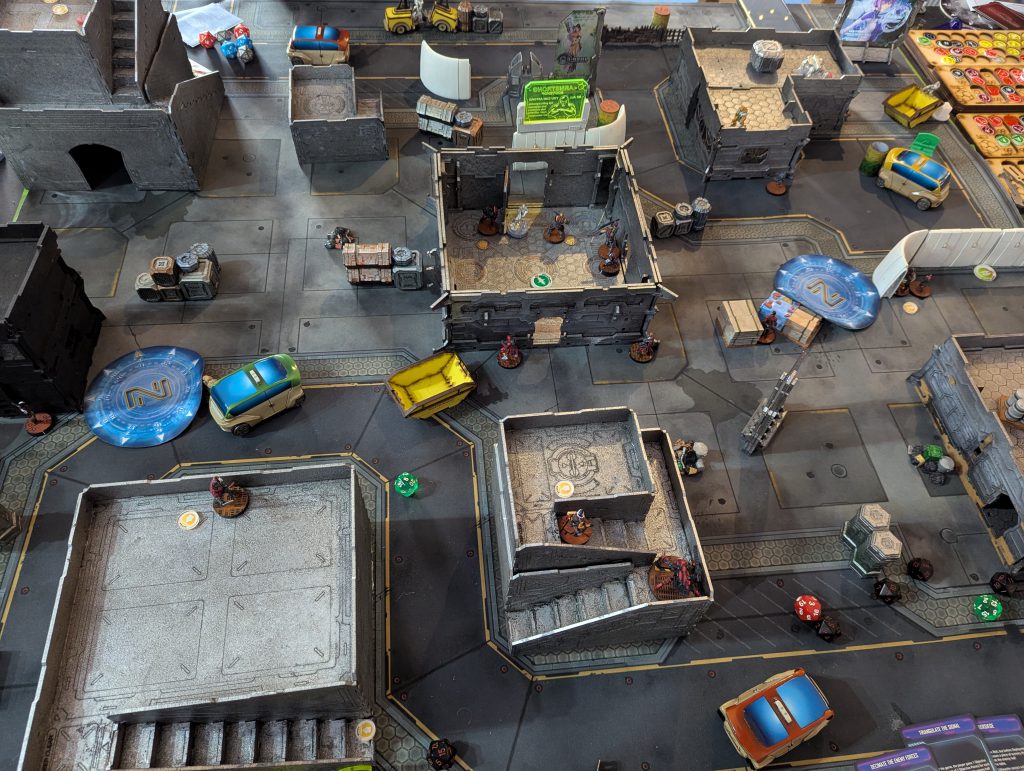
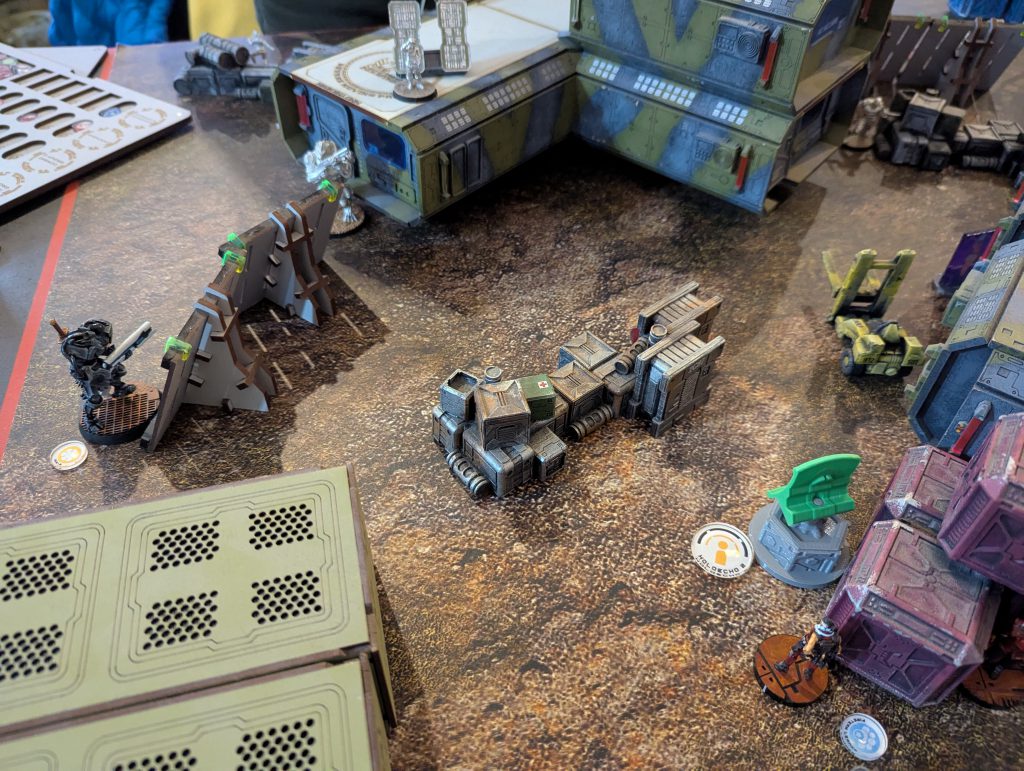
I deployed my Countermeasures-focussed list, deciding it was more fun and I wanted to use my new models. I held McMurrough and my Intruder HMG back, placed my Core Fireteam on the left with the EVAder feuerbach overwatching aggressively on a roof, and my Lobo/Diablo Duo in the centre right. This was another table with quite barren areas, where little scraps of cover could potentially be peeked over from high rooftops. My opponent was running a slightly off-beat list, with a Kosmosoldat Duo (two autocannons!) and a big Core team full of deployable turrets. He also had one Bearpode, Denma, an Uragan Baggage/TR/Guided bot, the new Kibervolk patrol, and a camouflage marker. The key thing here was he didn’t have any broad overwatch pieces, one Kosmosoldat was watching a narrow lane on my right, pinning down a Moran from advancing into the centre, and everything else was hunkered down.
I placed McMurrough and the Intruder both quite centrally; I wanted smoke-shooting, there were several avenues for McMurrough, and I thought there were lines where I could push the Intruder to see the Uragan and Denma in his centre. His reserve was Uxia, who passed her Infiltration roll and went down threatening my EVAder feuerbach on his roof, a classic play.
Round 1
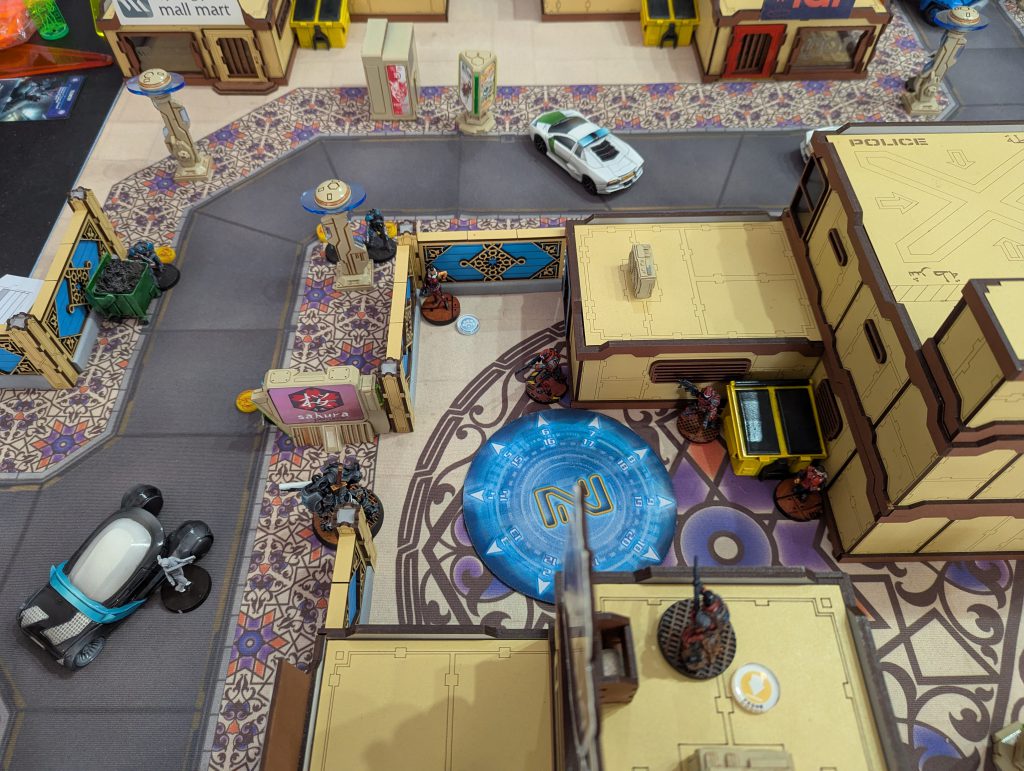
McMurrough was safe to Impetuously move forward behind the central building and throw smoke, which promptly let my Intruder HMG move up, taking out the Uragan remote (although there was an engineer available) and try a shot at Denma, who made his dodge. I was aware I wanted to deal with Uxia in my own active turn, so I threw another smoke with McMurrough onto the roof of that central building, moved my Intruder KHD up the ladder into the smoke, and spent an Order to Discover-Shoot. My opponent declared a dodge (he would have been discovered on a 14 otherwise), and succeeded, despite my Burst 4 advantages. This was a real problem because Uxia dodged into melee with my feuerbach. I considered shooting into combat but we counted the modifiers and realised I’d be on 4s to hit – the EVAder isn’t that tough! Caught between two fires, I decided to move McMurrough back to deal with her, which he did easily. But in retrospect I think I made a mistake here. I had 4 Orders left for him, and I’m confident that on the third Order I’d be taking the claymore to his first Kosmosoldat. It was almost certain I could kill both of them, and I thought (correctly) that the second was his Lt and he didn’t have any Chain of Command. In all likelihood, placing my opponent in Loss of Lieutenant for his first turn would have been even better than removing the Uxia threat.
But it had worked out alright, and it did leave me with two or three orders to spare, so I moved my Core team forward, keeping the EVAder on the roof, developing Jazz and the engineer toward the objectives, and proffering the Vostok as a mid-range ARO to contest the Bearpode and Kibervolk, which were on my left flank. This also let me target Denma with the Vostok, and he wasn’t lucky a second time. I was quite happy with this turn, and finished, instead of re-camouflaging my Intruder HMG as I’d intended, by coordinating a move with the Morans, to get them into better positions to access the consoles, while the Intruder finished prone behind a barricade in the midfield. In retrospect I can’t put my finger on why I thought it was going well – I’d removed three models, all of them useful capabilities but none of them expensive. I hadn’t lost anything, but I had brought both Intruders out of camouflage and generally raised my head up out of cover. I just felt that my opponent’s options were warband assaults, which I thought my AROs could handle, or firepower with the Kosmosoldats, which seemed relatively cumbersome and unlikely to break through.
My opponent started his turn with those Kosmosoldats, attacking McMurrough, who luckily dodged prone out of LoF, before engaging my EVAder feuerbach, but because the range was >32”, it wasn’t a good chance (B2+1SD on 7s vs my B1+1SD on 10s). The Kosmosoldat ended up losing two FtF rolls, but surviving, as the Duo tried to get closer without taking any shots while out of cover, which as my opponent noted, really drained his Orders, he spent around 5 on this sequence. But he did eventually get inside 32” before reappearing, and that time won the FtF, and my EVAder immediately exploded under the autocannon rounds. I felt okay about that given how it had absorbed so much of the enemy Turn 1, but I was then a bit shocked by how much more the Kosmosoldat achieved. My opponent split them up, with the obvious Lt heading back to cover in his DZ, and the other going after my Intruder – put him down in one go with an AP heavy pistol – and drawing LoF to my Lobo in my own DZ. I’d been sloppy with facing, thinking I was totally behind cover (the downed dropship in the photos) which wasn’t as solid as I thought. So the Lobo was shot in the back without recourse and also exploded. My own fault for not remembering his NCO Order and repositioning him in my Turn 1. But that loss stung, since it was effectively 3 Orders (his own, the NCO, and making my Diablo Regular).
That did more or less exhaust my opponent’s reach for the turn, with the one Kosmosoldat left in the wind, far up on my right flank. He placed a Koala or two with the Kibervolk, and placed a turret with an engineer on his left flank, which could see a lot of the table. I think he may have missed a bit of a trick here by not advancing the Kibervolk or something to set up the Koalas to explode in my Reactive turn, but I can’t clearly recall his options.
Round 2
I began Round 2 rather hurting for firepower, all my SWC guns having been knocked out, but I felt OK about the mission. The key capabilities for me now were my remaining Fireteam, which had no bonuses but could put specialists on the consoles, my Morans, and McMurrough to actually hit the Designated Targets. I opened by risking McMurrough’s Impetuous Order against the turret (at very long range) and both Crazy Koalas, passing my dodge roll and confronting the Kibervolk. This let me move Jazz and her team towards the left and centre consoles, stopping just short of where they’d be affected by the Kibervolk’s chest mines – I wanted to check some other options before taking it on, probably with McMurrough. I made silly mistakes here because of indecision and by sort of considering two plans and then moving in a way which combined both and achieved neither (this seems to be a bad habit with me). Essentially I was considering moving my Vostok across, behind the central building, to deal with the Kosmosoldat, which I knew I could use White Noise for. I ended up moving it out of cover towards that point, then I went with simply using my right hand Moran, under Jazz’s White Noise, to kill the Kosmosoldat in two Orders. With the last Order in his group, that Moran moved to my right-hand console, succeeded on the WIP roll, and revealed the HVT on my left (I picked it because it was near McMurrough), which did prove to be the real target. Unexpected success!
I’d expected my opponent to place the real one on the opposite side, further from my main strength. Unmasking is such an odd guessing game because you’re never sure whether an opponent will pick the safest spot, or bluff for a riskier one, or may just assess the table very differently to you. I played my usual tactic of simply guessing whichever HVT I thought I could get to most easily, and it worked here.
Running a bit low on Orders, I had McMurrough kill the Kibervolk, try the HVT once with chain rifles (it dodged successfully), and then make sure of it with Berserk. Because that first attempt failed, this did mean McMurrough was Immobilised-A by the Patcher’s adhesive launcher rifle in ARO, and I didn’t have an Order left to reposition my fireteam.
So Jazz was dangerously exposed near my left console, and the Vostok that was meant to be providing ARO cover for her was aimlessly wandering out of cover in my centre – the indecision I’d mentioned earlier. I also had a prone Intruder KHD hanging out on the roof of the central building who I think we might both have forgotten entirely. Perhaps because we’d removed the roof and him along with it. At any rate I don’t believe he played any further role in the game. Whoops.
In any case, scragging that one real Designated Target put me up, and we were running short on time, the Res Ops round having run over time for several pairs. My opponent really had to struggle against the time pressure and stress here, I felt for him. He threw his Bearpode forward, but although my Vostok was MIA, I had a flash bot far back which was looking out, and luckily Stunned it, while McMurrough tried to dodge out of Immobilisation. He tried again with his Patcher, and while McMurrough did break free that time, the Patcher barbecued Jazz to a crisp and bounced her final Oblivion ARO. He brought his Kosmoflot Lt around the other (my right) flank) and killed my Vostok cleanly, again my own fault. Under the time pressure we were both playing a bit sloppily, missing AROs etc. McMurrough wounded both the Patcher and Bearpode with chain rifle AROs while they tried to adjust their position. I think the Patcher must have been Stunned as well, or he’d have just carried on to the consoles, and I think at some point McMurrough was glued, and dodged out of it, a second time. Next was the Kosmosoldat shooting cross-board at McMurrough, who dodged or passed survival rolls on two Orders, to finish out of LoF and in a prime offensive position – a very impactful stroke of luck for me.
The final play of the Round was a support trooper trying a rifle shot at my EVAder shotgun engineer, inside the central building, but luckily I took a wound and guts rolled into total cover, literally next to the central console. That summarises the game state – I was getting hit, but hanging on, and crucially, I was the one in control of the objectives.
Round 3
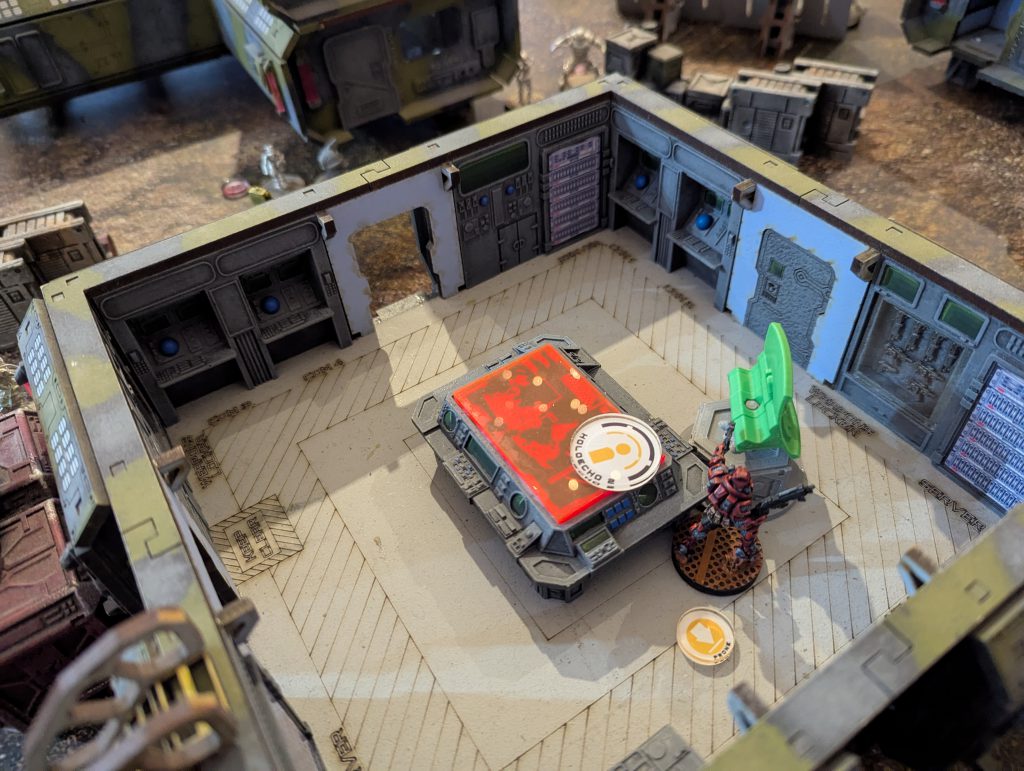
We literally had 6 minutes each for our turns, which actually I’m perfectly OK with in Round 3, the choices available having narrowed down significantly. But with a more challenging table state – he was the one who had to get the objectives during this Round – it was bloody difficult for my opponent. [It’s also why I don’t have any more photos] My turn was about simple, available wins. McMurrough ran into the big building sheltering my opponent’s Core Fireteam, putting down 2 guys with his chain rifles. My EVAder activated the central console – I was lucky to get it on the first attempt – and revealed a decoy behind that central building. McMurrough tried for the revealed decoy, but it crit the dodge roll and McMurrough died to rifle and turret AROs. With my last Orders, my left hand Moran got LoF and took it out. Such valuable troopers.
My opponent used the camo marker on his far left to be an SAS Forward Observer, flipping the console on my right and revealing one of my decoys, which was in my centre-left, right against the central building. I messed up my ARO declaration a bit, I could have held when he touched the console, but was silly enough to declare Dodges. This didn’t make a difference since he got the WIP roll on the first attempt, I couldn’t have stopped it, but it’s an example of how easy it is to make basic mistakes at the end of your third game of the day. My opponent just could not get to the revealed decoy past my flash pulse AROs, from a Transductor bot and a Moran. We talked it out, and the only apparent way he could score any more was to activate my left objective, which he could get one roll at with his final Order. He made it, which gave him two activated consoles to my one.
Summary
That left the score at 7-2, with him scoring 2OP for having more consoles, and me scoring nearly all the other available objectives (didn’t get his second decoy). It was actually a fairly bloody game – I had 118VP left to his 132 – and it was much closer than that score would suggest. I think my opponent very strongly felt he would have played differently with more time on the clock, and I have to say the whole game was shaped by that pressure. I certainly made some very silly mistakes, and of course I was enormously lucky to guess the right HVT first off. There were some critical rolls with McMurrough and his Patcher and Bearpode around my left flank, where if things had gone differently, perhaps that console would have been activated and my HVT revealed earlier. I didn’t feel at a disadvantage at all in terms of army match-up. Bearpodes are still scary, but it makes an enormous difference to be able to hold them off with flash ammunition in N5.
Conclusion
Well, another terrific event, although once again I drove home reproving myself for some basic errors, particularly getting caught between a couple courses of action in the mid- to late-game and picking the wrong one. I am also a repeat offender for finishing a turn at full stretch, and leaving valuable pieces in the wind to get swept up by the counter-attack. That might be a necessary evil when scrambling for objectives later on, but I do it a lot at the end of Round 1, which is probably a bad habit. We’ll get them next time. I did feel much better about my Corregidorians than I have in earlier games of N5 on Tabletop Simulator. McMurrough, the Morans and the Intruder(s) were all good. The Gator and Vostok, well, maybe I failed them rather than vice versa. Diablos are good, efficient assault troops, but maybe not something I’m comfortable or efficient enough using as an offensive ‘Plan A’. A Fireteam is a lot more cumbersome on the attack than a single, fast model like McMurrough. All learning opportunities for a future faction focus article. With that, I will leave you till the next time – I hope to be going to one-day events about once a month over the spring and summer.
Have any questions or feedback? Drop us a note in the comments below or email us at contact@goonhammer.com. Want articles like this linked in your inbox every Monday morning? Sign up for our newsletter. And don’t forget that you can support us on Patreon for backer rewards like early video content, Administratum access, an ad-free experience on our website and more.
