In our How to Paint Everything series we look at how to paint well, everything. In today’s article we’re looking at how to paint Death Guard in the classic white scheme they sported during the Horus Heresy, and which many still wear in the modern 40k era.
The Death Guard weren’t always green – back during the Horus Heresy they wore white armor, though as grim warriors unconcerned with appearances it would often be chipped or covered in the dirt of battle. When the legion was stilled in the warp and became corrupted by Nurgle’s Destroyer Plague, the armor of the Death Guard became tainted and stained with unnatural corrosion. Though most now wear armor colored sickly green and trimmed with verdigris brass, some still wear the stained white of the original legion as a mockery of their Imperial past.

That Gobbo’s White Death Guard
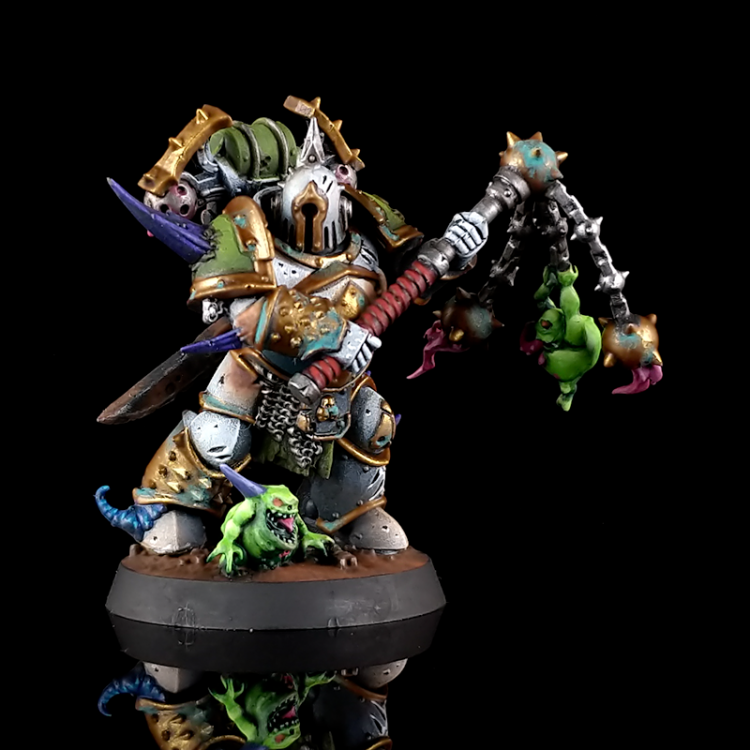
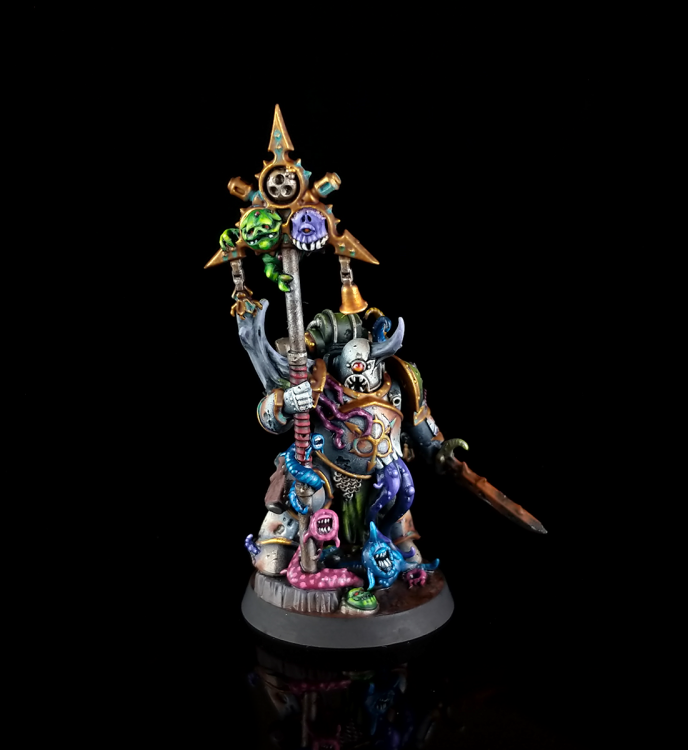
For these Death Guard I went in with the basic scheme of the Horus Heresy Death Guard of white, green, and bronze, but with an added splash of color for the various liquids, nurglings, and little creatures. I went into these miniatures wanting to leverage a lot of drybrush stippling for texture.
The white armor was started with a black primer and then I drybrush stippled the armor up to white using Vallejo London Grey, Vallejo Dark Sea Grey, and Vallejo Silver Grey. While doing this I try to keep in mind where I want the eye to go and where the most light would fall on the armor, those areas should be brighter. Lastly I stipple a very little bit of Vallejo White as a final highlight for the helmet and top of the chestplate for contrast. From here the armor is pretty neutral from black to white so I stipple Vallejo Dark Sea Blue in the darkest recesses to add some cool tones. Similarly I use Scale75 Brown Leather to add rust for warm tones and more visual interest.
This was all done using cheap makeup brushes which you should be able to find in any grocery store or you can get a big pack on Amazon. Drybrush stippling is easy to do and layering it provides some blending as well as texture to the armor.
I wanted to experiment with adding some micro details with chipping and battle damage so I used the smallest brush I had (3/0) and used pure black to create various holes and cracks, some of which extended the already broken armor of the Plague Marine. I then used pure white to highlight these lines and holes, this helps to make them stand out.
From here it’s a lot less interesting. The bronze was done using a basecoat of Scale75 Viking Gold, washed with Agrax Earthshade, and highlighted with Scale75 Dwarven Gold. I added some verdigris later on to add more color contrast and visual interest with Nihilakh Oxide, I made sure to thin it down a bit and layer it to have better control and not have the effect be overwhelming.
The green of the pauldrons is Scale75 Andrennes Green and drybrushed up with Scale75 Sherwood Green. The nurglings used the same recipe for my goblins: Scale75 Irati Green, Vallejo Escorpena Green, and Livery Green with a dark green wash. The pink goop is Scale75 Fuschia and highlighted by mixing in white. The plague knife used a similar process to the armor of drybrush stippling up from black with orange-browns and finishing off with a light drybrush of Vallejo Mecha Steel.
These were a lot of fun to paint and focus on doing the best painting I could at the time. I love how they turned out with the relatively neutral Plague Marine surrounded by bright colorful nurglings and little gribblies, the Space Marine Heroes Plague Marines were excellent sculpts for this.

That wraps up our look at white Death Guard. We’ve added this to the larger How to Paint Everything on the legion, so you can refer back to that one if you need to refer to this scheme or want to compare others. And as always, if you have any questions or feedback, drop us a note at contact@goonhammer.com.


