In our How to Paint Everything series we look at how to paint, well, everything, with a look at different approaches from different painters and some of the special techniques for painting. In this article we’re looking at how to paint Word Bearers Chaos Space Marines.

The Word Bearers were the most fanatical of the first founding space marine legions, led by their primarch, Lorgar. Unlike his brothers, Lorgar came from a religious upbringing and believed the Emperor to be a divine being, worthy of worship. As the Word Bearers conquered worlds, they’d build cathedrals and icons of the emperor, a practice which slowed their progress but created worlds devoted to the Imperial cause.
However the Emperor was not on board with this idea, and insisted he was no god. The Emperor had the Ultramarines raze the capital city of the Word Bearers’ planet to the ground and then publicly chastised the primarch in front of his peers, telling him to stop preaching and start conquering. Lorgar did not take it well.
Thanks to some manipulation from his trusted advisors, Erebus and Kor Phaeron, Lorgar would discover The Pantheon, the dark chaos gods who did desire worship and service. And in pledging himself to these beings, Lorgar would become the first heretic, ultimately working to create the events which would set the Horus Heresy in motion.
After the heresy, Lorgar ascended to daemonhood but his legion remained, zealous and vigilant as ever. As they burn planets they erect monuments and shrines to chaos in their wake, establish insidious cults, and summon daemons to their aid. The Word Bearers worship Chaos in its entirety, with some devoting themselves to specific dark gods and others spreading the word of the full Pantheon. The biggest irony of the Heresy is that Lorgar’s devotion lives on – his writing and theories on the Emperor’s divinity became the foundations of the Imperial Cult and the religion still practiced by imperial citizens in the 40k universe.
Also, they really hate the Ultramarines.
Covered in This Article:
- How to Paint the Word Bearers, from their classic 2nd edition scheme to more modern schemes, with different techniques from different authors.
- How to paint Heresy-era Word Bearers.
- Notes on the heraldry of the Word Bearers.
- How to paint special models from the Word Bearers, such as Argel Tal and the Gal Vorbak.
- Techniques for painting some of the common elements of the Word Bearers, from purity seals to Colchisian runes.

Word Bearers Heraldry - Click to Expand
The Word Bearers are a legion who changed their color and heraldry multiple times throughout history, going from ashen, grey armor prior to the Heresy to red during and a deeper read with silver trim following the Heresy. Since fleeing into the Eye of Terror the legion have abandoned their squad and company markings, instead replacing them with occult symbols and unholy icons.
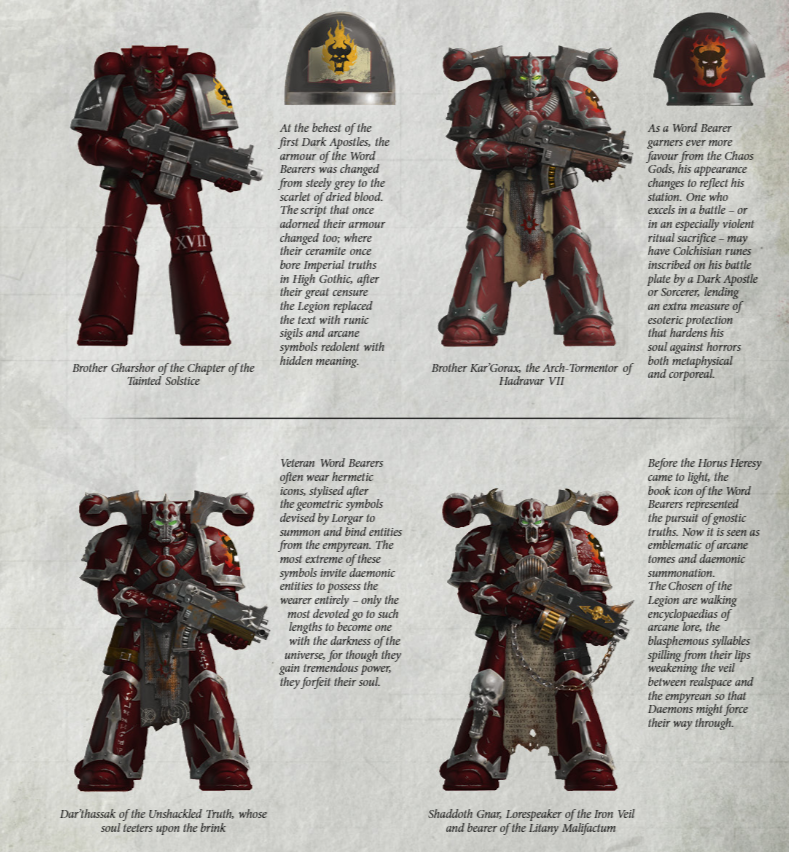
The current visual style of the legion has them wearing red or dark red armor with steel-colored trim, their armor often engraved with Colchisian runes and covered in blasphemous scripture. While the original icon of the Word Bearers featured a book, their current icon features a burning daemon skull.
Painting the Word Bearers Icon
You don’t have to freehand the legion icon; you can find the appropriate transfer for it on the Chaos Space Marines transfer sheet. If you’d like to, however, there are harder options. If you’re doing this method it works better over red armor than black, as you can go outside the lines without losing the shape of your skull.
![]()
We’re going to be painting a black daemon skull over flames, so we start with the flames. I basically use a small brush to mark where my flames will go using Averland Sunset. Then I come back and fill that in completely and shade the completed shape using a 2:1 mix of Cassandora Yellow and Gryph-Charger Orange Contrast paint. I hit the tips with Flash Gitz Yellow.
Then there’s the skull. I freehanded this with Black Legion Contrast paint but if you have a .005 Micron pen handy that’s just as good here.
Painting Word Bearers
The word bearers are one of the more elaborate legions, often adorning their armor with all manner of runes, scripture, candles, and purity seals to show their perverted devotion to the dark gods. As a result, there are a number of common aspects to painting them that don’t necessarily show up in the other legions, which we’ll cover in the sections below.

Scrolls and Purity Seals - Click to Expand
The Word Bearers are much bigger into faith and religious zealotry than their traitor brethren, to the point that they make much heavier use of chaplains and dark apostles. This also means that they make more visual use of purity seals and scrollwork, covering their armor with parchment scrawled with prayers to the dark gods. Painting these is pretty straightforward, but can be daunting since painting good purity seals means creating small lines to suggest the presence of writing. The good news is there’s an easy way to make this effect stand out.
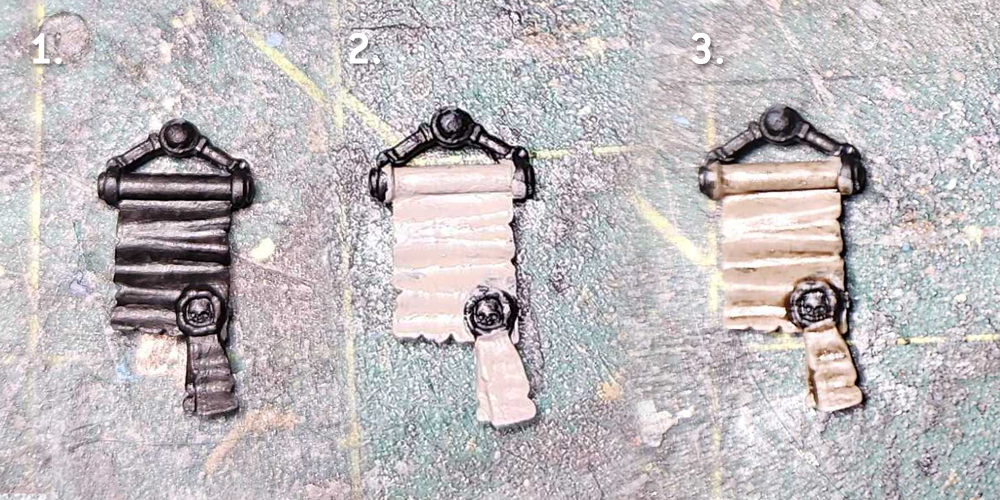
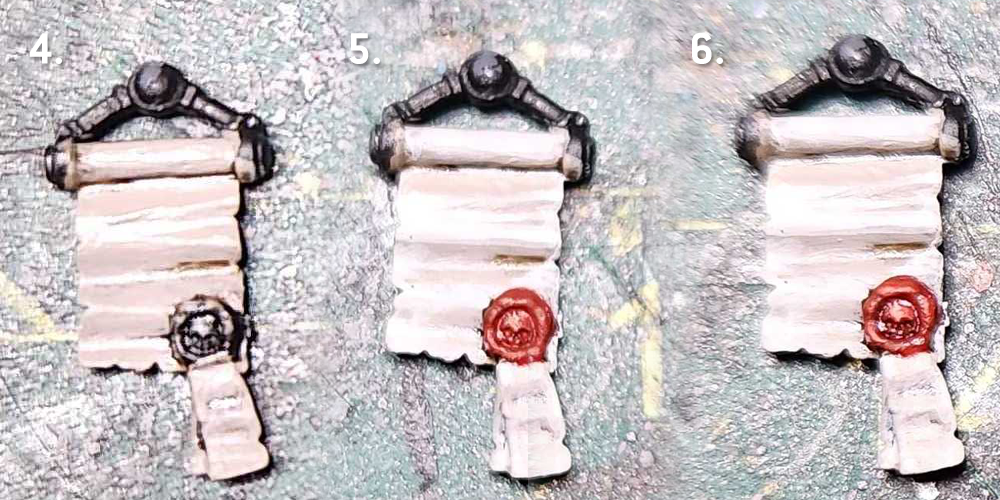
While Purity Seals are lighter in color, they’re usually going to be attached to a model you want to prime black. Either way, I start by painting them with a couple of thin coats of Rakarth Flesh. Once that’s dry, I wash the whole thing with Agrax Earthshade.
Next I go back and highlight that with Rakarth Flesh again and then highlight a second time – including the edges – with Reaper Polished Bone (Wraithbone in GW paints, give or take). This is also when I paint the wax seal – it’s Mephiston Red, and I’ll wash that with Carroburg Crimson and then highlight it with Evil Sunz Scarlet.
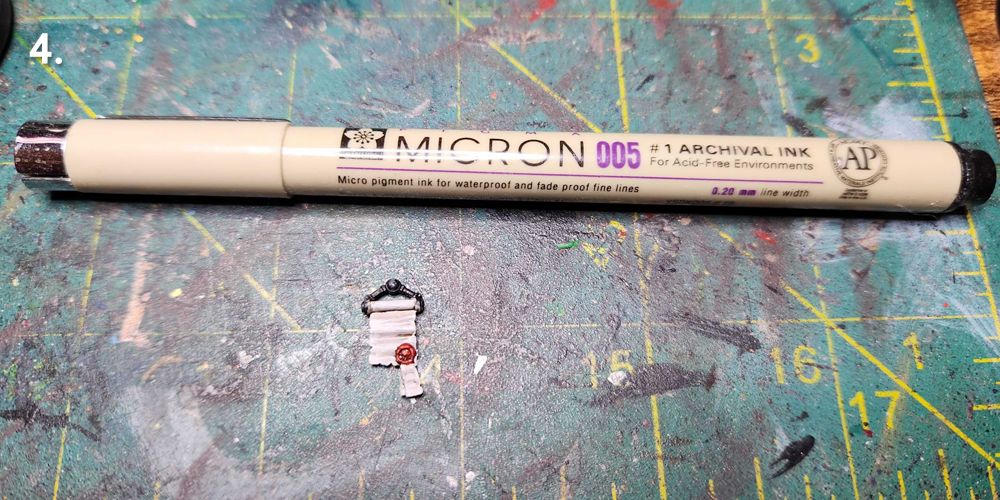
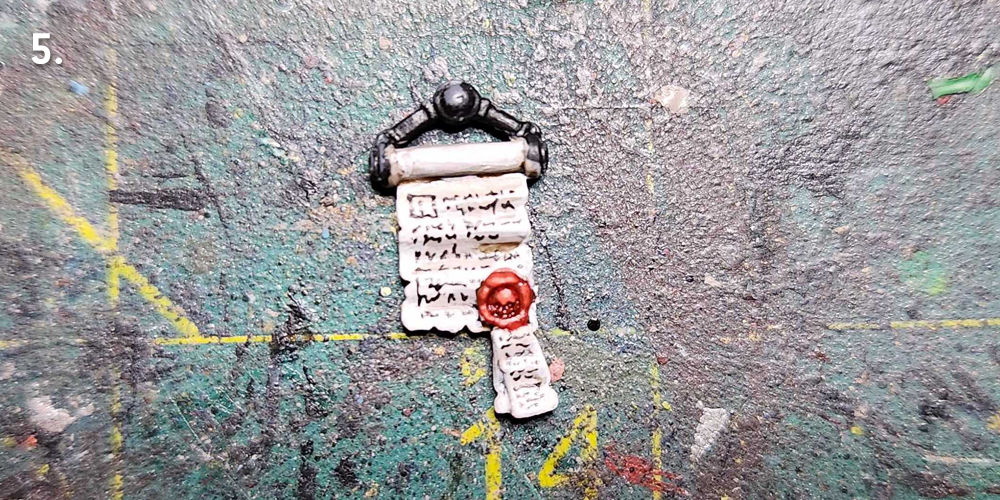
Now it’s time for the lettering. The “correct” way to do this is to use a very fine pointed brush and and paint lines with a dark brown. But if you want to go faster and have an easier time with it, I’ll let you in on a secret: Micron pens. The .005 pen gives you a very small point and is perfect for drawing the lines that work on something like this.
Using the pen start marking small lines (squiggles if you’re feeling brave), leaving the occasional space> your wording should have an “F-shaped” patter more or less, as that’s just how people read in English.
One Last Tip: Watch out if you paint over the micron ink. Water can reactivate it, causing problems like smearing.

Runes and Scripture - Click to Expand
In addition to their parchment, purity seals, and stoles, the Word Bearers decorate their armor in all manner of additional religious markings, including Colchisian runes etched into the plating and lines of blasphemous scripture. While these are modeled onto some models in the Horus Heresy and 40k ranges, you can also hand paint them yourself without too much effort. In this section we’ll cover how to do both.
Colchisian Runes
Painting the runes is mostly a work of freehand, so it’s worth practicing a bit on other surfaces before you tackle it on a model. It’s also worth planning out what you want to do a bit and looking at examples on other models first – the tainted dreadnought and the gal vorbak are great for this, as is the stole on the Dark Apostle model.
The process starts by painting your lines. I tend to use Black Legion Contrast for this, though if you want something a bit softer on red you can use a mix of black legion and Flesh Tearers Red instead. Make your thin lines, then it’s time to come back and highlight them. We basically want to edge highlight the area around the lines as though they were raised parts of the armor. For my dark red armor, I used Mephiston Red for the first level of highlights, then came back in and used Evil Sunz Scarlet for the second set. For a more muted effect, a pinker shade would also have worked here, or even a light flesh shade.
You can get similar results painting over black parts of the armor as well. This works particularly well if you’re using a lighter shade, like Corvus Black. Here the process is the same – trace the lines for the initial pattern with Black Legion Contrast paint, then come back and edge highlight them with Mechanicus Standard Grey. Then finish off by hitting the corners and edges with a lighter highlight – in this case Celestra Grey.
Scripture
A number of Word Bearers models feature scripture or text on their armor. Painting this is relatively straightforward, and similar to doing the text on purity seals. The challenge is that you’re usually doing them in white and not black, so you’ll have to use a brush instead of a Micron pen.
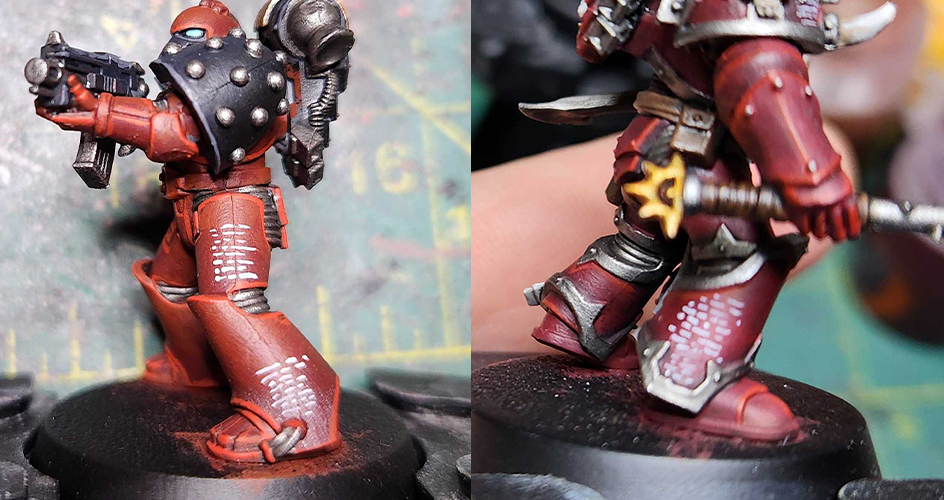
The key here is to not get too fancy. Do some lines, separate them in chunks and try to make it so the text line spaces don’t line up in every row. Additionally note that English text is usually left-justified, so as you write your text consider making all your lines start along the same vertical axis on the left side. This will help sell the effect.

Maxi_the_Pigasus' Method - Click to Expand
Do you want to play the coolest army in 40K, but hate the idea of painting trim? Do you like the idea of metallic armor, but don’t want to mess with Tamiya Clear? Do you like scribbling on your models to simulate the words of their profane religion? Have I got a recipe for you.
My personal philosophy when it comes to painting is start messy and clean up as you go. So with that in mind, we will start with all the dry brushing.
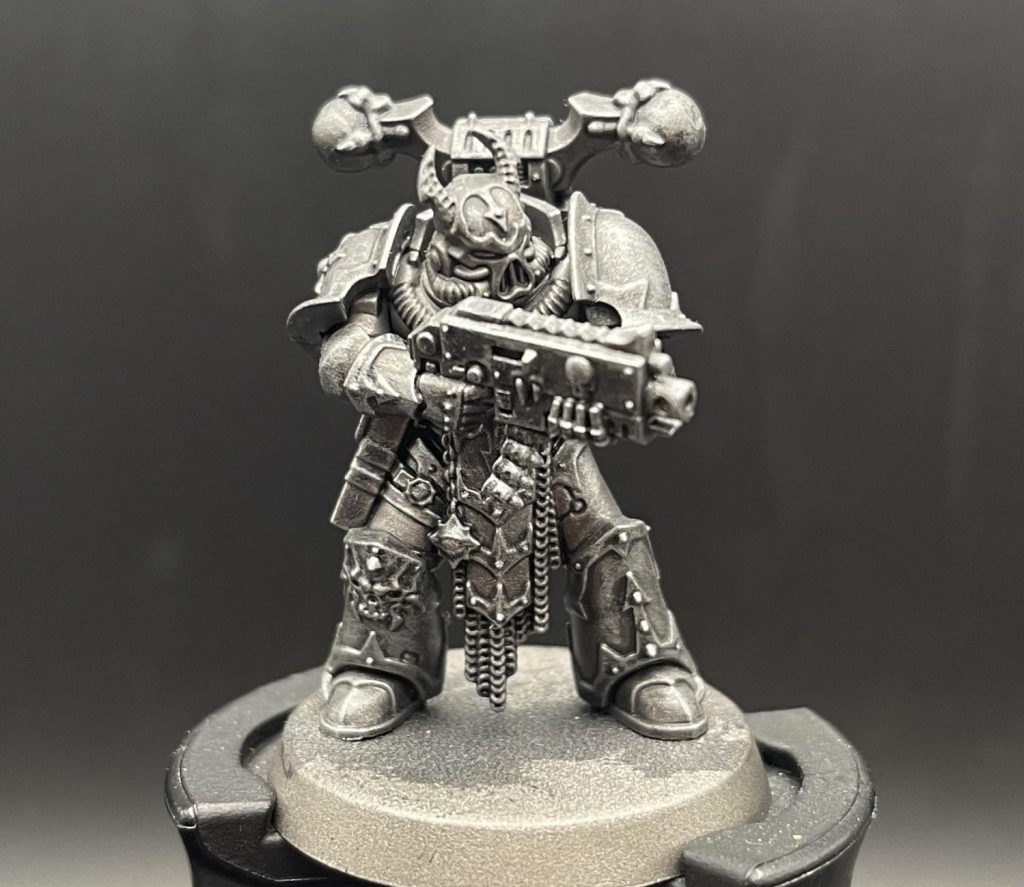
Step 1. Undercoating
Starting from an undercoat of Leadbelcher, I wash the whole model in Nuln Oil. The new variation is thinner, so either use two coats or substitute it with Basilicanum Grey. After that dries, hit the whole model with a dry brush of Ironbreaker.
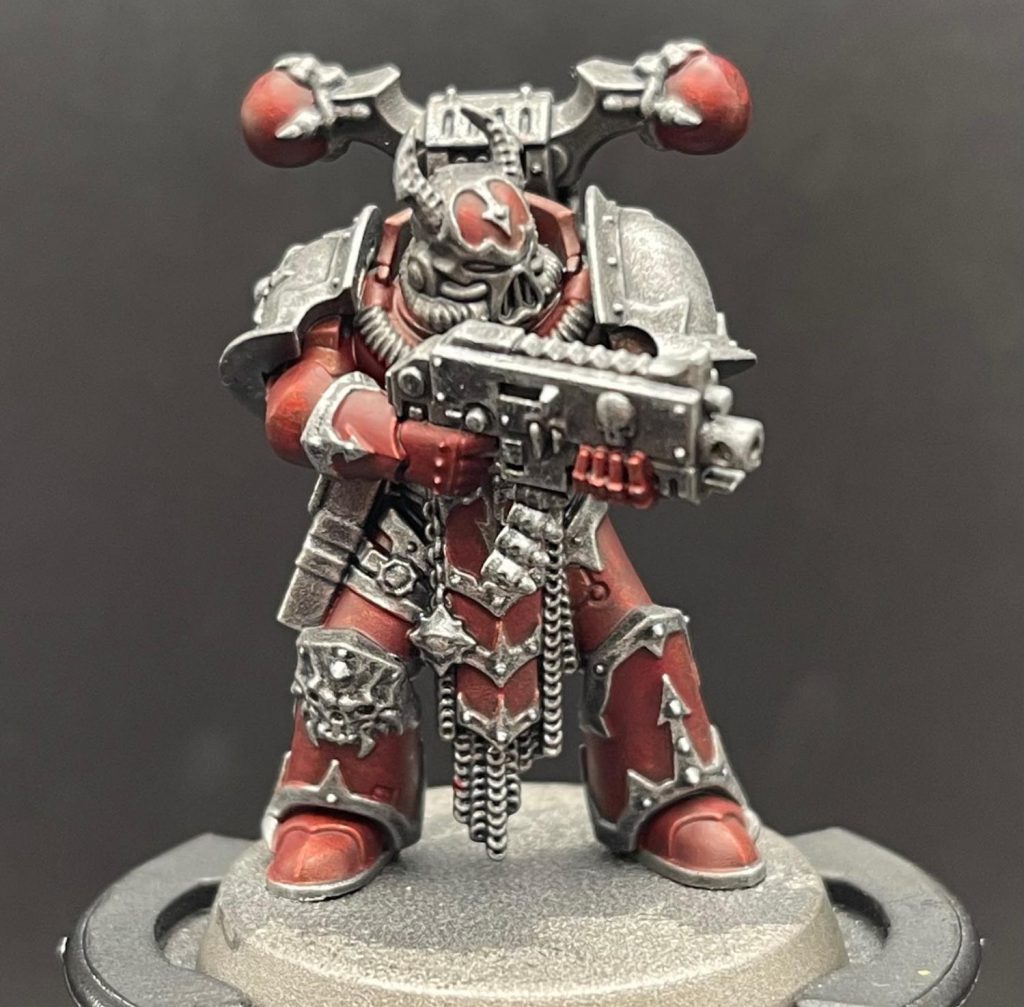
Step 2. Red Armor
Now we block out the red armor panels with Flesh Tearers Red Contrast paint. This will show through the metallic undercoat and give you that Heresy-era look without any fuss. Getting a nice even coat is important as you don’t want the tide marks, but if there are some near the edges (close to trim) don’t worry as in the next few steps we will be covering that up anyway.
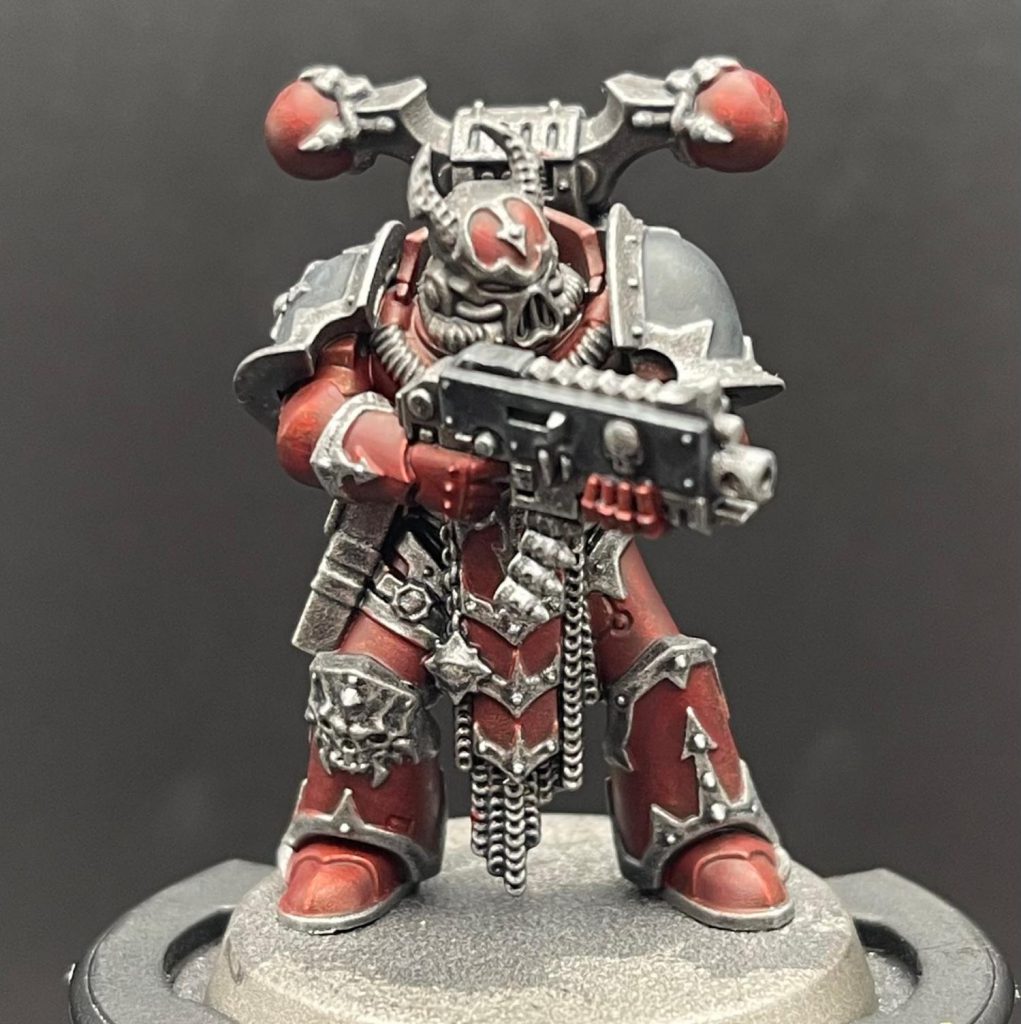
Step 3. Black Armor Panels
Once the red is dry hit all the black details with a coat of Black Templar Contrast paint. This includes the weapon casing, the soft parts of the armor (the undersuit) and any black armor panels you want. I paint my models in a mid/late Heresy look, with black pauldrons but if you like the all red look just hit them with Flesh Tearers.
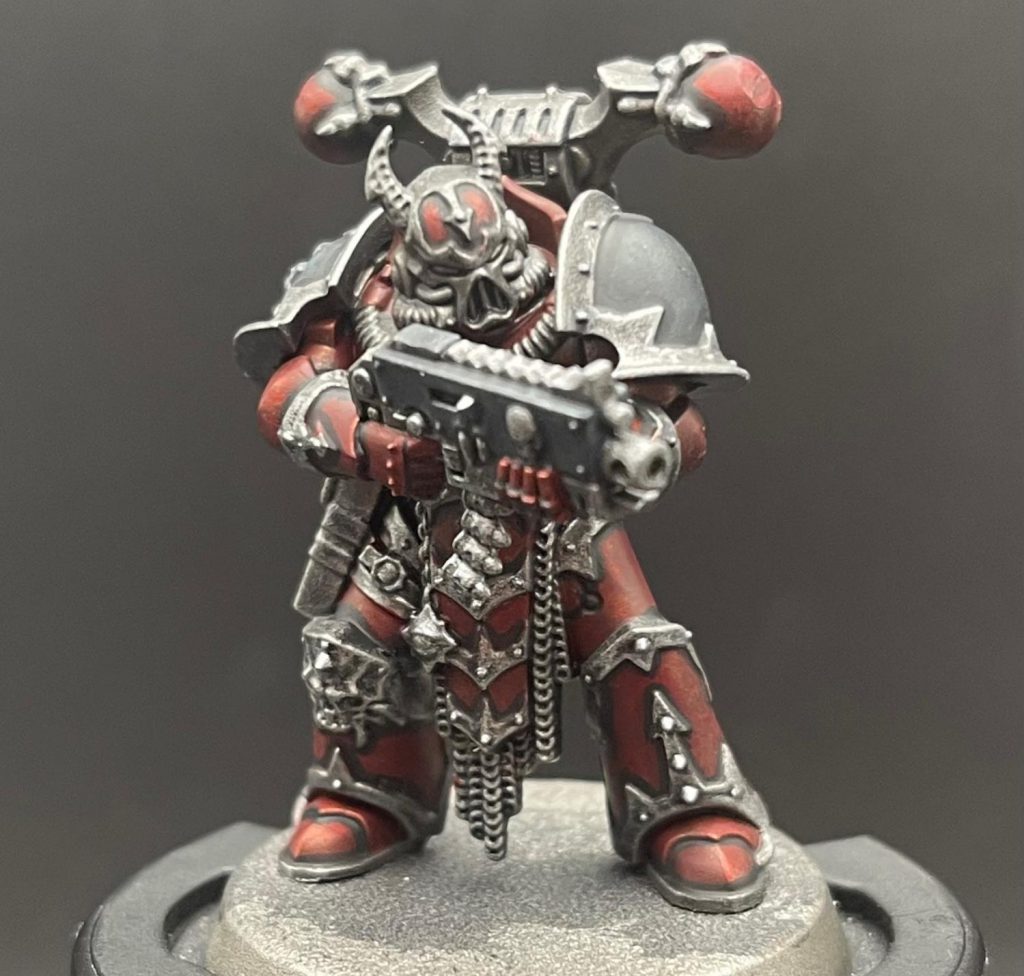
Step 4. Panel Lining
Now that the main colors are blocked in, we need to get some separation. Using Black Legion (you could use a black ink instead) paint along the borders of the armor where especially focusing on where the red or black meets the trim. I also like to hit between the fingers, this just helps you see the detail.
This step takes a while, and you may overspill onto the trim. If/when this happens just tidy up with a touch of Ironbreaker.
When this step is done, you can really start to see the model come together, making the process really fulfilling for my lizard brain. Small victories are the key to winning the Long War.
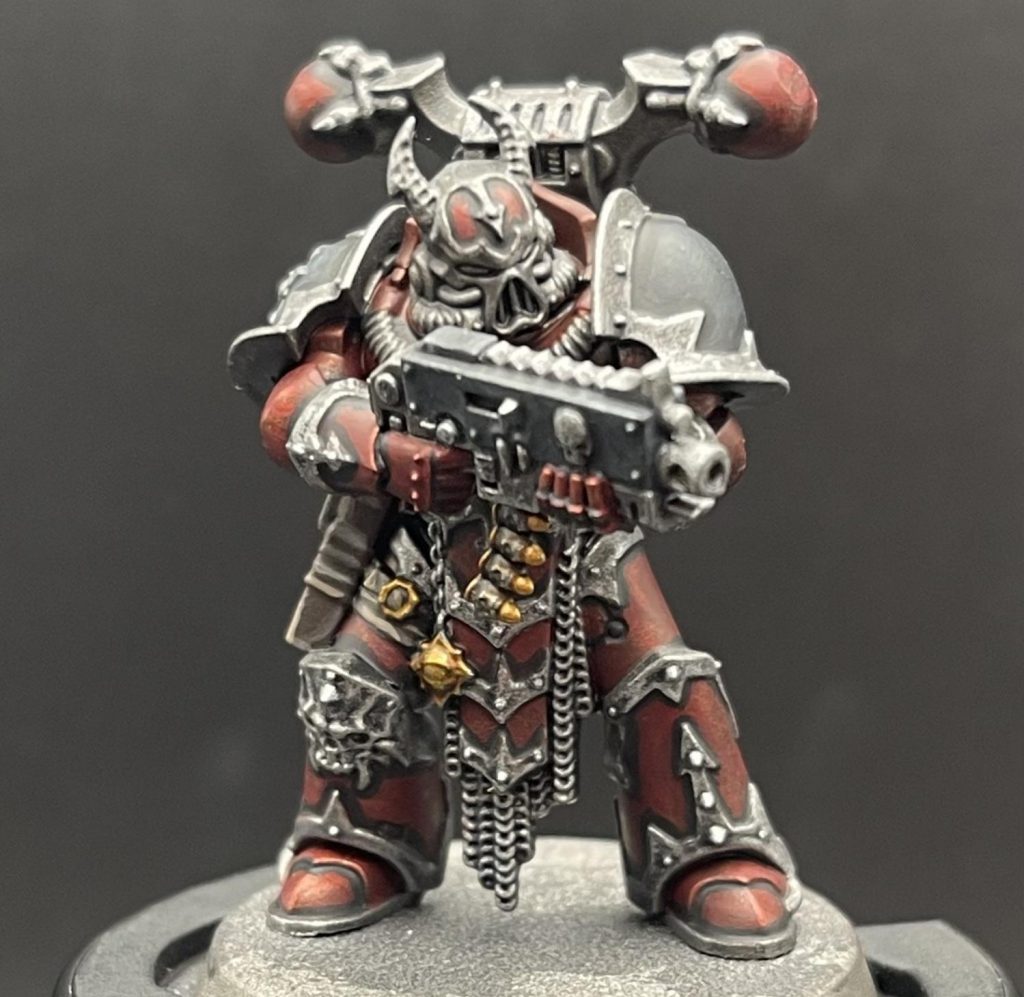
Step 5. Details
Now we need to tackle the small details, like gold and leather. These are super quick, just hit the gold with Retributor Armor and the leather with your chosen brown. I personally don’t worry about leather too much, it’s not a main color so whatever brown is near me I use, in this case Dryad Bark.
Once these are base coated hit them with a wash of Agrax Earthshade and highlight. For the gold I just brought it back to Retributor, and the leather I used Baneblade Brown which was the nearest light brown to me.
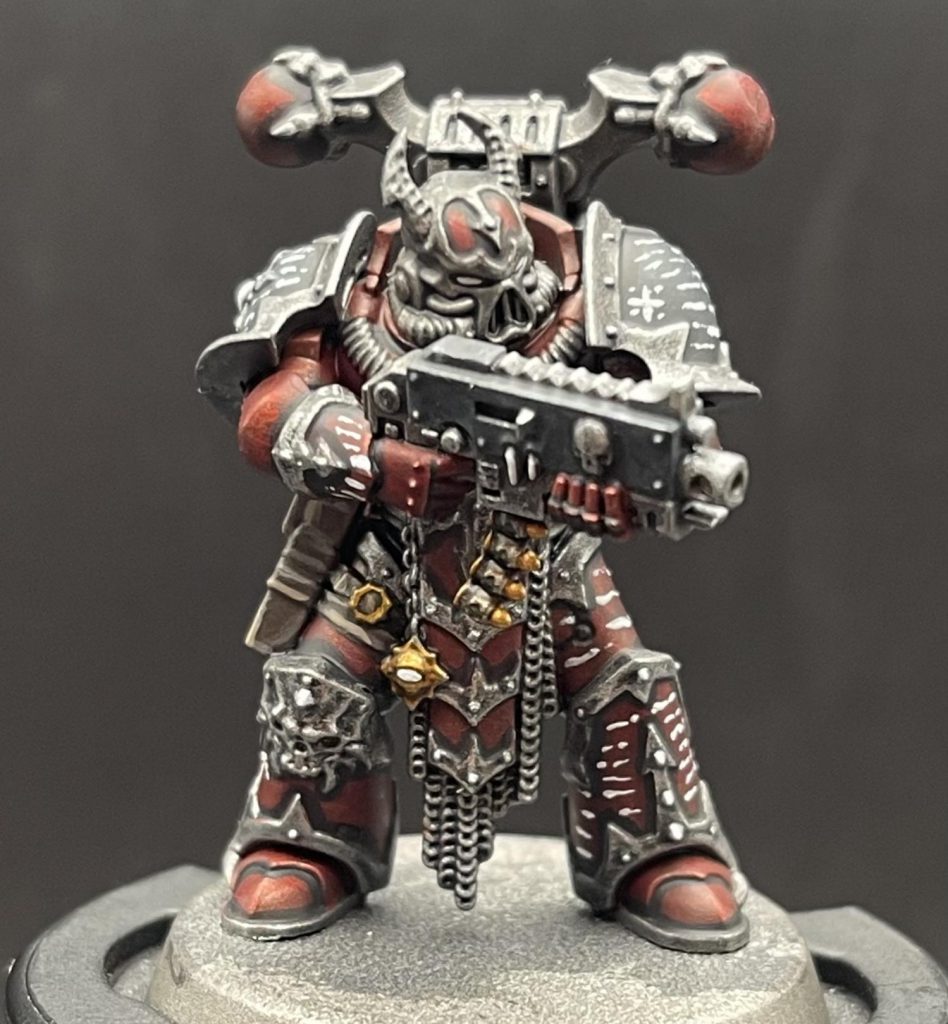
Step 6. Scripture
Onto the fun part, the Word of Lorgar.
I like to start on a large panel, on power armor this is usually a shoulder or lower leg. I start at the top and stipple/draw lines of “text” across the panel. Then you repeat this with variation down the side, and then do the same to the opposite side. Throwing in some runes or concentric circles is also good, and I have a specific marking on each model that unites the force which I put on the left (the models left) shoulder pad. For my Warhost it’s a plus sign with dots in the corners, which is supposed to represent a constellation seen by Lorgar in the Eye of Terror, in the case of my army it’s the Maw of the Void. but this is totally optional.

At this stage you should also basecoat the eyes and any other details you’ll be using contrast for in white. This includes teeth, bones, eyes, hair.
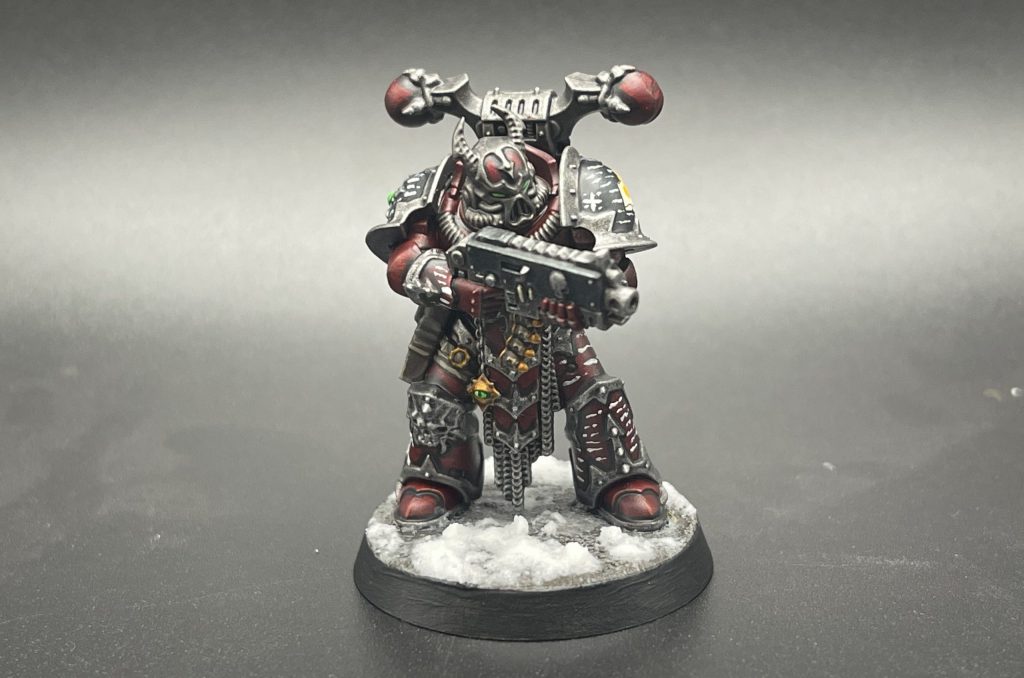
Step 7. Final Details
After this I hit we’re in the home stretch and just have some spot colors to add. I paint all the bones on a model with skeleton horde, in this case just the little teeth on the bolter. The eyes, including the lenses, get a coat of Karandras Green contrast, I really like how punchy this color is. If there’s hair on the model, I like to use a ghostly blue or black for it, so either Aethermatic Blue or Black Templar. Once that’s dry I like to add a pupil to the eyes around the model so they’re not so boring, just with a quick line of Black Legion.
After this, all that’s left is basing and transfers, so I’ve included some other angles to see it all and a picture with basing half done and the transfer on.

RichyP'sMethod - Click to Expand
RichyP is known around the Goonhammer offices of painting a large amount of models in a short amount of time. His techniques often focus on quick ways to achieve great results.

- Prime everything with Mephiston Red (I use the rattle can, but an airbrush would work equally well)Wash Armour in Citadel Wyldwood Contrast
- Drybrush the entire model in Vallejo Game Color Scarlett Blood
- Paint the Shoulder pads and black areas in Black Templar Contrast Paint. This will cover the Red primer really well. Black Legion also works, but the thinness of the Black Templar will give you a bit more variation in tone.
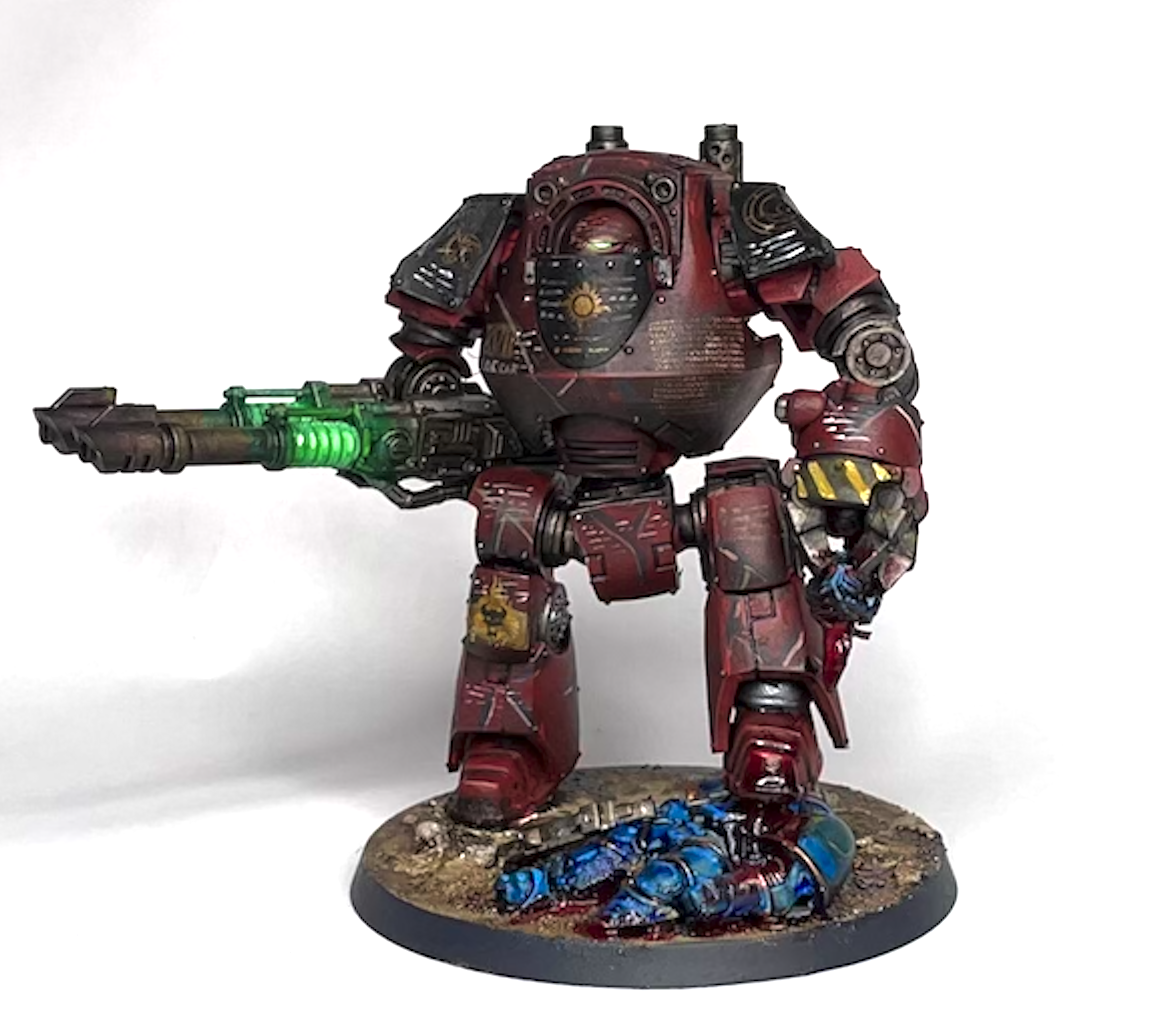
The following only applies if you want to go for the green flame effects:
-
- Paint the green areas in Citadel Contrast Ork Flesh. Over the red primer this will give you a dark blue/green which is a nice shadow colour to work from
- Layer on thinned VMC Intermediate Green
- Layer on thinned Livery Green in lines
- Paint eye lenses Escorpina Green
- Paint metals and weapons in Vallejo Model Air Gunmetal. It’s thin as it’s an airbrush paint but it covers really well.
- Paint pouches and green grenades in Vallejo Game Color Khaki (any off white/dark cream)
- Wash pouches in Citadel Contrast Gor Grunta Fur, to get a nice brown tone over the Khaki, with free highlights and shadows.
- Wash Grenades in Citadel Contrast Ork Flesh to darken and differentiate them against the green glow highlighted above
- Wash all the metals in Citadel Contrast Basilicanum Grey
- Apply transfers, I used Microsol and Microset for this stage.
- If the transfers are on the shoulder pads, wash over them with mix of black ink and lahmian (about 1:5 or thinned nuln oil) to remove gloss and blend them in with the black.
- For transfers on the red, just paint over with neat Lahmian medium to remove the sheen.
- Paint markings in Vallejo Game Color Wolf Grey. I use lots of little lines as markings and litanies. They’re also a great way to cover up any blotchiness or mistakes in earlier stages. I recommend going to town at this stage as the more heretical markings the better when it comes to religious zealots like the Word Bearers.


TheChirurgeon's Method - Click to Expand
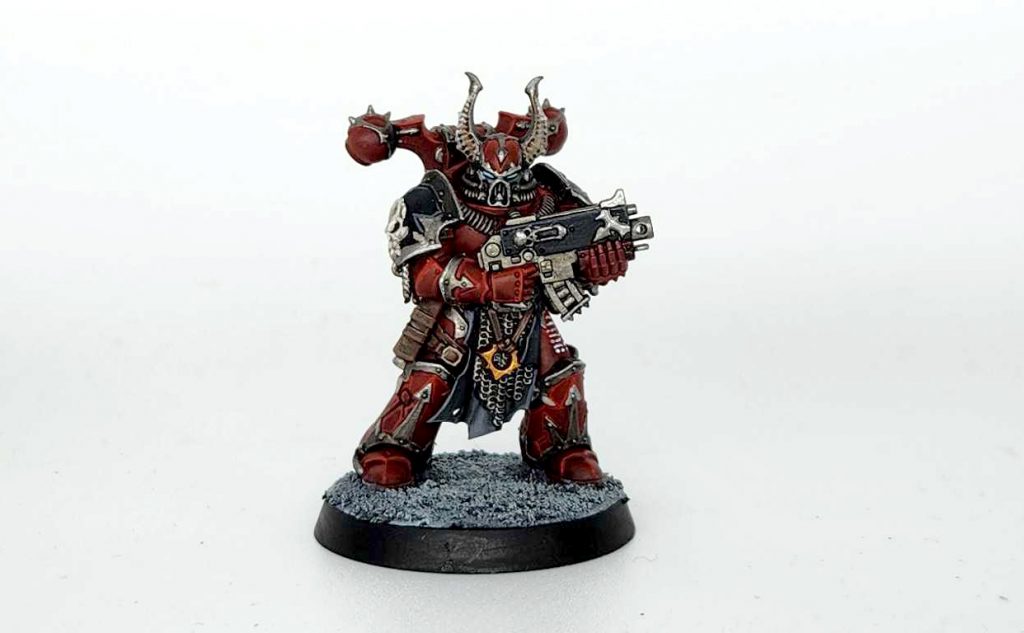
This is a more Heresy-inspired take on the Word Bearers which retains their black pauldrons and uses a brighter red for the scheme. The basic progression here is “Word Bearers Red -> Mephiston Red -> Evil Sunz Scarlet.
I started by priming the model black.
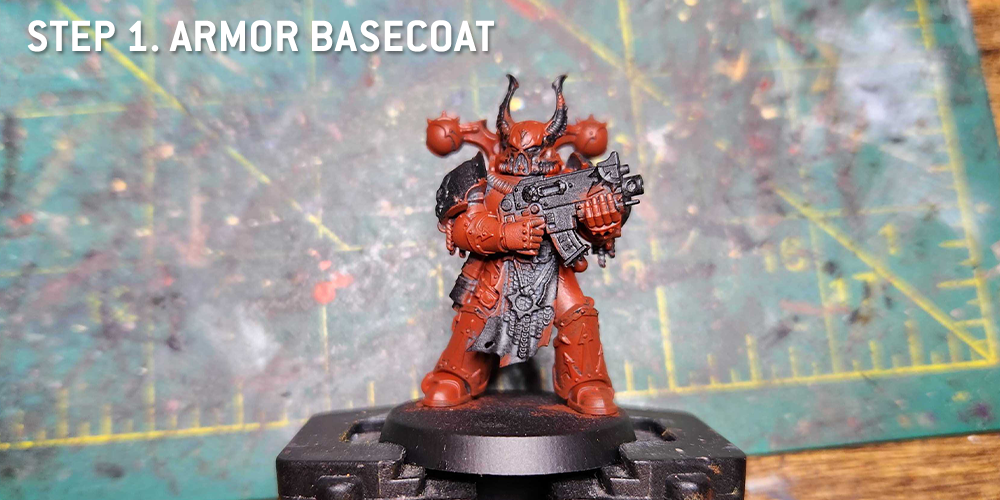
Step 1. Armor Basecoats
I started by painting the model Word Bearers Red, save the pauldrons, which I painted Abaddon Black.
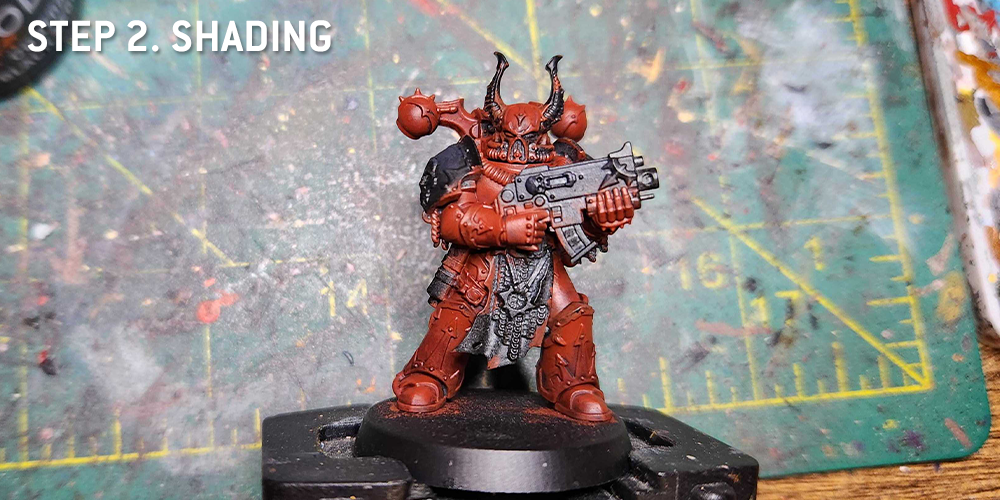
Step 2. Shading
Time to work up/down a bit. I highlight the armor using a mix of Word Bearers Red and Mephiston Red, and shade it in the lower parts using Carroburg Crimson. The shoulder pads are highlighted with Corvus Black, mixed and shaded for a bit of a gradient.
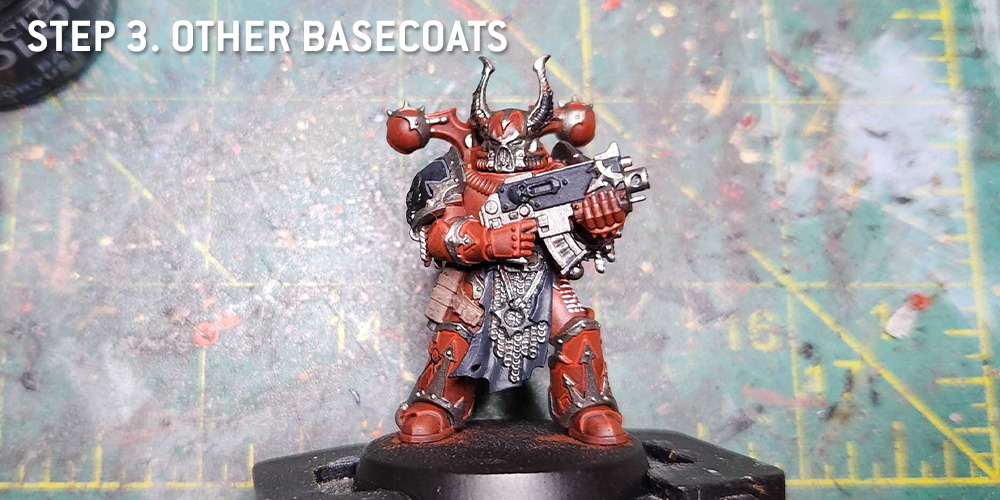
Step 3. Other Basecoats & Highlights
Time to hit the other parts of the model. The trim and metal bits are painted with Leadbelcher, the gun casing and loincloth are Corvus Black, and the leather bits are Cygor Brown. This is also the stage where I’ll add edge highlights, using Evil Sunz Scarlet for the red armor parts and Mechanicus Standard Grey for the Black parts.
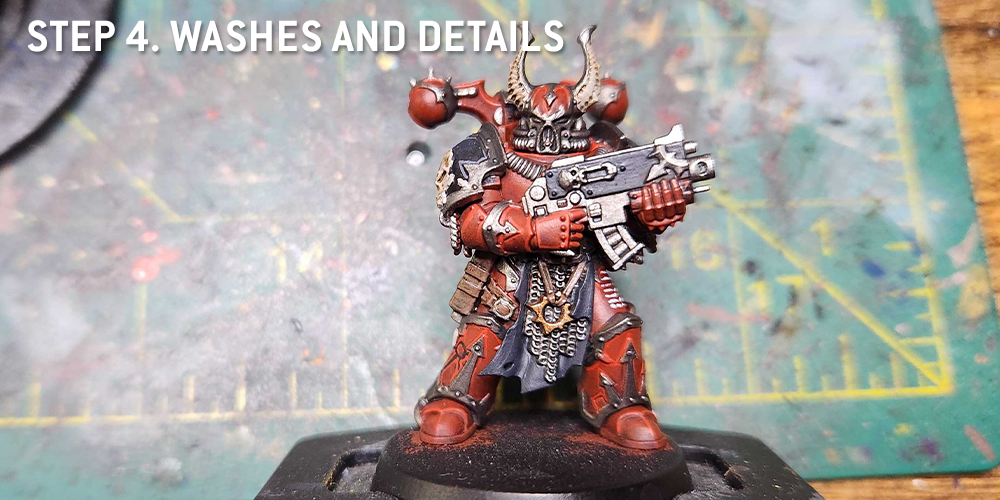
Step 4. Washes and Details
The metal parts and trim get a wash of Nuln Oil and an edge highlight of Runefang Steel. the leather and horns and gold parts are washed in Agrax Earthshade, then highlighted with their respective colors.
I’m also adding Colchisian Runes and text at this stage. For more on that process, check out the relevant section above. Same for the shoulder icon.
In all I’m happy with this Word Bearer but it’s not my favorite scheme for the faction – that’d be the darker 3rd edition scheme I painted in the next section.

TheChirurgeon's 3rd Edition Method - Click to Expand
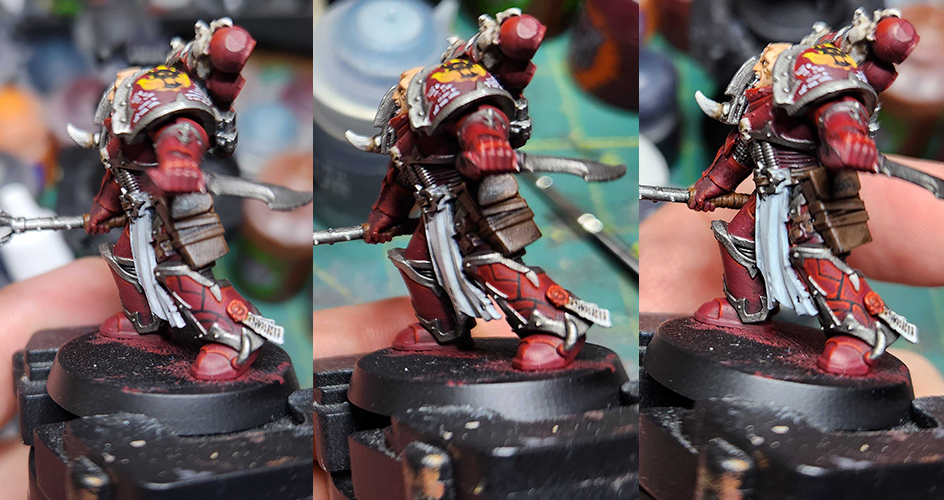
The third edition Codex: Chaos Space Marines reintroduced the Word Bearers with a new, darker red palette and showed off the white text on the armor for the first time. This new scheme featured more wine-colored armor with silver trim and featured red pauldrons, matching the armor. Although slightly less varied than the Heresy scheme, I tend to like this one more.
I started by priming the model black.
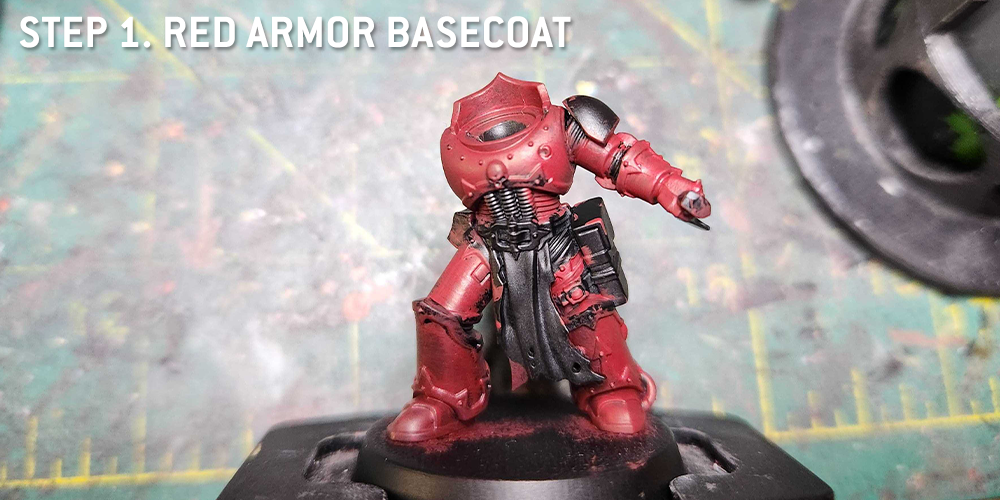
Step 1. Armor Basecoat
This is a bit of a weird model in that his right arm and head are conversion pieces from an old Chaos Warrior fantasy kit which I painted for a Word Bearers model I made for the site six years ago in one of our first posts. That model is far too small and dinky to use now but his head and arm were much more appropriately sized for the modern range. So I put his head, arm, and shoulder pads onto a new CSM body. This makes him a bit bulkier but I’m using him as a Chosen so it works.
The armor starts with a basecoat of Khorne Red.
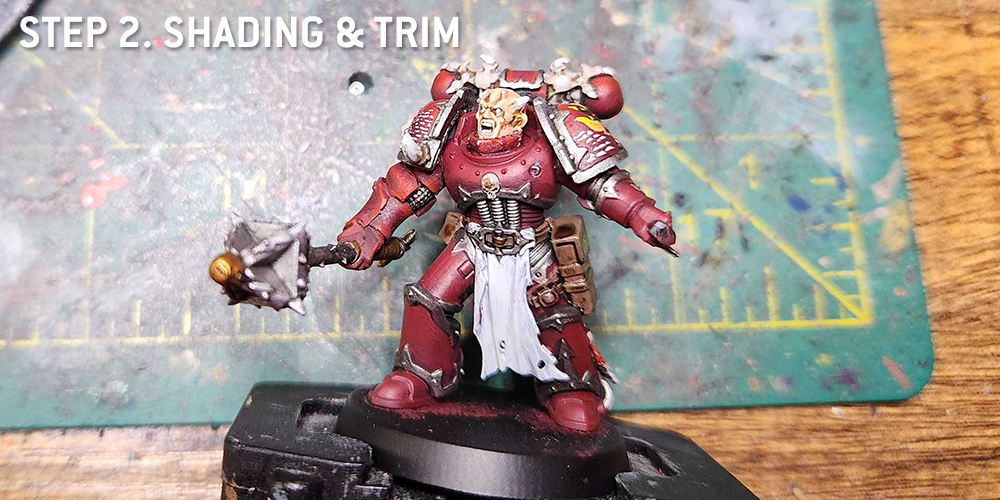
Step 2. Armor Shading and Trim
Next we’re going to shade rather than highlight. In this case, that will mean progressively mixing Khorne Red with Gal Vorbak Red to shade parts of the model and darken them. Following that I’ll shade the bottommost parts with Nuln Oil. The armor is edge highlighted with Mephiston Red.
Next up comes the trim. This is painted with Leadbelcher, then shaded with Nuln Oil and highlighted with Runefang Steel.
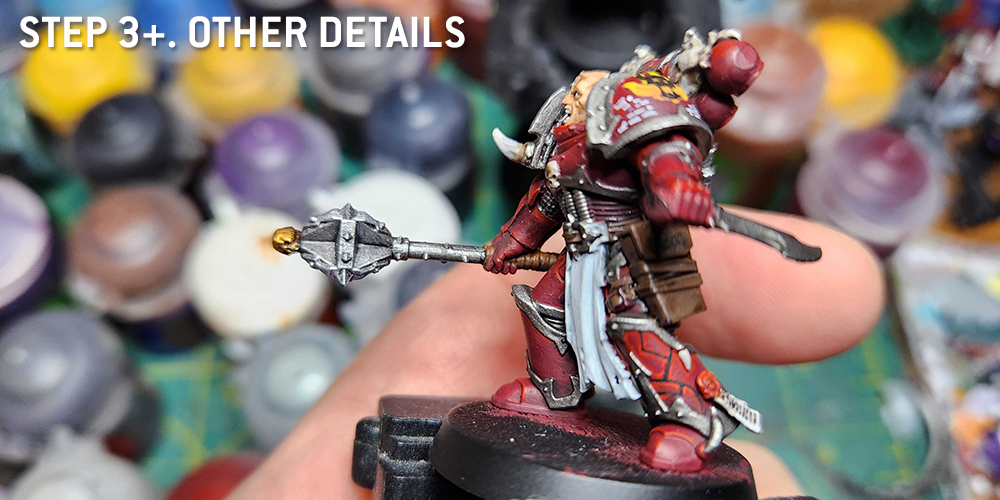
Step 3. Other Details
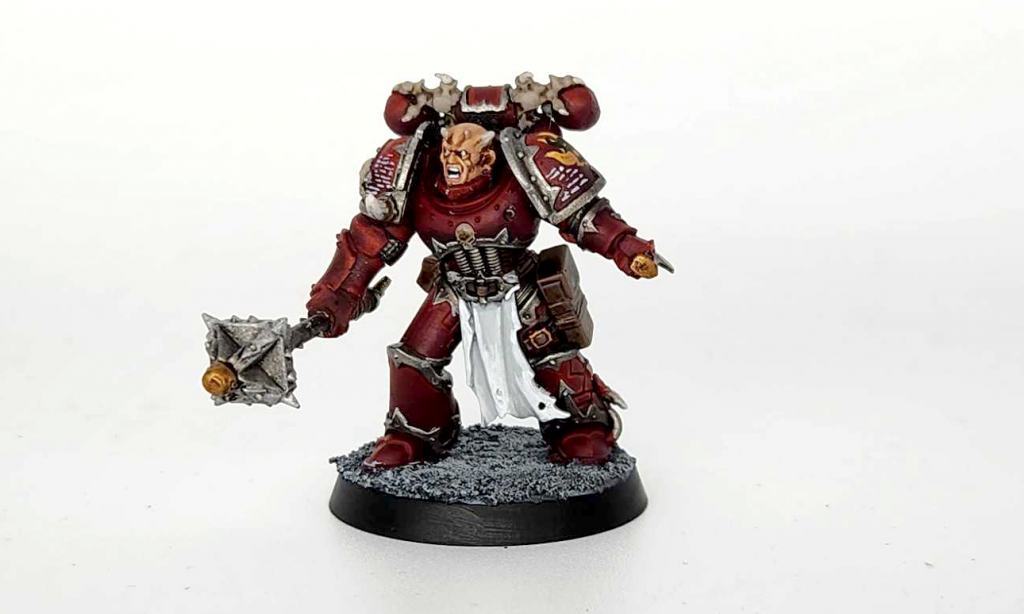
Those are the major steps – from here it’s all the same with regard to standard details – white lines for the scripture, purity seals, leather straps, white loincloth. I also add some runes on the left greave, and you can find tutorials for all these details in the sections above on painting runes, scripture, and purity seals.
I like this particular scheme quite a bit more than the brighter red and black pauldrons version, and will probably go with something like this when I do my full Word Bearers army.

TheChirurgeon's 2nd Edition Method - Click to Expand
The second edition Codex: Chaos introduced us to the Word Bearers with a bright red color scheme and some truly unique accents, such as black armor with molten effects.
For this project we’re rescuing an old 2nd edition plastic Chaos Space Marine. These models are awful by the way – they’re stunty, have bad details, and only have two poses. Also, they were the only plastic chaos marines you could buy from like, 1995 until the Plastic Berserkers came out in 1998 and everyone started converting those for use as regular CSMs. The greenstuff bands on the model are 14 year-old Rob’s attempts to make the model stand out a bit. They’re not great.
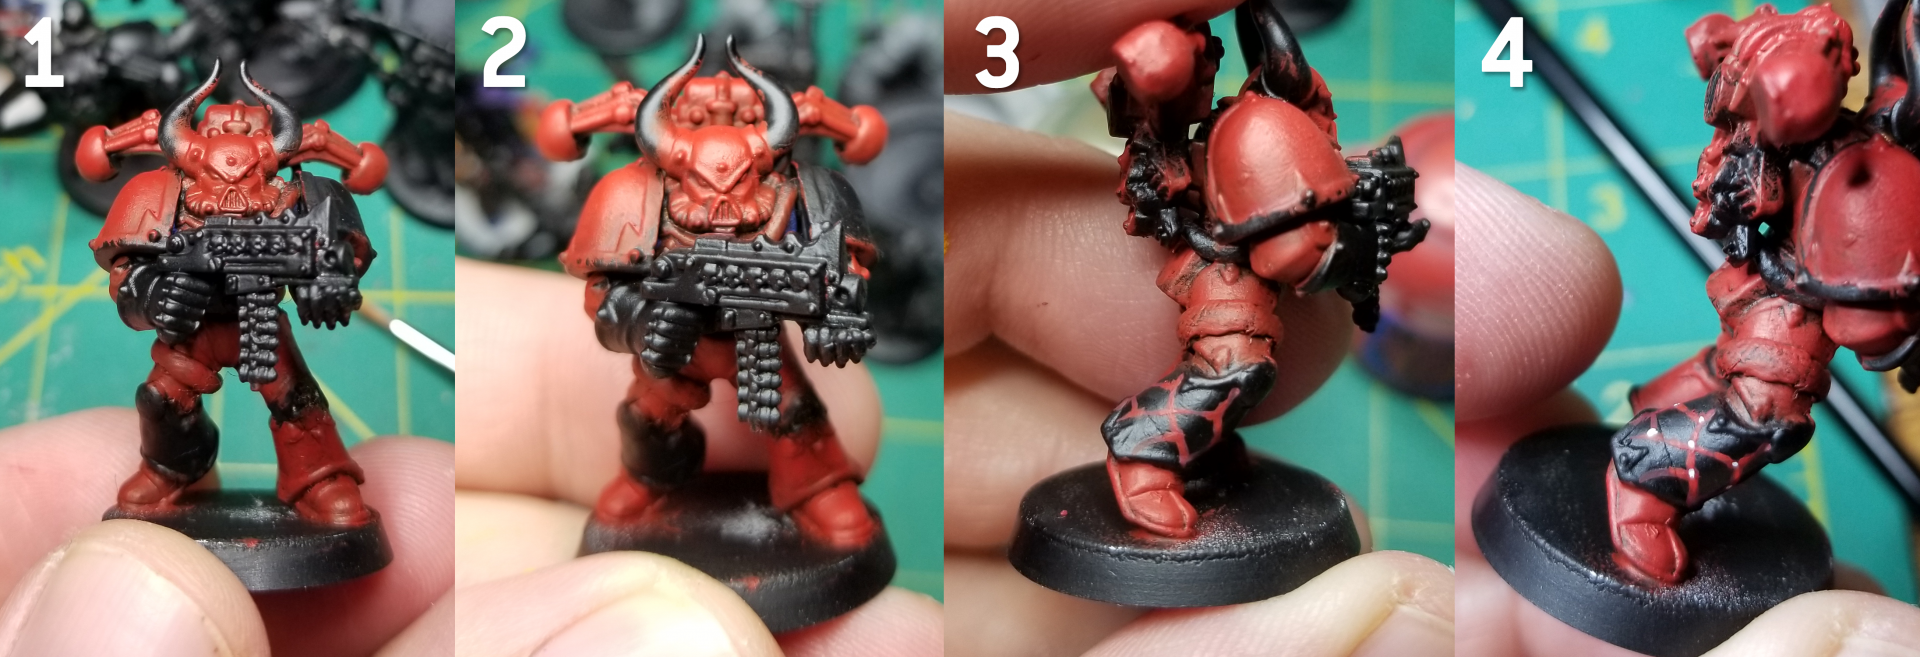
I started by priming the model black, then painted the armor, save a single pauldron and one of the greaves, with Mephiston Red. Then I highlighted the armor with a 50/50 mix of Mephiston Red and Evil Sunz Scarlet. On the greave we’re going to do something that you can see a lot of in the 2nd edition codex images for Word Bearers, which is this kind of cracking lava/coals effect. You can replicate it by drawing some lines with Khorne Red, then highlight the intersection points with Mephiston Red and dot them with white. I use Reaper Pure White for my white.
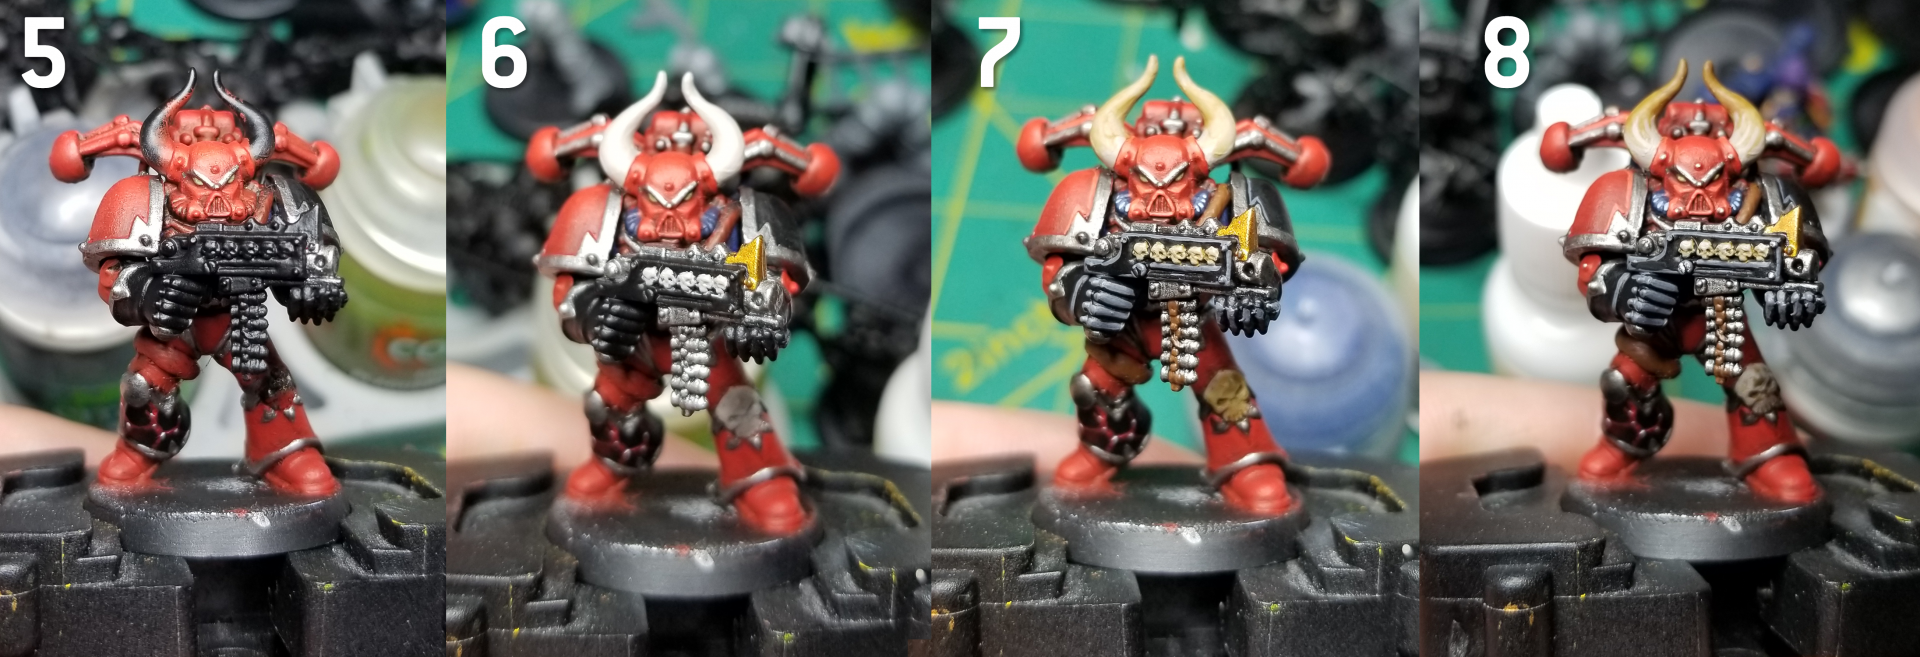 Next up is the trim. This gets painted Leadbelcher along with all the other metal parts of the model, then washed in Nuln Oil and edge highlighted with Runefang Steel. The Skulls and horns are Rakarth Flesh shaded with Seraphim Sepia. The eyes are Death Guard Green and Ogryn Camo. The Word Bearers had blue cables in the 2nd edition ‘Eavy Metal scheme, so those are painted Kantor Blue, shaded with Drakenhof Nightshade, then highlighted with Kantor, the Fang, and Reaper Snow Shadow. The black parts get a highlight of Corvus Black and an edge highlight of Mechanicus Standard Grey while the Red parts get an edge highlight of Wild Rider Red.
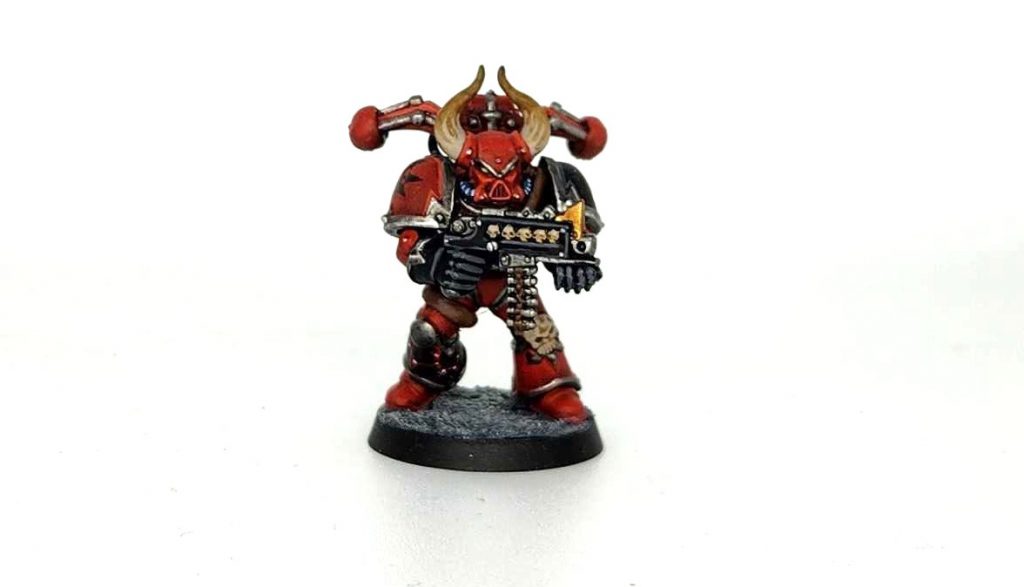
Despite it being a crummy model I’m pretty happy with the overall result. it’s not too bad a paint scheme to do a full army of.

TheChirurgeon's Heresy-era Word Bearers - Click to Expand
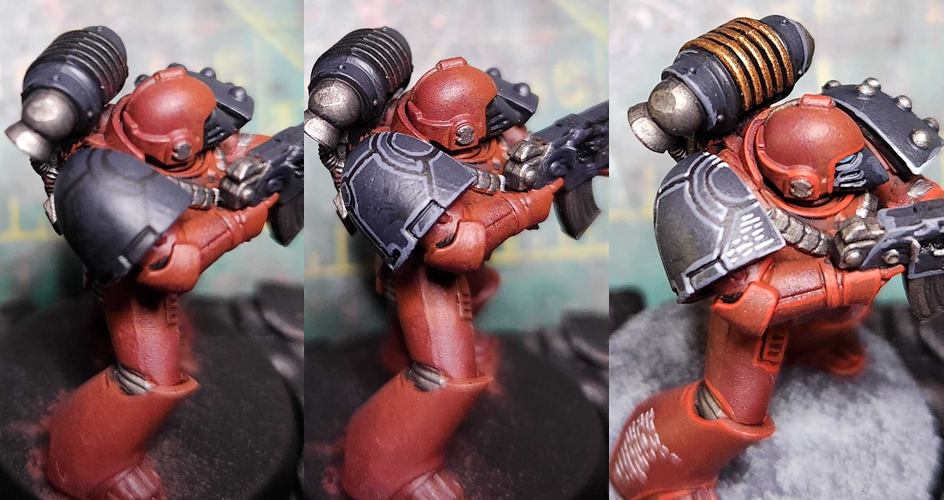
The Word Bearers notably changed their colors and heraldry for the heresy, to a red and black scheme more similar to their “modern” 40k scheme. This one’s pretty easy to replicate, and also looks great on the modern models, but there are a few quirks to the heresy era models worth exploring.
I started by priming the model black.
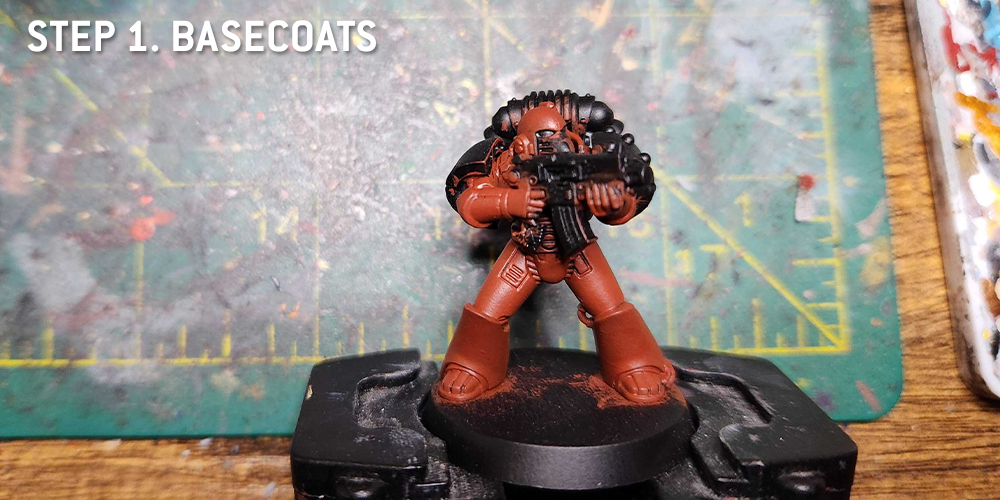
Step 1. Armor Basecoats
I started by basecoating the model with Word Bearers Red. I love that shade, and it’s very appropriate here. The pauldrons will be Abaddon Black, so I mostly leave them be.
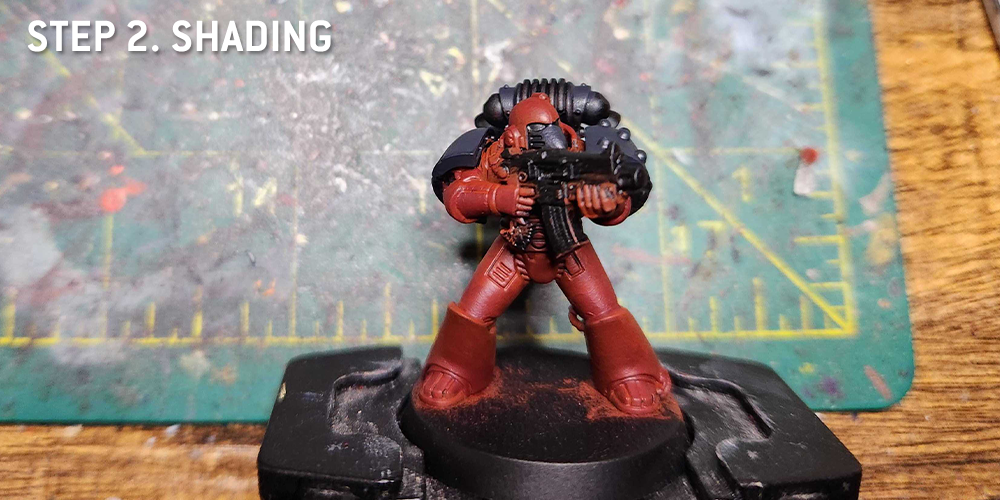
Step 2. Shading
Two big steps here: The first is that I shade the armor with Carroburg Crimson. Next up is the pauldrons. I highlight those using Corvus Black and use mixes of Corvus and Black Legion Contrast paint to create a gradient. Same goes for the beak.
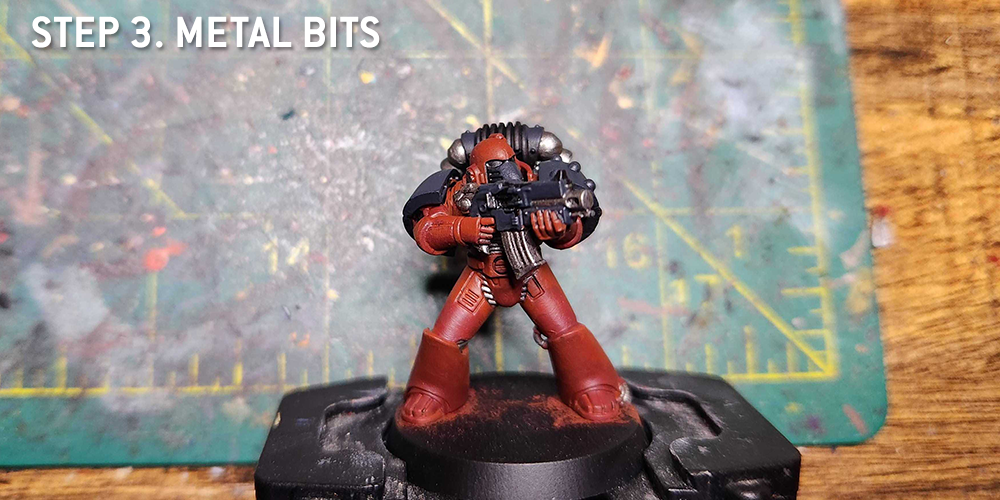
Step 3. The Metal Bits
I paint the metal bits with Leadbelcher. Then they get a wash of Nuln Oil.
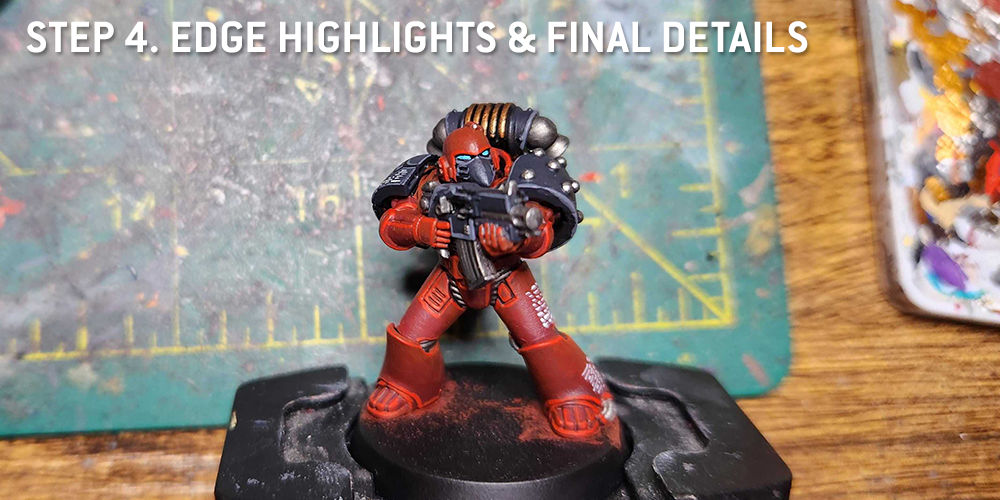
Step 4. Edge Highlights & Final Details
A few things going on here. First the edge highlights are done with Evil Sunz Scarlet. The edge highlights on the black parts are done with Mechanicus Standard Grey. The eye lenses were painted with Baharroth Blue, while the metal coils on the backpack were painted Balthasar Gold. I’ve also added some scripture and Colchisian Runes at this point – you can find the tutorial for those in the section above.
Overall this guy was easy to paint, and a lot of fun to work with. If I weren’t already in love with my Sons of Horus example, I’d strongly be considering a Heresy Word Bearers army.
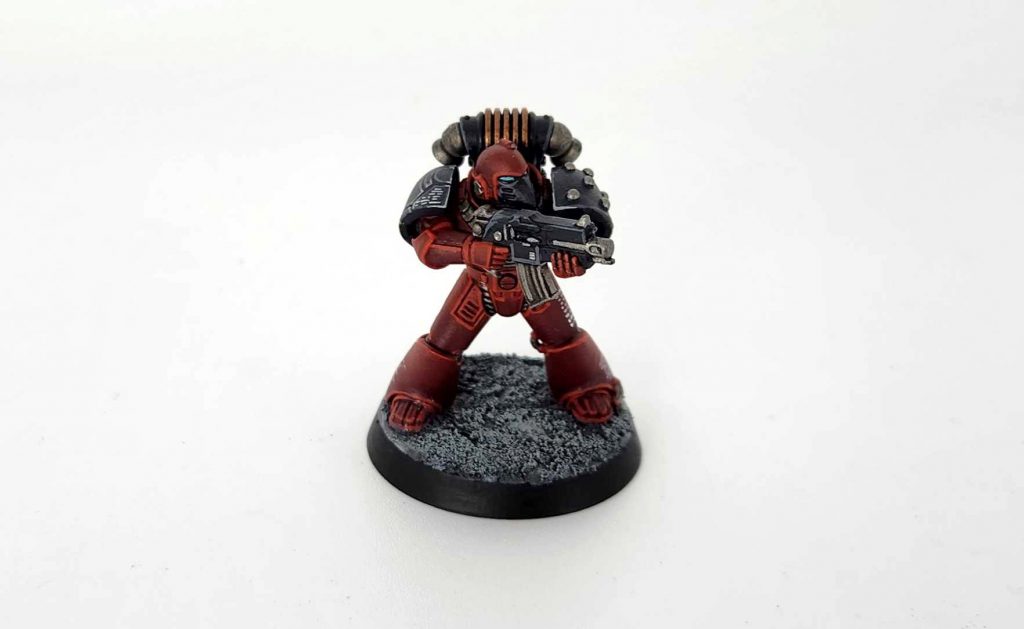

Contemptor Kevin's Method for Word Bearers - Click to Expand
My Word Bearers were designed as the opposite of my Heresy-era Ultramarines: the red bad guys as opposed to the blue good guys. Owing to the way I painted them, they come out looking quite good and can be produced at a relatively rapid clip.
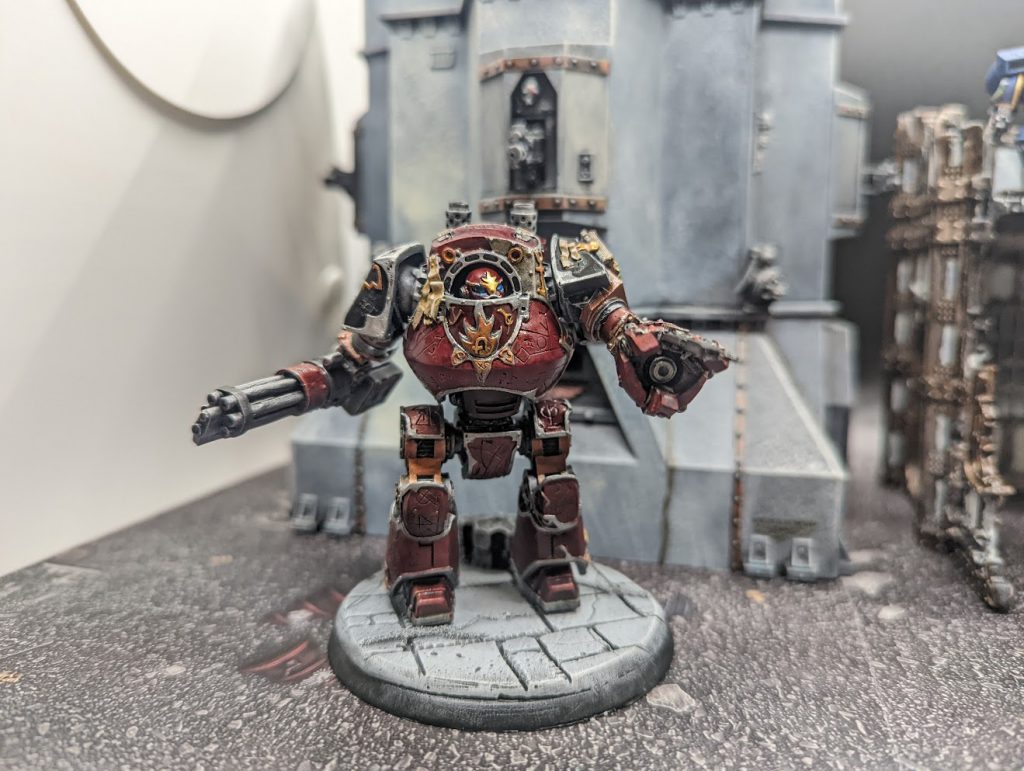
My steps:
1) Prime the model black
2) I then do three increasingly lighter dry-brushes of the following paints
a) Scale 75 Black Metal
b) Leadbelcher
c) Pro Acryl Silver
3) Recess shade with a thin green color, such as Coelia Greenshade or a green contrast. This works well for the runes on the Contemptor, because it deepens the shadows.
4) Paint the armor panels with Flesh Tearers Red. Take special care, of course, to avoid the trim!
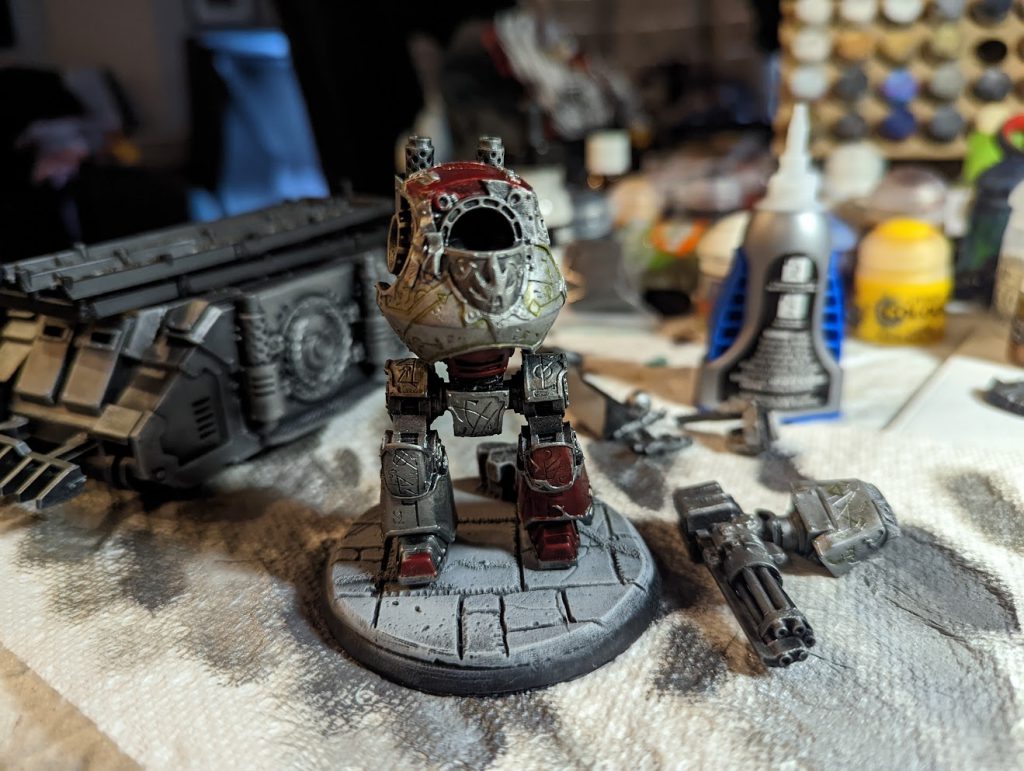
5) For my Word Bearers, I painted the left paldroun (with the Legion icon) black. At the time I used Abaddon Black. Now I would probably use either Black Templar or Vallejo Color Xpress Black Lotus to have something to shade with.
6) The Gold bits of the trim were painted with Retributor Armour, and then given a Guilliman Flesh wash. This gives the gold a slightly oily look, which I think goes well with the off-putting nature of the Word Bearers.
7) I painted the weapon casings and secondary mechanical bits with Balthazzar Gold. I then gave them a wash of Nuln Oil and a quick re-highlight.
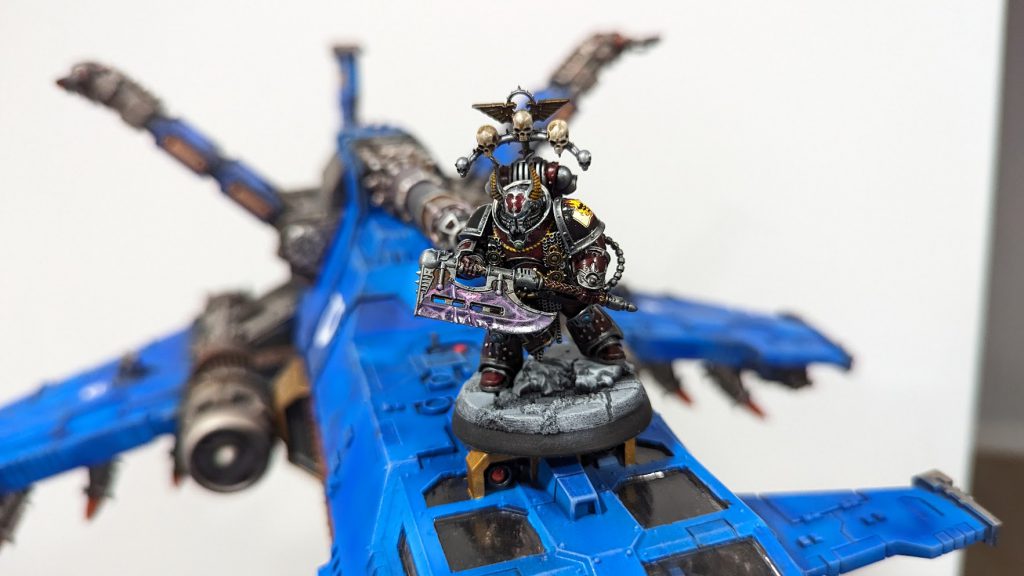
8) For Power Weapons, I decided to go with purple and pink because I thought it would be interesting and warp-y. I basecoated the metallic weapon with Shyish Purple, and then started painting in crackles with pink (I used Emperor’s Children Pink, IIRC) highlighted up with white. I then gave it a wash of Magos Purple
9) I then gloss-varnished the Power Armor, giving it a slicker look. This will help the decals adhere better to the model.
10) For the bone areas, I went with Wraithbone and a wash of Agrax Earthshade.
11) For the Pages of Word Bearers books and purity seals, I went with Wraithbone and then a wash of Seraphim Sepia. My thinking here is that Word Bearers’ books tend to be made from human flesh, I wanted to give the pages more of a leathery look
12) For basing, I went with a set of flagstone bases from the now-defunct Secret Weapon Miniatures. I chose a cool lighter grey color to contrast with the darker, warmer metallics of the Word Bearers.
I found this method to be both simple and effective in getting a good looking force onto the tabletop!

RichyP's Method for Argel Tal and Gal Vorbak - Click to Expand
For all the Word Bearers’ red armour, use the same method I used in the previous section, then carry on below as the colour scheme assumes a red undercoat from this point.

Fleshy Parts
- Paint Vallejo Game Color Pale Flesh over the red primer.
- Wash the flesh areas with Citadel Contrast Guilliman Flesh (if it goes in the recesses between armour plates then leave it, it’ll make a nice shadow/black line).
- Drybrush the flesh areas with Vallejo Game Color Pale Flesh.
- Cover all of the flesh with Citadel Bezerker Blood Shade to tie up the tones and reduce any sharp contrast from the dry brush.
- Optional: I like to apply some Citadel Technical Blood for the Blood God over parts of the flesh, in particular where it meets armour plating or any part of the flesh where things protrude or otherwise would cause distress to the skin
The Green Flames
This step is for the Gal Vorbak’s Warp fire effect. I use the same technique for all of the green glowing areas across the army including plasma, standards and anywhere that I need to add a pop of additional colour to the Word Bearers muted scheme.
- Paint area with Vallejo Game Color Bone White
- Wash the Bone White with Citadel Contrast Ork Flesh
- Layer Livery Green over most of the Ork Flesh
- At the centre of the flames, or the brightest parts paint some yellow of choice to tint the light source
- Lightly drybrush some of the green around the flame then flood surrounding area and the recesses near the flame with Citadel Contrast Ork Flesh. This is to put green in the shadows near the flame to give the illusion of a green light source hitting the shadows and recesses.
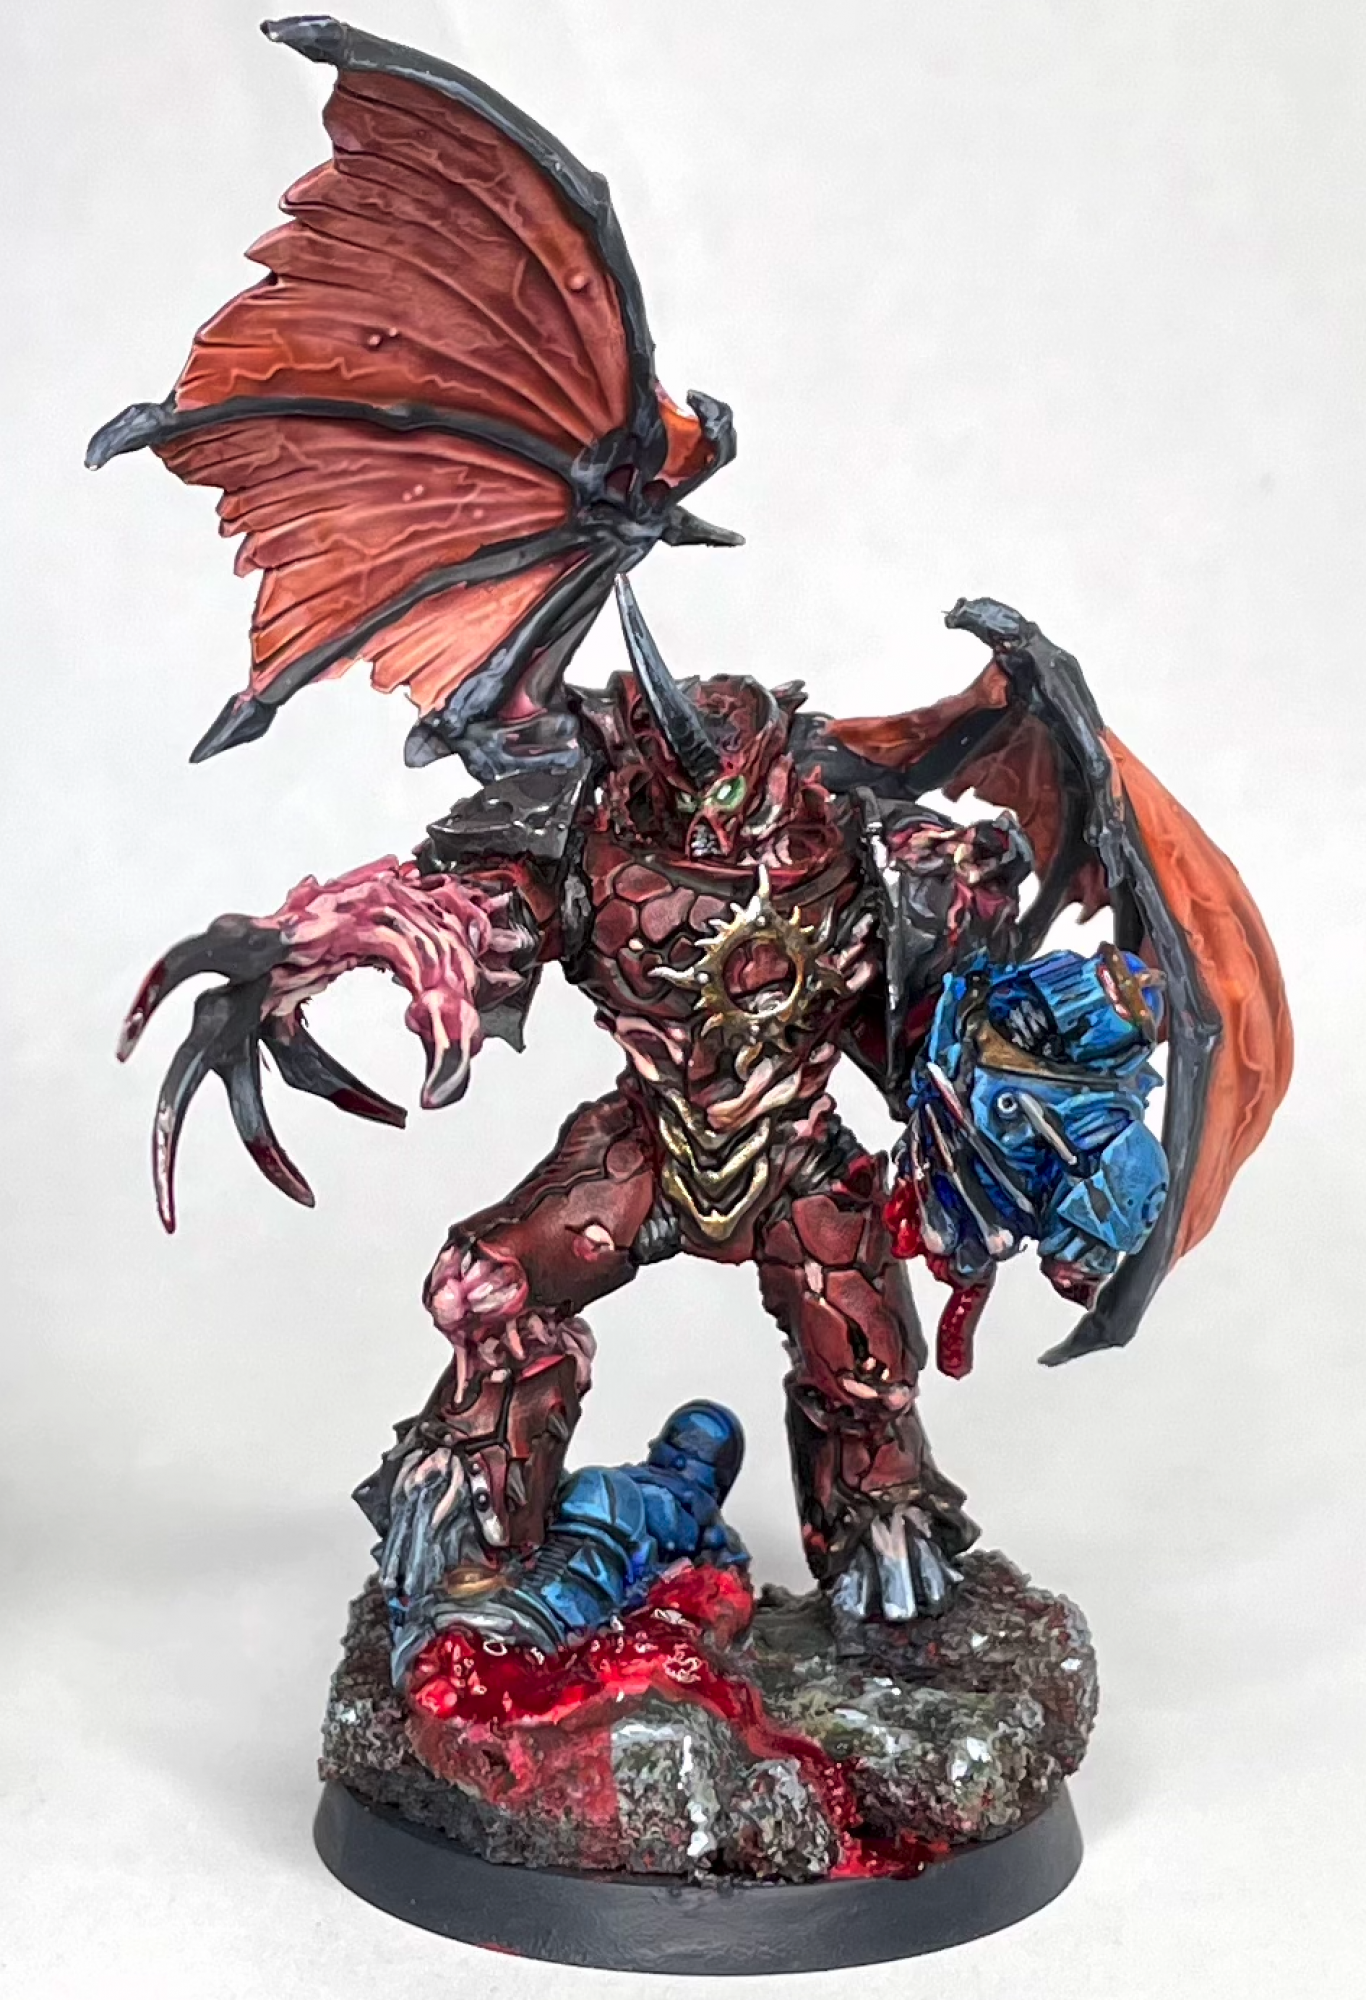

TheChirurgeon's Method for Lorgar - Click to Expand
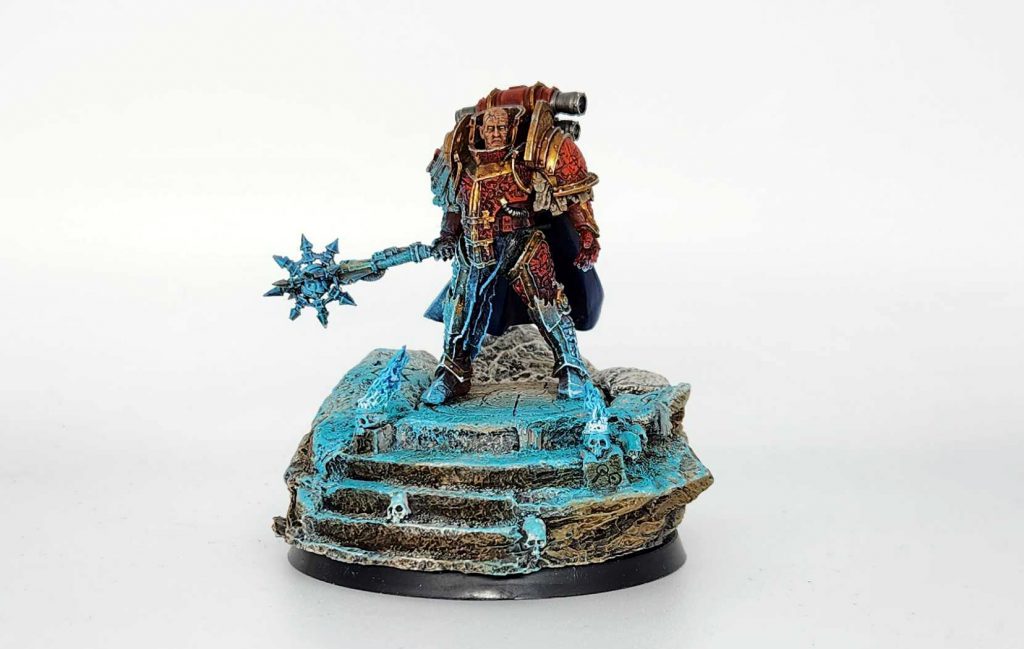
Lorgar isn’t a terribly complicated model, especially by primarch standards. He’s basically a bigger space marine, albeit one with a fancier suit of armor – though not nearly as fancy and detailed as say, Guilliman’s 40k duds. I started by assembling him sans arm, cape, and upper shoulderpads, choosing to do those as subassemblies.
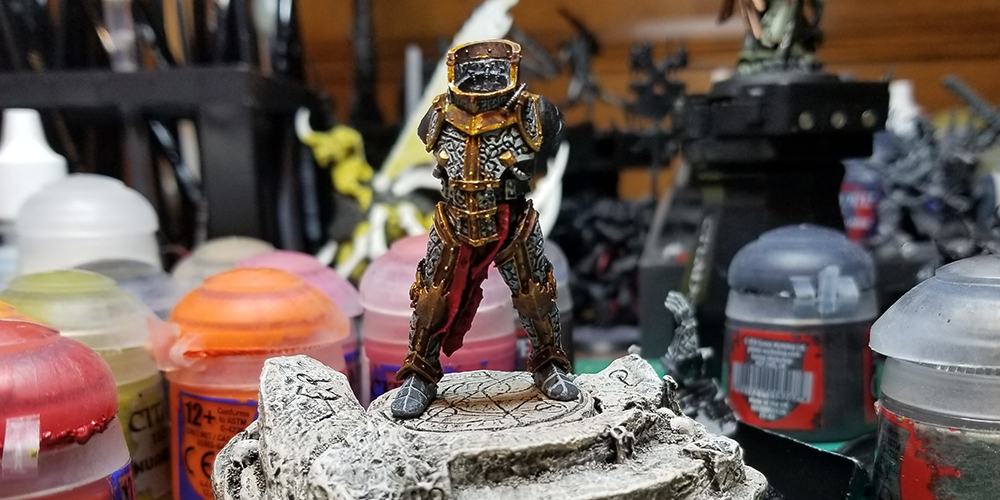
I originally chose to do Lorgar in his classic gray armor with a red loincloth (Mechanicus Standard Grey, Celestra Grey highlights, pure white for the corners) but as I painted him I decided it wasn’t really working the way I wanted to and didn’t want him to clash with the rest of the army (who would be red and black, so I’d end up later repainting him. The Gold trim is all done with Retributor Armour and washed with Agrax Earthshade.
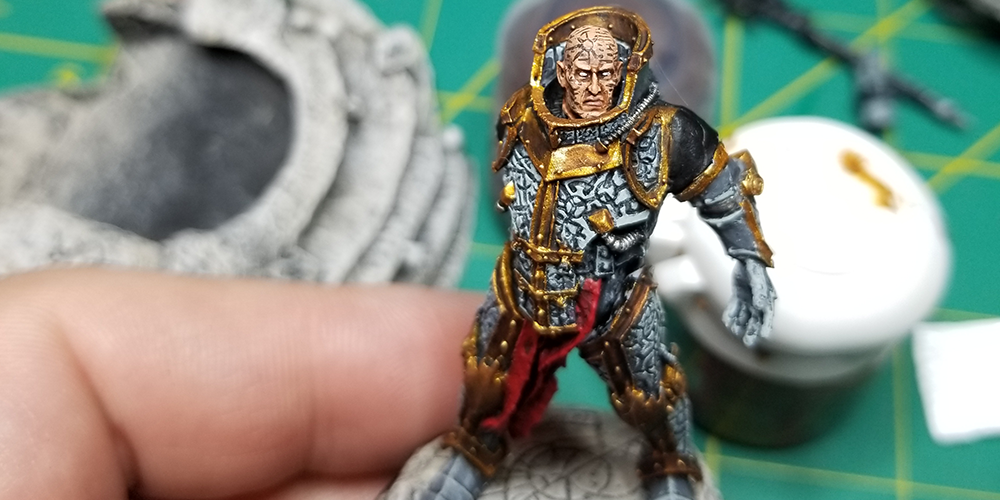
Lorgar’s face I did with Cadian Fleshtone and washed with Agrax and Reikland Fleshshade, then highlighted back up with Cadian and Kislev flesh. The runes and scripture on his face are done with a Micron pen (.005).
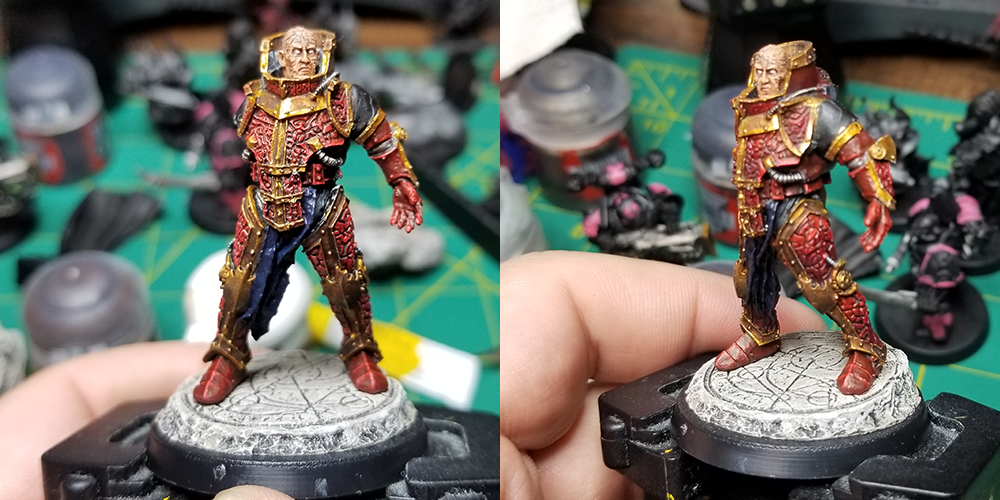
Eventually I decided to go red and gold for Lorgar, and painted over his armor with Flesh Tearers Red Contrast paint. I then came back and highlighted those sections with Mephiston Red and Evil Sunz Scarlet. The Loincloth I painted Night Lords Blue and highlighted it with Kantor Blue. Similar story on the cape.
The base ended up being a much bigger part of this – I painted it mostly with Krark Stone and drybrushed it with Reaper Polished Bone but the skulls would play a bigger role. I did them using mostly Baharroth Blue and Aethermantic Glow to do the OSL effects, with some Reaper Ghost White in the mix for the lighter parts of the flame. You can find more on this in our How to Paint Everything: OSL Tutorial.
I’m pretty happy how he turned out, though I painted him a while ago. There are some things I’d probably touch up now, like adding sharper highlights on some of the corners, and I think I could do his face better. Overall still pretty satisfied with him, though.
Final Thoughts
The Word Bearers have a lot going on visually and it makes them a fun faction to convert and paint. They take to loyalist bits better than most, and a lot of the Black Templars and Dark Angels bits – the robes, censers, and candles, especially – make for great accent pieces on Word Bearers models. And that deep red and silver just looks great on the table.
Have any questions or feedback? Drop us a note in the comments below or email us at contact@goonhammer.com.
