This article is part of a larger series on how to paint Space Marines. To return to that series, click here.
In our How to Paint Everything series, we take a look how to paint well, everything, with a look at different techniques and approaches from different artists. Today we’re looking at the White Scars space marines.
The White Scars are the First Founding Chapter created from the breakup of the Vth Legion at the end of the Horus Heresy. Never one of the biggest Legions, the White Scars spent the Great Crusade operating far away and alone. They spent little enough time at the sides of their brother Legions that neither loyalist nor traitor were confident of which side they would end up on during the Horus Heresy.
Unlike nearly every other Legion of Space Marines, who could best be likened to a hammer, the White Scars are a rapier, striking quickly and then withdrawing. The warriors of the White Scars favor mobile assaults, whether from the back of a bike, a Rhino, or an Impulsor. Unlike the Ultramarines, who plan everything to the finest detail, they eschew planning, flowing where the battle takes them. The White Scars have been described as the wind, everywhere and yet nowhere.
The White Scars were the third Loyalist Legion on Terra at the culmination of the Horus Heresy, fighting with the Imperial Fists and the Blood Angels to defend the Imperial Palace. Mounted on their bikes, the warriors of the Vth legion retook the Lion’s Gate spaceport from the Traitor forces, preventing resupply to the forces on the ground, and prompting the conflict on the Vengeful Spirit.
Covered in this Article:
- How to paint White Scars, with multiple methods for tackling white power armor.
- Multiple methods for how to paint Heresy-era White Scars, who use a similar scheme with some different visual elements.
- Notes on the Heraldry of the Chapter and how they mark companies and squads.
White Scars Heraldry - Click to Expand
The White Scars are a Codex-Compliant chapter in terms of organizational structure, but don’t follow the Codex Astartes when it comes to how they mark their companies and squads. Instead, the chapter uses red, scar-like markings to denote both their company and squad, with unique markings for each. Sergeants are marked with scar-like marks on their helmets.
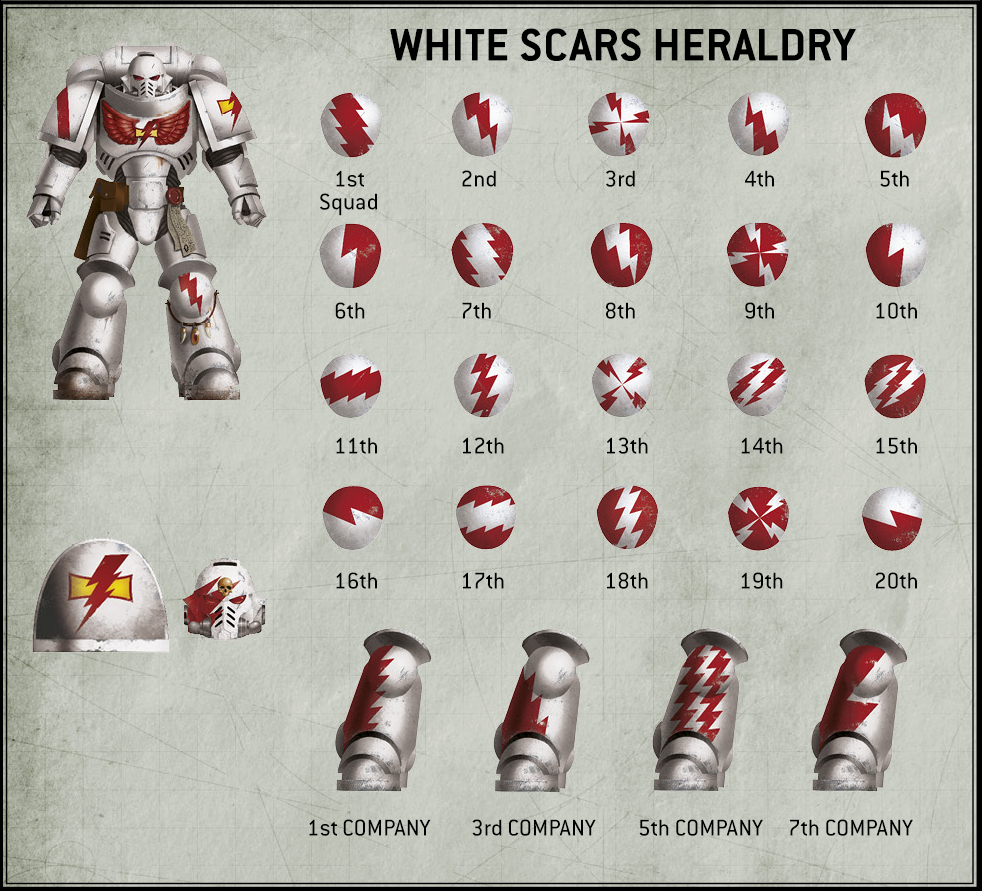
The chapter uses standard red icons for denoting battlefield role.
Painting White Scars
White Scars are an incredibly vibrant mix of white armor and red iconography, which can lead to all sorts of fun cleaning up overspill. For all the difficulty painting them, they make for a truly striking army on the table. In addition to our regular authors, we’ve brought in two guest painters, Ghazk and OhDearGodNo, to talk about how they approached painting their army.
Alfredo's Method - Click to Expand
For my White Scars I wanted a large amount of value contrast on the white armor and an earthier looking red to add color. Airbrush is pretty essential to the approach but I hope you’ll find it’s relatively simple to execute!
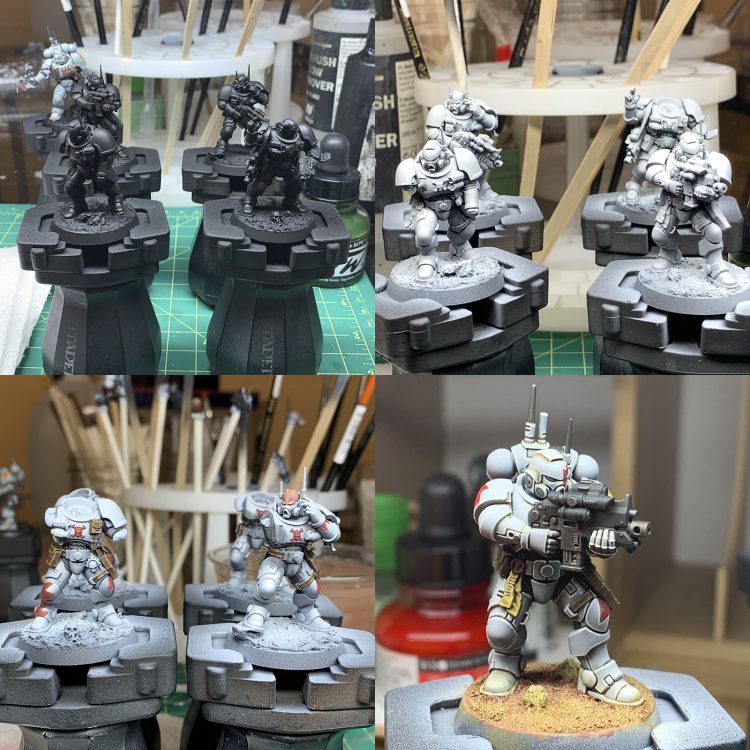
- First things, first, prime your miniatures black. Yup, that’s right, we’re painting white over black. It’s the wonders of airbrushing! Like I said, we want high value contrast on the armor and there’s no bigger contrast than going from black all the way up to pure white.
- For the main armor work-up I chose a relatively neutral set of greys, tending towards cool. I sprayed VMA Sea Grey horizontally, basically avoiding lower angles so that there is still black in some of the deepest recesses then followed up with a 45-degree angle spray of VMA Light Gull Grey. Then I sprayed Daler Rowney FW White Ink directly from above. I suggest thinning this 2:1 so that you can do several thin passes and build up more intense white on areas like the helmet, shoulder pads or anywhere else you might want to focus the eye.
- The other big color of note is the red. I wanted something earthy so I started with VMC Burnt Red and blended up to VMC Flat Red and then VMC Brown Ochre. Ochre is great for the desert-y look I’m going for here. There’s a fair bit of free hand going on here in terms of honour markings, squad marks, and company markings but it’s simpler than it looks. The key to these things is to plan your shapes out (White Scars are all about straight lines and jagged triangles) and thin your paint more than normal. I trace my outlines out with very thin paint and get those well-defined and then follow up by filling in with color. If you can draw a straight line, you can do this. It’s worth noting that this approach doesn’t really lend itself to clean-up due to the airbrushed armor but weathering can always help in hiding mistakes.
- Sticking to the earthy nature of these guys, I use a brownish-green enamel wash for panel-lining, which creates some real sharp contrast for the shadows. If you want a cleaner look, use a blue-grey instead but this approach works for me.
- Edge highlighting is your usual affair but for the white I do something a bit different and use Shmincke Artist Acrylic White from a tube. That stuff is super intense, thins down well and makes for edge highlights that really pop.
- For the basing I use texture paint and start by painting it with VMC Cavalry Red then drybrush with VMC Dark Sand before washing it brown and then drybrushing back up with Dark Sand and Pale Sand.
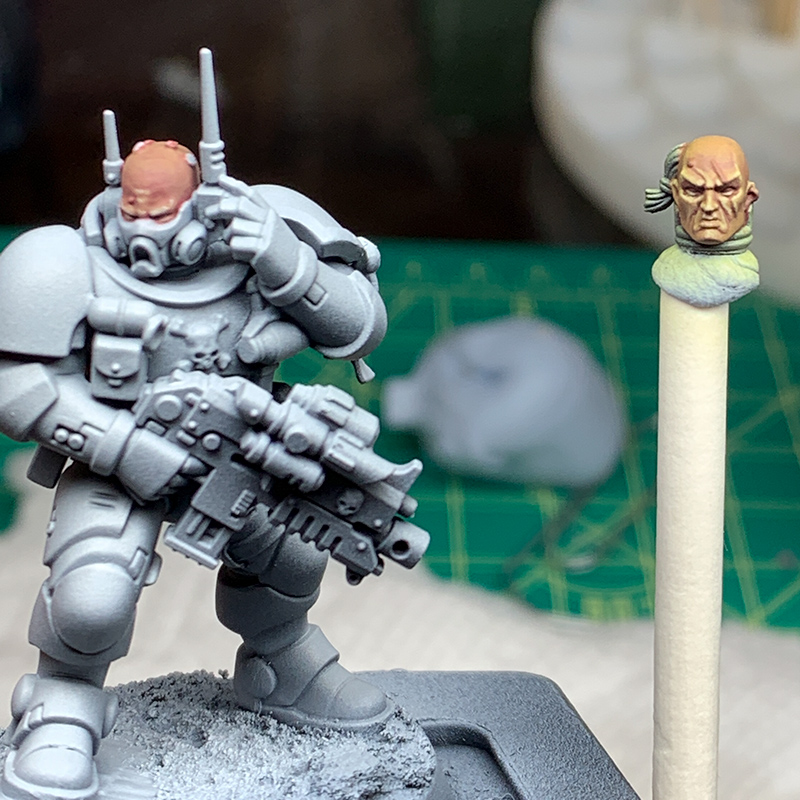
It’s worth saying a few words about painting skin. I wasn’t interested in a Caucasian look for these guys so I came up with a skin work-up I liked. Basically the following:
- Basecoat with 50:50 Scale Fantasy Crimson and Scale75 Arab Shadow.
- Add in equal parts Reaper Olive Skin Highlight for the first highlight.
- Next highlight is pure Reaper Olive Skin Highlight.
- Mix in Vallejo Fantasy Pro Highlight Skin in increasing amounts for your final highlights.
- Optionally (I did this on the right face but not the left) airbrush a glaze of Arab Shadow mixed with a dark green to blend the layers and add some green to the whole thing.
And there you have it!


OhDearGodNo's Method - Click to Expand
OhDearGodNo paints a slightly more traditional and brighter White Scars army, which looks truly fantastic. He does need to clean out his spray booth, though.
Painting White Scars can be done many ways, and there are a lot of good resources out there that involve everything from the GW layer method to dipping and now contrast. This method will require an airbrush, so if you don’t have one I’d recommend looking at a different tutorial.
Below are the paints I use for an Intercessor. If the model has any brass ammo components showing, I will also use Vallejo Model Color Old Gold 70.878 and wash with Nuln Oil.
Vallejo Black Surface Primer 74.602
Vallejo Grey Surface Primer 74.691
Vallejo Model Air White Grey 71.119
Vallejo Model Air Chrome 71.064
Vallejo Mecha Varnish (matte) 69.702
Vallejo Model Color black 70.950
Vallejo Model Color Mahogany 70.846
Citadel Mephiston Red
Citadel Evil Sunz Scarlet
Citadel Iron Hands Steel (leadbelcher can be used as an alternative)
Citadel Mechanicus Standard Grey or Vallejo Medium Gunship Grey 71.097
Citadel Dark Reaper
Citadel Deathclaw Brown
Citadel Pallid Wych Flesh
Citadel Contrast Black Templar
Citadel Soulstone Blue
Citadel Carroburg Crimson (red wash)
Citadel Agrax Earthshade (brown wash)
Citadel Nuln Oil (black wash)
Citadel Drakenhof Nightshade (blue wash)
I also have a Mix of 60% Nuln Oil, 40% Drakenhof Nightshade, which is used for pinwashing (recess shading) the white.
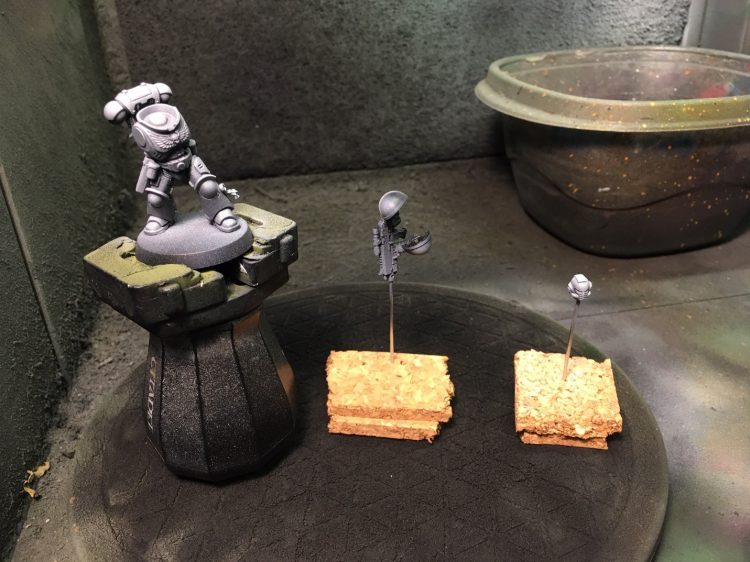
I begin with a zenithal highlight using the Vallejo Surface Primer. Zenithal highlighting when priming is to use the lighter color more on areas that would be exposed to the light, and more of the darker primer on shaded or recessed areas.
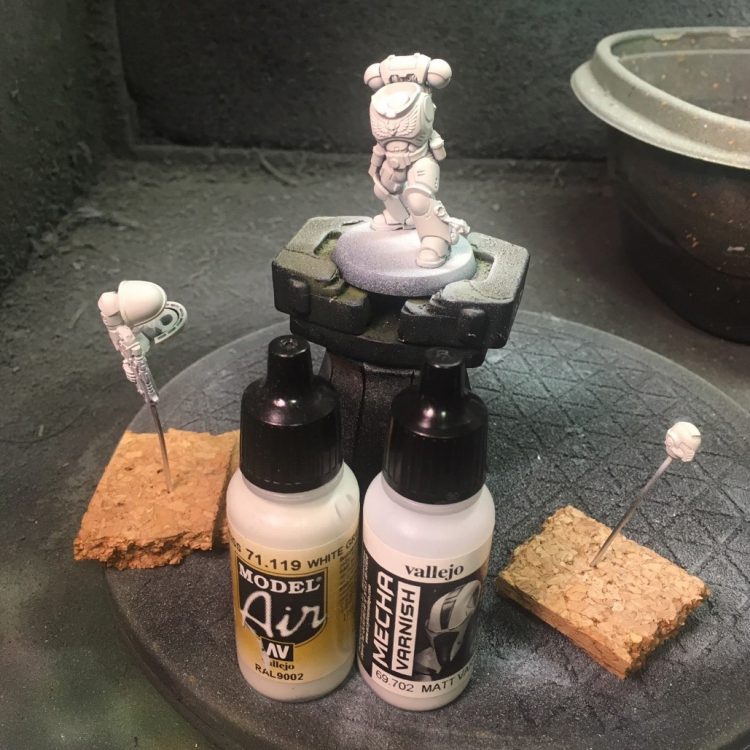
The base coat is VMA White Grey. I found this to be the best looking temperature of white. It’s warmer than a ‘pure’ white, however not so much that it would begin to look more like a bone-ish color. For models that aren’t batch painted or require extra detail, it also gives a little room for edge highlighting.
I put on about 2-3 thin coats of the White Grey with an airbrush. You’ll notice with each coat the color temperature gets warmer, by the third coat the actual pigment for this color is apparent.
Let all these coats dry completely. I’d say a minimum of 30 minutes should pass between coats, and an hour for the last. After painting the base coat, seal it with a good varnish. I use Vallejo Mecha Matte, as it’s a little thicker and tougher than their standard formula. Do not skip this step. If you don’t seal the white, the minute you so much as breathe on the mini the paint will speckle and peel off. Make sure to cover the entire model. I let the varnish dry overnight before moving on to pinwashing.
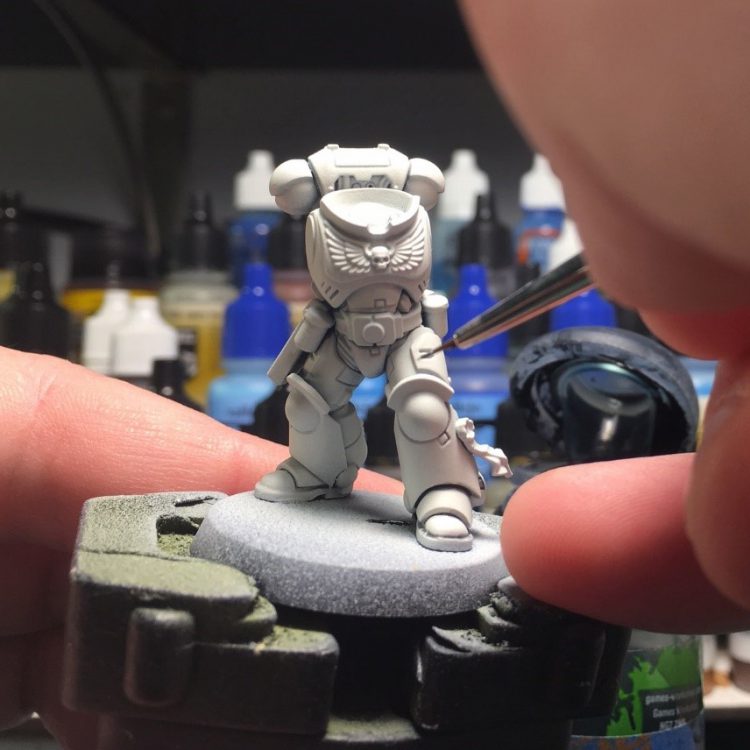
Now begins the most daunting, frustrating, and time-consuming part of this process. Think of this as the equivalent of what a Raven Guard player must go through with edge highlighting, but the opposite. You want to use the 60/40 mix of Nuln/Drakenhof and using a detail brush, wash all the recesses. You’ll find that if you varnished correctly, much of the wash will fill the channels on its own. You can use enamels to pinwash as well, or if you can find a good hydrophobic varnish that can also help. The problem with going those routes are that sometimes you don’t want to lose control of the ink and that can happen if you make it too easy for it to run.
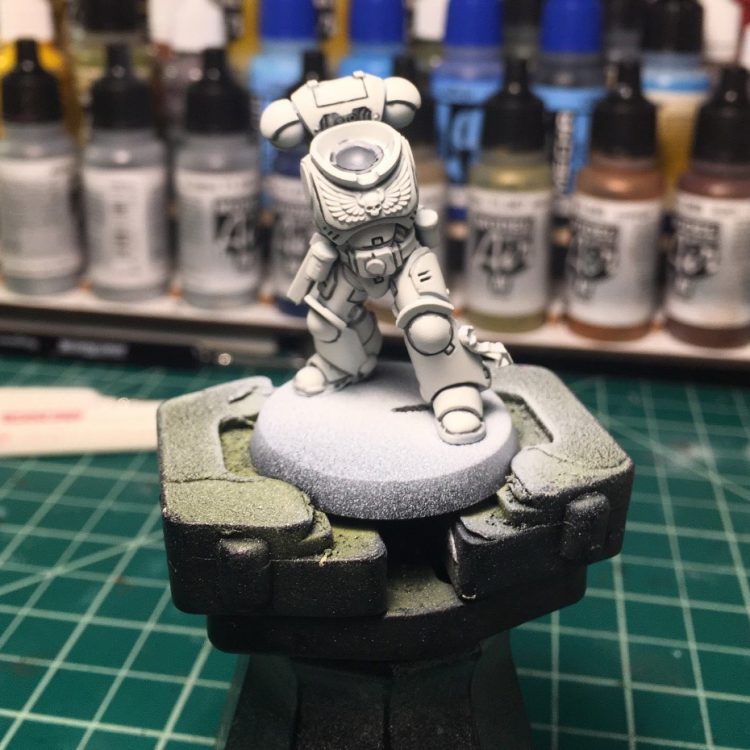
If you make any mistakes, just use some of the VMA White Grey to clean up where the lines are too thick, or if you got too handsy with some of the armor. Do everything possible to minimize these mistakes, as the coverup process will take about 3-4 thin coats, possibly more depending on the thickness of your mistake.
While not shown in this pic, make sure you shade the inside of the gorget as well as the outside border of the chest eagle. Do not bother pinwashing the eagle itself.
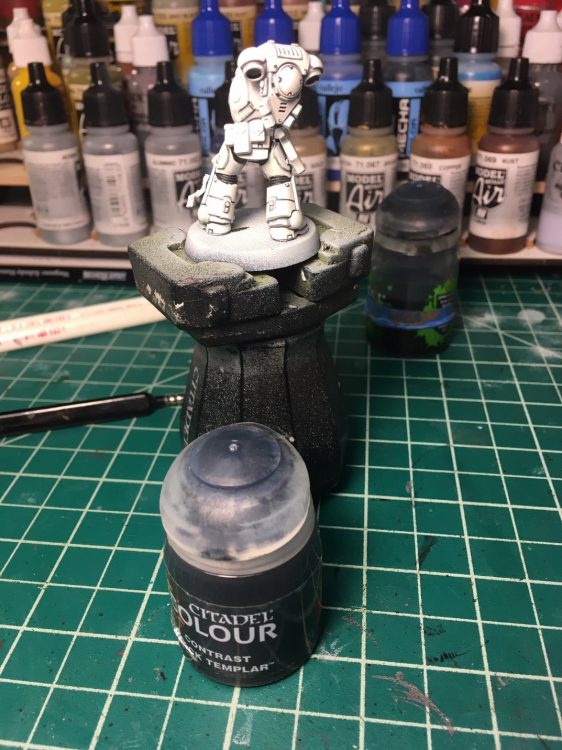
Something new for this, the old method I had for the bellows was to use Mechanicus Standard Grey and then wash it 2-3 times with Nuln Oil as a way to shade down. The traditional method is to use black and edge highlight with Citadel Eshin Grey, however it takes much longer and is more prone to the paint jumping from one ridge to the next. The good news is that with a white varnished base, you can apply two thin coats of Citadel Contrast Black and get the same effect. Neat. After you’re done, you may need to go back over the edges with the white to clean it up a bit.
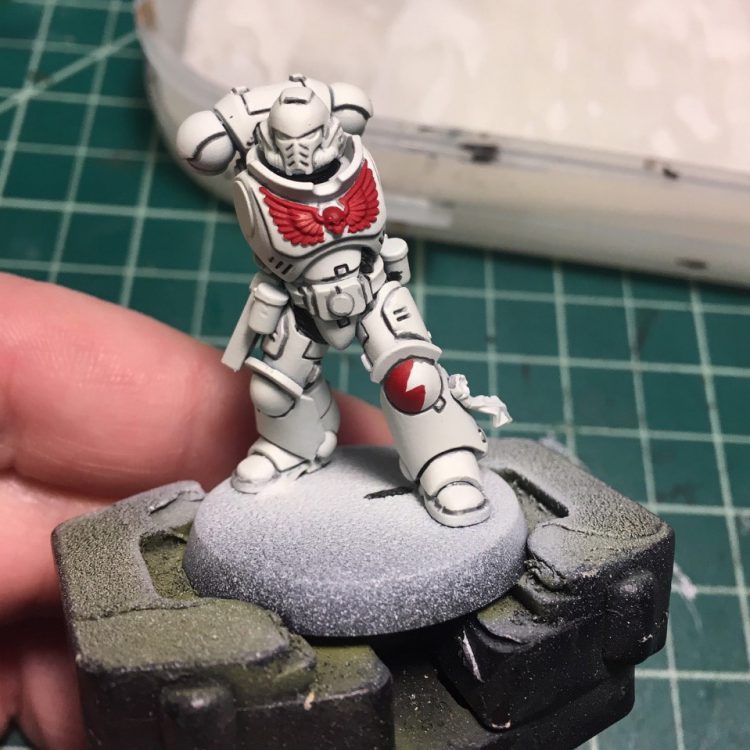
Moving on to the red, I use Mephiston Red for a base and just be stupidly careful while I paint it. For the squad markings, I freehand them and they just really take a lot of practice. You’ll want to do the usual two thin coats, because even with a base color as strong as this, the white still will show through if you don’t.
After basecoating I wash the red with Carroburg Crimson, then re-apply Mephiston Red to the non-recessed feathers and the skull. After that I edge highlight with Evil Sunz Scarlet. You don’t need to do this part, but it really makes a huge difference.
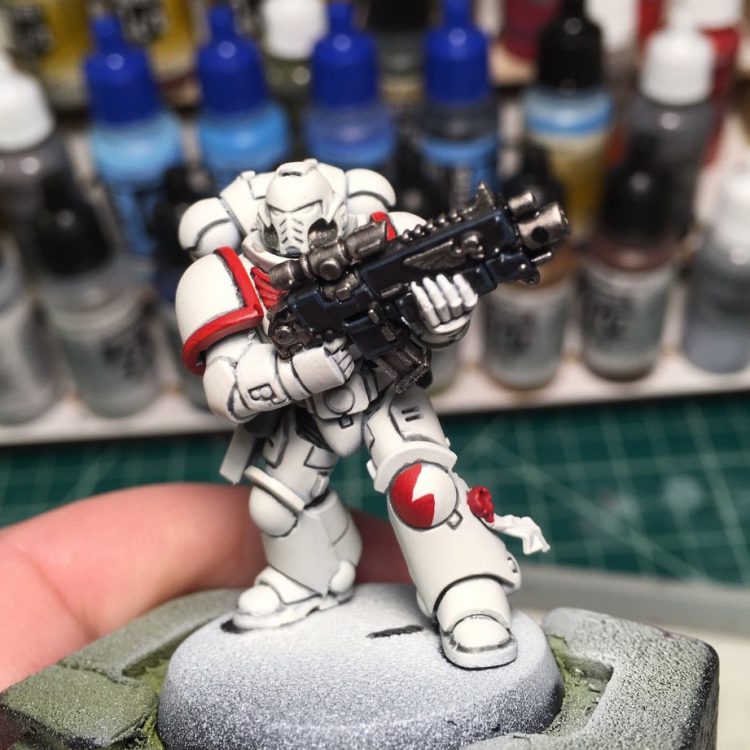
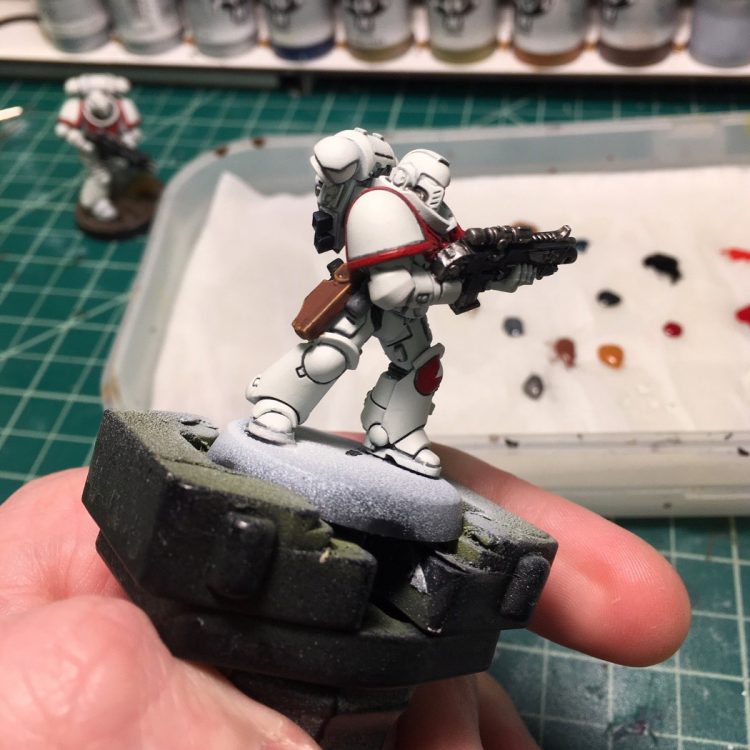
This next section is fairly universal so I’m going to go over it quickly.
For the bolt rifle, I just paint it with VMC Black, and use Citadel Iron Warriors for the metal. You can use Leadbelcher, however since I’m going for a clean look, I prefer to have the metal just a little bit brighter. I edge highlight with Dark Reaper and not grey- This way the edge highlight contrasts not only with the black, but with the white as well. If I used something with a strictly neutral shade, it could end up blending in with the white behind it… making its entire purpose wasted.
Drill your barrels.
For leathers, I personally use VMC Mahogany with an Agrax wash and a Deathclaw Brown edge highlight. You can use contrast or whatever you’d like to be honest.
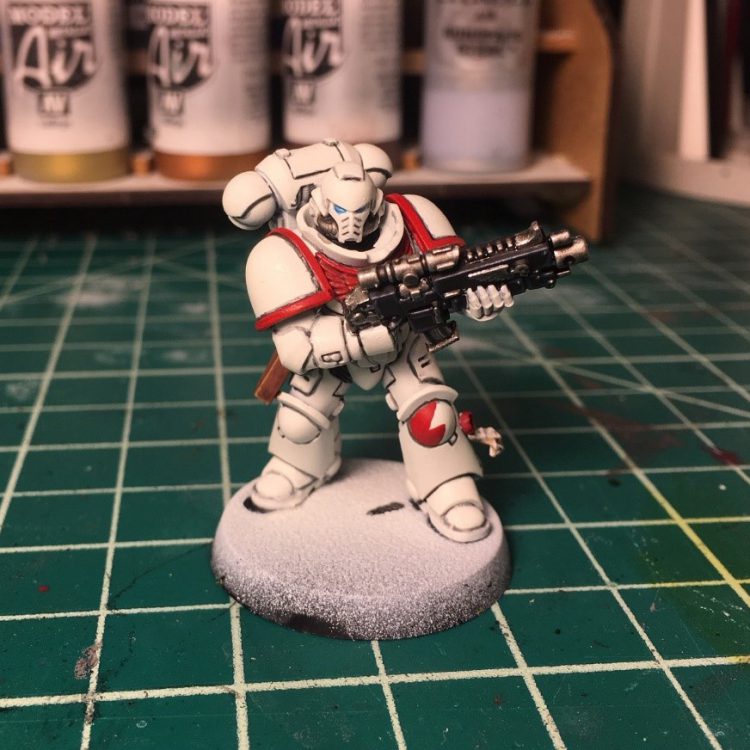
For the eyes and weapon optics, I use VMA Chrome and apply it with a brush. The thinned chrome flows easier and minimizes completely fucking it up. After that I apply Soulstone Blue in the usual method.
Sometimes after this, you may want to go over and clean any white areas that shipped or had something mark it a bit. After that, varnish the model again, this time sealing everything together. For this last step I use Testor’s Dullcote. While insanely overpriced, it’s stupid good at protecting models.
RichyP's Method - Click to Expand
48hrs before the original scheduled date for this article someone spotted there were no White Scars painted for the article with a regular brush, so I rummaged through my bits box to mash up a White Scars-looking marine.
Painting wise, while my intention was to do the white with Contrast paints, it didn’t work out as well as expected to I layered white over it. In hindsight Corax White primer would’ve probably worked a lot better, along with thinned Apocethary White instead of neat. Anyway…
Step 0

I started by priming the model in Wraithbone spray. As I mentioned above if i was to do this again I’d probably use Corax White instead, to reduce the number of layers of white in step 2.
Step 1

Cover the parts of the model that will end up white in Apothecary White Contrast paint. Like with all Contrast paints try and keep your brush strokes in the same general direction to help avoid streaking and pooling. Use the brush to soak up any puddles that form at the lower parts of the miniature. I also applied a mix of Darkoath Flesh Contrast Paint and Contrast Medium 1:1 to the face so the two colours could dry at the same time.
The base was washed in Athonian Camoshade.
If you use Corax White, I’d thin the Apothecary White about 1:1 with Contrast Medium at this point to take some of the greyness out of the paint.
Step 1.5
I wasn’t happy with how grey the result was so I did a test on a couple of armour panels using thinned Vallejo Model Colour (VMC) White…

You can see how much better a couple of very thin coats of VMC White worked, so that will lead to Step 2…
Step 2

Repeat what was done in Step 1.5 over the apothecary white, be prepared to do a lot of layers though. The image above was taken after about 4 layers of white and you can still see how blotchy his right leg is, but as I’m lazy we’ll just cover the area with some markings rather than do more layers of white.
Step 3

Using Blood Angels Red Contrast paint very carefully paint the red areas, taking even more care around the shoulder pad rims as it’s extremely annoying to have to fix up white paint without the temptation of covering mistakes with thicker paint to save time. Don’t worry too much about the streakiness of the markings, we’ll tidy that up later.
The metal areas were painted in VMA Gunmetal (thinned Leadbelcher would work fine).
Step 4 / Details stage


This stage is actually pretty quick but will make all the difference. For the hair/beard and any parts that are going to be black (pistol casing, sword, ribbing on armour etc..) mix some Abaddon Black with Contrast Medium (About 2:1) and wash over those areas (be carefull not to get it on the white or skin). Do the same in the eye sockets too.
After the eye sockets have dried, dot a bit of Wraithbone on either side to give you the pupil in the middle and some nice dark recesses.
For the red areas, paint a small edge highlight of Lugnath Orange. If you mess up the chest eagle, don’t panic, apply some Blood Angels Red or Carroberg Crimson over it and it’ll look great. I didn’t even bother trying to pick the feathers out, I just painted lines of orange over the outer 2 edges on each side and washed the whole thing to save time.
Tidy up any red areas with Evil Sunz Scarlet and draw any scribbles or markings with a fine brush.
Highlight the nose, ears and ridges around eyes with Kislev Flesh.
Finally using neat white, put a couple of spot highlights on the feet, around the top of the gorget, and on any other bits you want to make shine.
TheChirurgeon's Method - Click to Expand
I’m not usually a big space marines guy but I wanted to take on the challenge of painting white armored marines for this project. On the whole I had fun painting this guy and wouldn’t hate doing an army of them.
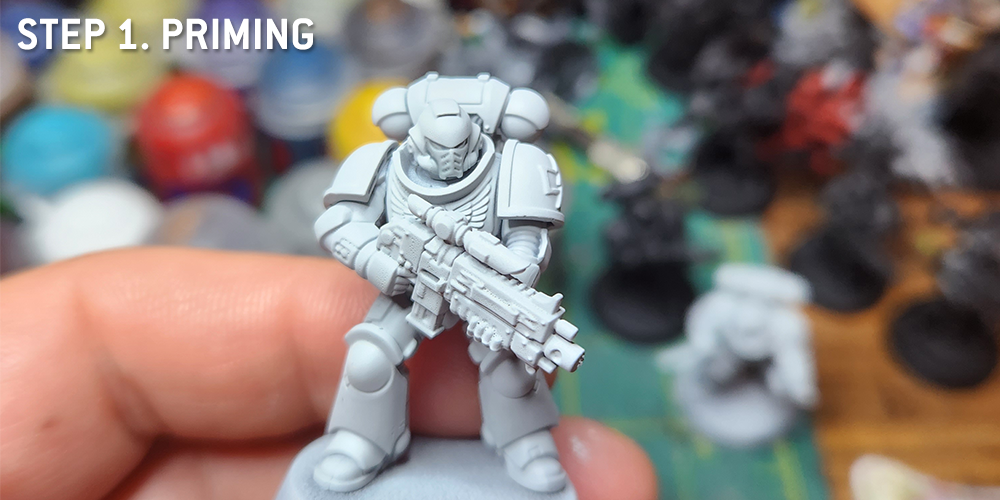
Step 1. Priming
I rarely do this, but I started by priming the model with Grey Seer spray primer. I’m going to use this for the base color of my marine – I rarely do pure white, preferring to use off-white for my white models. This gives me pure white to use as a highlight color later.
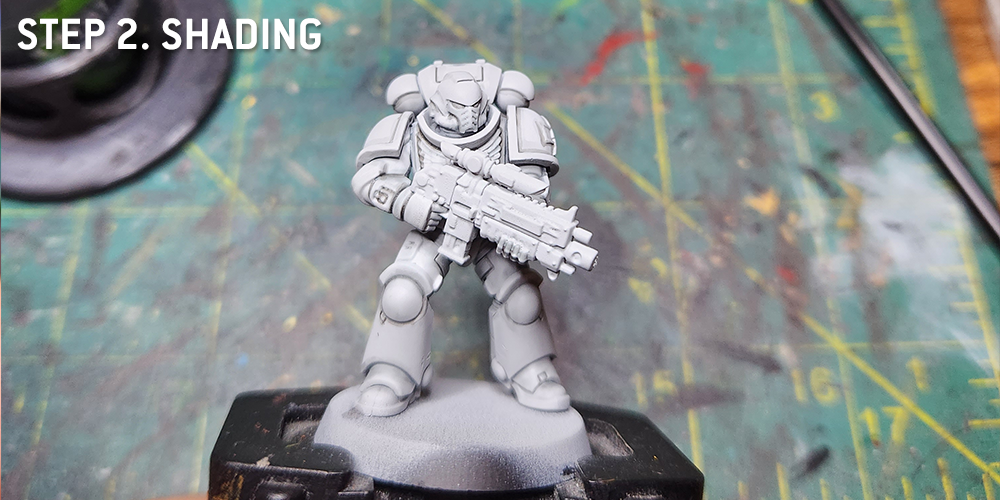
Step 2. Shading
This is the most time-consuming part of the process. I do a tiny bit of shading with Apothecary White Contrast paint, but the majority of the work in this step is using a small brush and Nuln Oil to brush in every crevice of the model. it’s not necessary to be super precise here as you can fix errors later, but ideally you don’t go too wild in this step.
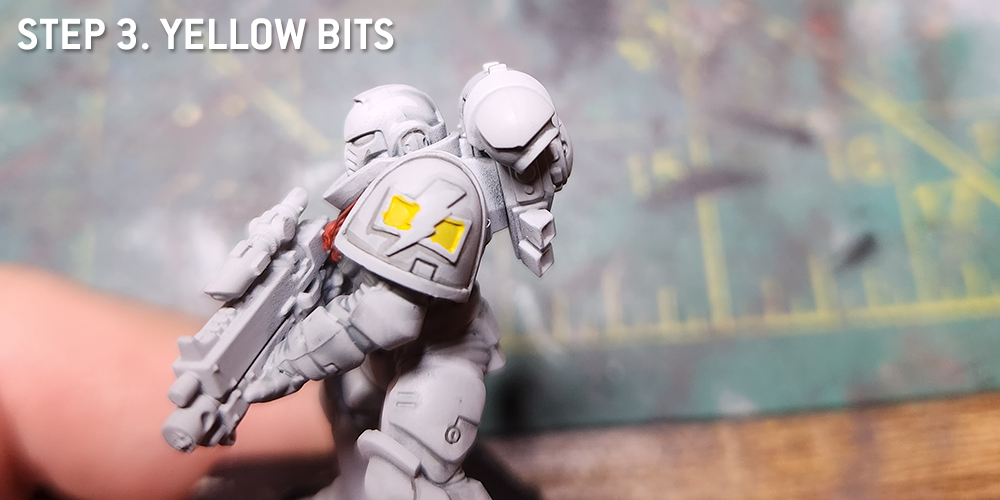
Step 3. Yellow Bits
Time to hit the inside of the chapter icon. I use Imperial Fists Contrast Paint for this.
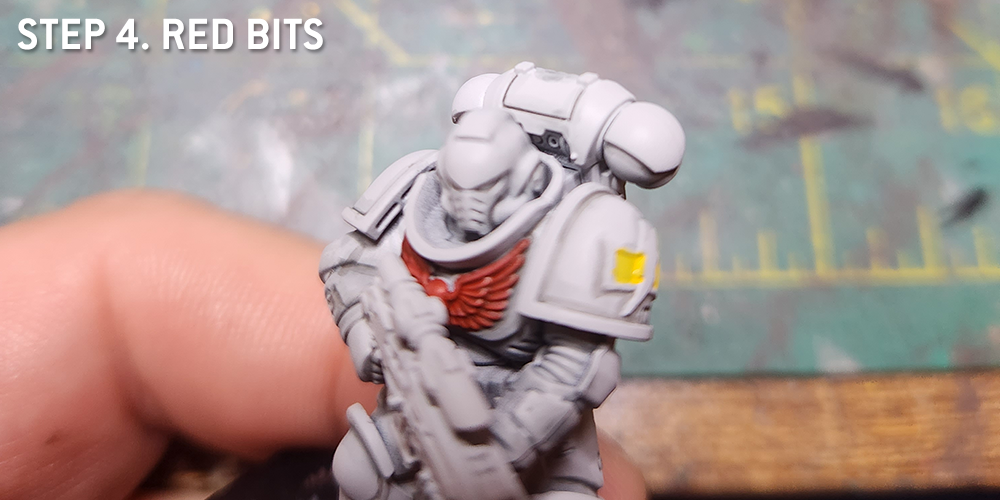
Step 4. Red Bits
I used Blood Angels Contrast Paint for the chest aquila.
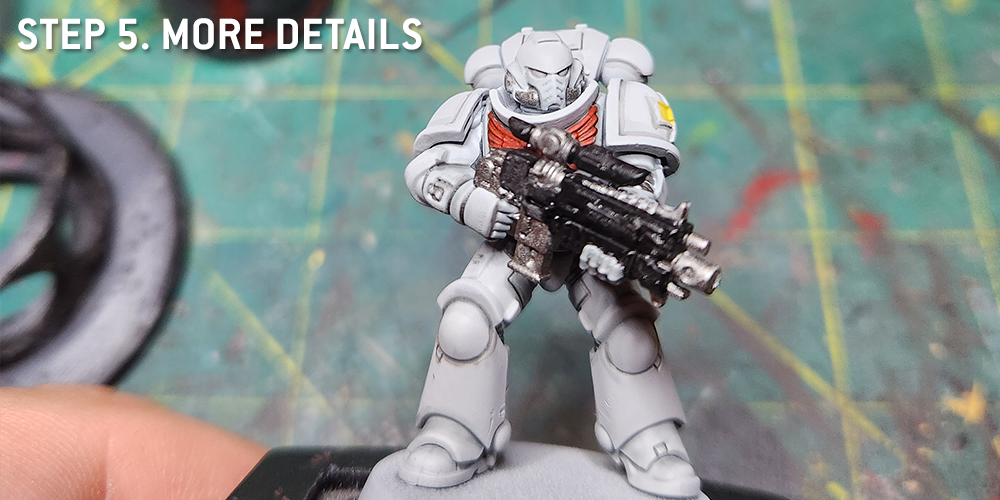
Step 5. Detail Basecoats
This is where I hit a number of other details on the model. The underarmor, cables, and bolter get a coat of Leadbelcher while the gun casing is painted with Black Legion Contrast Paint.
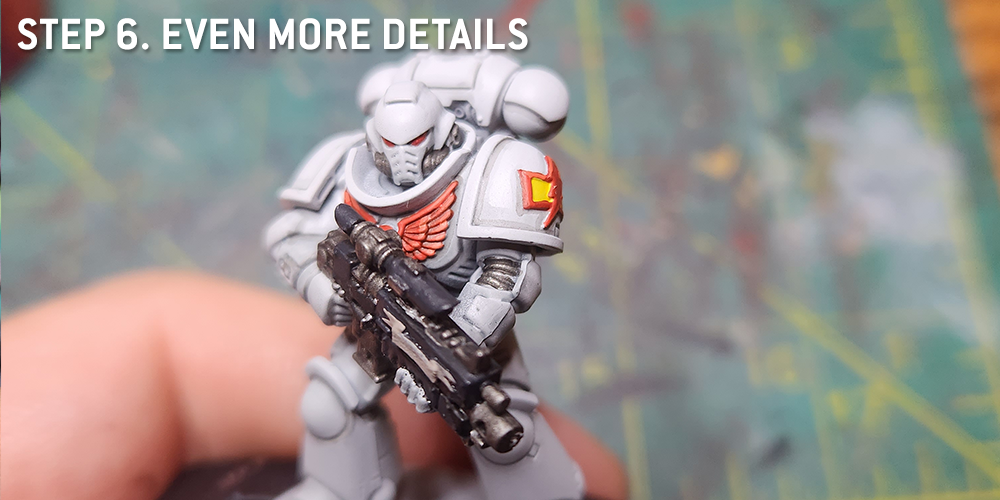
Step 6. More Details
I hit the outer parts of the chapter symbol and the eye lenses with Mephiston Red. They’re shaded a bit with Carroburg Crimson, then highlighted with Evil Sunz Scarlet. I’ll do the same shading/highlights on the aquila as well.
This is also when I paint the scroll on the bolter. It’s Rakarth Flesh shaded with Agrax Earthshade and highlighted with Agrax and Reaper Polished Bone.
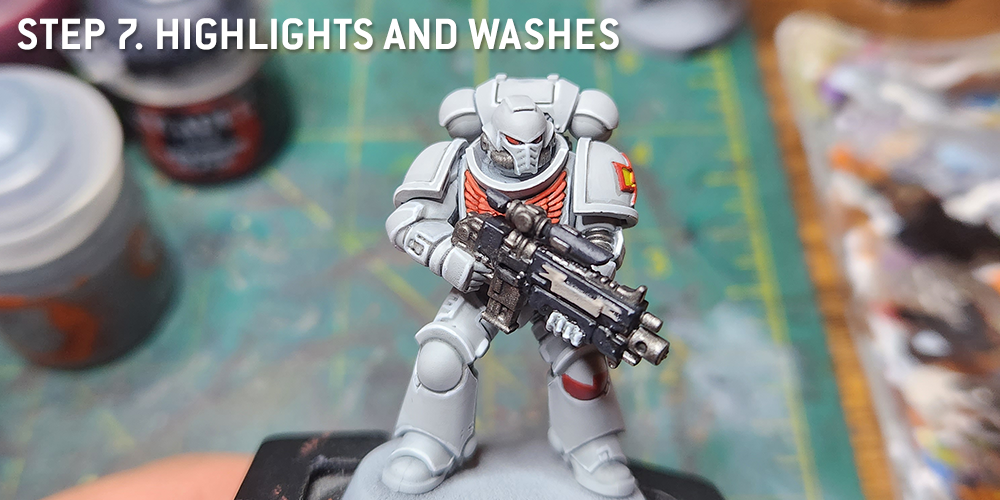
Step 7. Highlights and Washes
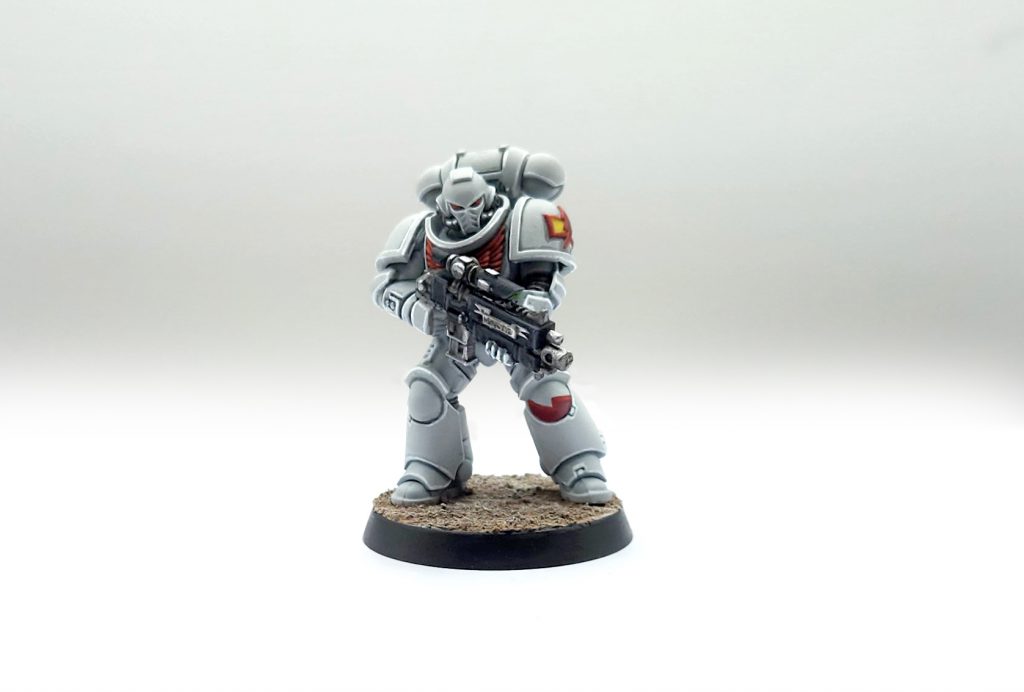
An odd final stage, this is where I do the final highlights and washes on key elements and add the squad marking to the knee. I clean up the armor around the cracks and then edge highlight everything with Reaper Pure White. I also wash the metal parts with Nuln Oil and edge highlight the gun with Mechanicus Standard Grey. The squad marking on the knee was done with Mephiston Red, shaded with Carroburg Crimson, and edge highlighted with Evil Sunz Scarlet.
And that’s pretty much it. The whole thing was pretty easy, with the shading being the most time-consuming part. The marine may be off-white in the end, but he’s white enough that it works on the table and looks great.
Ghazk's Method - Click to Expand
Ghazk is a local wizard who seems to show up to game night every few weeks with a brand new, fully-painted army, as well as some completed commission work for someone else at the store. Nobody is quite sure how he manages it.
In early 2018 I set out to put together a 1000 point Zone Mortalis force of Horus Heresy era White Scars which I was attracted to because the chapter was rarely seen in the 30K community. The few White Scars armies you would see would almost always be the stereotypical flood of bikes and I wanted to do something unique.
I had read a bit of fluff talking about how while White Scar recruits from Chogoris embraced the Mongolian inspired style of warfare, there were also recruits from Terra that embraced a more traditional Astartes approach to warfare. I took this idea a step further and asked myself how un-White Scar can I design this army? I decided to include the heavier marks of armor, inducted cybernetica, plodding artillery, and most importantly, no bikes!
Having purchased an airbrush not long ago, I had heard that painting white and yellow becomes a lot more trivial. I did some experimentation and came up with a quick and effective process for painting white. It turned out so well that I decided to expand the Zone Mortalis force into a full blown 3000 point army. Here is my process for the white basecoat:
Step 1: Priming
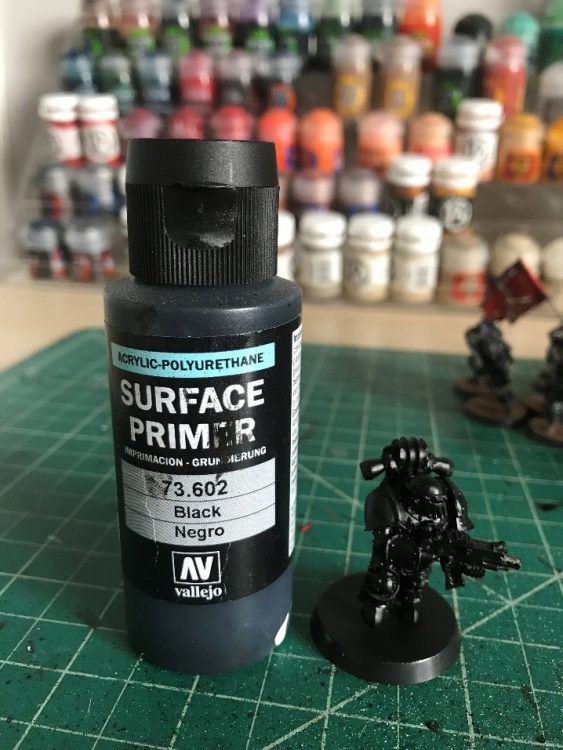
A simple coat of black primer! I shoot mine through my airbrush, but rattle can black works just as well in my experience.
Step 2: Cold Grey
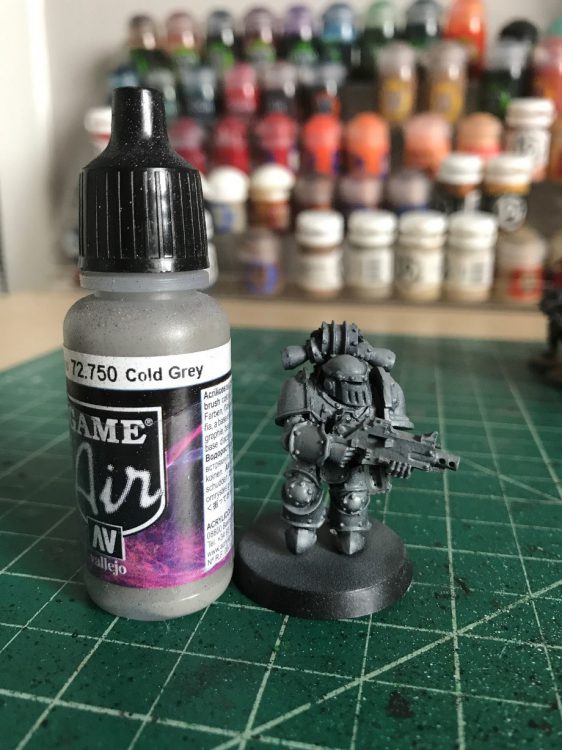
Next, I do what I call an 80% zenithal of Cold Grey. What I mean by 80% zenithal is that I spray from above, but I’ll roll the spray angle down to close to horizontal to cover about 80% of the model. You can only see black showing out from under the most extreme overhangs./
Step 3: Dead White
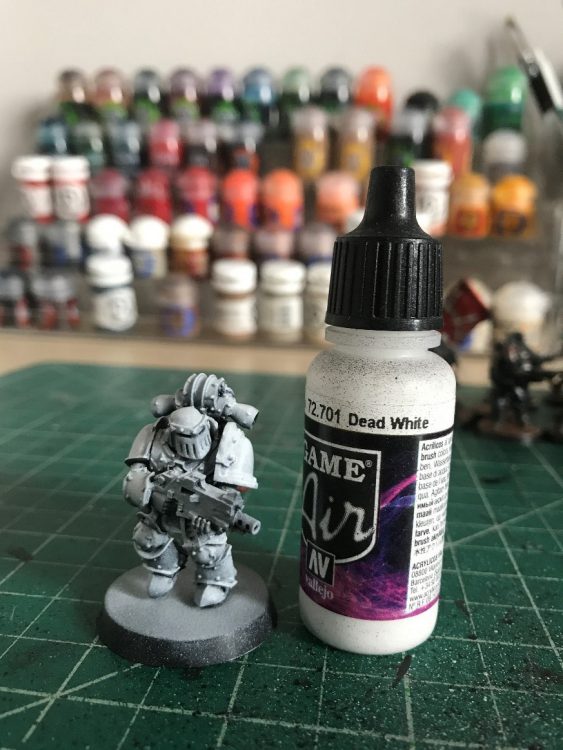
This step is a more traditional zenithal. I’ll spray from directly above and roll down the sides only enough to get almost full coverage on the most exposed areas like the shoulder pads and head.
Step 4: Sponging Leadbelcher
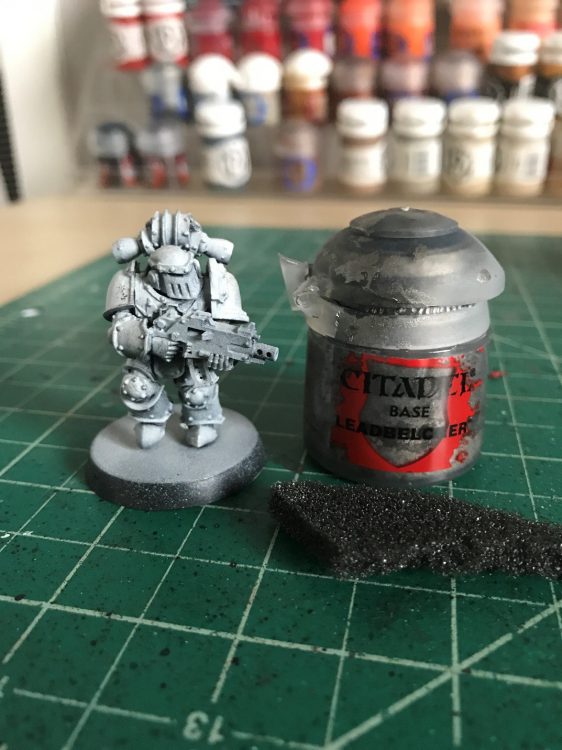
Finally, I’ll do a pretty generous sponging of Leadbelcher. Paying special attention to get any long sharp edges. This step really adds a lot of contrast to the white and brings out a lot of detail.
Finish: The rest of the details.
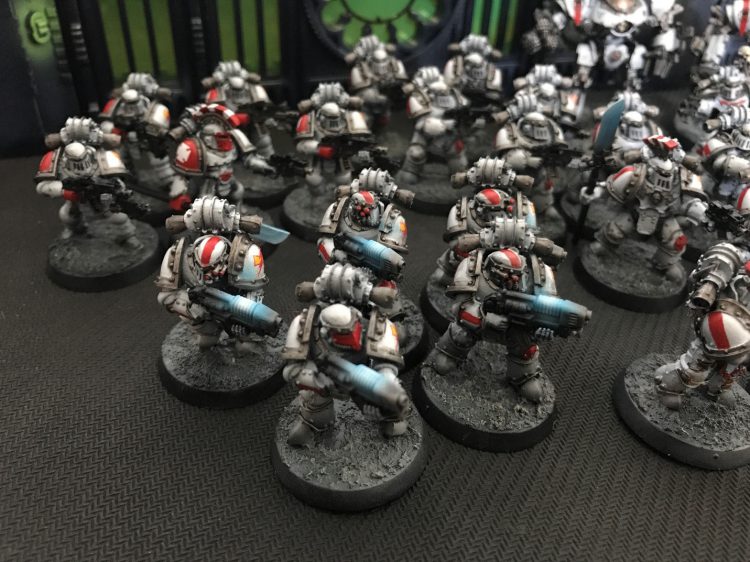
The rest of the details are done in a traditional manner. Metallic trim is done with Leadbelcher followed by Nuln Oil and a silver drybrush highlight. The black weapons are done with Abaddon Black followed by a drybrushing of P3 Greatcoat Grey. Add a little red for flavor. Easy and effective!
Soggy's Method - Click to Expand
The White Scars have long been an underrepresented Legion on the table and with the advent of Heresy 2.0, I decided it was time to be the change I wanted to see in the world. My approach is largely cribbed directly from Alfredo’s method, although a little bit lazier as that’s how I roll. Like his method, this approach strictly requires an airbrush – in theory you could just prime with White Scar, but your white will lack depth (not that you could tell from the photos below).
Speaking of building depth, we start off with black – counter to all common sense. The subsequent 3 photos may look the same, but trust me there is a slight build up in the white. This is achieved by a base coat of AP Shark White, followed by a highlight of AP Yeti White finished with a very light zenithal of AP Matt White. These three colours make up one of the Army Painter air colour triads, starting with a grey white and working your way up.
Next we move onto the details, as this was for a character I did opt for gold trim, where normally I would opt for red.
Details:
- Red – VGC Heavy Red, highlighted with Pro-Acryl Bold Pyyrole Red
- Yellow – Contrast Imperial Yellow
- Undersuit – Contrast Black Templar
- Blue Visor – Caledor Sky highlighted with Temple Guard Blue
- Cloak – Based with Rhinox Hide followed by Steel Legion Drab, highlighted with XV-88 and Zandri Dust
- Plume – VMC Heavy Charcoal highlighted with Pro Acryl Blue Black
- Gold – Scale75 Viking Gold
- Silver – Darkstar Old Silver
- Exhausts – Darkstar Blue Steel highlighted with Old Silver
- Gemstone – AP Savage Green base, edged with AP Gauss Green and a white dot of VMC Blanco Hueso
For the base I use Vallejo Desert Sand and wash it with Fuegan Orange, this then gets hit with a light Tau Light Ocre Drybrush. The standing stones get the same treatment after they are initially hit with a Jokareo Orange basecoat.
Once all the base colours are in place, I hit the model with Vallejo Mecha Gloss Varnish and move on to the pin washing stage.
Using a small brush I use Ammo Panel Line Wash Green Brown to make all the panel lines and rivets pop. We can use enamel thinners to clean up any mistakes at this stage until we are happy with the result. I then mush on some Iron Oxide weathering powder to the legs and wipe most of it off to dirty things up a little.
Once this is done I blast the model with Vallejo Premium Matt Varnish to seal the deal and call it a day.
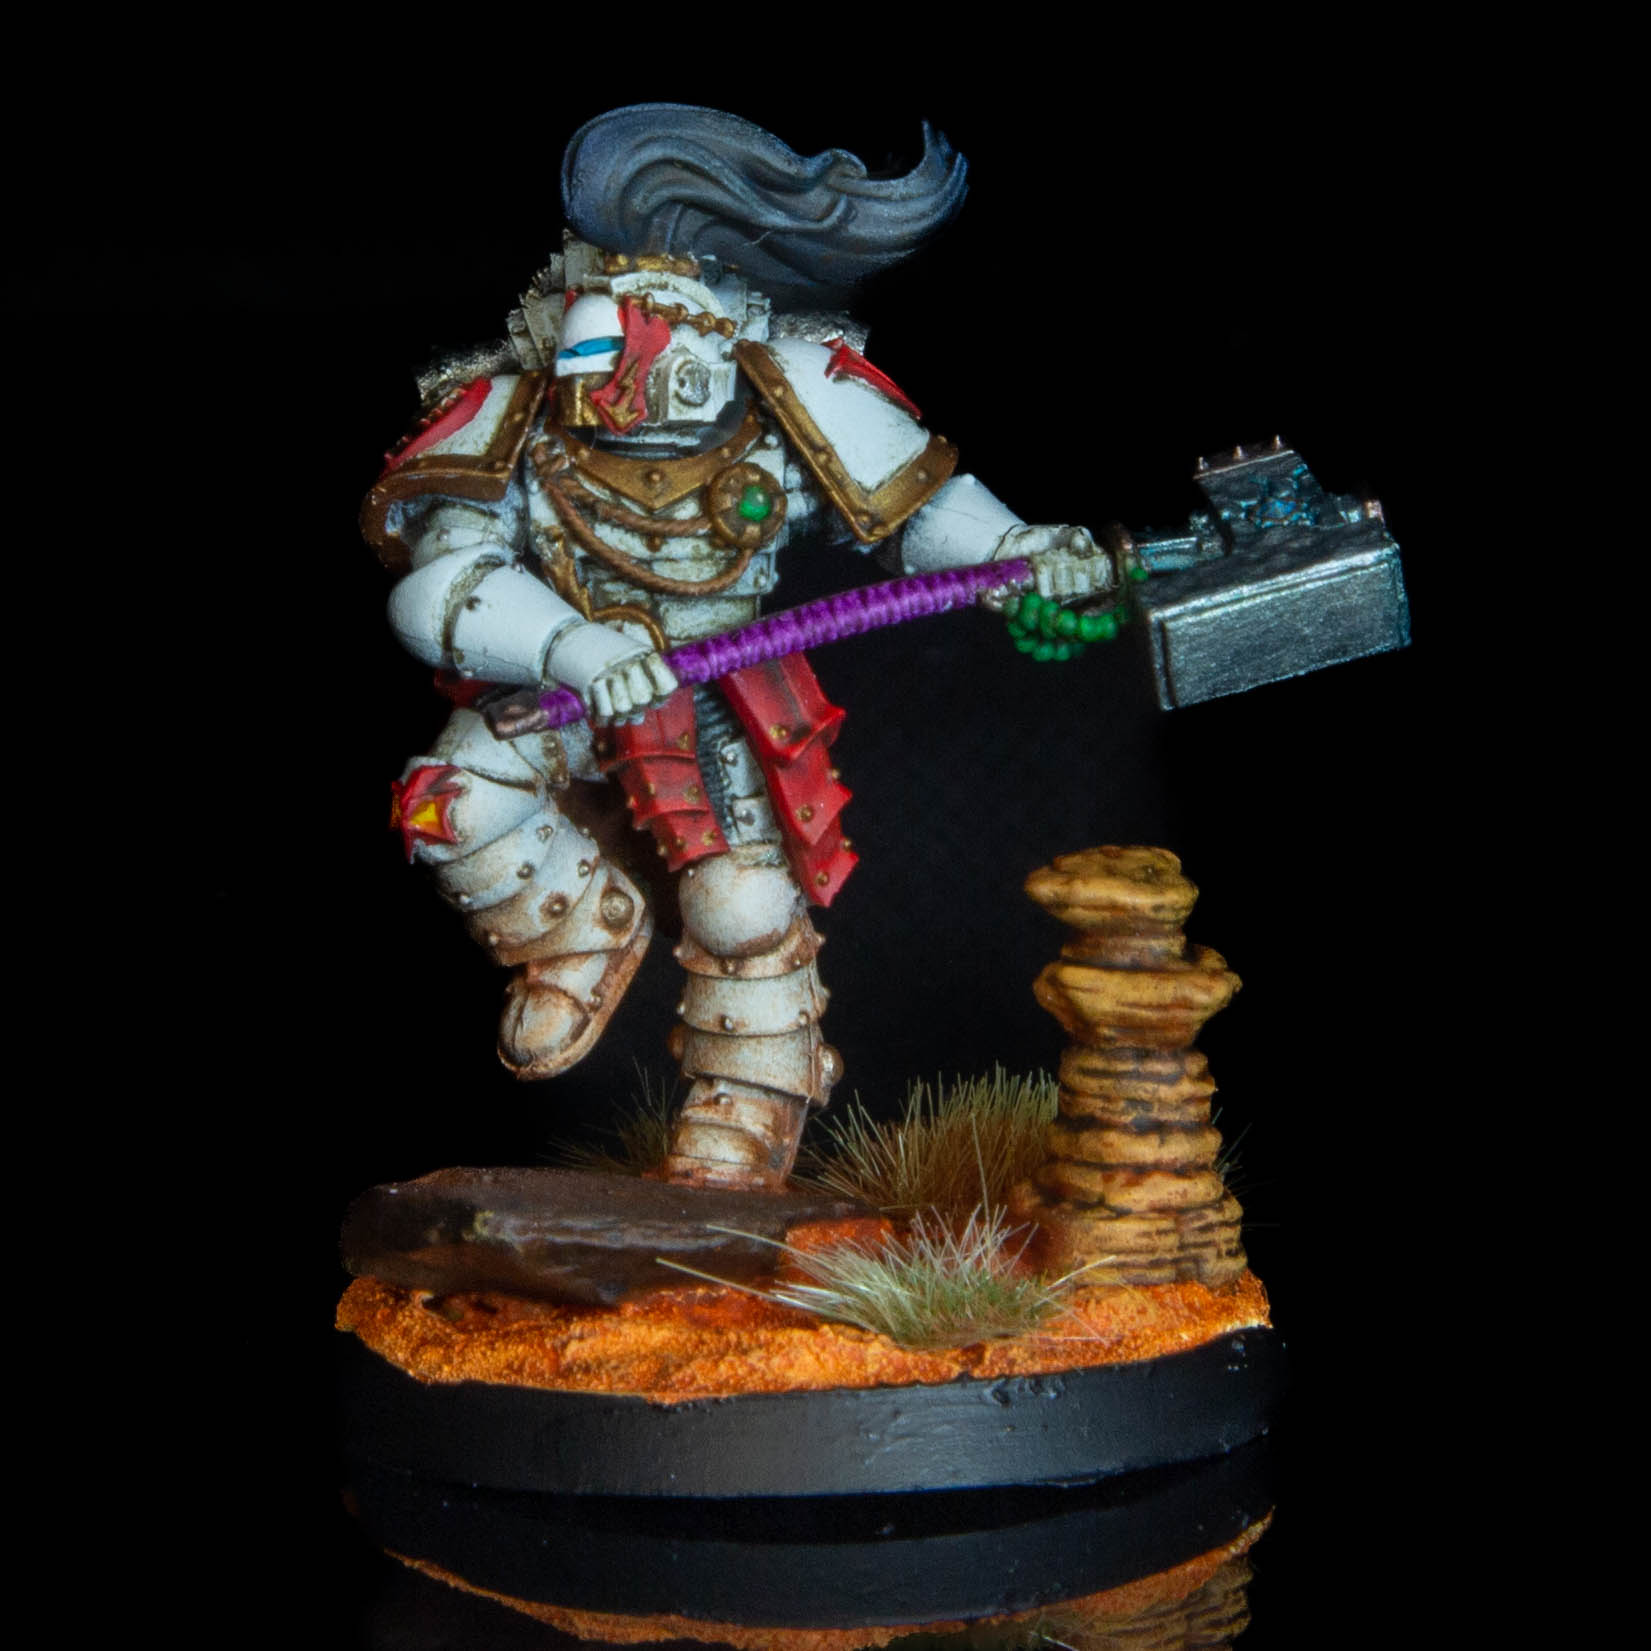
A model isn’t finished until you use Abaddon Black on the rim! I do this after the matt varnish so that the rim has a satin finish.
Final Thoughts
The White Scars are unique among first founding chapters in having white armor, and that can make them daunting to paint – if you mess up on that red it’s going to be a pain to fix. That said, they aren’t too bad to paint and if you’re careful with your red work, you shouldn’t have much to fear when it comes to touch-ups.
Have any questions or feedback? Drop us a note in the comments below or email us at contact@goonhammer.com.
This article is part of a larger series on how to paint Space Marines. To return to that series, click here.


