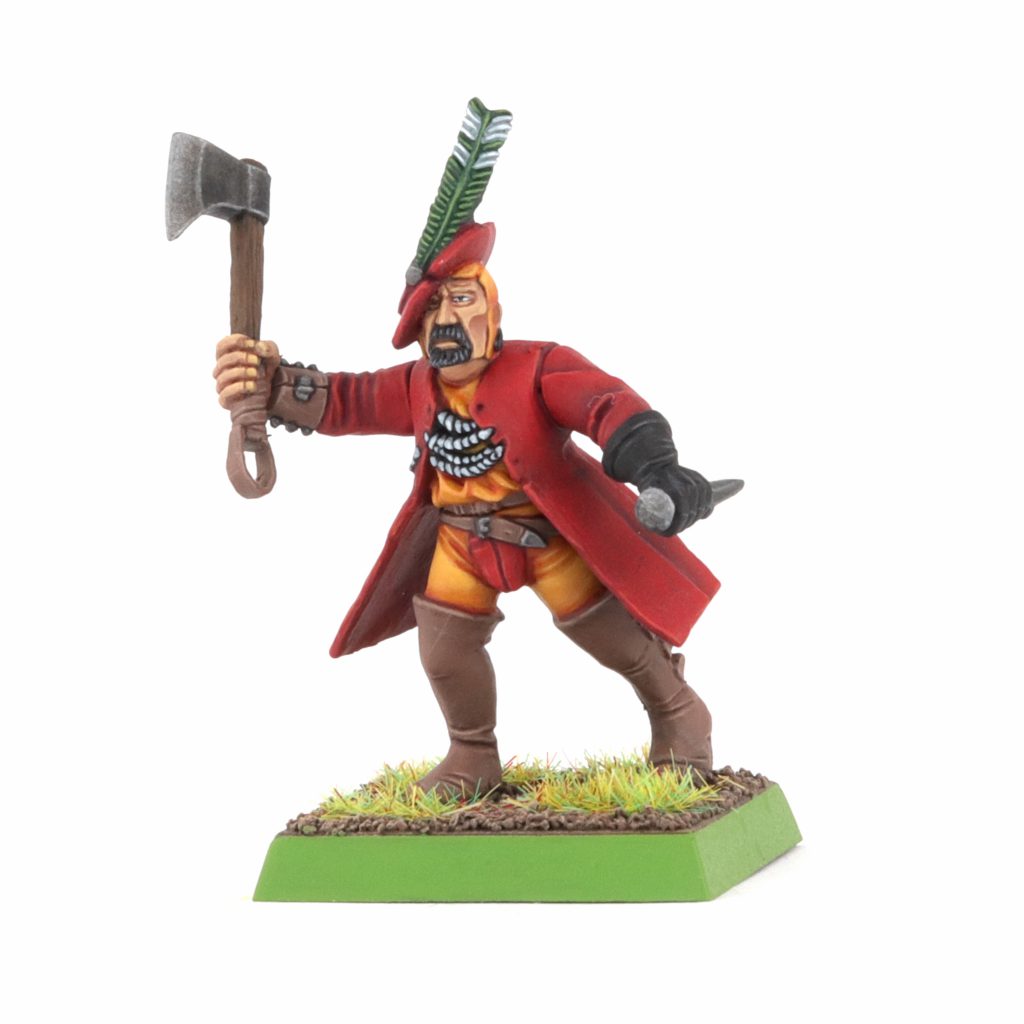
With the release of Arcane Journal: Empire of Man upon us, you might be thinking about painting up your own little army, but where to begin? In spirit of its historical inspiration, the Empire of Man boasts multiple provinces, electorates and free cities, all of which have their own heraldry. So to make it easier for you, over the next few weeks we will be picking out the major cities and provinces and showing you how to paint the most important parts of their uniform and heraldry.
First on the field are soldiers of the provinces of Talabecland and Hochland and a grim warrior of the city of Middenheim. As I first mention paints by name I will add which company they’re from, and I will also here and there propose potential paint alternatives as I see fit.
Talabecland
Part of the Grand Duchy of Talabec. Unlike their capital Talabheim, the soldiers of Talabecland are clad in bright reds and yellows.
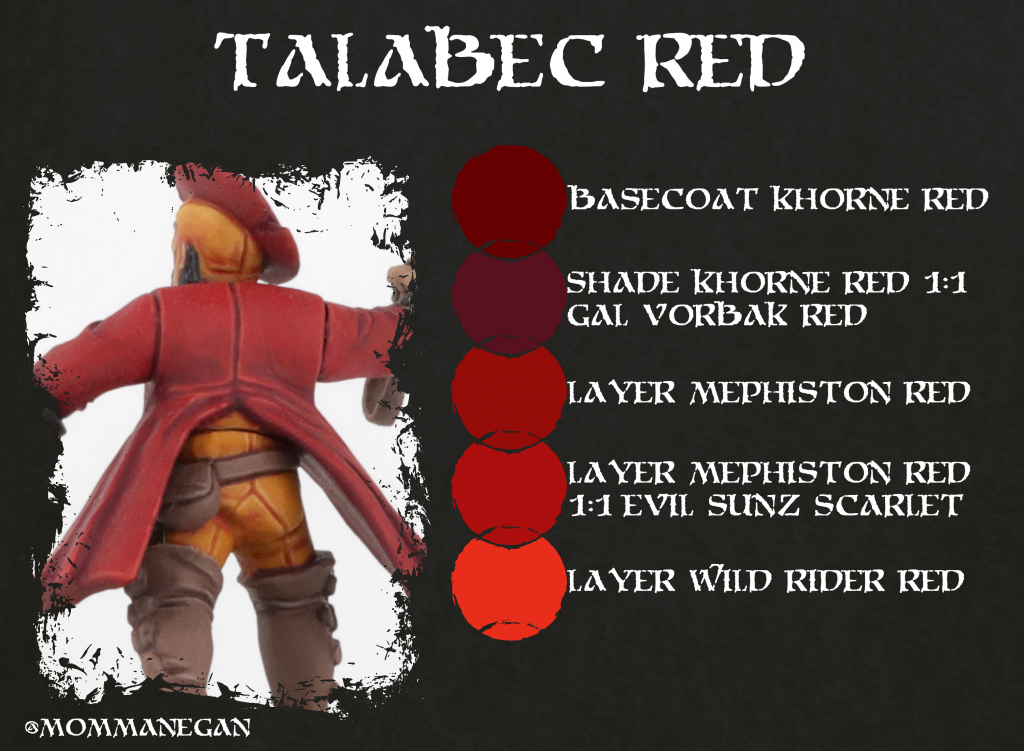
After basecoating the red areas with Citadel’s Khorne Red you want to mix up Khorne Red and Citadel’s Gal Vorbak Red in equal parts and apply it thinly into all the recesses, we don’t want to darken down any of the big flat areas or else it will take extra time to brighten those up again. Once the recesses are dried you can grab Citadel’s Mephiston Red and generously apply it to all the flat and raised areas, for a cleaner transition you want to glaze it near folds. Apply the Mephiston Red until it covers fully in all the major flat areas. Next you mix in Citadel’s Evil Sunz Scarlet in equal parts and repeat the same step, leaving a small bit of the pure Mephiston Red showing. As a last step you want to edge highlight with some Citadel’s Wild Rider Red, making sure to especially pick out the folded areas.
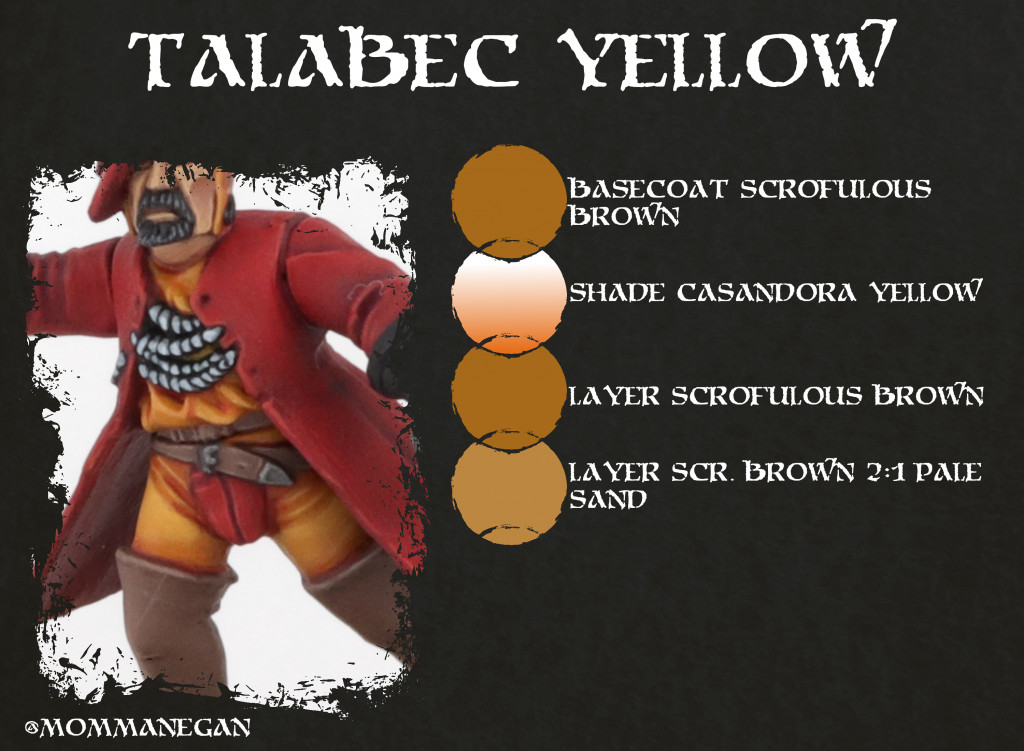
Don’t let the painting card fool you; the result of this recipe will be a nice and saturated yellow.
You want to apply Vallejo’s Scrofulous Brown all over the areas that are gonna be yellow, thin your paint and do it in multiple layers, despite not being a pure yellow the coverage is still middling at best and we need a strong and full coverage for the next steps. Once you have applied the basecoat, you take some Citadel’s Casandora Yellow and generously shade the entire area. Next up you want to reestablish the Scrofulous Brown, if you feel confident in your abilities, you can feather the paint towards the raised areas, leaving a bit of the surface shaded. The last step requires a mix of two parts Scrofulous Brown to one part of Vallejo’s Pale Sand. Apply this in thin layers over any of the raises details, on flat areas you can try and layer it towards the edges, but keep it only to near the edges or else your yellow will turn out too pale.
Middenheim
Vast and impregnable, Middenheim is a teeming mass of humanity that stands atop the Ulricsberg, a sheer-sided pinnacle of rock that juts from the surrounding forest like the broken fang of a great wolf.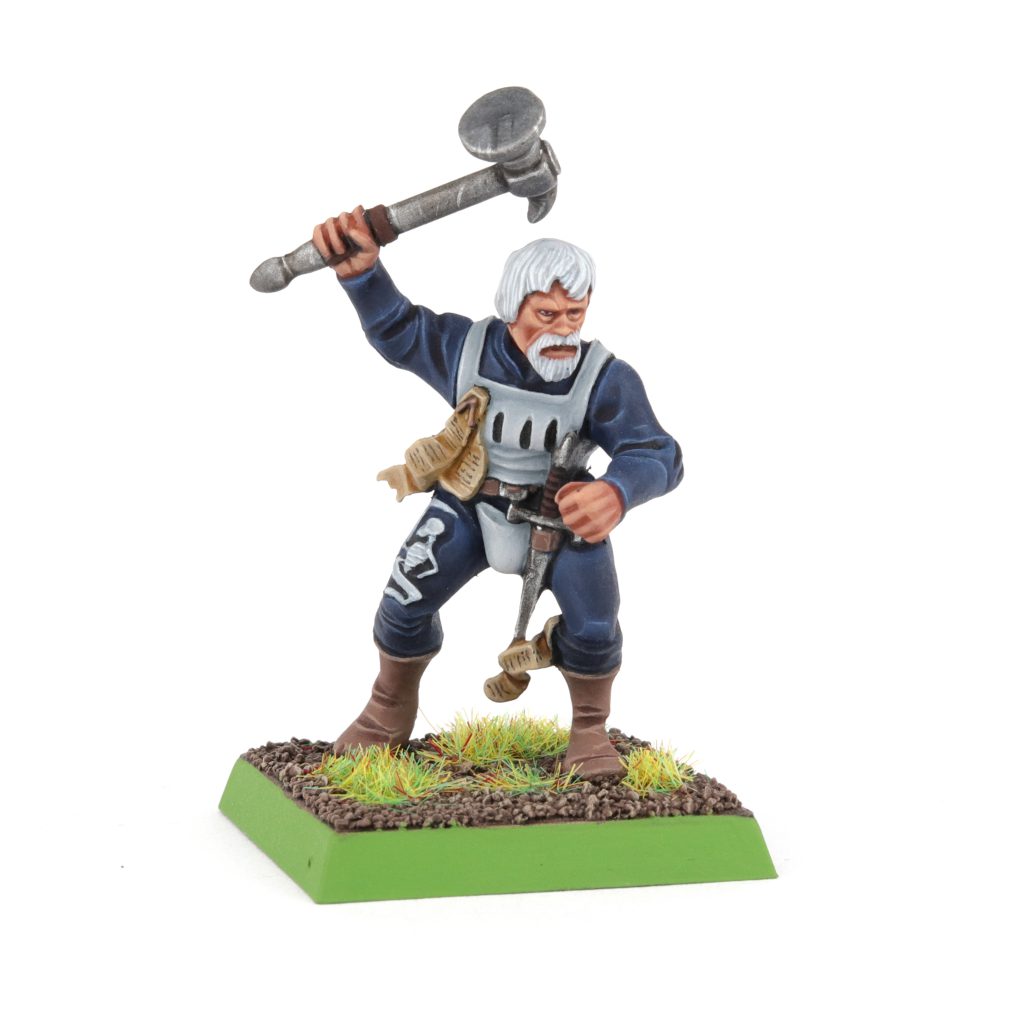
Middenheim is known as the City of the White Wolf, the symbol of its patron deity, the god Ulric. It is also the home of the Order of the White Wolf and so you can spice up some of your soldiers by replacing their swords with the warhammers you get in the Empire Knight kit. The livery of Middenheim consists of cold blue and a bluish white.
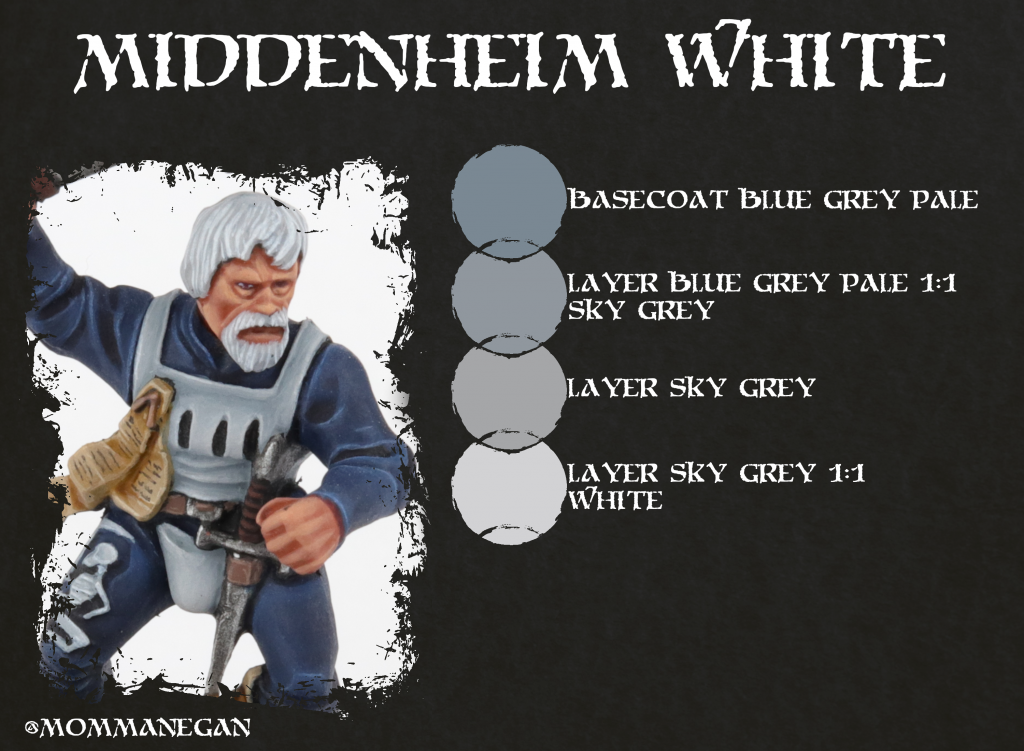
My recipe for white cloth is a bit finnicky and I would absolutely understand if people felt it too daunting for their first army, so alternatively you could get to a similar result by simply shading Citadel’s Grey Seer with Citadel’s Apothecary White or Army Painter’s Battleship Grey and then reestablishing the highlights with Grey Seer and some White.
If you however feel up for the more ‘layered’ approach (pun intended) then you can start by basecoating with Vallejo’s Blue Grey Pale(be sure that it is Blue Grey Pale and not Pale Blue Grey). Then you want to mix Vallejo’s Sky Grey into the Blue Grey Pale in a ratio of one to one and layer it over all but the deepest recesses. Next you want to build up a highlight of pure Sky Grey by leaving some of the previously painted areas visible. The last step will take some careful layering and glazing to not be too stark of a jump in brightness. Mix White into your Sky Grey in a one to one ratio and apply it to all of the edges and some of the areas hit by the most light.
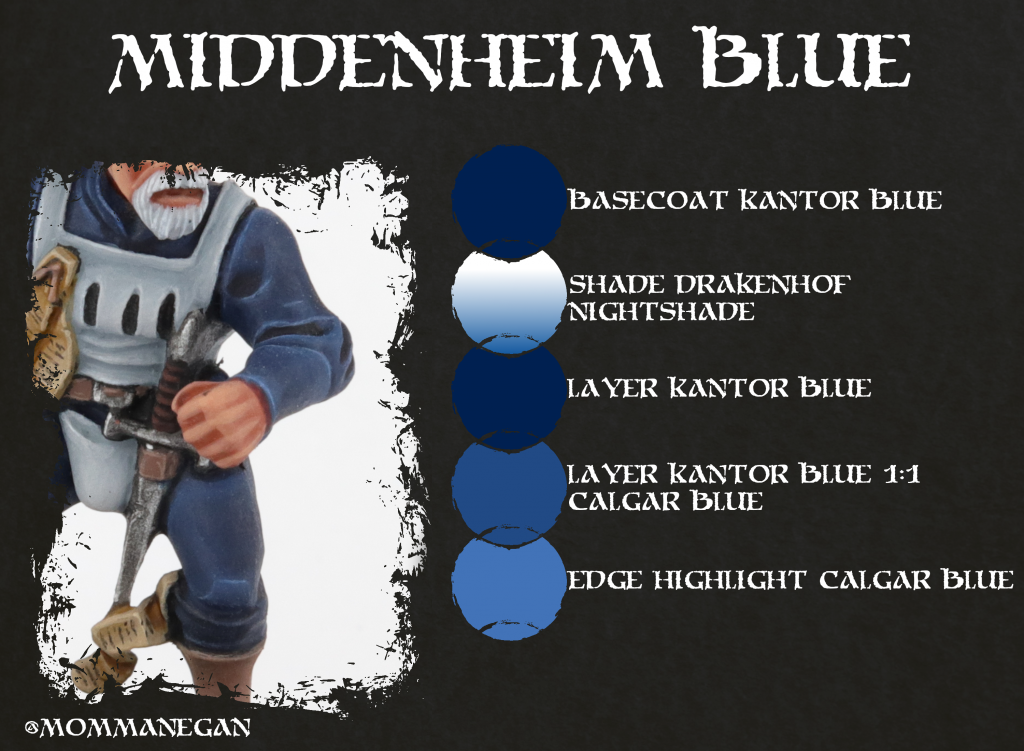
We begin by basecoating with Citadel’s Kantor Blue, be sure that it fully covers. Next you want to shade all over with Citadel’s Drakenhof Nightshade, the bottle I am using is still the old formula, so your result may turn out a bit differently from mine; However thanks to one of Juan Hidalgo’s recent videos and some testing of my own, I can confidently suggest Duncan Rhode’s Two Thin Coats Tempest Blue as a viable alternative. Once the shade has dried, you want to reestablish Kantor Blue towards the raised areas, be sure to leave some of the shades areas visible to imply stretched fabric. The next step continues this effect, but you want to mix in equal parts of Citadel’s Calgar Blue into your Kantor Blue and make a smaller highlight. The last step is an edge highlight of pure Calgar Blue.
Hochland
While part of Osterlund during the time of The Old World, Hochland is still a proud province, famed for their huntsmen and sharpshooters. Their more rural ways get them looked down upon by more cosmopolitan areas such as Marienburg and Altdorf.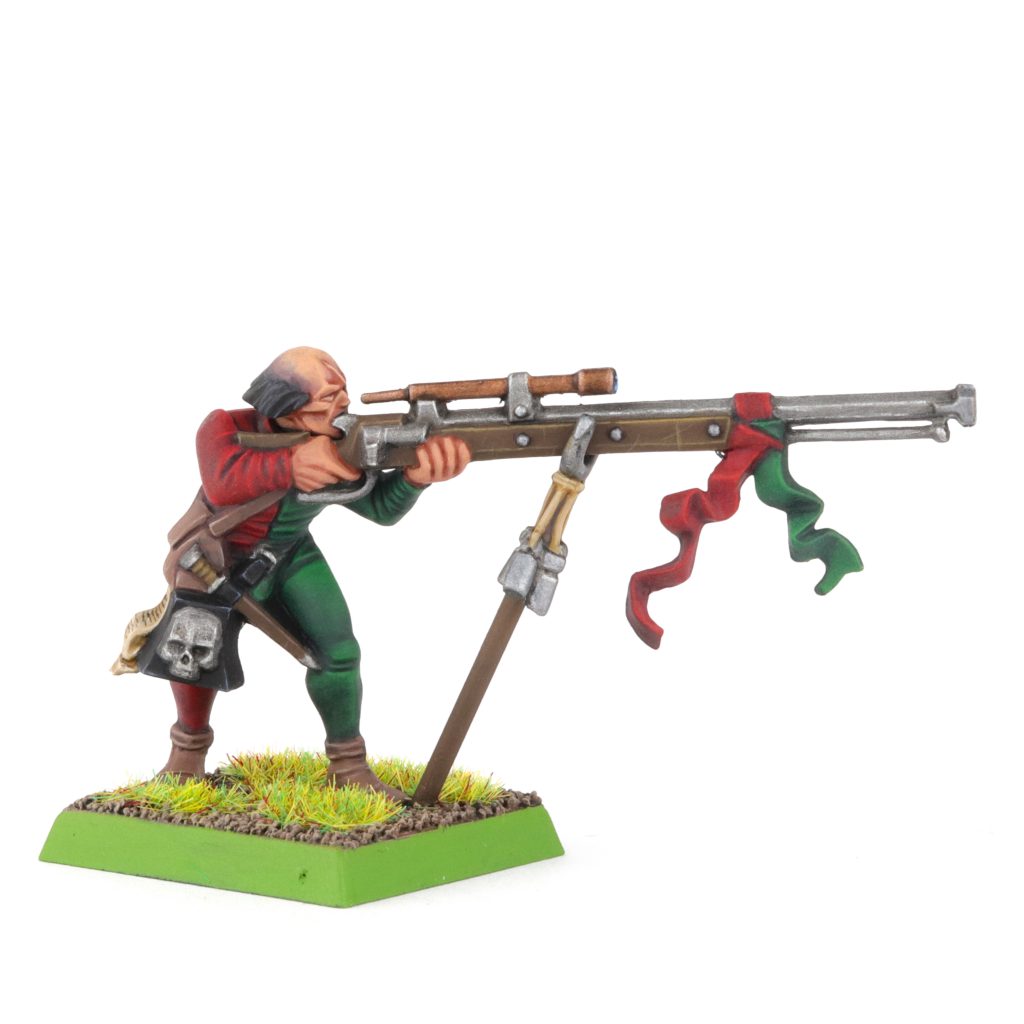
Most infamous among its legacies is the Hochland Long Rifle, also known as ‘Leon Todmeister’s Fantabulously Far-reaching Harquebus of Unforeseeable and Unperceived Bereavement’ — a terrifyingly accurate long rifle most commonly seen in the hands of experienced Engineers or more rarely in the hands of experienced marksmen among the ranks of the State Troops. They wear Uniforms split red and green.
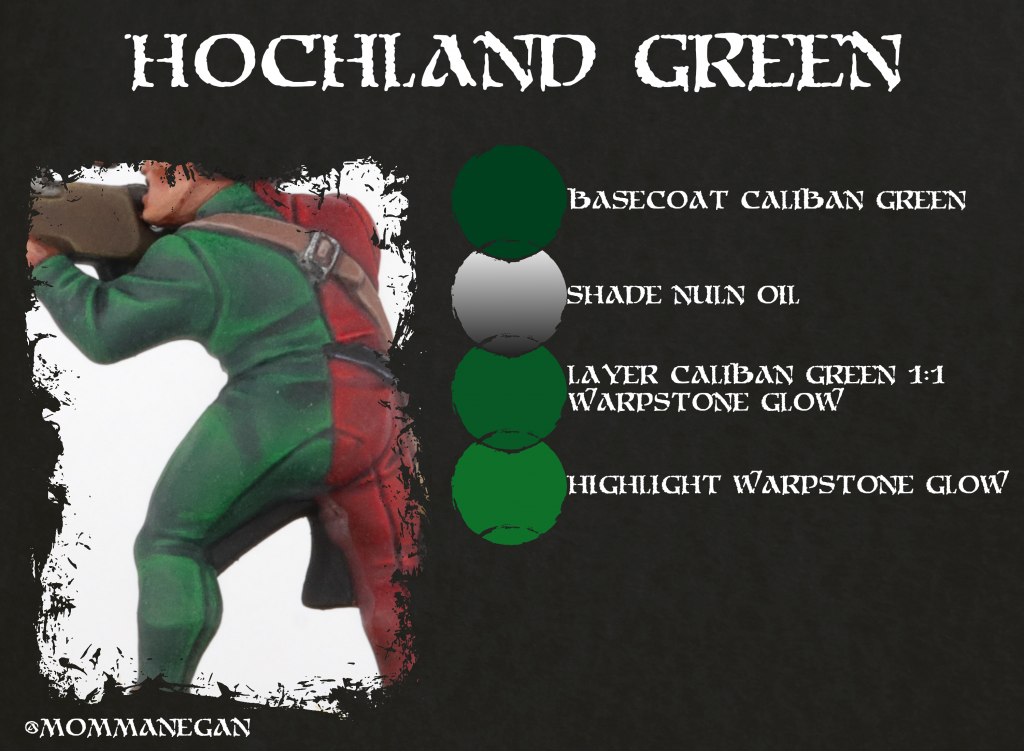
Similar to the Middenheim blue recipe, this one includes a bit of glazing to create the look of stretched fabric. If you don’t feel ready for that, you can still follow along this recipe, just instead of glazing, apply layers instead. We begin with Citadel’s Caliban Green as a basecoat which we then shade with Citadel’s Nuln Oil, or alternatively Duncan Rhodes’ Two Thin Coat Oblivion Black. Once the shade had time to dry we create mix of one part Caliban Green and one part Citadel’s Warpstone Glow, apply that mix to most of the flat areas. When applying this layer, thin your paints and work them towards the edges and folds of the cloth, leaving some darker areas in the middle of large flat areas. Be sure to finish off this stage by doing one strong edge highlight with the mix. The last step is an edge highlight with pure Warpstone glow, but if you feel up for it, you can glaze some on the upward facing areas of the model too for a brighter result.
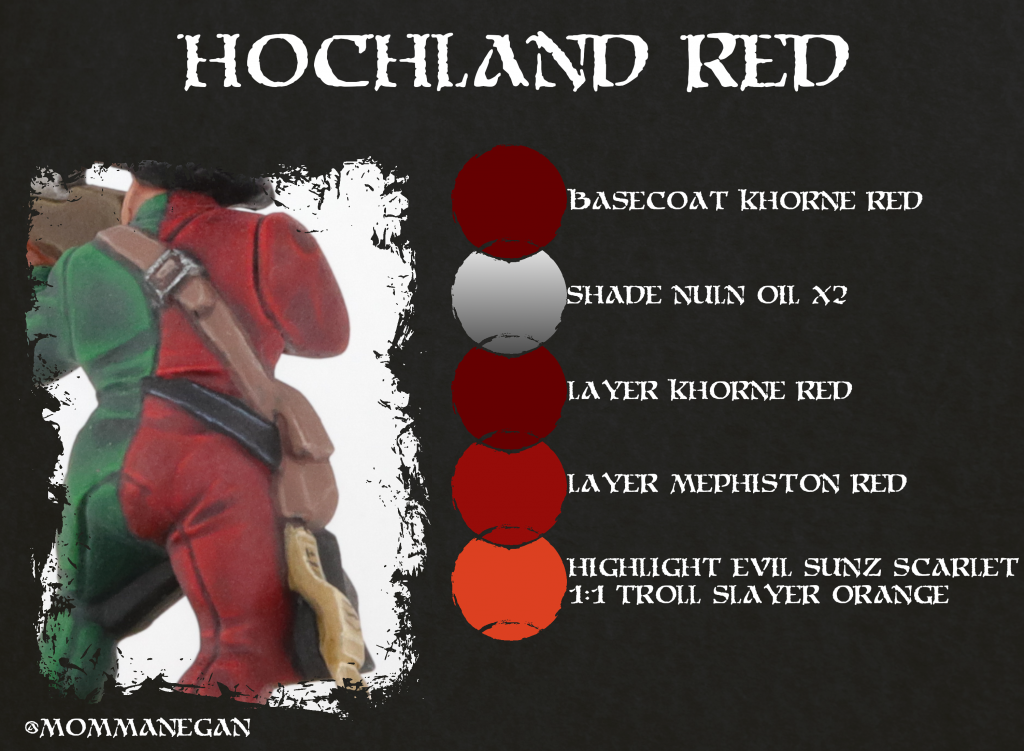
While A very bright red would definitely work for Hochland, I think a more muted red with strong highlights fits better. For that you begin by basecoating Khorne Red, which you then shade with Nuln Oil(or Oblivion Black). Once the Nuln Oil has dried, apply a second layer of shade. When that is dry, layer Khorn Red in a similar Fashion to the Warpstone Glow/Caliban Green mix from the green recipe. Then you want to edge highlight with Mephiston Red. And to finish it off mix one part Evil Sunz Scarlet and one part Citadel’s Troll Slayer Orange and apply a small edge highlight to the most pronounced edges, such as seams and areas where two articles of clothes meet.
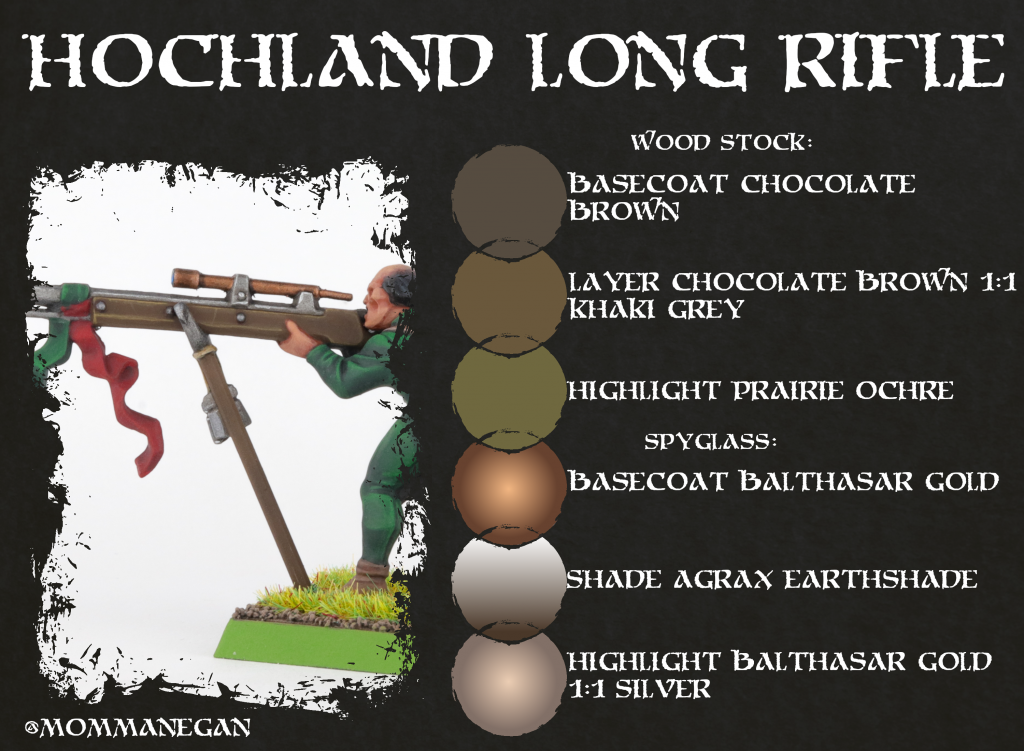
It wouldn’t be a Hochland tutorial without the infamous Long Rifle. While you can use this recipe for virtually any gun in your empire army(the difference is really just down to length), the important bit is the brazen spyglass and at least in my opinion the specific color of the wood. For the barrel of the rifle and any screws, you can use your preferred iron recipe, mine is a simple Army Painter’s Gun Metal shaded with Nuln Oil/Oblivion Black and then highlighted with any Silver. As for the spy glass, I use Balthasar Gold as my basecoat and then shade that with Citadel’s Agrax Earthshade or alternatively Duncan Rhodes’ Two Thin Coats Battle Mud. Be sure you apply the shade somewhat plentiful. As a highlight I make a one to one mix of Balthasar gold and any Silver and apply it only to the edges. The wood is basecoated with Vallejo’s Chocolate Brown and then Highlighted and layered with a mix of one part Chocolate Brown and one part of Vallejo’s Khaki Grey. As a finaly highlight I use thin Prairie Ochre from the Army Painter. When doing your final highlight, be sure to grab a small brush and do very soft and quick stroking motions across the wood to create small scratches or you can add tally marks.
That is it for the first part of this How to Paint Everything subseries; I hope you enjoy this little project and found some of the guides in here useful. Thank you for reading this and until next time!
Have any questions or feedback? Drop us a note in the comments below or email us at contact@goonhammer.com. Want articles like this linked in your inbox every Monday morning? Sign up for our newsletter. And don’t forget that you can support us on Patreon for backer rewards like early video content, Administratum access, an ad-free experience on our website and more.

