In our How to Paint Everything series, we take a look at different armies of the Warhammer universe, examine their history and heraldry, and look at several different methods for painting them. In this article we’re looking at the Leagues of Votann.

The Leagues of Votann are the newest addition to the list of Warhammer 40,000 factions, brought in at the end of ninth edition. They’re a dynamic army with a distinct aesthetic that reflects their access to Dark Age technology and a firm understanding of how that technology actually works.
In the lore of Warhammer 40,000 the Kin are divided into subfactions known as Leagues. Each of these groups have their own culture and customs, and are made of allied Kindreds and guilds which have banded together under a common purpose. Among the Leagues there are five major Leagues which dwarf the rest, as well as countless smaller and minor leagues. Each of these has their own color schemes and markings. In this article we’ll look at the five major Leagues, schemes for painting each, and offer up schemes for a few minor Leagues as well.
Covered in this Article:
- How to paint each of the major Leagues of Votann, with a look at different methods and notes on how to paint them from different artists.
- How to paint notable elements of the Leagues of Votann, such as their power weapons and lenses.
- How to paint Uthar the Destined, the hero of the Greater Thurian League.
Painting the Leagues of Votann
The Leagues of Votann are pretty straightforward when it comes to painting – the have tech that’s visually reminiscent of Imperium and T’au technology, and tends to employ a lot of geometric shapes and sharp angles and beveled and mitered surfaces. This can mean a lot of edge highlight for details combined with large, flat surfaces. Depending on your preferences the army can be as clean or dirty as you like visually.

Power Swords and Axes - Click Here to Expand
The Votann employ a number of power weapons and axes. If you’re looking for more on how to paint these glowing blades, we’ve got you covered – check out our article on painting Power Swords and Lightsabers here.
 TheChirurgeon's Greater Thurian League - Click to expand
The Greater Thurian League are the most well represented of the Leagues, with what is basically the army’s flagship color scheme in the Codex and on box art. It’s also a relatively difficult scheme to paint, in my opinion – the colors it uses are striking, but a pain to work with.
I started by priming this model with Grey Seer. It needs a colder, bluish tone and Grey Seer works well for that. Plus it’s light armor and I’m not really about trying to paint light armor over black primer.
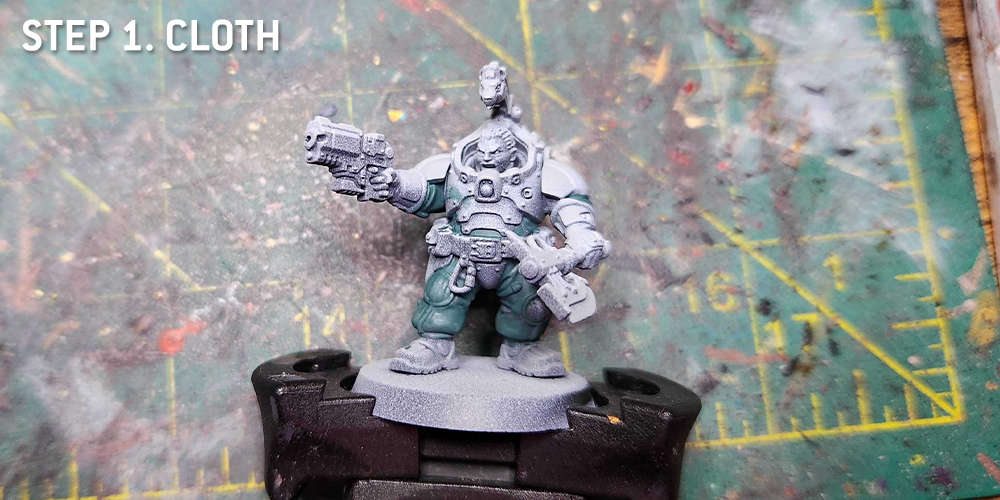
Step 1. The Cloth
I started by painting the cloth parts – the legs, arms, and torso areas not covered by armor plates – with a basecoat of Sons of Horus Green. This is my favorite part of the scheme because this is a great color to work with.
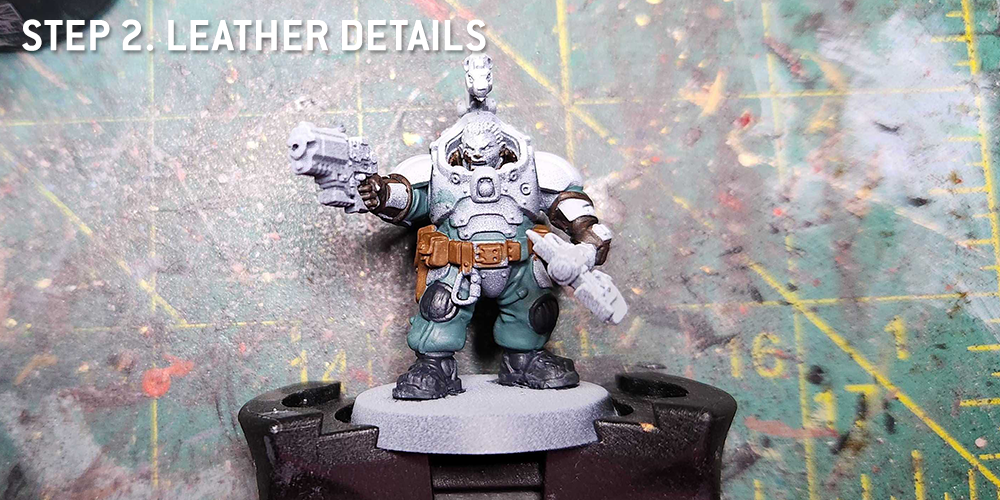
Step 2. Leather Details
Because the armor on this model is a lighter color, my goal was to hit a lot of the areas around it before doing the armor, since it’ll be easier to touch up those other parts if I accidentally paint them with a lighter color than it will be if I get brown or black on my armor after that basecoat is down. There are three specific bits I’m doing here:
- Painting the belt with Snakebite Leather Contrast
- Painting the gloves with Cygor Brown Contrast
- Painting the boots and kneepads with Corvus Black.
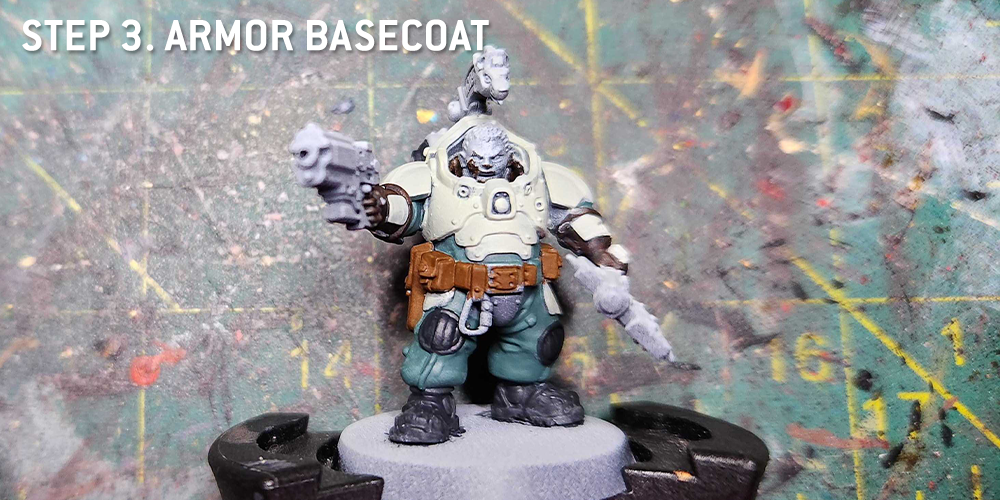
Step 3. The Armor Basecoat
Time for the Armor basecoat, the worst part of this model. I really did not enjoy working with Deepkin Flesh, which was a bit too chalky for my tastes. I had to thin it a ton, and do multiple thin coats over the armor plates on the body, shoulders, gloves, and thighs.
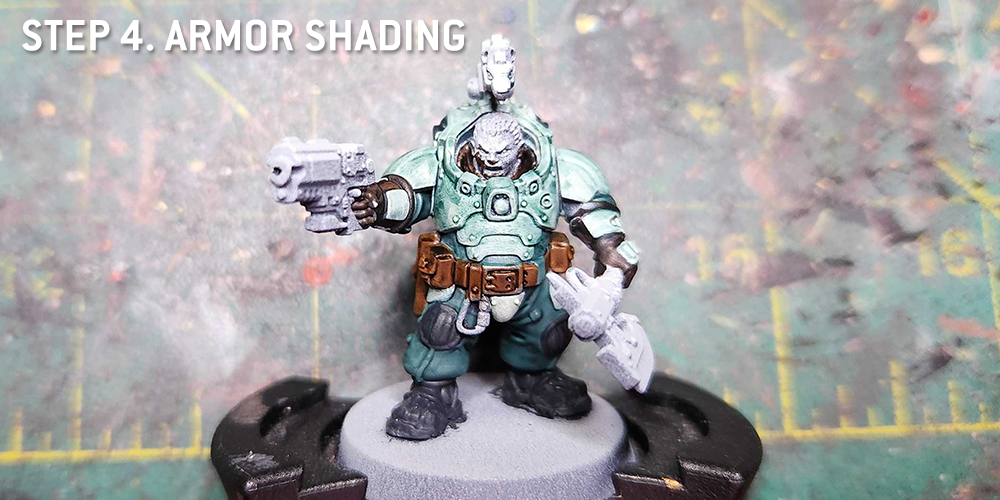
Step 4. Armor Shading
Then I ruin it all by shading the armor with Coelia Greenshade. I shaded the green clothing with the same shade as well. The Goal is to get Greenshade in all the cracks.
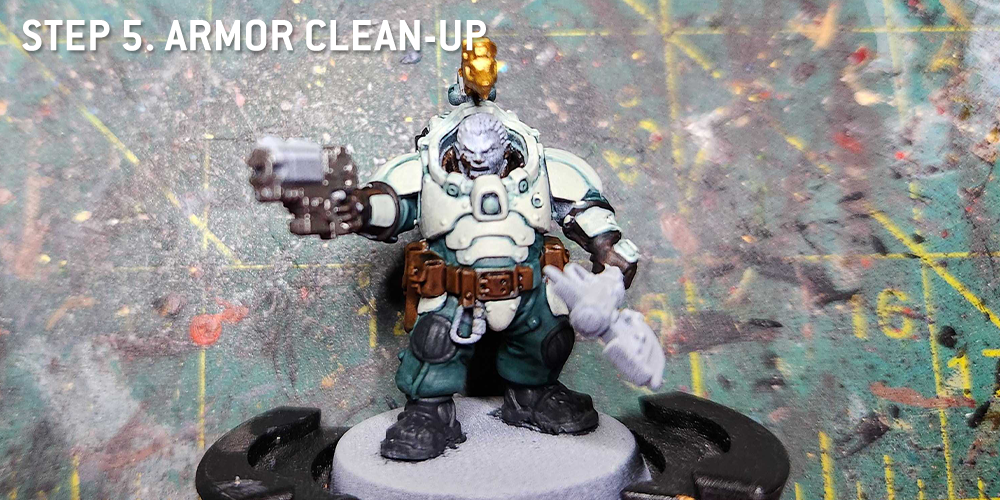
Step 5.Cleaning up the Armor and the Metal Bits
Now it’s time to go back and clean up the armor again, this time with another coat or two of Deepkin Flesh. Toward the end of the process I’ll come back and edge highlight the armor with white. I’ll hit the cloth bits with another later of Coelia to darken it.
This is also the step when I painted some of the metal bits, hitting the metal parts of the gun with Leadbelcher and the ornament with Retributor Armour.
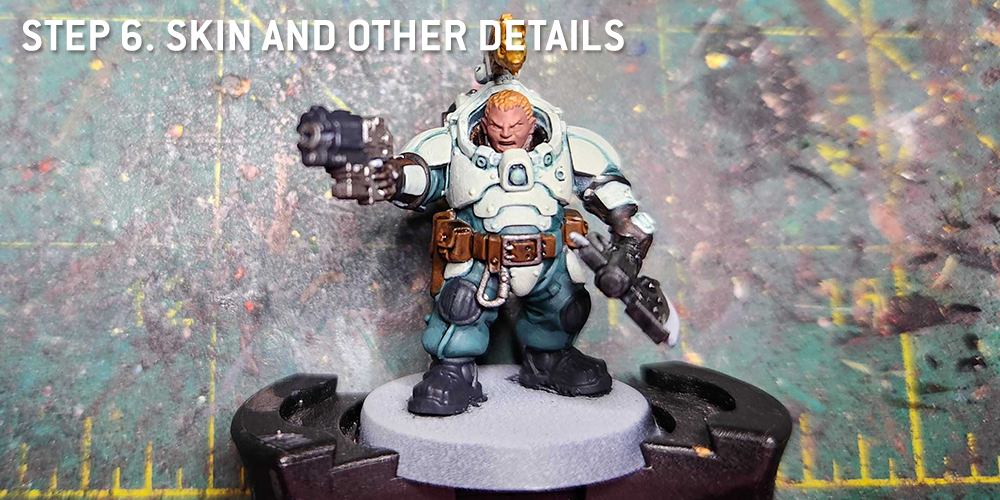
Step 6. Skin and Other Details
More detail work. I paint the gun and the axe with Corvus Black and hit some of the metal bits with Leadbelcher. The skin here is Bugman’s Glow and the hair is just Averland Sunset. This is when I highlight the cloth, coming back to it with more Sons of Horus and highlighting it with a mix of Sons of Horus Green and Deepkin Flesh.
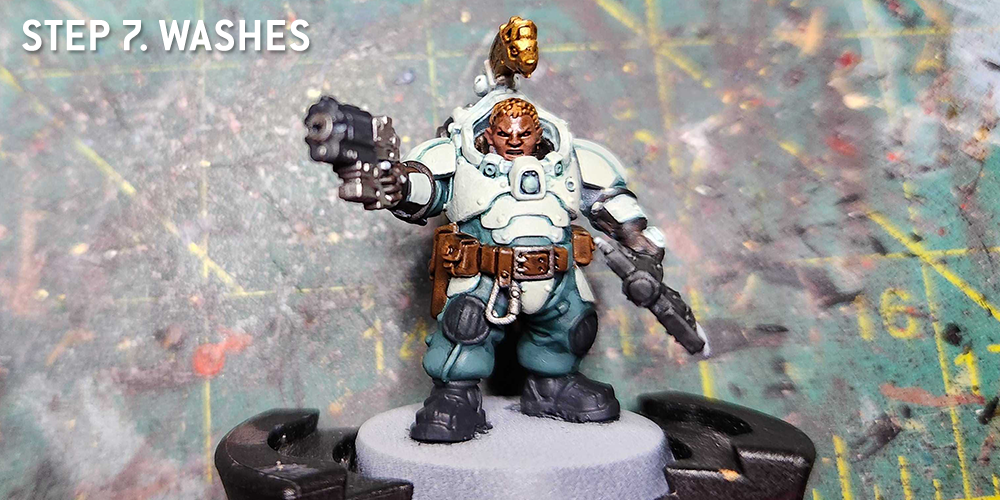
Step 7. Washes
I wash all the detail bits – the boots and gun get a wash of Nuln Oil, same as the Axe, while the gold, skin, hair, and leather bits all get a wash with Agrax Earthshade.
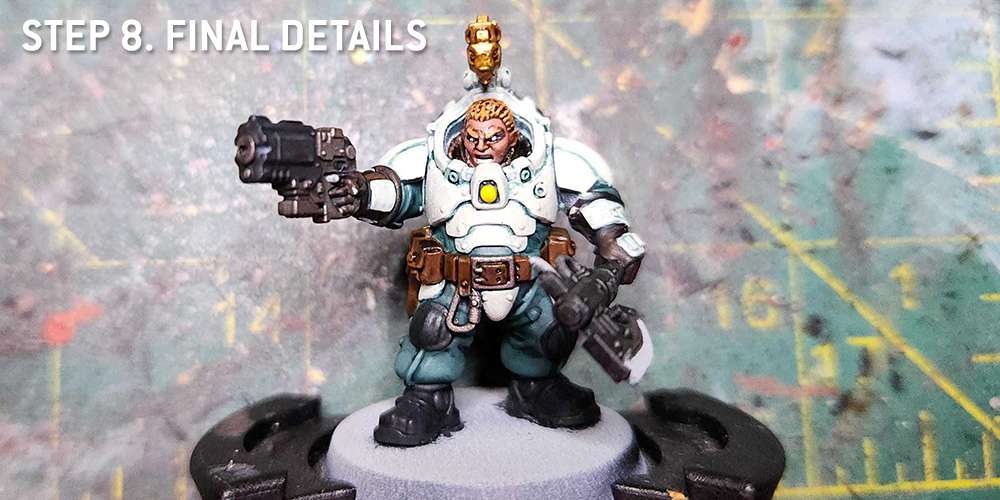
Step 8. Final Details
I’ll come back and highlight the skin and face with their original colors – Bugman’s Glow and Averland Sunset, then do highlights with lighter shades. For the skin that’s a mix of Bugman’s Glow and Kislev Flesh, and for the hair that’s a mix of Averland Sunset and Dorn Yellow.
I’ll edge highlight various parts here – the gun and boots and kneepads get highlights with Mechanicus Standard Grey, and the armor gets edge highlights with Reaper Pure White. I’ll paint the axe using my method for molten weapons – shade from white out to orange, then do a line of red on the edge and some dark brown/red specks. The final result was a pain to get to but I’m pretty happy with it.
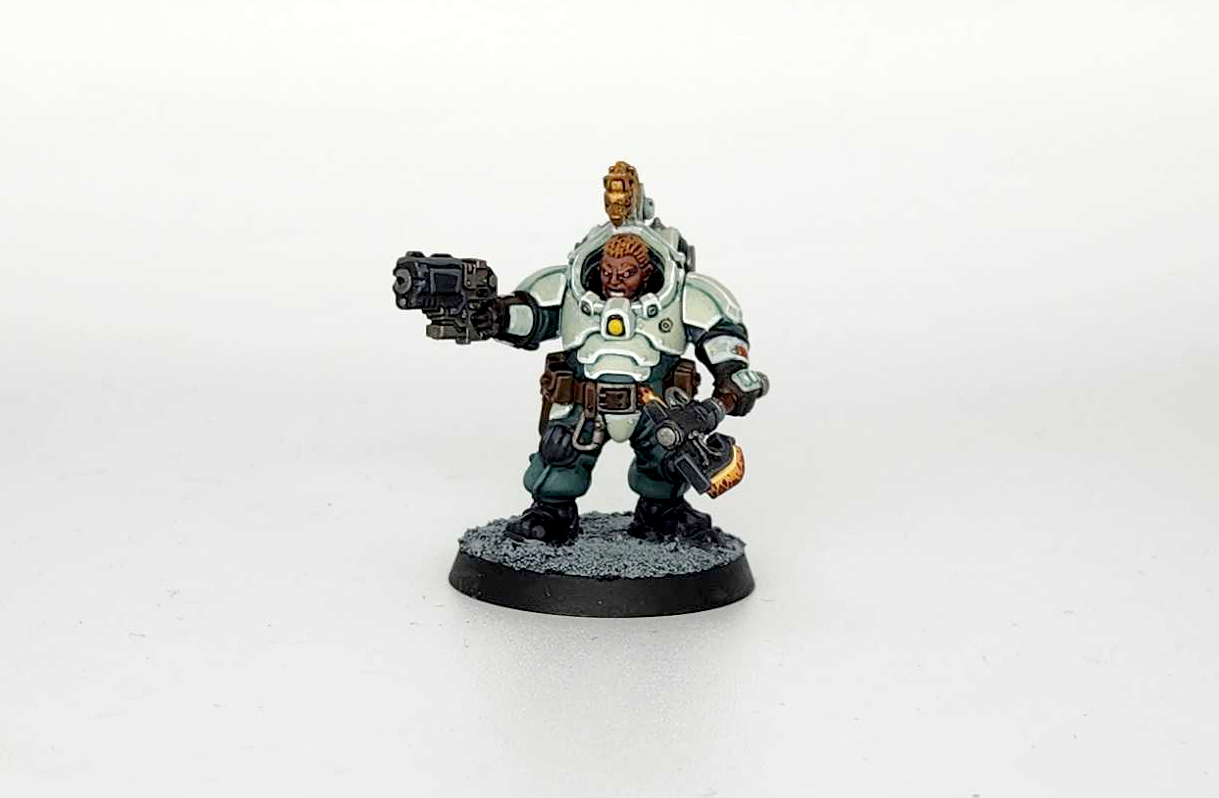

Keewa's Greater Thurian League - Click to Expand
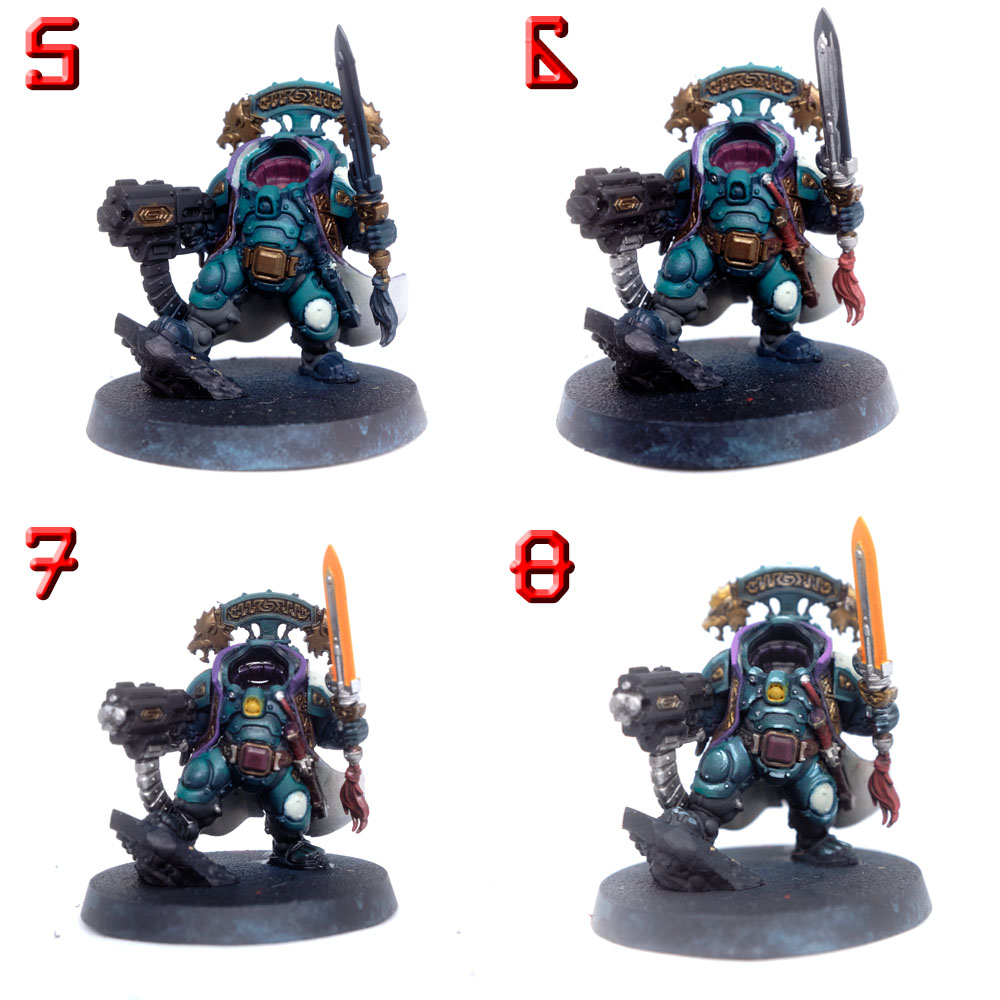
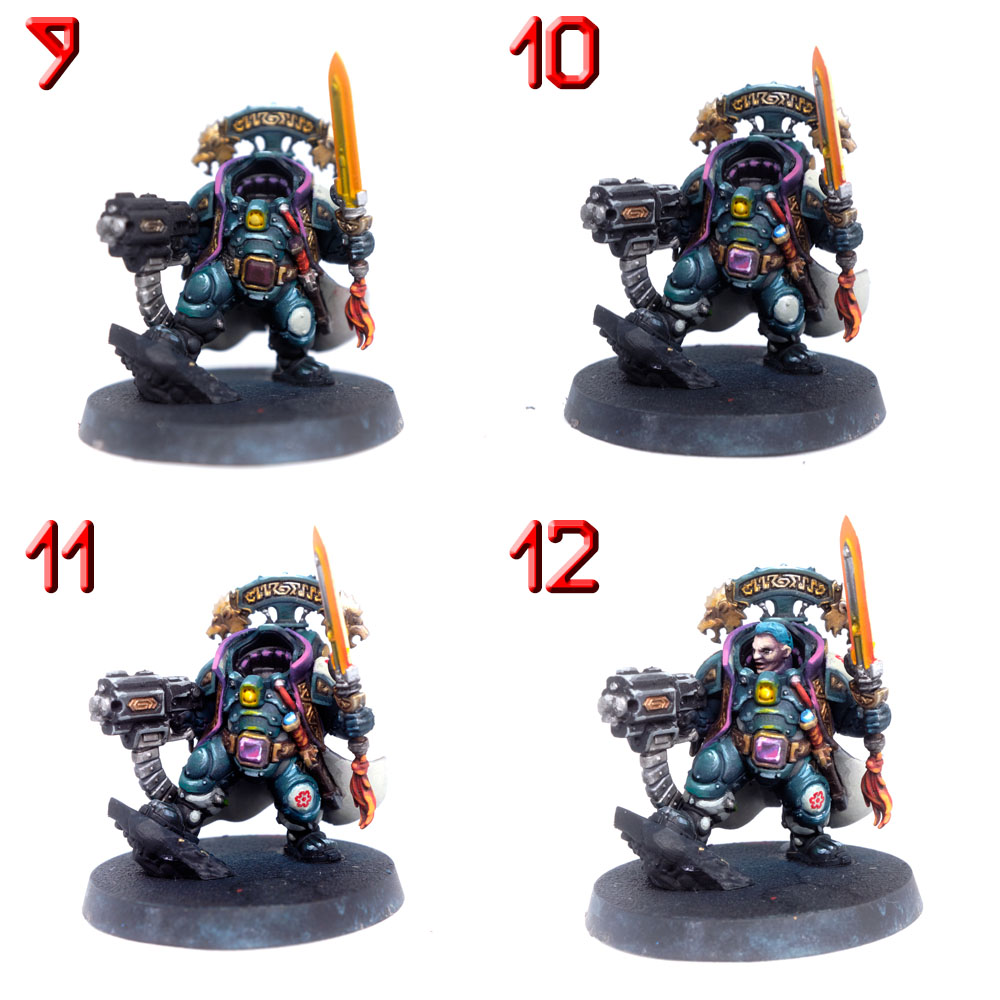
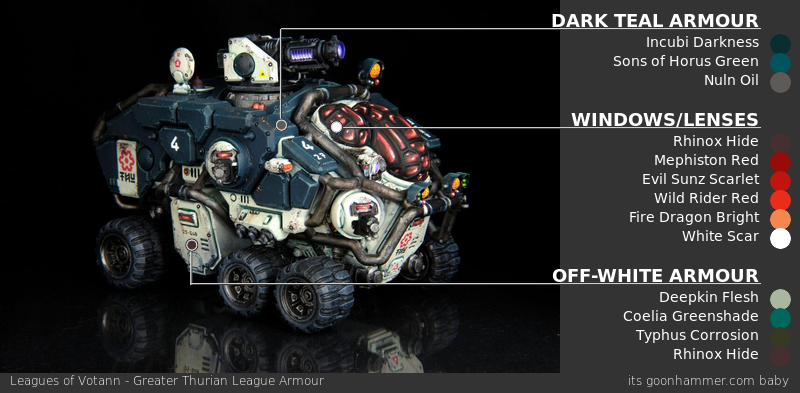
The Greater Thurian League are the biggest of the Leagues of Votann, and the box-art boys (and girls) for the LoV faction. Here’s how I paint their various armour and clothing! I’ve used various paint brands for my scheme, but I’ve taken care to include their closest GW equivalents in parentheses wherever possible.
Personnel Armour
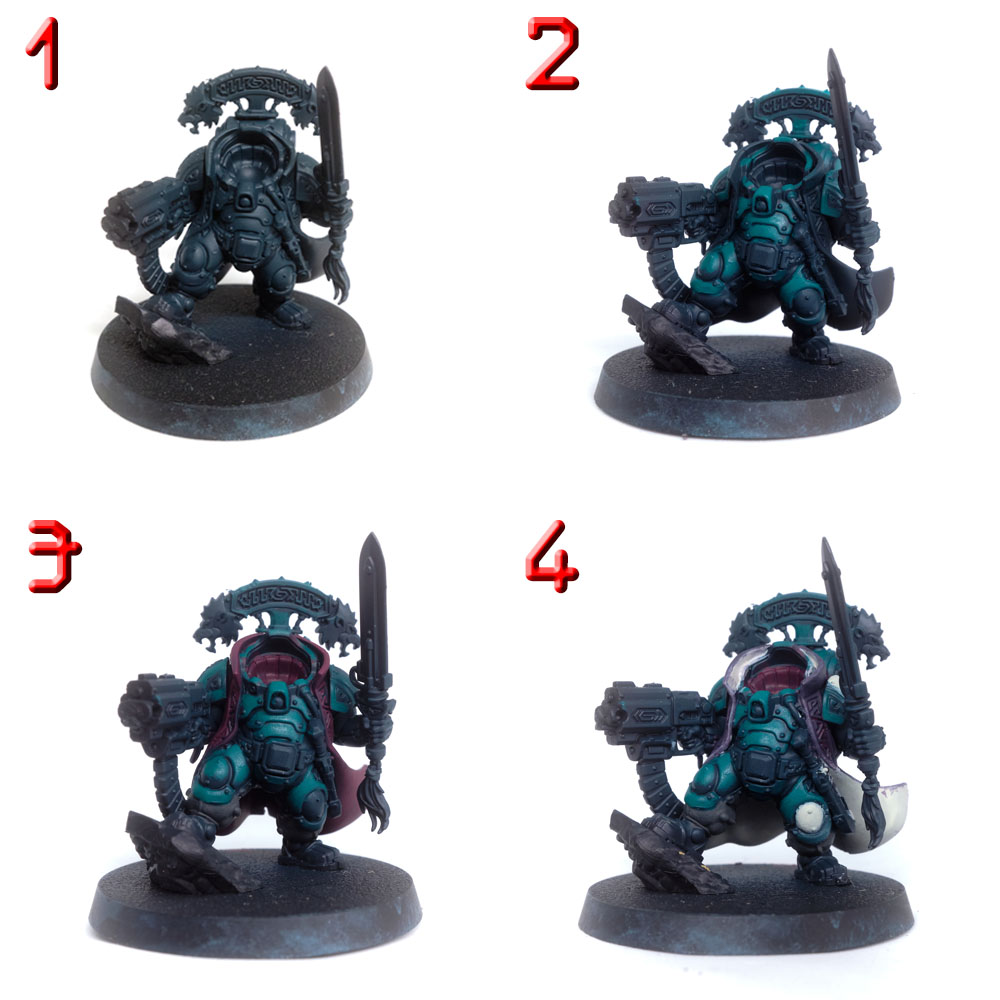
- Prime Black and undercoat everything with Incubi Darkness
- Layer everything with either ProAcryl Jade or PA Jade mixed 1:1 with Sons of Horus Green, depending on how saturated you want your final result to be.
- Paint the padding inside the armour with Screamer Pink and the soft parts of the trousers with PA Dark Warm Grey (Eshin Grey).
- Paint the coat with a mix of 3:1 PA Purple and PA Coal Black (Naggaroth Night), paint the lining, central stripe of the shoulder pad, and kneepad with PA Bright Warm Grey (Deepkin Flesh)

- Basecoat weapon casing with ProAcryl Coal Black (Corvus Black), gold metallics with Scalecolor Decayed Metal (Warplock Bronze)
- Basecoat silver metallics with Vallejo Metal Colour Aluminium (Ironbreaker) and sword grip, tassle, and tube with ProAcryl Burned Red (Khorne Red)
- Basecoat sword blade with PA Orange (Troll Slayer Orange), the gem on the belt buckle with screamer pink, and the lamp on the chest with PA Golden Yellow (Yriel Yellow).
- Layer gold parts with Scalecolor Dwarf Gold (Retributor Armour). Edge highlight the teal armour with a 1:1 mix of Sons of Horus Green and Fenrisian Grey, mix in more Fenrisian Grey for the sharpest edges. Layer ProAcryl Purple on the coat (Genestealer Purple). Shade the chest lamp with a small amount of Casandora Yellow.

- Layer the red tassle, sword grip, and tube with ProAcryl Bold Pyrrole Red (Evil Sunz Scarlet) with a final highlight of Fire Dragon Bright. Glaze highlights onto the coat with ProAcryl Magenta.
- Edge highlight black bolter casing with Warm Dark Grey, progressively smaller highlights with more white mixed in towards corners. Layer the trousers with Dark Warm Grey mixed with some Titanium White. Follow the normal method for painting gems with PA Magenta, Purple, and White to paint the large gem on the belt buckle, and with PA Blue and Sky Blue for the pommel of the sword. Glaze yellow towards the centre of the plasma sword blade and red towards the edge, final edge highlight with Vallejo Model Color Ice Yellow.
- Final highlight of the gold with some Vallejo Model Air Silver. Decals applied to relevant areas with a little Vallejo Decal Softener to make them look painted on.
- Head.
Vehicle Armour
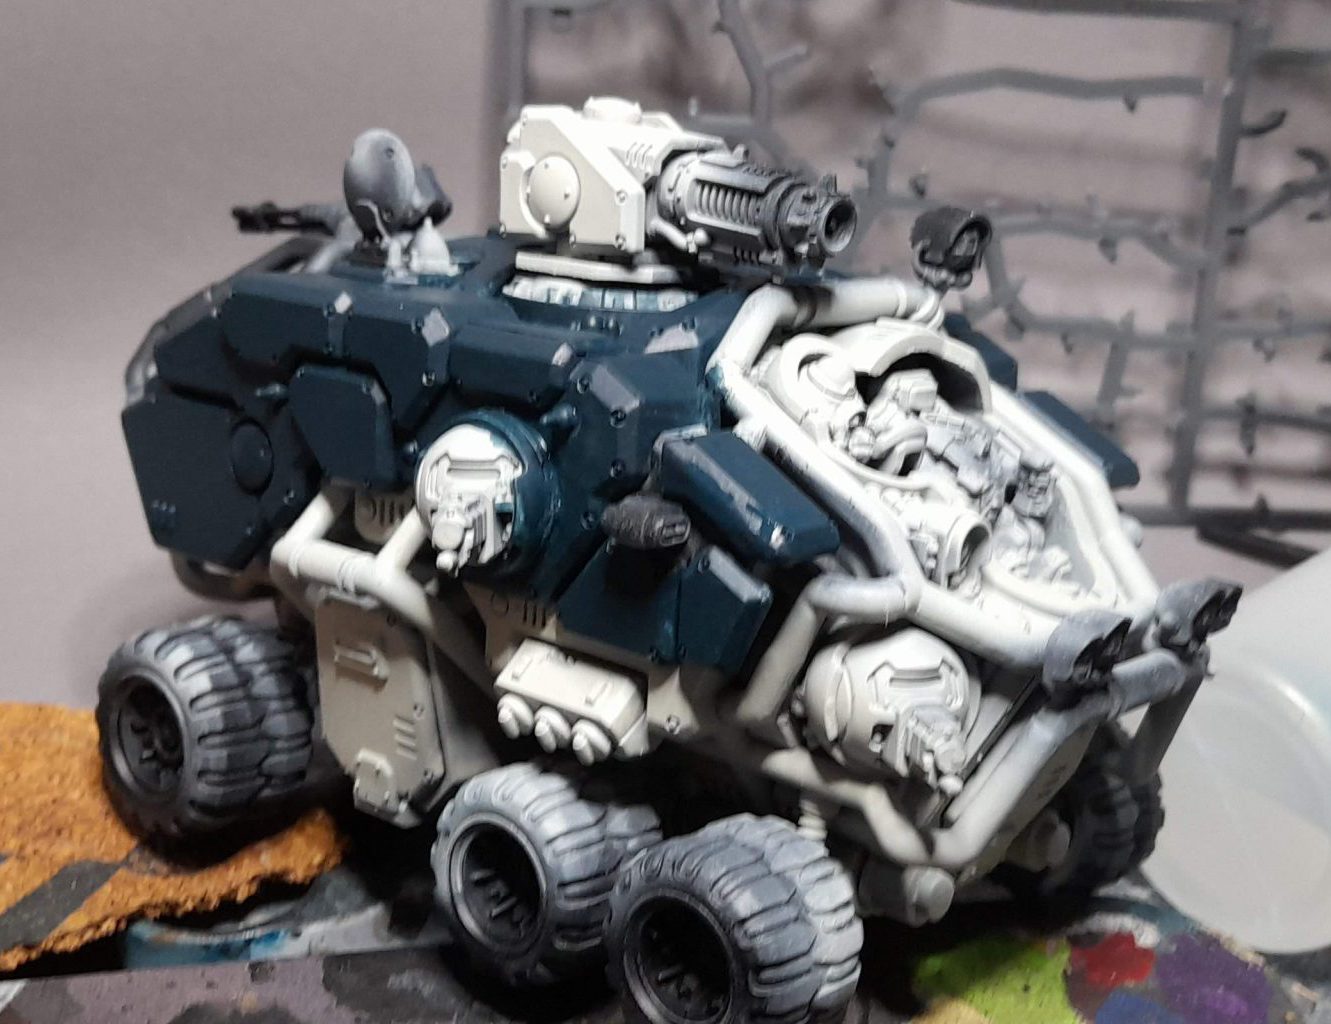
- Prime grey, then airbrush all the off-white parts with GW Deepkin Flesh.
- Paint all the dark green panels with Incubi Darkness, at least 3 thin coats to cover over the Deepkin Flesh.
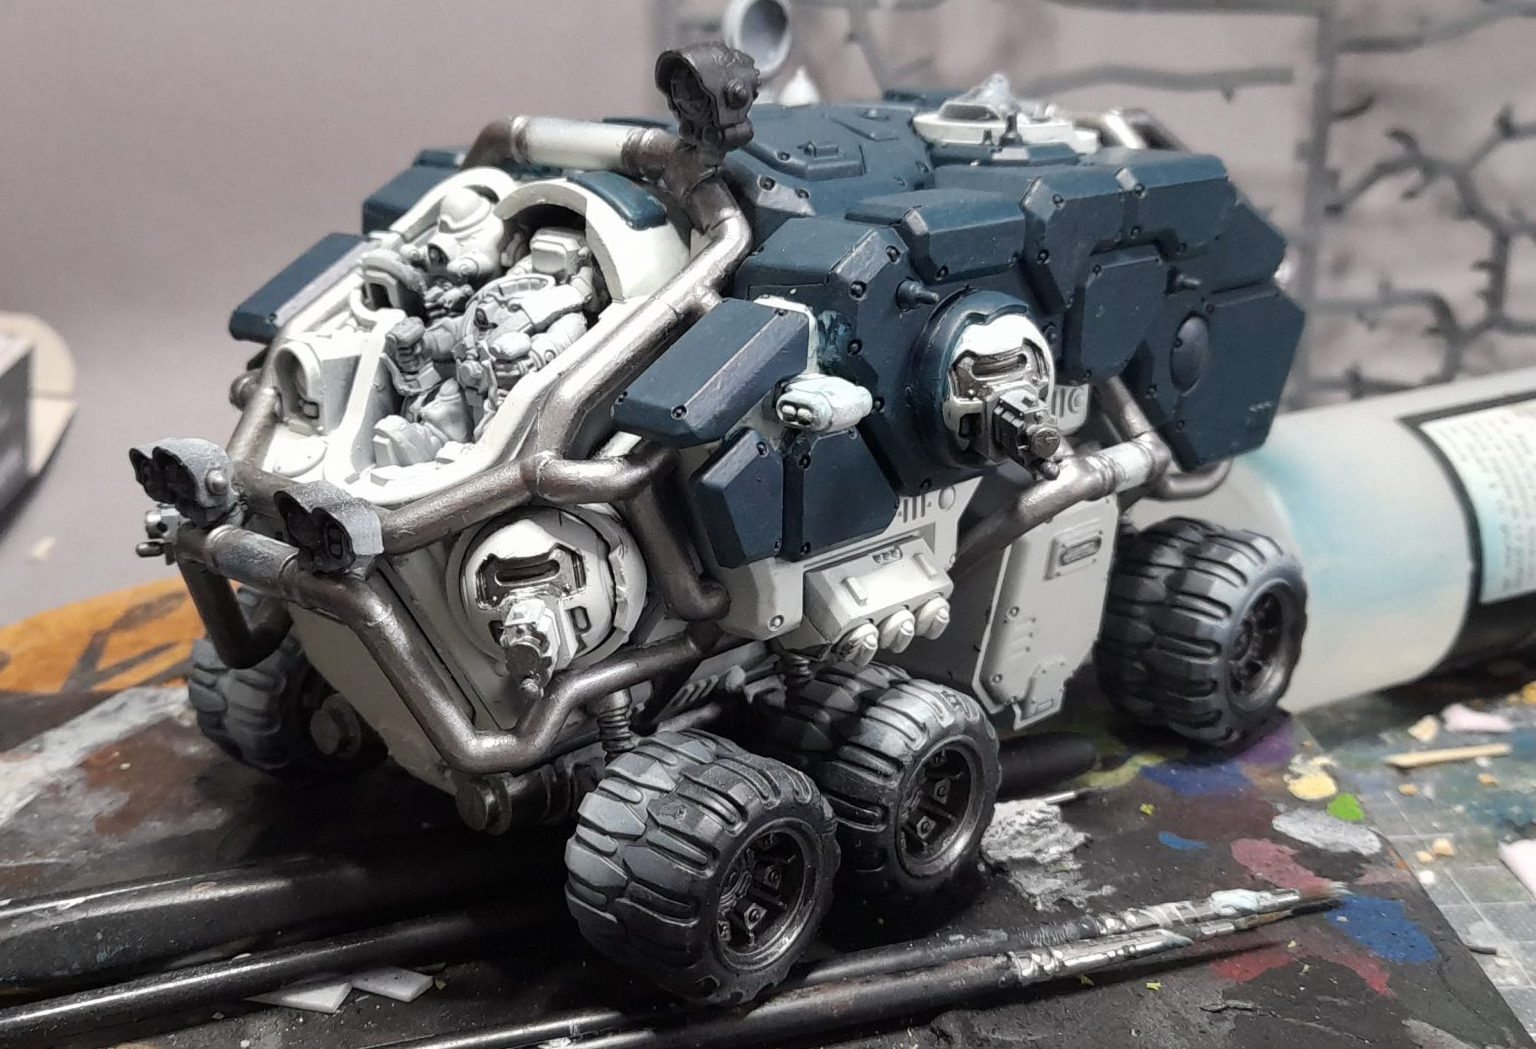
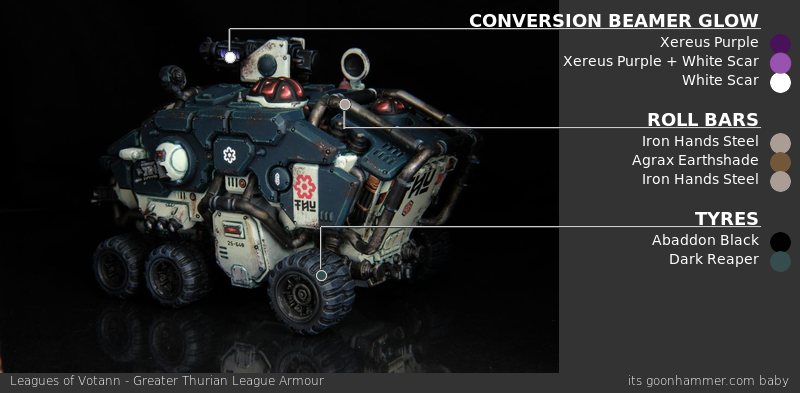
- Basecoat all the rollbars and other metal parts with Iron Hands Steel, thin layers to cover smoothly over the Deepkin Flesh
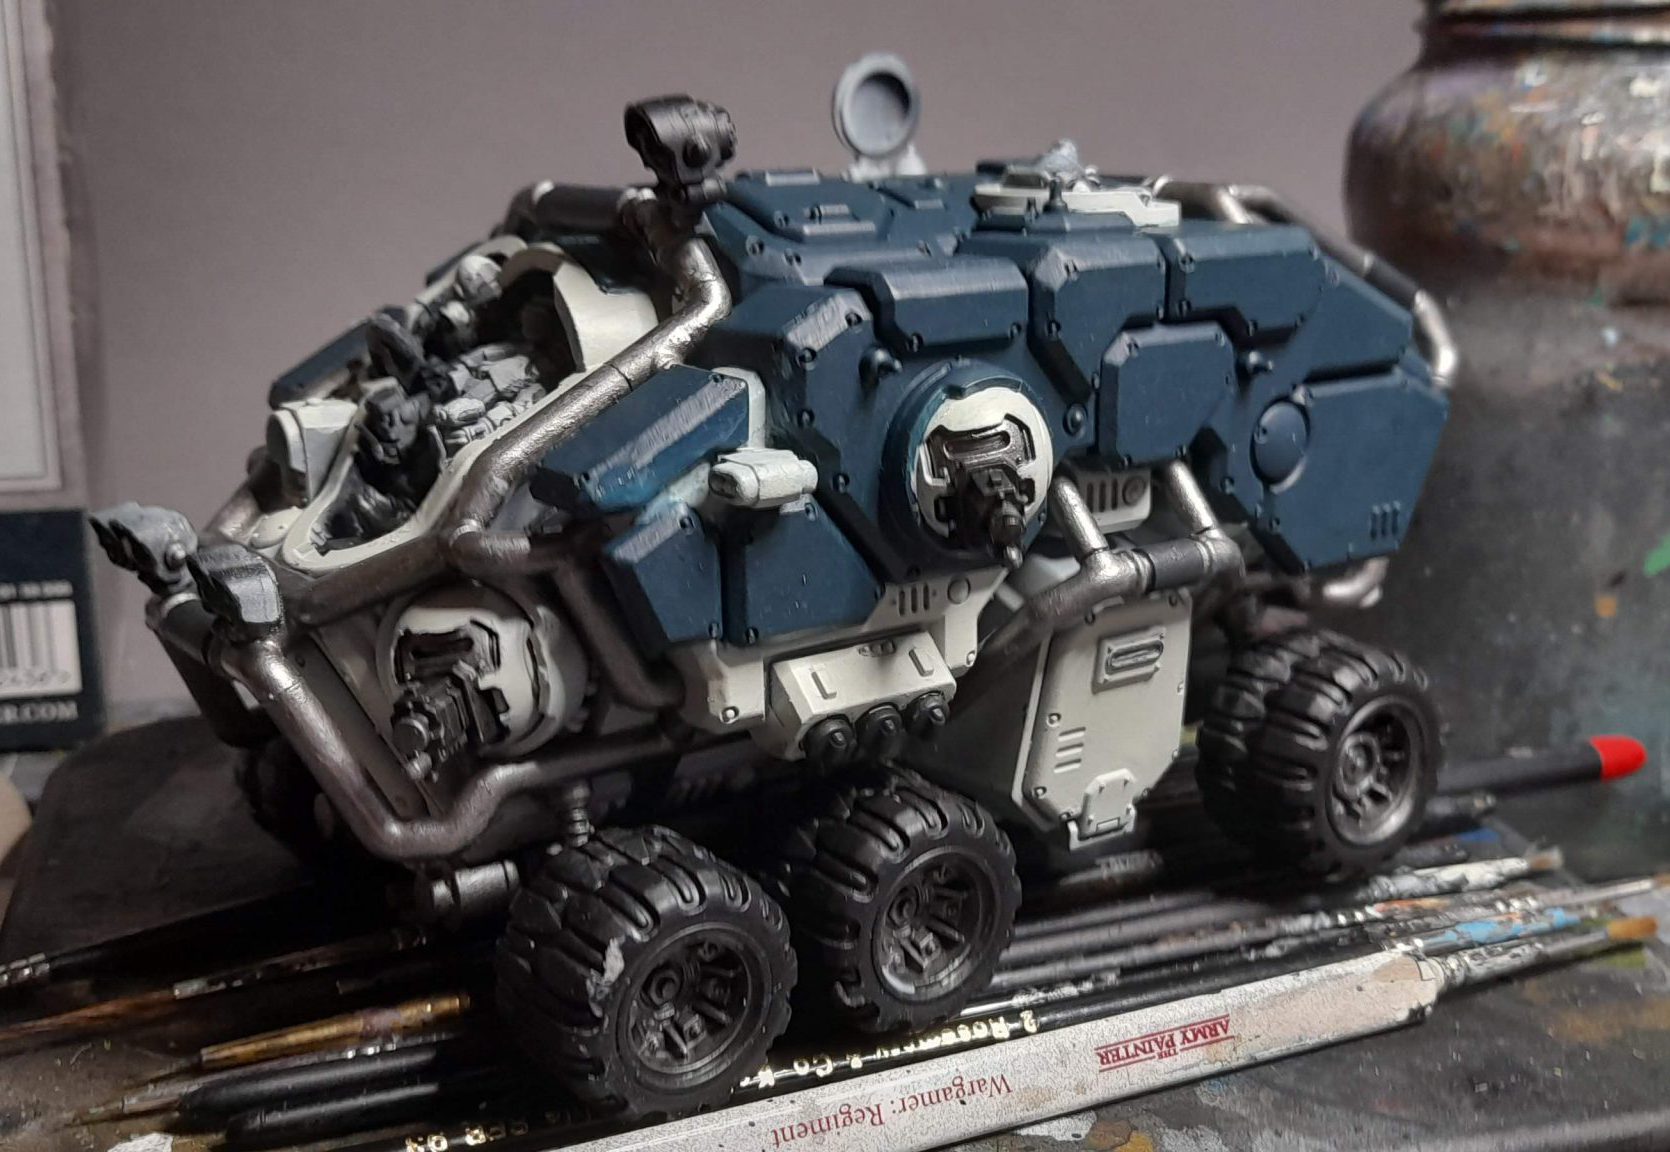
- Basecoat tyres and other black elements with Corvus Black.
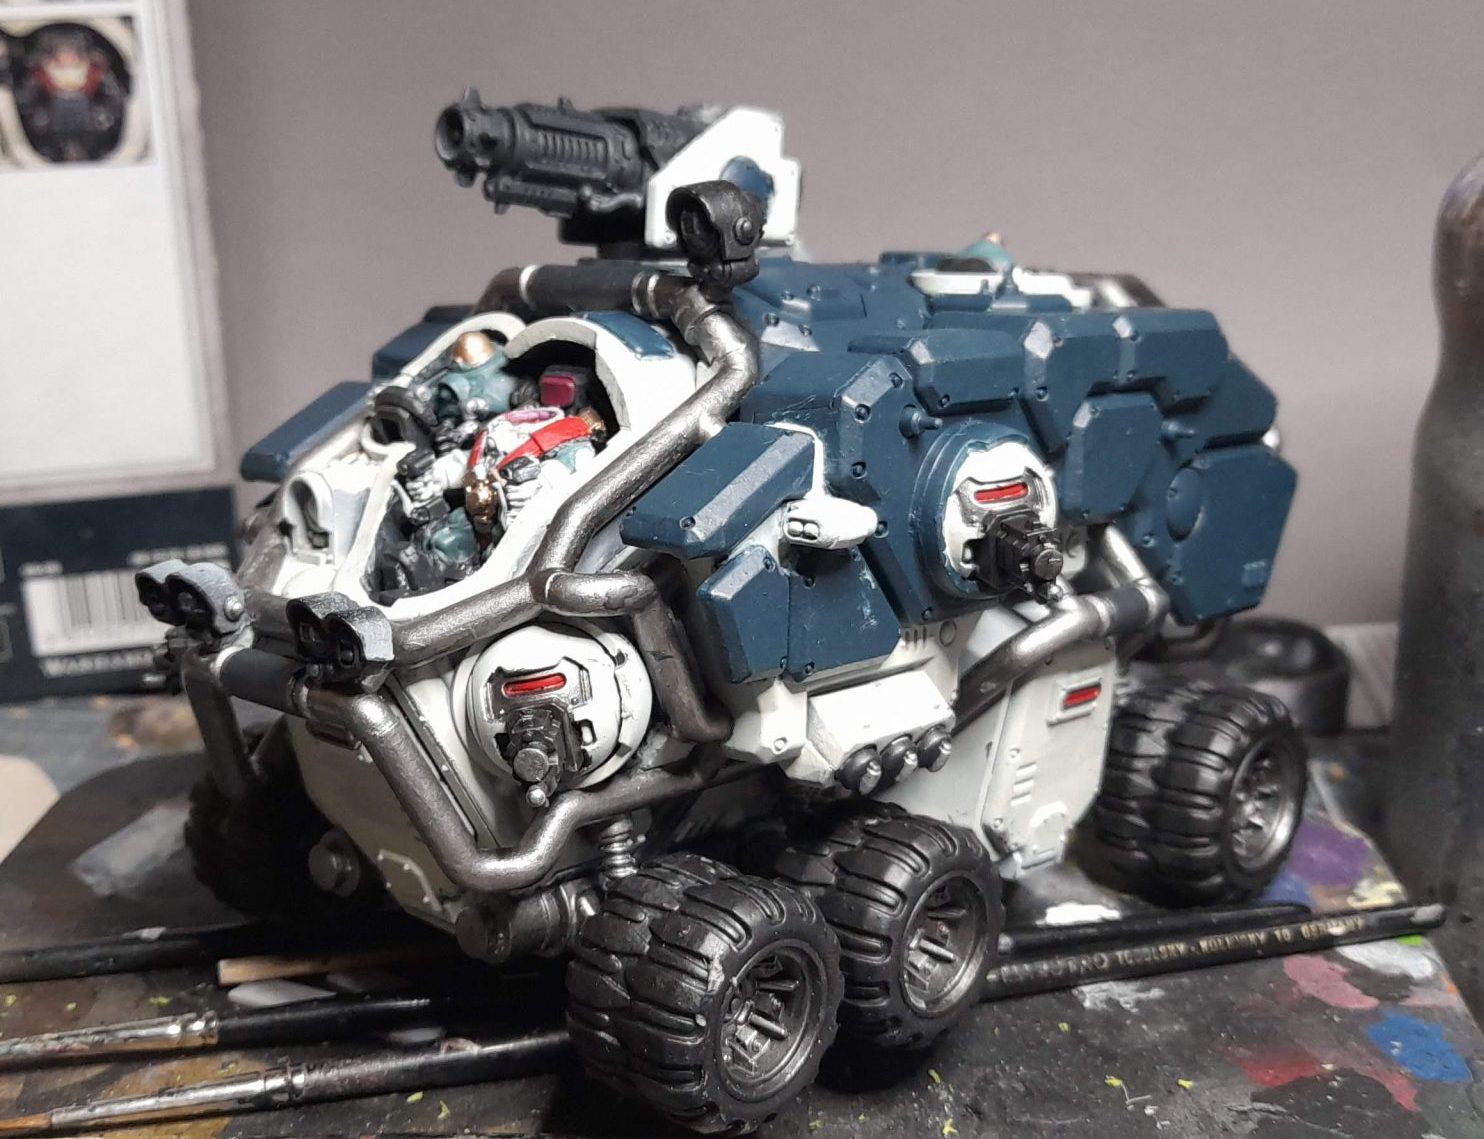
- Paint various red lenses and window panels with Mephiston Red. At this point I intended to paint the pilot but ultimately scrapped that for opaque windows.
- Paint the wheel hubs with Iron Hands Steel.
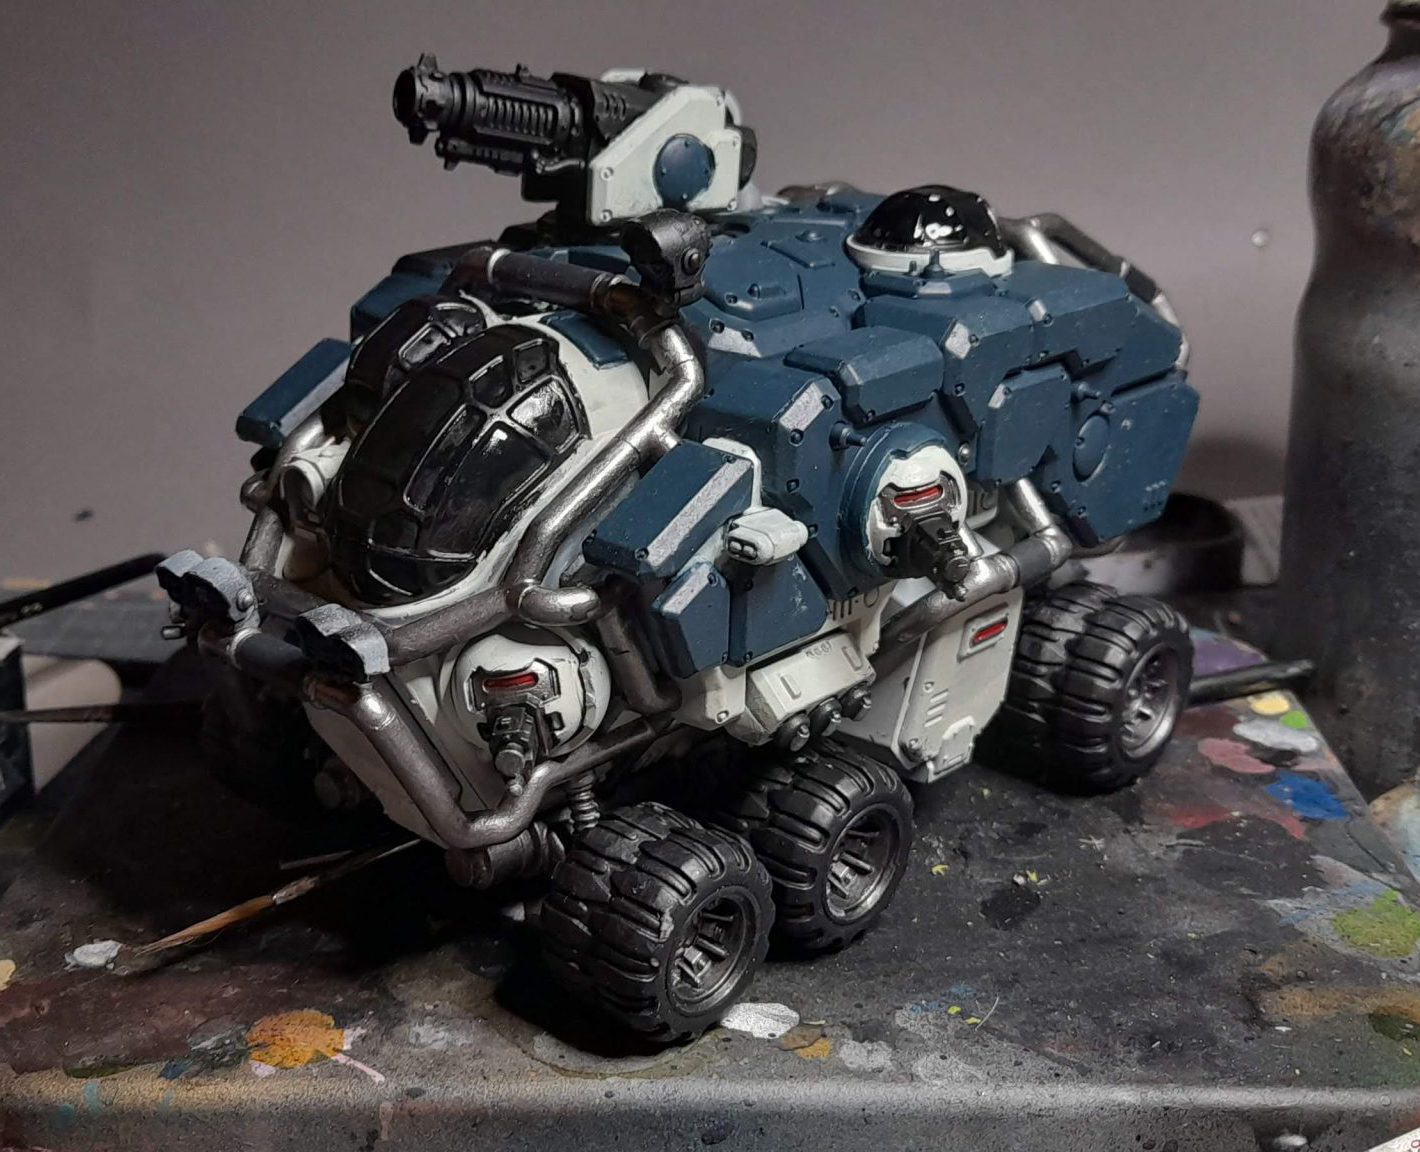
- Optionally: Prime the various canopies in black
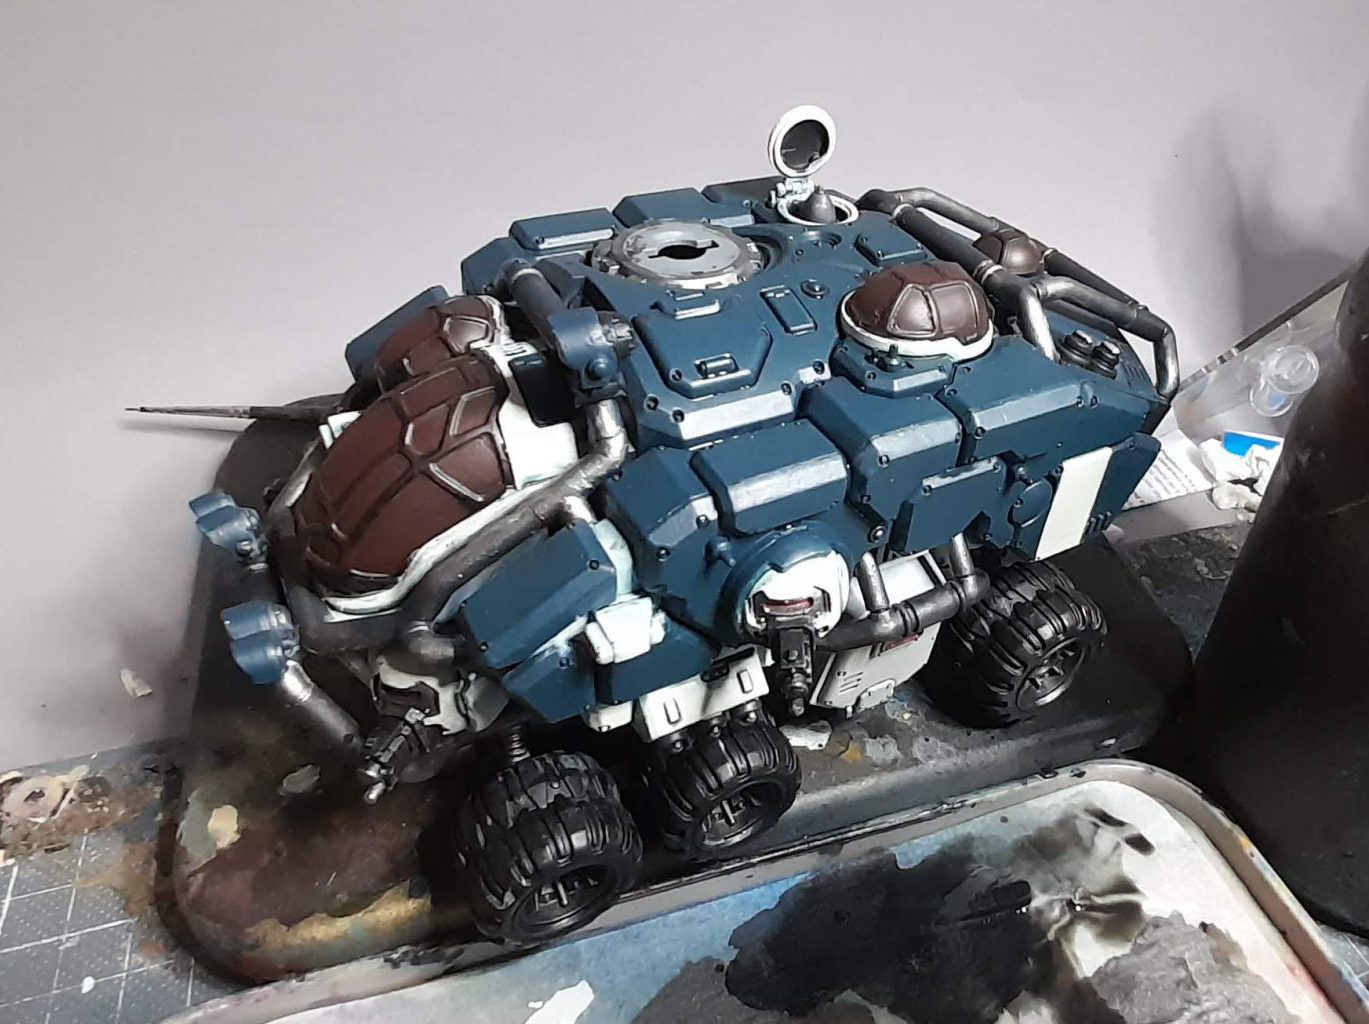
- Paint the covers of the large lamps with Incubi Darkness
- Optional: Paint the windows with Rhinox Hide
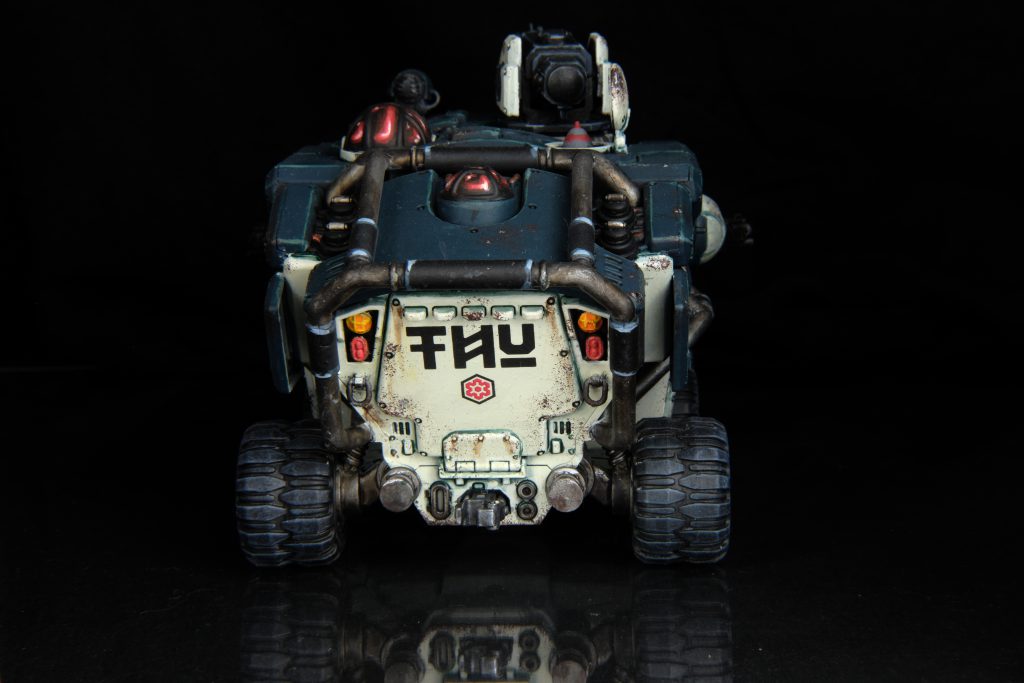
- Using masking tape, paint the stripe on the rear panel with Deepkin Flesh. Make sure the stripe you create is wide enough to fit the largest of the decals.
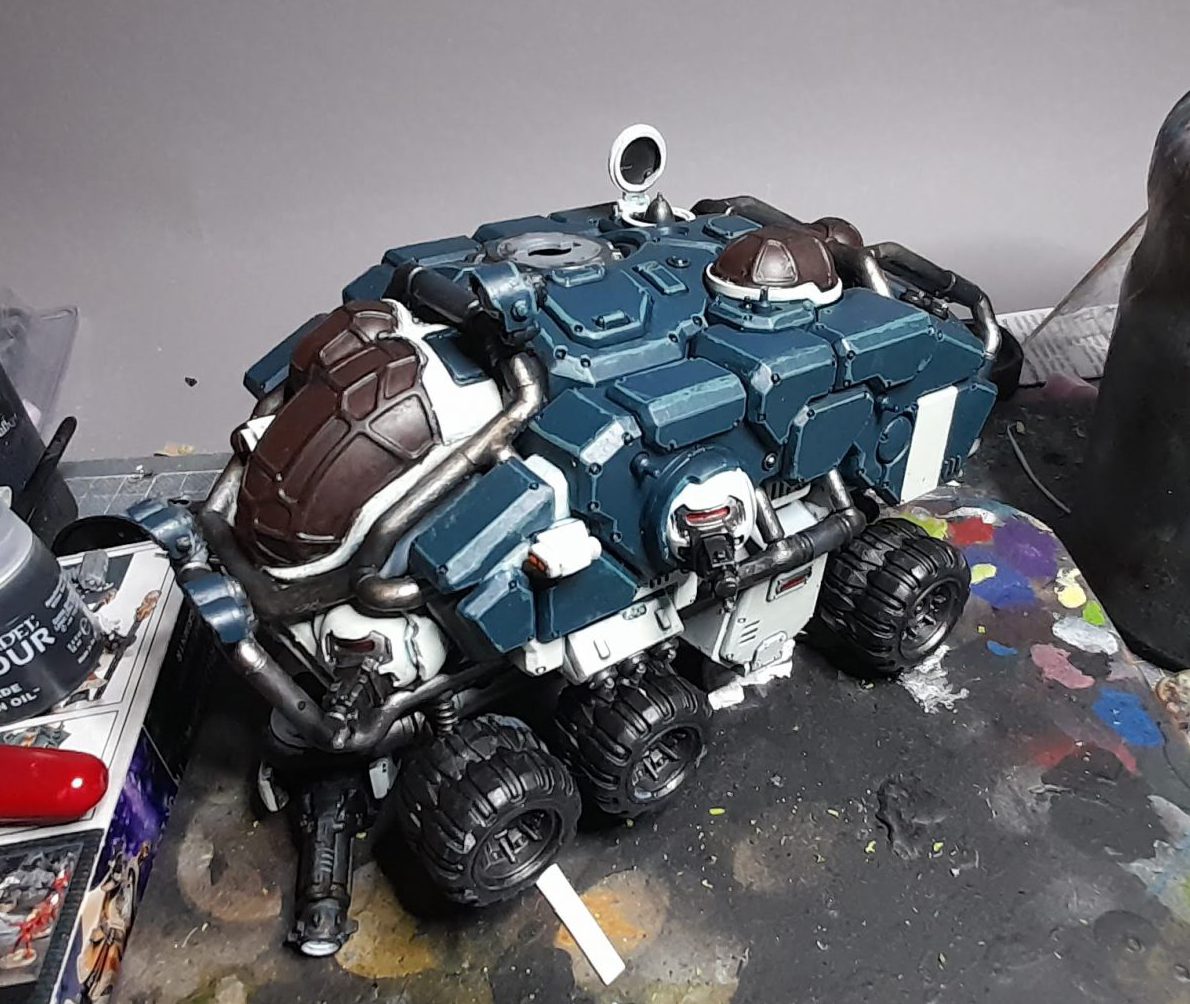
- Edge Highlights the green panels with Sons of Horus Green. Don’t worry about being too precise here, we can neaten up the panels with Incubi Darkness later.
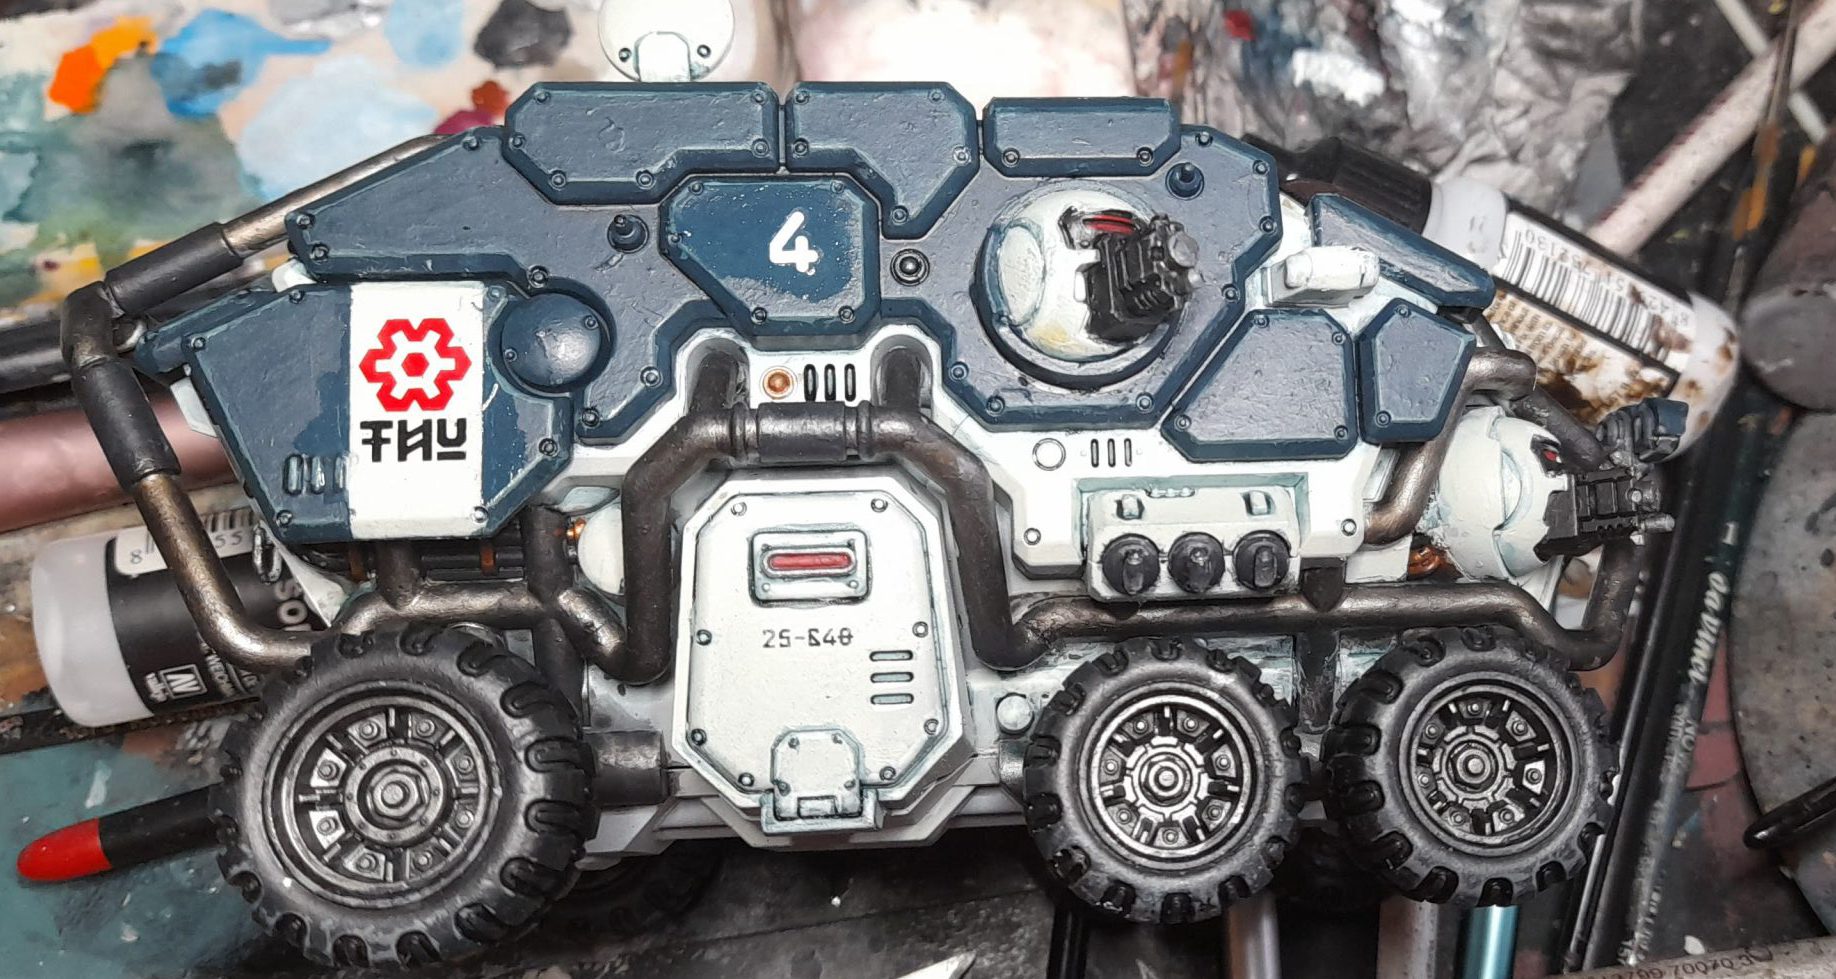
- Shade the Deepkin Flesh with Coelia Greenshade, pick out the rivets on the Incubi Darkness with Nuln Oil.
- Apply various decals where you want them. I’ve not really neatened up the edges or shading just yet, I’ll do that later.
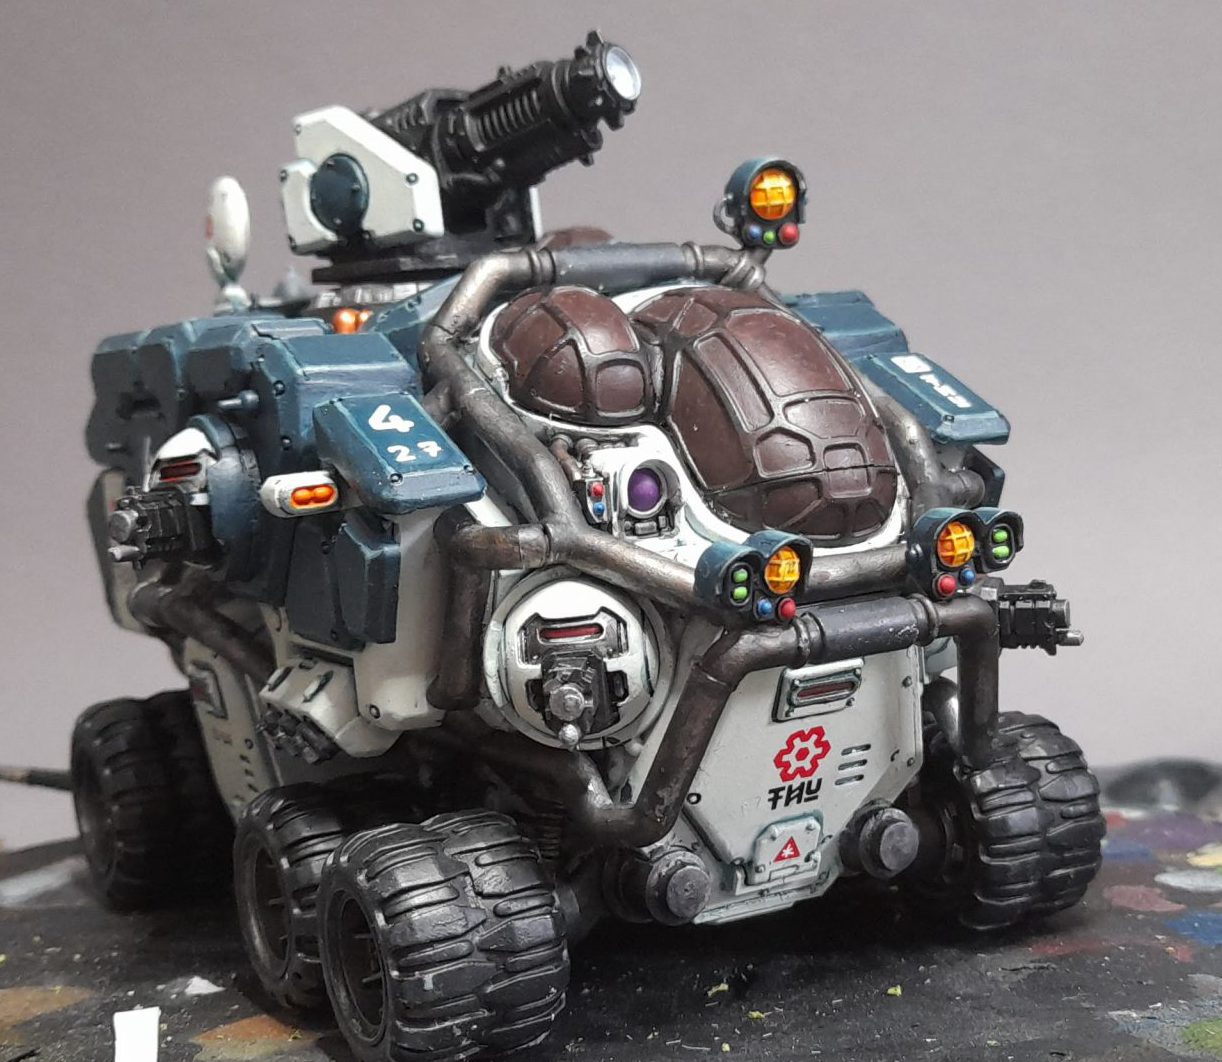
- Paint the lamps and spectral whatsits with different colours as you like. I painted the large headlamps and searchlight white and then shaded them with Casandora Yellow. The orange lamps on either side were painted with Scalecolor FX Fluor Orange, the green with Moot Green, the purple with Xereus Purple, and the red and blue with Caledor Sky and Mephiston Red.
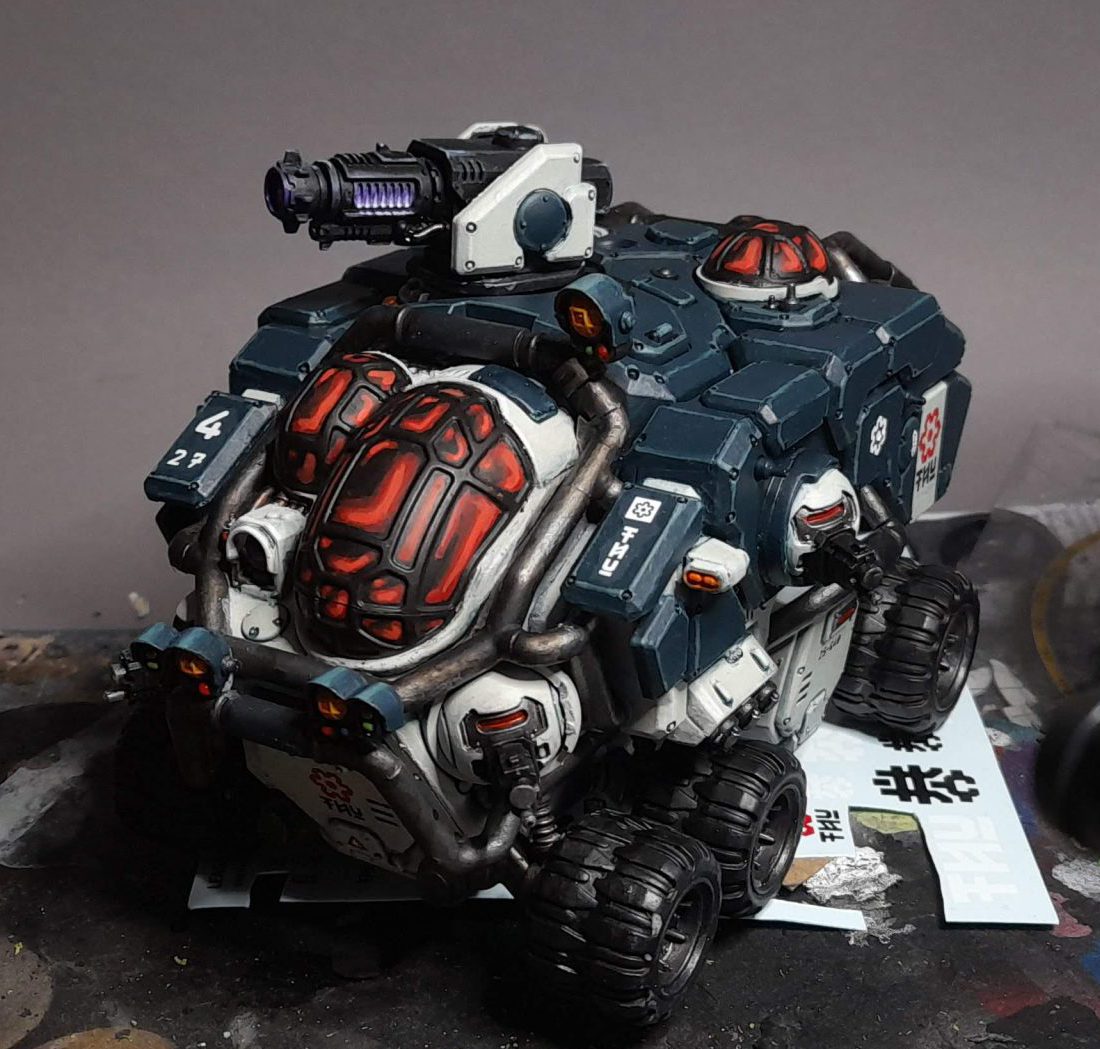
- Paint the vents on the Conversion Beamer barrel with Xereus Purple, then layer smaller and smaller sections of each vent with Xereus Purple mixed with pure white, adding more white with each layer to build up a glowing gradient.
- Paint the bottom right corner of each window pane with Mephiston Red, layer over this with Evil Sunz Scarlet and Wild Rider Red in smaller and smaller sections. At the same time, paint the opposite corner in the same way, but in a much smaller section.
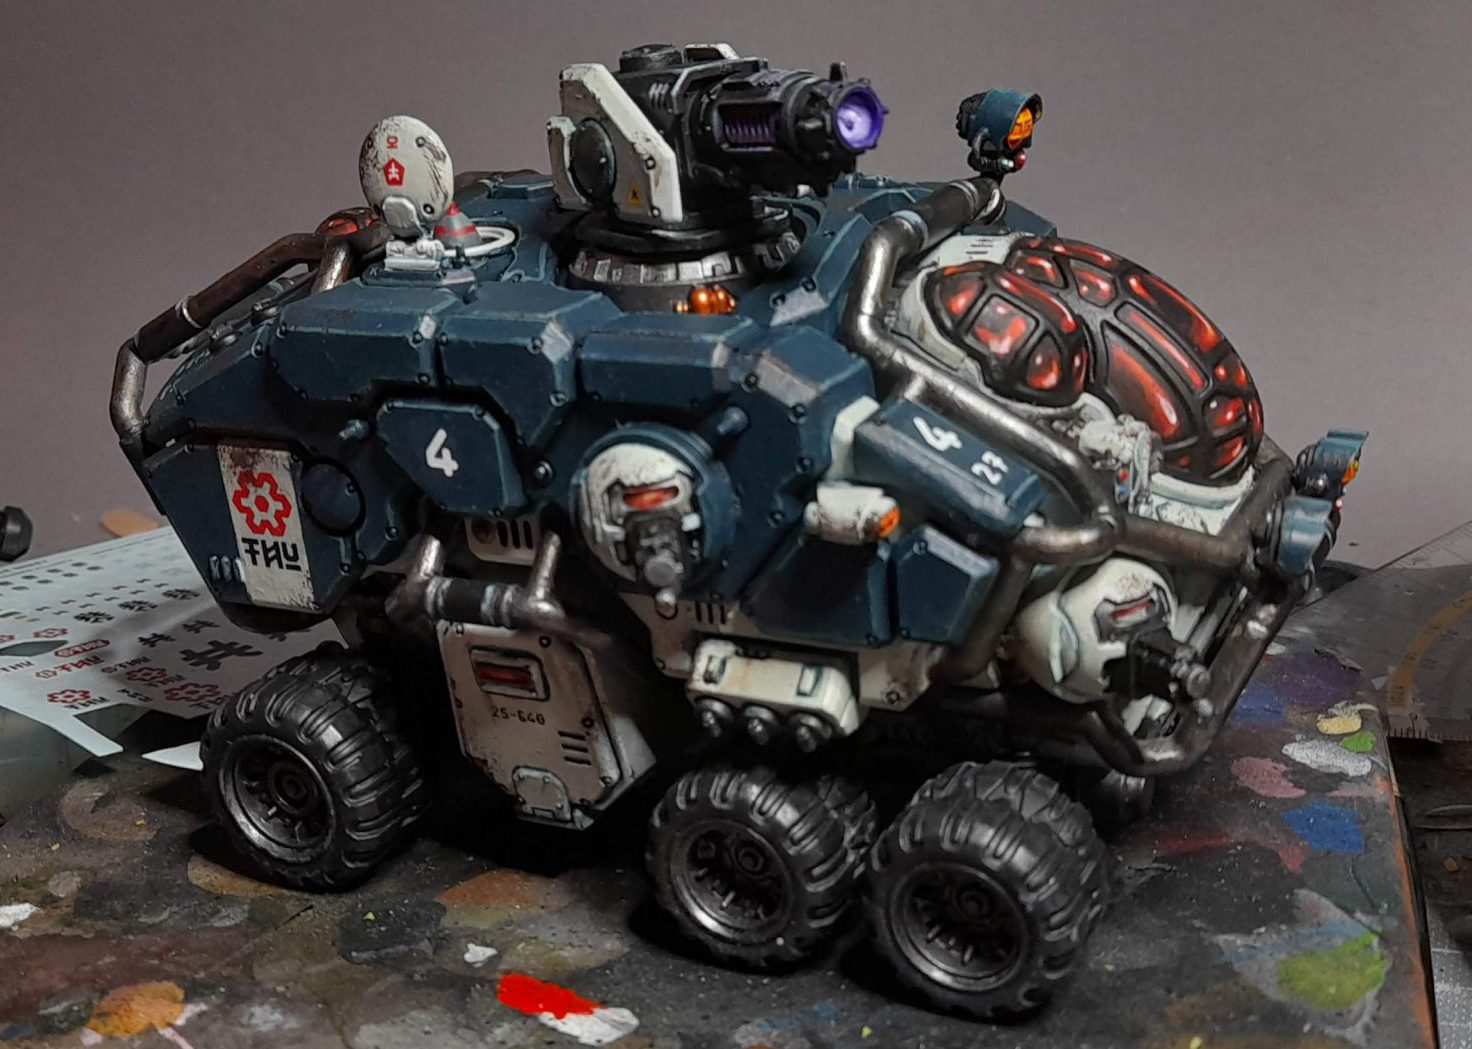
- Build these layers up through to Fire Dragon Bright mixed with a dash of white into each corner.
- With a sponge and some undiluted Rhinox Hide, add some chips and scuffs to the corners and sharpest edges of panels that you’d expect to receive damage. Make sure you add your decals before this step so you can chip them too, making them appear to be a proper part of the vehicle paintwork.
- Dab a little Typhus Corrosion in places you want to be somewhat dirty and then drag those dabs down with a fingertip to create some grimy streaks, particularly around rivets.
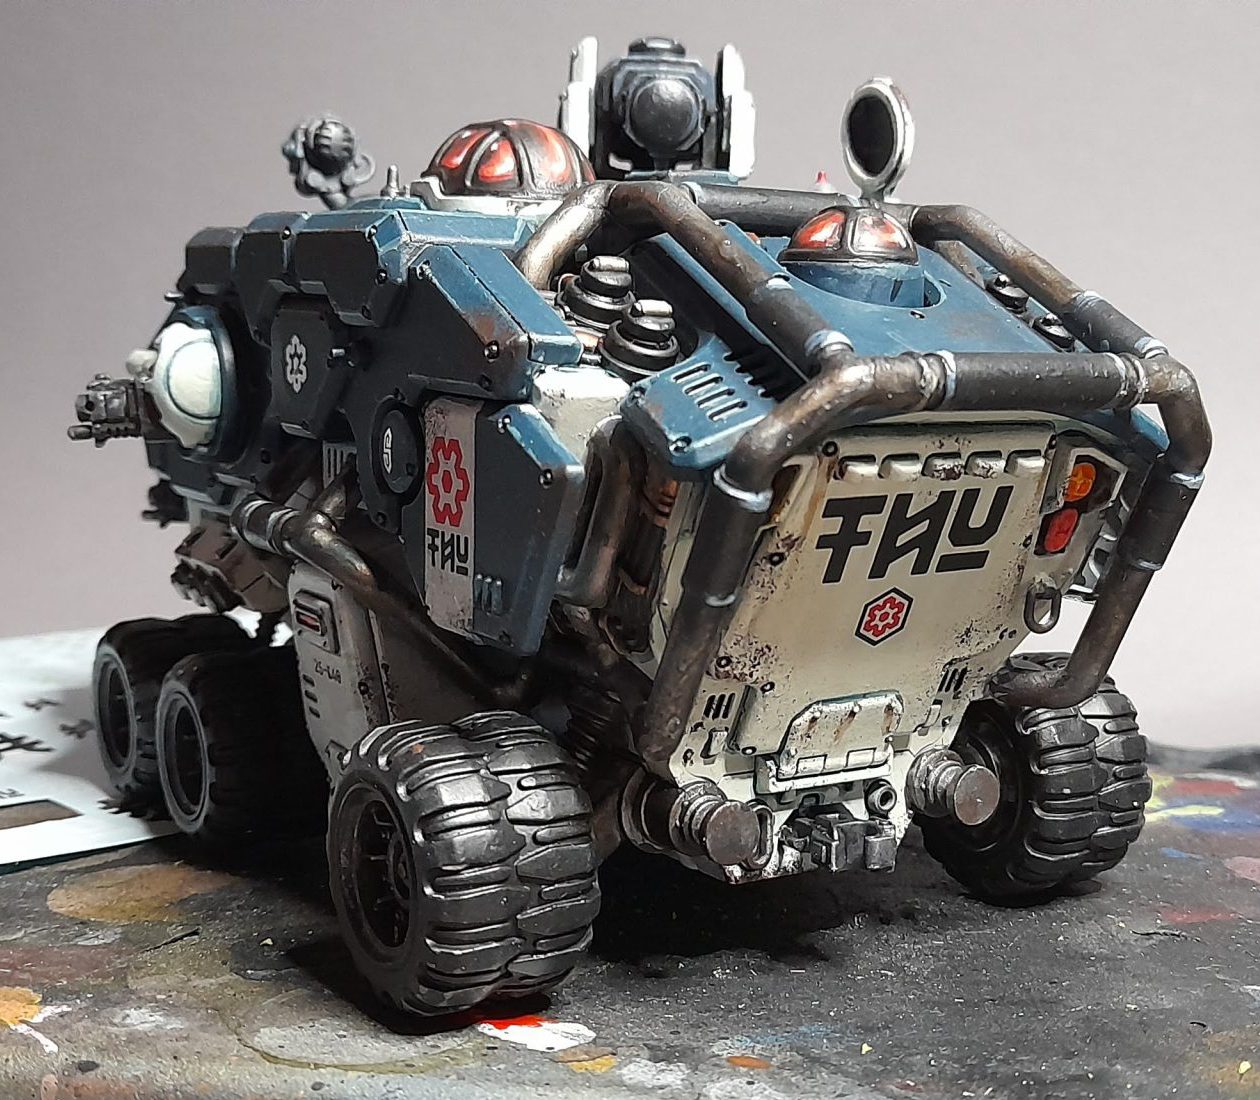
and now, without the cruelties of phone cameras:

Colin's Trans-Hyperion Alliance - Click to expand
As soon as I saw the Orange/White/Black scheme for Trans-Hyperion Alliance I knew exactly how I wanted to paint my Leagues of Votann. Subtlety was out the window in an instant. This is an army you can see from across the room. This scheme is best executed with an airbrush. In fact, I don’t really see how it would be possible to do without an airbrush given the properties of the paints involved. That being said, again, this is not a subtle paint job and is very forgiving. So get your favorite airbrush and get ready to grip it and rip it.
- Prime Black (Chaos Black Primer)
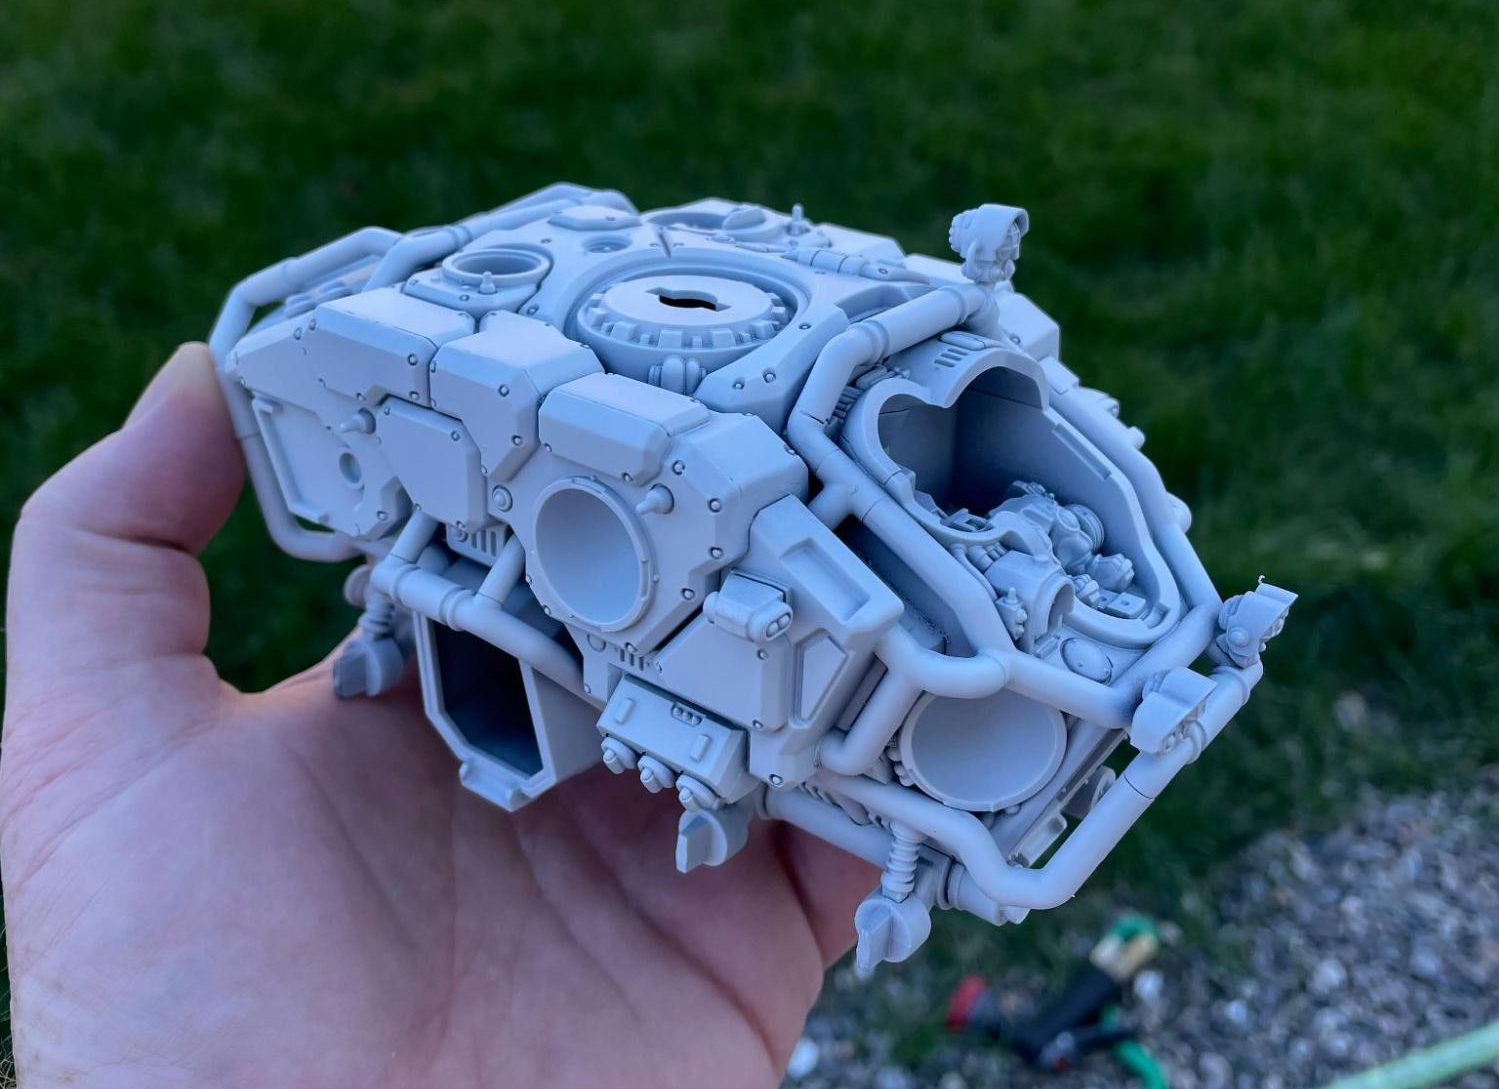
- Airbrush the model white. This is NOT for a zenithal effect. Airbrush the model white but don’t do such a thick coat that you obliterate the black in the recesses of the model.
- Airbrush GW Evil Sunz Scarlet into shadows
- Light airbrush white from above to knock down the red
- Airbrush Vallejo Game Air Hot Orange over whole model. This will take two thin coats to get good coverage as this paint is VERY thin
- Airbrush white highlights – top center of chest in front of face, top of shoulders, top of arms, top of backpack
- Airbrush Vallejo Game Color Orange Fire over highlights. You will also be hitting the hot orange at the same time. That’s ok. Do not obliterate the shadows. You want a good gradient at this point.
- Vallejo Game Air Gold Yellow on highlights. This is to enrich the highest highlights. Be careful here
- Thin down VGA Hot Orange 1:1 with water. Maybe a little more. This is THIN. Lightly airbrush the whole model in hot orange. Make quick passes. This is a filter to tone down the yellow in the highlights and help smooth the gradient.
Side note: You can paint the areas you want the white stripe first, then tape off, then paint the orange.
- Shadow: Vallejo Game Color Sombre Grey
- Highlight: Vallejo Game Color Wolf Grey
- Highest: Vallejo Game Color White
After you are done with the orange it should look like this:
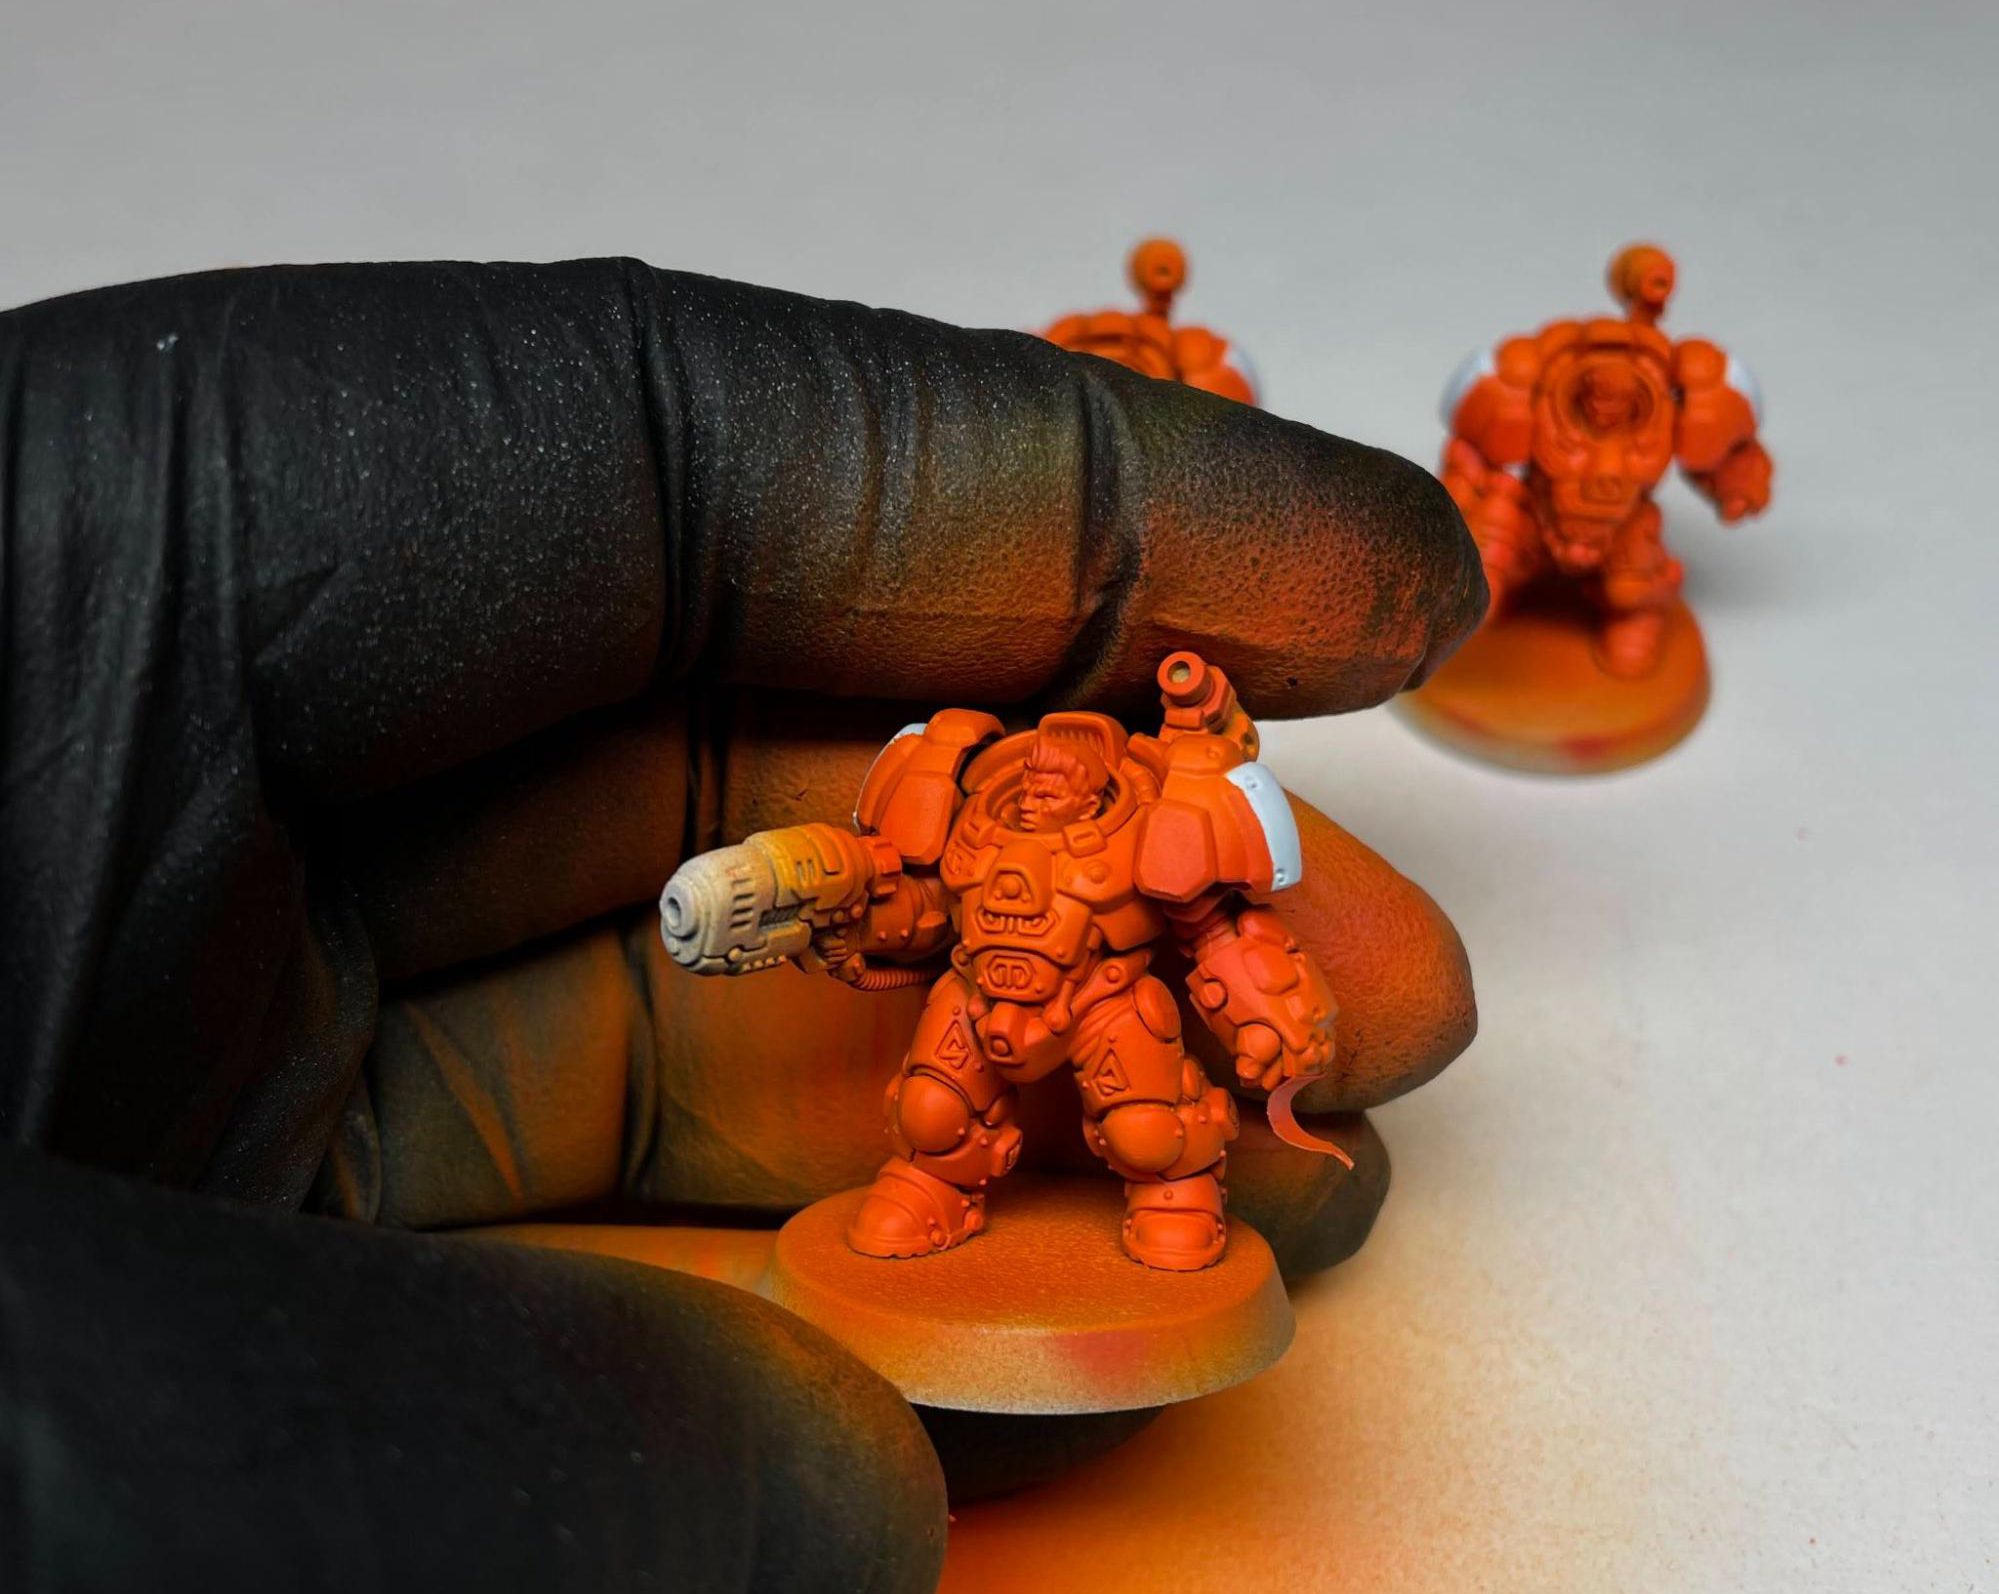

I’m sure at some point you asked “why so much back and forth? Why so many layers? This is dumb, why not just zenithal and do hot orange?”. The richness on the orange is the payoff for doing the 13-step process. Yes, it’s a pain, but the rest of the scheme is also really, really easy to make up for it!
Now the next part is chipping. I use torn foam from carrying cases/packing/etc. Standard fare. This will look a little extreme half way through but please stick with it! You are going to want to chip basically all the edges of the model. We are doing chipping instead of edge highlighting for these as it’s way faster and gives you a good textural look which is perfect for a bunch of mining Kin.
- First sponge your darkest layer. I mix black with Vallejo Game Color Tinny Tin. You can use Mournfang Brown, Rhinox Hide, etc.
- Sponge a mix of Orange fire, Vallejo Model Color Ice Yellow, and white. This is going to be way lighter than you think it should be. Trust me please.
After you are done sponging the yellow it’s going to look like this, which if I’m being honest looks pretty terrible:

However, Do not give up! Go back and sponge with VGA Hot orange over the previous two layers of chipping. This will fix it.
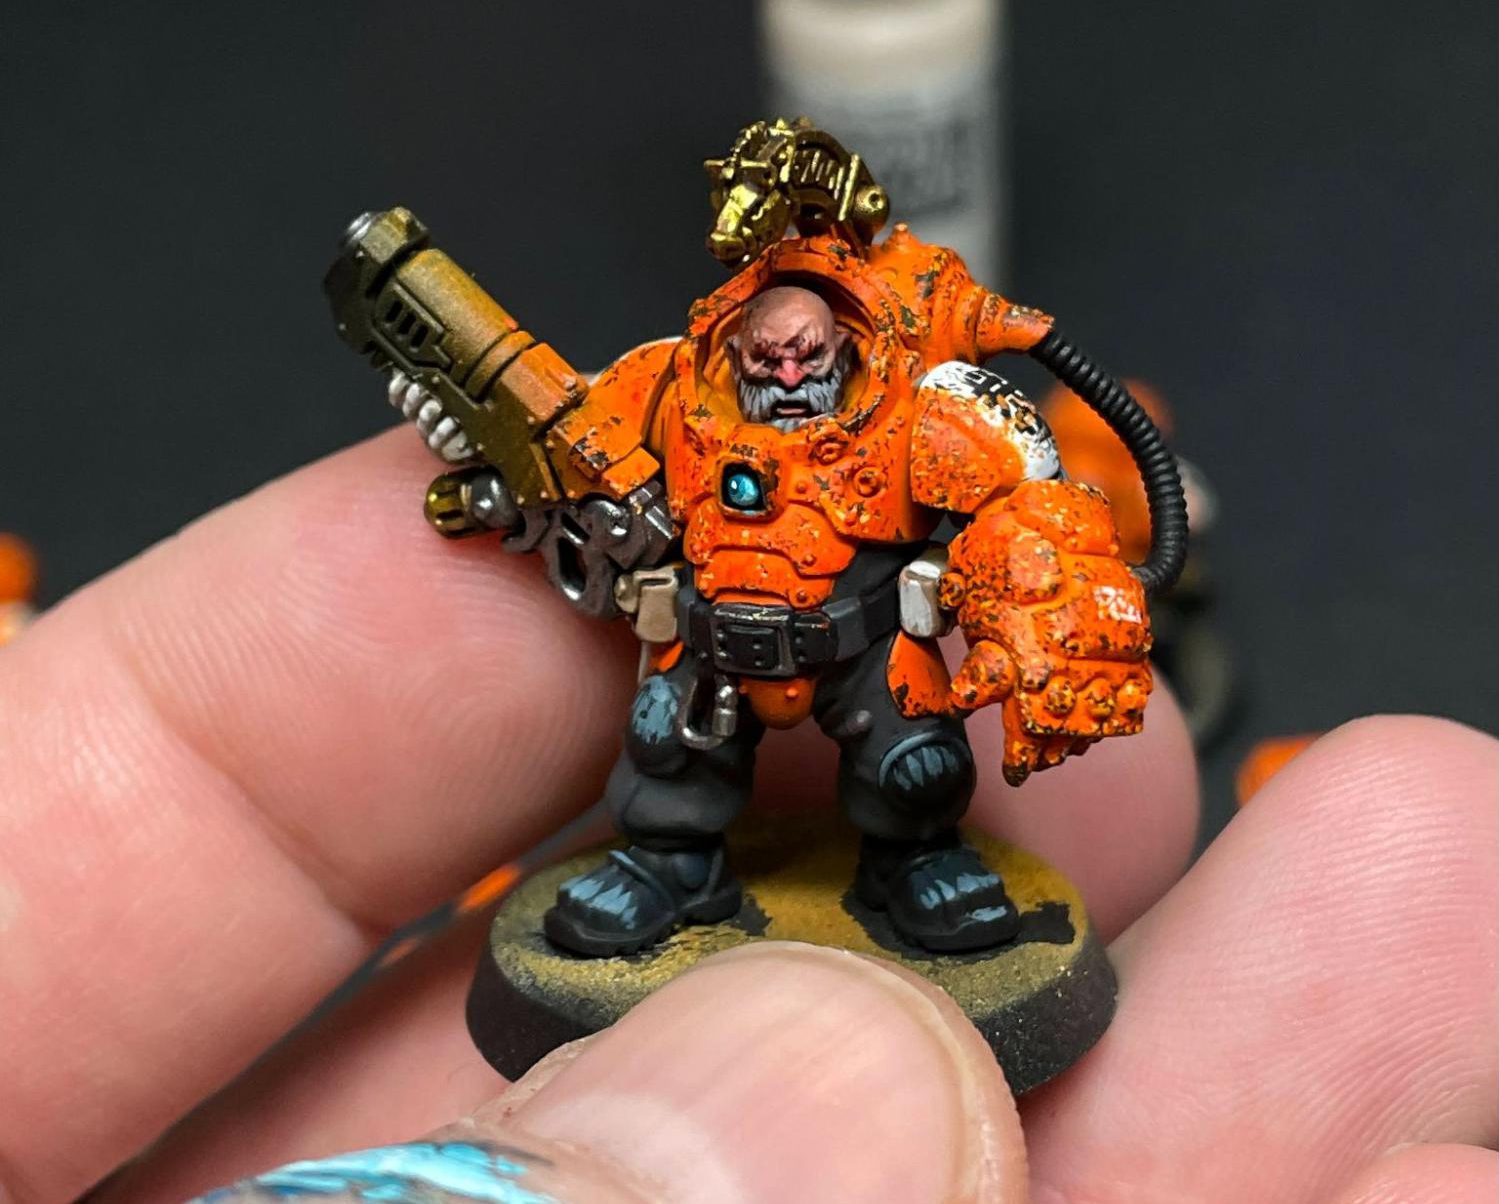
Much, much better. It evens everything out and integrates the chipping a lot more naturally.
Bonus scheme elements: Lenses and Faces
Turquoise Lenses/OSL:
- Basecoat Vallejo Model Color Turquoise
- Wash P3 Turquoise Ink
- Highlight Vallejo Model Color Blue Green
- Highest – Blue Green + White
- White spot in dark area
Faces:
- Basecoat P3 Bloodstone
- Wash Druchi Violet
- Highlight Bloodstone + P3 Khardic Flesh
- Highlight Bloodstone + Khardic Flesh + Vallejo Game Color Salmon Rose
- Add more Salmon Rose to highlight
- VERY thin glaze of Evil Sunz Scarlet to bring warmth back to face
- VERY thin glaze of GW Stegadon Scale Green in shadows to bring cool tone to shadows
- Build up Evil Sunz Scarlet on noses to emphasize the cold environment as they’ll be going on snow bases
- Best part of this face scheme: Don’t bother painting eyes. They’re too small and sunken in. Don’t think I painted a single eyeball in this army!
When it’s all said and done, you get an army scheme that looks like this:


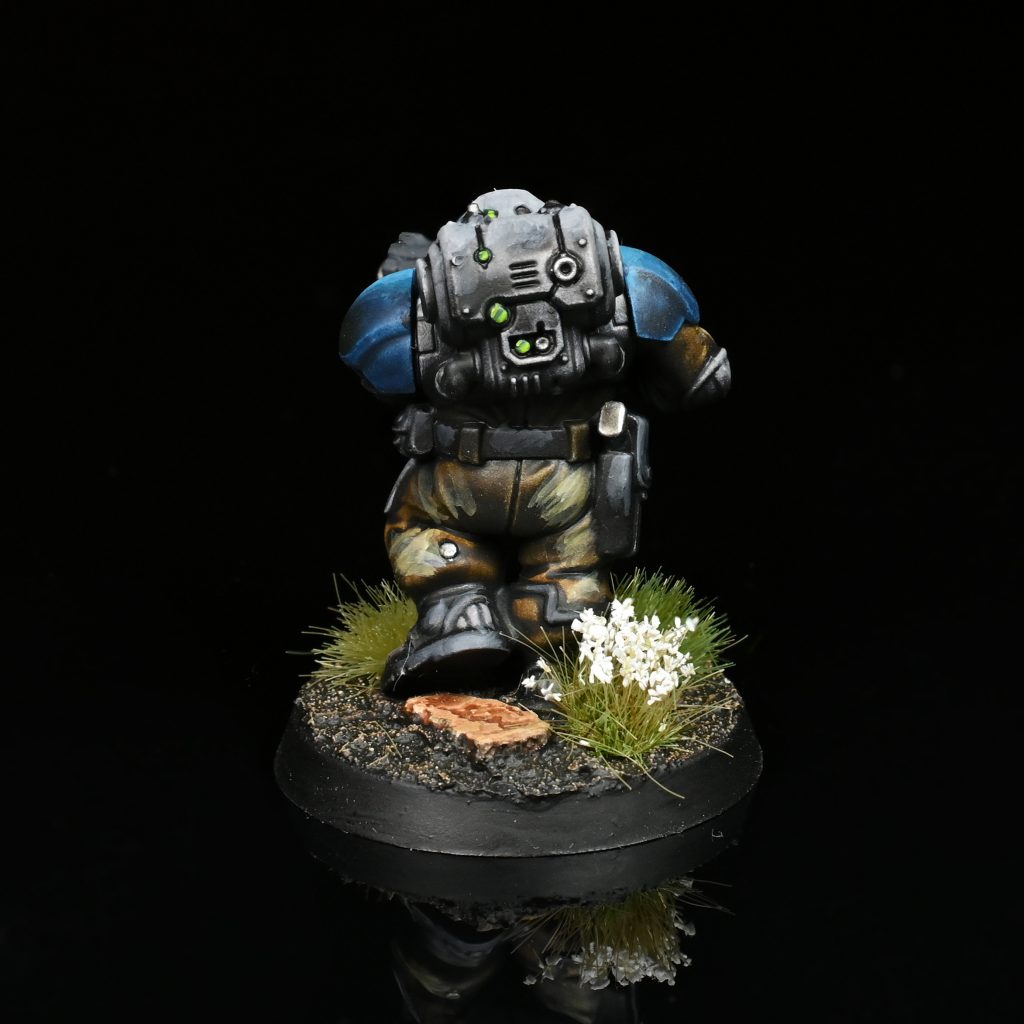
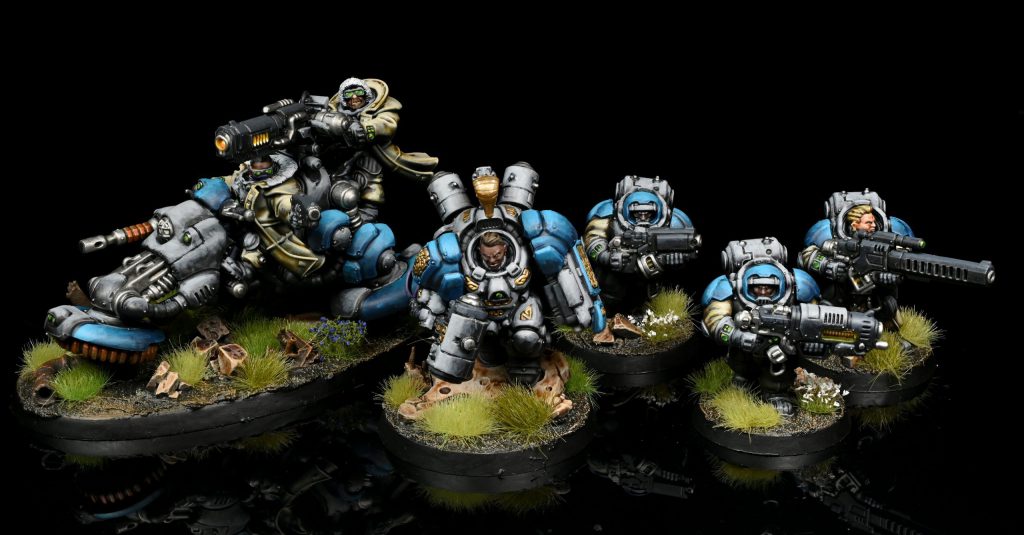
Rockfish's Pan-Telluric Commonwealth
The Pan-Telluric Commonwealth are a minor League. Little is known about them from the fluff, save that they are a particularly Egalitarian society.
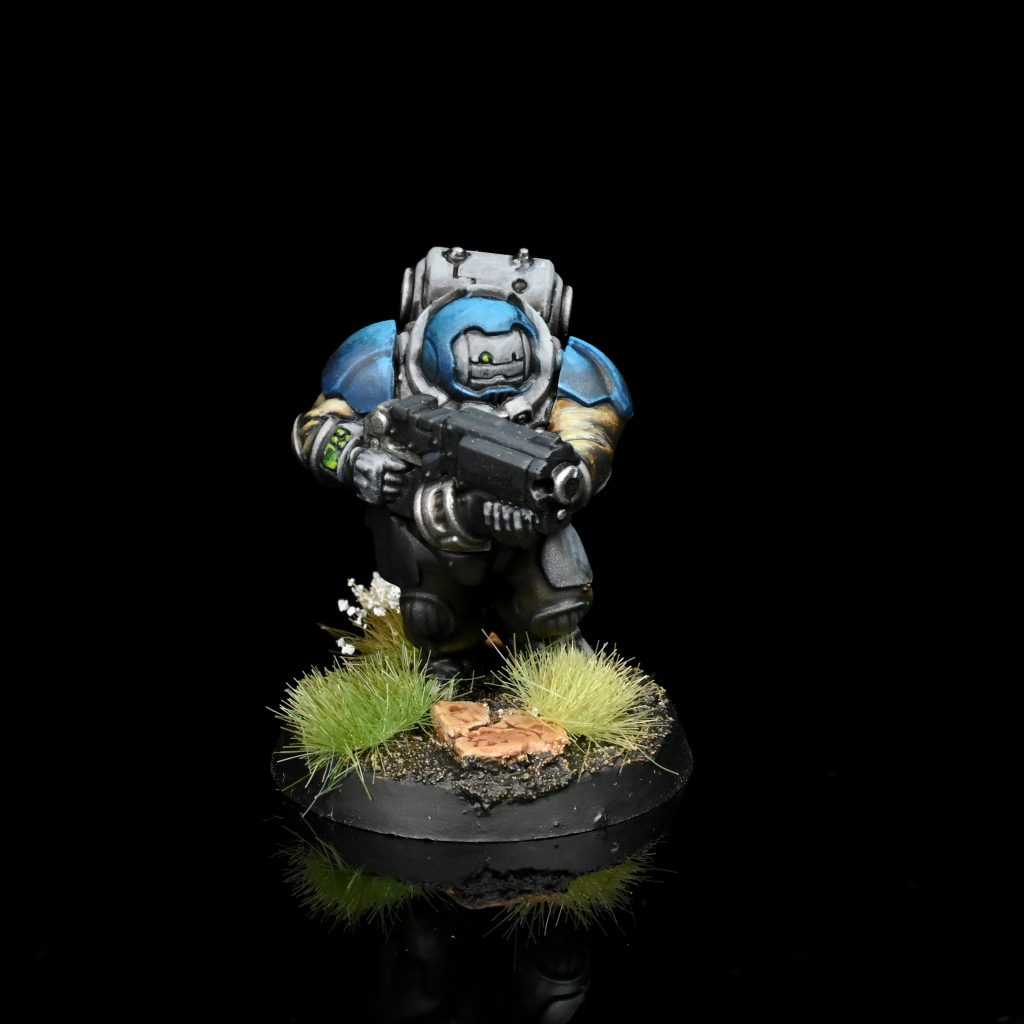
While I played around with doing a canon scheme, I ended up doing the rest of the models in my own scheme. I quite like how it turned out, its got a very RTS feel on the board.
Steps
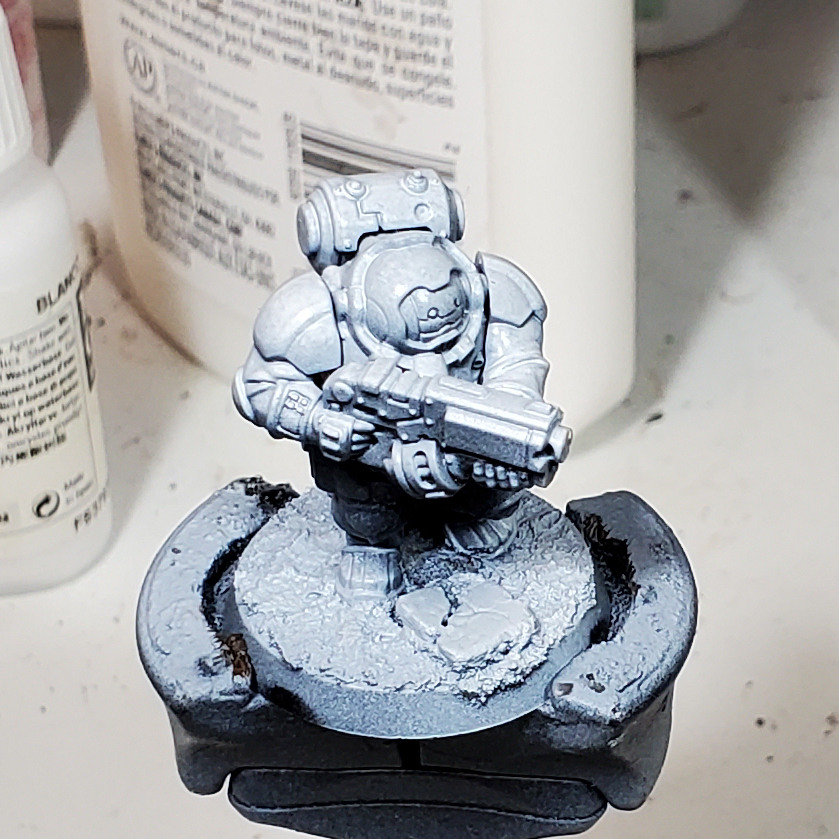
It starts with the exact same zenithal under coat as the GTL scheme…
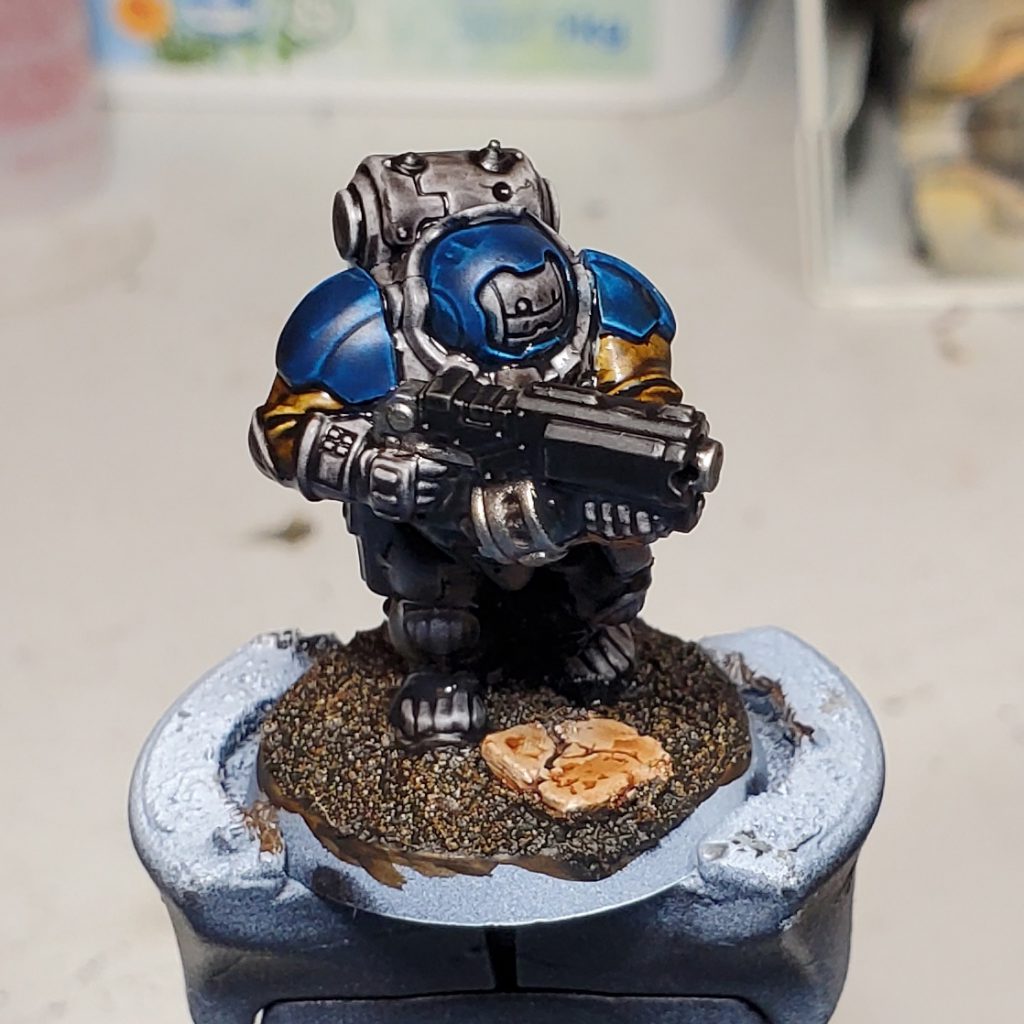
The base gets the same colors too, along with the metals and black of the gun casing/leather. It departs in the main colors obviously, the undersuit is Garaghak’s Sewer, then the majority of the armor gets a coat of Basilicanum, after that its just the spot color of Stormfiend. Everything above the base gets the same overall drowning in Nuln Oil from the other scheme.
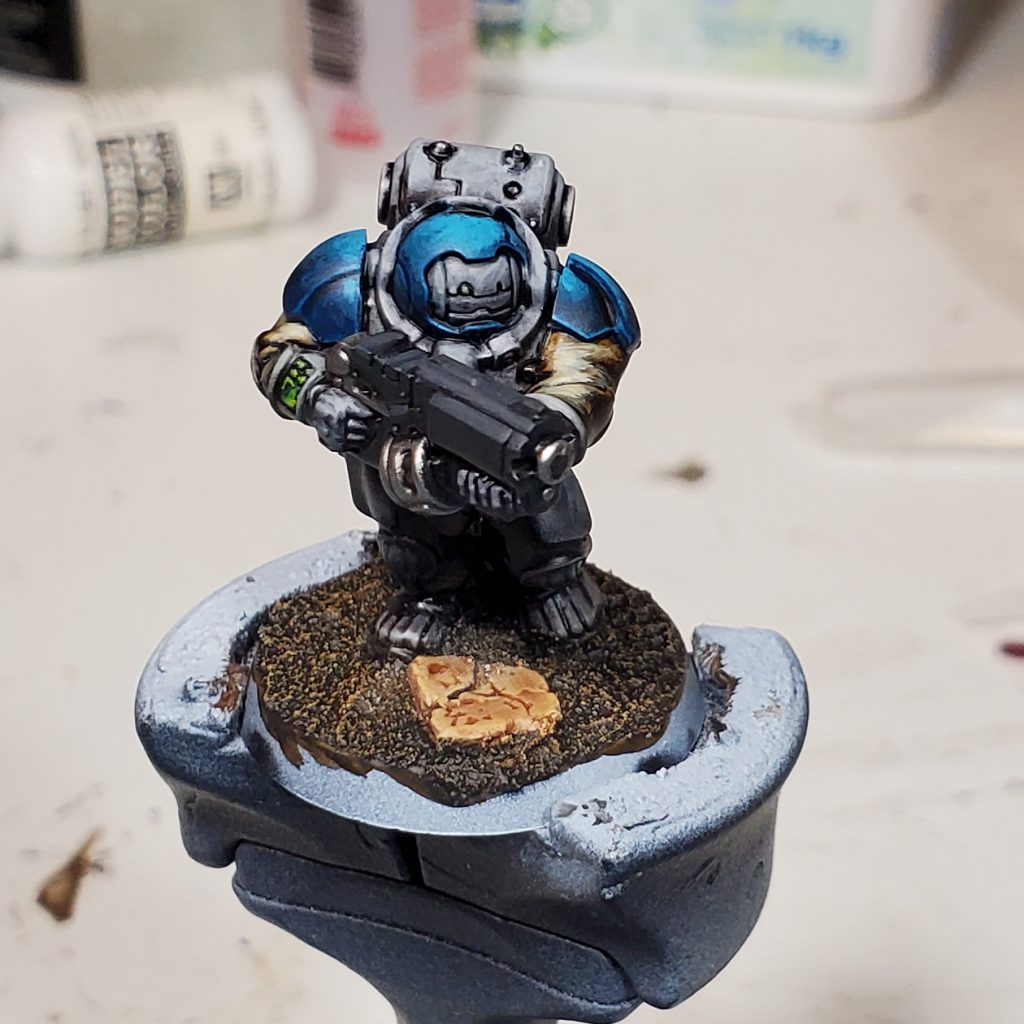
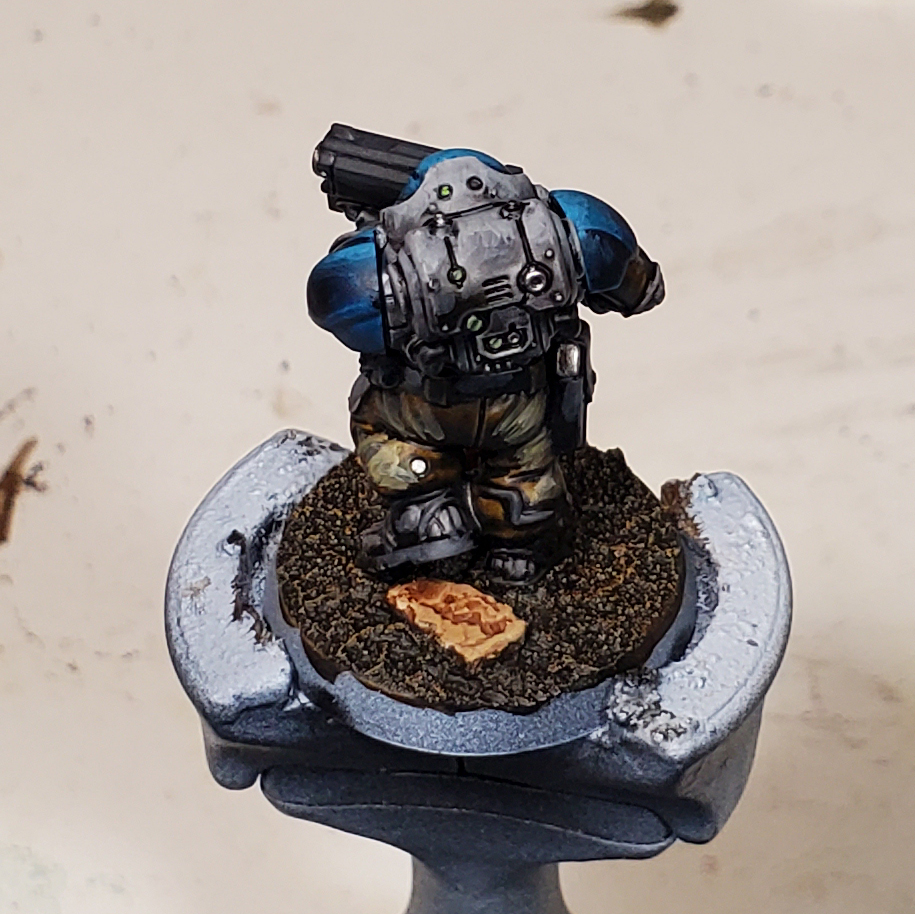
The highlights follow roughly the same pattern as before, just simple crude thicc glazes to get the color down quickly.
- The blue is Sotek and temple guard
- The grey main armor is Dawnstone and Administratum
- The undersuit is Vallejo Green Ochre followed by Screaming Skull
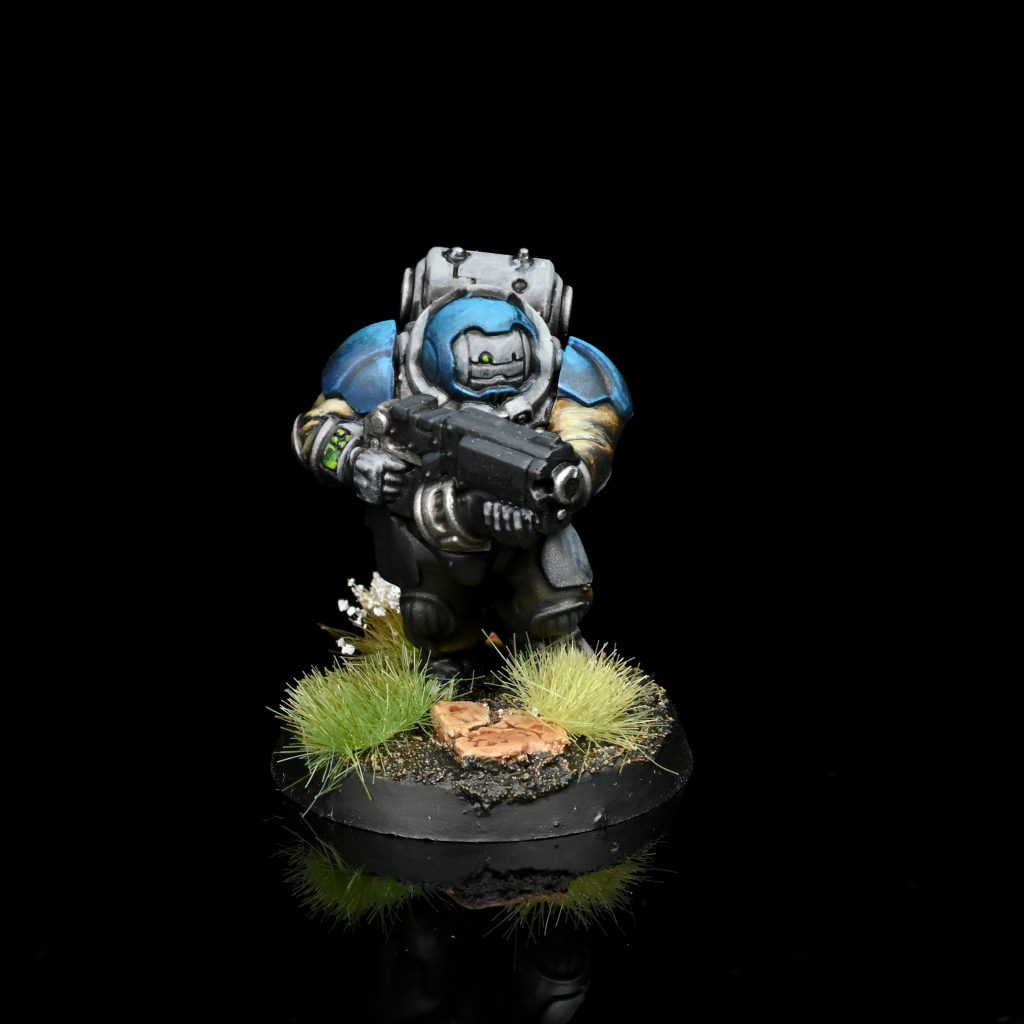
The various details like rubber, metal and weapon glows get the exact same colors as in the other scheme. For the lenses and screens I use green to give them a bit more contrast over the yellow, its a much simpler set of colors its just Caliban, Moot and Flash Gitz. I start with Caliban then slowly mix up to pure Moot, then the last crescent in the gem effect is Moot with a little Flash Gitz added. I use pure Flash Gitz for the reflection, if you wanted to push it a bit further on big areas you could probably also use Dorn or a tan off white.
The bases get finished off with the same set of tufts and drybrushing.
Gallery

TheChirurgeon's Urani-Surtr Regulates - click to expand
The Urani-Surtr Regulates’ worlds are beset on all sides by Xenos adversaries, making them a hardened bunch who hold more grudges than any other League. They’re best known for their grim determination and stubbornness. They have the most drab of the Leagues, wearing green armor with green cloth.
I started by priming the model with Grey Seer.
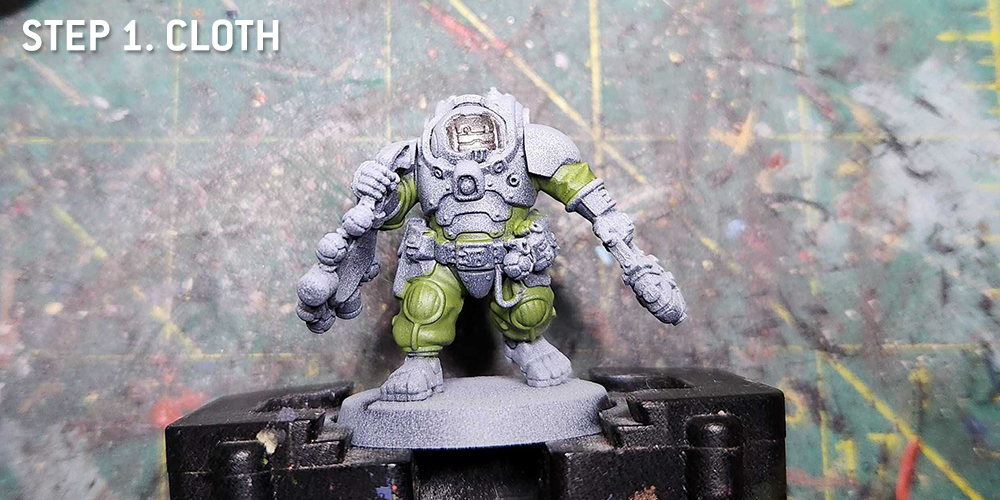
Step 1. Cloth
I usually start with the cloth parts of the models and here is no exception. I painted the cloth with two coats of Gutrippa Flesh Contrast paint, getting a good even coat of the lighter green. I also painted the faceplate with Leadbelcher at this point, jumping the gun a bit.
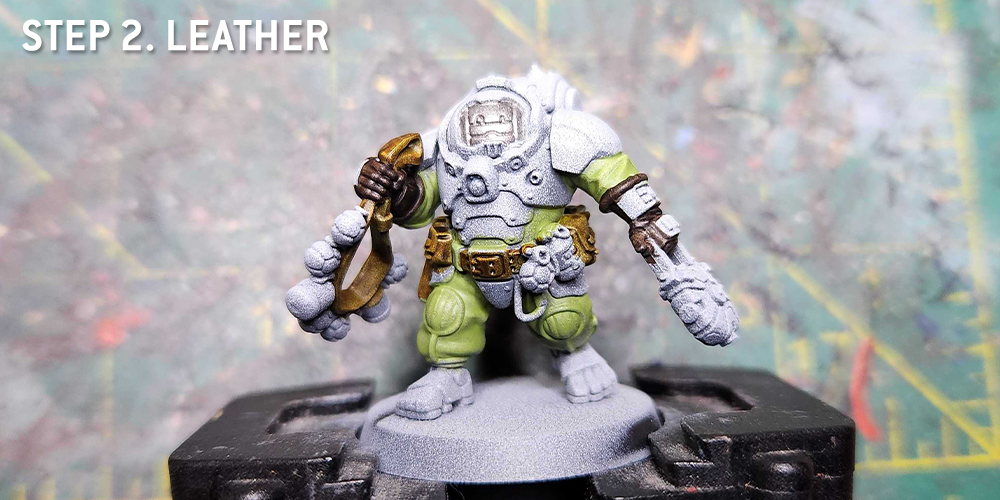
Step 2. Leather
The best part about doing a white basecoat is being able to easily use Snakebite Leather Contrast to do the leather parts – I hit the model’s belt and grenades belt with it, then I paint the gloves with Cygor Brown Contrast paint.
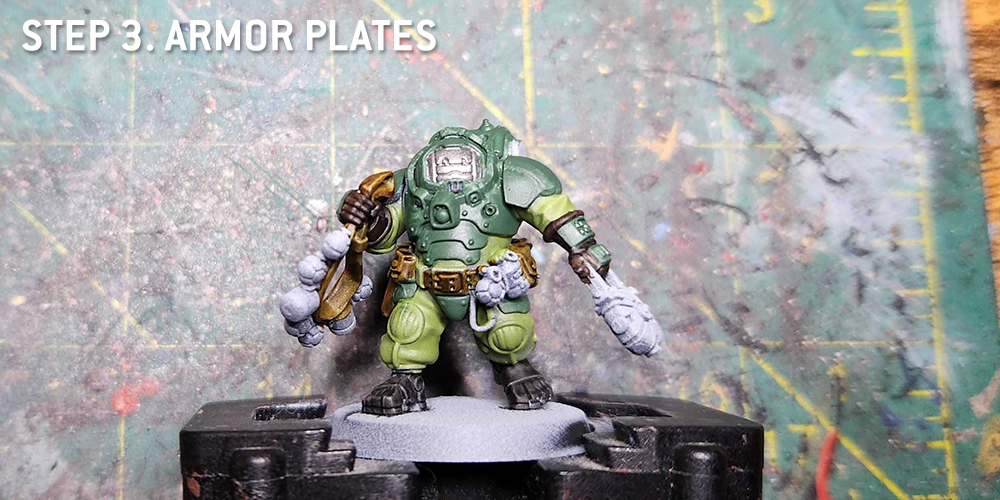
Step 3. Armor Plates
Time for the armor. This is just a coat of Waaagh! Flesh over the armor parts. Be sure to hit the thigh plates when you do this part – they’re easy to miss. I also jump ahead a bit here and paint the boots – they’re just a coat of Black Legion Contrast.
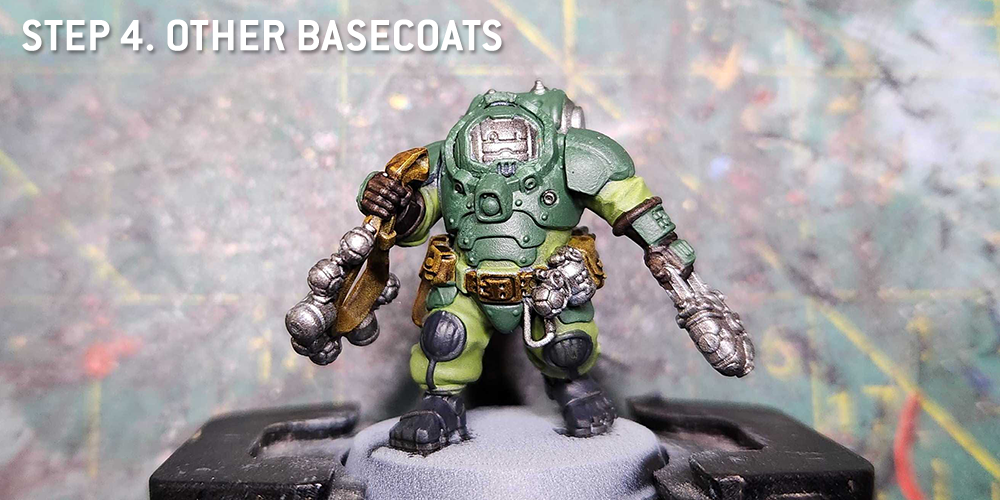
Step 4. Other Basecoats
At this point I finish applying the other basecoats. That’s primarily Leadbelcher for the metal parts and then Corvus Black to the kneepads and boots. On the boots it serves as a highlight and helps to fill in any parts with an uneven finish from the Contrast over white.
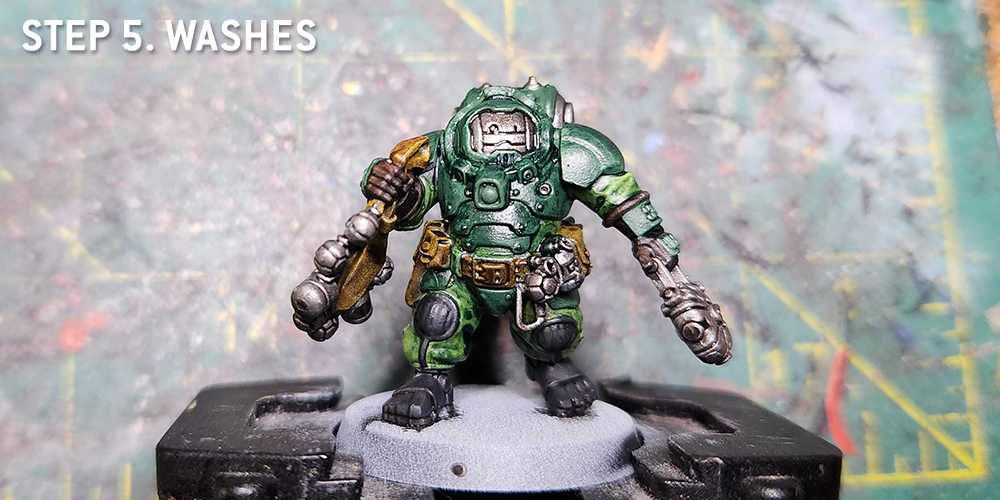
Step 5. Washes
Time for washes. I wash the clothing and the armor with Coelia Greenshade, then I wash the metal parts and the boots/kneepads with Nuln Oil. The leather bits don’t really need a wash.
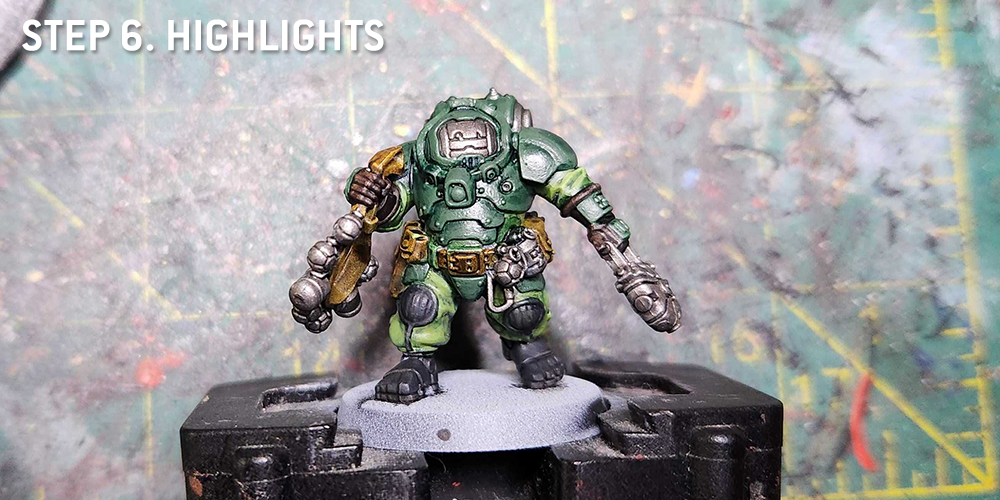
Step 6. Highlights
Time to clean up the work I did with the washes. For the cloth I go over the raised parts and folds with Skarsnik Green, but that’s a bit lighter and bluer than I’d like so after doing those highlights I go back over the cloth parts – shaded bits and all – with a single coat of Gutrippa Flesh to even it out and give it a yellower hue.
For the armor, that gets a new coat of Waaagh! Flesh, though I’m careful to leave the cracks untouched. I’ll shade the plates with a little mix of Waaagh and Coelia Greenshade as well, to make some smoother transitions.
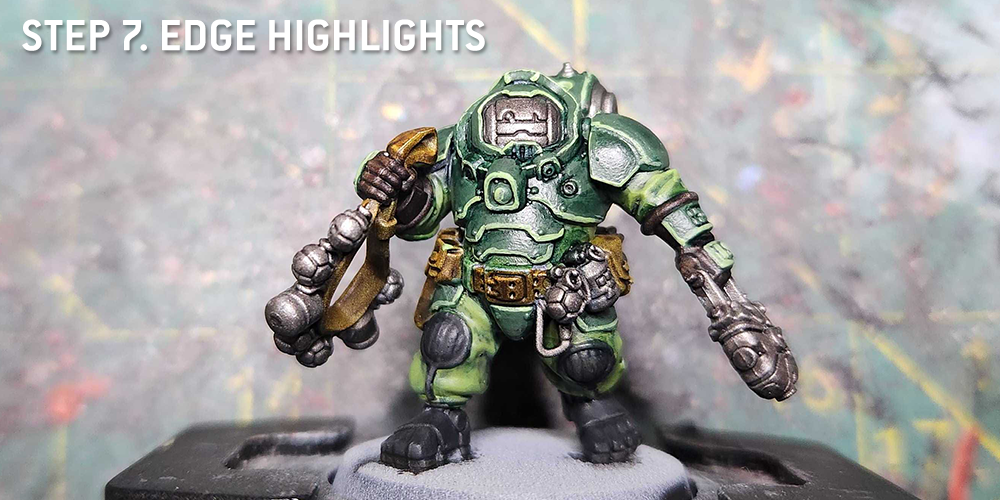
Step 7. Edge Highlights
There are really three sets of highlights here:
- I edge highlight the armor plates with Skarsnik Green
- I edge highlight the boots with Mechanicus Standard Grey
- I edge highlight the grenade belt with Rakarth Flesh
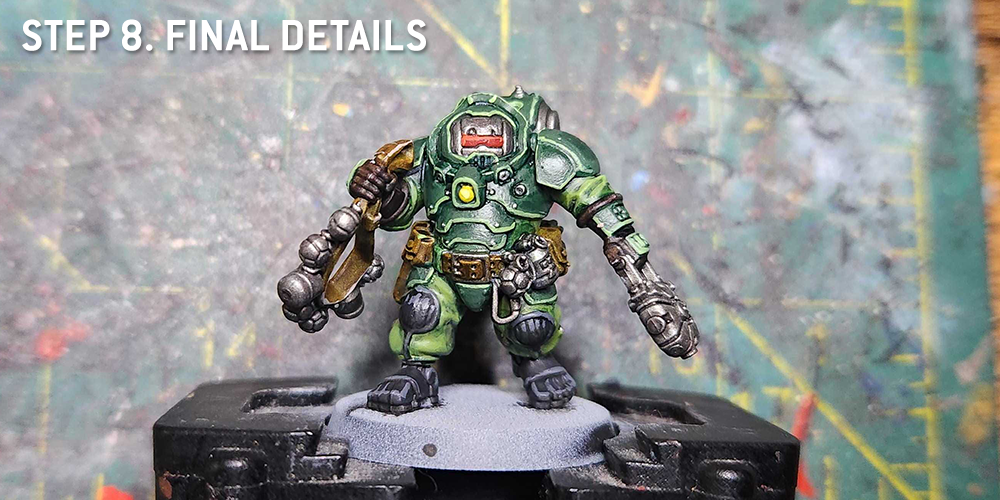
Step 8. Final Details
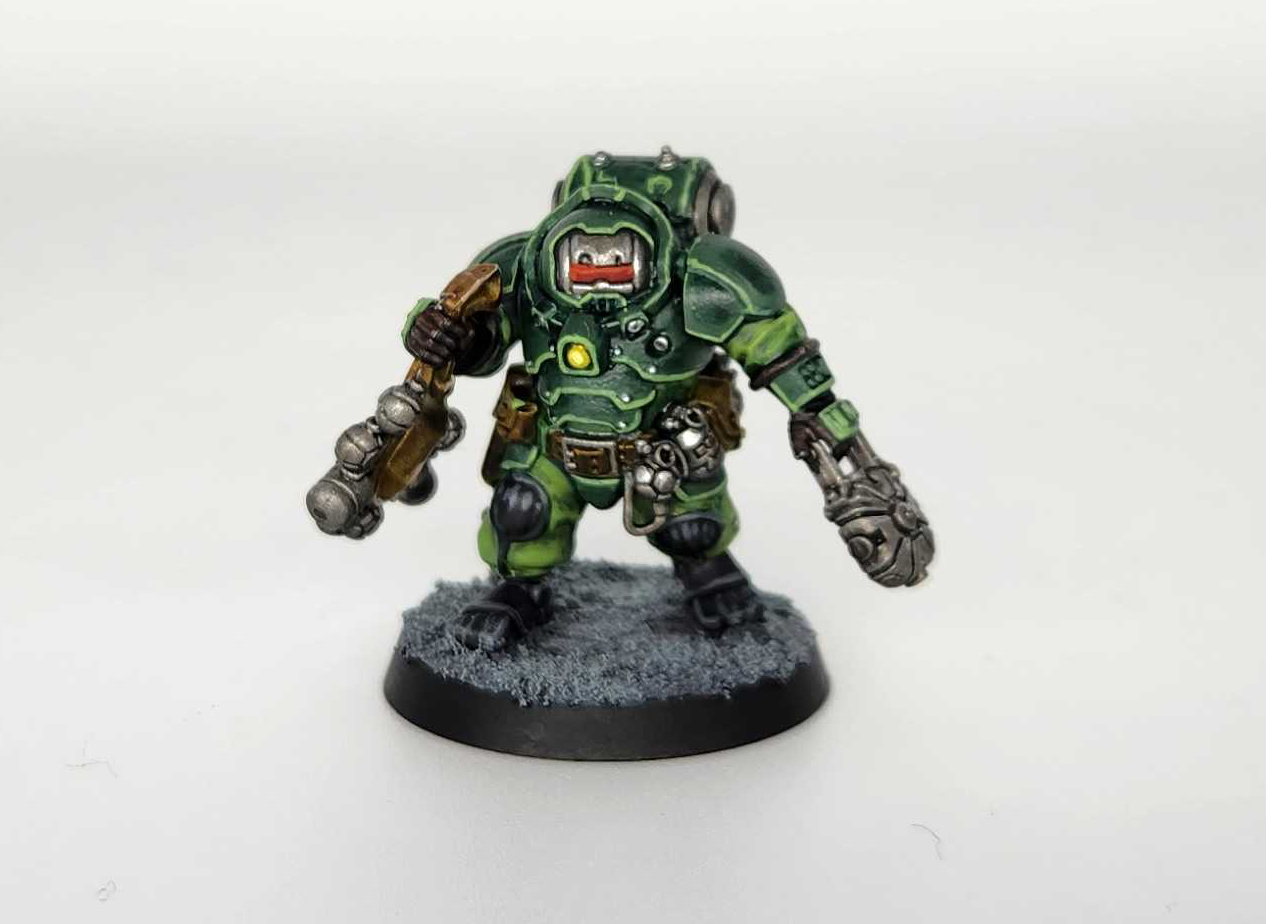
Wrapping things up, I hit the belt buckle with Leadbelcher and paint the visor – that’s Mephiston Red, shaded with Carroburg Crimson and then highlighted with Wild Rider Red. I hit the rivets on the armor with Runefang Steel and the chest light is Averland Sunset with two progressive dots of Flash Gitz Yellow and Dorn Yellow inside it.
And that’s it – pretty easy, and the result is solid. It’s not my favorite Votann scheme but you could do a lot worse and it’s certainly easy to paint.

Cronch's Ymyr Conglomerate - click to expand
Although I ultimately decided on a custom scheme for my army set, I originally planned to paint the Ymyr Conglomerate. With this in mind, as soon as I picked up the free miniature of the month from my local Warhammer store I got to work testing a scheme. Unfortunately, because I’m not smart, I didn’t take a huge amount of photos of the process! My initial starting point was this “top paint picks” image shared on Warhammer Community.
I first put the model together, tacking the gun arm on with superglue so that I could pop it off to access the chest armour details. After building and cleaning up the mini, I primed it in Chaos Black spray, then popped the arm off to start basecoating.
The model was basecoated mostly in line with the GW-suggested paints above, with a few exceptions. The main armour colour was based Mephiston Red, with Stegadon Scale Green used for the undersuit. Brown leather boot parts, pouches and belts were Thondia Brown, “hard” black areas such as the gun casing and face mask were Army Painter Matt Black (my favourite black!) and the “soft” black areas such as boots and gloves were painted with Vallejo Model Color German Grey. Fun fact, this grey is almost a 1:1 match for Citadel Corvus Black, but has much more solid coverage. To round the basecoats out, the silver metals were based with Leadbelcher and the few brass bits got a coat of Runelord Brass.
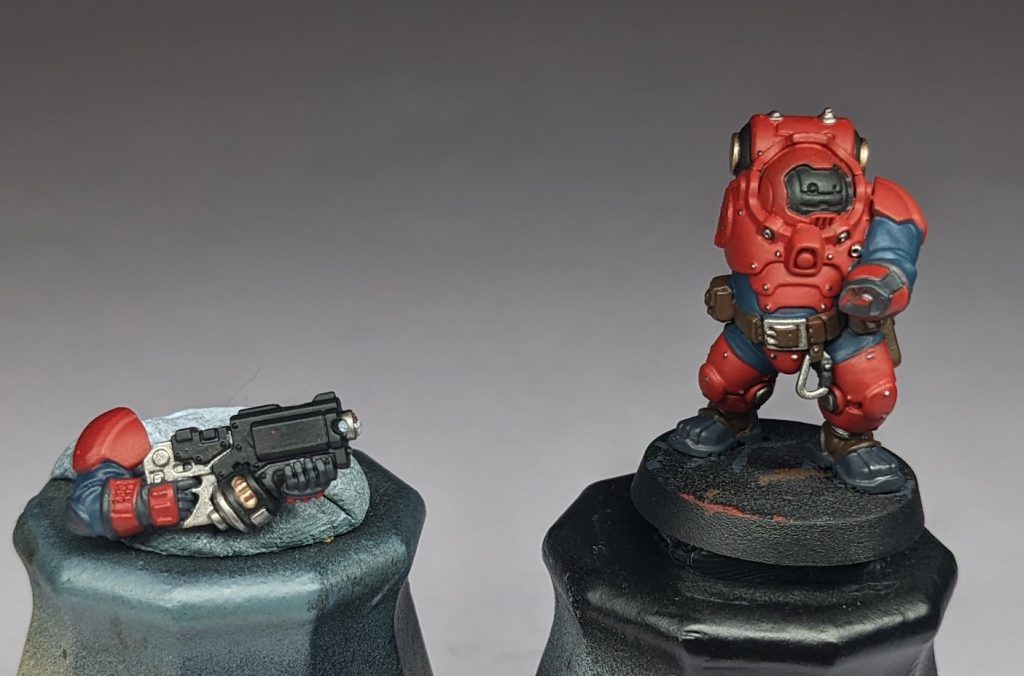
With the basecoats in place, it was time to start adding some definition to the warrior. First off, a round of washes was applied to most of the model – Nuln Oil for the metal and black areas, Coelia Greenshade for the undersuit, and Agrax Earthshade for the brown and brass areas. After this, I tackled the red armour. To start with I dark-lined the panels with Nuln Oil for definition. However I wasn’t really satisfied with this effect, and I was keen to push myself a bit here, so I mixed some Mephiston Red down with some black paint and thinned it out with water into a glaze consistency.
This glaze was applied in a few thin coats to add some shadow and modulation to the armour panels. In the deepest shadows, I did a second pass with more black mixed in. Finally, I glazed back in some areas with some thinned Mephiston Red, to make sure the model wasn’t too dark overall. It’s worth noting here that, in my opinion at least, when you’re army painting it is not hugely worth the time to make sure the shadows are being placed in exactly realistic places. Adding some visual interest to the model is the name of the game, and frankly incorrect light modulation does that just as well as perfectly-placed imaginary light sources do.
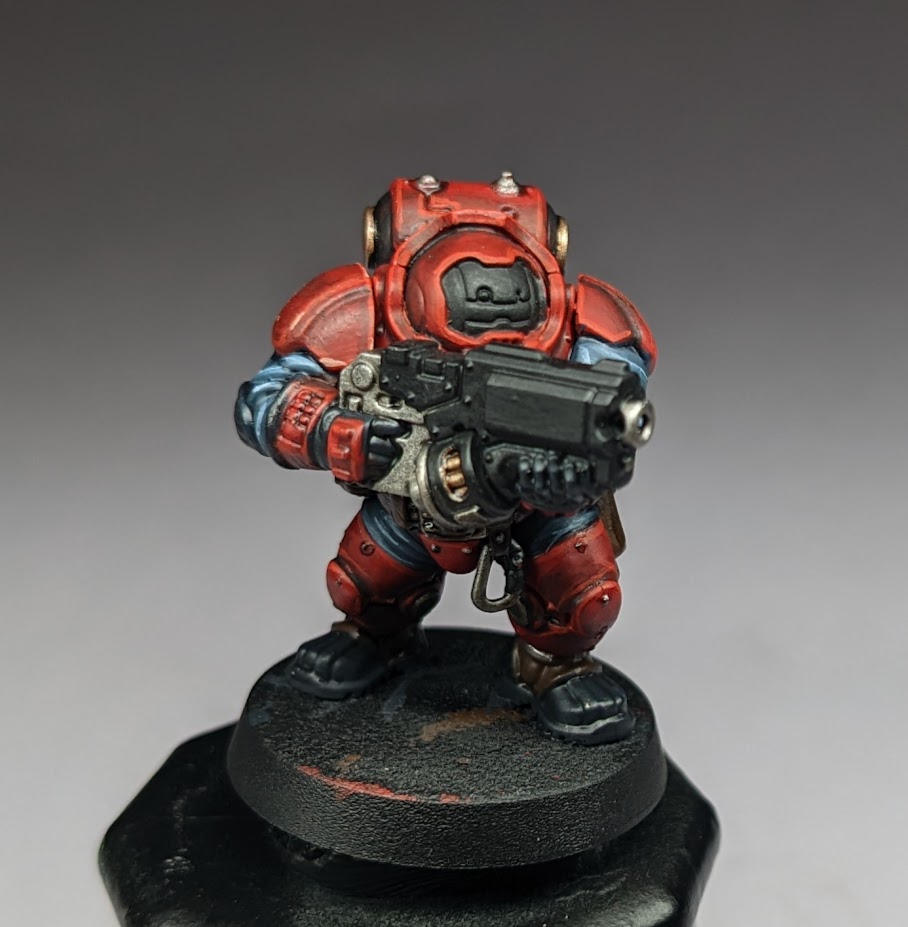
With shading tackled, I could focus on highlights and final details. I also glued the arm on at this point, as I didn’t want to waste time highlighting bits that wouldn’t be seen. I followed a pretty standard GW house style here, highlighting each area with a couple of colours of increasing brightness in turn. The red armour got highlights of Evil Sunz Scarlet and then Cadian Fleshtone, to avoid the armour reading as orange. The undersuit was highlighted with Thunderhawk Blue and Fenrisian Grey. Brown leathers were highlighted with Skrag Brown, and black leathers were highlighted with Eshin Grey and Stormvermin Fur. For hard black areas, I used edge highlights of Mechanicus Standard Grey, followed by bright points of Administratum Grey. Metals were highlighted with Stormhost Silver, and a touch of Canoptek Alloy for the brass.
Highlights done, it was time for finishing touches. The visor was painted with Thousand Sons Blue, and glazed with Ahriman Blue and Temple Guard Blue to highlight, before adding hard edge highlights and glare lines of Blue Horror and Vallejo Model Color White (any white would do).
To lean into the slightly Nordic aesthetic, I wanted to do some runes/patterns on the shoulders. I based these in Morghast Bone, before going over with Wraithbone, and then tidying up with Mephiston Red.
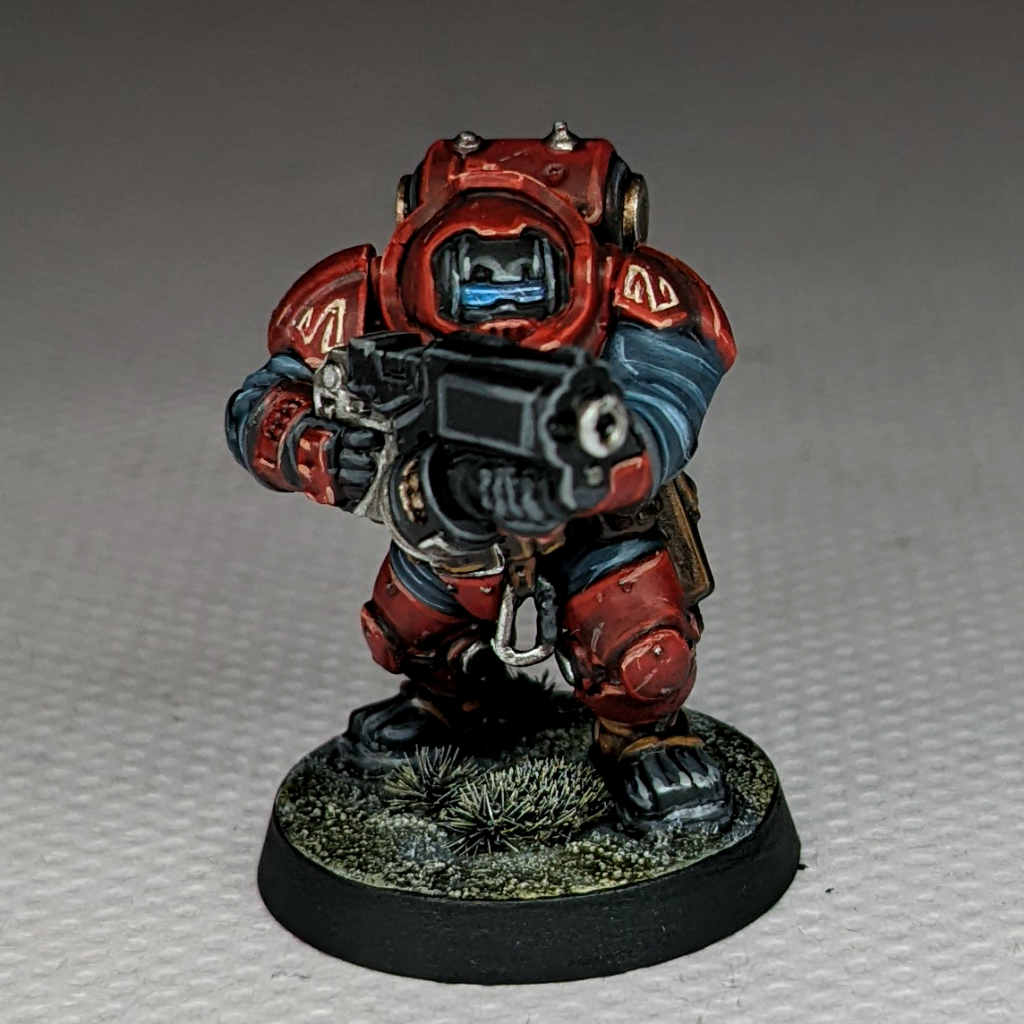
I based the model with Astrogranite, adding a couple of small tufts while the texture was still wet. Once dry I washed the base, including tufts, with patchy blobs of different green Citadel washes – Athonian Camoshade and Biel-Tan Green. Once these had dried I drybrushed the base, again making sure to catch the tufts, with some light colours – I honestly can’t remember what I used, but my guesses are on some combo of Dawnstone, Ulthuan Grey, Karak Stone, and Screaming Skull.
Overall, I’m quite happy with how he came out! There are definitely things I could improve (rush less, be neater) but I think an army of these would look fearsome lined up on the tabletop.

Corrode's Ymyr Conglomerate - Click to Expand
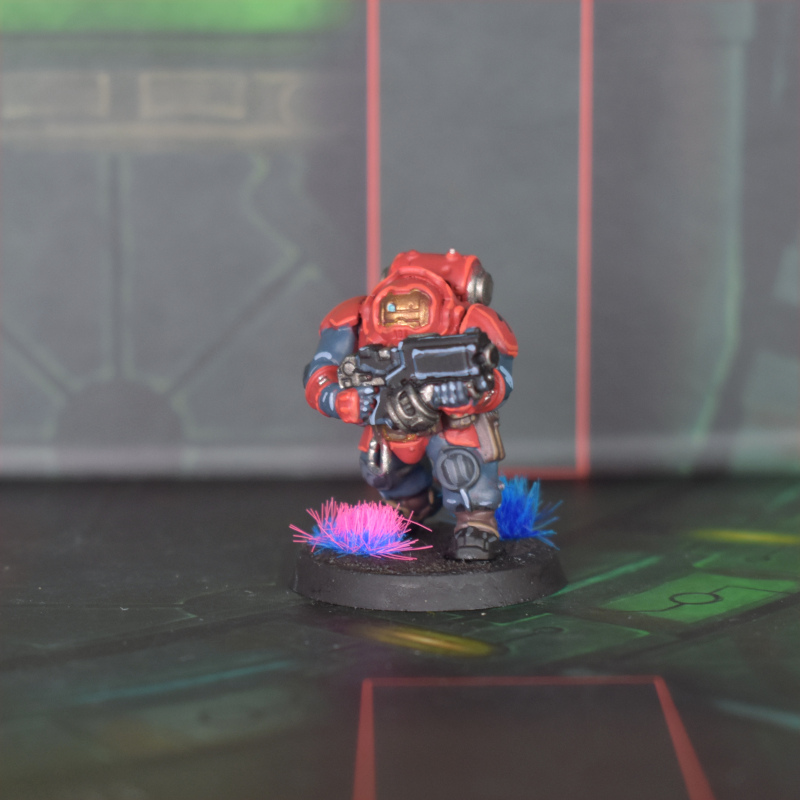
The Ymyr Conglomerate was the natural fit for me, because it’s the red one. I approached this very similarly to how I approach my Blood Angels and Sisters of Battle, by starting from a Mephiston Red prime – if most of the model is going to be red, it may as well start that way!
The armour is then a further layer of Mephiston Red highlighted with Wild Rider Red. Looking at the codex, the fabric of the undersuit is grey, but quite a bluish grey. After living in ignorance for much of my life so far I’ve recently discovered Dark Reaper, and it’s the perfect colour for the undersuits here, highlighted with Fenrisian Grey. To keep the knee pads distinct I went with VMC Black Grey highlighted with Mechanicus Standard Grey.
The bolter is VMC Black highlighted with the same colours as the undersuit – Dark Reaper and Fenrisian Grey on the corners – and all the metal is my standard Darkstar Old Silver washed with Nuln Oil. The leather is low-key, painted Catachan Flesh and then highlighted with Steel Legion Drab.
Finally for the faceplate I went with a VMC Ancient Gold, with the eye picked out in Baharroth Blue.
The scheme is basically the same for Einyhr, although without the undersuit:
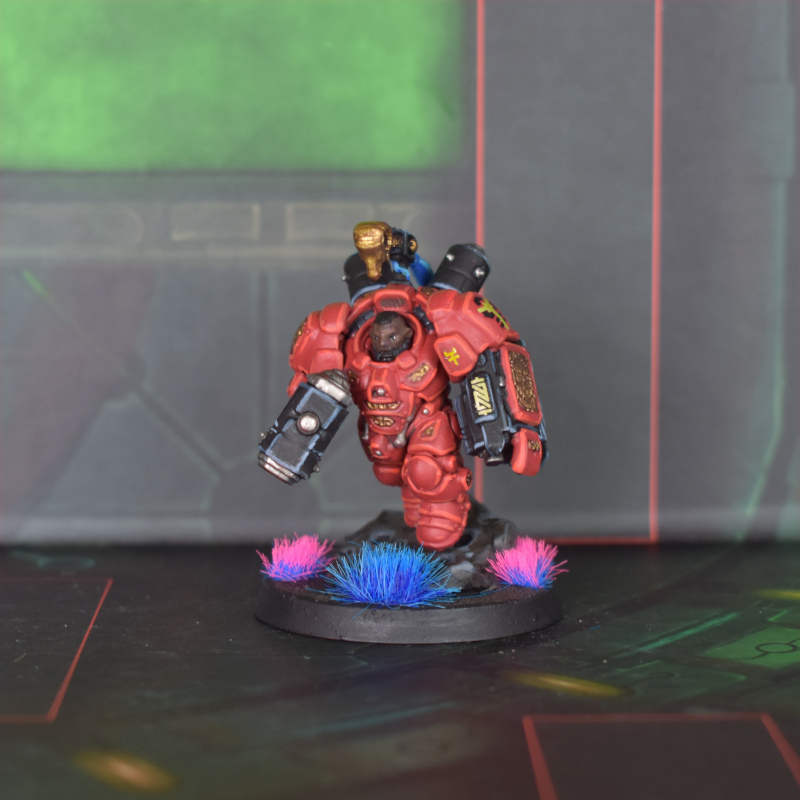
Basing is some straightforward Astrogranite washed with Agrax, and some alien tufts from Gamers Grass to add some xenoflora.
That’s pretty much it – a nice straightforward way to get your Ymyr on the table.

TheChirurgeon's Kronus Hegemony - Click to Expand
The most warlike of the Votann Leagues are the Kronus Hegemony, who are just chock full of piss and vinegar and ready to beat the tar out of the enemies of the Kindred. They’re the most vaunted warriors of the Votann and joining them requires proving your mettle in combat. Anyways, they’re black and yellow and probably my favorite Votann scheme to paint.
I started by priming this model with Grey Seer.
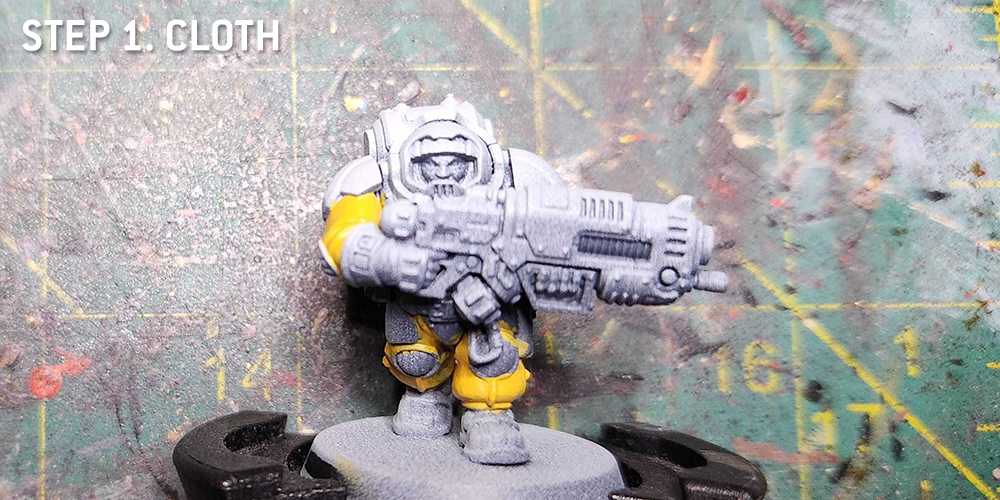
Step 1. The Cloth
I like to start with the cloth bits. I painted the cloth bits here with Imperial Fists Contrast paint, which after two coats gave me a really nice, smooth yellow. I contemplated doing the darker kneepads but in the end went with yellow kneepads the same color as the cloth.
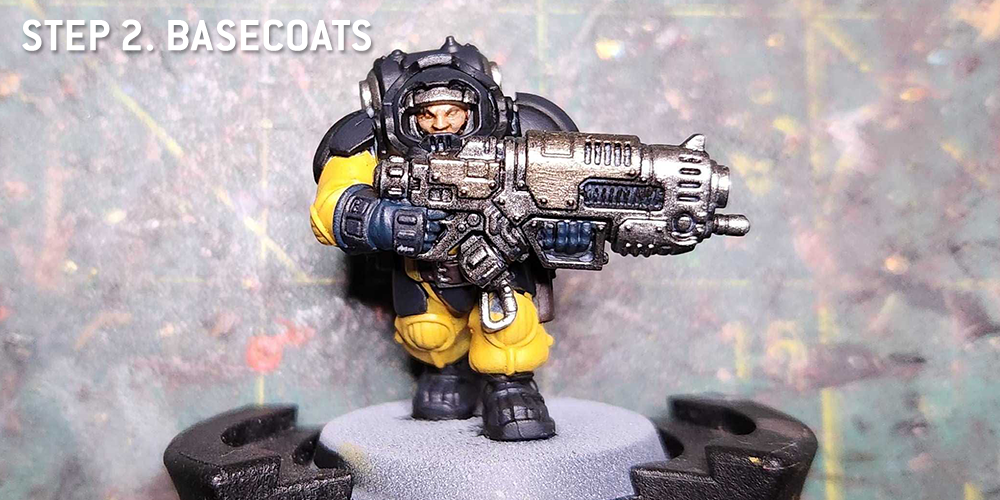
Step 2. Basecoats
There’s a lot to cover here so I did a bunch of it at once. The boots and armor were painted with a couple coats of Black Legion Contrast, which I then highlighted using Corvus Black. The gloves here are Incubi Darkness, and the metal parts are Leadbelcher, while the skin has been painted Cadian Fleshtone. I used two tones of metal on the gun; the raised sections are painted with Iron Hands Steel, which has a different, warmer steel tone than Leadbelcher.
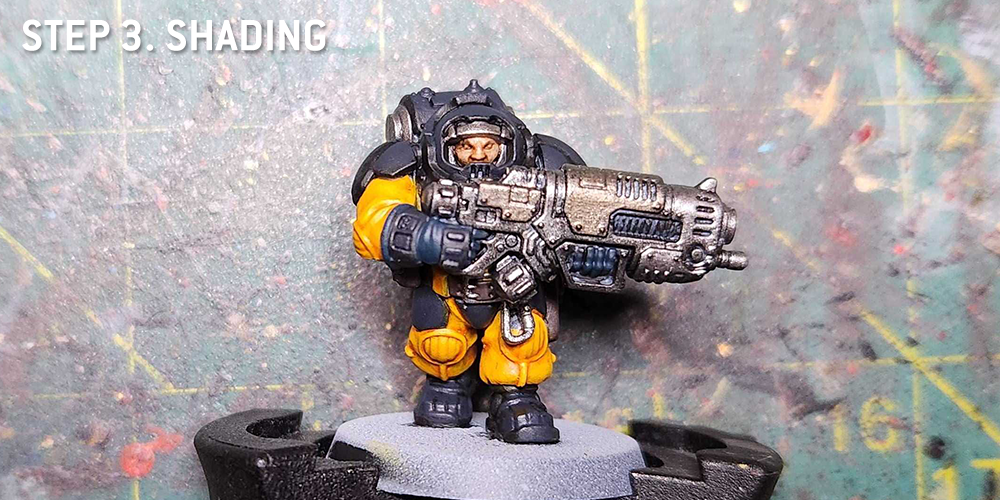
Step 3. Shading
Lots of Shading happened at once here as well – I shaded with flesh with Agrax Earthshade, the metal and black parts with Nuln Oil, and the yellow cloth parts were shaded with Casandora Yellow. That last step I did a couple of times to get some nice, darker lines. I used a bit of Fuegan Orange as well.
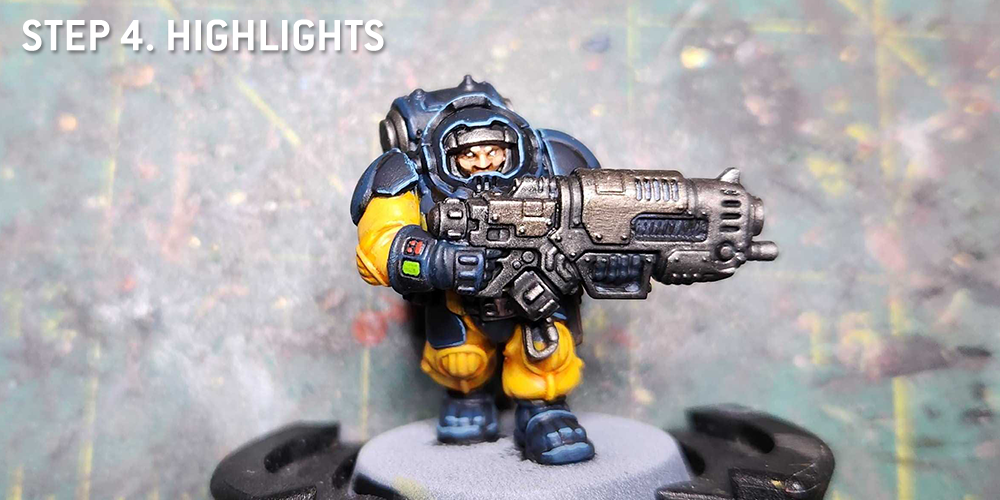
Step 4. Highlights
Time to add some highlights. I went for some bluer highlights here than the GW paint scheme, and I think it makes for a more interesting contrast with the orange/yellow. The armor has been edge highlighted with Night Lords Blue and then Thunderhawk Blue, with some top edge highlights using a mix of Thunderhawk and a spot of Reaper Snow Shadow. The skin gets a highlight of Kislev Flesh, and the cloth is highlighted with Iyanden Yellow and a mix of Iyanden and Dorn Yellow.
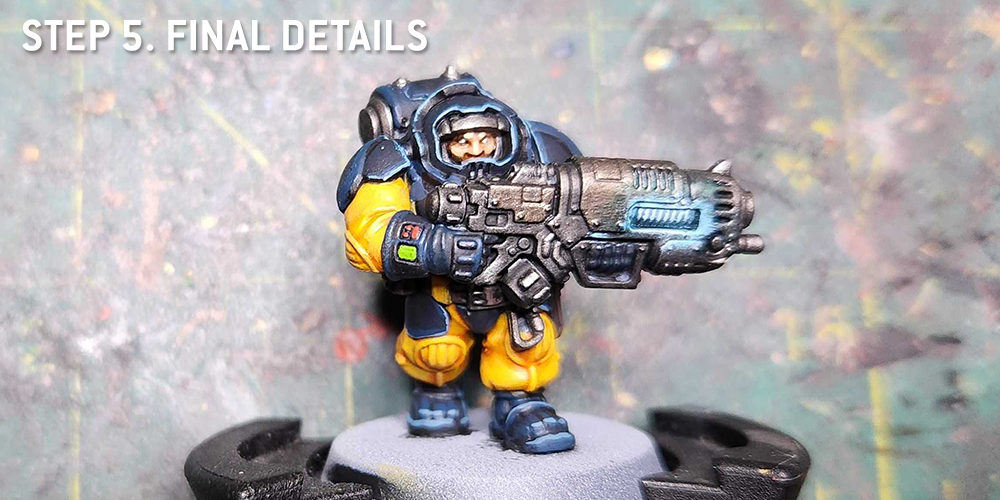
Step 5. Final Details
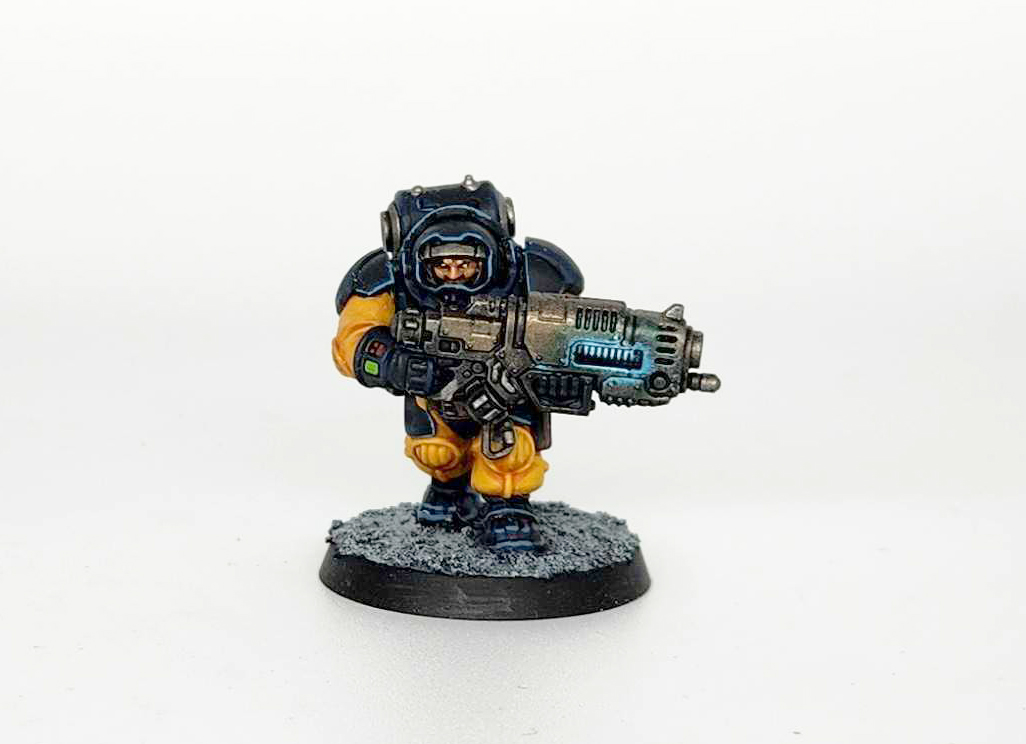
There isn’t a ton left to do here, save pick out some edge highlights with silver, paint the buttons, and do some quick OSL on the gun – this is just Baharroth Blue and some highlights with Reaper Ghost White.
I’m very happy with how this turned out, and it was a hell of a lot easier and faster to paint than the Greater Thurian League model I did.

Jack's Typon-Styx Protectorate - Click to Expand
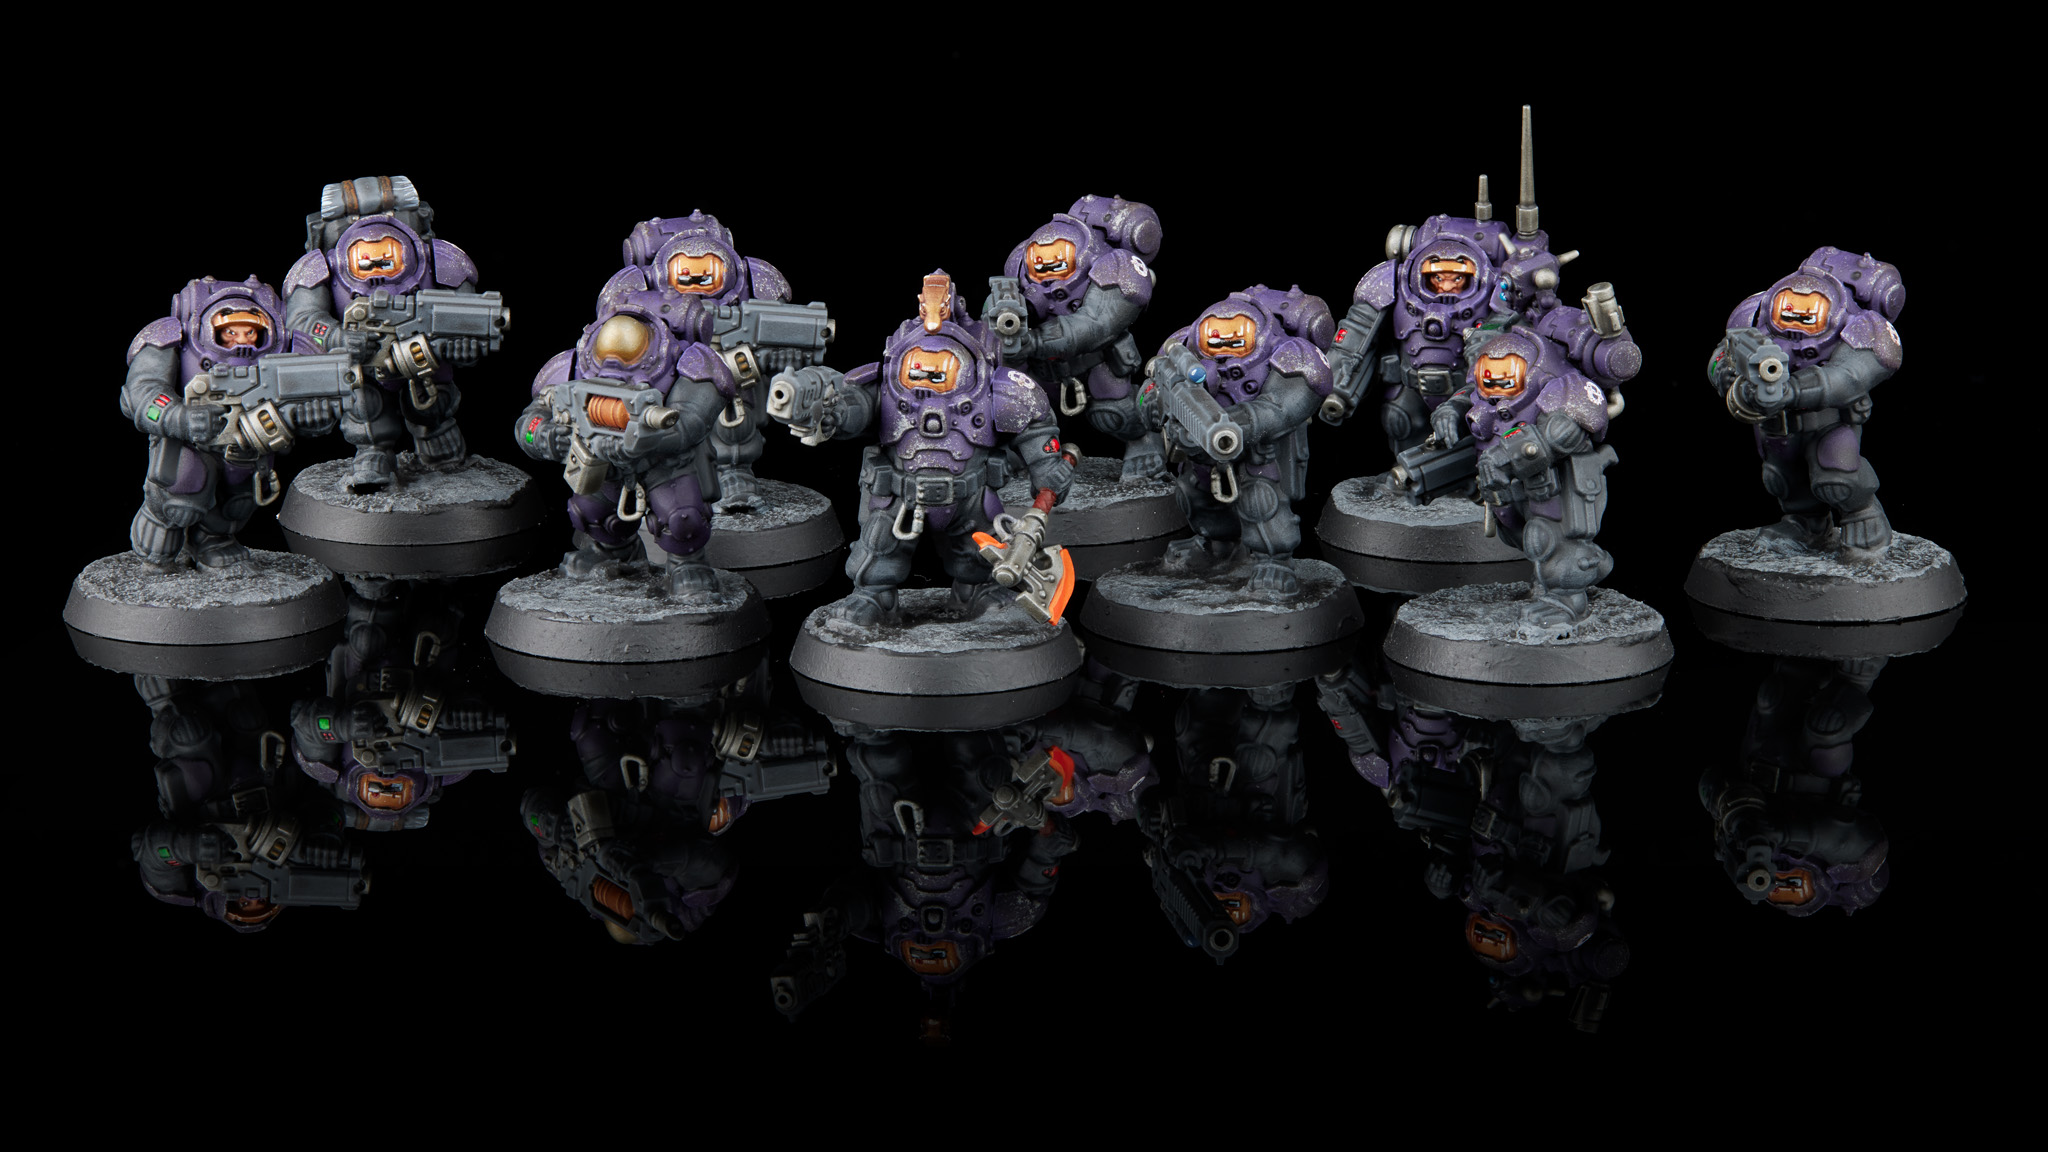
The Typhon-Styx Protectorate are always looking to fortify their forces and make themselves unassailable by outside forces so they can repel invaders. On the battlefield they advance from one fortified position to the next and their holds are massively fortified. They’re basically the Imperial Fists of the Votann and so obviously they’re the League we’ve chosen to associate with Jack.
This is a fairly dark scheme, so we’re going to start with priming in either black or dark grey. From there, give the whole model a coat of Reaper Master Series Paint Deep Twilight. Follow that up with an airbrush highlight of Reaper Imperial Purple. If you don’t have an airbrush, a good soft drybrushing could do the same job.
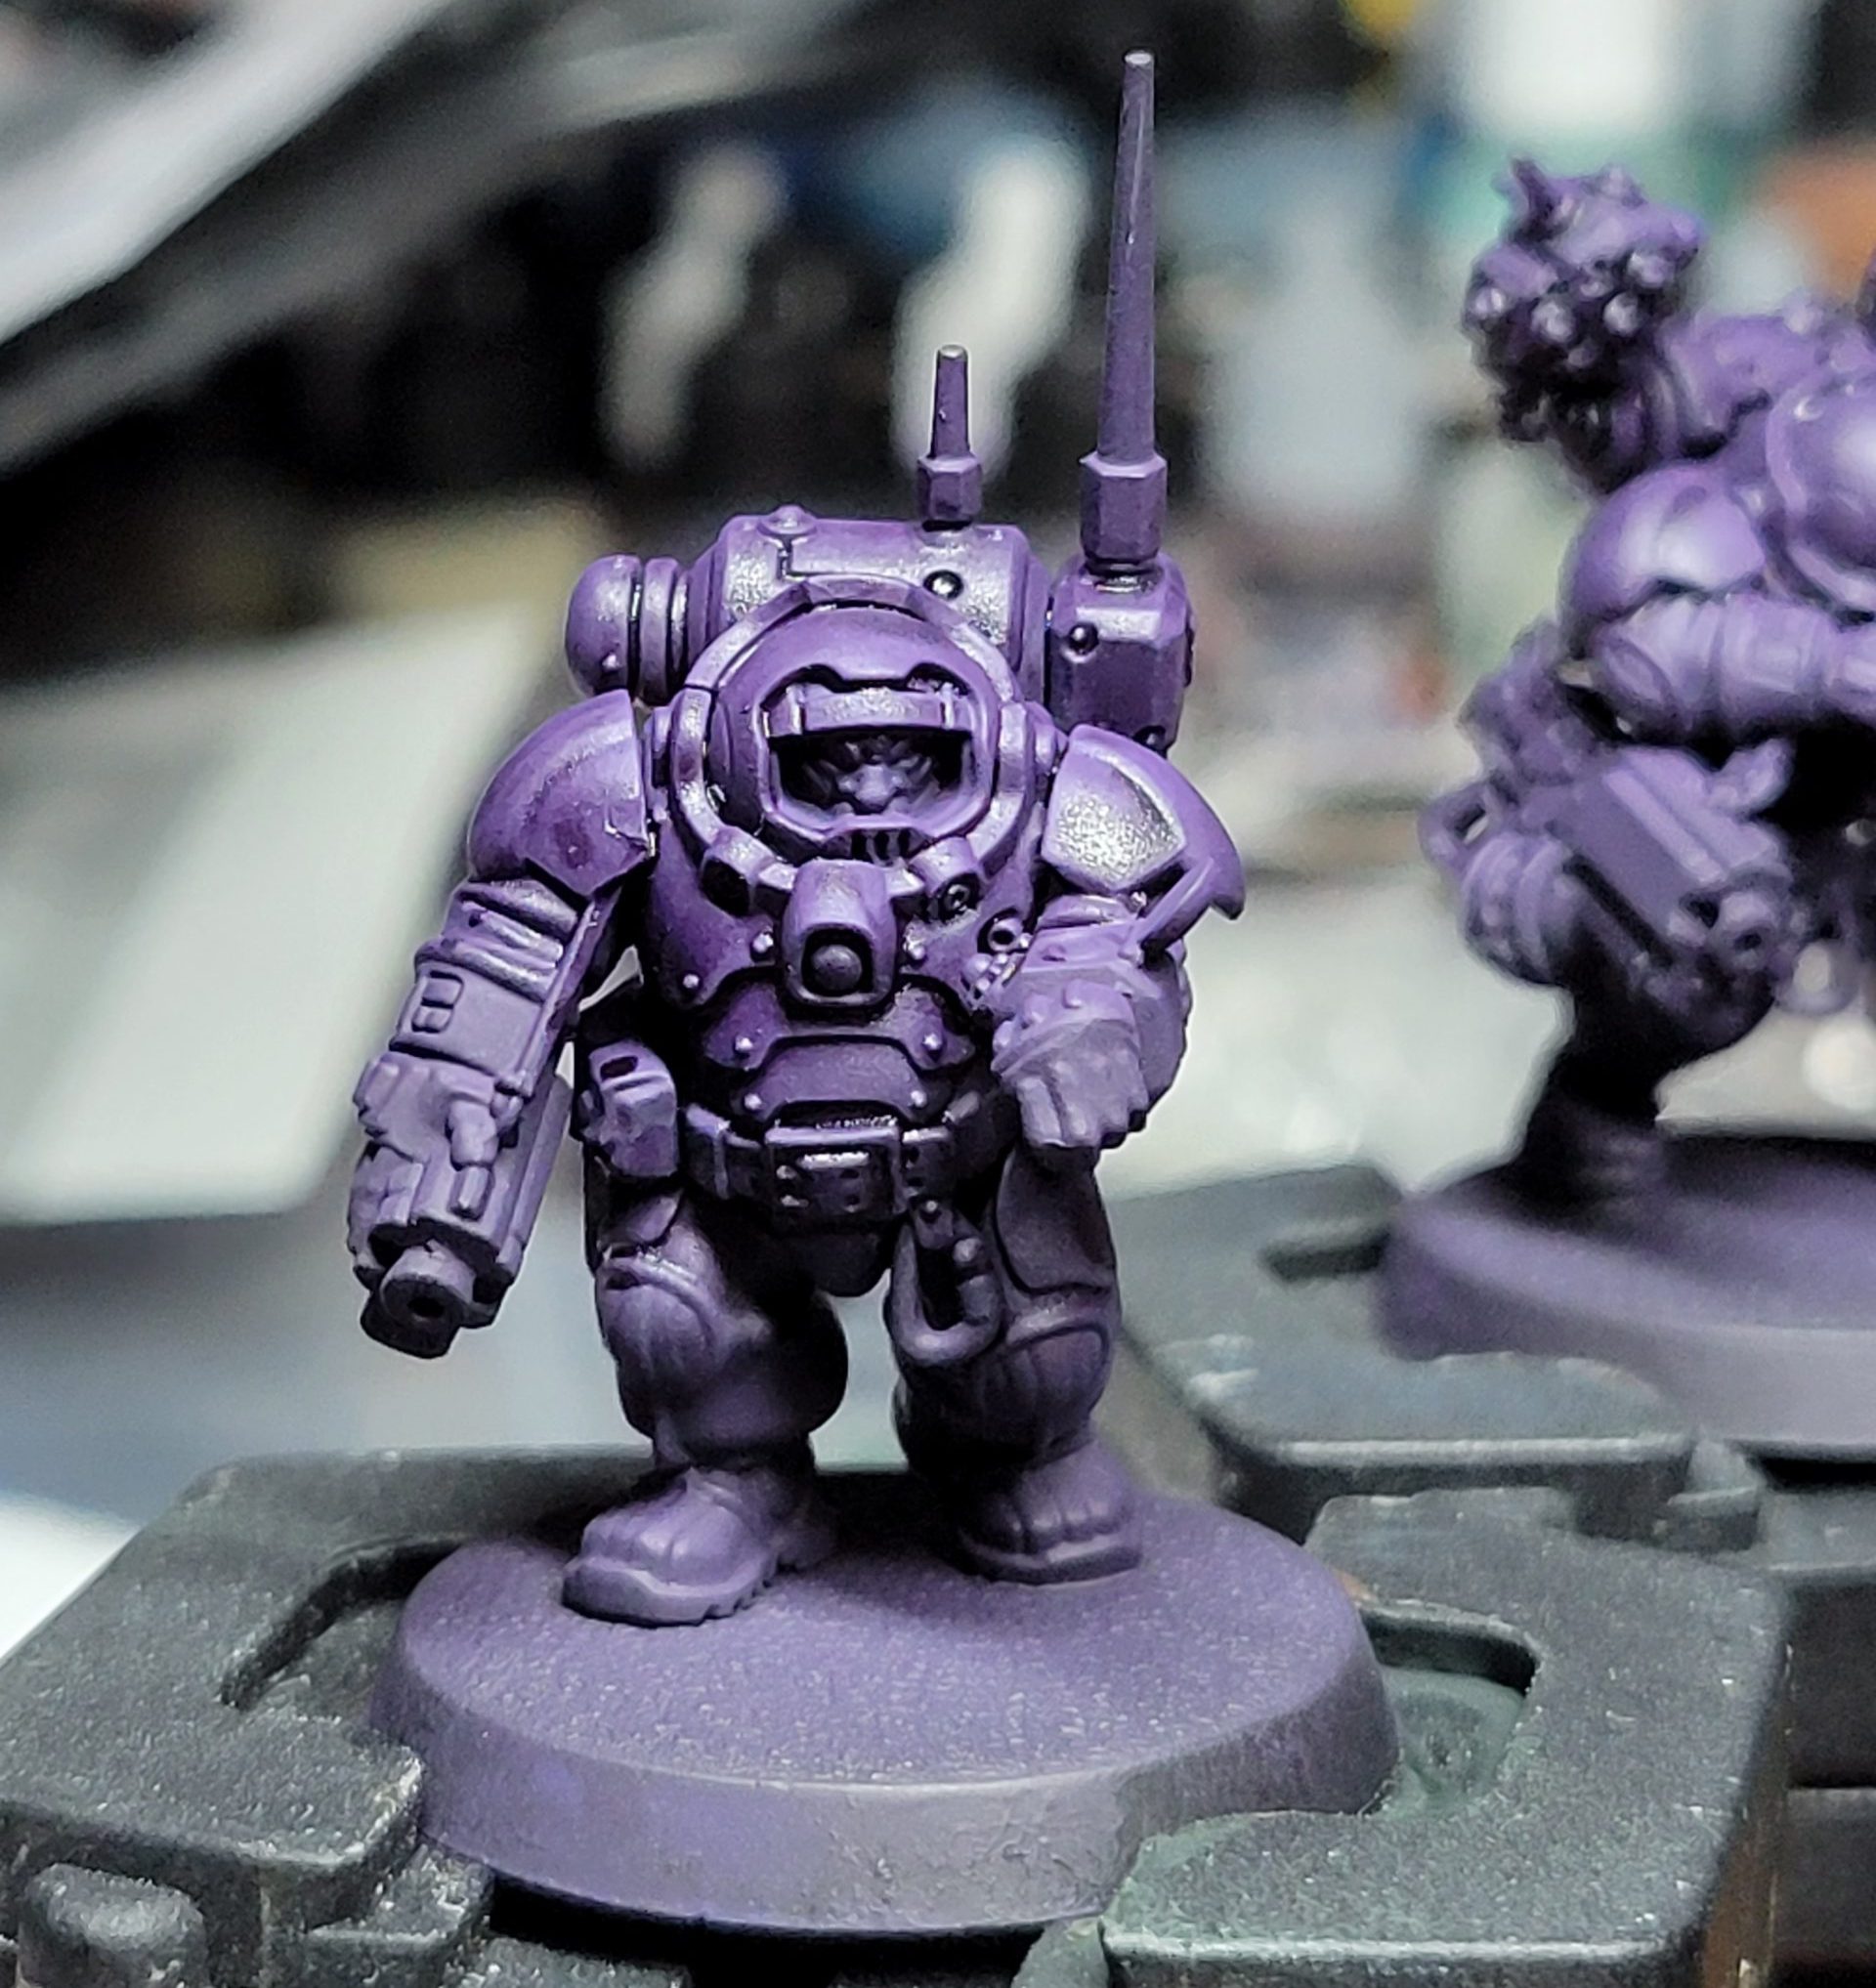
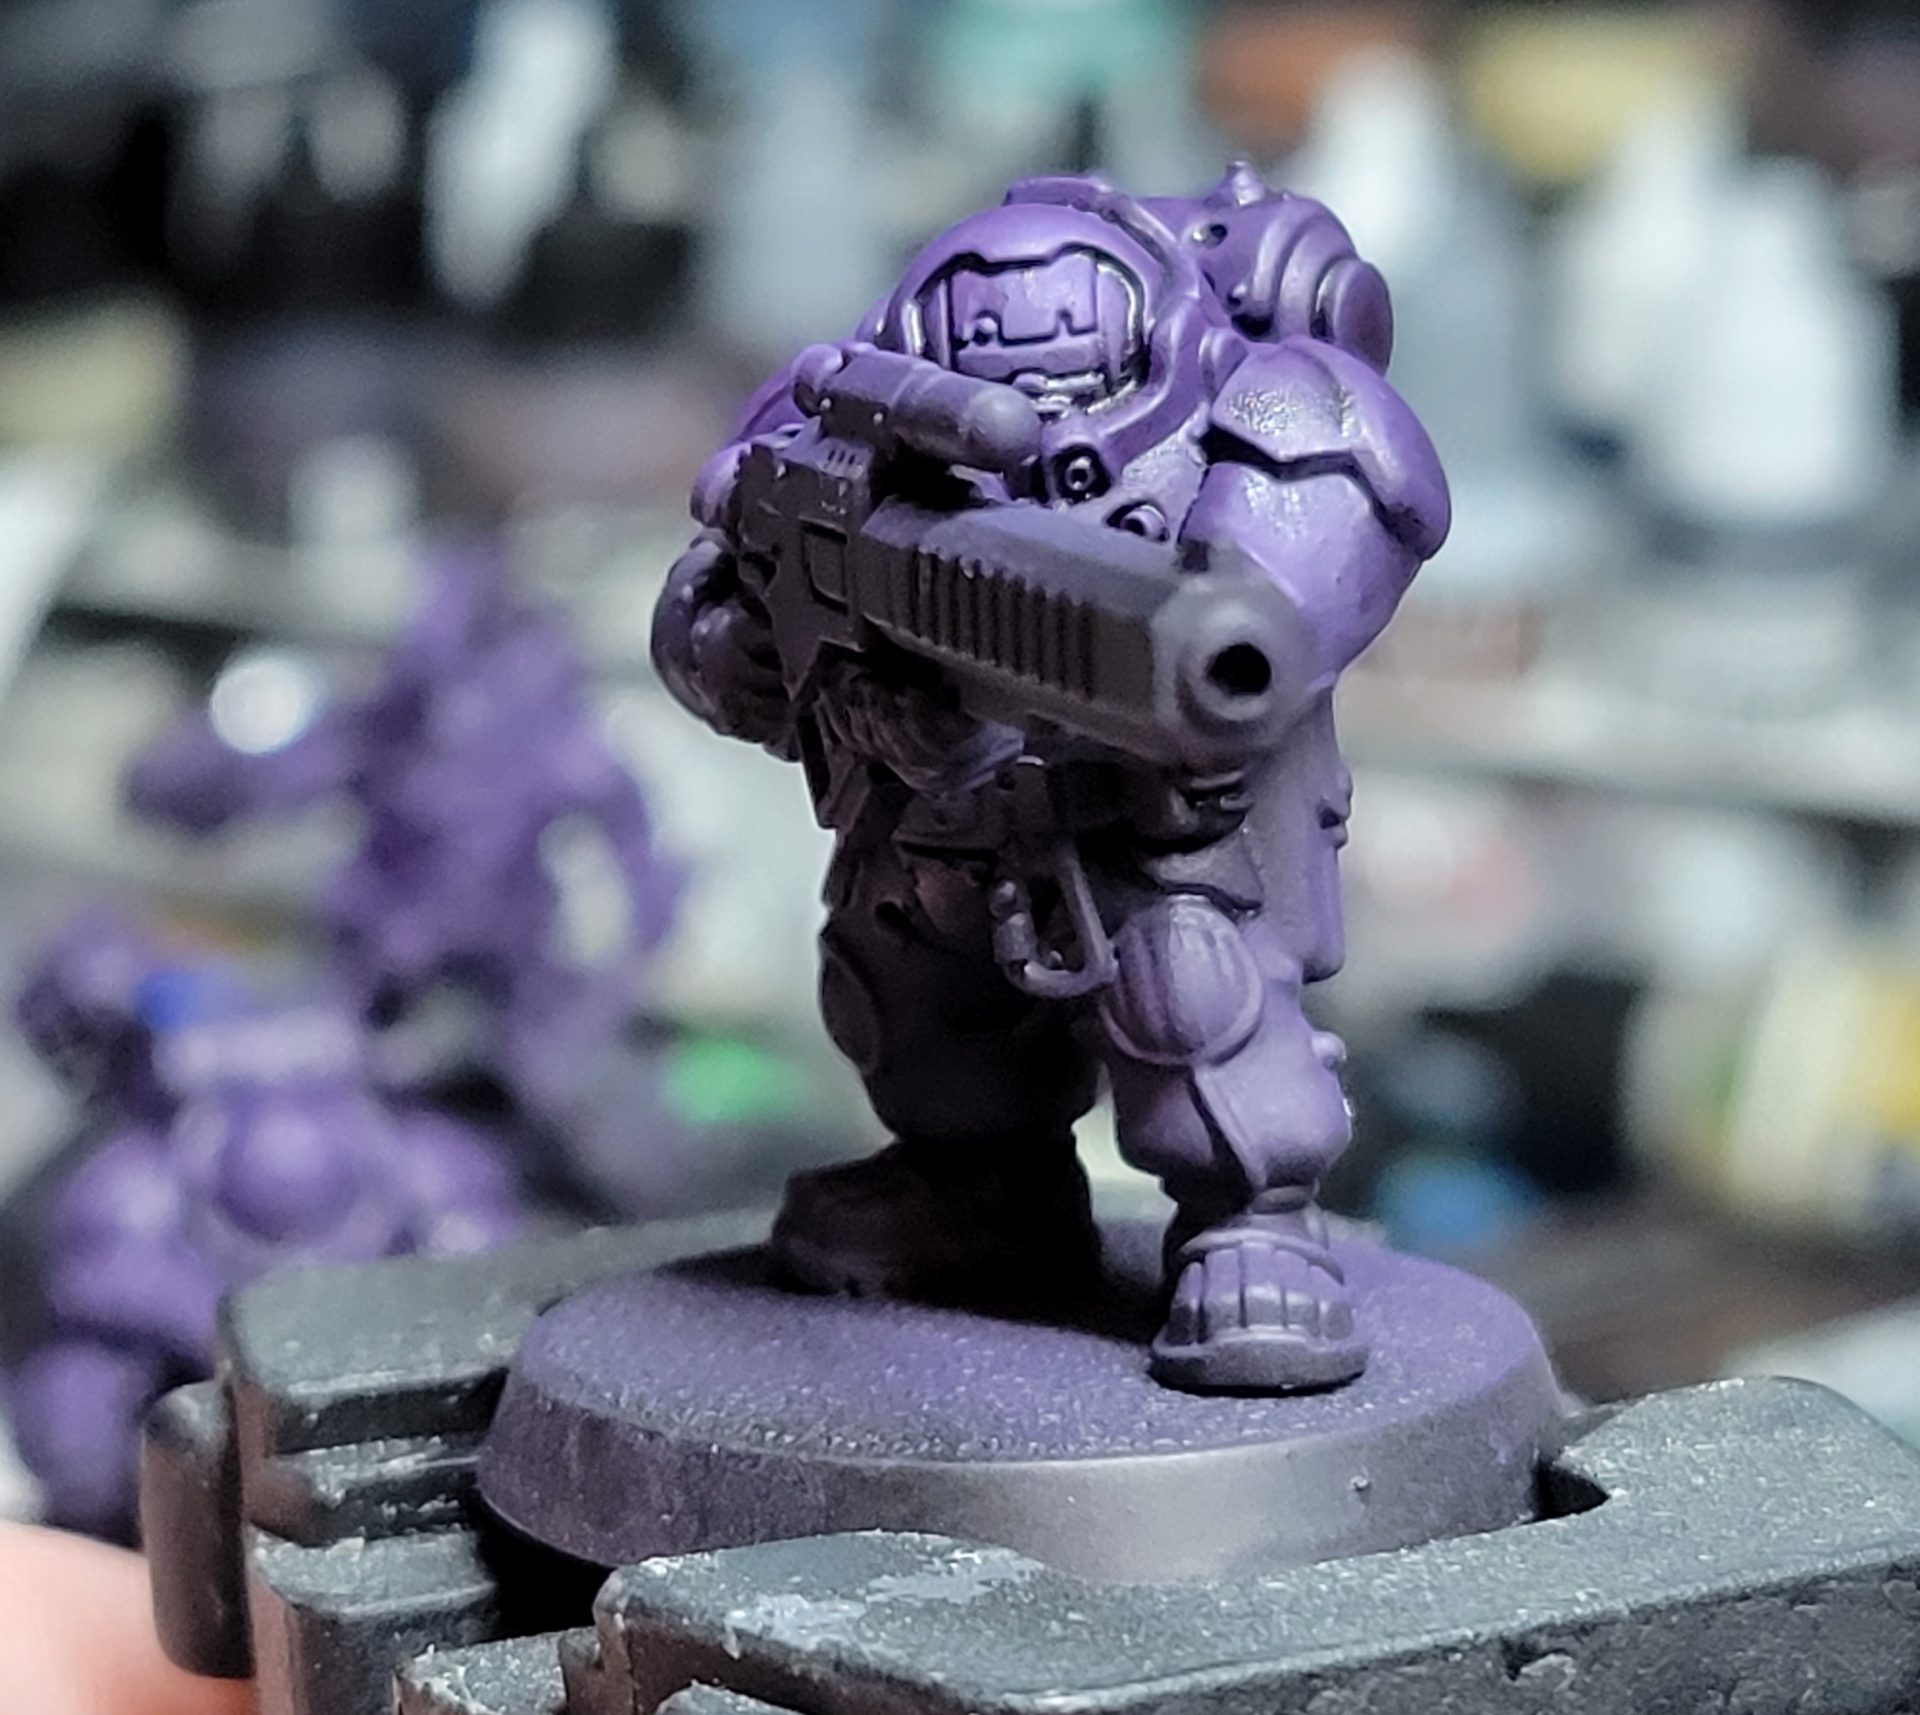
Wash all of the armor with Nuln Oil. You want to avoid too much pooling, but a little bit will help define the shapes. Edge highlight the most prominent edges with Reaper Malvernian Purple. This isn’t absolutely vital, but does help make models pop – I highlight more edges on characters than I do on basic troops.
If you’re going to add any decals, now is the time.
Next up is to weather the armor, which we’ll do with two passes of sponge weathering. The first pass is Citadel Rhinox Hide, followed by a lighter pass of Citadel Iron Hands Steel.
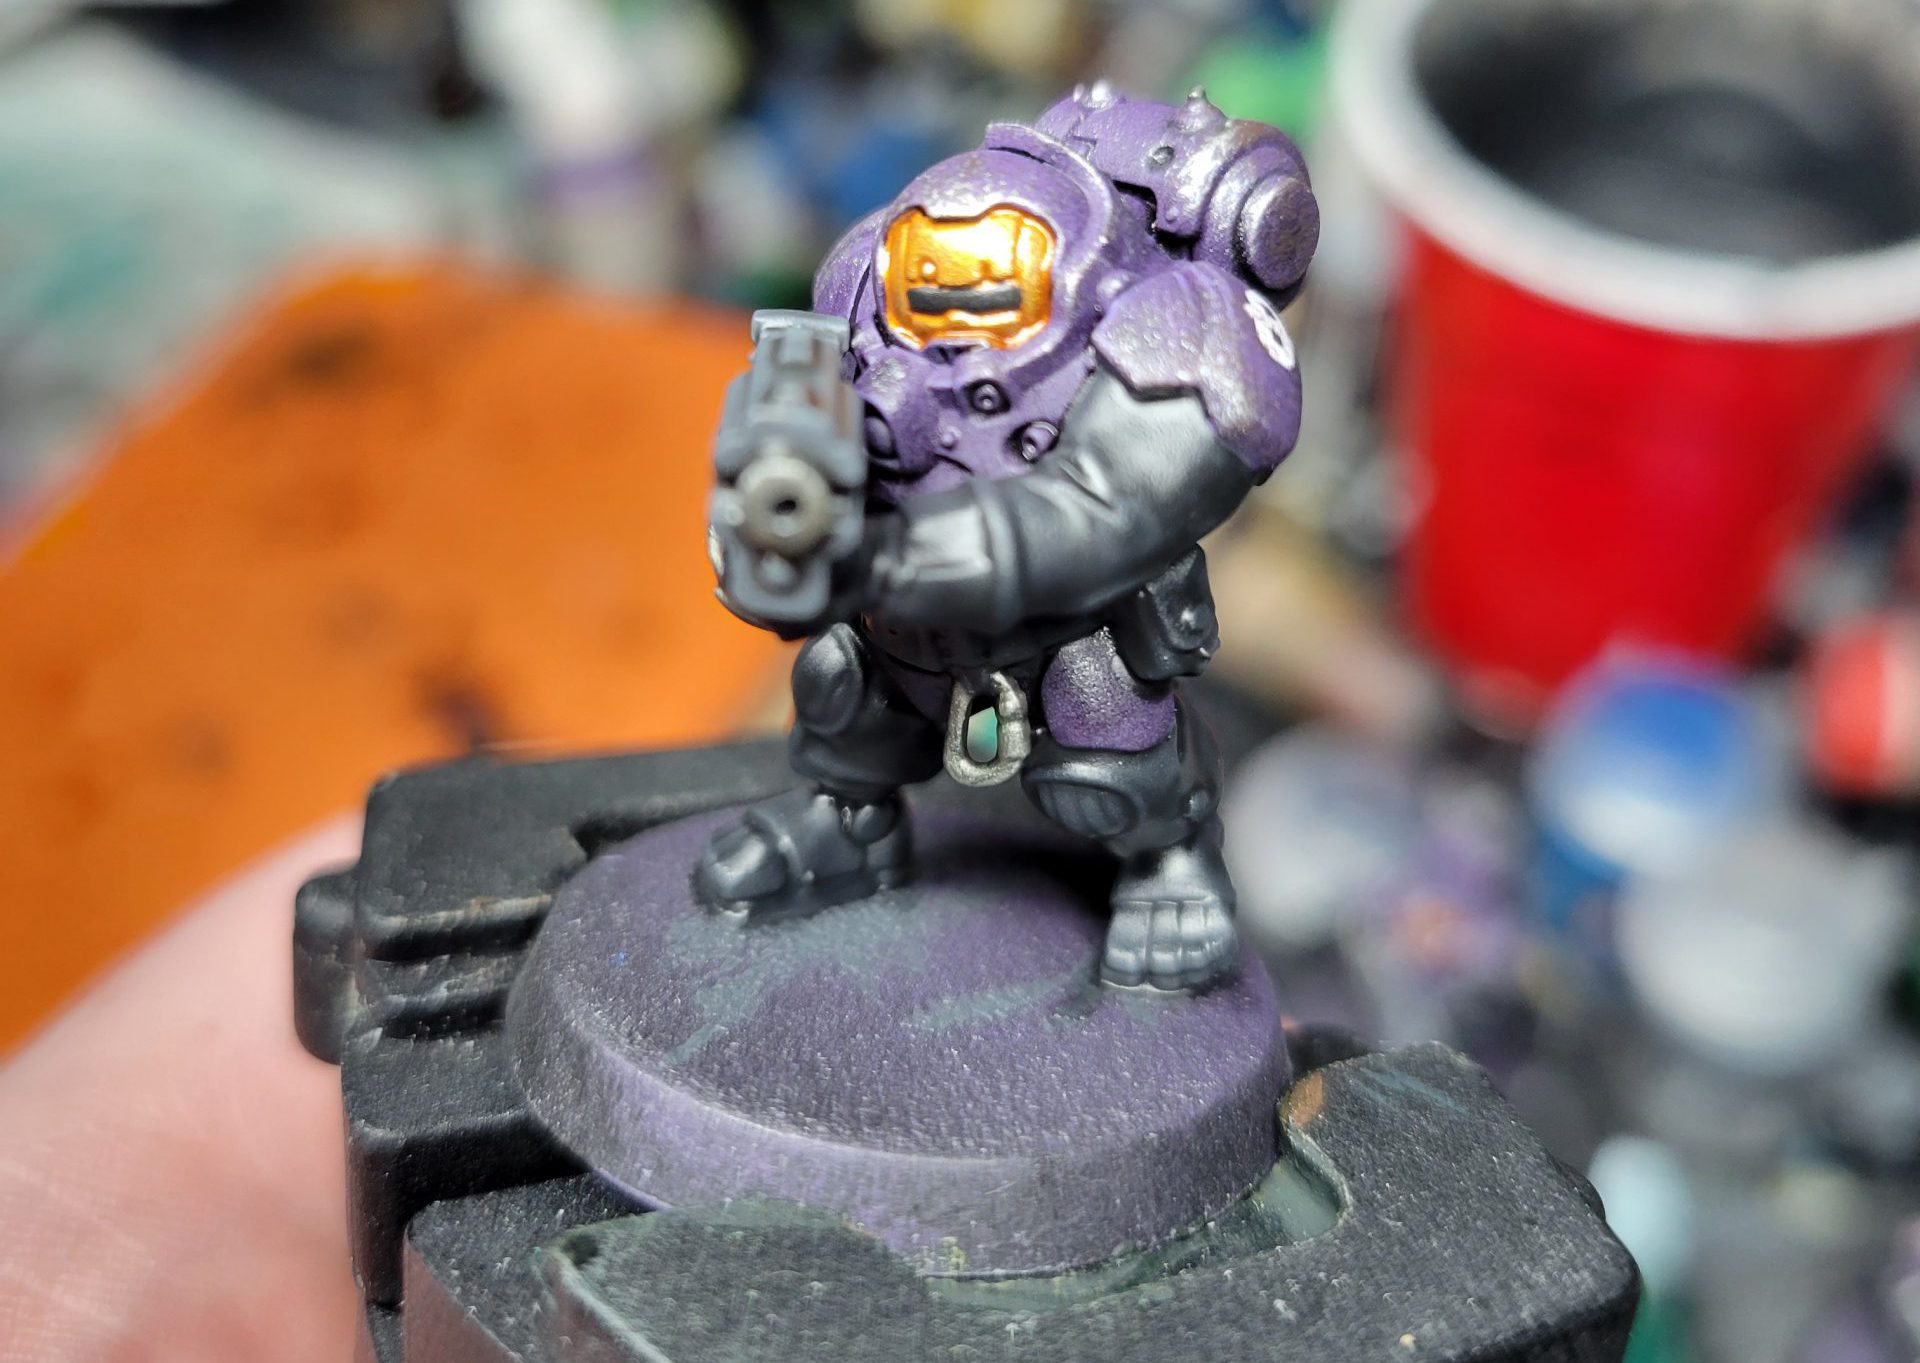
At this point the armor is finished and we can move on to painting the details, which are again going to be done pretty quickly to be able to get this army on the table.
Any of the leather and fabric can be painted with Vallejo Model Color Black Grey, weapon casing with Vallejo Model Color Neutral Grey, and metals with Citadel Iron Hands Steel. Give all of these a quick wash with Nuln Oil and they’re finished.
I used the astronaut face masks on everyone as I’m too lazy to paint much skin, which was done with Scale 75 Victorian Brass followed by Reikland Fleshshade. If you’ve still got any, use the gloss version of the wash, though the regular one will be adequate if you don’t – just take care to avoid pooling. Give them a quick highlight of Scale 75 Citrine Alchemy to finish the masks off.
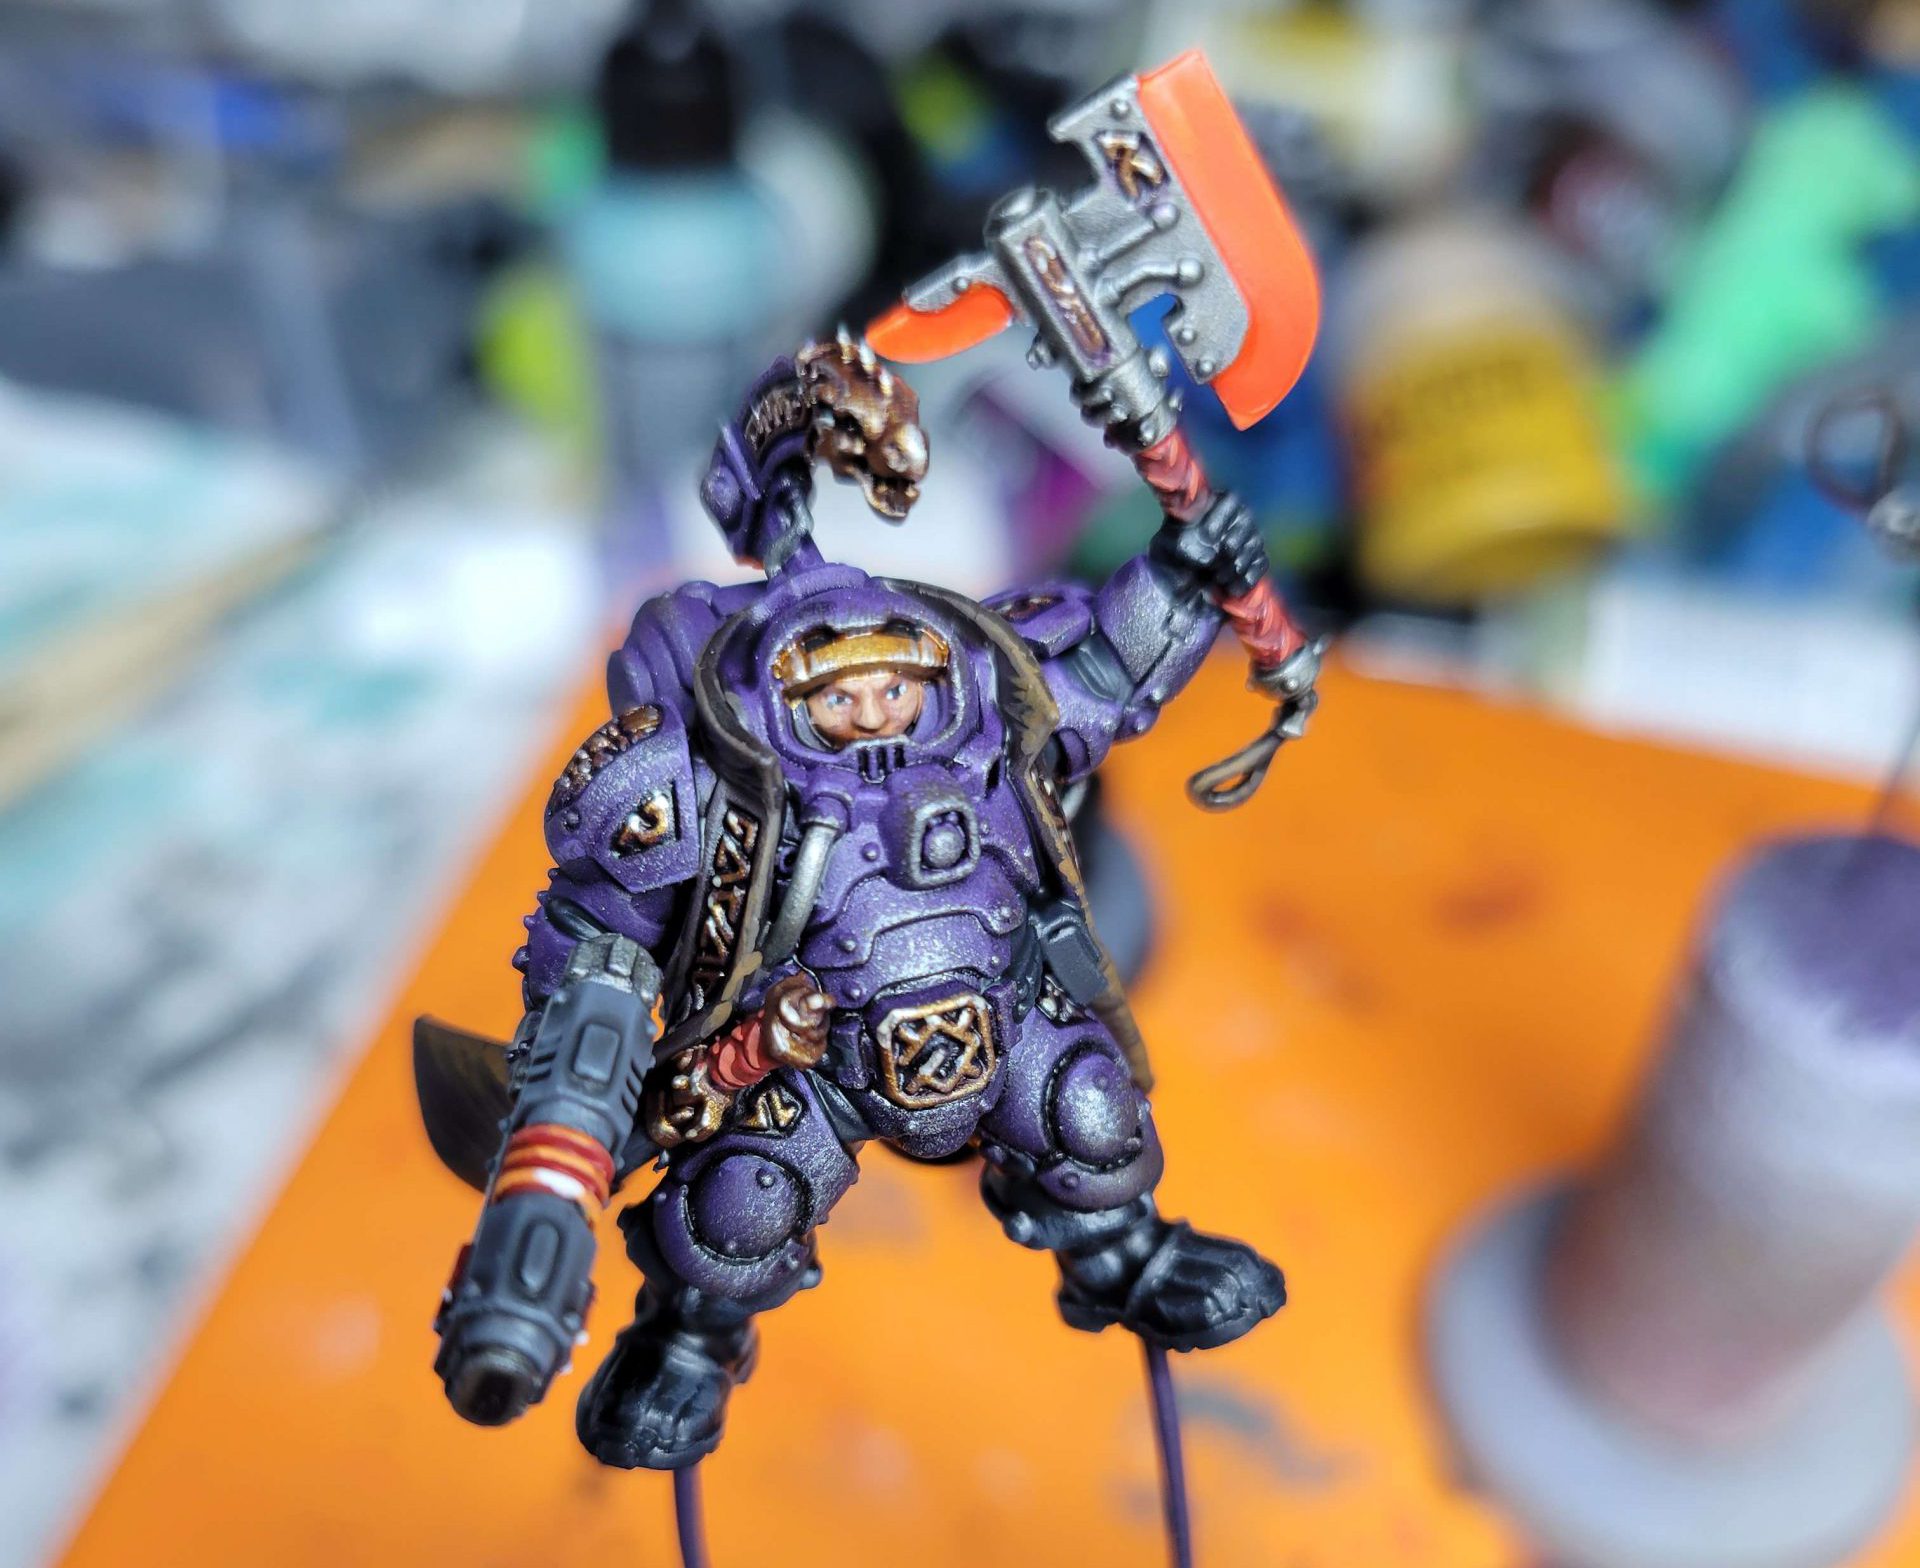
I painted a handful of remaining details (primarily inlaid runes) in gold, which started from Scale 75 Viking Gold, was washed in Druchii Violet, then highlighted first with Scale 75 Dwarven Gold then Citrine Alchemy.
Because the primary colors on these models are dark cool tones, I wanted to make sure any power blades are the opposite – as bright as I can and something very warm, so I went with an orange. I started by basecoating the blades in a couple layers of Proacryl Bold Titanium White, then used Citadel contrast Magmadroth Flame to establish the base orange. To finish them off I wanted a bit more glow around the inner edge, so ran a thin line of Citadel Lugganath Orange where the blades meet the metal.

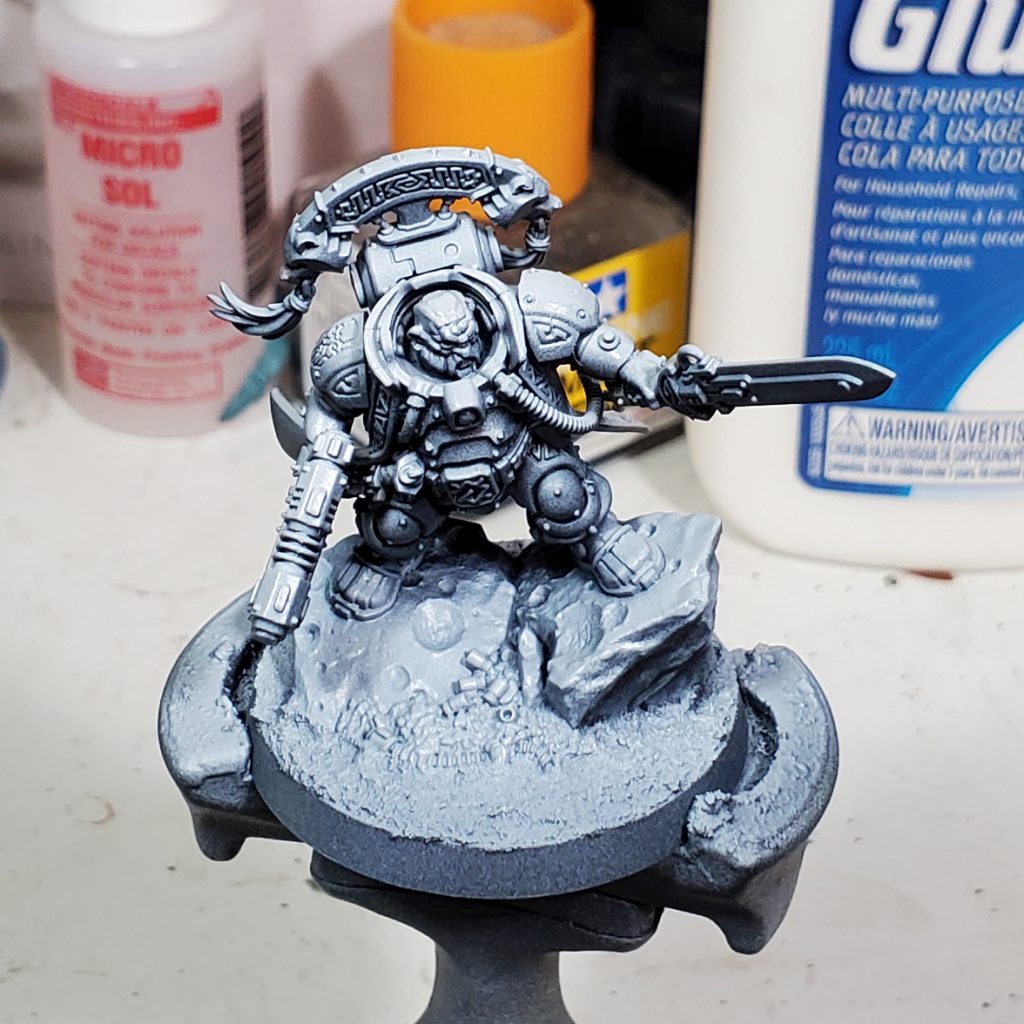
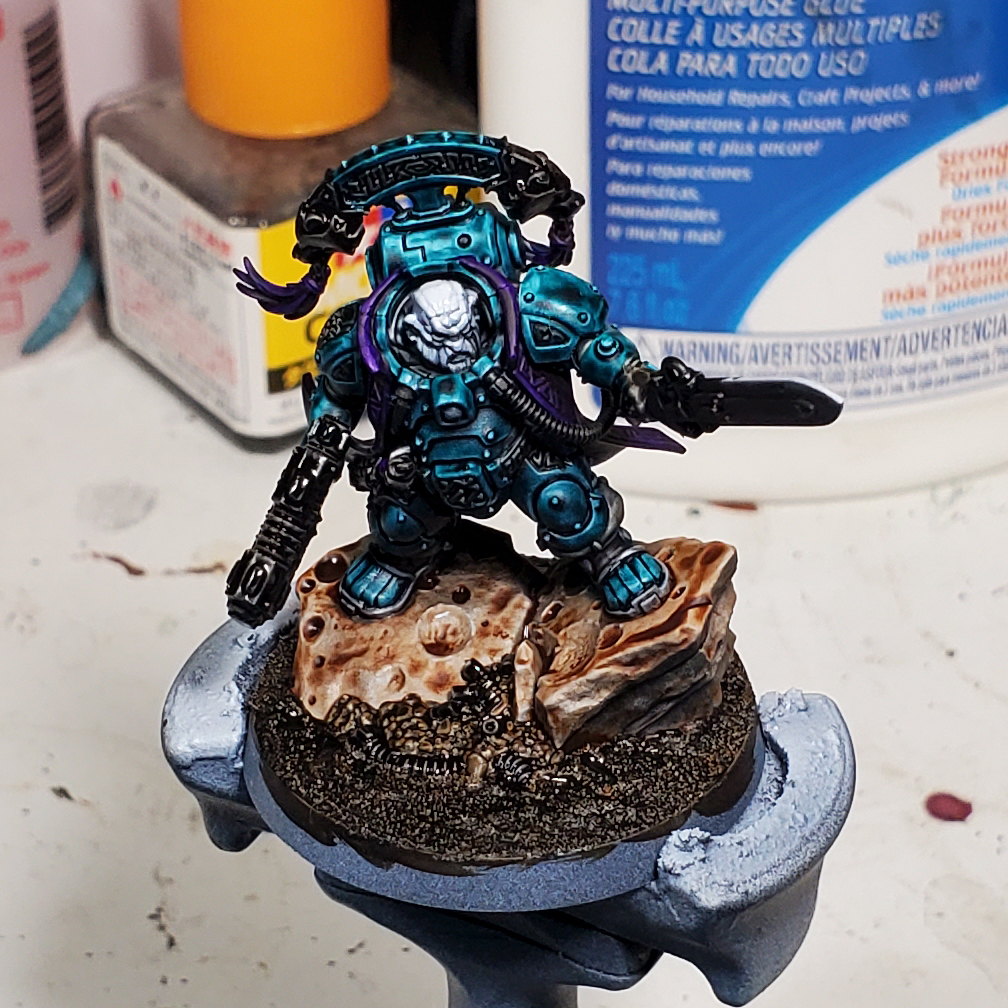
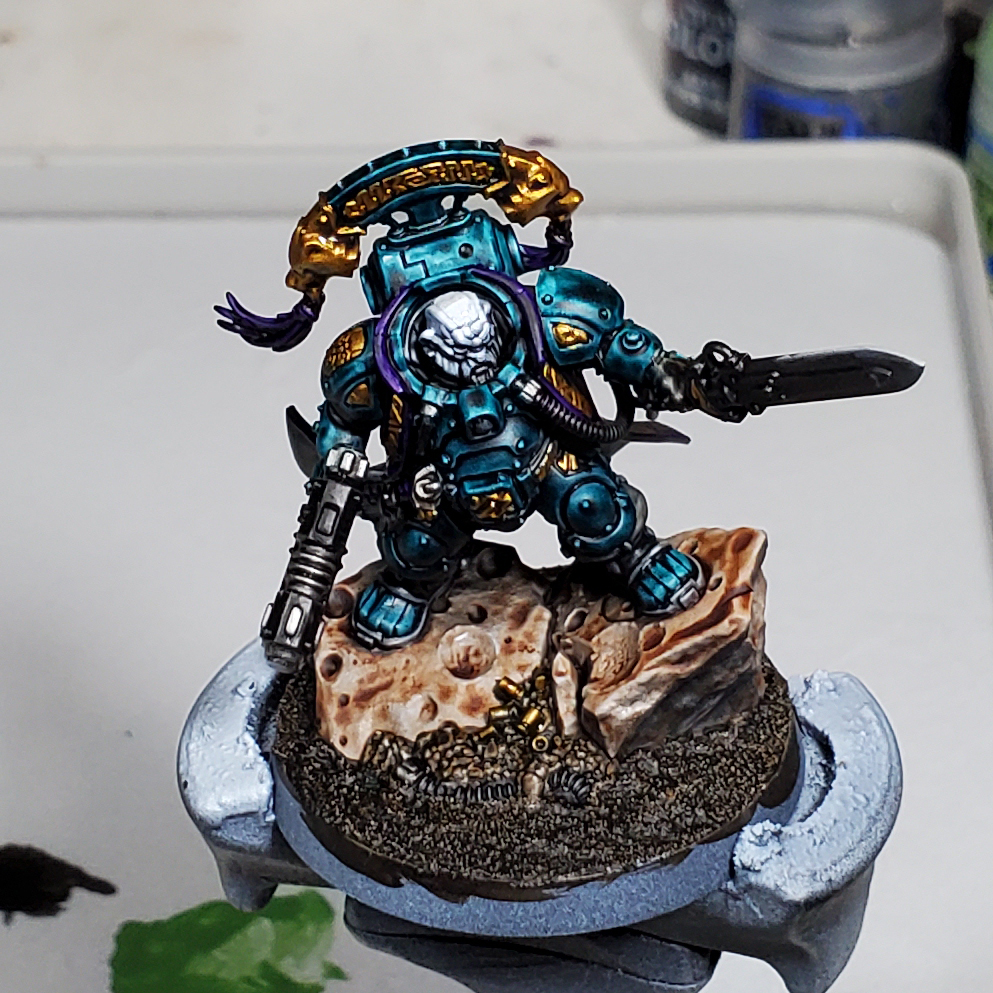
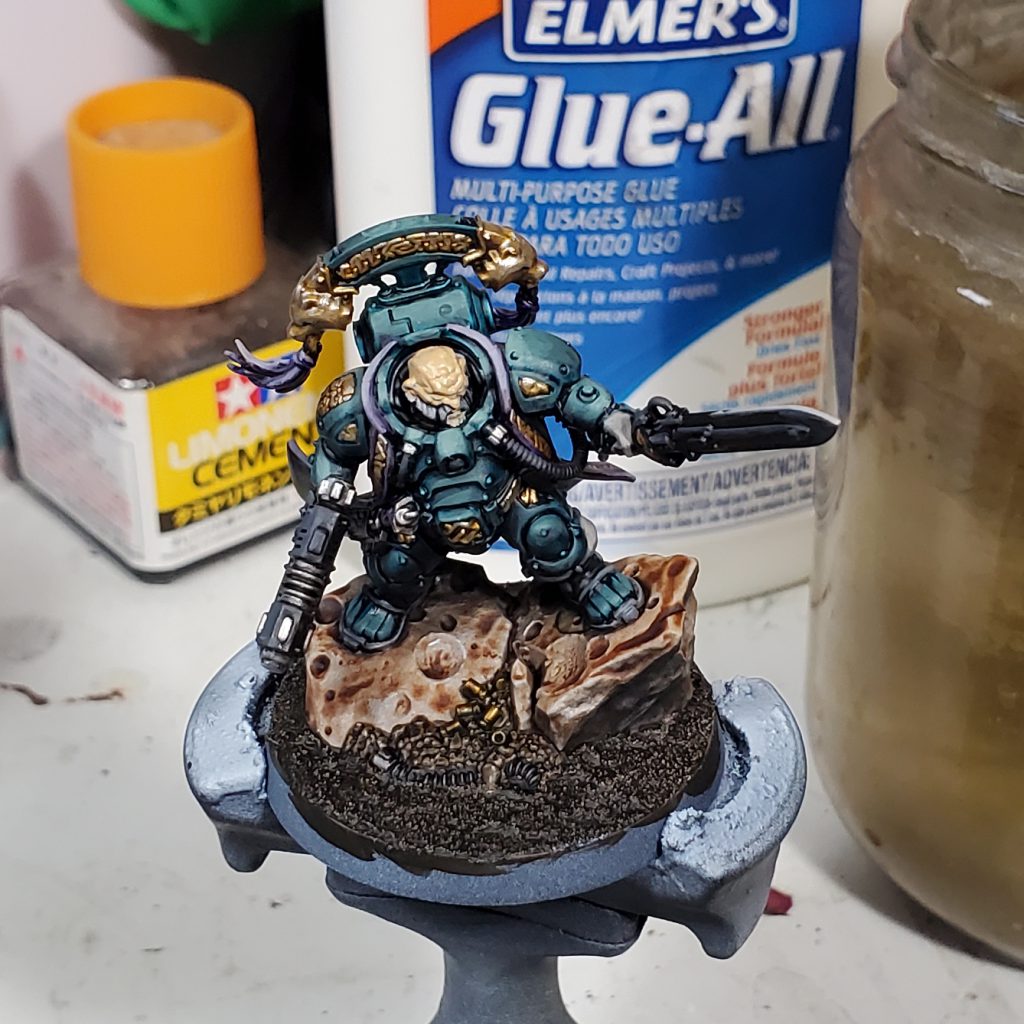
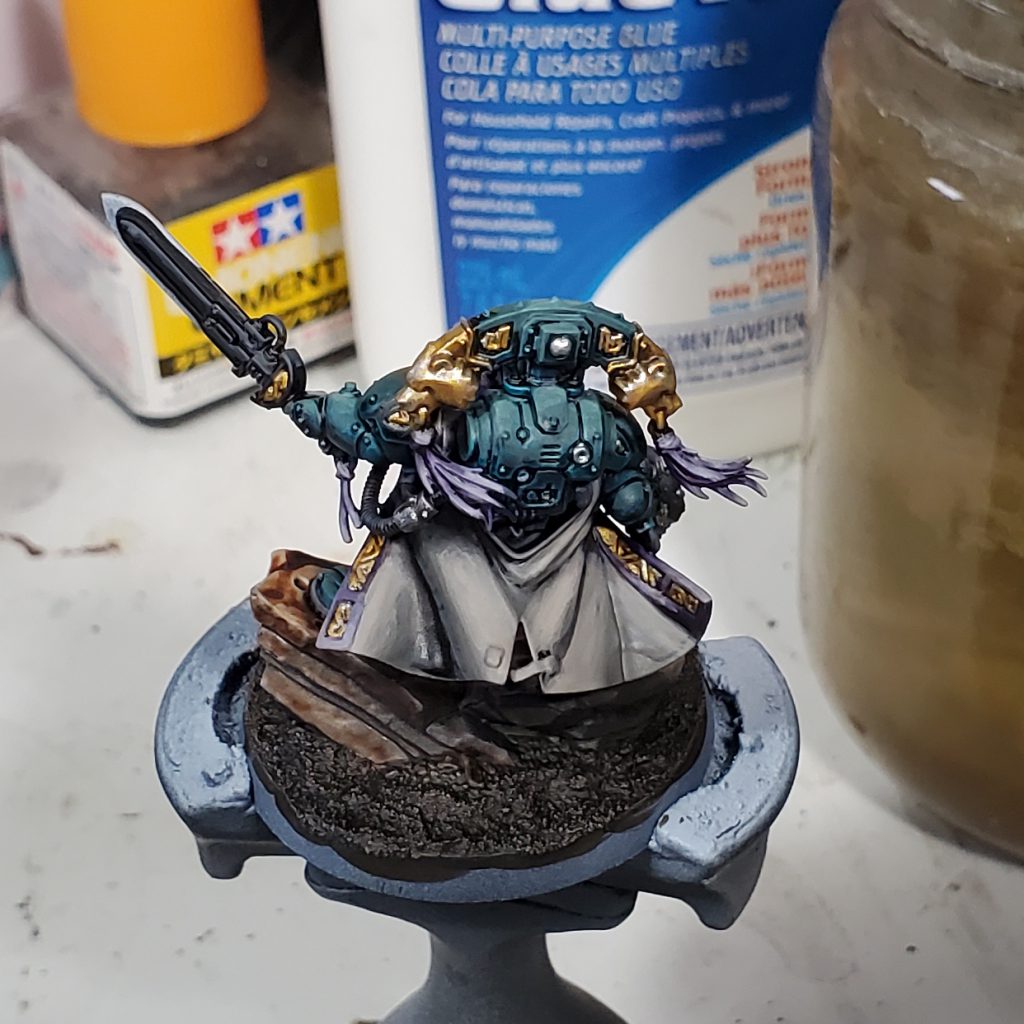
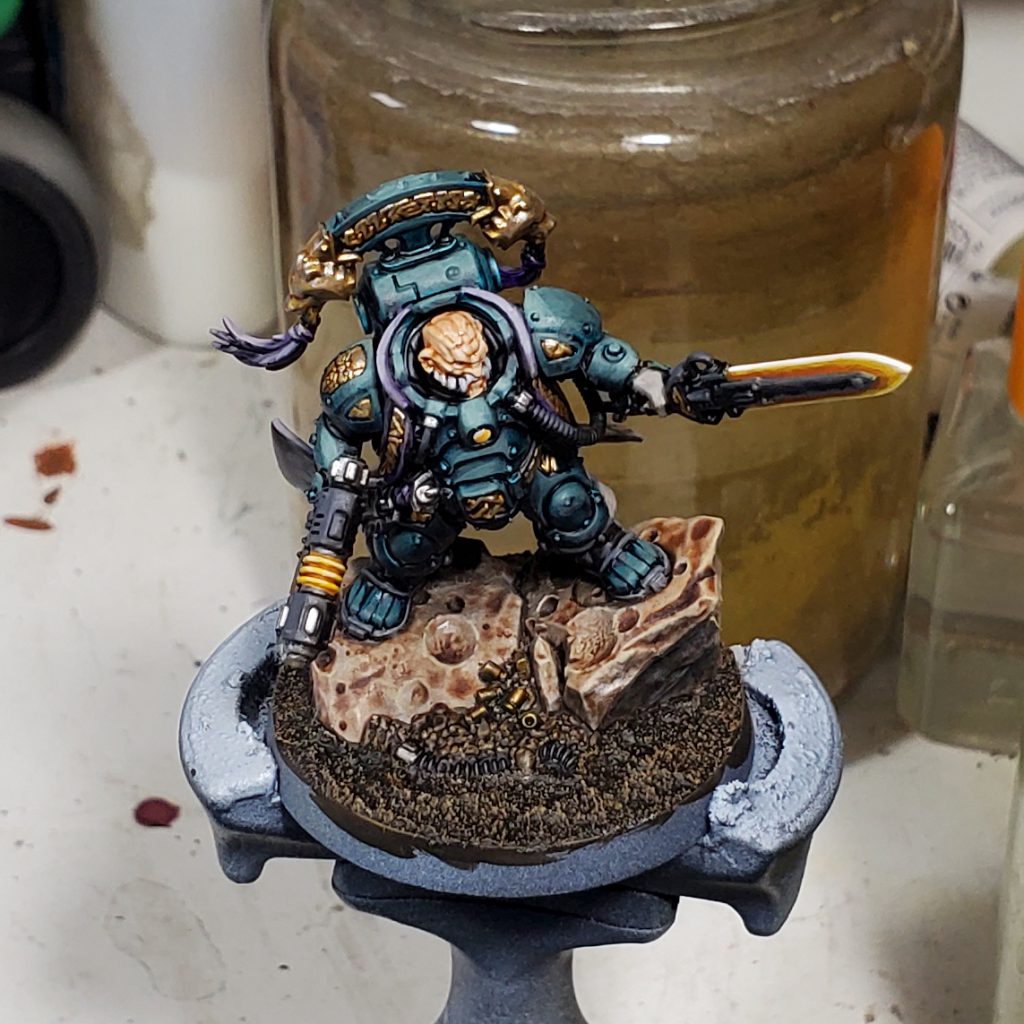
Uthar the Destined - Rockfish's Method
The big “Faction Warmaster” character for the Leagues of Votann is Uthar the Destined, the most accomplished her of the Greater Thurian League.
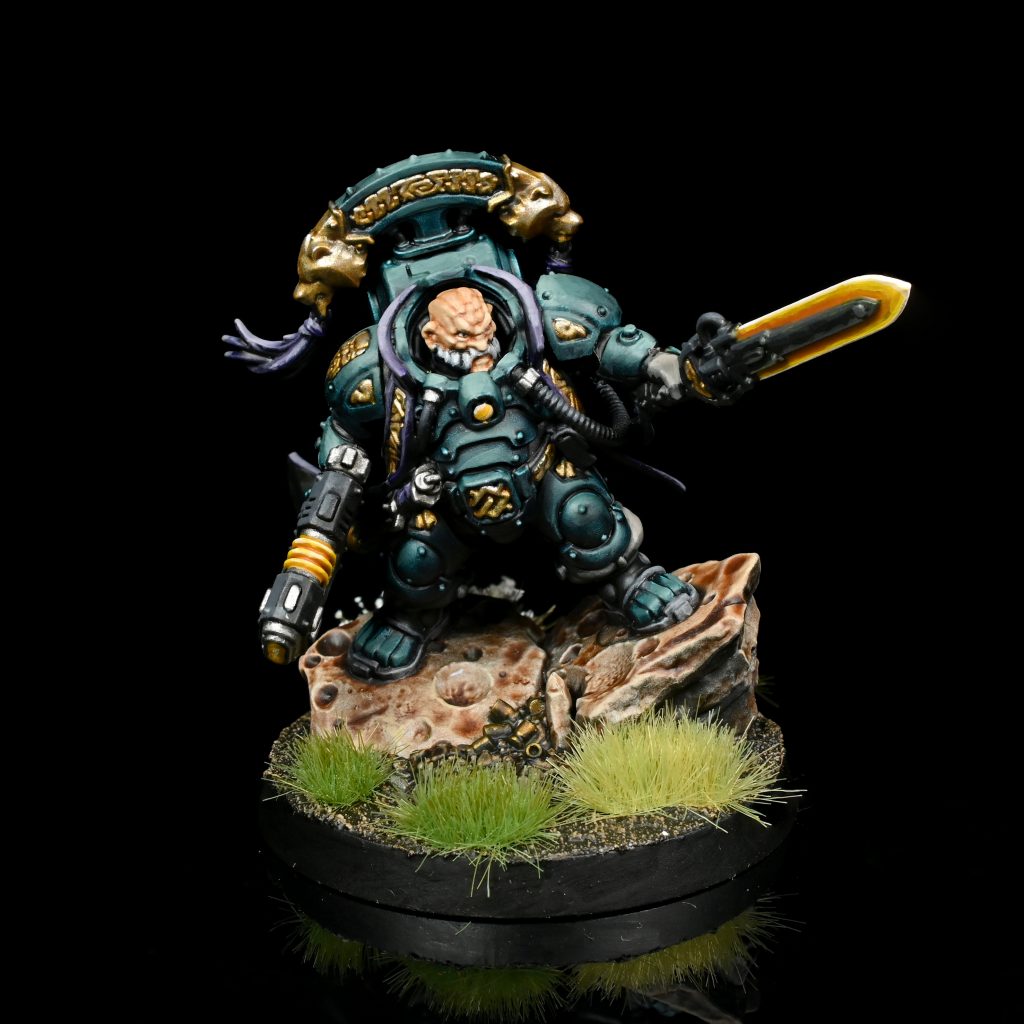
While I did most of my dorfs in my own scheme, I did this guy up in the canon scheme for him so he could turn up in a WarCom article. While I think I prefer my scheme, this one was fun as a one off and would be great as a full army!
Steps
Gallery
Final Thoughts
That wraps up our look at how to paint the Leagues of Votann. They’re a fun army to paint, with some of the coolest vehicles and models in the game. We’ve just scratched the surface here with our take on the major leagues but if you have your own scheme, we’d love to see it – show it off in the comments below!
Have any questions or feedback? Drop us a note in the comments below or email us at contact@goonhammer.com. And if you want regular updates in your inbox, subscribe to our newsletter.
