In our How to Paint Everything series, we take a look at different armies of the Warhammer universe, examine their history and heraldry, and look at several different methods for painting them. In this article, we’re looking at how to paint the brave warriors of the Astra Militarum.
Table of Contents
Who Are The Astra Militarum?
Commonly known as the Imperial Guard, the Astra Militarum are the Imperium’s standing army of regular old humans. Making up the vast majority of the Imperium’s military forces, Guard soldiers are the first line of defense against the threats to the Imperium. Every world in the Imperium has its own force of guard, and soldiers in the Guard are drawn from worlds across the galaxy and stationed in locations of strategic or cultural importance. On the ground, the Astra Militarum’s infantry forces are supported by legions of heavy tanks and artillery and in the air, they’re supported by the Imperial Navy. While the Adeptus Astartes are the Emperor’s Angels of Death, making surgical strikes and taking out key targets, the Guard are the Emperor’s Hammer, acting as the full armored might of the Imperium. The Astra Militarum’s origins date back to the Emperor’s Great Crusade, when the fledgling Imperium needed a way to supplement the work of the legions of Space Marines reclaiming the galaxy. As the Space Marines spread across the galaxy, the Imperial Army was formed to supplement them, recruiting brave men and women from countless worlds in the growing Imperium. These human forces acted as expeditionary forces, eventually acting as the forefront of the Great Crusade, fighting alongside (and under) the marine legions. In the wake of the Horus Heresy, these ties were cut, and the Imperial Army became the Astra Militarum, split into two branches: The Imperial Guard and the Imperial Navy. The new organizational structure was designed to reduce the power of any individual commander or regiment, and ensure that, should a regiment turn against the Imperium, their treachery would be limited to a small area of influence.
Valhallans. Credit: SRM
The Imperium is massive, and its core strength comes from its people. There is rarely, if ever, an Imperial conflict that doesn’t involve the Astra Militarum and its forces. As such, they’ve been involved in every major conflict in the Imperium’s history, from the Horus Heresy and the battle for Terra, where Solar Auxiliaries helped defend the Emperor’s Palace, to the Fall of Cadia and the ensuing Indomitus Crusade. The guard are made of a great many regiments whose deeds are legendary, from the Steel Legions of Armageddon to the indomitable forces of Cadia, who held even after the planet itself was destroyed.
Where to Read More
The Imperial Guard feature in a ton of 40k literature, and there are a lot of really great stories about them. So we’re gonna talk about our favorites here.
The Gaunt’s Ghosts series by Dan Abnett is a massive collection of 16 novels that document the struggles of the Tanith First light inantry regiment of the Imperial Guard during the Sabbat Worlds Crusade. They’re led by the legendary Ibram Gaunt and span the entire history of Games Workshop’s Black Library, with novels published as early as 1999 and as late as 2019. It’s a big investment, but many of the Ghosts books are regarded as some of the best in the Black Library works.
Honourbound by Rachel Harrison is a relatively recent novel that covers the exploits of Severina Raine, an Imperial Guard commissar of the 11th Antari Rifles. Goonhammer’s Coda wrote a glowing review of this one already, if you’re looking for motivation.
The Ciaphas Cain series is a collection of books chronicling the life and deeds of Commissar Ciaphas Cain, with the stories presented as taken from Cain’s personal notes and collected following his death. Cain’s an unreliable narrator, and extremely self-centered, though Cain himself never becomes someone you hate. There are ten books in the series, plus a number of short stories if you’re looking for more.
Helsreach by Aaron Dembski-Bowden is about the defense of the Helsreach Hive during the 3rd War for Armageddon and while it’s written from the perspective of Black Templars Chaplain Grimaldus, it features the guard throughout, including Andrej Valatok, a Steel Legion Storm trooper with the biggest balls in the galaxy.
Other book recommendations from the Goonhammer crew: 15 Hours (which our friends at the 40k Badcast read way back when), Shadowsword, and Baneblade all got thumbs up when I asked for people to list their favorites.
Covered in This Article:
Methods for painting the various units of the Astra Militarum, from basic guardsmen to elite infantry to tanks.
How to paint notable regiments of the Astra Militarum, such as Tempestus Scions, Kasrkin, and Death Korps.
How to paint notable elements of the Astra Militarum, such as power weapons, heraldry, and heat scarring.
Common Visual Elements of the Astra Militarum
The regiments of the Astra Militarum offer near endless variety for 40k players – there are countless Imperial worlds in the galaxy, each contributing its own regiments with their own color schemes, formations, and combat tactics. Any discussion of painting Astra Militarum has to focus on the army’s two key facets: Painting dozens of infantry, and painting tanks. In this section, we’ll address both how to paint the infantry, both from the standpoint of how to create good schemes that unify your army and look great on the tabletop, and also from the standpoint of how to avoid losing your mind as you paint 60 to 120 guardsmen. The soldiers of the Astra Militarum come from a wide variety of backgrounds and environments. They come in all shapes and sizes, and all colors, genders, and walks of life. Painting them requires painting skin regularly, something that we covered in great detail in our How to Paint Everything: Human Skinarticle. We recommend you read and refer to that that as a companion piece to this article.
Power Weapons
We’ve covered power weapons in this article, which covers everything from power swords and axes to crazier weapons.
Weathering
If you’re painting tanks which have been through hell and back, you’re going to want to do some weathering. You can find our guide to painting weathering here.
Dan's Steel Legion - Click to Expand
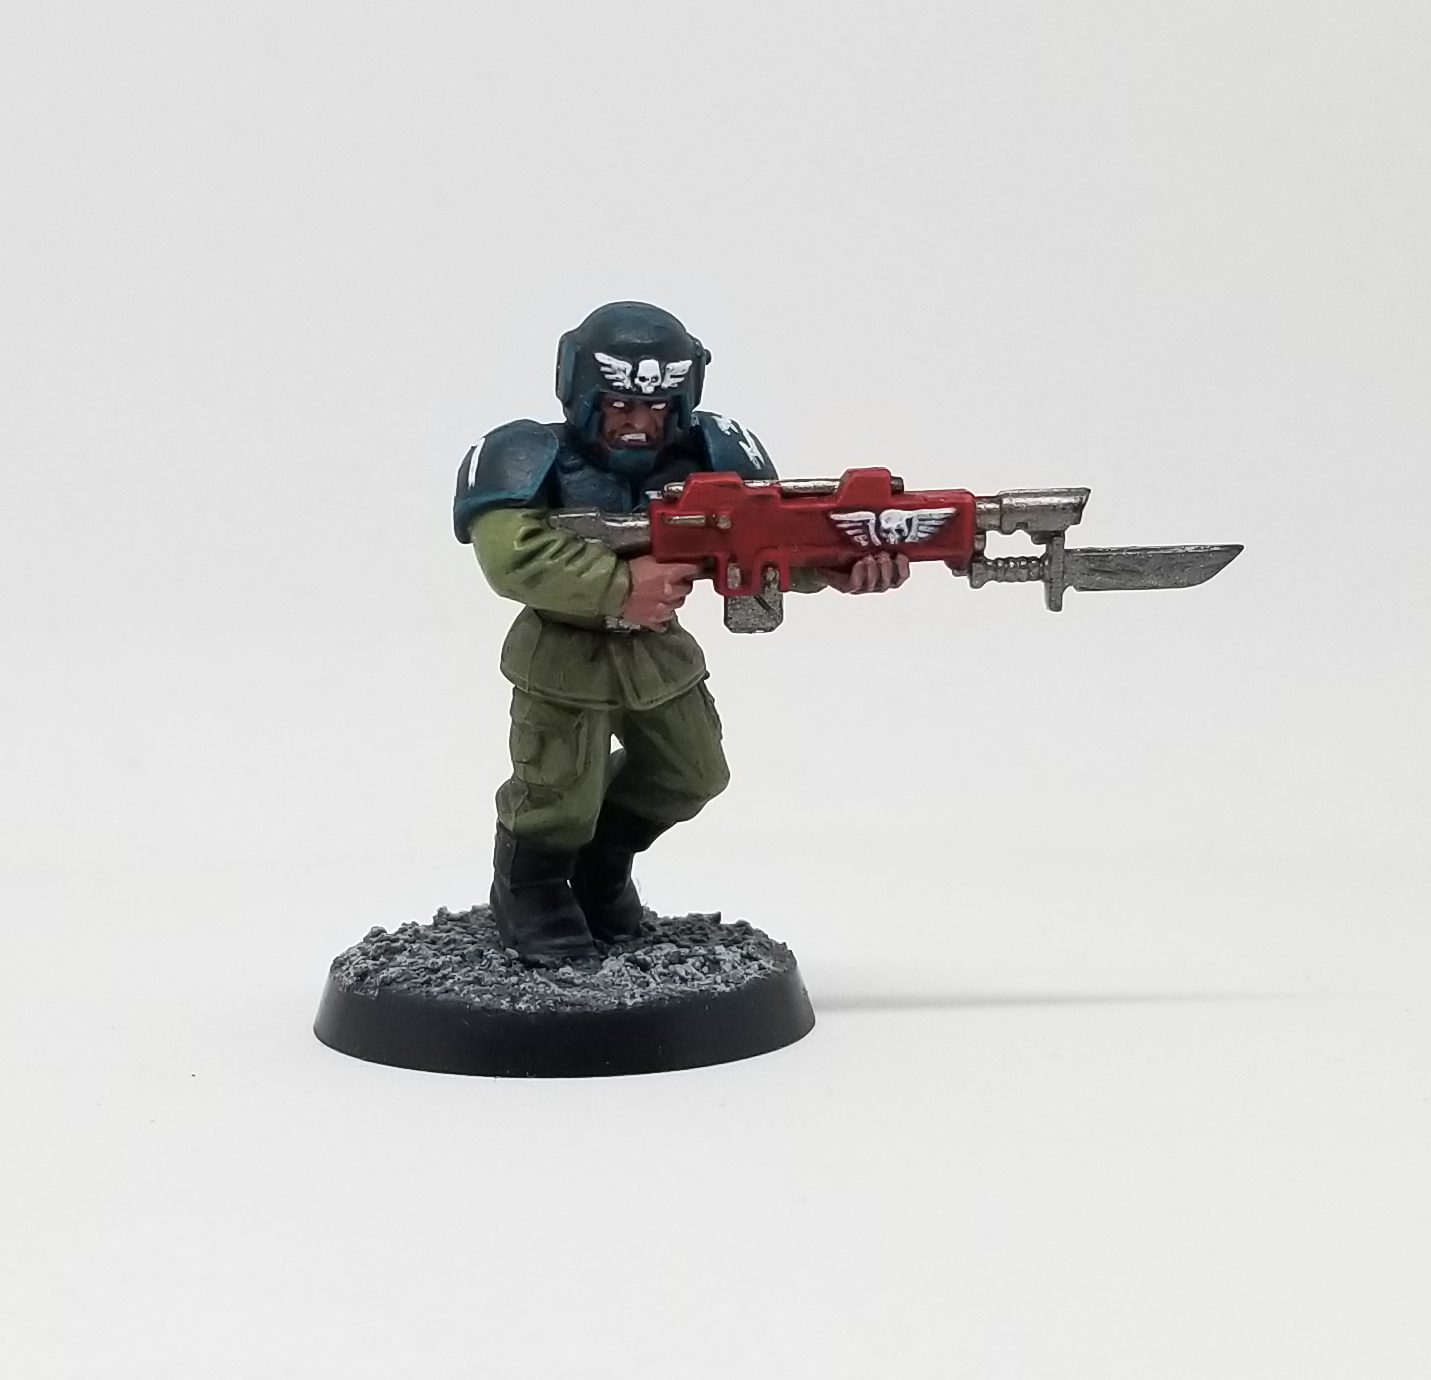
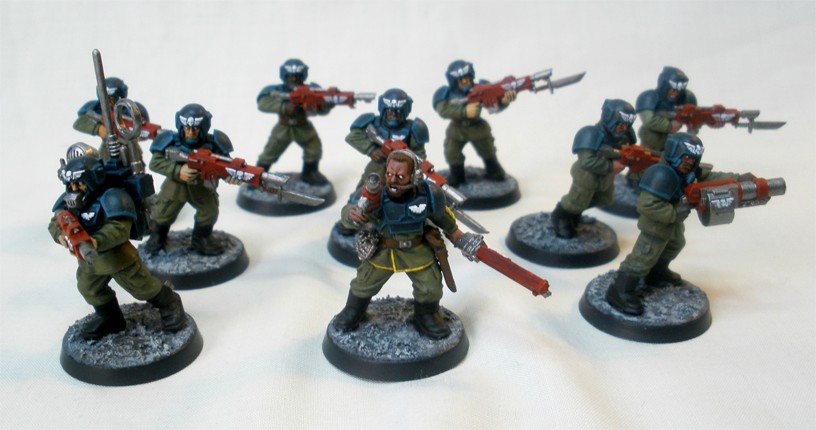
Hey gang, it’s your boi deezy. Y’all have seen my Raven Guard in HTPE: Raven Guard, but before that project, I was working on my Steel Legion. While I consciously attempted to elevate my painting with the Raven Guard project, my prime directive whilst painting Steel Legion was to get them on the table. This method was effective, as I have over 7,000 points of Steel Legion fully painted. While they look good, especially when massed for battle, they are not up to my standard of painting anymore. I still love them, though. No doubt about it.
Infantry
Credit: Dan “SexCannon” BoydCredit: Dan “SexCannon” Boyd
Primer:
Black
Coats:
Averland Sunset
Agrax Earthshade recess wash
Screaming Skull drybrush
Leather:
Rhinox Hide
Mournfang Brown drybrush
Black:
Abaddon Black
Stormvermin Fur drybrush
Metals:
Leadbelcher
Nuln oil wash all over
Goggles:
Kantor Blue
Slightly smaller Alaitoc Blue
Even smaller Teclis Blue
A small, tiny, thin line of Lothern Blue
Arm patch:
White Scar
Evil Sunz Scarlet
Base:
Abaddon Black
Stormvermin Fur drybrush
White Scar light drybrush
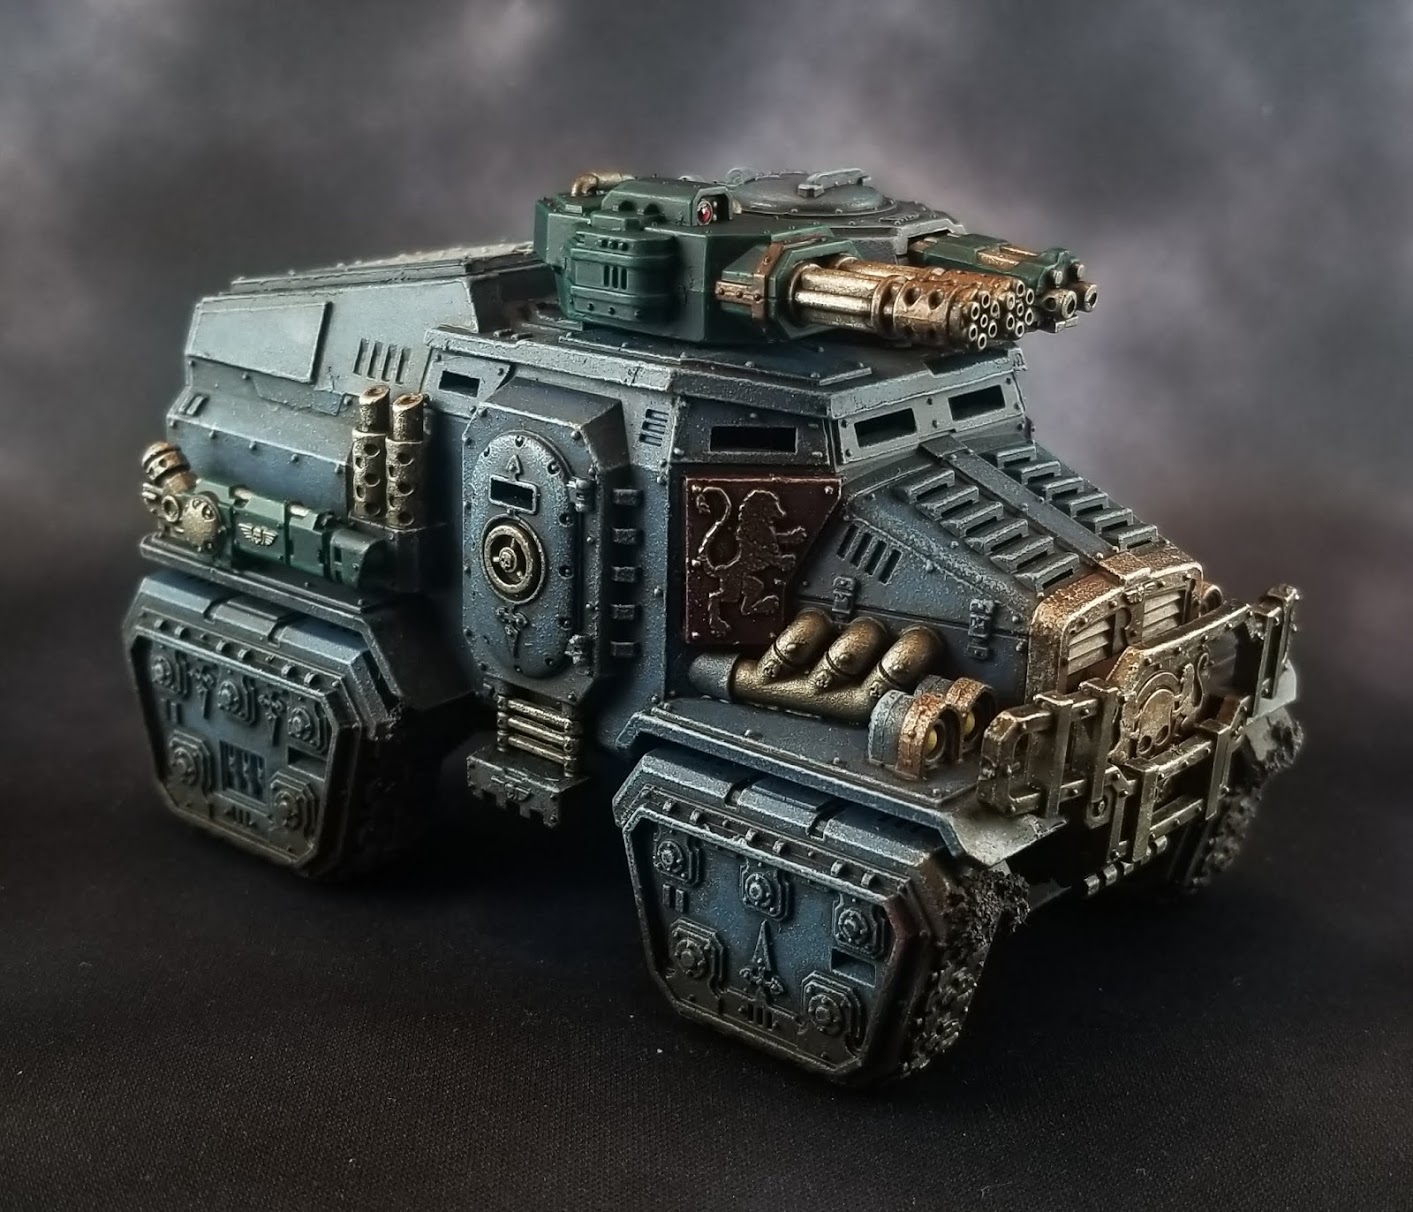
Vehicles
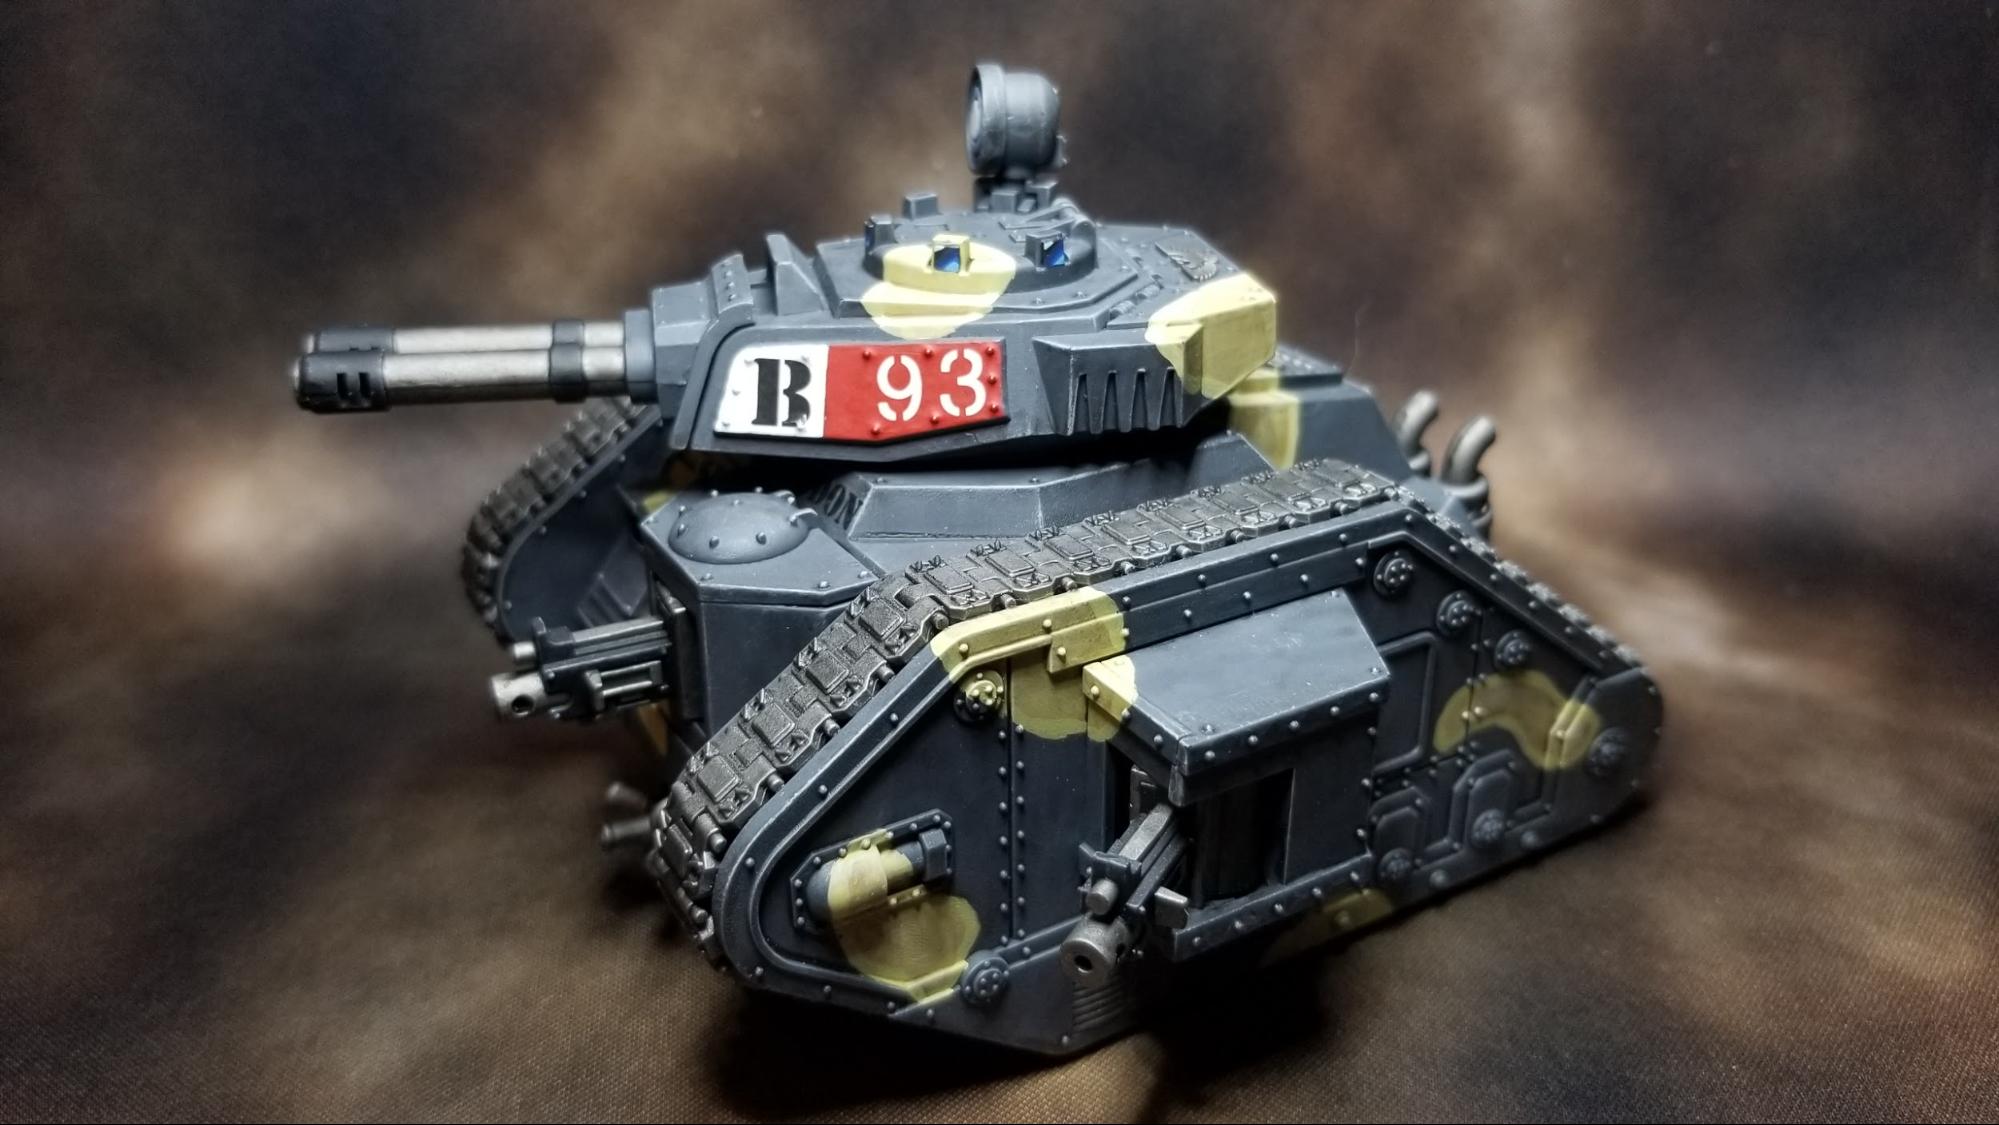
Credit: Dan “SexCannon” BoydCredit: Dan “SexCannon” Boyd
For vehicles, the black, red, white, metallic, blue, and leather parts are all done the same as infantry, so we’ll focus on the camouflage.Primer:
Mechanicus Standard Grey Spray
Grey:
Mechanicus Standard Grey (a whole nother coat because it is actually quite different from the spray)
Nuln Oil wash
Administratum Grey drybrush
Yellow:
Averland Sunset base
1:1 mix of Vallejo Game Color Dead Flesh and Pallid Wych Flesh
Agrax Earthshade wash
1:1 mix of Vallejo Game Color Dead Flesh and Pallid Wych Flesh but only on the edge of the yellow blobs
1:1 mix of Vallejo Game Color Dead Flesh and Pallid Wych Flesh drybrush on the darker parts
Screaming Skull drybrush
Campbell's Retro Cadians - Click to expand
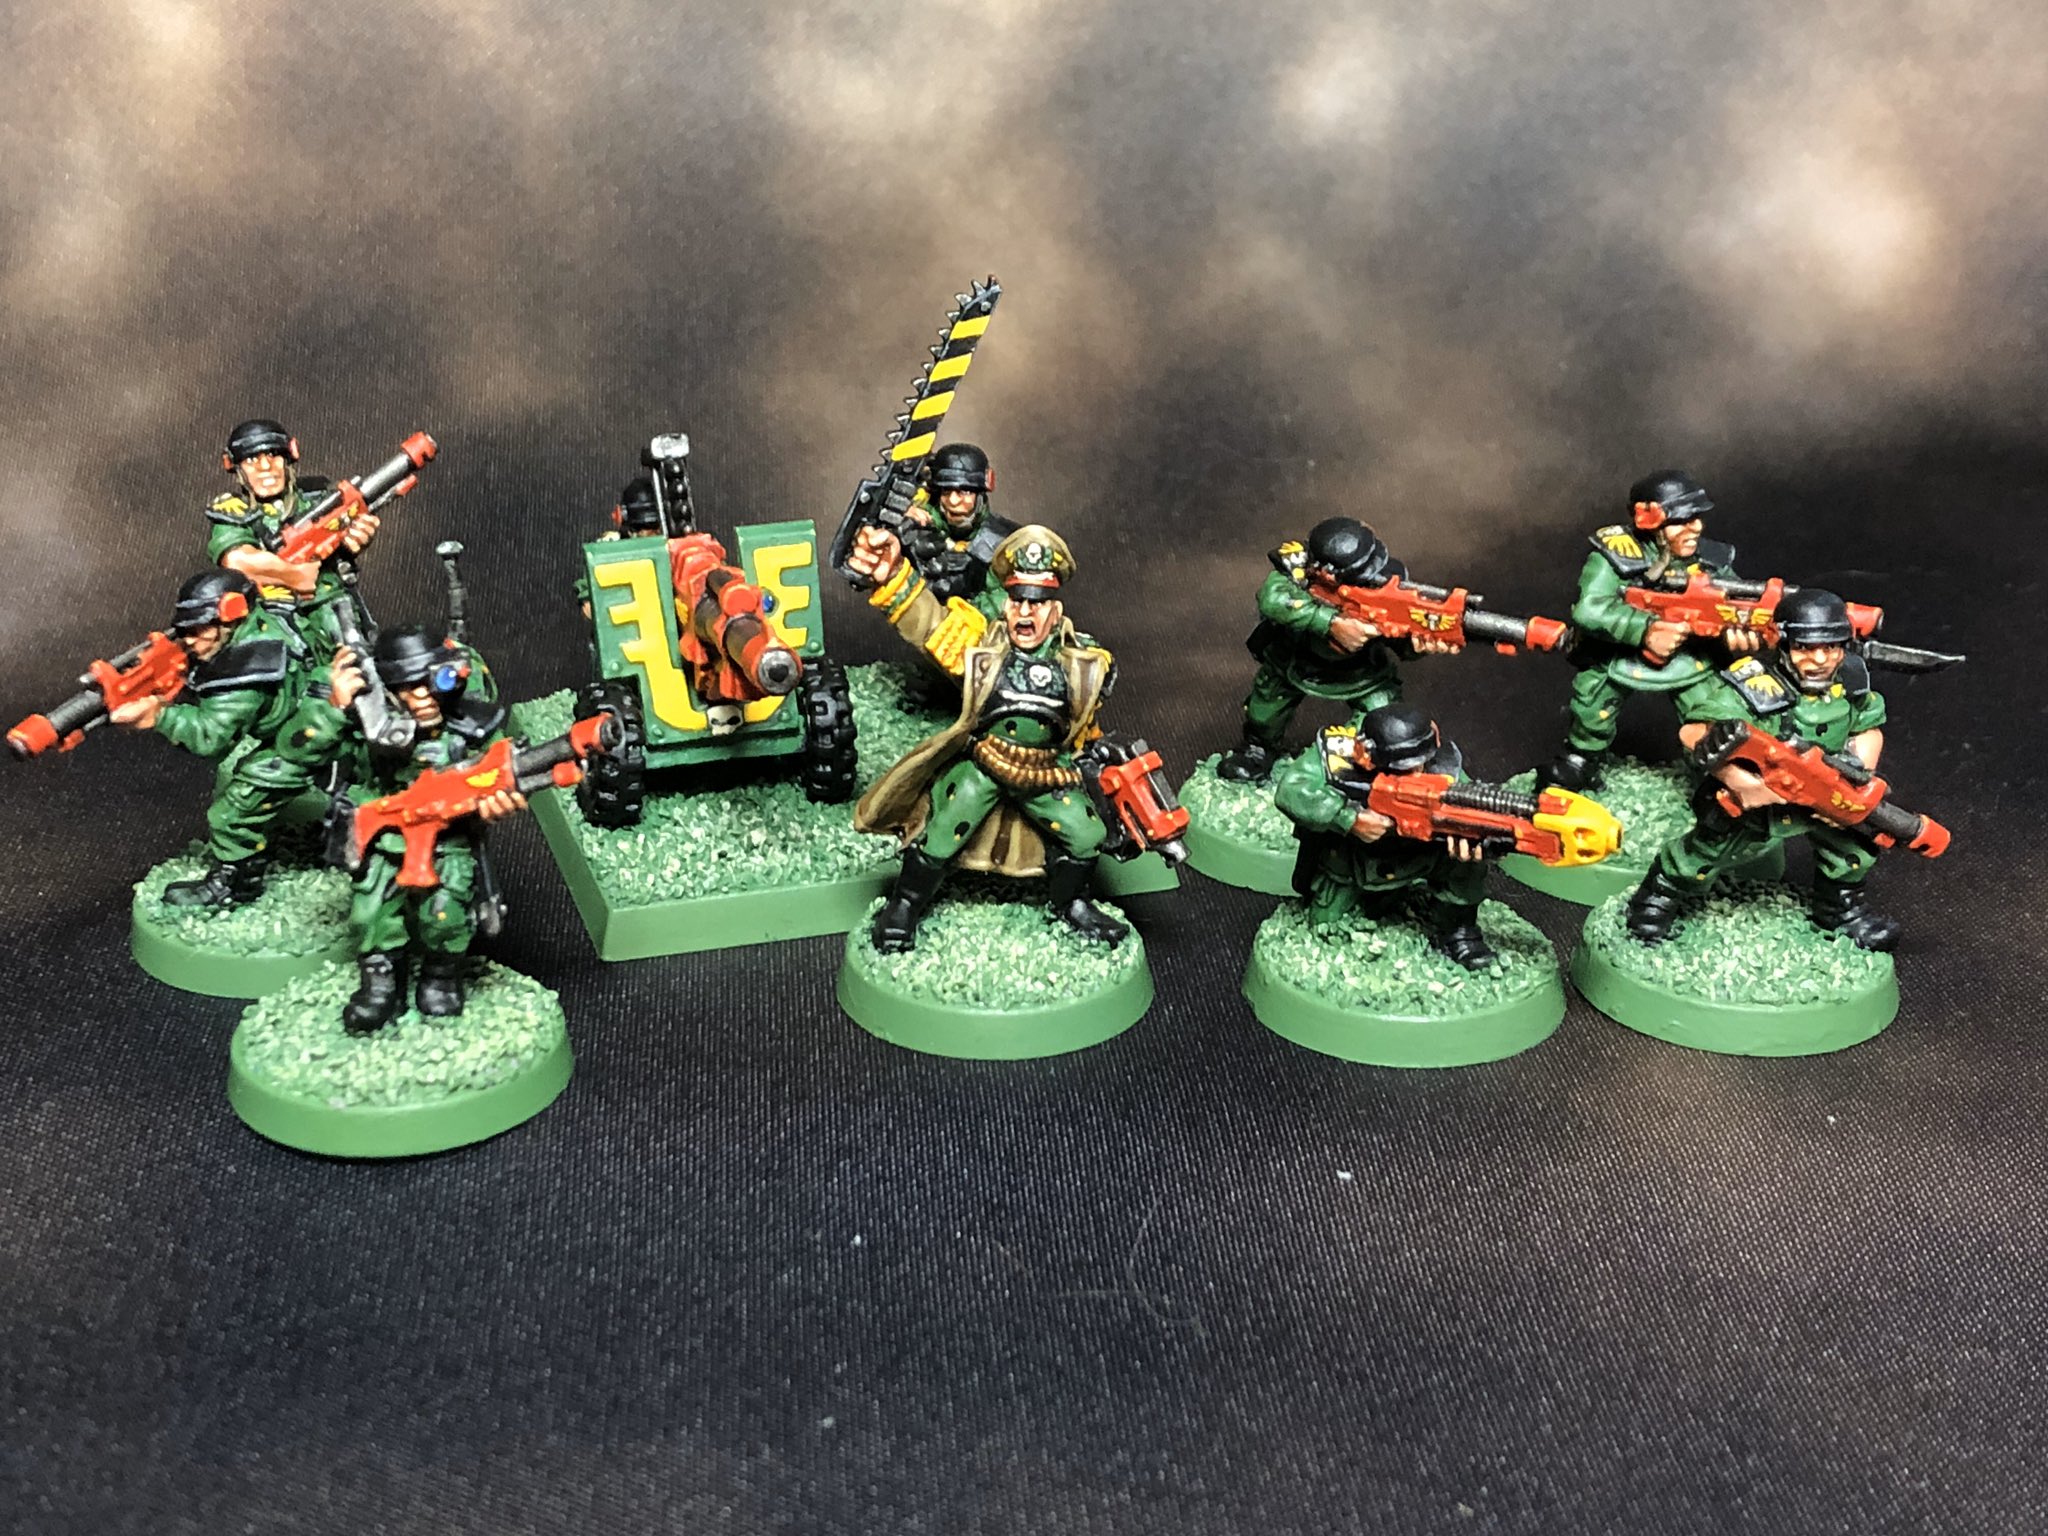
If my Valhallans (see below) have one foot in the real world and one in the far future, my Cadians have both firmly planted in a Discovery Zone circa 1995. These classic Perry sculpts have a load of character and their scheme could easily be applied to modern models, or, ideally, Victoria Lamb’s Arcadian Guard range. This scheme is more or less how I interpret the ‘Eavy Metal scheme of the mid 90s, but a bit simpler so you can hopefully knock a squad of these guys out in a timely fashion. I’ll break down their scheme now.
Infantry
Uniforms: I started with Army Painter’s Goblin Green primer, as that even shares a name with the green of the period I was emulating. This was a mistake, as the spray rubs off easily and the matching bottle paint has garbo coverage. Instead, I would prime white and paint them Warboss Green. A recess wash of Athonian Camoshade brought the green down a little bit and added some much needed depth. Finally, a highlight of Skarsnik Green finished off the green. The camo spots are very simple, and are just little dabs of P3’s Thamar Black (any black will do, that’s just my favorite) with a smaller, overlapping dot of Averland Sunset on top. I don’t know where this camo is effective, but it looks nice. Body armor: Thamar Black, Dark Reaper highlights, and then some extreme edge highlights of Fenrisian Grey. Thin highlights and bluer tones make the armor seem more “hard” than the leather, which we will get to next. Leather: Thamar Black again, Eshin Grey highlights, and Dawnstone for the extreme edges. Weapon casings: This was GW’s “Red Period” if you ask any Oldhammer nerd, and by gum is it represented in this scheme. Mephiston Red, Nuln Oil in the recesses, then edge highlights of Evil Sunz Scarlet and Fire Dragon Bright take care of the red. This is reproduced on the sides of their helmets as well. The yellow aquilas on their weapons are just Yriel Yellow with a dot of Fuegan Orange wash in the middle for depth. Metallics: Leadbelcher, a wash of Nuln Oil, and an occasional highlight of Stormhost Silver was all it took. Easy. Other stuff: The yellow wings and aquilas on their pauldrons and uniforms were painted the same way as on the weapons. The skulls in the middle of the pauldrons were Zandri Dust, Ushabti Bone, and a Corax White highlight. Caution stripes and yellow bits of the plasma gun were Yriel Yellow with a Flash Gitz Yellow highlight. For the officer’s coat, I just painted it the same way as my Valhallan coats above. Of course this scheme works on Guardsmen, but would you believe it works on tanks too? It’s true!
Vehicles
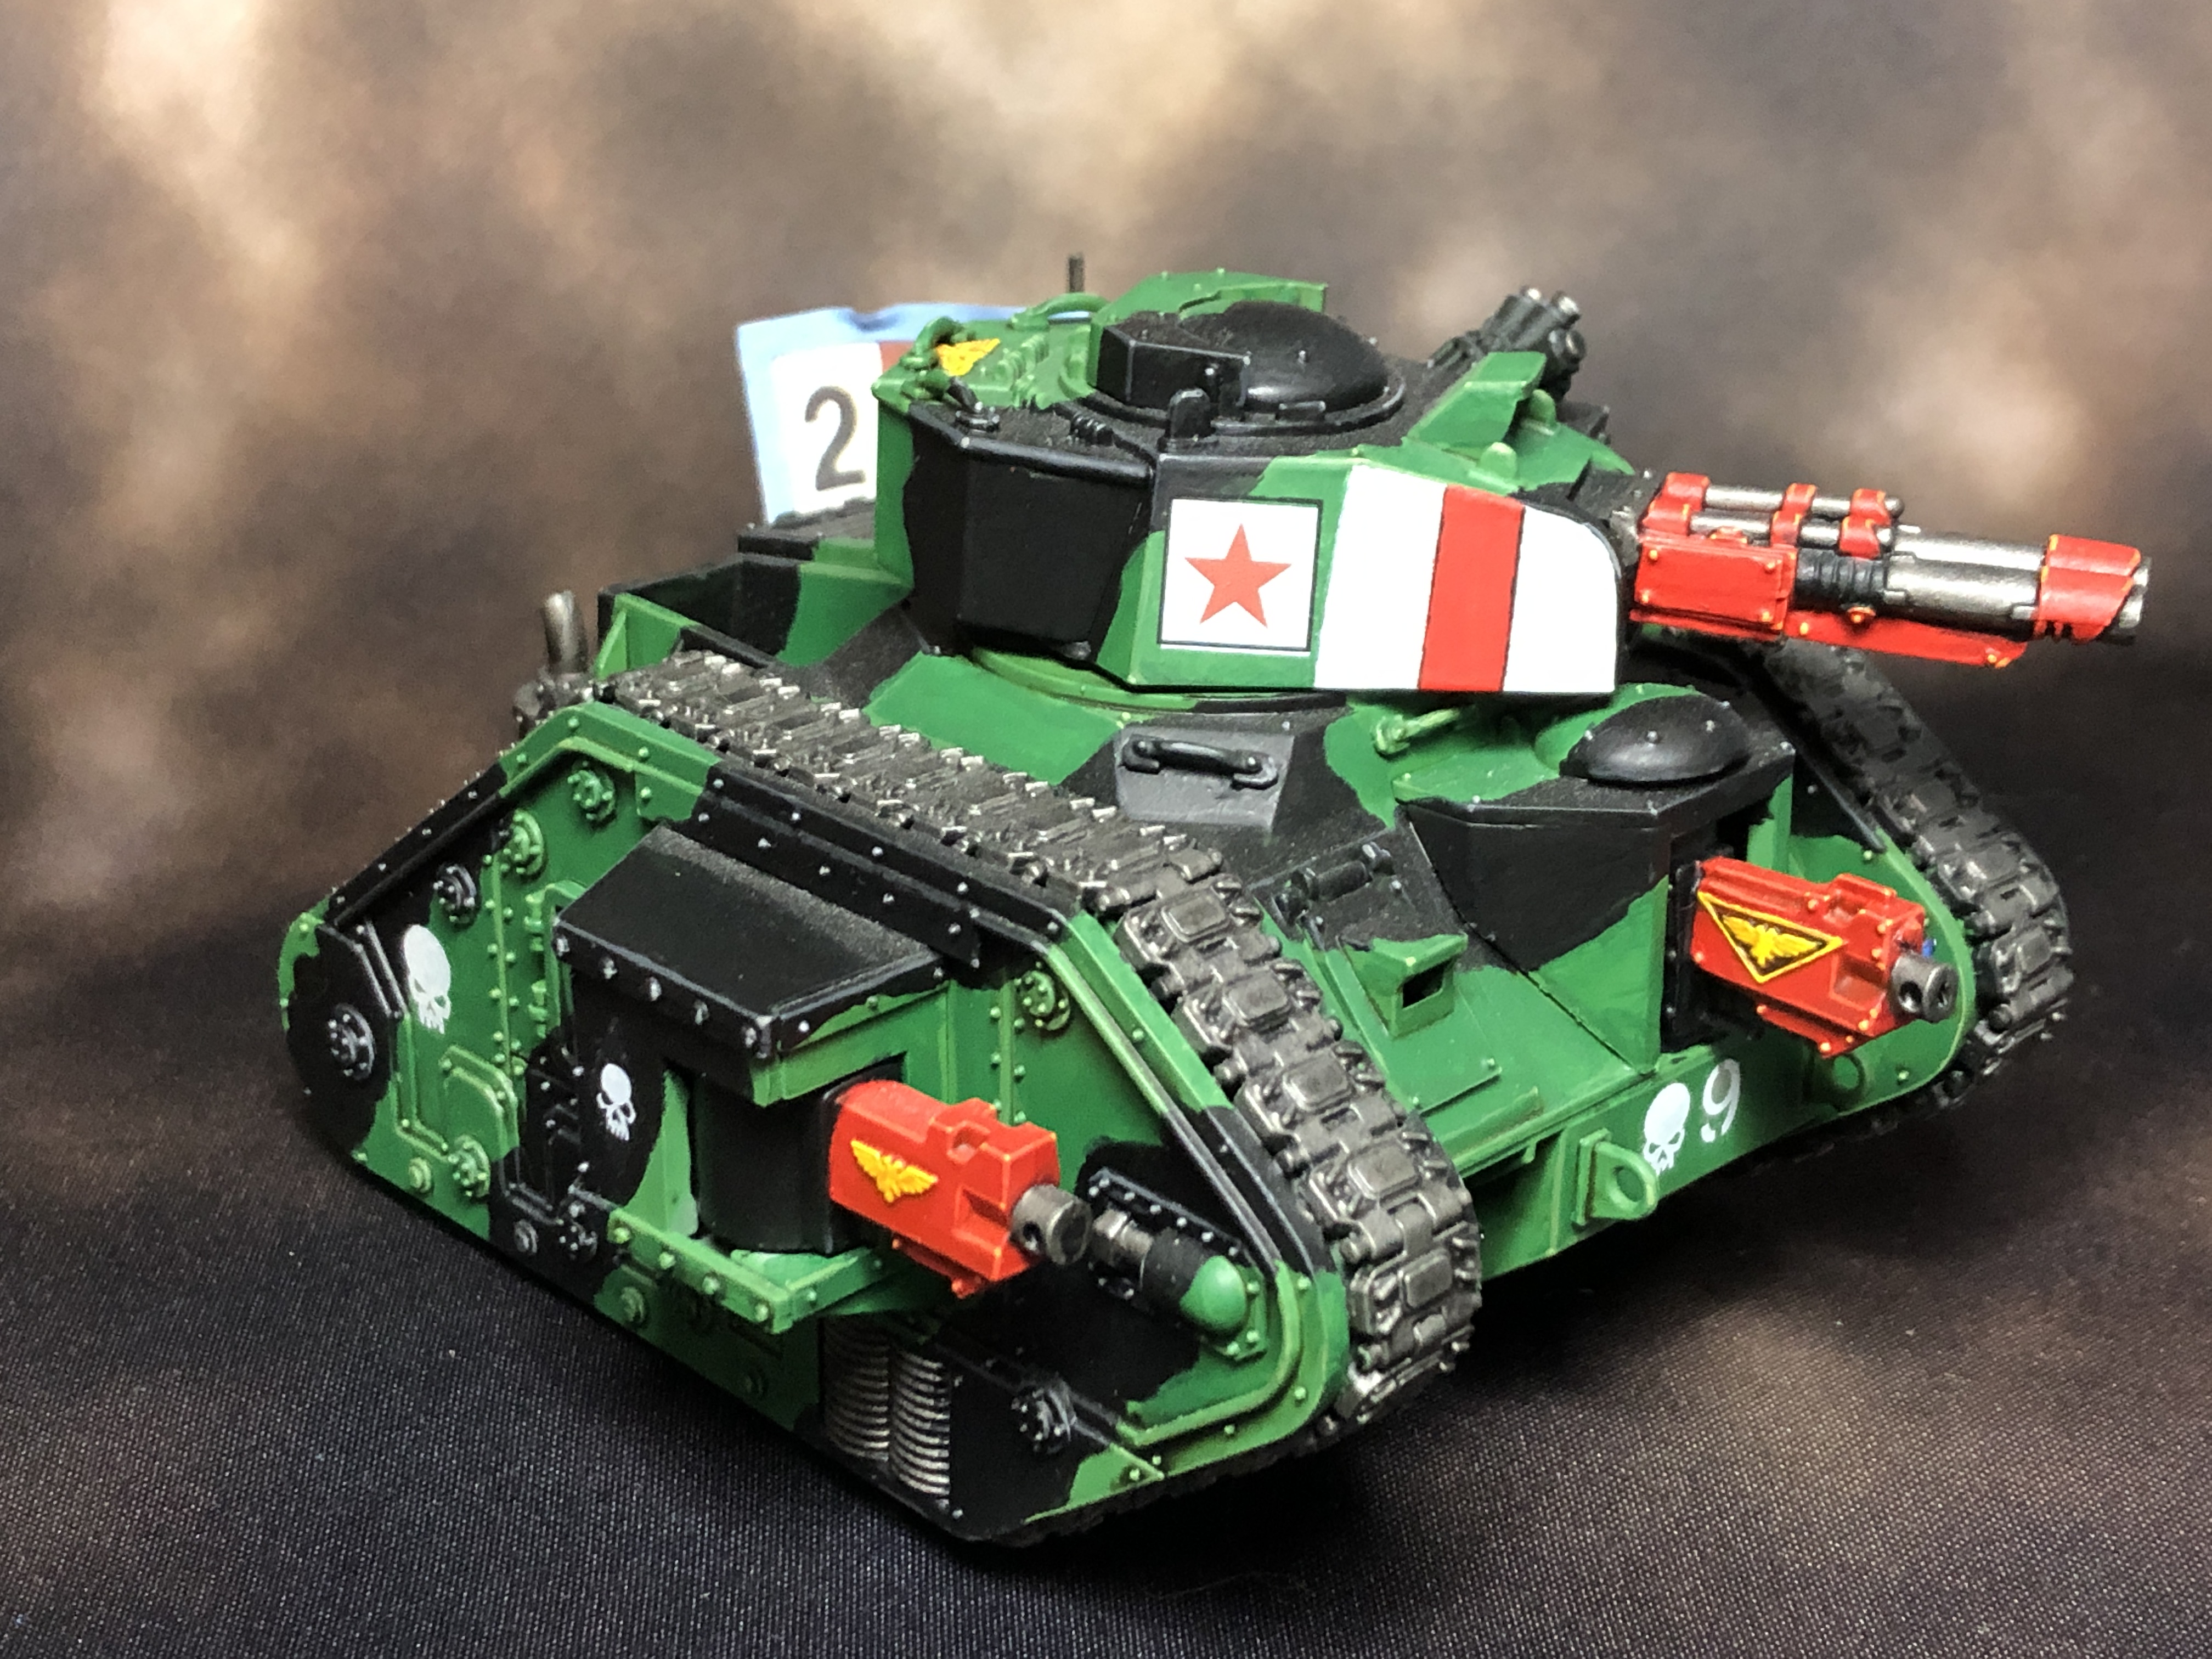
Retro Leman Russ Exterminator. Credit: SRM
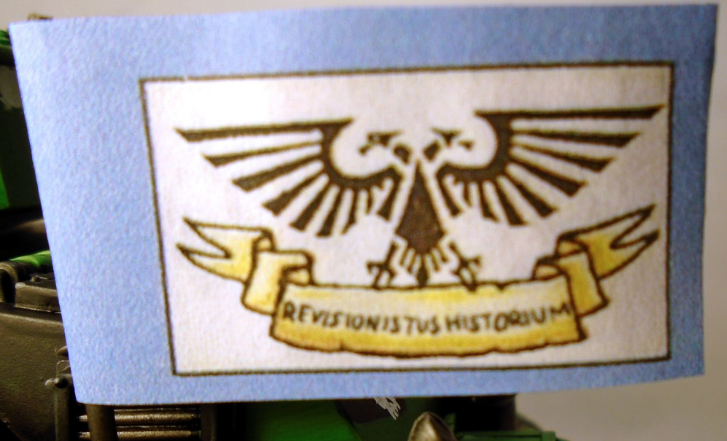
Now of course they didn’t have Leman Russ Extreminators in 2nd ed, so I had to make a new banner for the back:
Revisionistus Historium. Credit: SRM
If you ignore the dust, however, you’ll see a tank using the same color scheme as the infantry. I primed this tank with the same Army Painter Goblin Green spray as the infantry, then painted in camo splotches using P3 Thamar Black. If I were to do this again I would paint the whole tank with Warboss Green after the spray to even out the coverage and make cleanup easier. The black was highlighted the same as the leather on the infantry, as I didn’t want the tank to get too blue, and the green was highlighted the same as the uniforms, with Athonian Camoshade being used sparingly on rivets and recesses. When painting camo, it’s important to get clean lines, so using a slightly thinned down paint and a fine brush, draw the patterns in and fill them in later. Alternatively you could use another spray or airbrush and blu-tac or modeling putty to mask off areas, but you do you. The last detail here that isn’t on the infantry is the striping on the side of the turret, which was just the same red recipe as before, then Ulthuan Grey with a Corax White highlight, and lines of Thamar Black dividing them. I painted this whole scheme before airbrushes were quite as mainstream as they are now, but I imagine using one would make quick work of an army of these folks without repeating my mistakes.
BuffaloChicken's Catachans - click to expand
BuffaloChicken’s Catachans are well known around the Goonhammer offices, as we’ve long talked about the way he incorporates beautiful conversions into his efforts. In addition to using a pet store’s worth of aquarium plants on his army’s bases, he also frequently rescues old toys (particularly dinosaurs) to use for terrain and conversions. His Catachans have a lighter, painterly feel.
– Highlight underside of grey blotches with Vallejo Camouflage Green
– Irregular pooling or streaking washes of Vallejo Parasite Brown (representing rust)
Camo Fabric (Stowage, etc.)
– Basecoat Vallejo Cayman Green
– Drybrush Vallejo Camouflage Green
– Paint irregular blotches of Vallejo Charred Brown
– Paint smaller irregular blotches of Vallejo Black
– Wash with very thinned Vallejo Black
– Pick out any buttons or buckles with Vallejo Gunmetal Metal
Guns
– Basecoat exposed metal areas in Vallejo Gunmetal Metal
– Wash metal with Citadel Agrax Earthshade
– Wash metal with Citadel Nuln Oil
– Highlight metal with Vallejo Mithril
– Basecoat ammunition in Citadel Hashut Copper
– Wash ammunition with Citadel Agrax Earthshade
– Highlight ammunition in Citadel Hashut Copper
– Highlight ammunition with Vallejo Mithril
– Basecoat weapon casings Vallejo Black
– Highlight weapon casings Vallejo Cold Grey
Plasma Coils
– Basecoat Vallejo White
– Wash Vallejo Yellow Ink
– Highlight Vallejo White
Aquilas and Skulls
– Basecoat Vallejo Bonewhite
– Wash Citadel Agrax Earthshade
– Highlight Vallejo Bonewhite.
– Final small highlight with Vallejo White
Contrast Details
– Basecoat assorted details (such as prominent cannon muzzles or small armour plates) Vallejo Wolf Grey
– Wash Vallejo Shadow Grey
– Highlight Vallejo Wolf Grey
– Highlight muzzles Vallejo White
Hazard Stripes
– Basecoat Citadel Averland Sunset
– Wash Citadel Agrax Earthshade
– Highlight Citadel Averland Sunset
– Mark stripe locations with mechanical pencil
– Paint stripes with Vallejo Black
– Highlight yellow stripes with Citadel Flash Gitz Yellow
– Highlight black stripes with Vallejo Cold Grey
Lenses
– Basecoat Vallejo Scorpy Green
– Paint 1:1 mix of Vallejo Scorpy Green and Vallejo White on bottom-right of lenses.
– Paint one or two dots of Vallejo White on upper-left of lenses.
Credit: BuffaloChicken
BuffaloChicken on painting lots of Guard Infantry: Answer is… run real light on infantry, convert lots of monsters and vehicles and Rough Riders and Ogryns, and lose plenty of games! At least that’s my technique. Closest thing to ‘real’ advice would be “paint in squads of ten, break them up with fun centerpiece models.”
Colin's Death Korps - Click to Expand
This scheme was developed as a way to paint a large number of Forgeworld resin Death Korps of Krieg models very efficiently. As much fun as that army project was, I was very glad to see Death Korps redone in glorious plastic. Efficiency, repeatability, and looking good en-masse are the keys to this scheme; which I think it accomplishes. I went with a classic blue-grey greatcoat, yellow calfskin leather, and steel detailing. The calfskin and blue-grey contrast each other well and keep the bare bones infantry squads visually distinct on the table. To get the blue-grey for the greatcoat and pants, I first primed the model black. I then did an overall basecoat of Vallejo Game Color Dark Sea Blue. To highlight, I added some Vallejo Game Color Blue Grey Pale to the Dark Sea Blue and concentrated on the arms, upper chest, lower greatcoat, and knees. For the final airbrush highlight I added more Blue Grey Pale to the previous mix. I wanted to get a nice desaturated yellow calfskin leather for the gloves, boots, wraps, and pouches. The decision to paint them all in the same yellow ochre was definitely a decision borne of efficiency, but one that works for what is a horde infantry army. I basecoated the leather boots, wraps, straps, pouches, packs, and gloves with Vallejo Model Color Basic Flesh. I then washed the leather with Vallejo Game Ink Sepia All the leather is highlighted with Vallejo Game Color Yellow Ochre The final highlight/scratches on the leather were made with a 1:2 mix of Yellow Ochre and Vallejo Game Color Ivory The steel metallics were basecoated with Vallejo Metal Color Exhaust Manifold, washed with GW Nuln Oil, and highlighted with Vallejo Metal Color Dark Aluminium. This looks a little bright at this stage, but it will get toned down with the oil wash and matte varnish at the end. Eye lenses and rifle lenses were basecoated with P3 Gnarls Green, washed with Vallejo Game Ink Black Green, highlighted with P3 wurm green and Vallejo Game Color Yellow Green. Final sun dot of white in the corner, like painting a gemstone. The gas mask and bedroll were basecoated with P3 Hammerfall Khaki, washed with GW Agrax Earthshade, and highlighted with Vallejo Game Color Deck Tan.
Credit: Colin W
Finishing up the paint, I picked out the helmet eagle with Scale75 Dwarven Gold and edge higlighted the coat using Vallejo Game Color Blue Grey Pale. After all the painting was finished, I gloss varnished the model before the oil wash (I prefer Liquitex Gloss Varnish). This lowers the surface tension of the model, which helps the wash wick into the recesses and also makes cleanup easier/more effective. I use an oil wash of Burnt Umber and a little Black, mixed with W&N Artists’ White Spirits. For the DKOK, I do an overall oil wash on the entire model. After the wash is dry, I use a q-tip dipped in white spirits to gently remove the wash from the raised surfaces, leaving a well developed recess lining and shadow with some grit. I then Matte varnished the model (Vallejo Matte).
Credit: Colin Ward
I did a very simple basing scheme for the army, using both Agrellan Earth and Agrellan Badlands to get some basic texture on the base. I then did a very thin pigment wash with Isopropyl Alcohol and some clay and brown pigments from Vallejo. Base rim painted black, and the model is finished!
Credit: Colin Ward
This scheme sounds a lot more complicated than it is, and was really efficient when painting over 100 of the old, tiny, Forgeworld Death Korps models. It was even easier to paint the plastic model, which bodes well for future entrenching-tool-bearers! If you’d like to see full video tutorials for DKOK infantry and armor, you can find them on my Patreon here.
Credit: Colin Ward
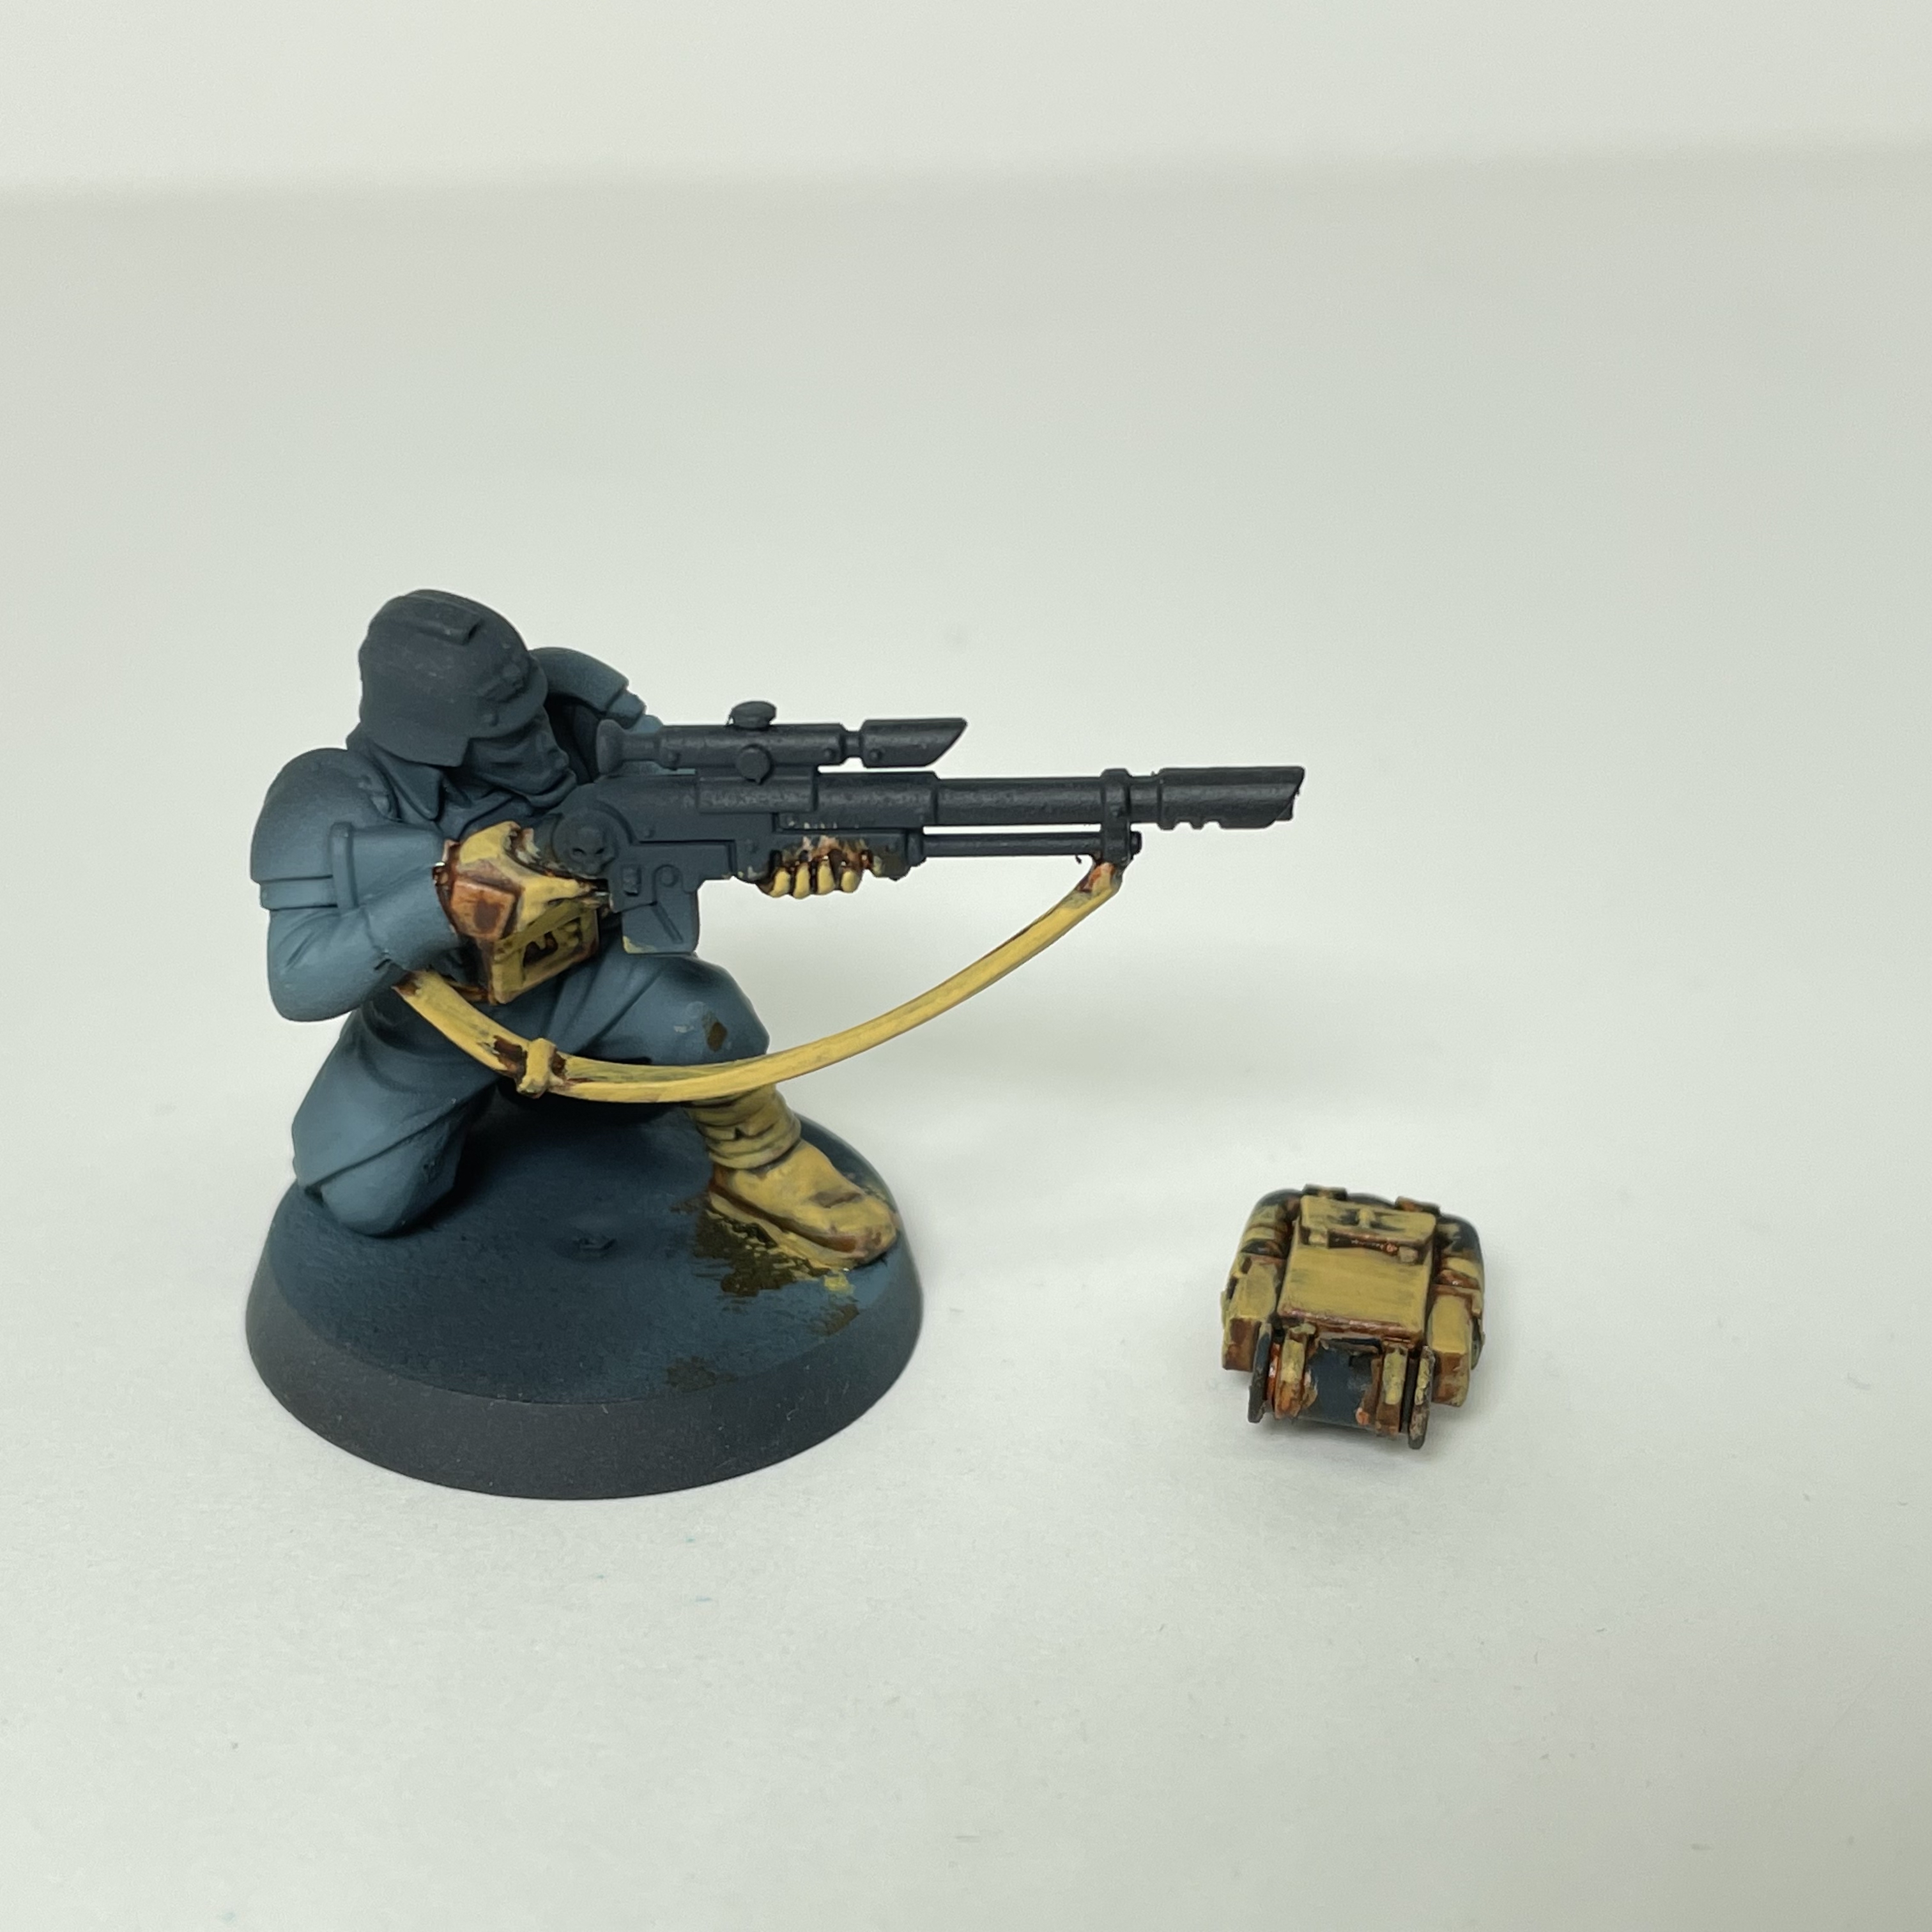
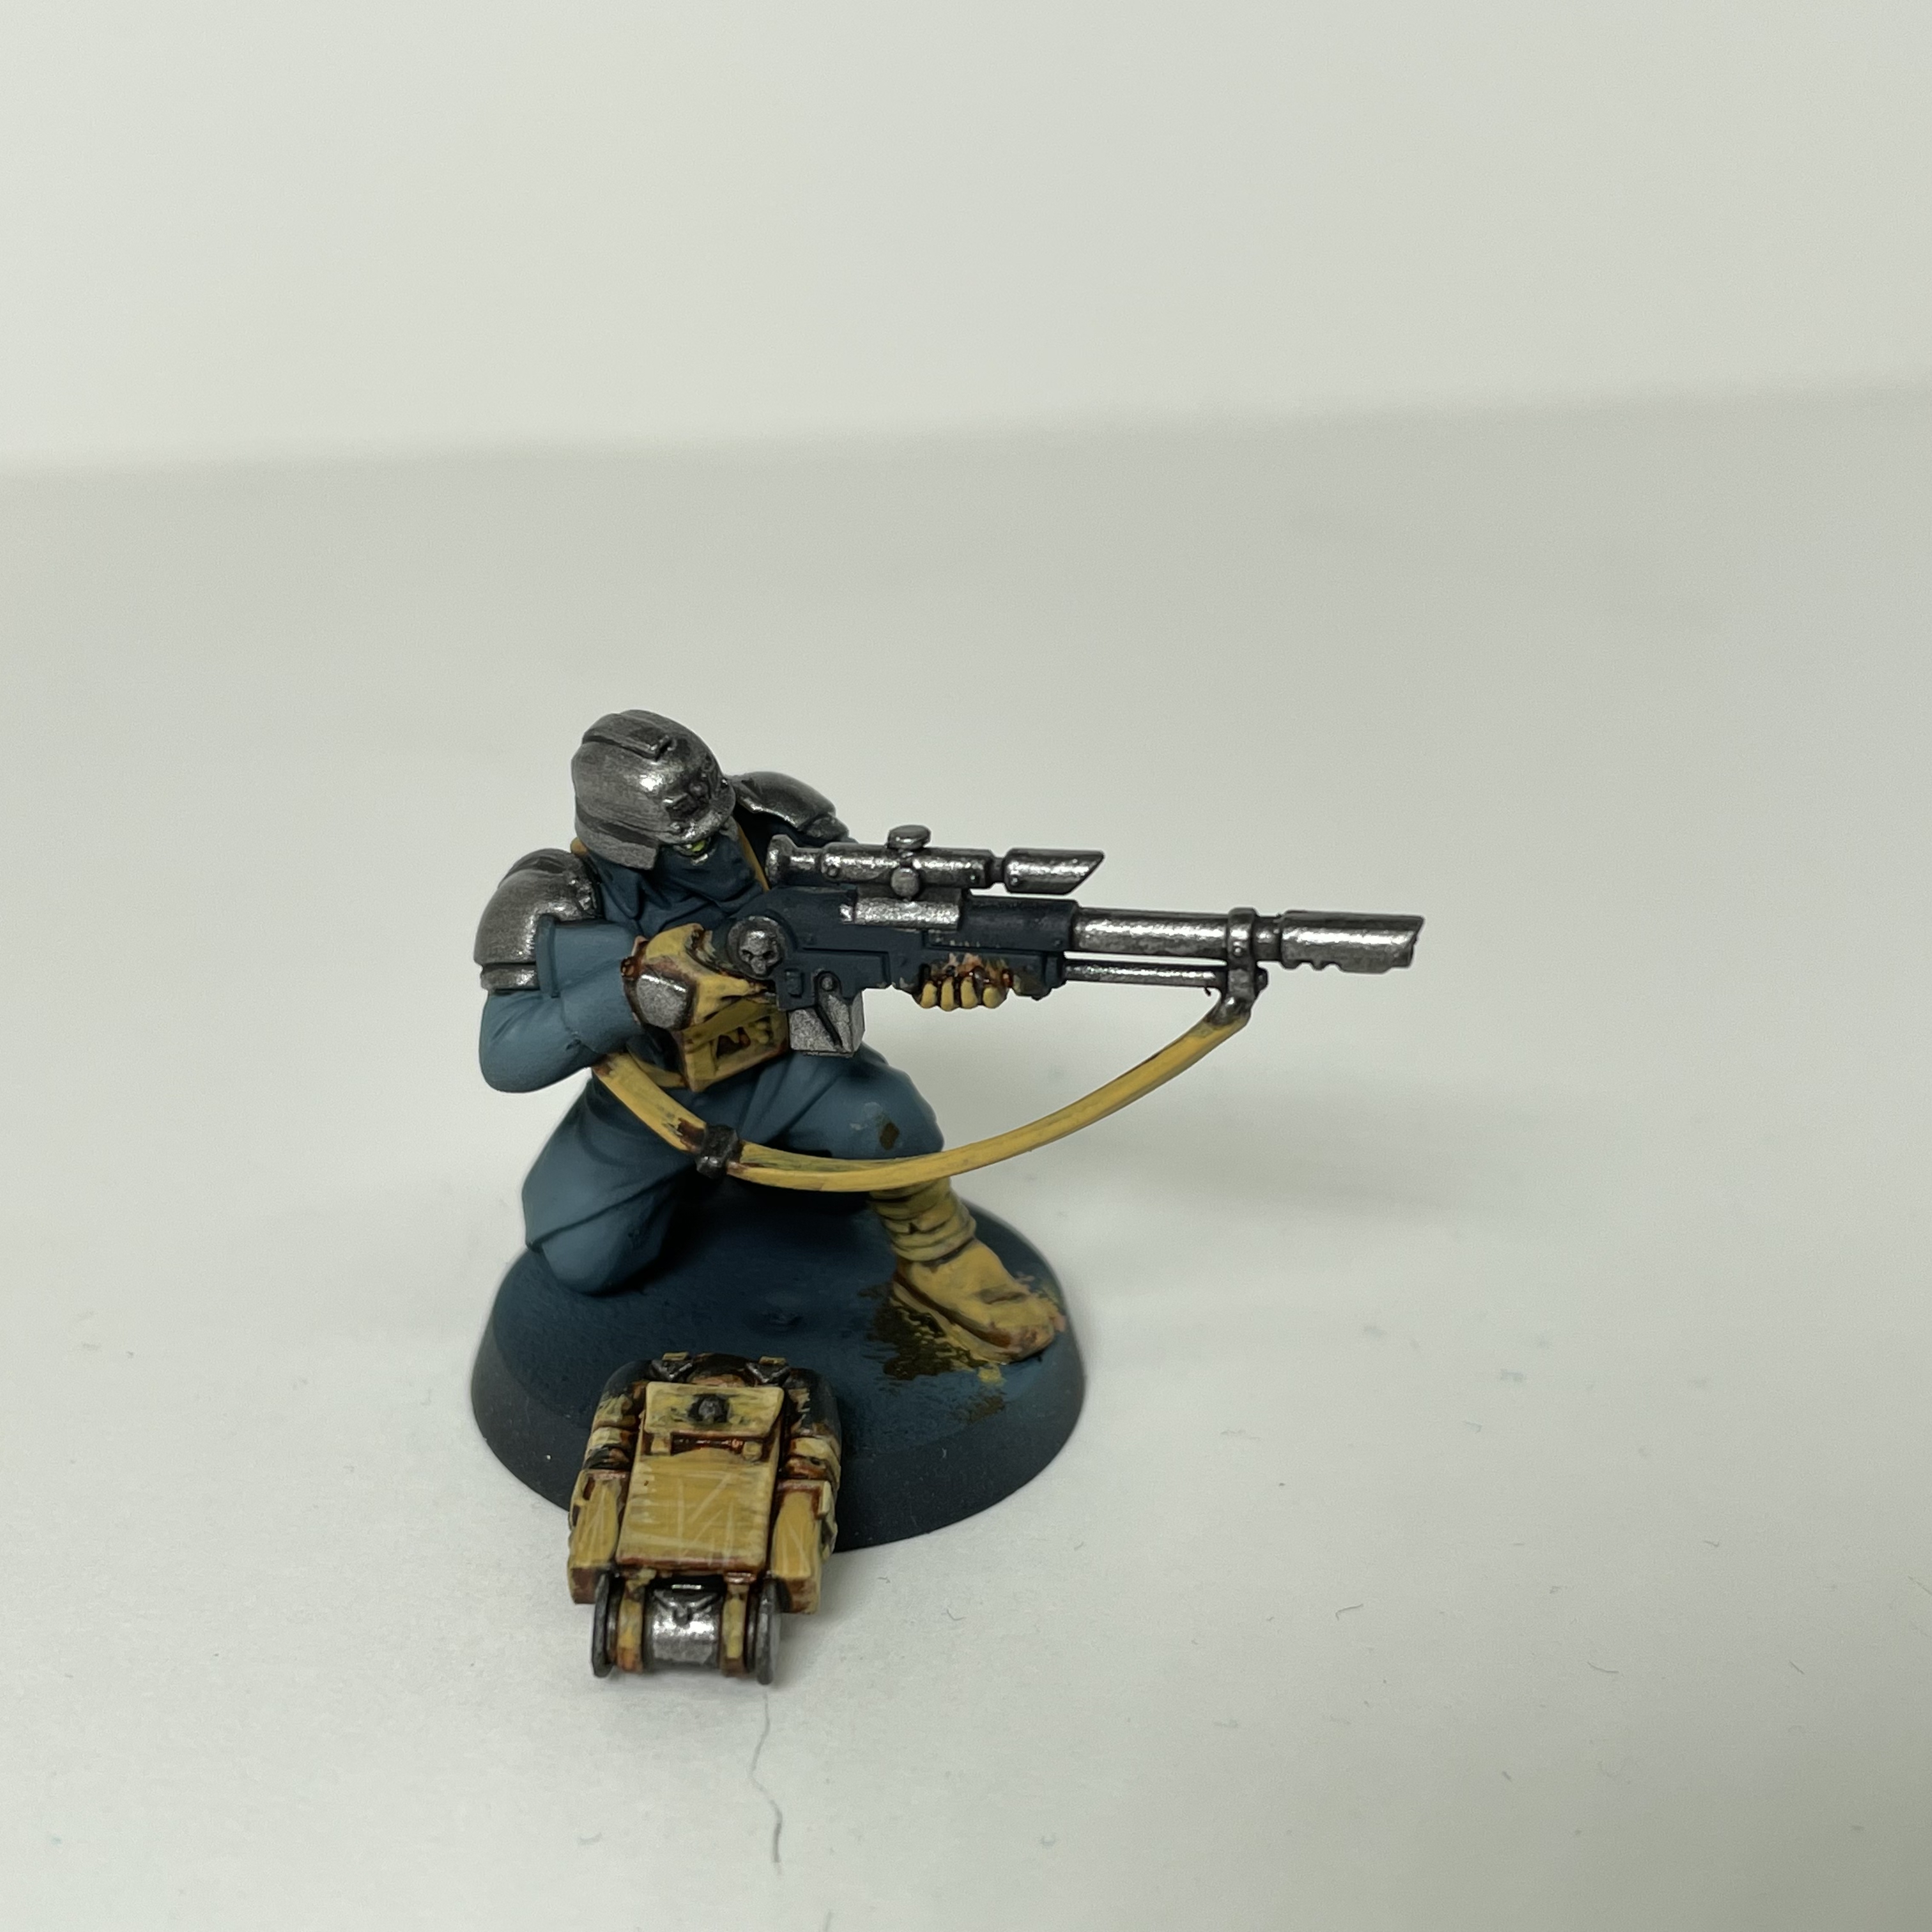
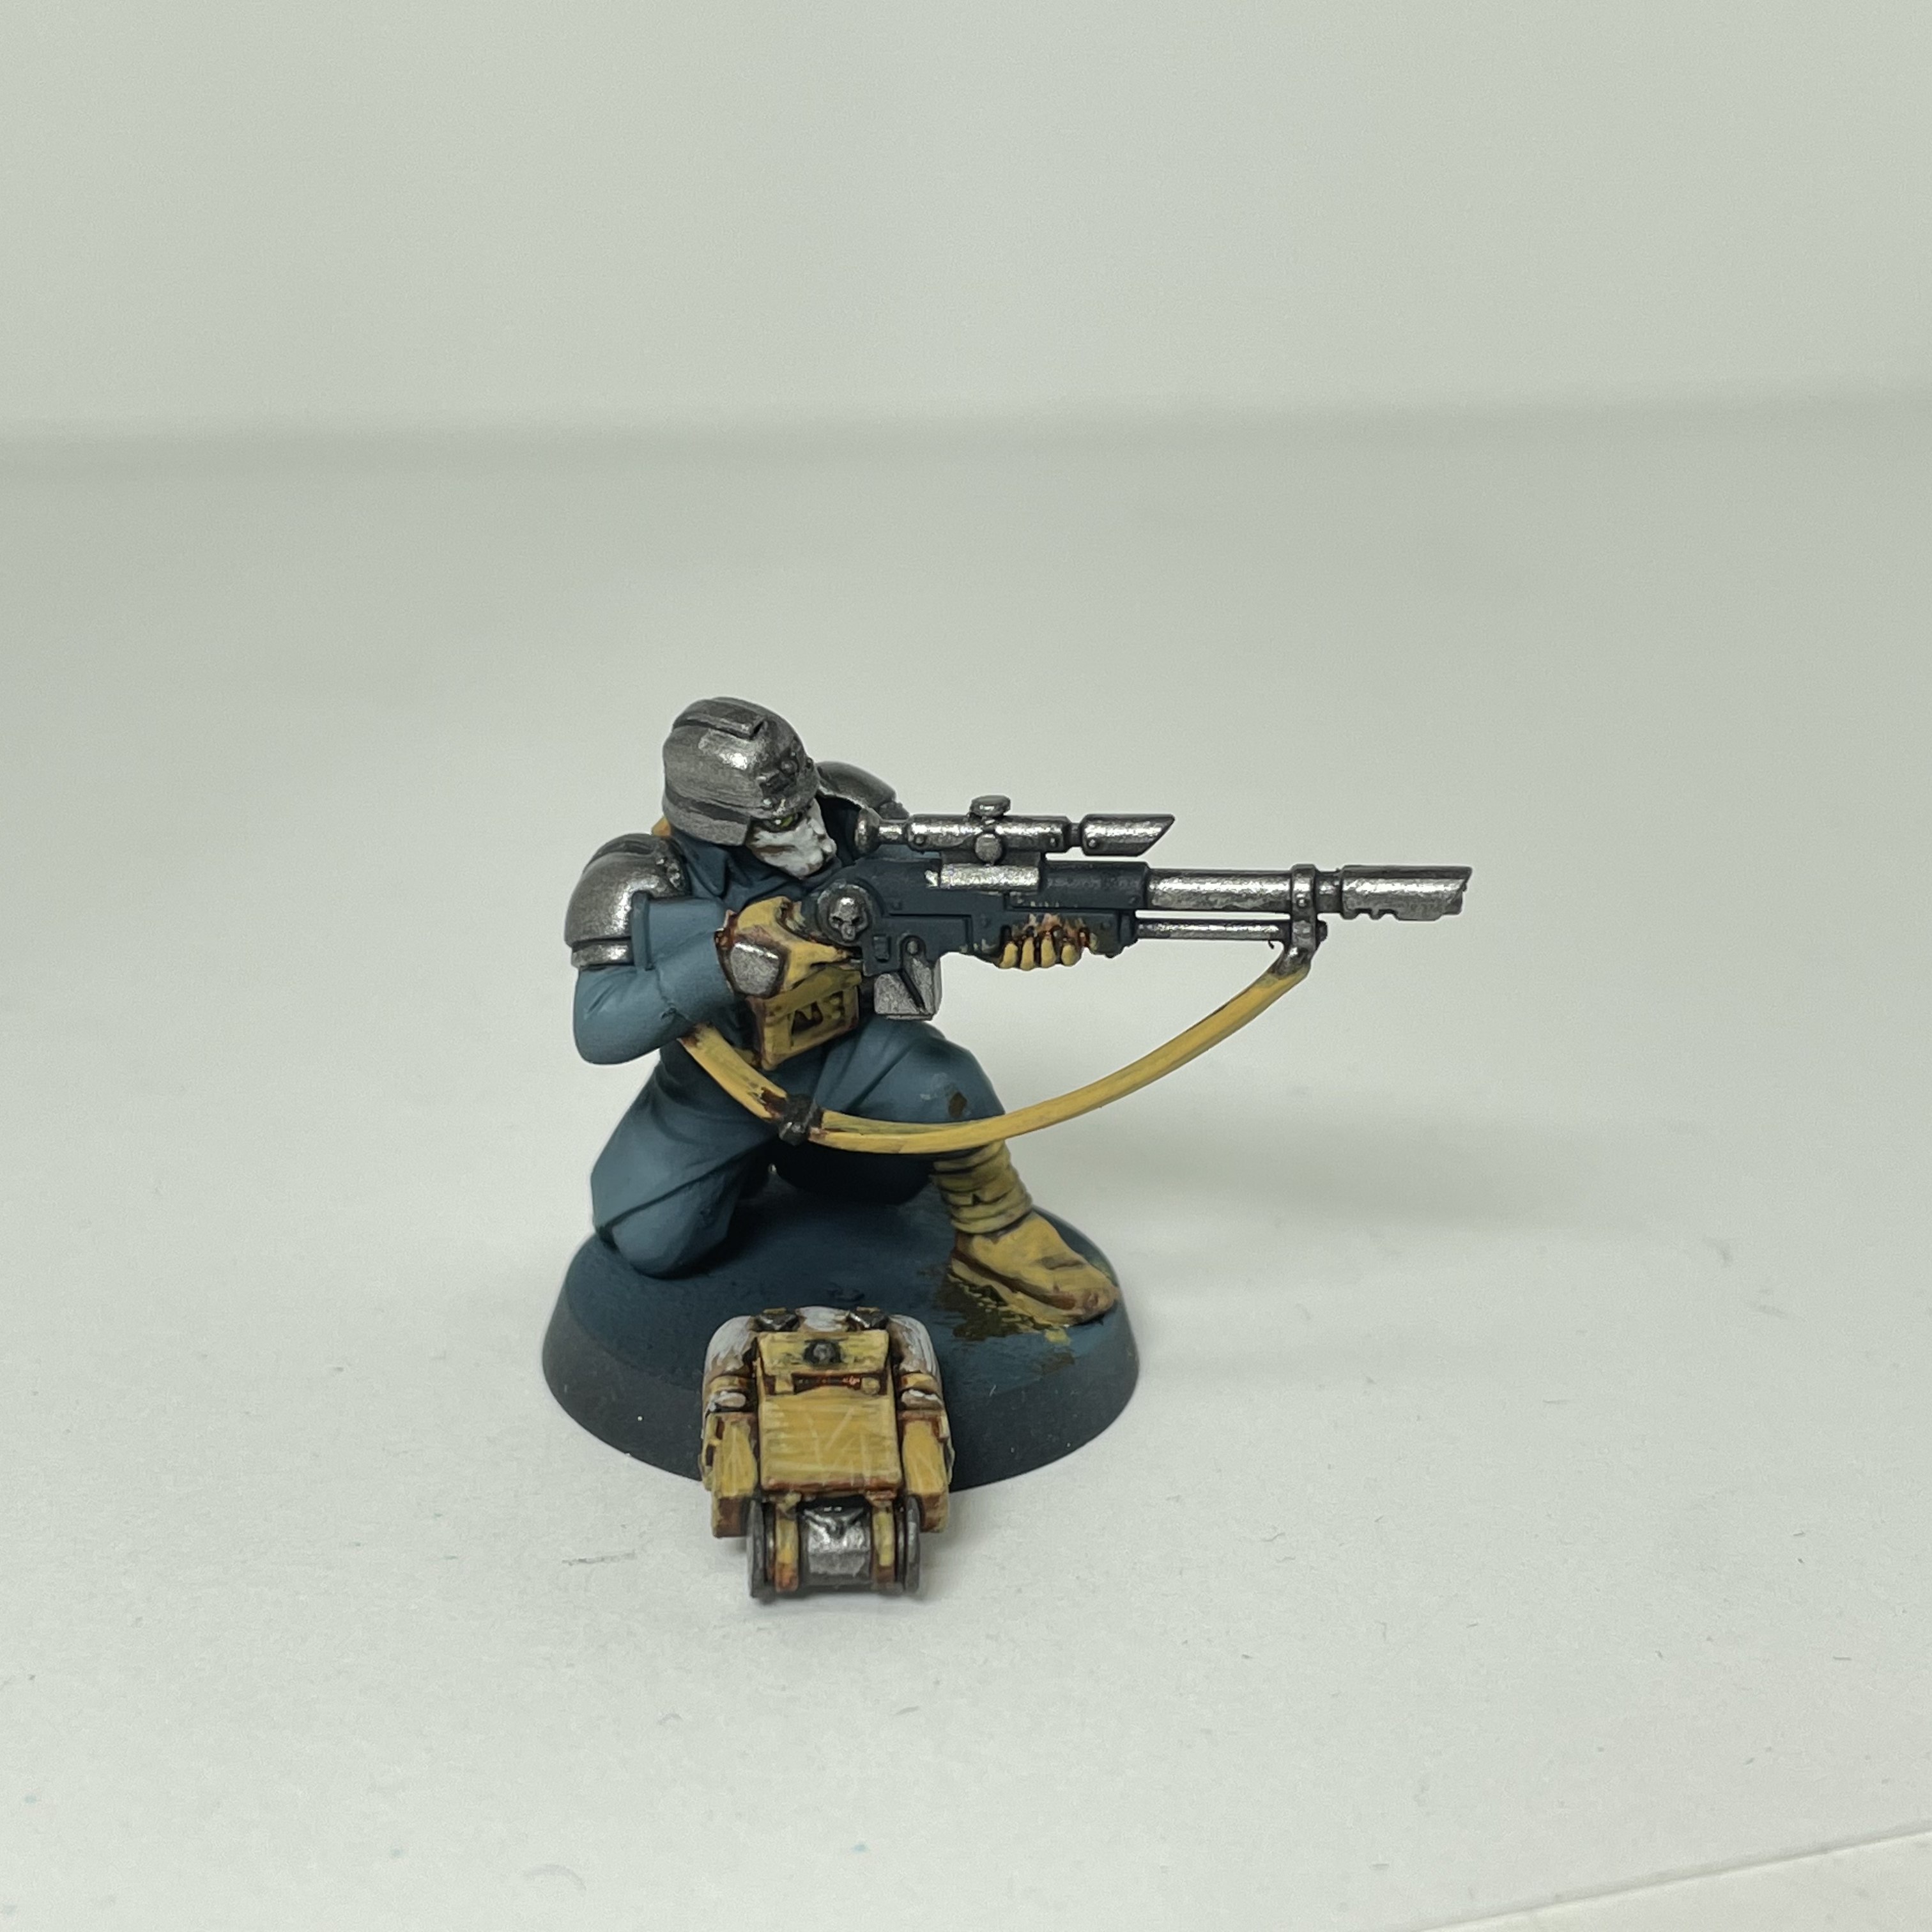
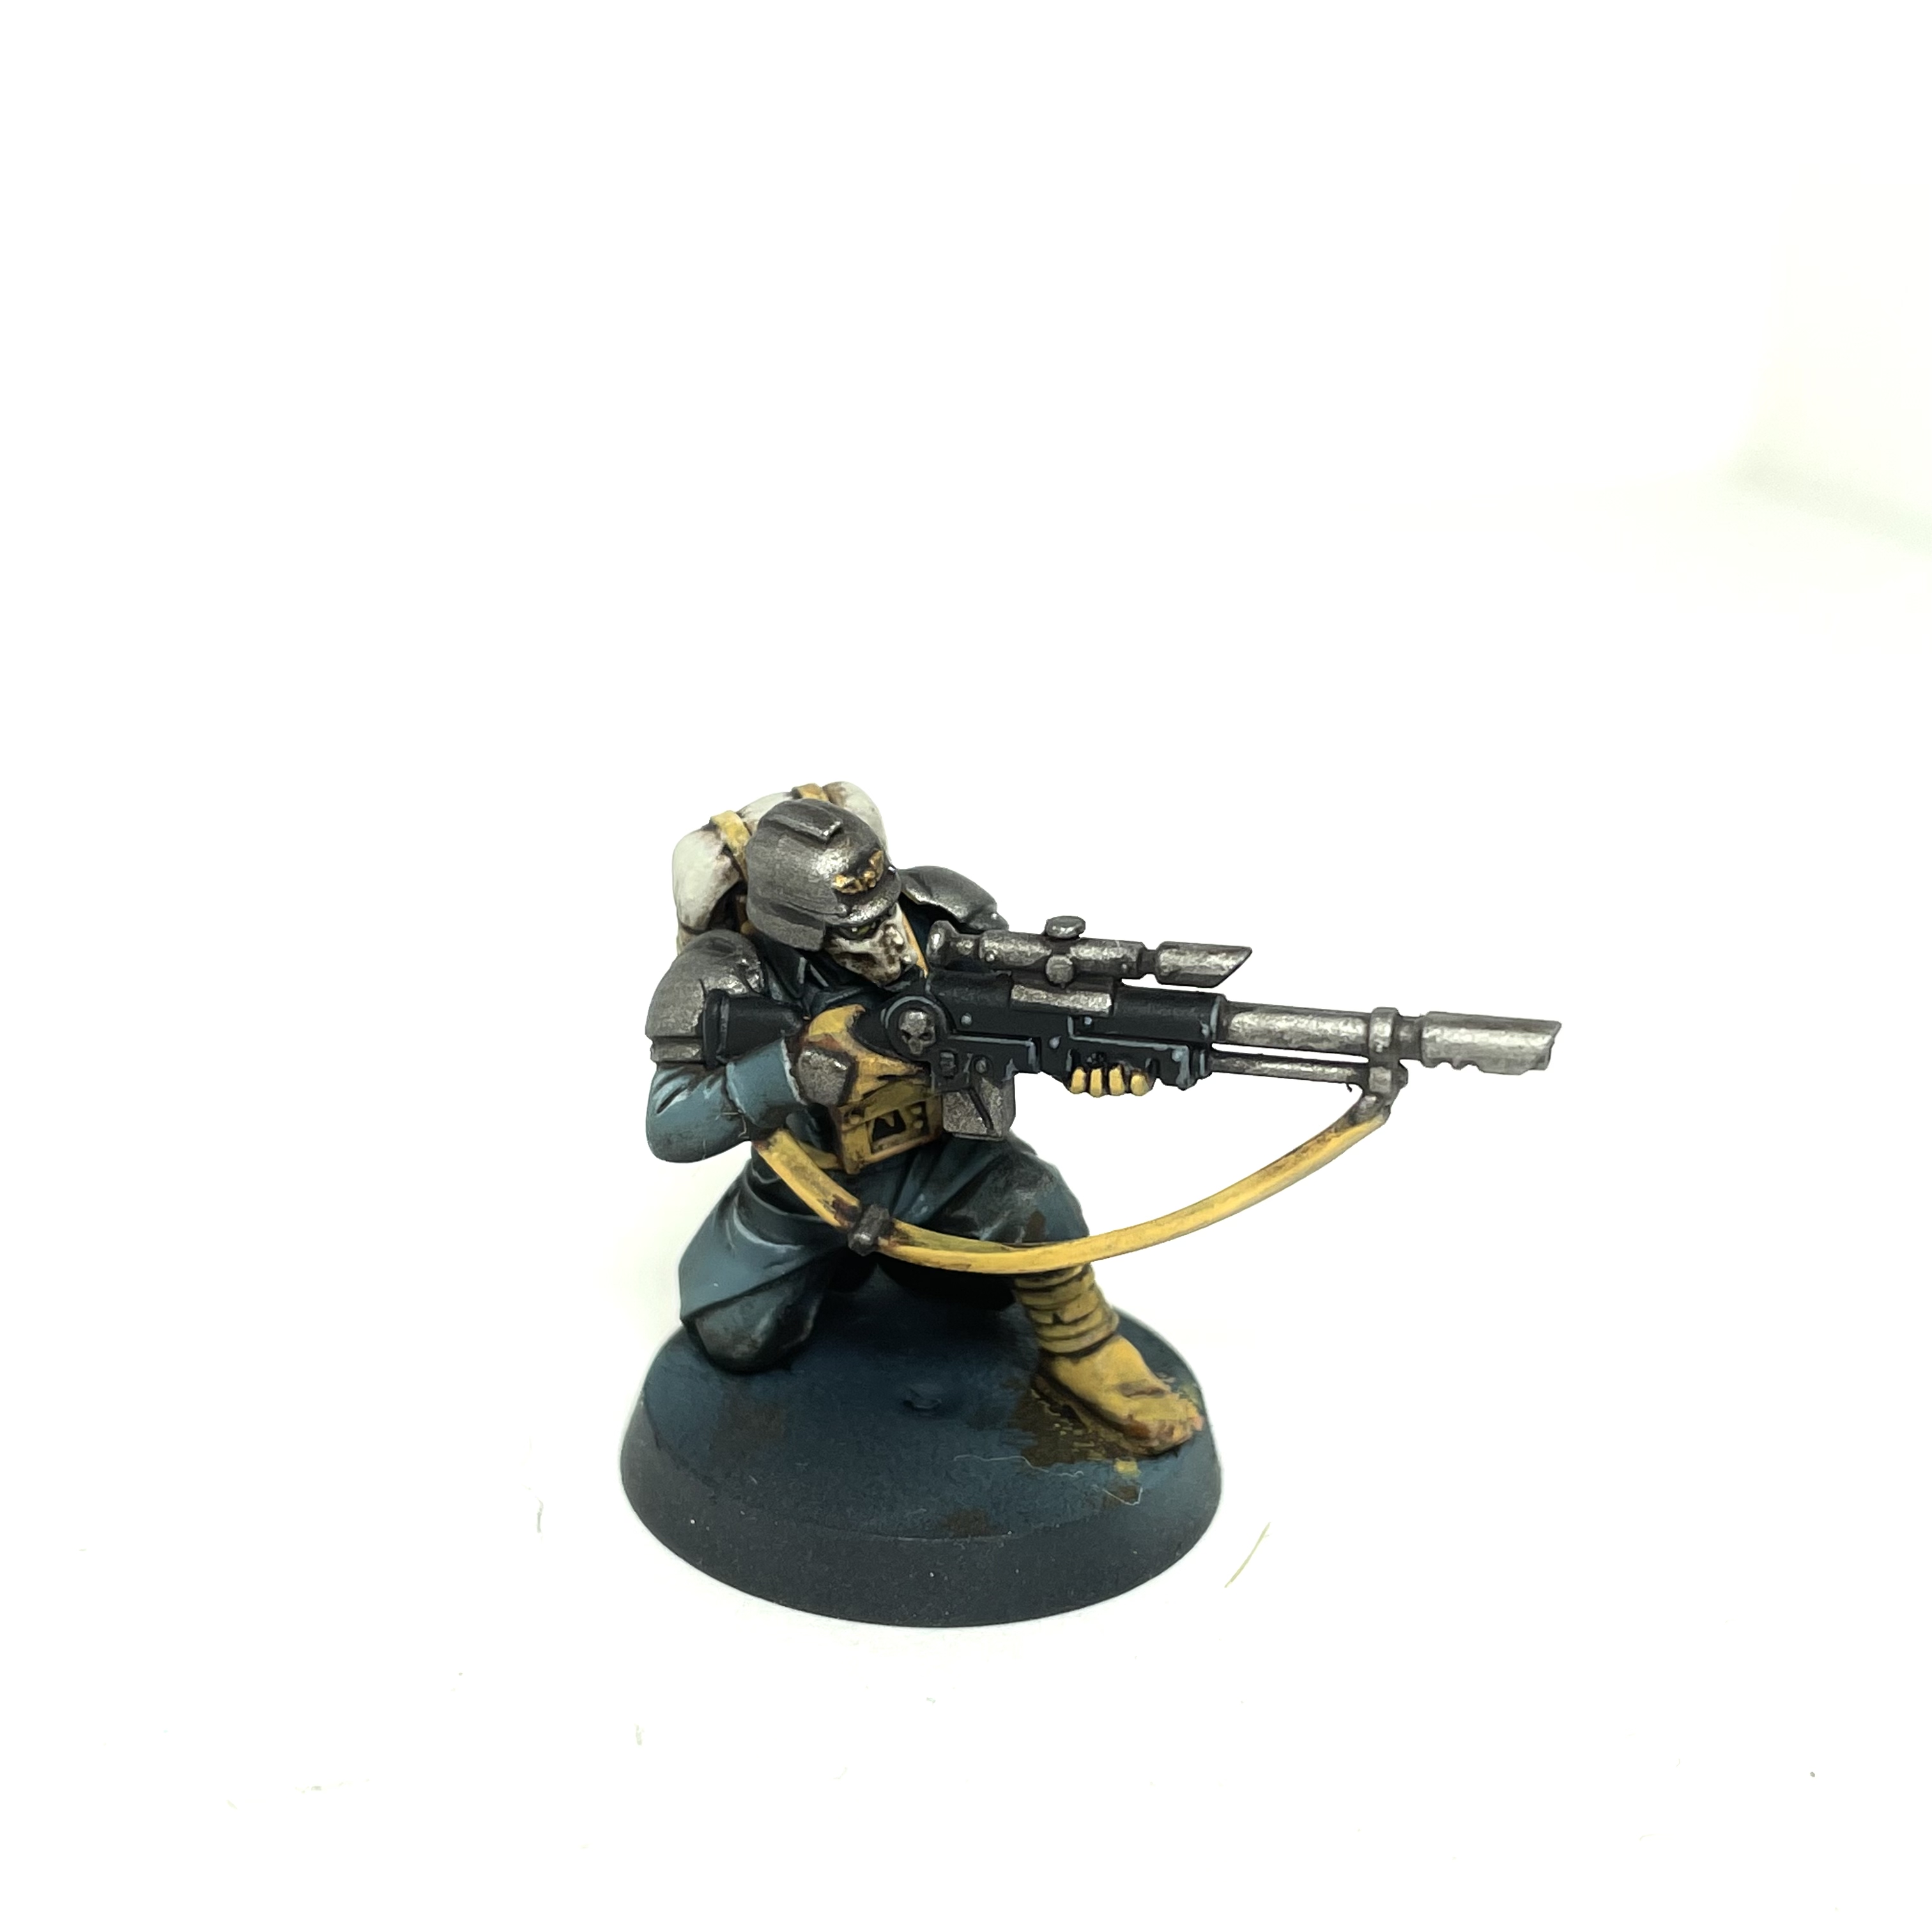
Rockfish's Death Korps - Click to Expand
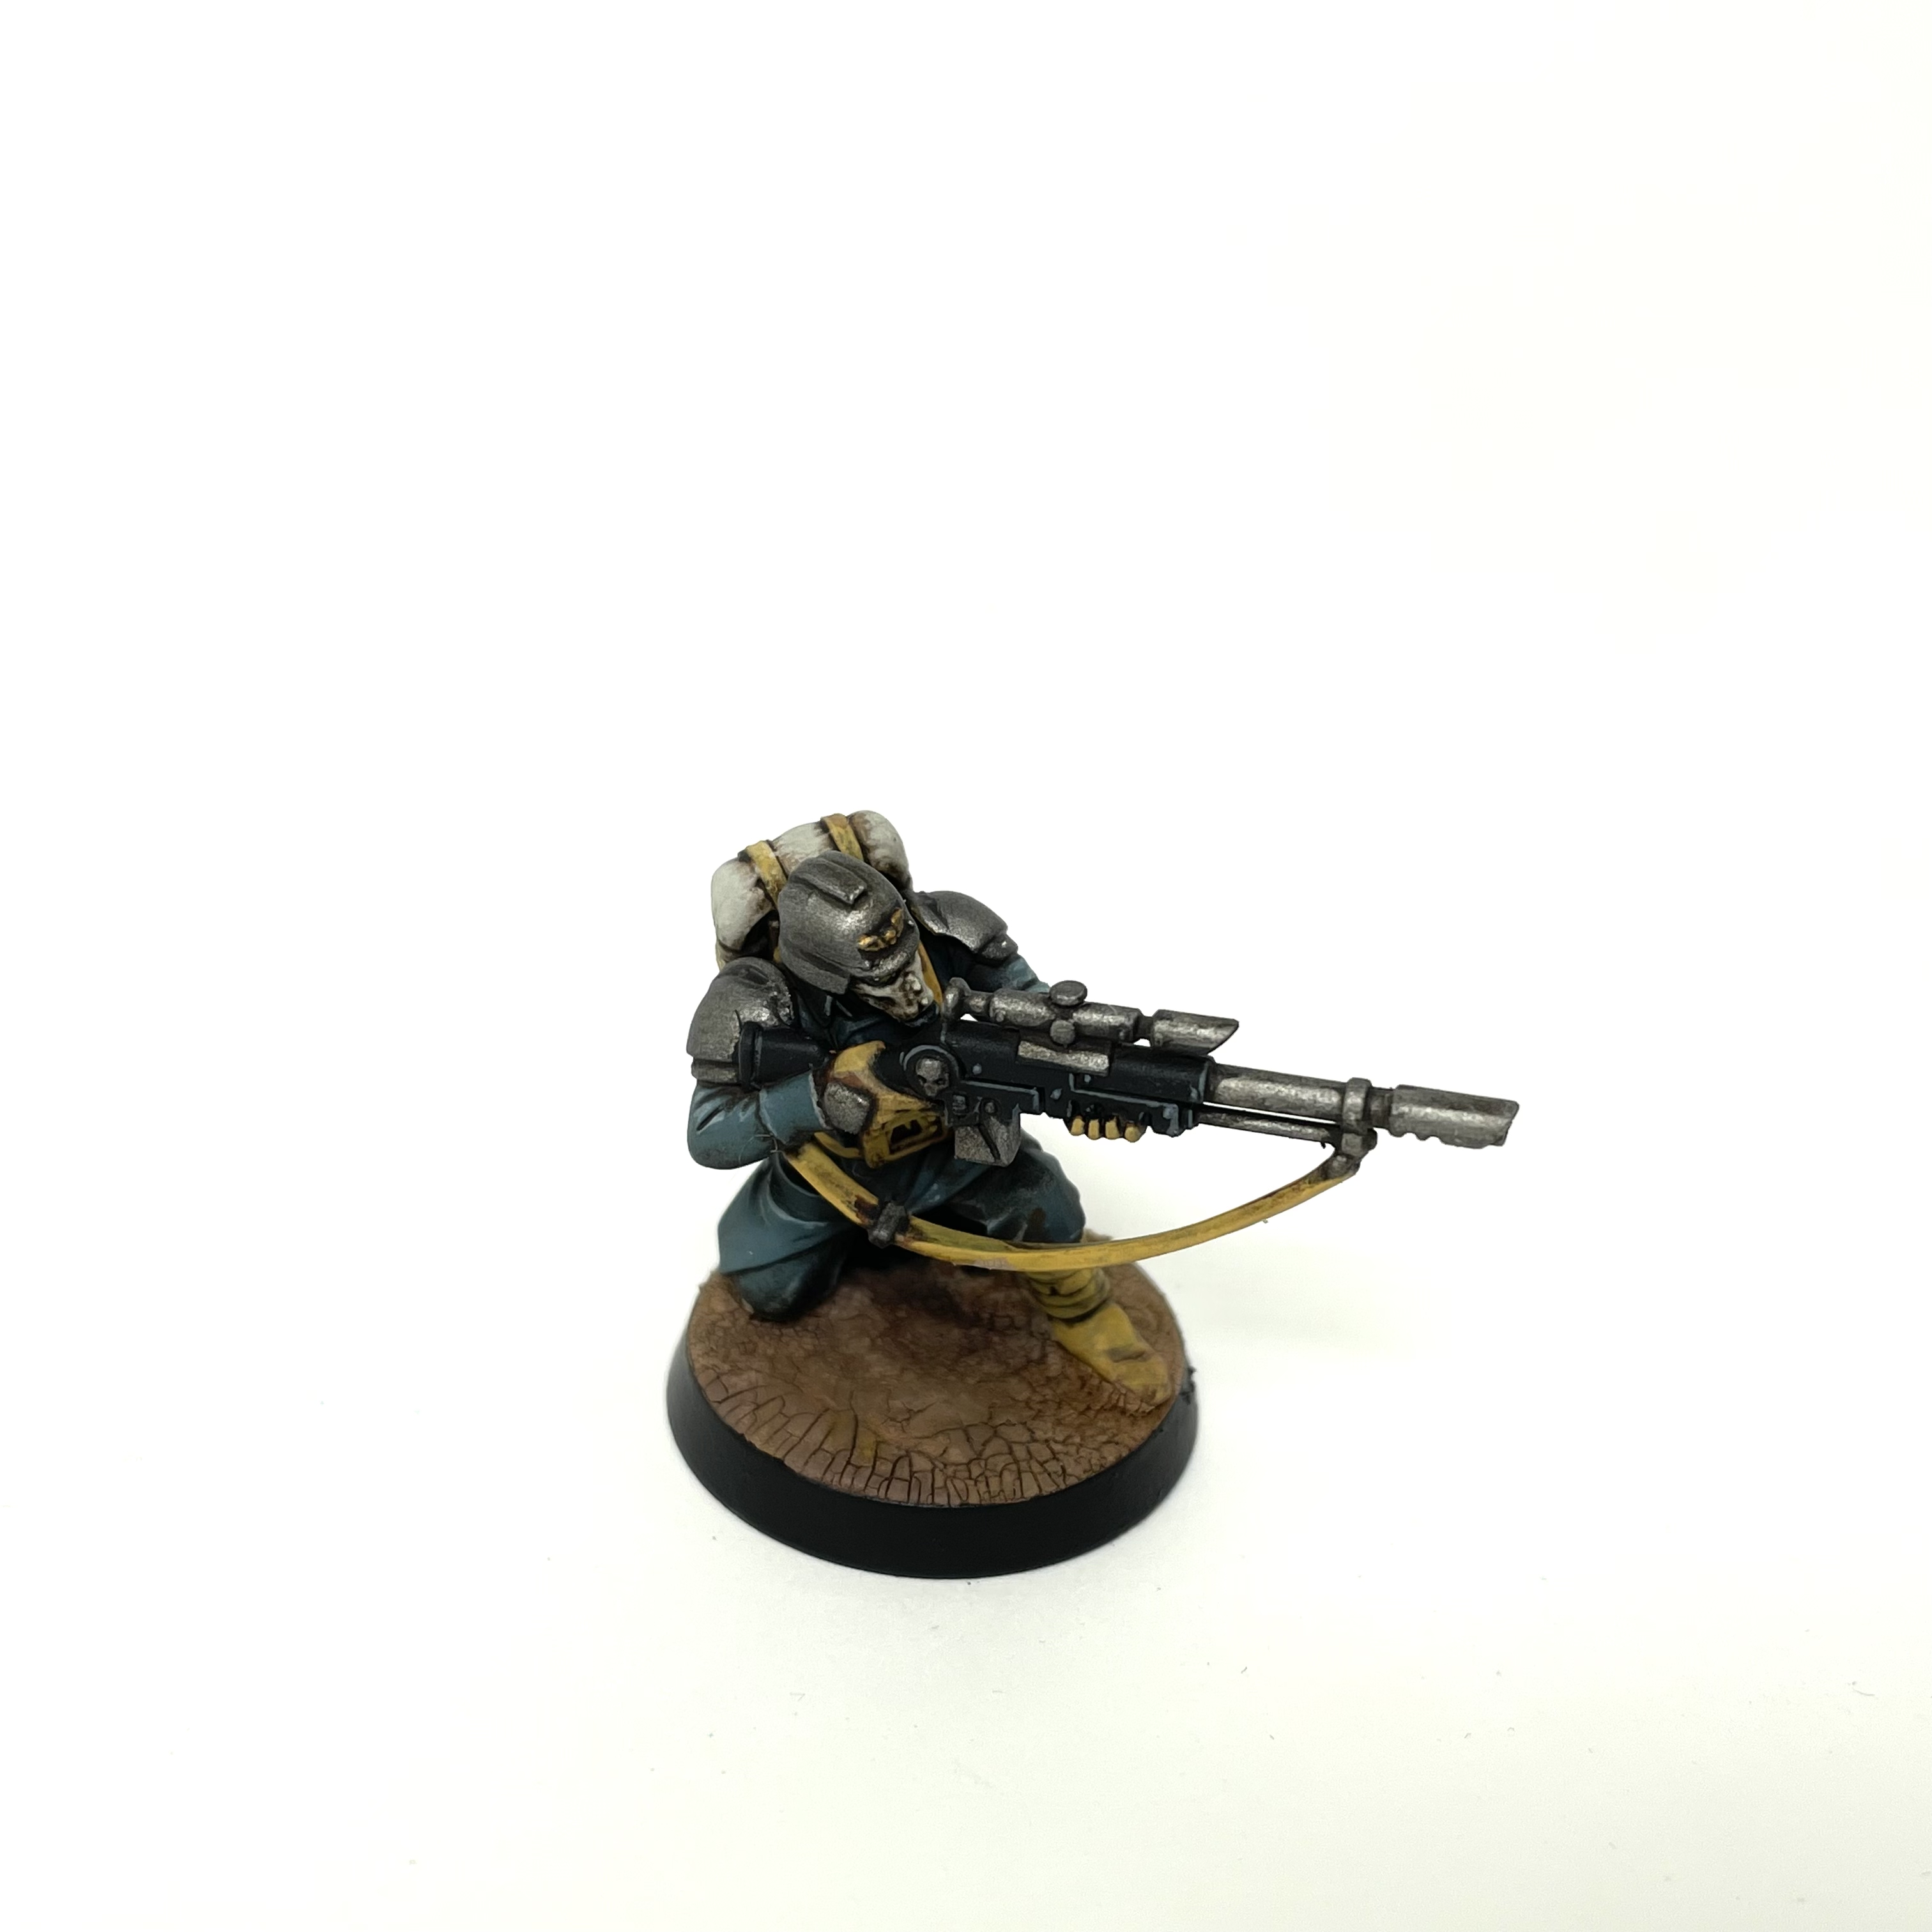
Rockfish opted for a less standard purple-with-bone-armor scheme for their Veteran Guardsmen.
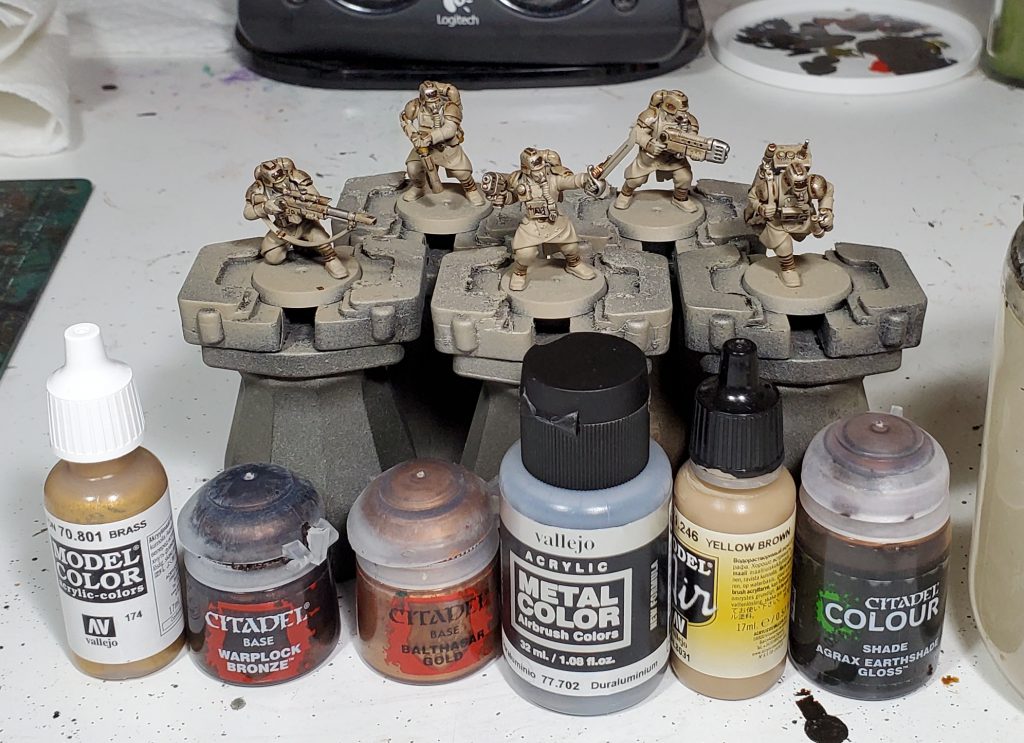
Airbrushing – Chipping away
After priming black I gave the models a coat of Vallejo Metal Colour (VMC) Duraluminum, followed by two thin coats of Vallejo Chipping Medium thinned down with water. You might be able to get away with one thicker layer but this stuff is weird to apply through a airbrush, so your experience may vary. After that was just about dry, I applied a coat of Vallejo Model Air (VMA) Yellow Brown that I then chipped back in a few ways to get variety:
Just using a fairly damp toothbrush, you have to be gentle with this as the chipping medium is not that active so if you go ham you might tear through the metal layer. This is mostly if you want to just chip edges without knocking anything large off.
Applying a bit of water to a area and leaving it for a bit before coming back with a rough paint brush. This tends to chip off large pieces so you have to be careful with this on small models, otherwise you might find yourself running out of the top coat.
Being lazy about waiting for the chipping medium to dry, since the medium behaves weirdly through the airbrush I find it tends to pool occasionally resulting in areas that take longer to dry. You can exploit this by just not quite letting it dry in those spots as it will give a good impression of a larger patch of paint falling off after a bit of gentle rubbing with a damp brush.
You can get spider webbing cracks by rushing the drying paint with a hairdryer, this one might not be up your alley in which case you probably just gotta wait on it drying slowly.
Once the chipping is where you want, its crucial that you seal thoroughly with varnish, otherwise washes and later paint layers can reactivate the chipping medium. In my case I am using either Vallejo Mecha Matte or Premium Air Matte, and I am not quite sure how other finishes will affect how the the scheme turns since there are a lot of washes involved.
Do note, that while I describe doing this with a airbrush you could probably do it by hand or rattle can, its just that it might take a lot longer.
Base Coats – Washing away the toils
We start with getting all the metals done, the main aluminum/steel is VMC Duraluminum like under the chipping. The remaining metals are Warplock on the iconography and Balthasar on copper like the power sword power unit. Then the metal and armor panels are washed with Agrax Gloss, this will get us the final sandy beige of the main armor and recess shading on the metals.
I went over anything that will be covered with contrast and the uniforms with the yellow brown to cover up any undesired chipping.
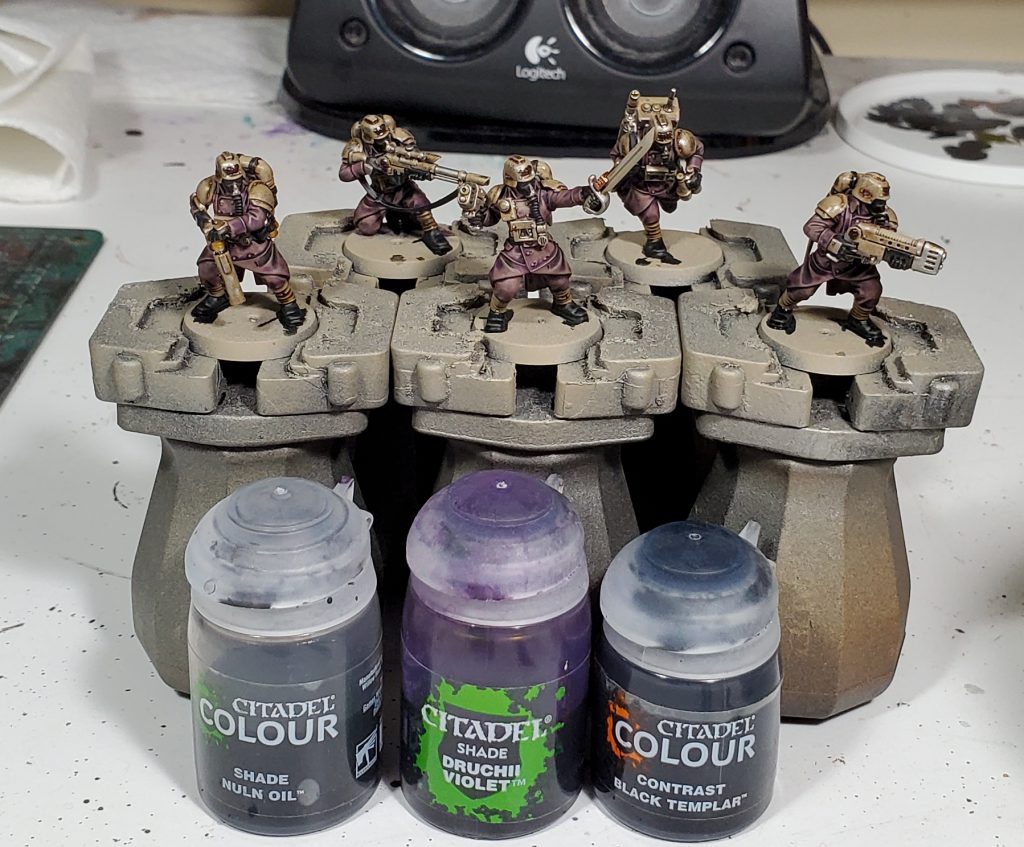
The uniforms are washed with Nuln and Druchii and the leather and rubber is washed with Black Templar.
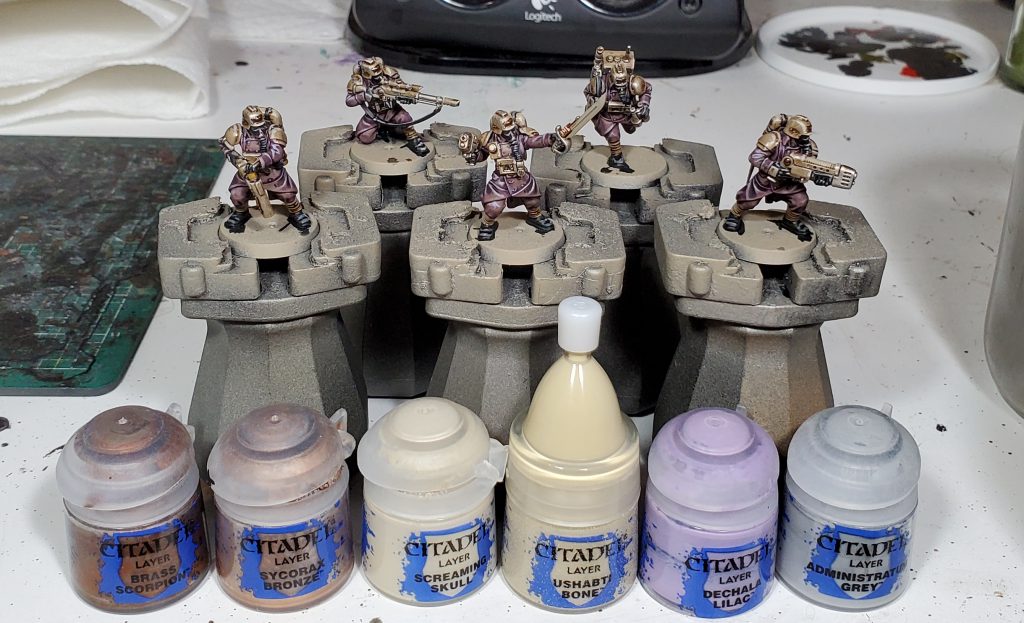
Highlights – Crisping the edges
Since these are just simple edge highlights I will just list out where they go:
Administratum on the black
Dechala on the uniform
Screaming Skull on the armour panels
Ushabti on the cloth wrappings on their legs and the bed roll, I also base the lights with this colour to be covered with contrast
Brass scorpion on the coppery material of the power sword
Sycorax on the iconography
This step could be skipped if you want to save some time on hordes of infantry.
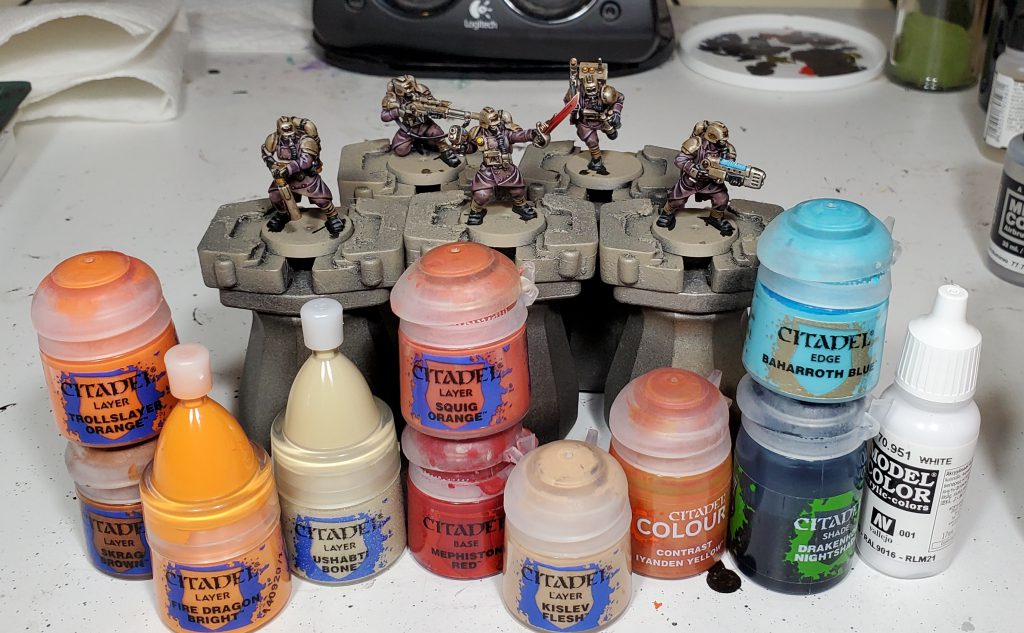
Details – More colours then any other step!
Theres a lot going on in here, most of it simpler then the number of paints would imply, for example the lights are just Ushabti and Iyanden.
The plasma is based with Baharroth then washed Drakenhof and the coils are highlighted up with Baharroth and white, both of the highlights are relatively thin so as not to be too stark.
While only one type is visible on these particular models, the army also has blue lenses, like on this sentinel:
We have a dedicated article explaining Lenses and Gemstones but the general idea is painting successive crescents getting lighter towards one side with a extreme contrast in the other.
For the orange lenses and glow I used Skrag, Trollslayer, Fire Dragon and Ushabti for the main colours and a extreme reflection of Vallejo Model Colour White. The blue lenses are Kantor, Caledor, Calgar, Fenrisian Grey, and the Ushabti plus White from the oranges.
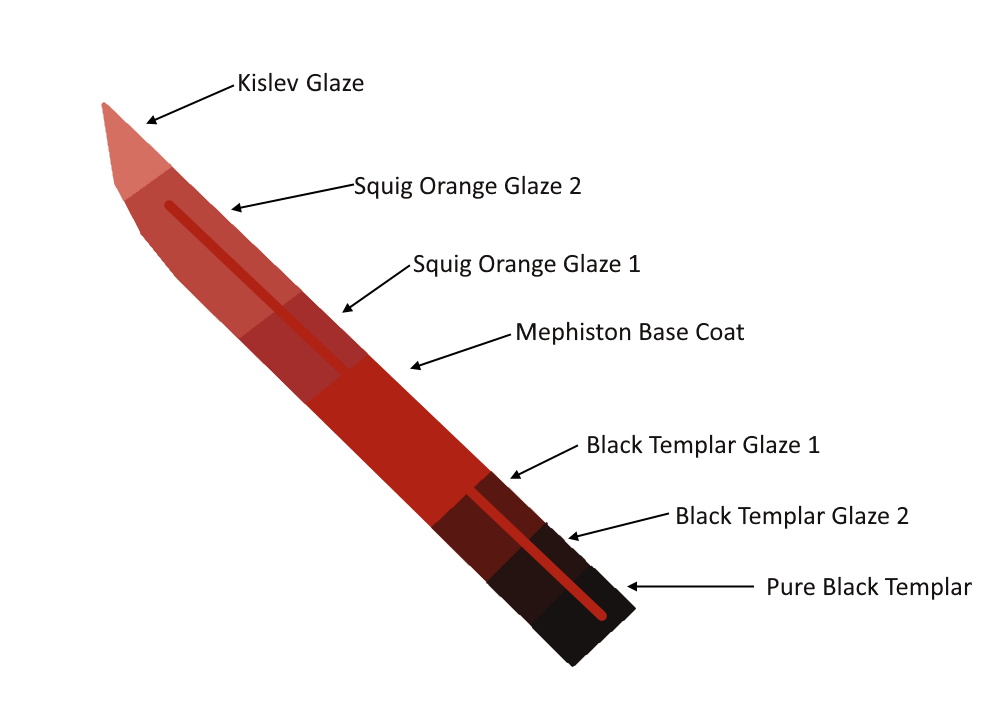
The blade is almost exclusively glazes over Mephiston, you could replicate this by just mixing on your palette to approximate the glazes.
The base colour is Mephiston as mentioned, then there are a few glazes of Squig Orange and Kislev towards the tip of the blade, and black templar glazes to the base of the blade. After the glazing is done, outline the blade with kislev, then towards the tip push the outline brighter with your choice of pure white.
River Bank – Cow pies optional
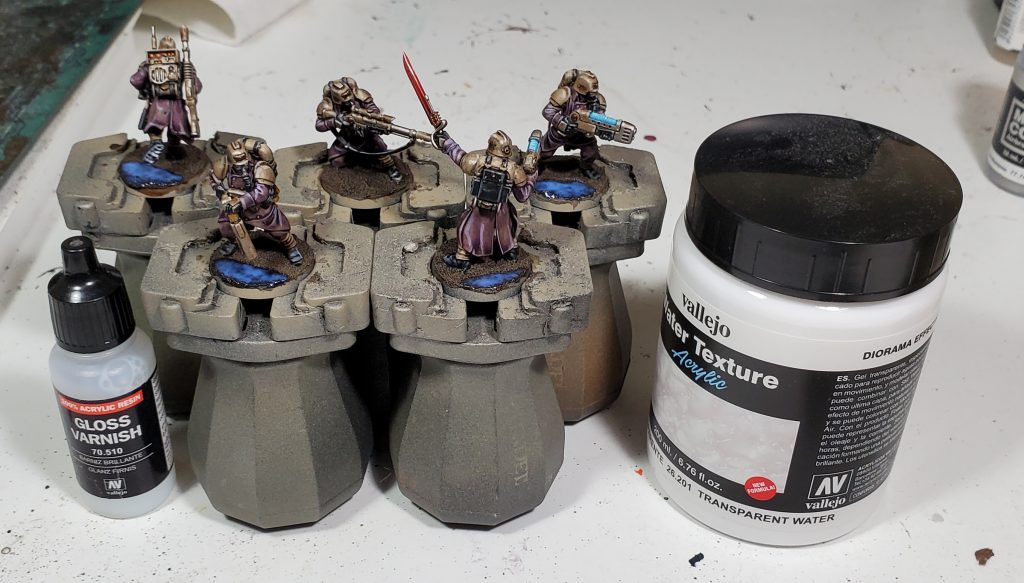
The bases start with Vallejo Dark Earth in a fairly thick layer, this is so I can press it back in a few spots to form the river/lake. Once that dried I put Wyldwood on the river/lake and Agrax on the rest of the base, once dry I then drybrush only the river bank with Steel Legion Drab.
Water – Soggy socks alert
The river is just covered with gloss varnish to get it shiny looking, if you want to get a bit more texture you can use Vallejo Transparent Water Effects to add in white water that you can push a bit further with a overloaded drybrush of pallid wych. A word of warning on the thicc water, it seems to have difficulty drying completely clear which is fine for rough water but I am not particularly impressed with it.
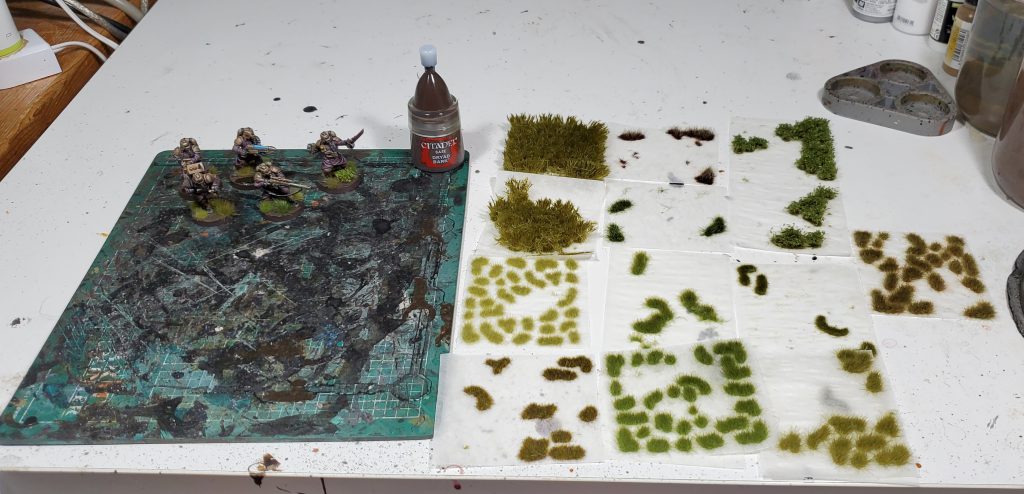
Tufts and Rims – I swear I didn’t buy all of these in one go
With the rest of the models done its just painting the rims in Dryad Bark and adding tufts, for this army I am using these ones from Gamers Grass:
6mm Burned Grass
6mm Dry Green
2mm Dry Green
2mm Moss
4mm Green
6mm Mixed Green
6mm Strong Green
Spiky Green
Dark Green Shrubs
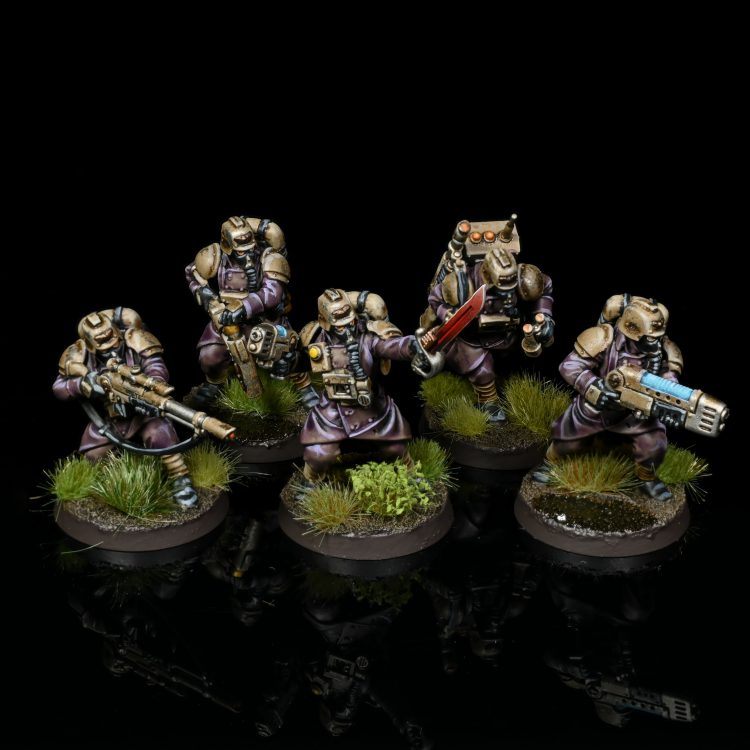
The Final Result
Now that we are done with the squad its time to huck them in the photo booth and get some final pictures!
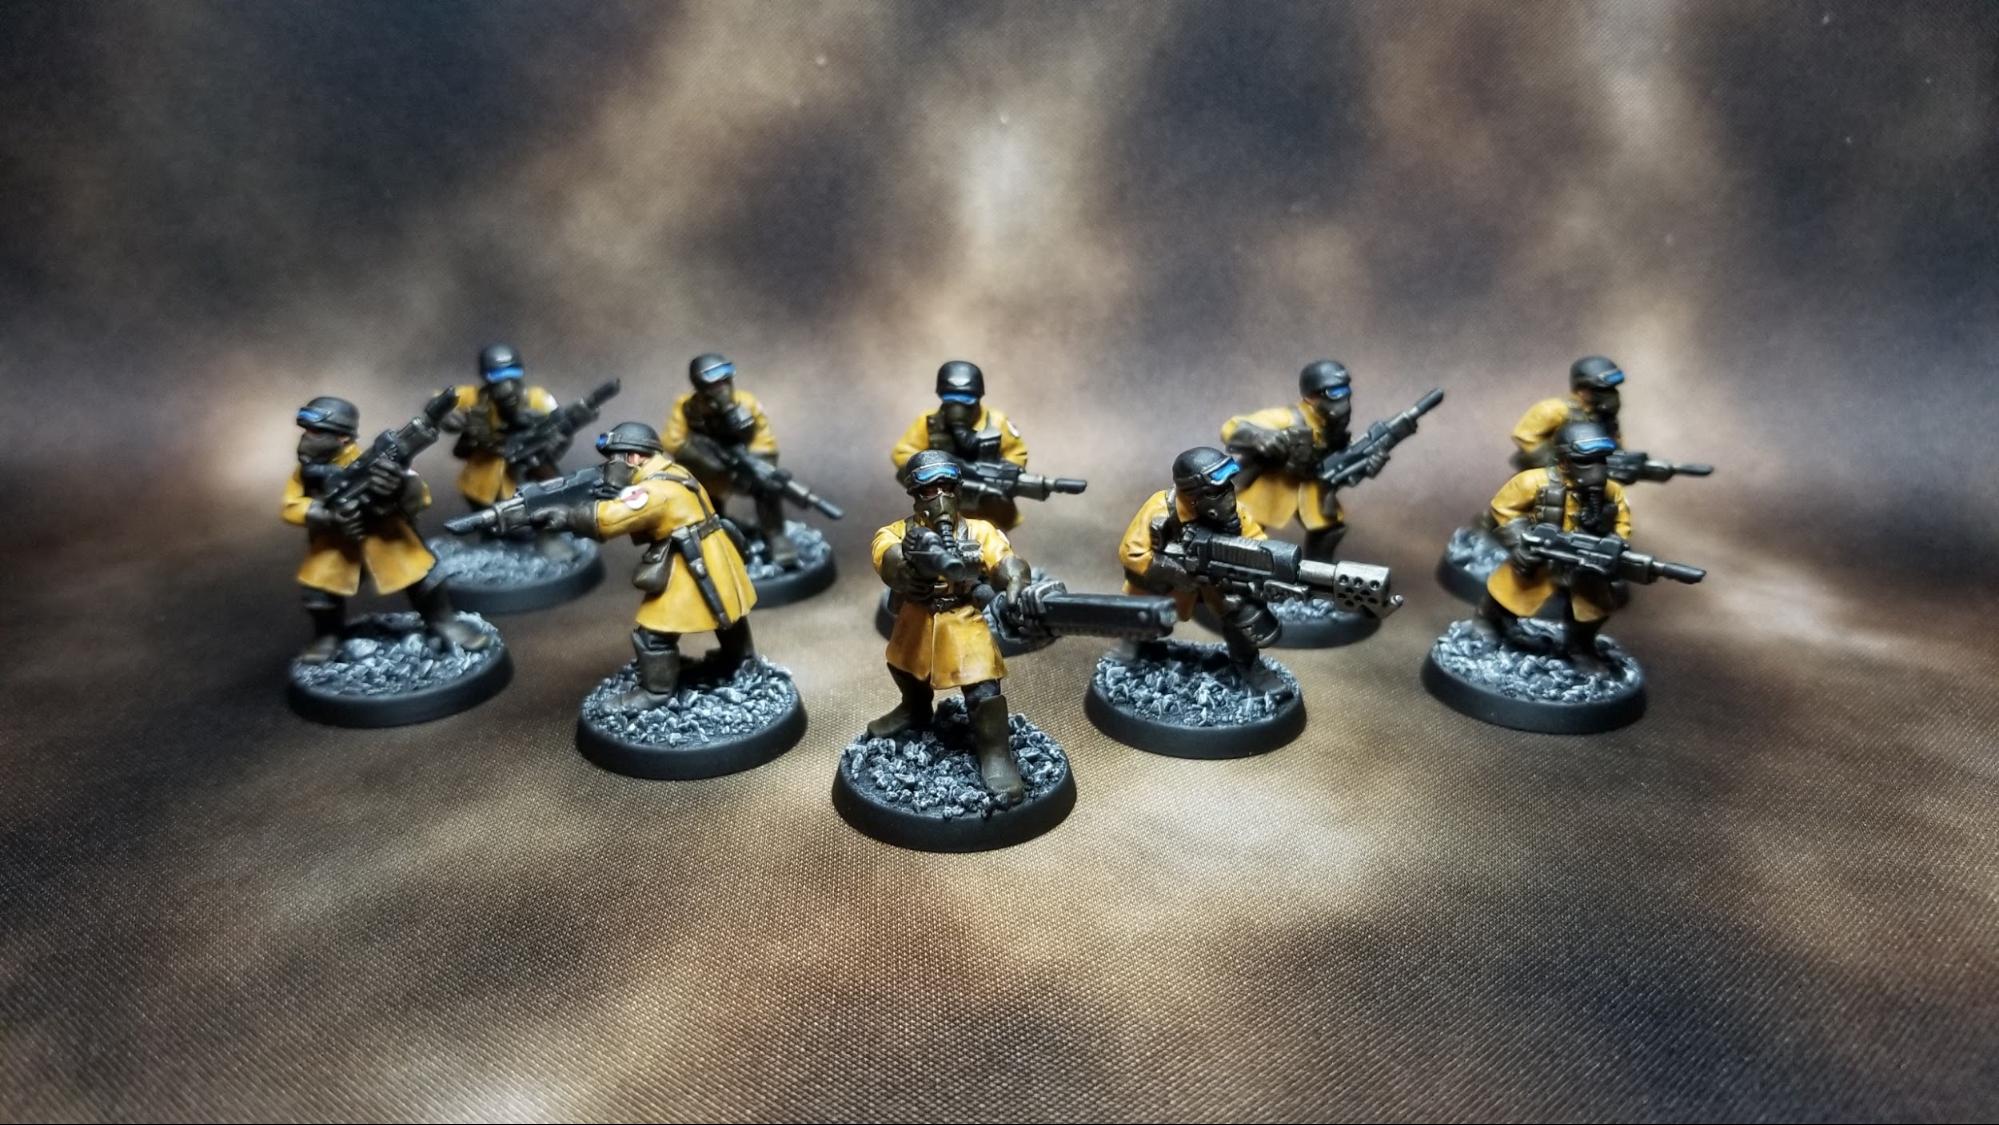
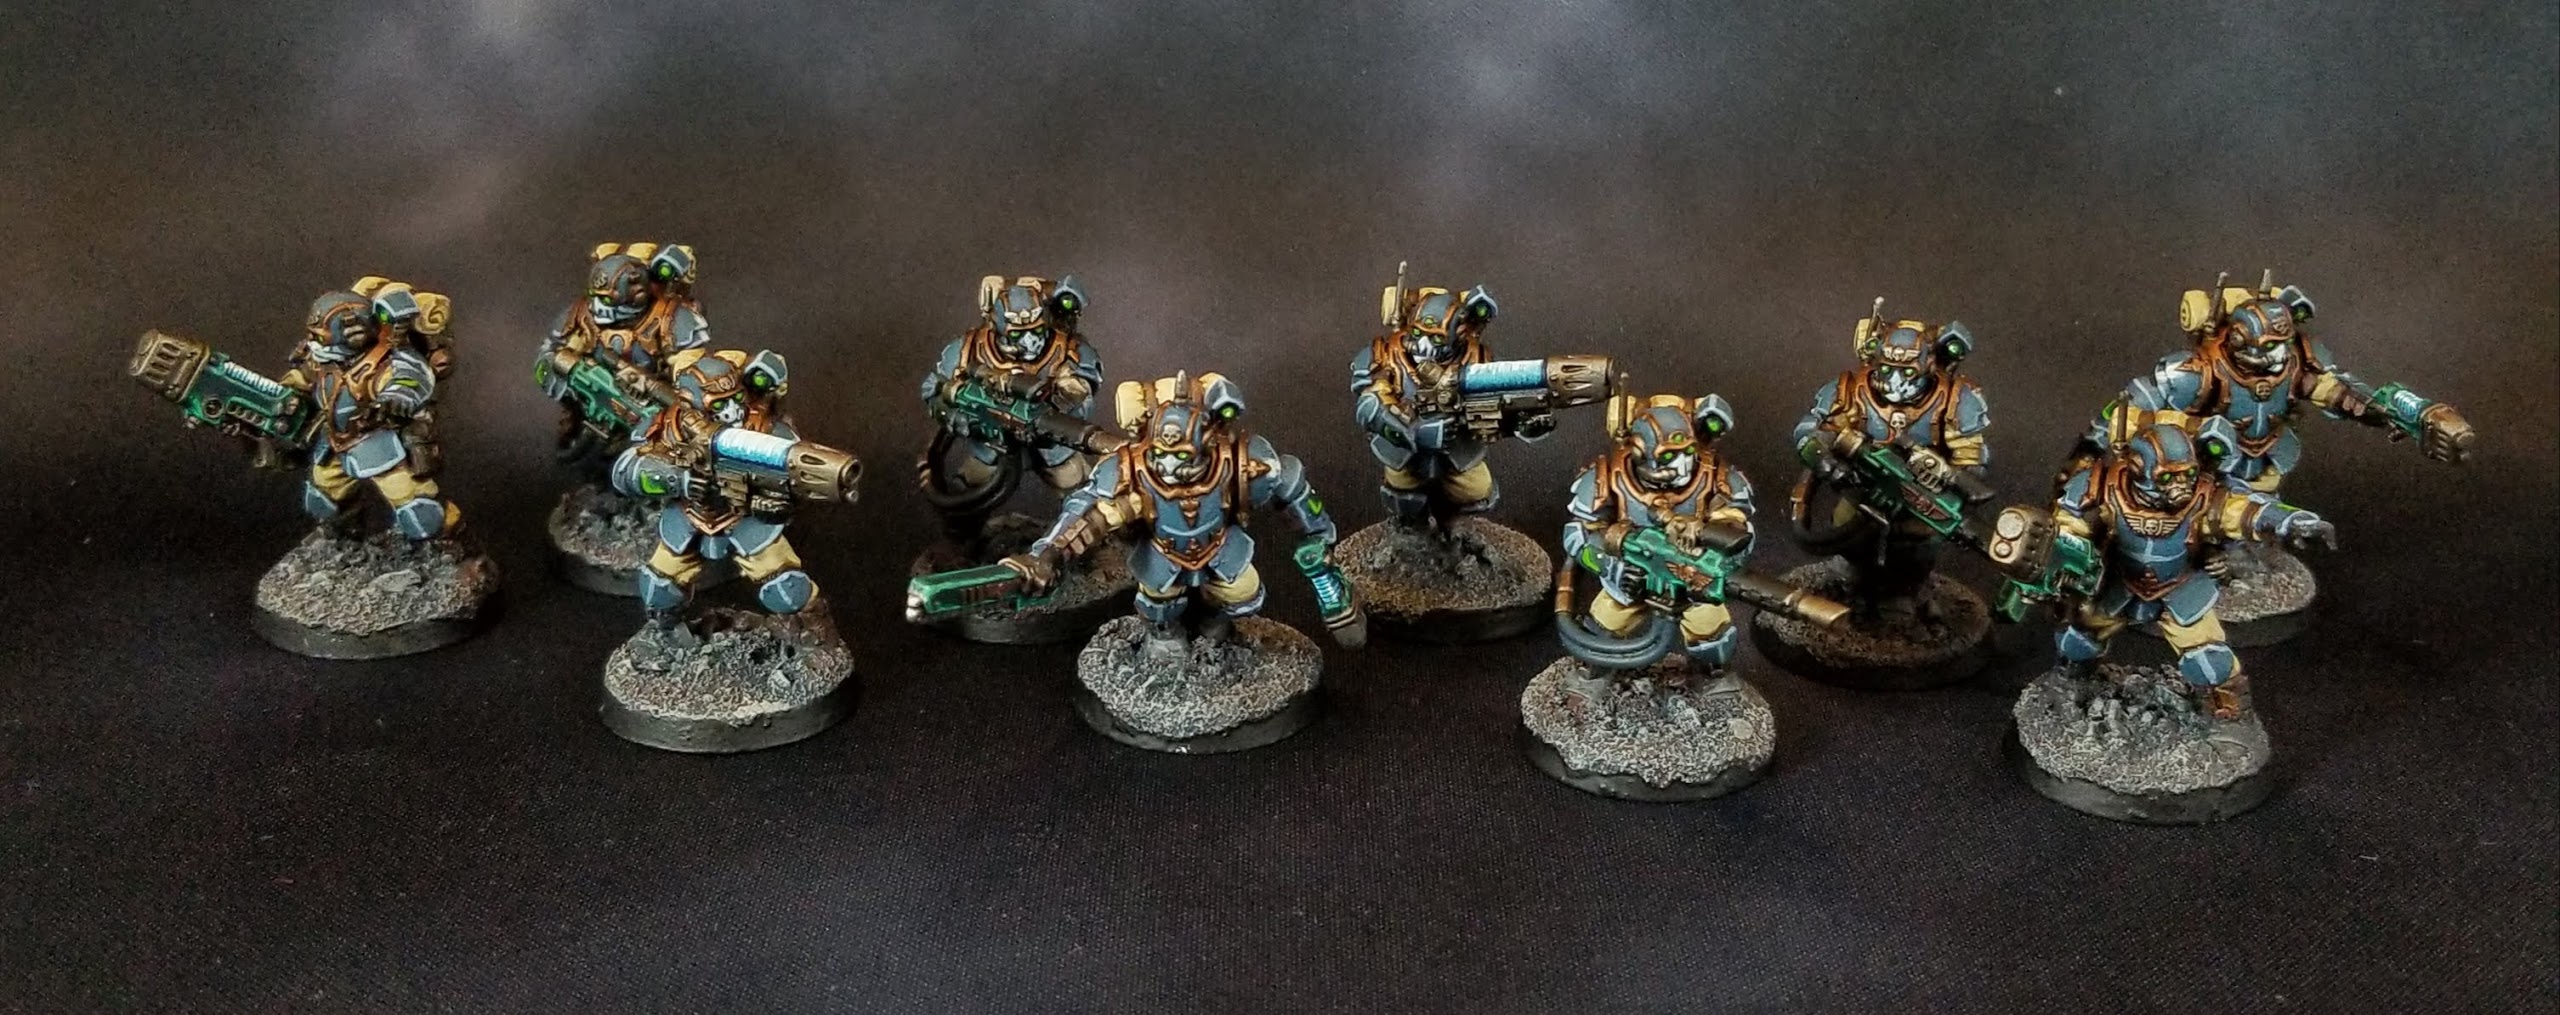
CSM went with with a classic blue-grey and gold trim approach to the Tempestus Scions. It’s a simple but striking scheme that’s easy to replicate.
Infantry
Credit: Crab-Stuffed Mushrooms
Battle-Ready
Paint the sloppy parts, first!
Prime the model with Zandri Dust spray paint.
Basecoat the gold trim with Balthazar Gold
Basecoat the metal parts with Leadbelcher
Basecoat the armor with The Fang
Basecoat the backpack and boots with Steel Legion Drab (leave the bedrolls alone)
Wash the entire model with Reikland Fleshshade
Re-apply the base colors above, ignore the recesses.
Basecoat the gloves with Abaddon Black
Basecoat the weapons with Incubi Darkness
Basecoat the eyes and wrist screens with Caliban Green
Basecoat the face masks and squad markings with Fenrisian Grey
Paint the Plasma on the plasma guns with White Scar and Wash with Aethermatic Blue contrast paint.
Parade-Ready
Tempestus Scion models are very detailed and subsequently tedious to paint. I don’t advise going beyond “Battle Ready” if you’ll be doing a lot of them, but if you insist…
Highlight the pants, sleeves and bedrolls with Zandri Dust, followed by a smaller highlight of Ushabti Bone (Optional: Add a final highlight of Screaming Skull).
Highlight the metal and gold trim with Stormhost Silver
Highlight the armor with Thunderhawk Blue (Optional: Add a final highlight of Fenrisian Grey).
Highlight the backpack and boots with Gorthor Brown
Highlight the gloves with Dawnstone Grey
Highlight the weapons with Kabalite Green
Highlight the eyes and wrist screens with Warpstone Glow (Optional: Add a final highlight of Moot Green).
Highlight the face masks and squad markings with Ulthuan Grey (Optional: Add a final highlight of White Scar.
Highlight the Plasma on the plasma guns with White Scar.
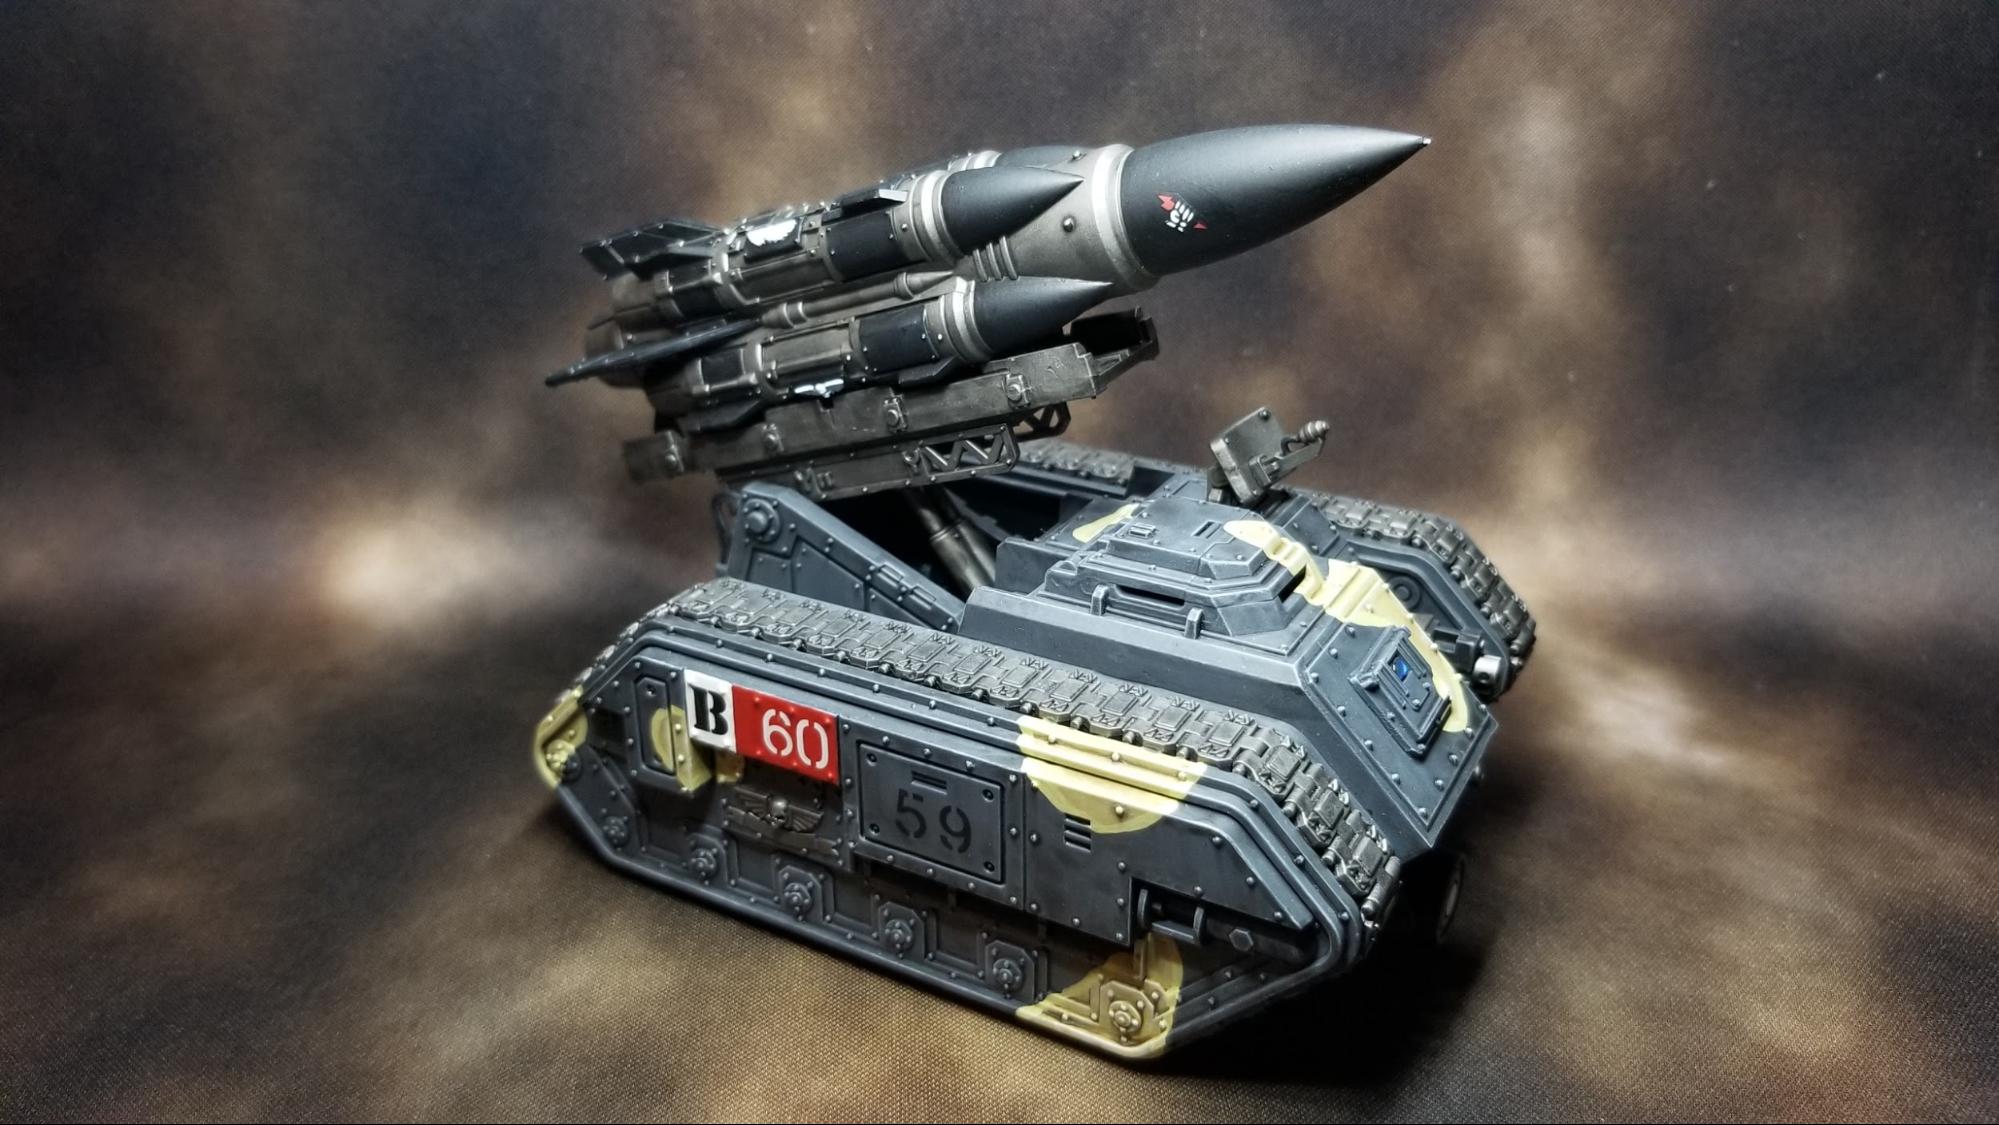
Vehicles (The Taurox)
Credit: Crab-Stuffed Mushrooms
Battle Ready
Prime the model with The Fang spray paint.
Drybrush the hull with Thunderhawk Blue.
Wash the crevices with Reikland Fleshshade
Clean up with a drybrush of Thunderhawk Blue.
Do a final lighter drybrush with Fenrisian Grey
Basecoat the metal parts with
Basecoat the gold trim with Balthazar Gold
Basecoat the red areas with Khorne Red
Basecoat the weapons with Incubi Darkness
Wash the metal, gold and red areas with Army Painter Strong Tone
Parade Ready
Highlight the metal parts and gold trim with a drybrush of Necron Compound
Highlight the weapons with Kabalite Green
Dirty the tracks and bottom of the vehicle with Stirland Battlemire
Drybrush the dirt with Steel Legion Drab followed by a lighter drybrush of Gorthor Brown (optional: do a final light drybrush of Ushabti Bone)
Campbell's Method - click to expand
In 6th edition these guys had their own codex and a half decent formation in it, so I have a buttload of Tempestus Scions, or as I still call them, Stormtroopers. Their boots, pouches, straps, weapon casings, metallics, and lenses are all the same as I detailed in the above Valhallan infantry and tank guides. The pants were painted the same as the coats of the Valhallan infantry, as that gives them a cleaner look and I figure these guys would get to go to the Imperial laundromat. All that’s left is their armor!
Infantry
Tempestus Scions. Credit: SRM
White Armor: Like the rank and file Valhallans, I painted these whole models in Steel Legion Drab first. The armor was based with Ulthuan Grey (my secret weapon, holy shit this color is so useful) and down in two coats. I washed the recesses with Agrax Earthshade, then highlighted up with Corax White. Trim: Retributor Armour (another knockout good paint) washed with Seraphim Sepia is where I started. I then highlighted with Liberator Gold. I didn’t want it to be too gleaming – these are the best of the Guard, but they’re still pretty small cogs in the Imperial war machine. If I was going to give these dudes berets they would be painted in the same reds I used for the red badges and so on further up the guide. Vehicles were painted the same as the rest.
Campbell's Method - click to expand
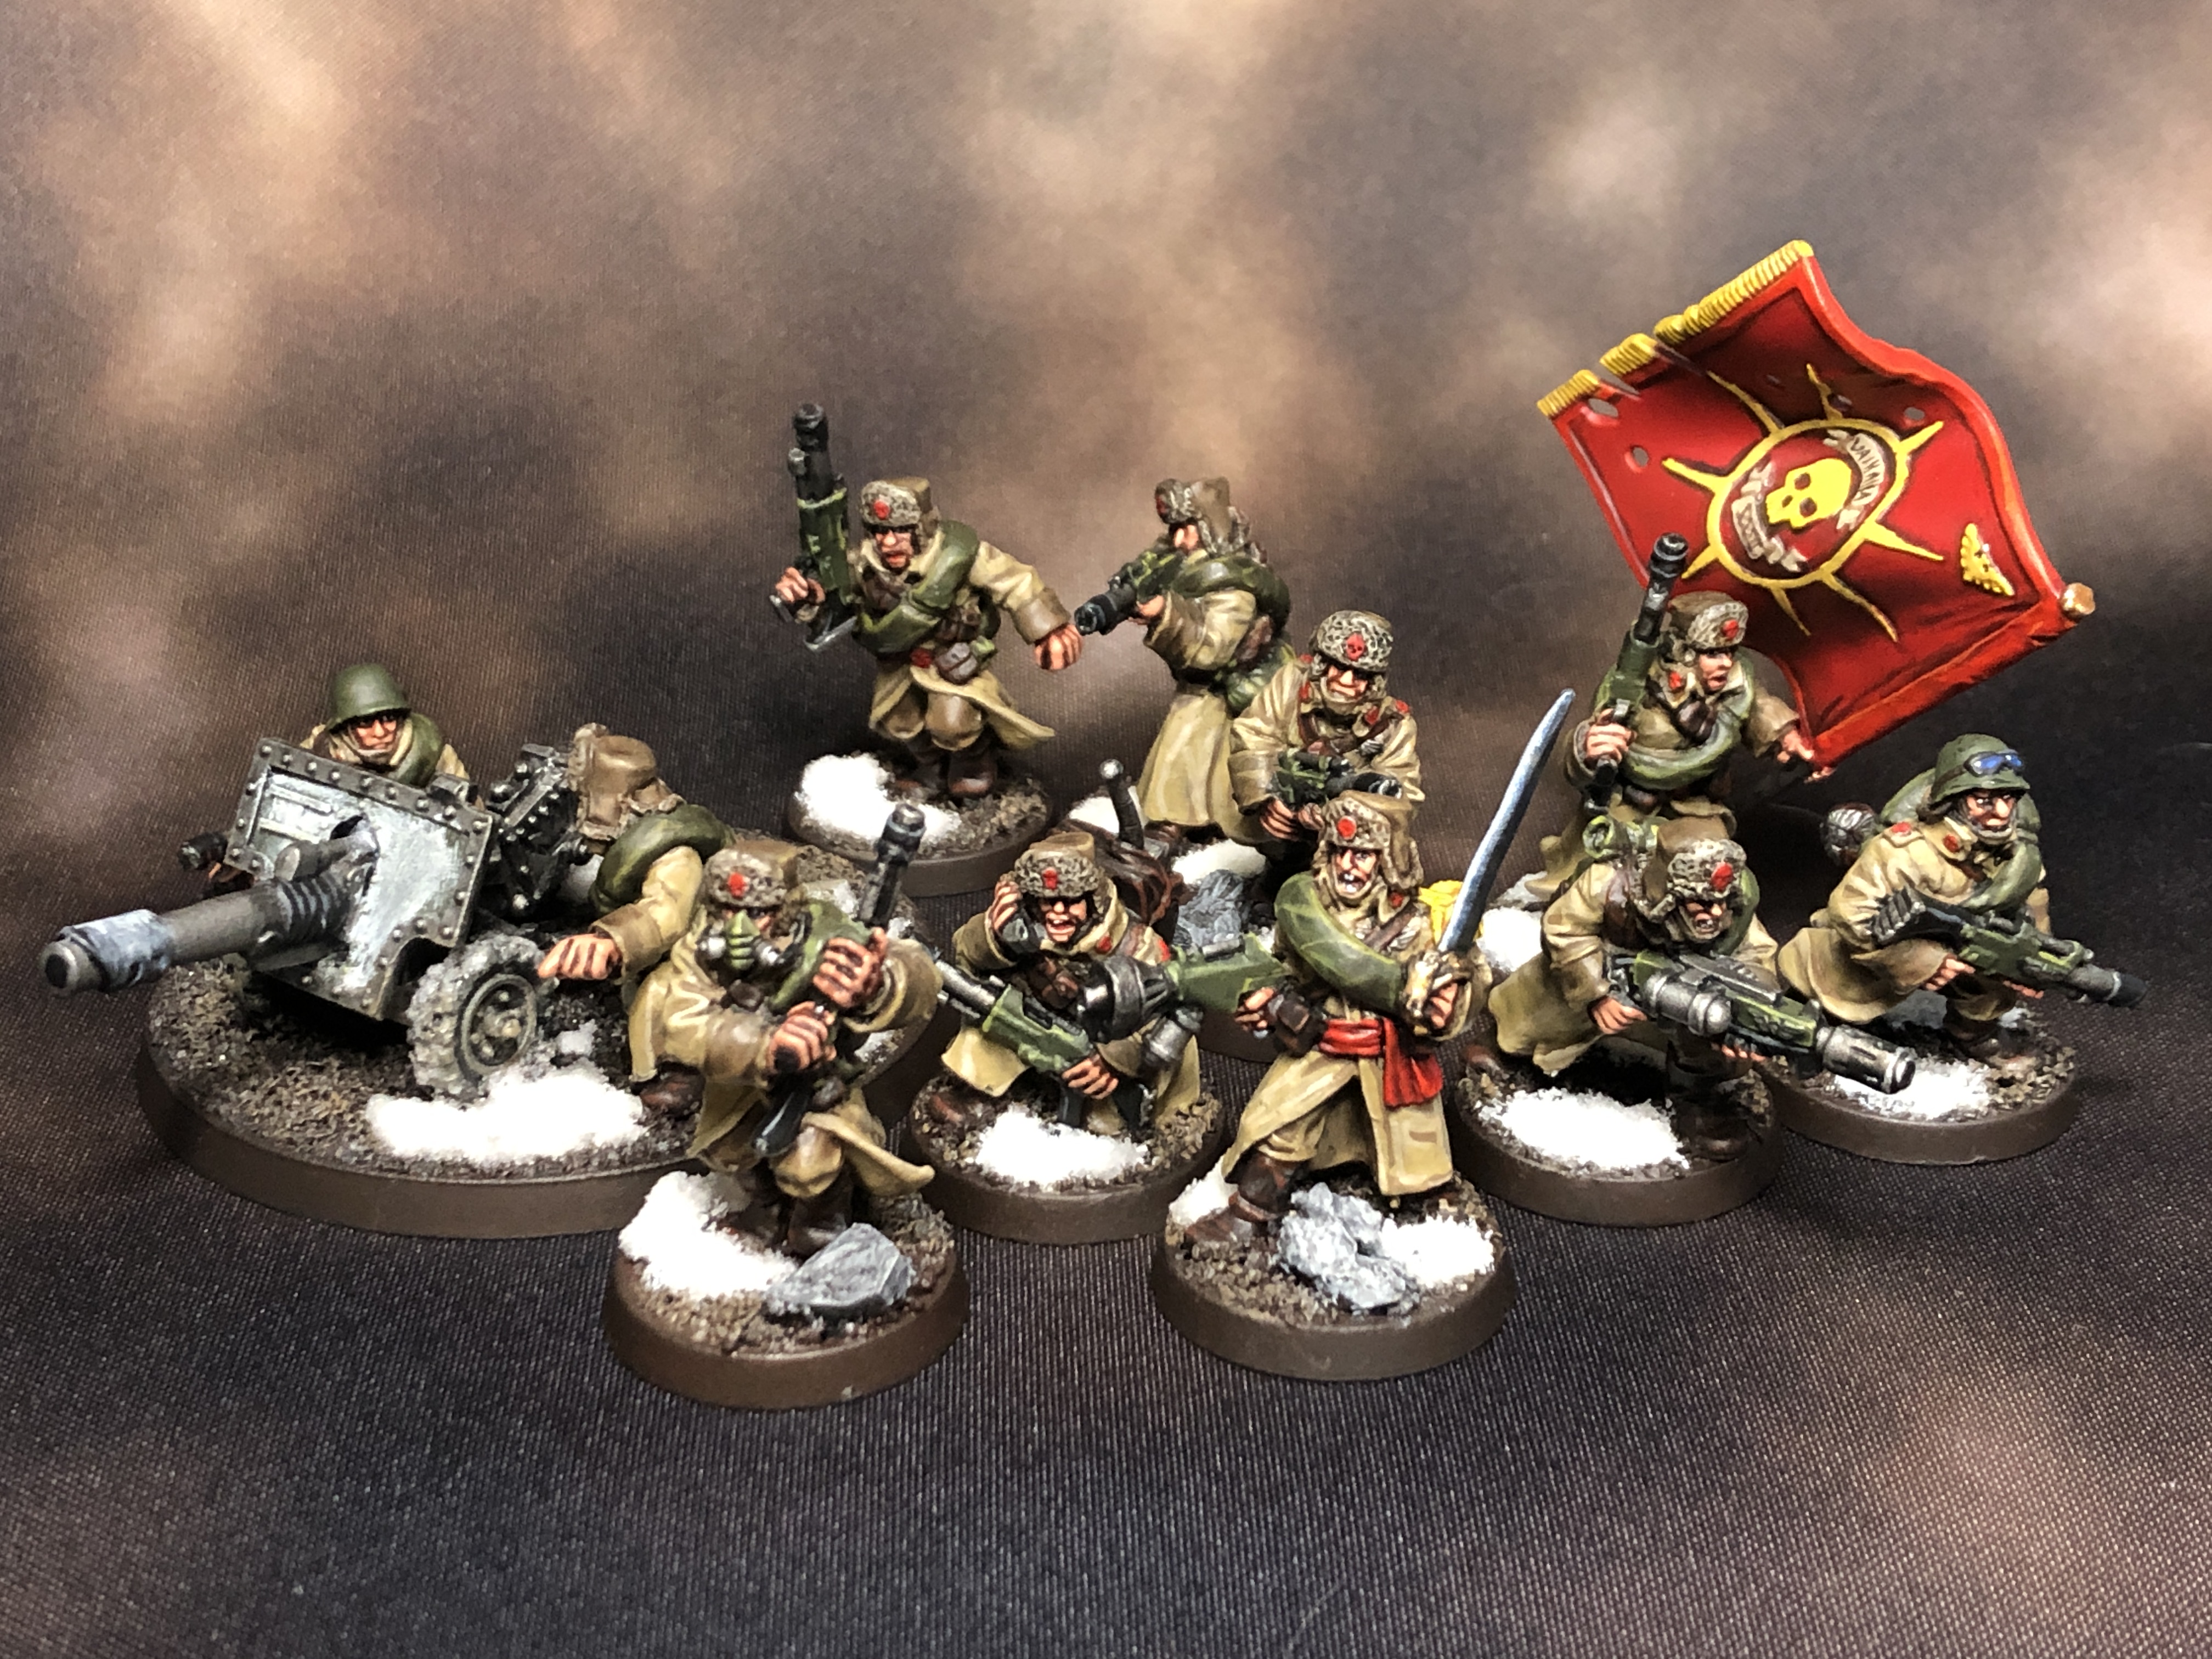
I had always wanted these guys as a kid after seeing the big spread of them fighting Tyranids in the 3rd edition rulebook, so one of the first things I did on getting a real job was buying up an army of them. They hit a wonderful balance of 90’s simplicity, hand sculpted character, and realism that give them a certain timeless charm. For my Valhallan 32nd Rifles, I took inspiration from the same place as the Perry Twins did when they sculpted them – the Soviet Red Army from World War II. A quick disclaimer – if you’re going to reproduce a historical scheme for a non-historical game, be mindful to avoid any explicit markings of the era. These guys have some red stars that are sort of generic enough, but I avoided the hammer and sickle or any real world unit markings. This is doubly true if you want to do a German-inspired army, in which case you should stop, breathe, and pick a new scheme.
Infantry
Valhallan Imperial Guard. Credit: SRM
Anywhomst, here’s how to paint these not-quite Soviets who are more Red Alert 3 than Red Scare in a very efficient paintscheme that focused largely around 3 shades of brown: Coats: I started by painting the entire model (save the weapons) in Steel Legion Drab. I layered up the coat with Tallarn Sand, leaving Steel Legion Drab in the recesses. Finally, I highlighted the edges with Karak Stone. Pants/Hats/Cuffs: From the Steel Legion Drab basecoat, I highlighted the raised edges with Tallarn Sand and washed these with Agrax Earthshade. Fur: Steel Legion Drab then Agrax Earthshade, same as the rest. Drybrush with Karak Stone. Done. Boots/Pouches: I started with Rhinox Hide, then caught these in the same wash of Agrax Earthshade as the pants. I then highlighted with Doombull Brown. Weapon casings/Knapsacks: Hey, something that isn’t brown! Castellan Green, that same wash of Agrax Earthshade, then highlights of Elysian Green (RIP Elysians). On the weapons focus this on the recesses, but hit the knapsacks all over. There’s occasional helmets and gasmasks which you can paint the same as the weapons. Muzzles: The muzzles of the lasguns were done in P3 Thamar Black with highlights of Eshin Grey then Dawnstone. Metallics: Leadbelcher, Nuln Oil, then Stormhost Silver. Red badges: Mephiston Red, Nuln Oil in the eyes and such, and Evil Sunz Scarlet highlights. With officers I tried to incorporate more red in sashes and such, painted the same way.
Vehicles
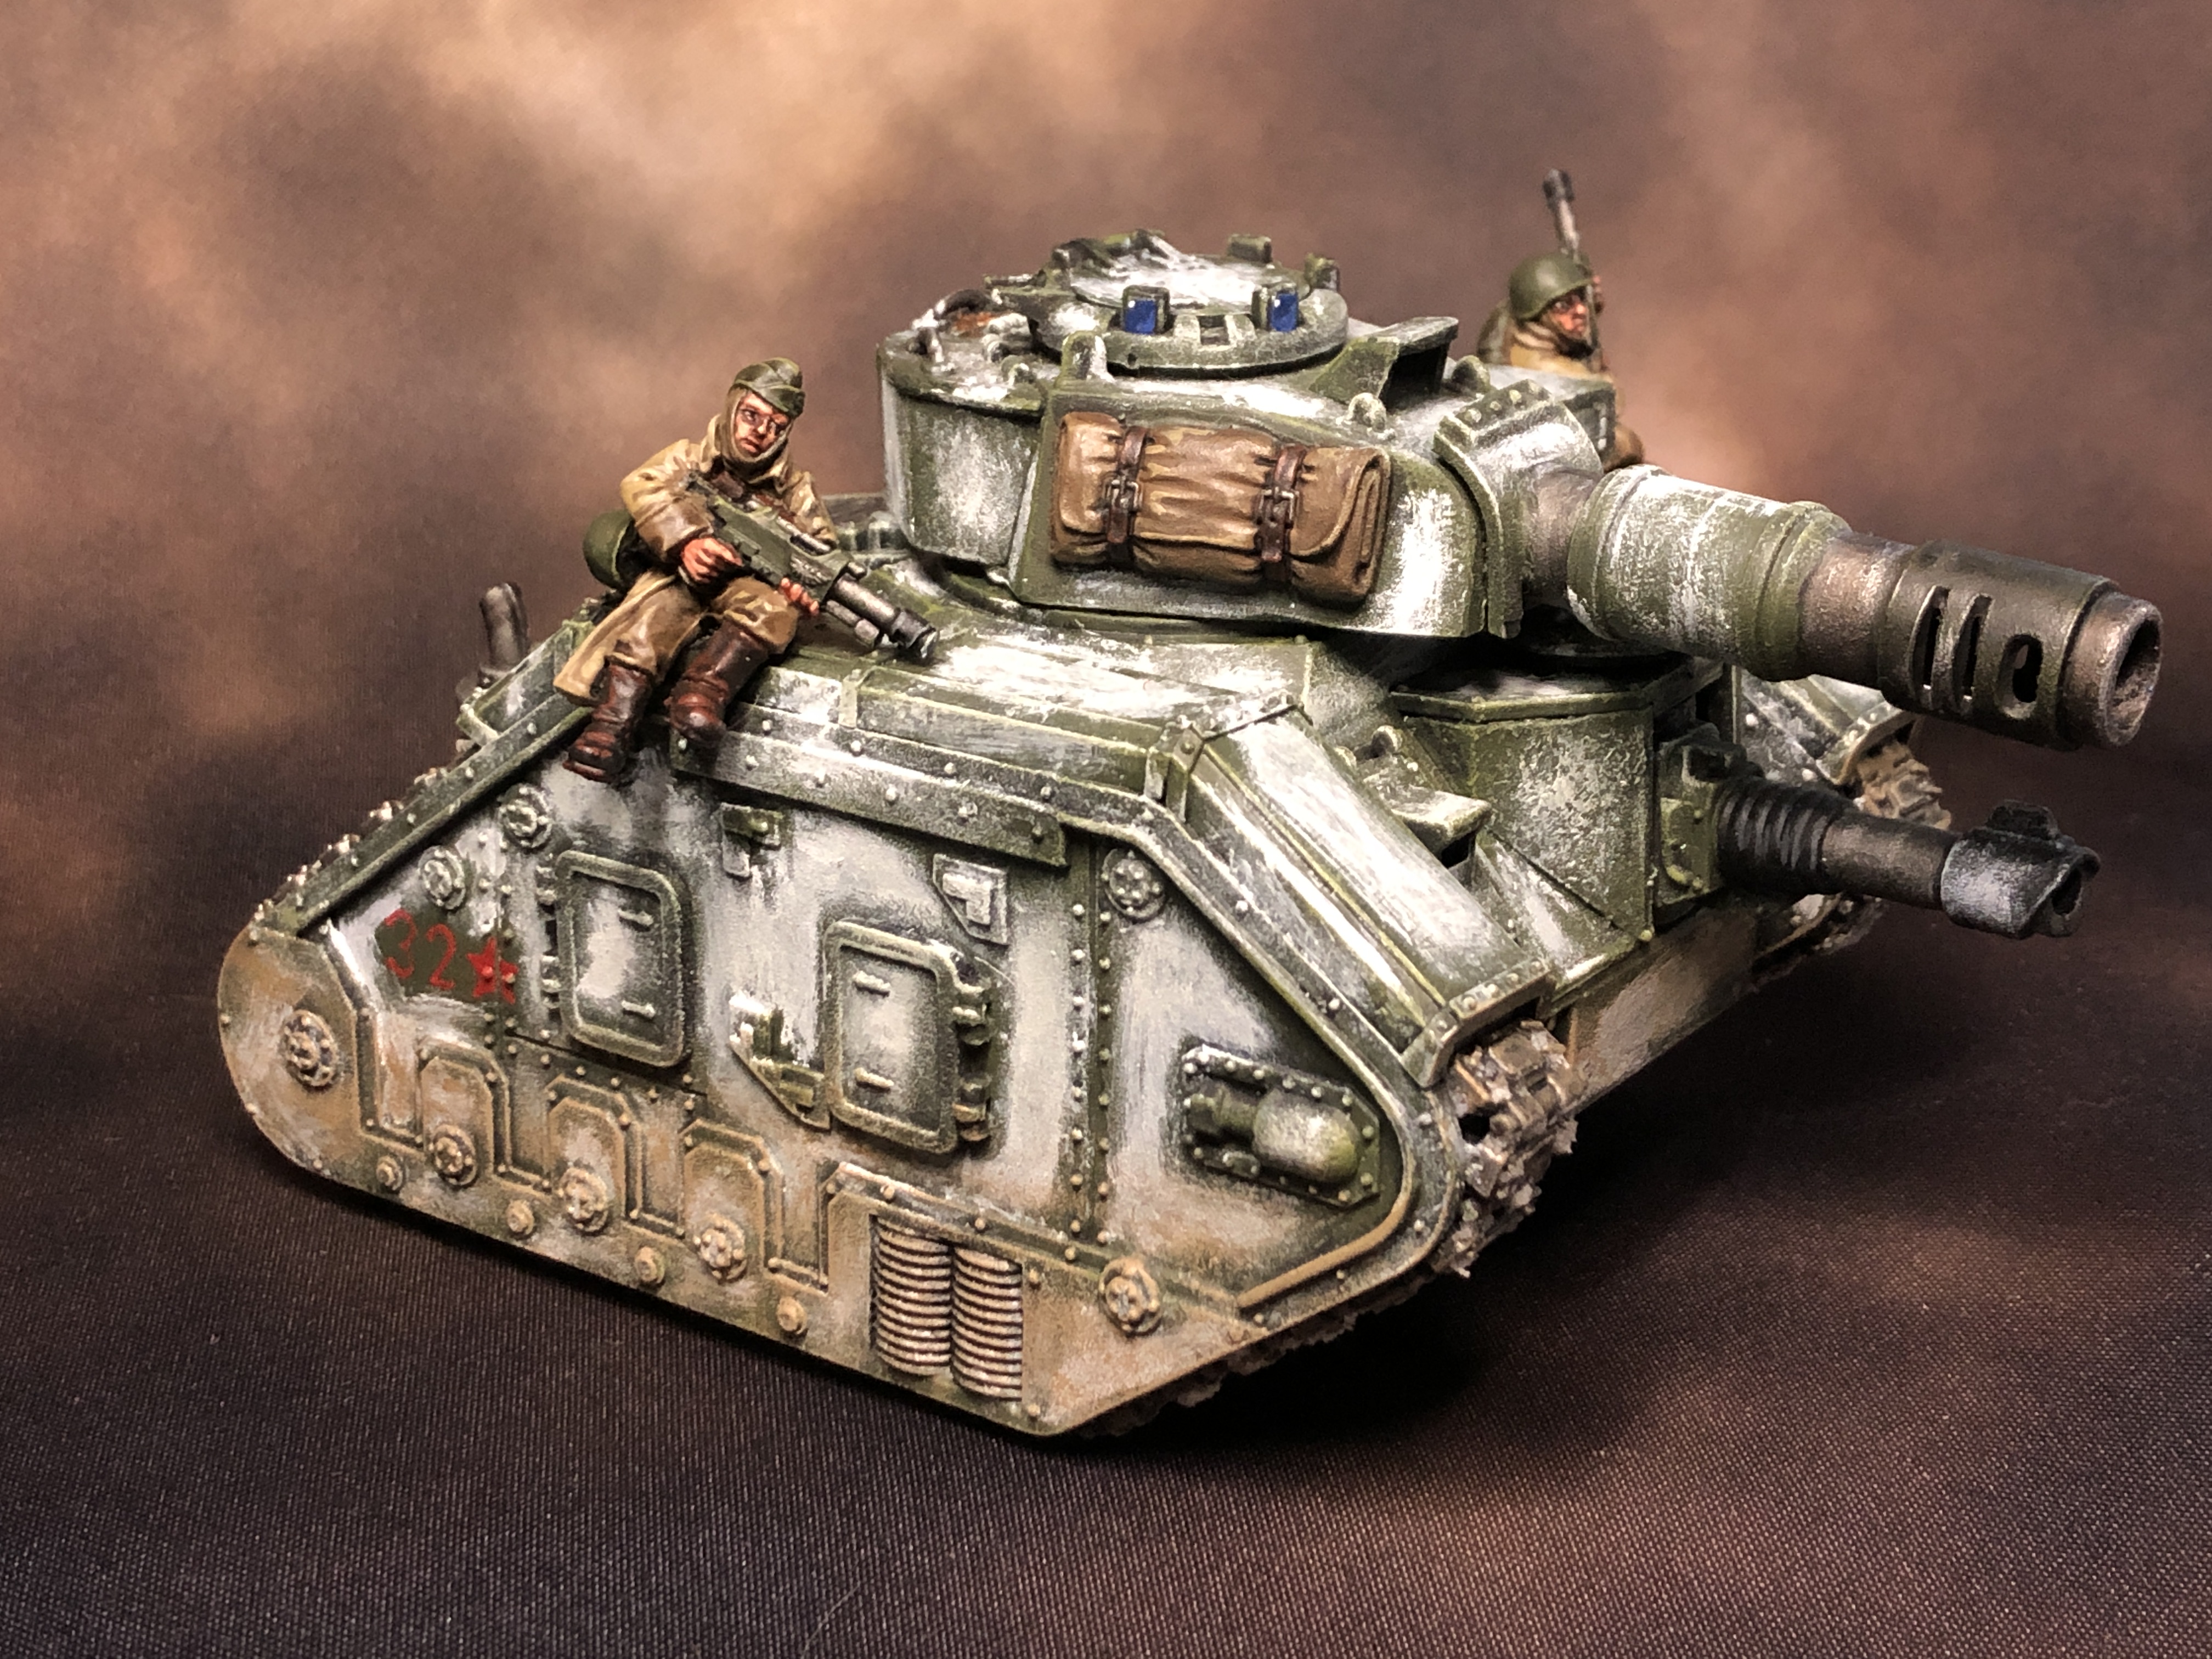
Valhallan Leman Russ. Credit: SRM
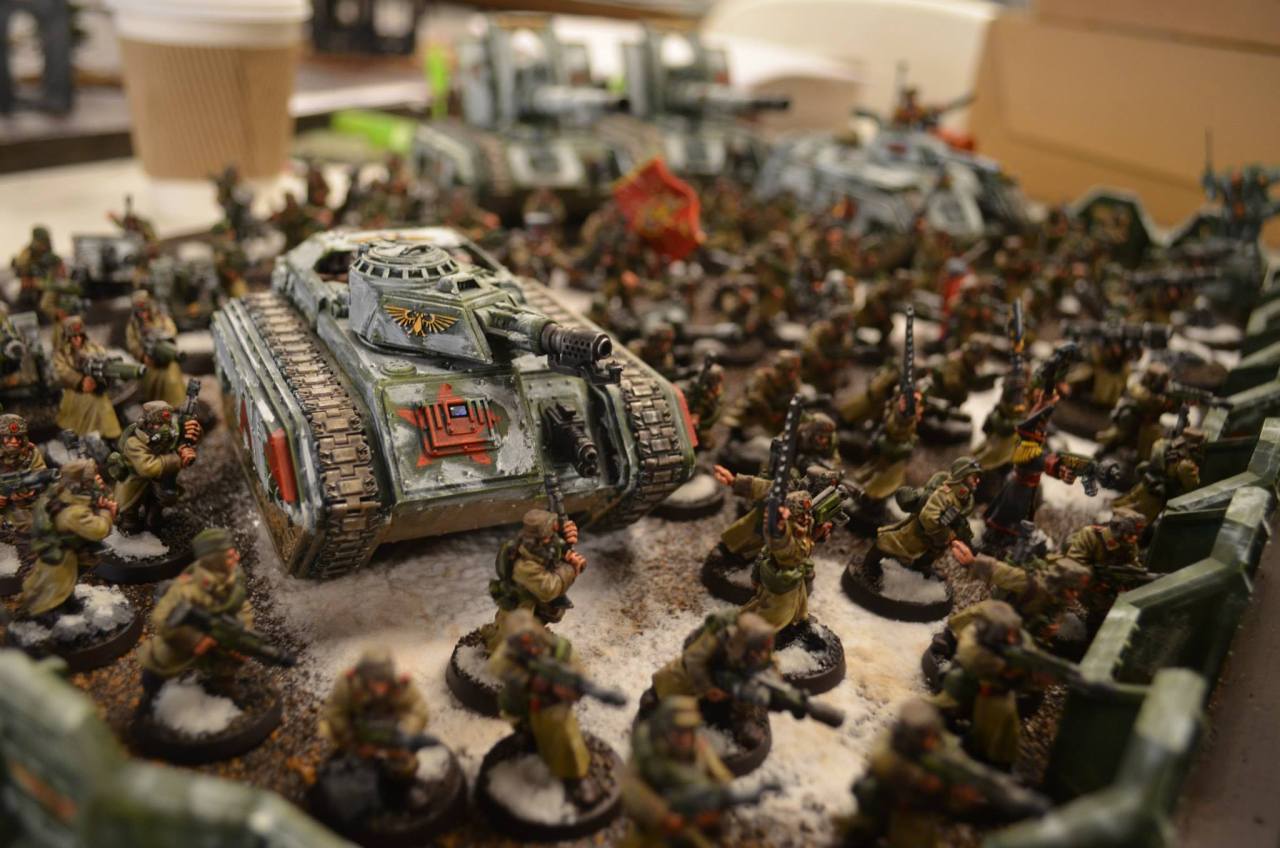
Hope you like drybrushing because it’s time to paint a tank in 3 hours. Armor: I always start here since it’s the biggest part of the model and pretty messy. From a black basecoat, I heavily drybrushed Caliban Green all over, then slightly less heavily drybrushed Castellan Green all over, then did a lighter drybrush of Elysian Green all over with a focus on the edges. This is a good place to call it if you want, but in World War II it was common for tankers to whitewash their tanks to better blend in with the winter landscape. This was done on both the eastern and western fronts by tankers using brooms, rollers, whatever to roughly apply the paint. Resultantly, I wanted a rough look to the whitewashing here. I used Praxeti White, a shitty old brush, and a stabbing, stippling motion to whitewash the tank. I focused it more on the flat panels and further from the edges where it would be more likely to wear off. Whitewashing would be done after markings and so on, so I left spots where I was putting any markings or transfers. Weapon casings: P3 Thamar Black, then highlights of Eshin Grey and Dawnstone, same as the lasgun muzzles. Metallics: Starting from Leadbelcher, do washes of Agrax Earthshade and Nuln Oil. I usually applied another Nuln Oil wash near the muzzle, or a drybrush of black to represent the scorching of the shells. I then highlighted with Stormhost Silver. Markings: I painted mine in with Mephiston Red and a highlight of Evil Sunz Scarlet. Stowage: I painted this the same as the Valhallan pants. Steel Legion Drab, Tallarn Sand, Agrax Earthshade wash. Leather straps the same as the boots and straps on the infantry – Rhinox Hide, Agrax Earthshade, and Doombull Brown. Lenses: I went with blue for contrast. I started with Kantor Blue, with crescents of Altdorf Guard Blue and Fenrisian Grey on the bottom. For the top where the “light” catches, I just did a dot of Nuln Oil then Corax White. Weathering: Back to drybrushing! We’ll go back to that same trinity of browns, drybrushing Steel Legion Drab up to around the halfway point, Tallarn Sand up to around a third, and Karak Stone up to a round a fifth of the way up. Crew: There were some extremely dope tank rider models back in the day which I painted the same as my infantry. Should be a no brainer. The modern plastic Leman Russ kit has a real Russian tanker-looking head in there which would be a good bit to use. That’s an SRM-approved pr0 tip.
Crab-Stuffed Mushrooms' Method - click to expand
The Vostroyan Firstborn are a regiment who are sourced from the world Vostroya, an Industrial world who refused to send troops to aid the Emperor during the Heresy and instead opted to make a bunch of weapons. That was widely seen as a mistake, and since then the Vostroyans have agreed to send all of their first-born children to serve in the guard. They’re yet another regiment modeled after Russians.
Infantry
Credit: Crab-Stuffed Mushrooms
Battle Ready:Paint the sloppy parts, first!
Prime the model with Abaddon Black or (preferably) Mechanicus Grey spray paint.
Basecoat the brass trim Balthazar Gold
Basecoat the cloth with Mephiston Red
Basecoat the metal with Leadbelcher
Basecoat the poofyhats with Ushabti Bone
Basecoat the wood with Dryad Bark
Basecoat the boots with Mournfang Brown
Wash the model with a liberal amount of Agrax Earthshade
Re-apply the base colors above, ignore the recesses.
Basecoat the skin with Cadian Fleshtone
Wash the skin with a 50/50 mix of ReiklandFleshshade and Druchii Violet
Parade Ready:Follow the steps for Battle-Ready before proceeding below.
Highlight the brass with Stormhost Silver
Highlight the cloth with Evil Sunz Red
Highlight the metal with Stormhost Silver
Drybrush the poofy hats with Screaming Skull
Highlight the wood with lines of Gorthor Brown
Highlight the boots with Doombull Brown
Highlight the skin with Cadian Fleshtone followed by smaller highlights of Kislev Flesh
Vehicles
Credit: Crab-Stuffed Mushrooms
Author’s Note: I painted my Vostroyans 12 years ago and some things have changed. More spray paint colors are available but older Citadel Colors like Rotting Flesh paint are no more. You can substitute with Putrid Green from Coat D’Arms or a slightly greener paint in the form of Ogryn Camo.
Prime the model with Zandri Dust
Heavily Drybrush (aka “Roughbrush”) the hull with Ogryn Camo
Drybrush with Ushabti Bone
Lightly Drybrush with Administratum Grey
Paint the brass parts with Balthazar Gold
Paint the metal parts with Leadbelcher
Wash the entire model with a 4:1:1 mix of Water, Dawnstone Grey, and Abaddon Black
TheChirurgeon's Method - Click to Expand
I wanted to do a series of “normal”-looking guard to go with my Alpha Legion (instead of just renegades) to give them an air of respectability, and so the sleeper cell Cadians were born. The scheme is designed to be quick, so I can hammer out 30-120 of these to act as cultists in a pinch. I ended up only painting 30 of them, but it’s an easy enough scheme and it looks fine. It matches them well with my cultists, who have a similar scheme, and my Alpha Legion marines.
Credit: Robert “TheChirurgeon” Jones
These guys have a pretty simple recipe: Fatigues: Castellan Green, washed with Coelia Greenshade, then layered with Castellan Green, Death World Forest, and highlighted with Death Guard Green. Armor: Incubi Darkness highlighted with Sotek Green Gun: Mephiston Red highlighted with Evil Sunz Scarlet
Credit: Robert “TheChirurgeon” Jones
Commissars - Click to expand
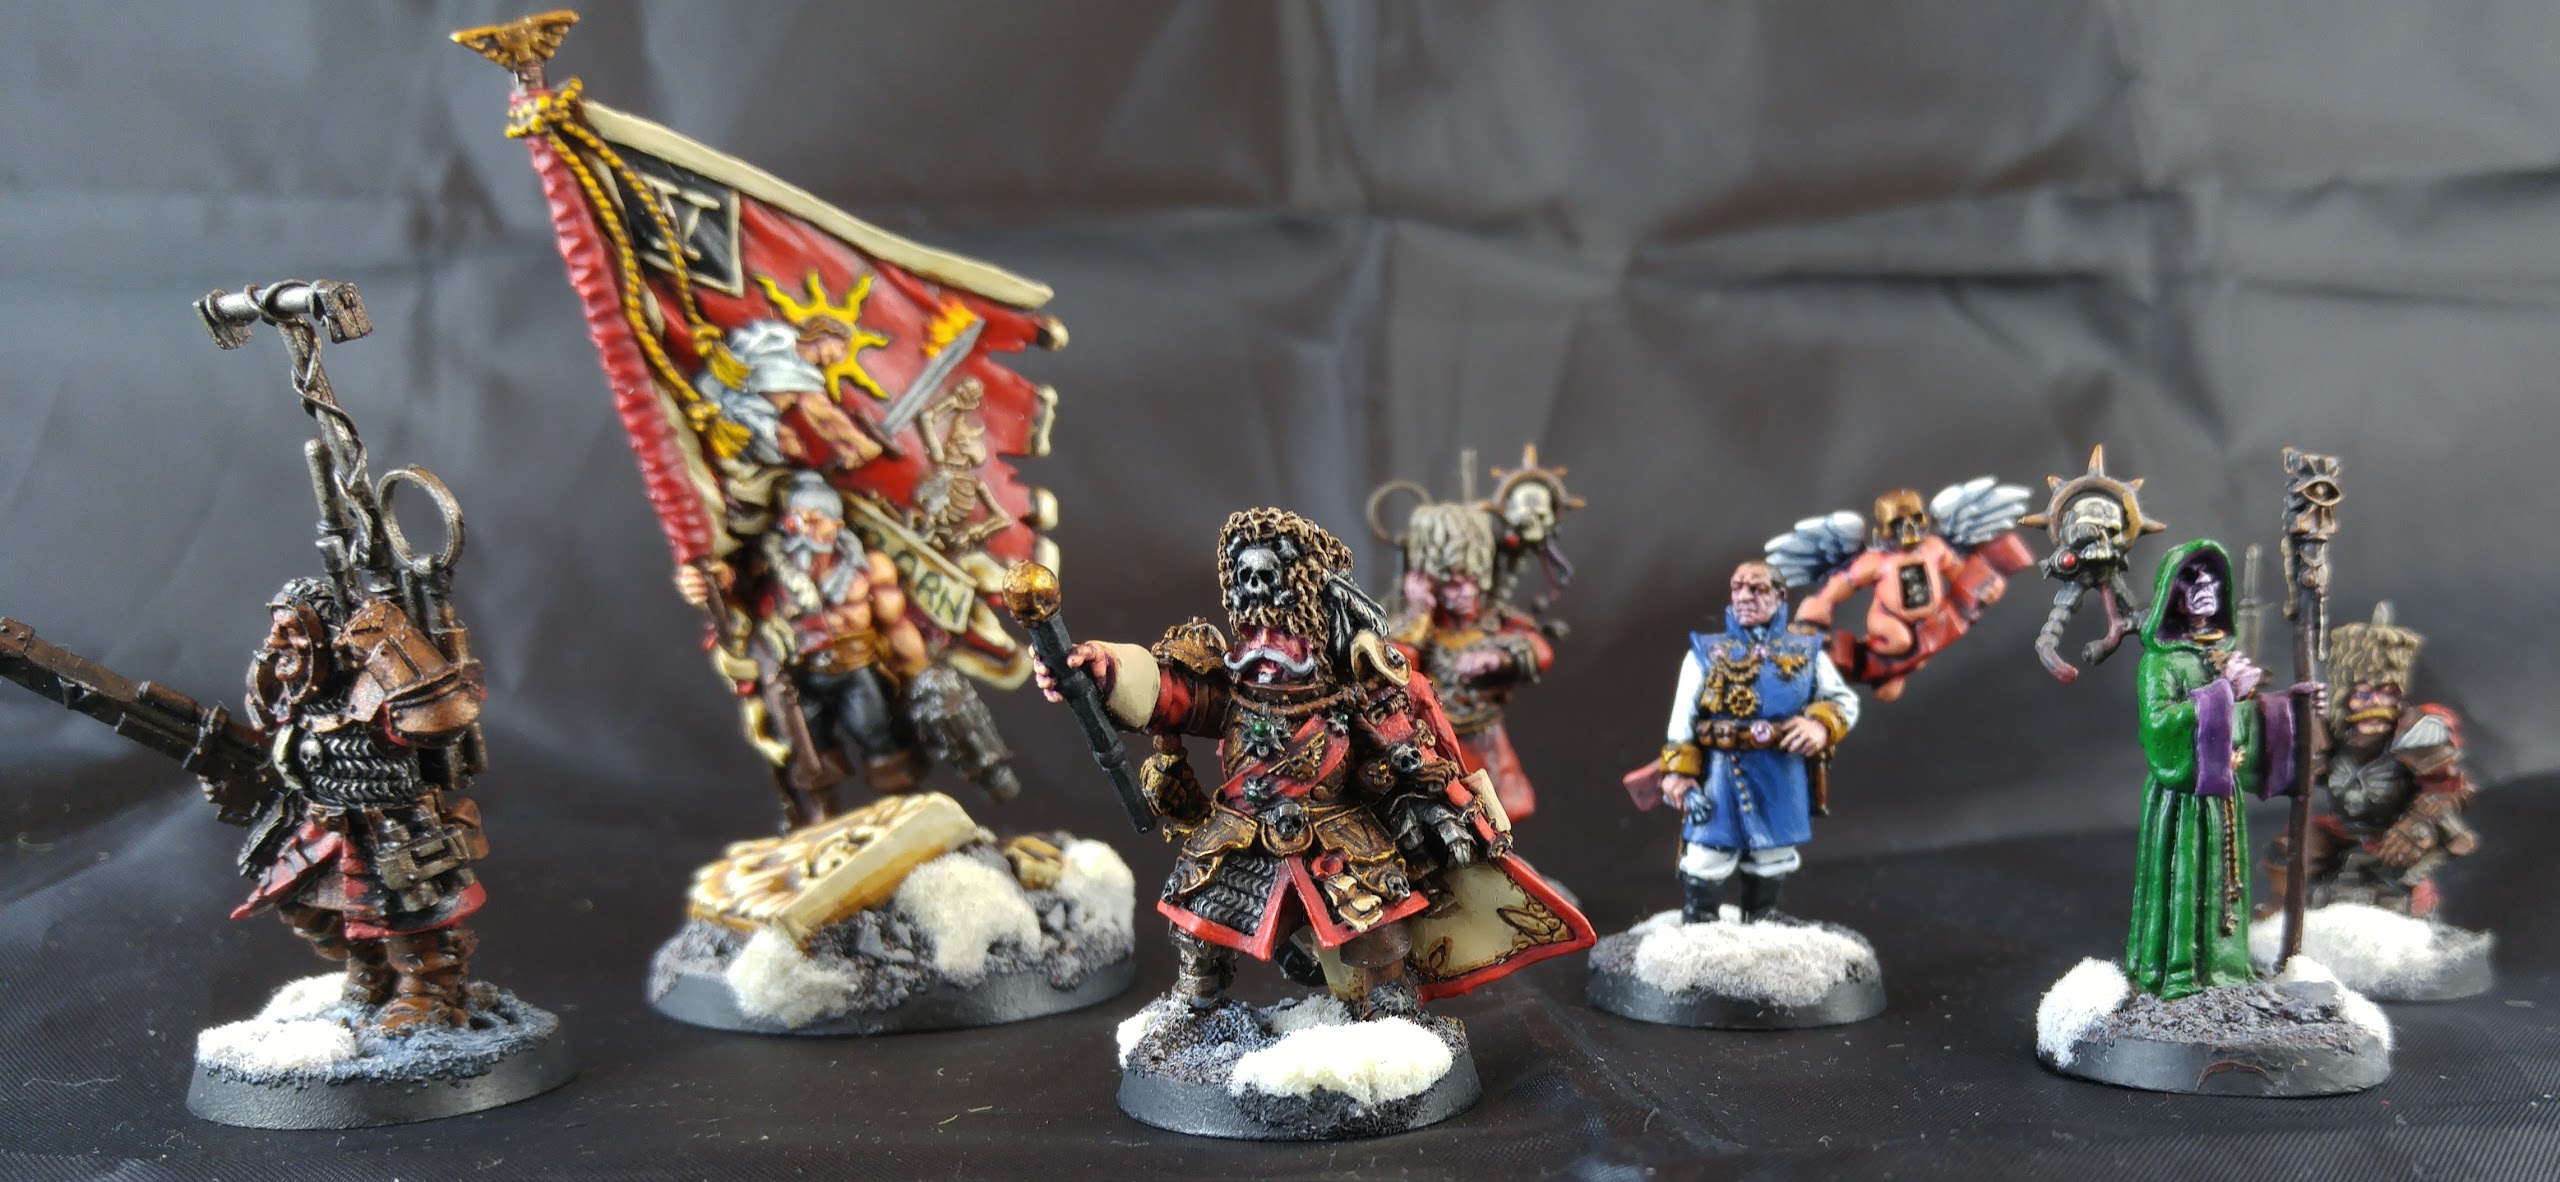
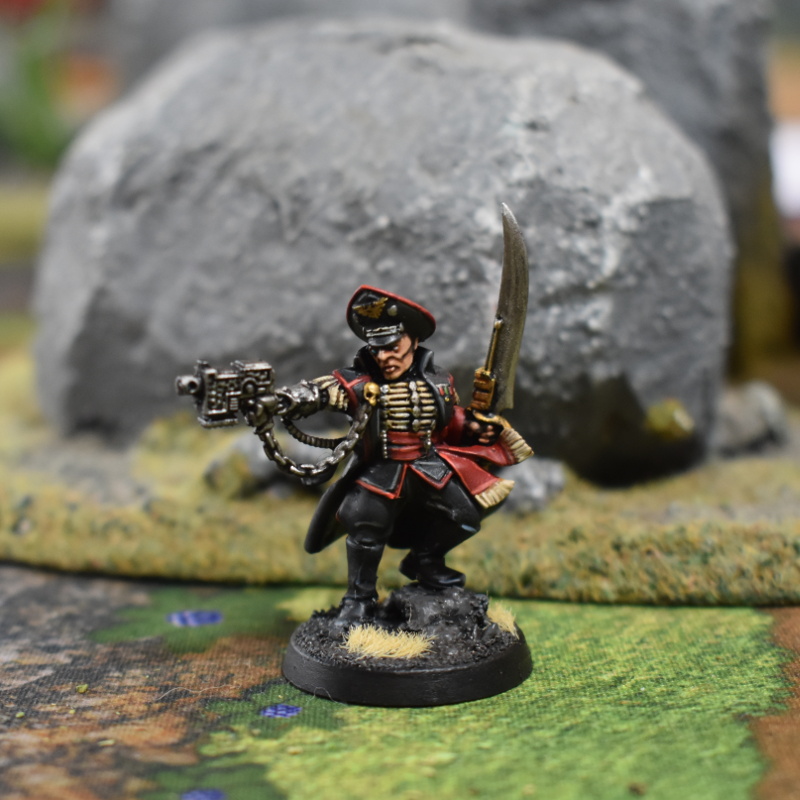
Commissars are a bit of an outlier for the Guard in that these officers do not typically conform to the visual standards or style of a given Regiment. These soldiers are tasked with maintaining discipline and morale during battle and typically come from a world different to the one of their regiment. This is reflected in their garb, which tends to be a more uniform red-and-black ensemble.
Commissars are iconic to the Imperial Guard, and as you may have guessed from the book recommendations above, they feature a lot in the fluff. Black Library authors can’t get enough of Commissars as a concept, and it’s not hard to see why – they make for really interesting characters. All Commissars have the same job, to instill discipline in Imperial Guard regiments as political officers, but how they go about it is infinitely varied. They can be harsh disciplinarians, exemplars of personal courage, quiet menaces in the background, or if you’re the guy from the Wicked and the Damned anthology, total lunatics screaming about blue-eyed hogs.
Imperial Guard Commissar. Credit: Corrode
On the tabletop, the classic Commissar scheme is a mix of red and black, which is always a striking combo hence why it also appears throughout the Sisters of Battle and Blood Angels ranges. The particular Commissar in the photo above is the newer plastic version, but all Commissars can be productively painted in basically the same way. I sprayed him black and then covered him in VMC Black Grey, which is my go-to for any black that wants to have a little depth to it. I picked out the red edges in Khorne Red and then Mephiston Red, the cream is Rakarth Flesh and then Flayed One Flesh, and the gun and chains are just straight Leadbelcher. I then washed the metal and black with Nuln Oil and the creams with 1:1 Seraphim Sepia/Lahmian Medium. The black was highlighted Eshin Grey and then Mechanicus Standard Grey, the red with Wild Rider Red, and the cream re-layered with Flayed One Flesh.
That’s roughly 90% of this model done – getting your black, red, and metal done well will carry you most of the way. This guy’s skin was, I think, straight Cadian Fleshtone with a wash of Reikland and then highlighted Cadian then Kislev, and I picked out his little medals and the gold for his skull/aquila/power generator on the power sword he never, ever gets to actually pay points for. That’s pretty much it. These guys are 16pts per model, don’t go wild on them!
Cadia Stands!*
That wraps up our look at the regiments of the Astra Militarum, but there are plenty more schemes that we haven’t covered – the sky’s the limit when it comes to this army and there’s a ton of room for conversions and other schemes you can paint.
Have any questions or feedback? Drop us a note in the comments below or email us at contact@goonhammer.com. Want articles like this linked in your inbox every Monday morning? Sign up for our newsletter. And don’t forget that you can support us on Patreon for backer rewards like early video content, Administratum access, an ad-free experience on our website and more.
This website uses cookies so that we can provide you with the best user experience possible. Cookie information is stored in your browser and performs functions such as recognising you when you return to our website and helping our team to understand which sections of the website you find most interesting and useful.
Strictly Necessary Cookies
Strictly Necessary Cookie should be enabled at all times so that we can save your preferences for cookie settings.
If you disable this cookie, we will not be able to save your preferences. This means that every time you visit this website you will need to enable or disable cookies again.
3rd Party Cookies
This website uses Google Analytics to collect anonymous information such as the number of visitors to the site, and the most popular pages.
Keeping this cookie enabled helps us to improve our website.
Please enable Strictly Necessary Cookies first so that we can save your preferences!