In our How to Paint Everything series, we take a look at different armies of the Warhammer universe, examine their history and heraldry, and look at several different methods for painting them. Today we look at everyone’s favorite (only?) xenos coalition, the T’au!
Who are the T’au?
The T’au are the most recent addition to the lore of Warhammer 40,000, first appearing late in the third edition of 40k with a Codex released in 2001. Originally just called the Tau, the T’au were a stark departure from the lore of the 40k universe; where the other races of the 40k universe were paranoid, superstitious, xenophobic, and hateful, the T’au were optimist expansionists working with a coalition of alien races to expand a benevolent empire across the stars. Not being possessed of any psychic ability of their own, they relied on their technology and coordinated action between multiple units acting as one. The T’au were also visually different from the rest of the 40k universe, drawing inspiration from Japanese influences, both in terms of how Fire Warrior armor resembles that of samurai, and the battlesuits that resemble the mecha found in Japanese anime.
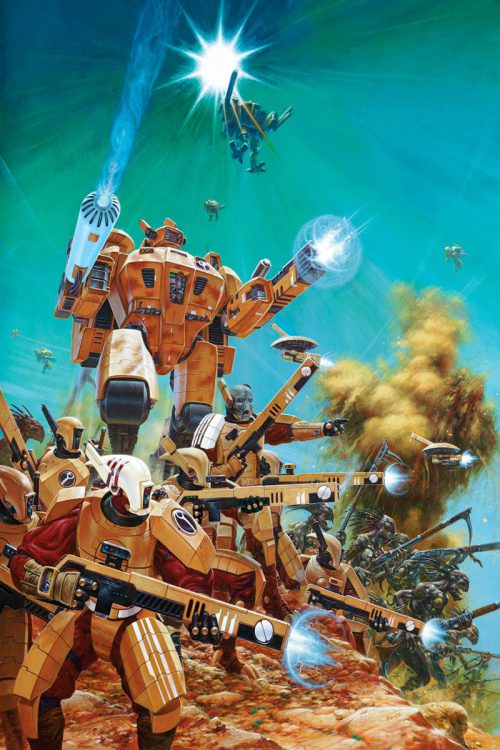
The T’au are a relatively very young race in the galaxy, having only come up in the last six thousand years or so. They were first discovered by the Adeptus Mechanicus on the galaxy’s eastern fringe in the 35th millennium, at which point they were at what might be described as a stone age level of technological development. The T’au during this time were crude and warlike, constantly at battle with each other. At some point during these times of warring tribes, the first Ethereals emerged. Ethereals were strange Tau whose words were irresistible to the other T’au. The Ethereals preached peace and the need to unite to strive for a greater good, and the T’au ceased their internecine wars and began to work together. In the time since their technology has rapidly evolved and they have begun to voyage out into the stars, conquering other worlds and building an empire. During this time they have brought other races into their coalition, working with the mercenary Kroot, the winged Vespids, the industrious Demiurge, the nomadic Nicassar, and even humans where they are able to convince them to abandon their Imperium.
T’au society is divided into castes. At the top are the Ethereal caste, the religious and political leaders of the T’au. They preach the doctrine of the Greater Good, and no T’au can refuse an Ethereal’s order. Beneath them are the Fire caste, made of the empire’s warriors, the Earth caste, made of laborers and technicians, the Air caste, who act as messengers and operate the T’au Navy, and the Water caste, made of merchants and diplomats. All T’au strive for Tau’va, or “The Greater Good,” a central philosophy that suggests that each T’au is equal and has a role to play in T’au society. Generally, the T’au have no desire to destroy other species nor their cultures, though they see other cultures’ insistence on individual freedoms as selfish and short-sighted.
In combat, the T’au rely on ranged combat, using their technology to keep opponents at a distance and using ranged firepower to bring them down. As they prefer to fight primarily with ranged weaponry, they tend to rely on alien auxiliaries like the Kroot for close combat. They’re accompanied by a mix of automated drones that are programmed to fight and protect other T’au, and large mechanized battlesuits that can be equipped with incredible firepower. While the T’au are not psychically developed and as such warp travel is still relatively new to them, the rest of their technology matches anything the Imperium has to offer.
Who is this Farsight dude?
Commander O’Shavah, now known as Commander Farsight, was a prominent T’au commander fighting for the empire’s expansion involved in a protracted campaign against Ork forces. During that time, he became known for encouraging his forces to fight close quarters combat, refusing to rely strictly on ranged combat. Over many battles he was successful, but during the campaign his expedition’s Ethereal was killed and all contact with them was lost. It was believed that Farsight had perished, but this was not the case. Farsight pressed onward and won his personal campaign, though separated from the Ethereals’ influence. He eventually broke off from the empire, staking a claim on a series of worlds that became known as the Farsight Enclaves. For the Ethereals, this meant Farsight had turned his back on the Greater Good, and he was declared a renegade and enemy of the empire. He has led the Enclaves ever since, living for 300 years, far beyond the life span of any T’au. Though whether he has extended his life through technological means or has been replaced by other T’au taking on the Farsight mantle is unknown to the T’au (Editor’s Note: The actual answer is that Fasight wield and alien daemon sword called the Dawn Blade that literally steals the lifeforce from his enemies and adds it to his own, prolonging his life. Totally the good guys.)
Where to Read More
The T’au have gotten a bit of a bad deal when it comes to books and reading material but there are a few books out there about them. I haven’t read these myself, but I’ve heard good things about the following:
- Farsight: Crisis of Faith by Phil Kelly details the Arkunshasa campaign, where Commander O’Shavah’s forces would encounter an enemy they weren’t expecting, leading to the fateful set of events that would lead to him turning his back on the T’au Empire.
- Farsight: Empire of Lies by Phil Kelly is the upcoming second book in the Farsight series.
- Tales of the Greater Good is an anthology of T’au stories from several authors, set in different locations and at different times, but all told from the T’au point of view.
- Blades of Damocles by Phil Kelly tells the story of a conflict between T’au and Ultramarines in the early days of the Damocles Gulf conflict.
Playing T’au
We’ve probably devoted as many words to playing T’au as we have any other faction in the Warhammer 40,000 universe. They’re very popular, and T’au fans are voracious when it comes to reading about it. T’au are a faction that relies primarily on shooting and coordinated actions between multiple units.
Warhammer 40k
- You can find our standard guide to playing T’au – Start Competing: Tau Empire Tactics here. It’s not up-to-date at the moment, as new rules have just been released.
- You can find our review of Psychic Awakening 5: The Greater Good here, which covers the new rulebook.
- Noted best T’au player Richard Siegler wrote a fantastic piece on the new T’au rules for us, which you can find here.
Kill Team
- We haven’t finished our guide to Kill Team Tactics: T’au yet, but we talked a little bit about the T’au and their new Tactics in our review of the Xenos factions in the Kill Team 2019 Annual. As with 40k 8th edition, T’au in Kill Team do best when supported by a large number of drones.
Aeronautica Imperialis
- T’au haven’t been released yet, but they’ve been shown for AI. When they’re eventually released, we’ll add a link to playing their fleets here.
Painting T’au
A Note on Heraldry Camoflage
Unlike many of the other forces in the 41st Millennium, the T’au see the value in camouflage and use it extensively. What this means in practice is that you’ll often want to think about tying the color of your models’ bases to the main color(s) used in your scheme to represent your force choosing an environmentally appropriate uniform. Furthermore, T’au vehices are great for actual camouflage, particularly modern schemes like shard or digital camo or even more futuristic like hex camo. Stencils will be your friend when it comes to T’au vehicles.
It may make sense to vary the scheme within your army somewhat based on the unit, for example giving your stealth suits or Ghostkeels a darker scheme than the rest of your army to represent their ‘stealthiness’. Something you’ll often see on T’au units is sept marking on their helmets or weapons and using these in a standard color across the entire army can help unify everything if you go this route.
Joe Tau – Alfredo’s Method for Farsight Enclaves
T’au infantry are relatively simple in that they don’t have a ton of materials, so you get large blocks of color. But you also get a lot of edges. My goal for this scheme was to maximize contrast on the red armor so that Joe would be easily readable at a distance. That said, I also didn’t want to go with a complicated scheme so hopefully you’ll find this approach relatively simple but striking.
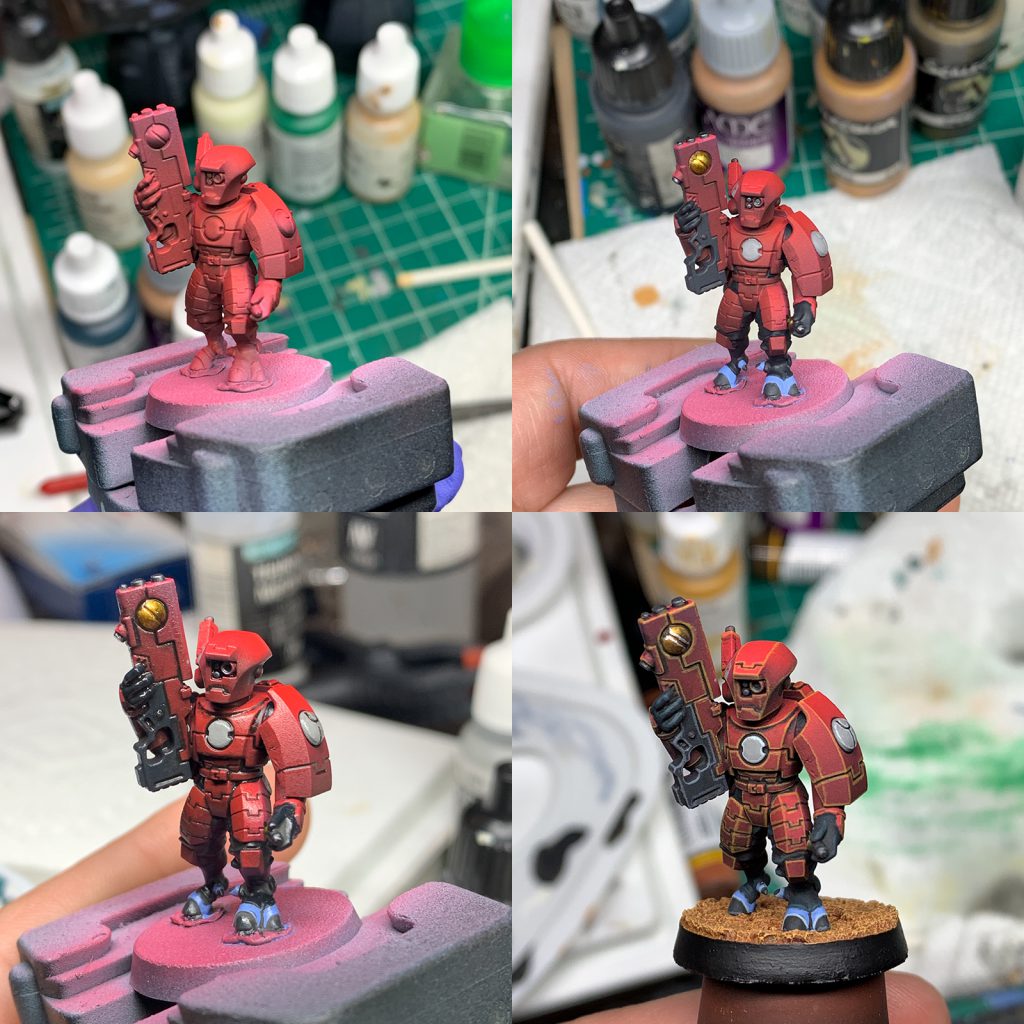
- First things first was priming (which isn’t pictured but I’m sure you know how that works). I went with a black/grey/white zenithal prime using my airbrush. The plan here was to give me enough initial contrast so that I could then spray a single base color and still get a nice gradient effect. To achieve this I airbrushed Scale75 Blood Red which makes for a great baseline red in my opinion. I thinned it 4:2:2:1 with water, flow improver and airbrush thinner and sprayed it in several thin layers to get a nice basecoat that takes advantage of the zenithal underneath. The contrast is much less obvious when you first spray the model and everything is the same color but it comes to life as you paint more. To push the contrast further, before moving on to the remaining basecoats, I thinned green ink heavily (8:1) and sprayed it from below to push the shadows towards green and have them contrast with the red armour.
- Like I said, there’s not a ton of materials on your typical T’au infantry so the remaining basecoats were fairly simple. For all the cloth I used a 1:1 mix of Black and Vallejo Dark Sea Blue. This is a green-ish dark blue (not unlike Incubi Darkness) and again helped me push the contrast with the red. For the sept color I went with Vallejo’s Dark Sea Grey which is a cold grey with some green tones (do you see the theme here yet?). Other than that I used a nice bright gold for the thankfully limited metal bits and a neutral near-black for the rifle. For the skin, I wanted something reasonably saturated and found that Vallejo Azure was the perfect color to serve as a base for T’au skin. Like any skin, feel free to vary this across your army and create some tonal variations (I can’t imagine all T’au are exactly the same color).
- As is usually the case, I gloss coated the miniature and then use a black enamel wash to pin wash everything. T’au have lots of panel lines and so pin washes work really really well to create visual distinction. Just take your time with this and erase any mistakes with thinner, it’s pretty simple thankfully.
- Finally, edge highlights. There’s a lot of these on the armour and they take a while, so buckle up. For the armour, I highlighted using an ochre, which is my preferred method usually instead of an orange or pink. I specifically used Vallejo Brown Ochre and also used that as my first drybrush on the base (which helps tie the model and the base together). The cloth was highlighted by mixing in some Sunny Skintone to Dark Sea Blue in order to add some yellow tones and brighten it up. The rest is pretty straightforward, neutral grey for the weapon, a lighter grey for the sept color and highlights for the gold. For the skin, you want to have something actually skin-like to highlight with. You can use an actual light skin color (like kislev) or mix it in with whatever you base was. In my case I have a lot of fantasy/alien skin colors and I used Scale Fantasy’s Braineater Azure to highlight. It’s blue but also skin-like so works great. The final step was to once again spray the entire mini from below with thinned green ink to push the contrast further. I think it worked quite nicely and you end up with some really good tonal variation that is readable at a distance. The actual last step (after matte varnishing) was to paint a bright silver on the eye lenses (and the glowy bits on the back) and then cover with Tamiya Clear. You could use green for the eye lenses for maximum contrast but I’ve usually seen yellow in the codexes so I went with that and it looks good. I gloss coat the lenses afterwards and all finished.
And the final result:

Greg’s Vior’la Method
I decided to go with Vior’la Sept, which is the new GW studio default for Tau. Not only does it look sharp, but it’s pretty similar to the scheme I’ve been using for Booley’s Tau, so this should be an easy jump to make. I didn’t quite stick to the canon scheme, in a couple of areas: the rim of the drone I did in red instead of grey, because I didn’t pay enough attention to the codex art, and the undersuit is black instead of red, because it looks better and I wish GW hadn’t changed that on the studio scheme.
First, prime your models and get out your paints. Not a lot here, but it ends up looking ok, and goes quickly. Other than the Contrast paint, and some of the panel lining, I used all Vallejo Game Color paints for this – there are Citadel equivalents for all of them, and the conversion chart is on Vallejo’s site for reference.
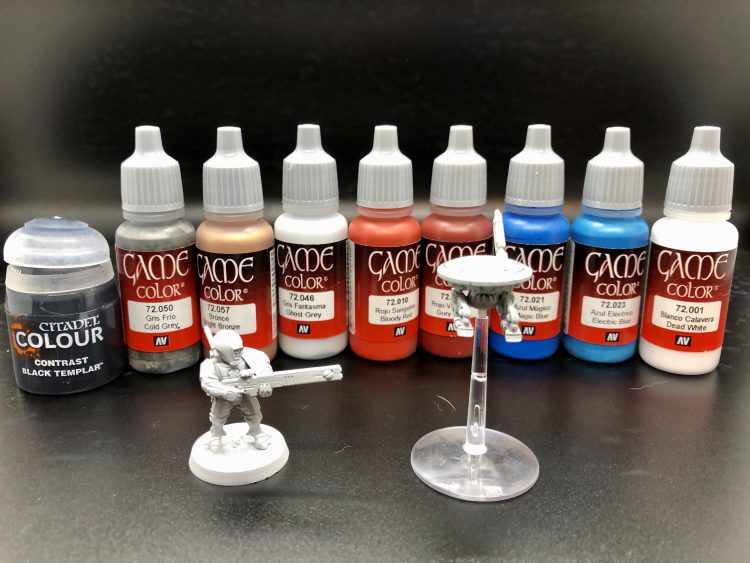
I’ve become a huge fan of the Black Templar contrast lately for laying down on cloth or fabric, but we’ll still be highlighting it to give it that extra bit of depth. It also helps that Vior’la is a scheme that takes to priming white pretty well, making the Contrast path an easy one. Basecoats are:
- Citadel Black Templar Contrast on the undersuit (arms, legs, back of head) and the mechanical parts on the bottom of the drone. Tau don’t typically use a lot of metallics, which is something that seemed odd to me at first, but it’s growing on me.
- Ghost Grey for the armor. This still reads as white from a distance, and leaves some room to highlight with actual white later. Also, yes, you’ve already primed white, but it looks much better with proper paint over it.
- Gory Red for the red panels, Bright Bronze for the metals (just the big round dome things, basically), and Magic Blue for the lenses.
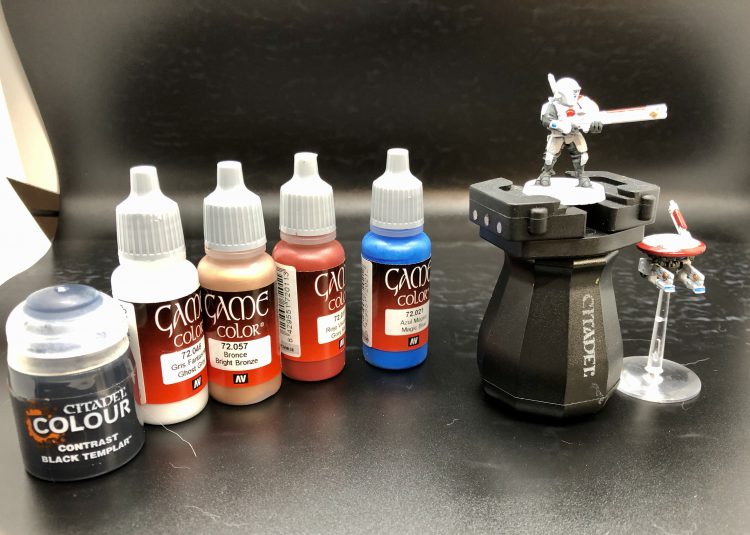
So white armor, with a couple of panels picked out in red – the top and bottom of the shoulderpad (though on the squad sergeants this is inverted, and the middle section around the Tau logo is red), the center of the chest, and a few accent pieces. I hit a few of the smaller armor sections on the leg later, when I was adding the little stripes, but we’ll get to that in a minute. First, let’s do some panel lining. This is admittedly more of a task on battlesuits, but even this little infantry goober has some lines to pick out. I use two tools for this, neither one really making a ton of sense: a marker pen, or contrast paints (you could probably get the same results with thinned-down Nuln Oil, but I wanted to try this out for kicks). This is probably the longest single step in the process, but it’s not as bad as it sounds. Just take your time, and use a small brush for it.
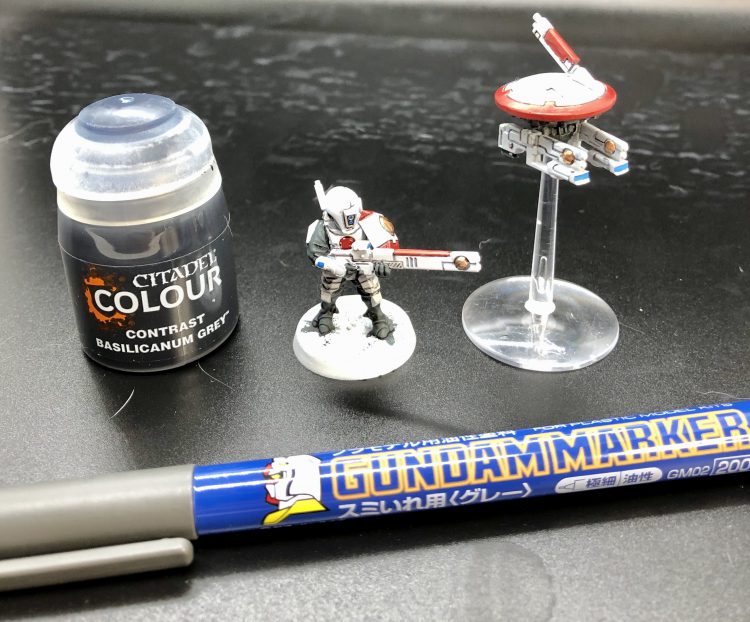
The model is likely to require a bit of cleanup here. I know I hopped the lines a bit going around the edge of the drone, and that marker does not come off once it’s dried, plus Contrast can be unruly on the best of days. This is a good time to stop and handle that, but then we’re on to highlights:
- Cold Grey over the Black Templar, though if you’re in a hurry they look fine without it. This is a 7 point model (well, the drone is 10), so I won’t judge.
- Electric Blue on the lenses. I have to admit here that I don’t really paint lenses well.
- Bloody Red over the red.
- Dead White over the armor, and as dots on the lenses.
This is also when I went and filled in some of the smaller red pieces on the leg armor, and added the sept/ranking stripes – just one on the smaller shoulderpad and some on the barrel of the pulse rifle. On a related note, I have zero experience, or skills, with free handing, so the reason i put the Bloody Red before the Dead White above is because I used the white to clean up where I stuffed things up. Anyway, here’s the end result:
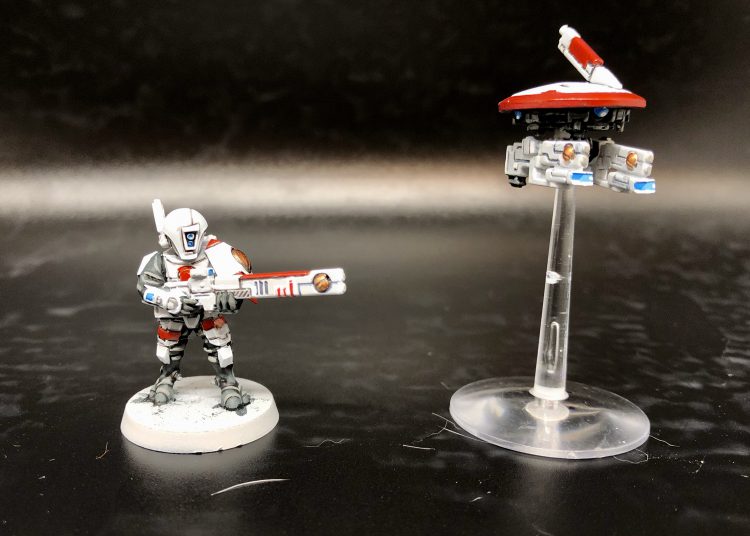
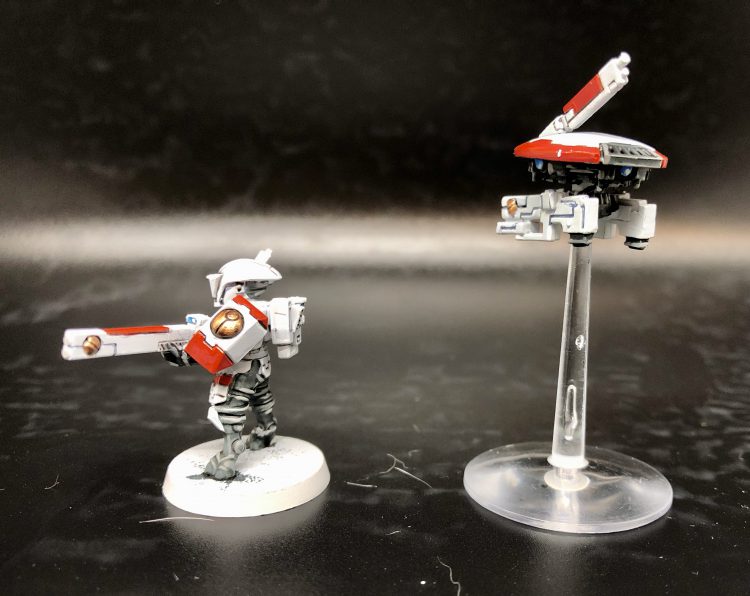
That’s about it, just need to base the thing. They aren’t going to win any awards, but I was able to paint them in about an hour, and now that I have the scheme sorted enough to not have to think about it, assembly-lining a squad of 10 in a How to Paint Everything: T’au evening is probably a reasonable pace.
Booley’s Cerberus Tau
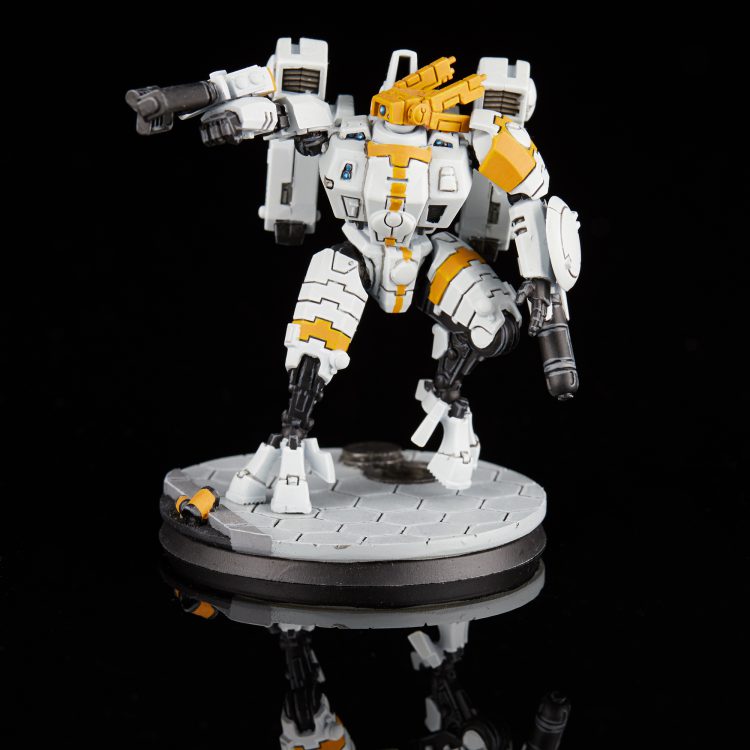
At some point, years and years ago (roughly 2013) I saw someone else painting up some tau based on the colors of Cerberus from Mass Effect, which a year after release I was still playing far far too much of. Much like the official Vior’la sept scheme the high contrast of color blocks, white, and dark grey/black undersuits and mechanical parts works great with the design of Tau for an army that paints up quickly and looks great on the battlefield. I’ve shown a picture of a battlesuit above, but the same techniques apply to infantry and vehicles equally well. I’d strongly recommend breaking models down into as many subassemblies as reasonably possible – when painting black over white you really want to avoid having to work your brush into any recesses, since cleaning it up is a huge pain.
- Prime white (or near white). My preference is Vallejo Grey out of an airbrush, but anything will work.
- Airbrush (or brush) GW Ulthuan Grey over the entire model. This step sucked back when I did it, but they’ve released an Air version of Ulthuan Grey since then which should make it much easier.
- Paint all the mechanical areas with your favorite black. I’m really liking Scale 75 Decay Black right now. If you’re painting infantry with undersuits, paint them with Vallejo Model Color 70.994 Dark Grey, then wash it with Nuln Oil.
- Highlight all the black areas with GW Eshin Grey and then Dawnstone. You can probably skip this on undersuits unless it’s a character.
- Pick out what panels you want to have be yellow, and paint them with GW Averland Sunset.
- Edge highlight the yellow panels with GW Yriel Yellow.
- Clean up any areas of white that got black or yellow on them with thin layers of GW Ulthuan Grey. You may need to use something like Grey Seer or Fenrisian Grey to help build up some coverage, just keep the layers thin.
- Gloss varnish the entire model.
- Carefully pinwash Gloss Nuln Oil into all the recesses of the armor, whether on a white panel or yellow panel. If you’re someone who likes working with oil paints, this is a perfect time for a Lamp Black oil pinwash instead – the goal with the gloss varnish and gloss or oil wash is to rely on the high surface tension to flow the wash into the recesses and keep it off the panels.
- Matte varnish the entire model.
- Edge highlight the white panels with a pure white – Daler Rowney FW acrylic ink works well here, though it’s extremely thin.
- Paint any lenses with Kantor Blue, Temple Guard Blue, and Barharroth Blue. Toss a highlight of pure white into the uppermost corner.
- Do one final coat of matte varnish for protection and to tie everything together, then gloss varnish the lenses.
Beanith’s Menagerie of Stealth Suits
Beanith has gone the extra mile to give us 6 different Septs done with contrast paint; there’s something for everyone here!
Ah the Glorious Tau, big bold lines, nice clean armor, lots of various big robot suits and oversized guns… what isn’t there to love? <<<You know, aside from the hate and bile you’ll always hear, see about online or encounter in person for these poor little fishy bishies. When played competitively, your opponent is almost always guaranteed a shitty time trying to kill one of the three riptides while you palm off everything onto the umpteen group of shield drones that infest your army. Editor’s note: Does this speak to you, learn more about the way of the T’au in our interview with Richard Siegler.
Today once again I’ve somehow managed to sneak my sloppy work into Goonhammer and that’s only because I had some Fishies sitting in my pile of shame and Corrode was asking for Tau stuff, so can I really be held accountable for this?
So that said, here are my 6 Stealthy Suited Fishie Bishies, 1 for each for the 6 major Septs cranked out over two evenings.
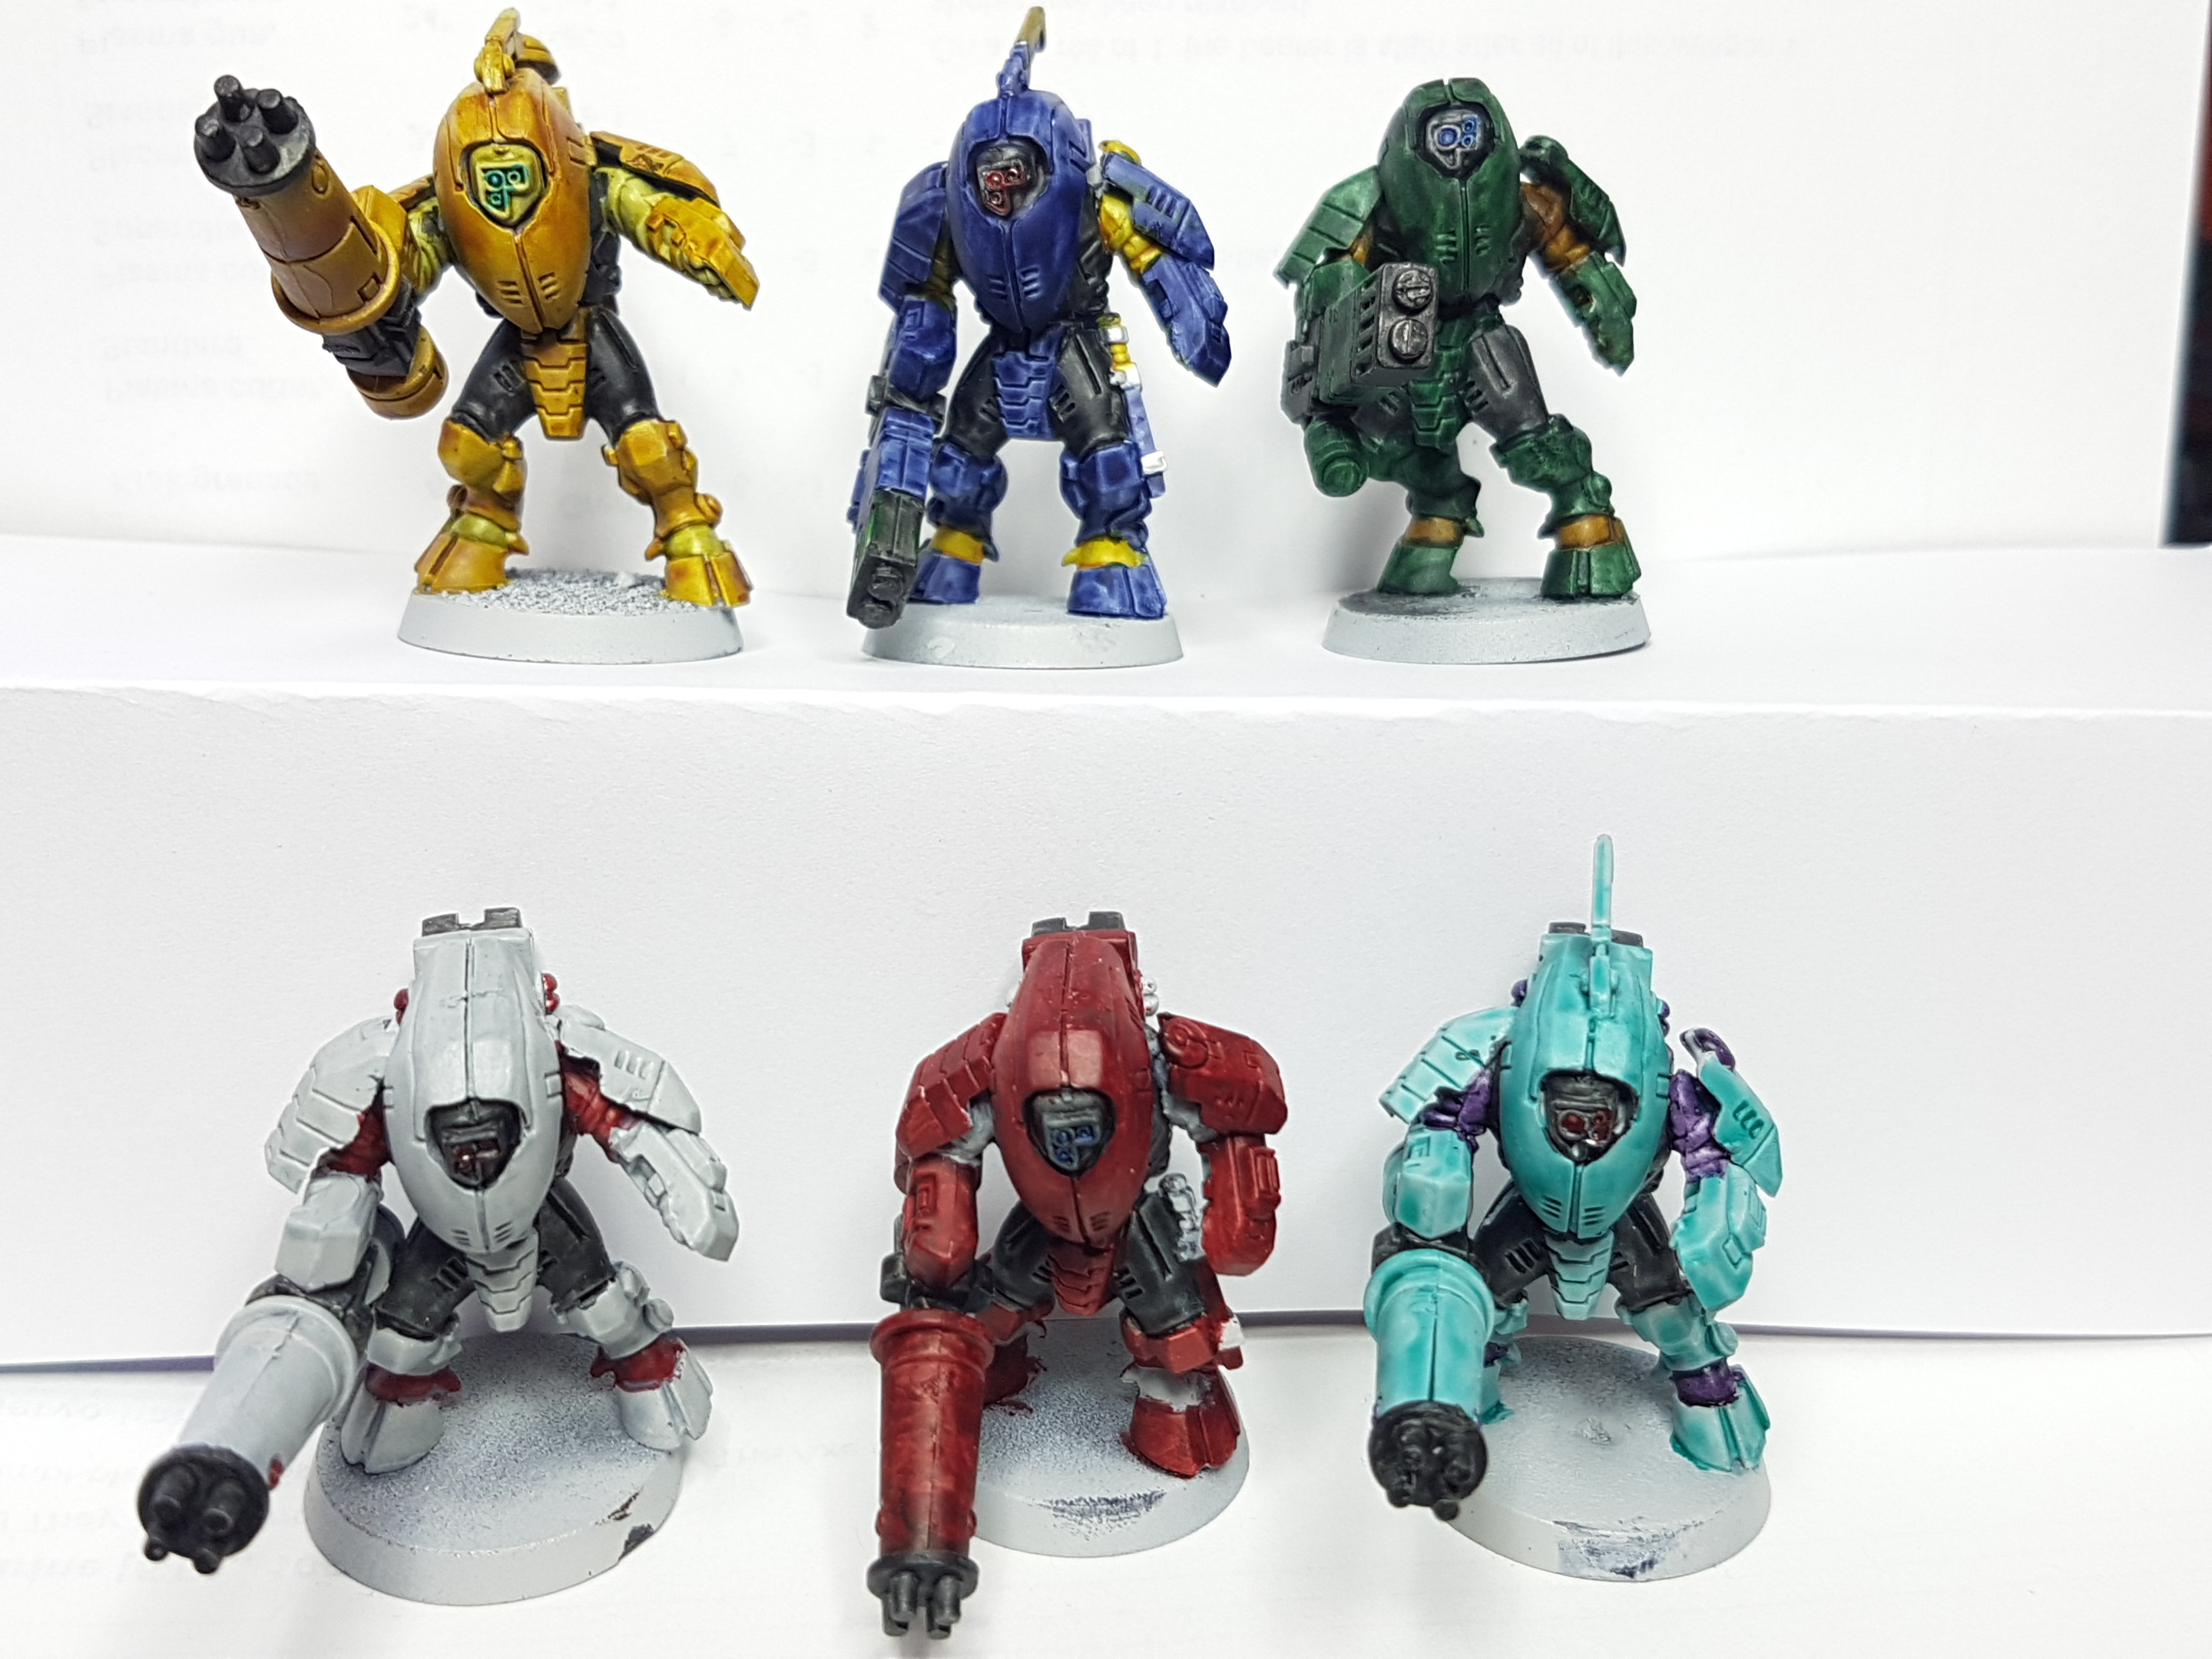
All were undercoated with the Grey Seer Spray and then parts of the suit, gun and backpack were picked out in Black Templar. Touch of silver in the lenses and then a touch of Talassar Blue
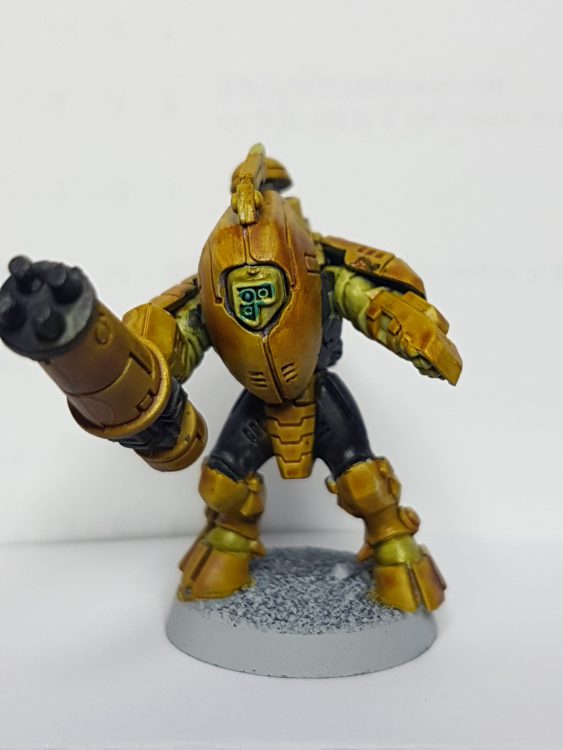
T’au Sept: Overwatch 5+… lousy Iron Hand wannabes.
I picked out the armor with Nazdreg Yellow, and picked out some spots on the armor and clothy bits with Plaguebearer Flesh.
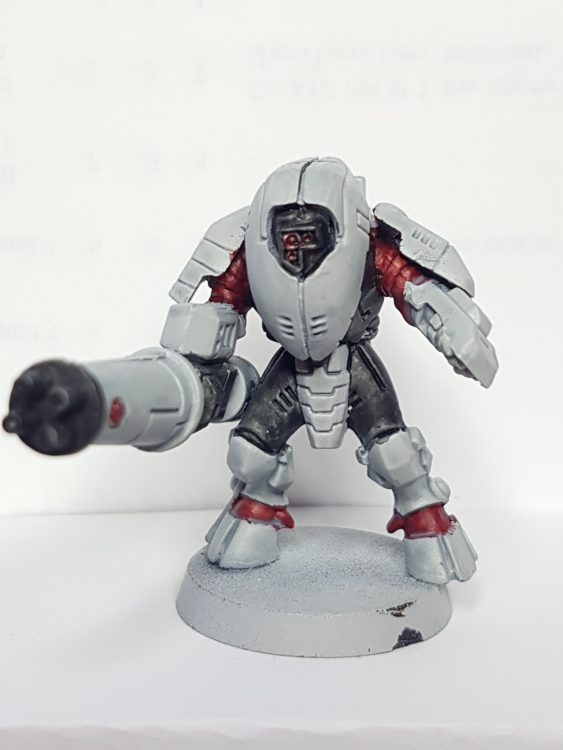
Vior’la Sept: ADVANCE! Make all those Rapid fire weapons count as Assault. Pew pew pew!
I picked out the armor with Apothecary White, and picked out some spots on the armor and clothy bits with Flesh Tearers Red
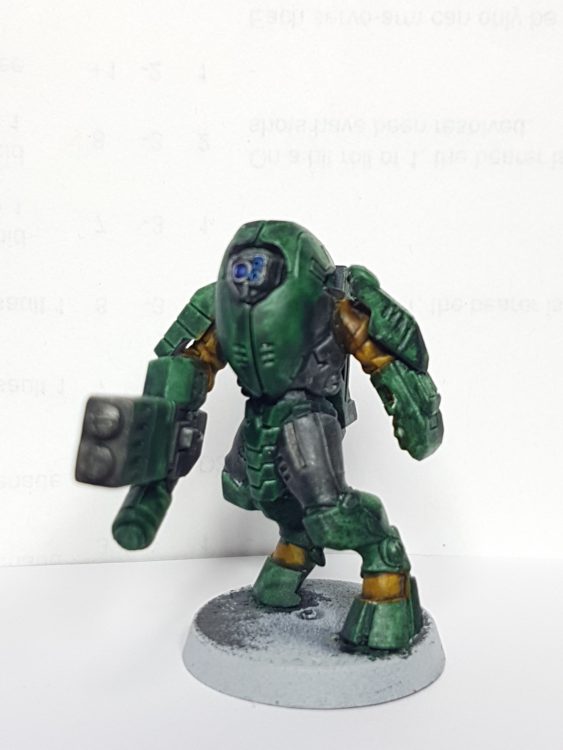
Dal’yth Sept: These boys have the Ghost in Shell camo cloaks that don’t like moving around.
I picked out the armor with Dark Angels Green, and picked out some spots on the armor and clothy bits with Snakebite Leather
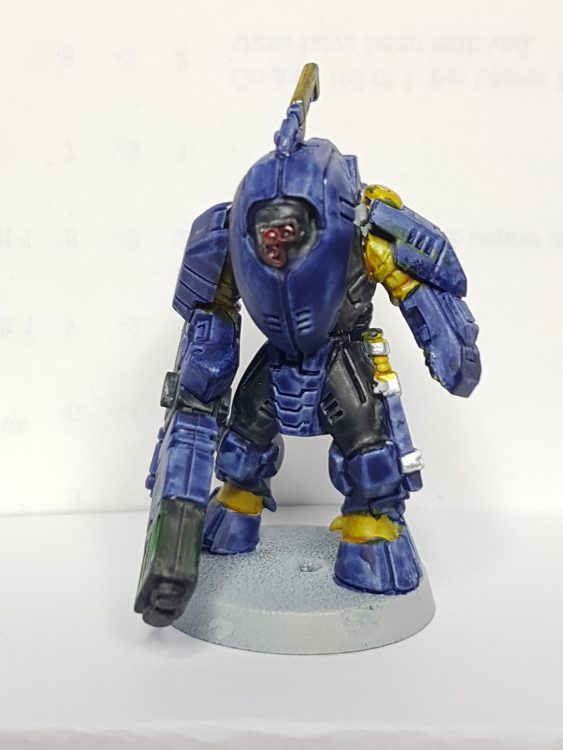
Sa’cea Sept: They’re painted Ultramarines Blue for a reason, +1 LD and reroll a single failed hit roll per unit
I picked out the armor with Ultramarines Blue, and picked out some spots on the armor and clothy bits with Iyanden Yellow
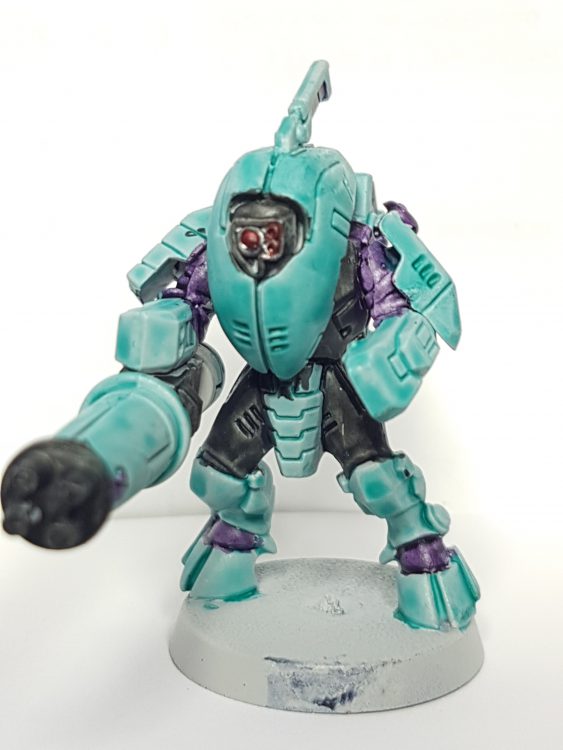
Bork’an Sept: 6” Longer range Dakka. Nuff said.
I picked out the armor with Aethermatic Blue, and picked out some spots on the armor and clothy bits with Shyish Purple
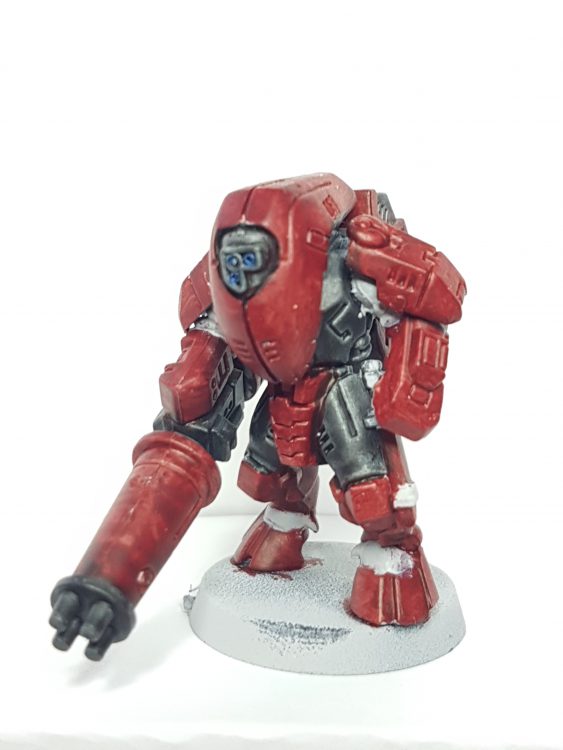
Farsight Enclave: Reroll ones when you hold fire until you can see the whites of their eyes
I picked out the armor with Flesh Tearers Red, and picked out some spots on the armor and clothy bits with Apothecary White
That Gobbo’s Kroot Method
Skin: S75 Adrennes Green Agrax Earthshade S75 Burch (1:3 paint / lahmian medium)
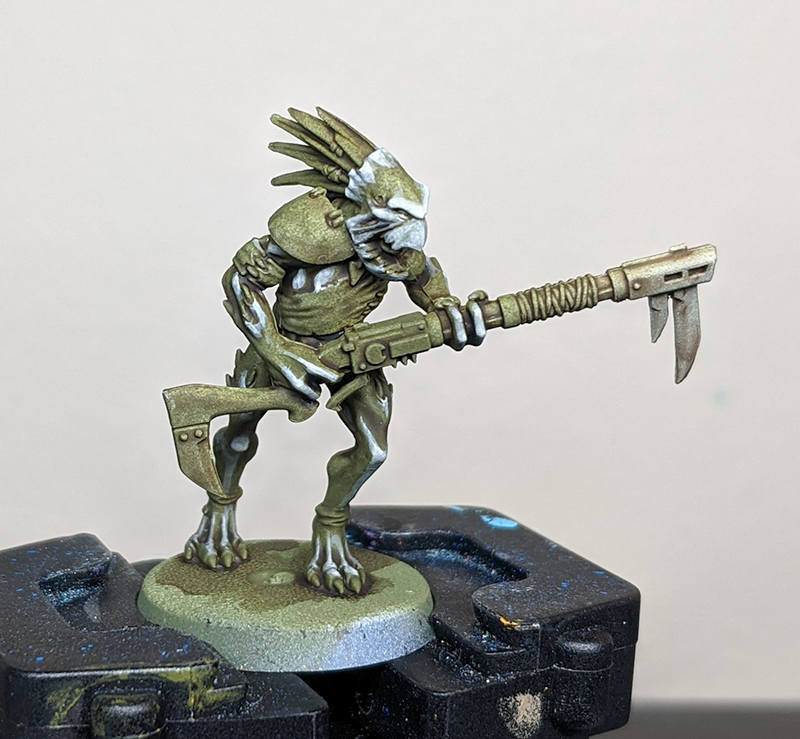
Leather: S75 Red Leather Nuln Oil S75 Red Leather 1:1 Red Leather/Pink Flesh S75 Pink Flesh (1:1 paint / lahmian medium)
Add some depth here by doing the base coat, wash, then building up highlights from the base coat again. At the end I use my 000 brush with the thinned Pink Flesh to do some stippling to add a bit of texture.
Quills: VMC Titan Dark Blue VMC Titan Blue S75 Tesla Blue
Some pretty quick layering for the quills, I think if I were to do this again I’d start brighter from the beginnings of the quills and then another layer of a lighter paint for highlighting along the ends and edges of the quills.
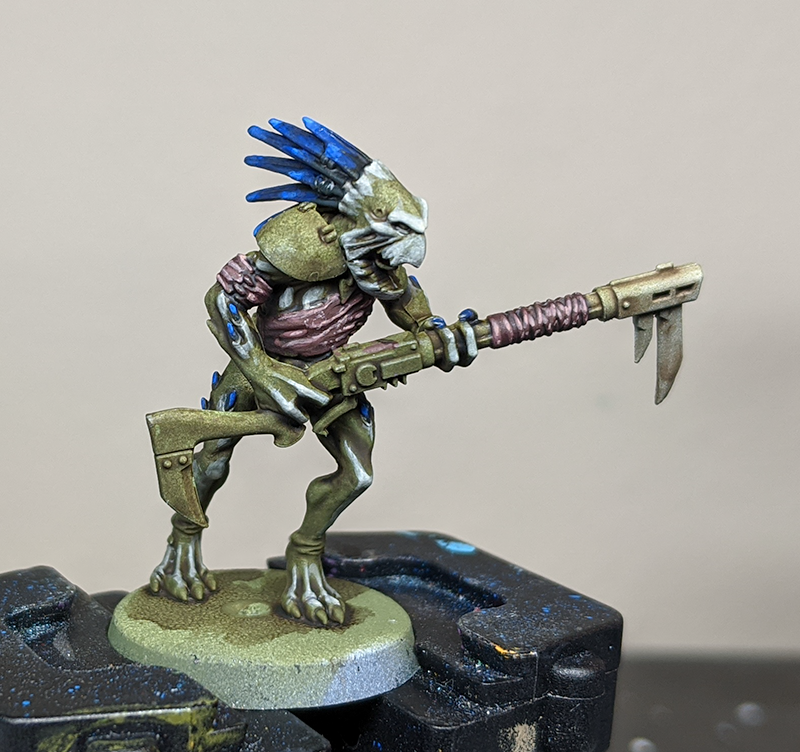
Metal: VMA Steel Agrax Earthshade Nuln Oil Typhus Corrosion (Drybrush stipple) VMA Steel (Highlights)
For the metal in this step I use Agrax Earthshade to give the metal a dirty quality and then go over it again with Nuln Oil to draw out the recesses. I then put a bit of Typhus Corrosion on a small sized makeup brush, wipe off the excess, and gently stipple it sparingly on the metal. I find this gives a really nice grungy look, the most obvious place for this is on the shoulder armor.
Details: VMC Turquoise (Grenades) Nuln Oil
Retributor Gold (Jewelry) Agrax Earthshade Nuln Oil
Again here I do Agrax Earthshade then Nuln Oil to pick out the recesses. You’ll see it in the gold rings in the quills.
S75 Pale Flesh (Thread) Agrax Earthshade
Wood: S75 Walnut S75 Sandlewood S75 Inktensity Wood (1:1 ink/ lahmian medium)
I did the basecoat of the wooden stock of the rifle then using a 000 brush I applied some lines in a lighter Sandlewood for wood grain. Then I do a glaze of the Inktensity Wood to give it a nice rich color. This was the first time I tried this wood recipe out and I’ll definitely be using it in the future.
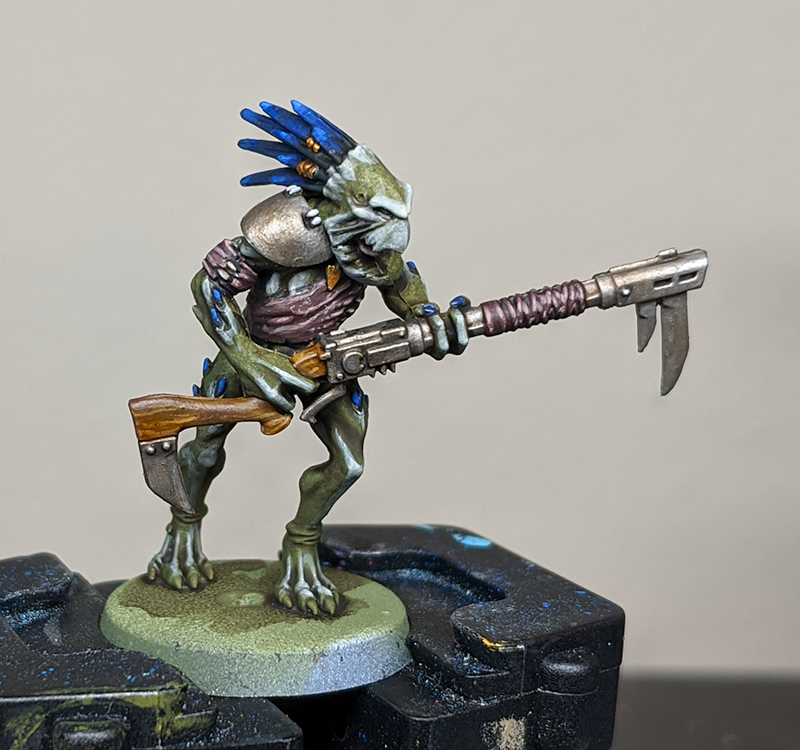
Eyes: S75 Deep Red Nuln Oil S75 Blood Red
Base: Vallejo Earth Texture Desert Sand Red Tone / Strong Tone (1:1) S75 Light Skin (drybrush) Army Painter Wasteland Tufts
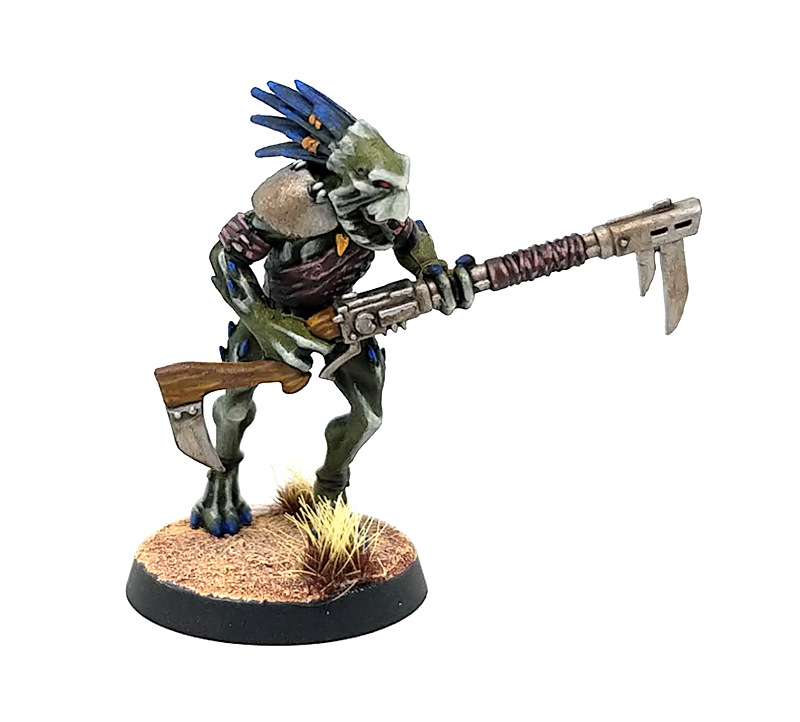
I’m pleased with how this guy turned out, but if I were to do more batch painting of Kroot I’d skip some of the intermediate steps and the stippling in the leather stage.
Suited and Krooted – Lupe’s Kroot Method
Tau are fine I guess, but Kroot are the real star of the factions. We all know that right?
Concept
But Kroot have some issues from a painting perspective. How do you take a green skinned alien with a focus on close combat and fast furious attacks and make them distinct when, you know, those boyz are knocking about?
For me I wanted to make them feel very grounded, give them a naturalistic and realistic look. This was as a contrast both with the suits of the main Tau, but also with the cartoonish Orks.
As usual for me, I started with skin. On an organic model it’s such an important element, so getting it spot on is essential. In addition, if we think about how humans dress, they do it around their biology. Dreadlocks originated in certain places because of the types of hair common to the people living there. People choose colours to compliment their skin tones and colouration. If you nail a character’s natural tones, skin, hair, and the rest, then everything else will flow from it.
Knowing I wanted to approach this with naturalistic tones, I started with something desaturated and with strong brown undertones. I decided in the end to actually start at brown, and then slowly work up to a bright highlight keeping a strong green tone through, and then wrapping it all together with a glaze. Other than the basecoat I kept my layers nice and translucent, using a thinner medium to do so.
My skin recipe:
- Basecoat Dryad Bark
- Layer with a mix of equal parts Dryad Bark and Straken Green. I hit everywhere except the deepest recesses at this step
- Layer everywhere except the recesses, as if you were retouching after a wash, with pure Straken Green
- Now begin highlighting. I tend to highlight zenithal (light coming from above) so look at your model and work out where the light would hit. Slowly cover less and less area with your highlights, until your very final step are just dots in the right places.
- These were my colour mixes for this stage. You can see I’ve blended a 1:1 mix between each colour to smooth the transition. You can skip that, but it’ll be harsher and less organic in the end result. 1:1 Straken Green: Ogryn Camo; Ogryn Camo; 1:1
- Ogryn Camo:Krieg Khaki; Krieg Khaki; 1:1 Krieg Khaki:Deepkin Flesh; Deepkin Flesh
- Glaze the whole area when it’s completely dry with a mix of equal parts Athonian Camoshade and Water
This sounds laborious! It is! But if you nail the skin, then the rest of the mini will come together well. If you really can’t hack it, I’d basecoat the entire miniature with Deathguard Green and then wash it with a 1:1 mix of Athonian Camoshade and Agrax Earthshade. It won’t look as good, but it’ll give the overall effect and if you’re going in hard on kroot… I understand. We all understand.
Clothing and Accessories
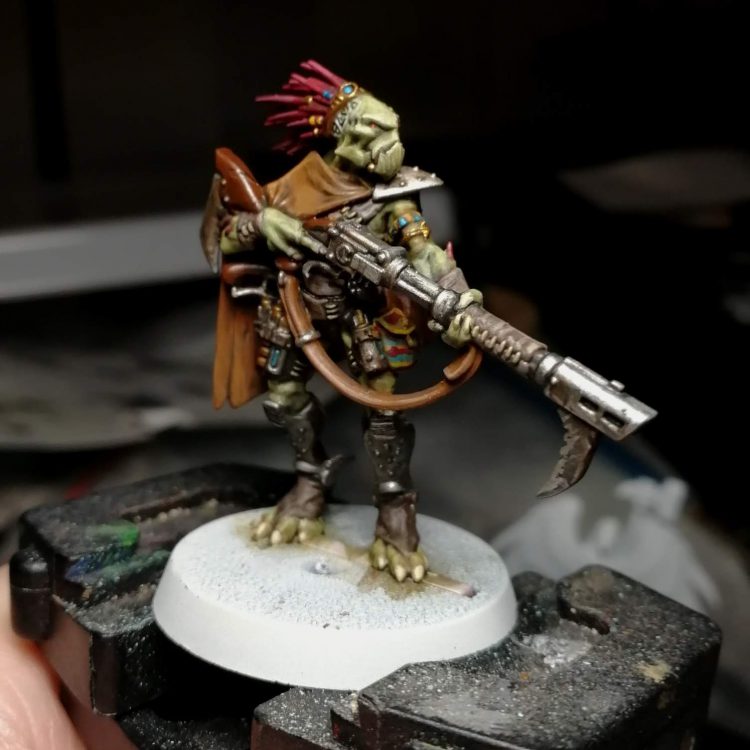
So for the demonstration mini I painted the Kroot bounty hunter from Blackstone Fortress because it’s so damn cool. That means there’s a little bit more detail and fuss on the mini than on a normal kroot, but the principles remain the same.
The goal for the clothing is to give something with the feel of natural fibres and something that complements the skin without clashing. I decided to take the brown tones from the skin tones and play with those primarily, saturating towards yellow, desaturating towards cream and stone for variety.
I used Dryad Bark for the dull leather sections, like the feet wraps, belt and pouches, shading with Druchii Purple and just giving a quick highlight with Karak Stone.
For the cloak I went warmer, using XV-88 as the base. To distinguish from any similarly toned battlesuits, and to make the cloak feel organic, I went with an Agrax Earthshade wash, and then a highlight with Karak Stone (Karak is my goto highlight for leather).
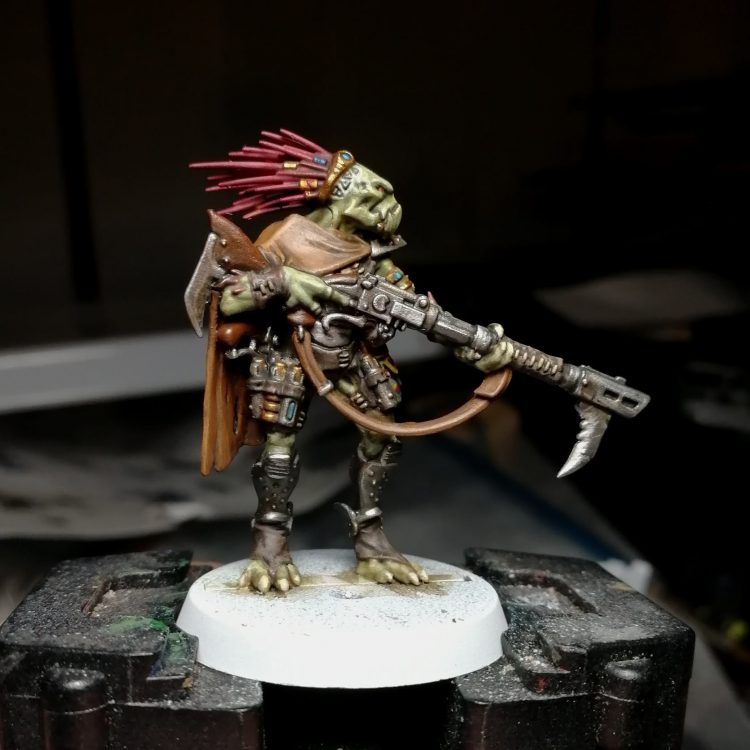
You’ll note these are far simpler than the skin, and that’s intentional. It’ll make the surfaces feel flatter and less alive.
For me it wasn’t quite popping. To give it a bright highlight I chose Temple Guard Blue, as it complements the green really nicely while being bright enough to jump out. I did some designs inspired by those of first people’s clothing and jewellery in the US (I’m sorry to say I didn’t note which people or tribe). That bright sharp blue I matched with a dark desaturated red (Khorne Red). I blended it to the cloak with a little Agrax.
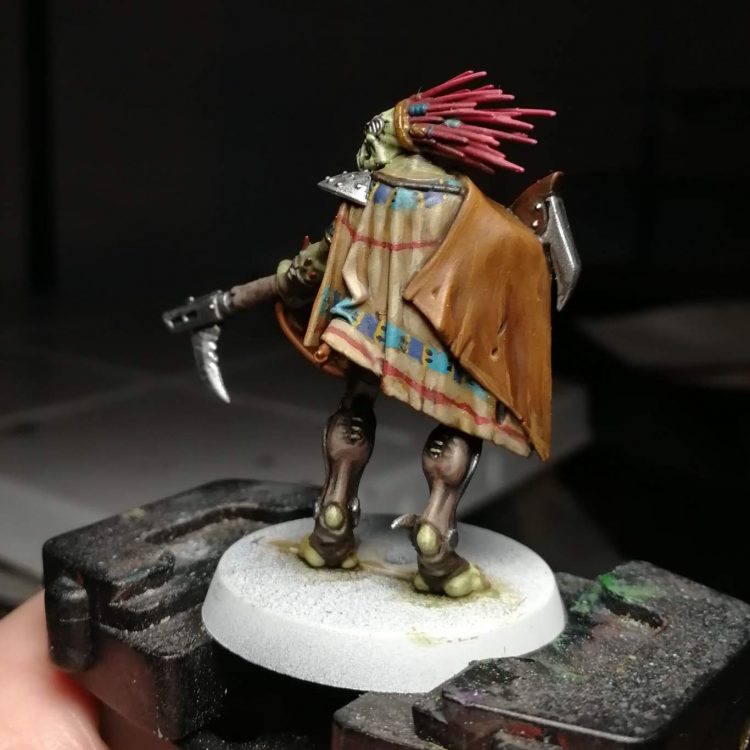
I used similar colours on the beads and other jewelry parts. I used a really rich gold for a few (Viking Gold from Scale 75) and also some flat steel for weapons (Black Metal from Scale 75). A wash and then using the basecoat as a highlight, and they’re done.
Final Thoughts
Tau are really fun to paint as long as you like edge highlight. Camo patterns are fun to do and they also take well to weathering. They also usually feature few materials and minimal metals (I hate metals) so you can get them basecoated relatively quickly. While we’ve shown you a solid half dozen schemes done in a variety of ways, we’ve only just scratched the surface and you’re limited only by your imagination. Perhaps in the future we’ll come back and look at painting the bigger battlesuits and some of the really fun techniques you can steal from Gundam and scale modelers to push those to the limit. And as always, if you have any questions or feedback, or you just want to share your pretty models with us, feel free to drop us a note in the comments below, or email us at contact@goonhammer.com.


