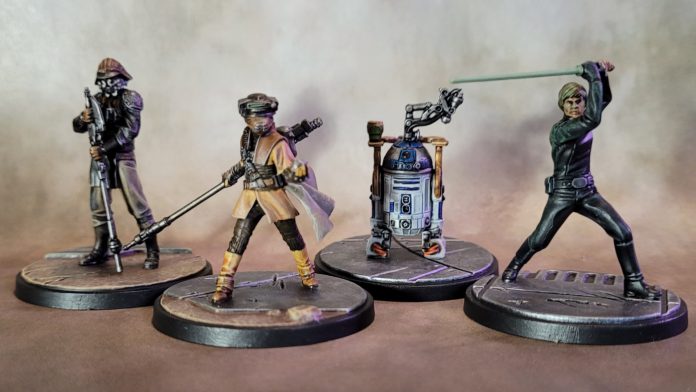
The escape from Jabba’s Palace sequence in Return of the Jedi is one of the original trilogy’s most exciting set pieces, and it is arguably the one that plays out the most like a game of Shatterpoint. Visually this squad pack offers some nice variation, with Luke Skywalker’s striking black costume and green lightsaber, Leia and Lando’s palace disguises, and a fancy drinks tray for R2.
Assembly
All four models in this pack come with alternate parts, so you’ll have some decisions to make before you start clipping pieces off of the sprues. Luke can be wearing his heavy vest, Leia and Lando have optional helmets, and R2 can be built with his serving tray, or without it if you want him to be more classic-looking. The alternatives are all interesting enough that I’m considering picking up a second copy so I can build the other versions.
Assembly for the three human characters was pretty straightforward, and I don’t think the head or torso swaps would make them any easier or harder. Getting the top of R2’s head on exactly right was the only major challenge – the piece is very small and flat, and the peg hole is kind of shallow, so the piece will slide around a bit. I imagine the version with the serving arm might be a little easier than the one without since it gives you a little more to hold on to while positioning and waiting for glue to dry.
Priming
Since Luke, Leia and Lando are in fairly dark clothes I primed them in Vallejo brush-on black. For R2 I did the base in black, but the figure in Vallejo brush-on grey, which is a very light, nearly white primer. One huge advantage of using brush-on primers is that you can prime different parts of the model in different colors if needed.
Bases
I like all my Shatterpoint models to have a consistent look, so I used my usual method for doing the bases. Over the black primer I drybrushed Vallejo Model Air Gunmetal and then Vallejo Model Air Steel. For the bases with ground showing, I base coated the ground in Reaper Muddy Brown, followed by a heavy drybrush of Reaper Leather Brown and a lighter drybrush of Reaper Amber Gold. I then went over the lines between the floor plates in Vallejo Model Air Metallic Black, and cleaned up the edges between the ground and the metal plates with a mix of the Vallejo Gunmetal and Steel. Finally, the edges were gone over in Reaper Pure Black.

Jedi Knight Luke Skywalker
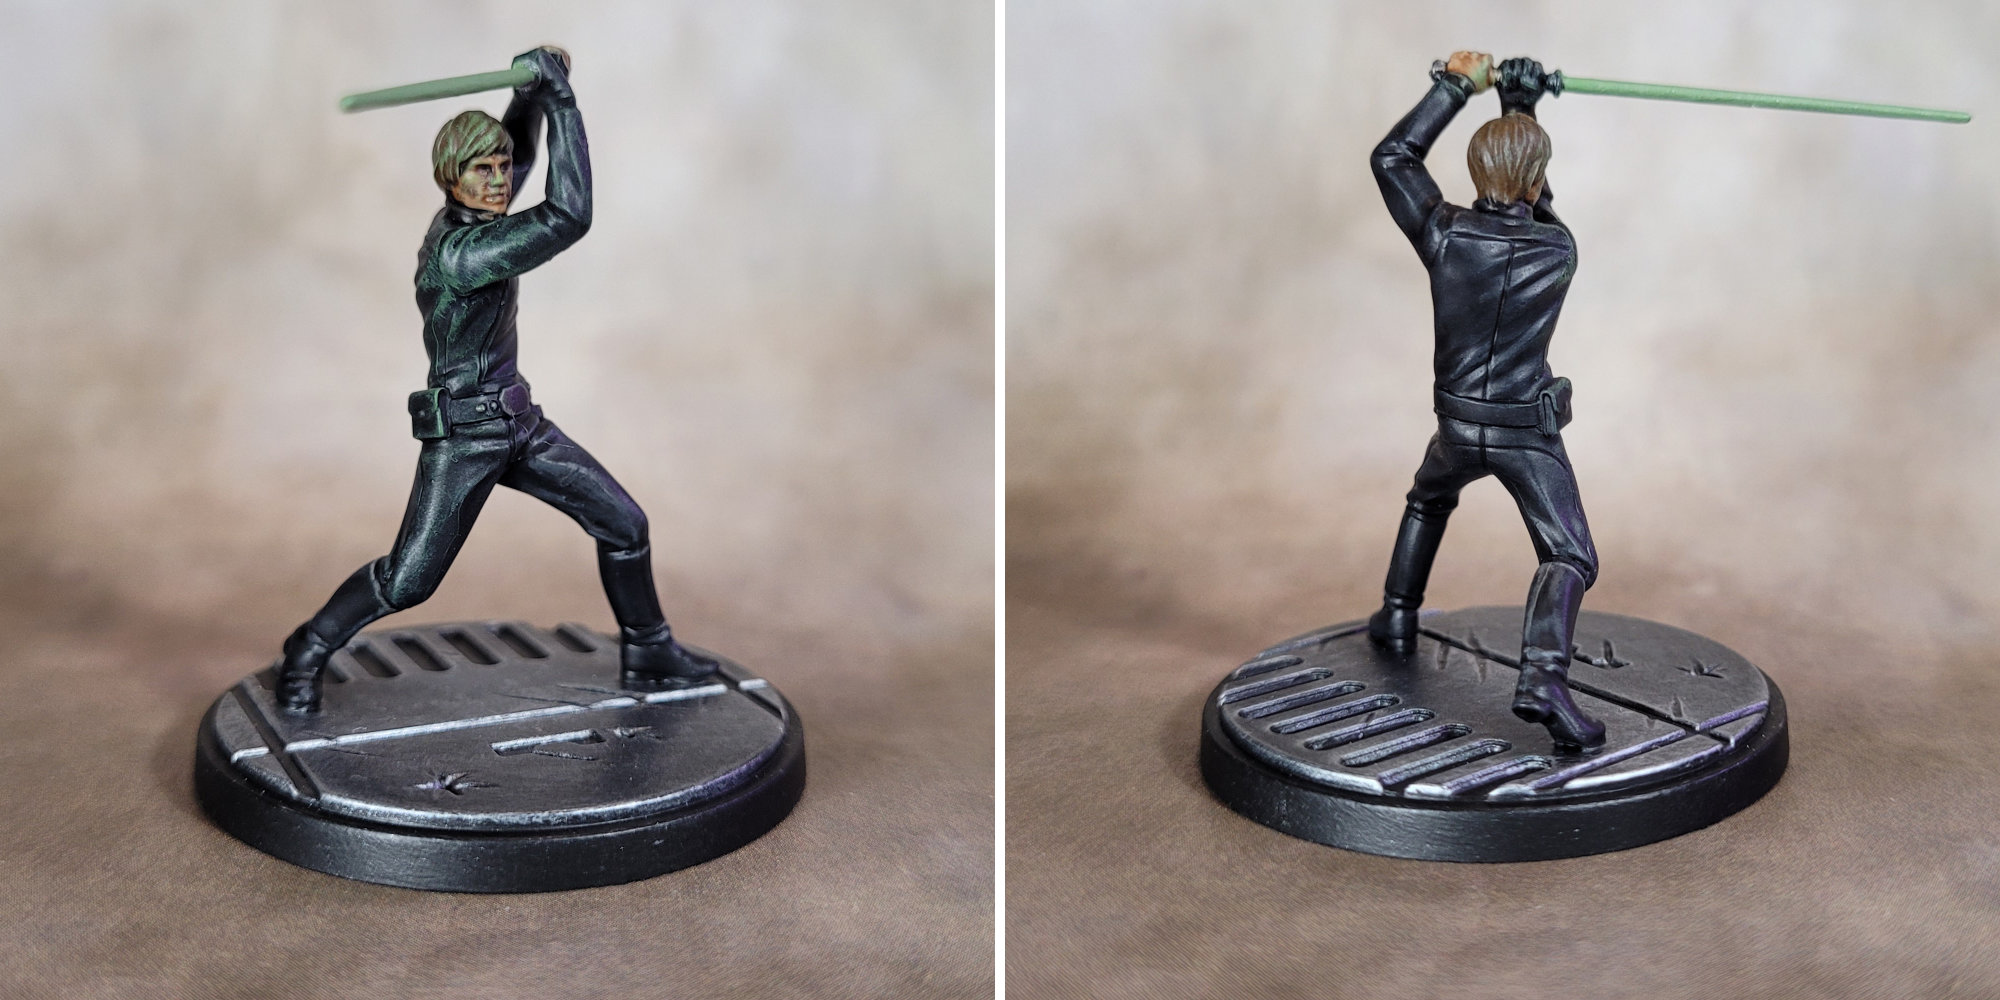
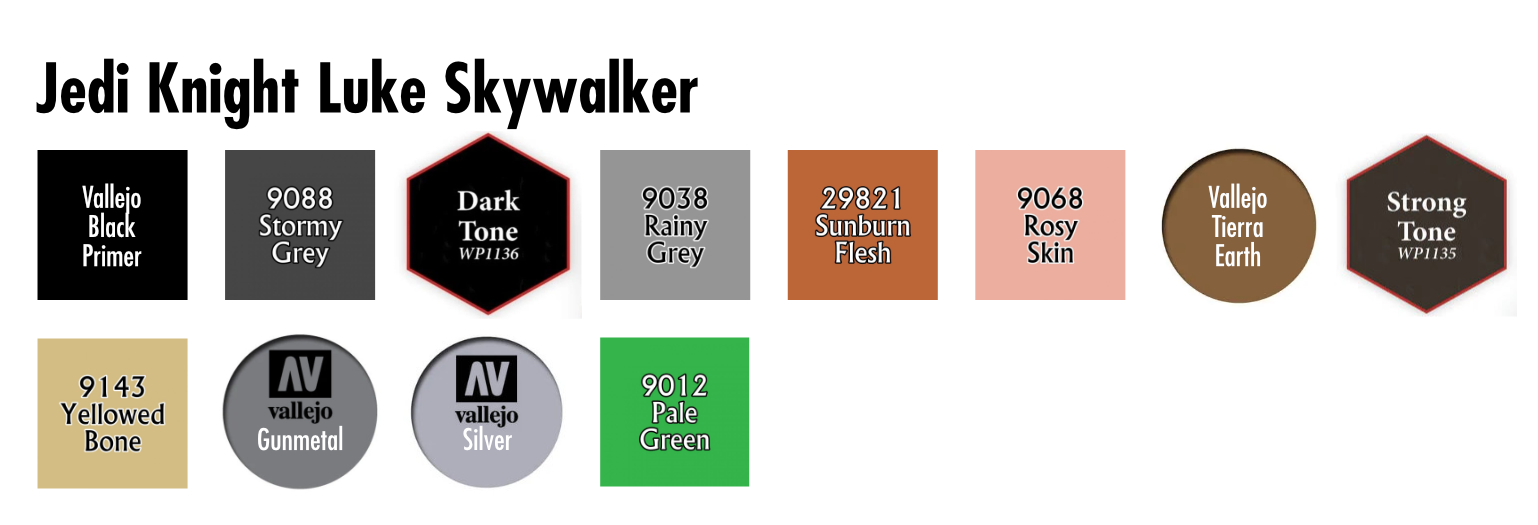
I chose to assemble Luke without the vest so he’s dressed head-to-toe in black, which sounds easy but can be challenging to get just right. I started with a light drybrush of Reaper Stormy Grey and then went over some of the highlight areas – drybrushing over black leaves you with a darker version of the drybrushed color, so going over it by painting in the same color will lighten things up a little. However, this left the model looking a little too grey for my liking, so I darkened it up by going over all the cloth areas with an Army Painter Dark Tone wash. I then went back over the raised areas on the boots in Reaper Rainy Grey, to give the shiny leather a more high-contrast highlight.
I did his face and left hand with a basecoat of Reaper HD Sunburned Flesh followed by some brushed-in highlights in Reaper Rosy Skin. His hair was done in Vallejo Game Color Tierra Earth (I don’t normally use Vallejo color but I got this one as a freebie with an order from somewhere), followed by a wash with Army Painter Strong Tone and a very light drybrush of Reaper Yellowed Bone. His belt buckle and lightsaber handle were painted with Vallejo Gunmetal, with the Dark Tone wash over that to add a little definition.
For the lightsaber blade I stuck with my go-to technique of adding just a little Vallejo Model Air Silver to the lightsaber color, in this case Reaper Pale Green. The silver adds a little reflectivity to the color, so when the light catches it just right you get a nice glow. To enhance that I drybrushed his shoulder and part of his head with the same Pale Green, just where I thought light from the saber would hit.
Boushh (Princess Leia)
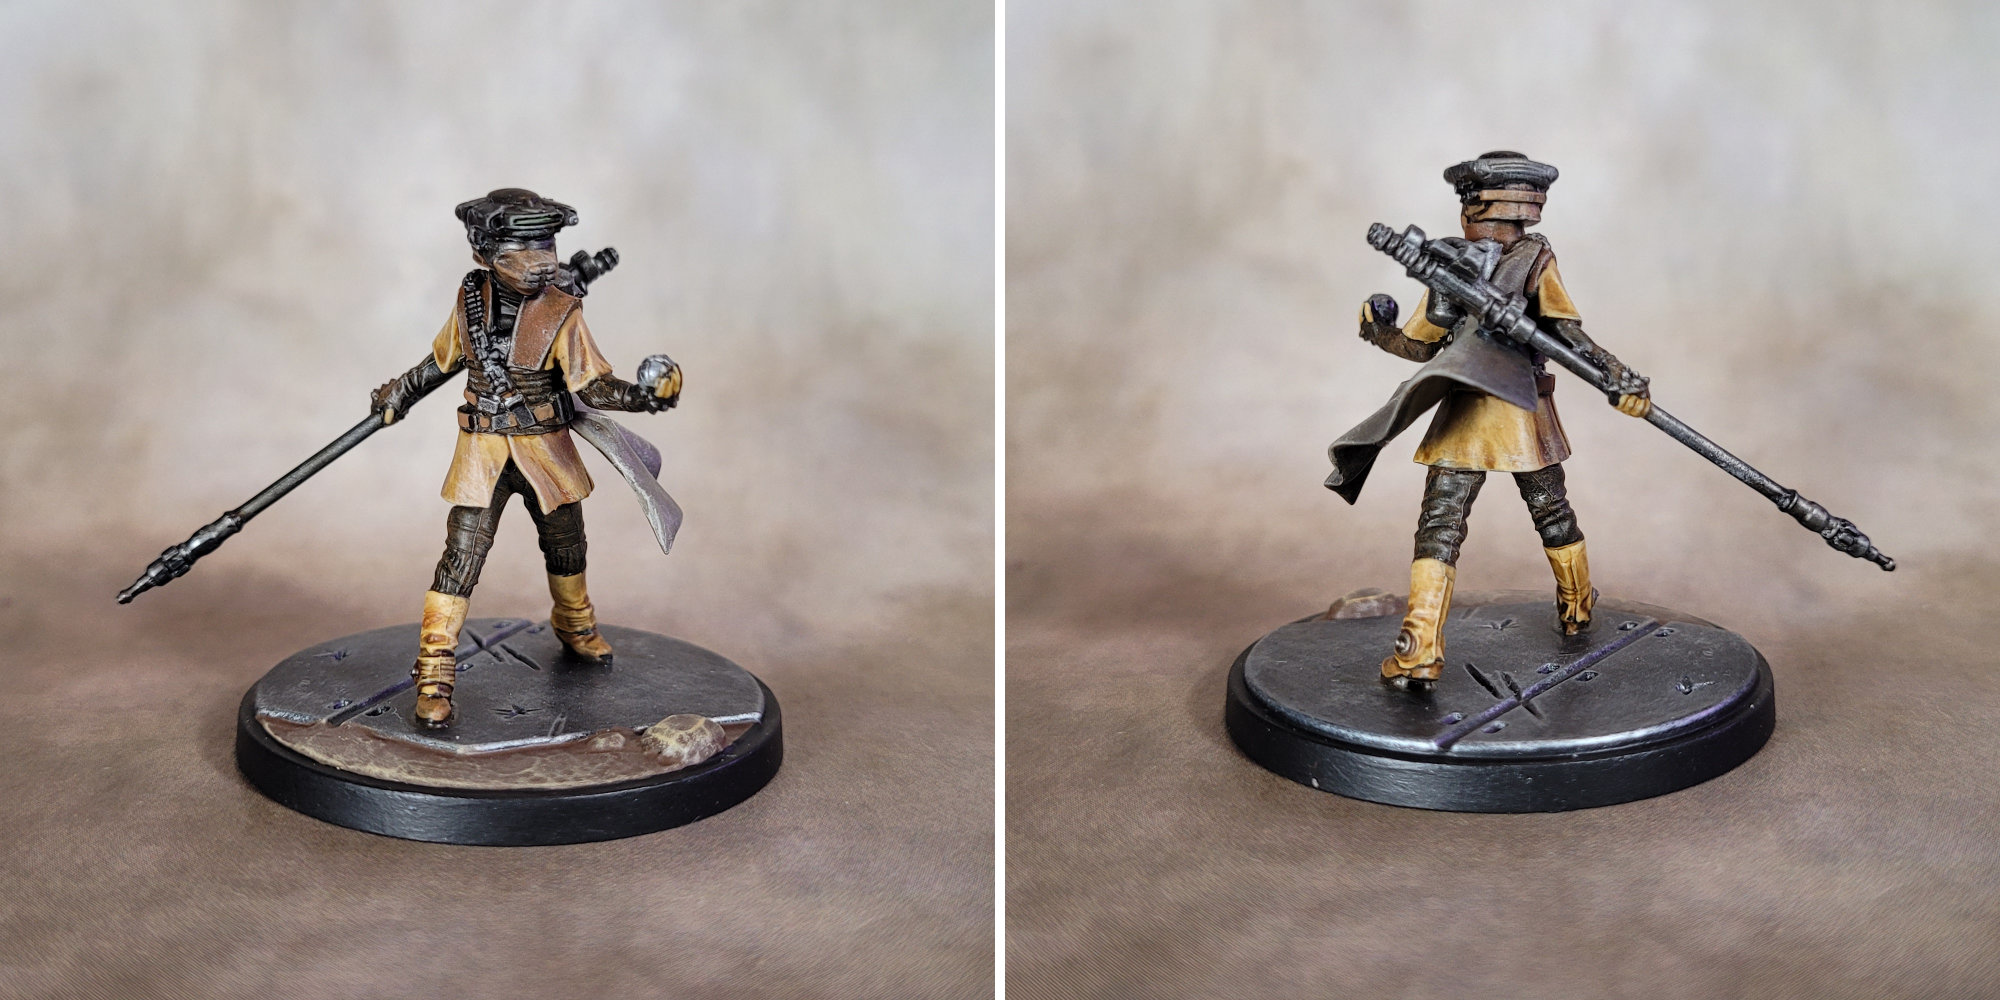
Leia and Lando’s outfits have a lot of little fiddly details and layers. Luckily, Star Wars cosplay demands a high level of accuracy and attention to detail, so there are tons of high quality reference photos just an internet search away.
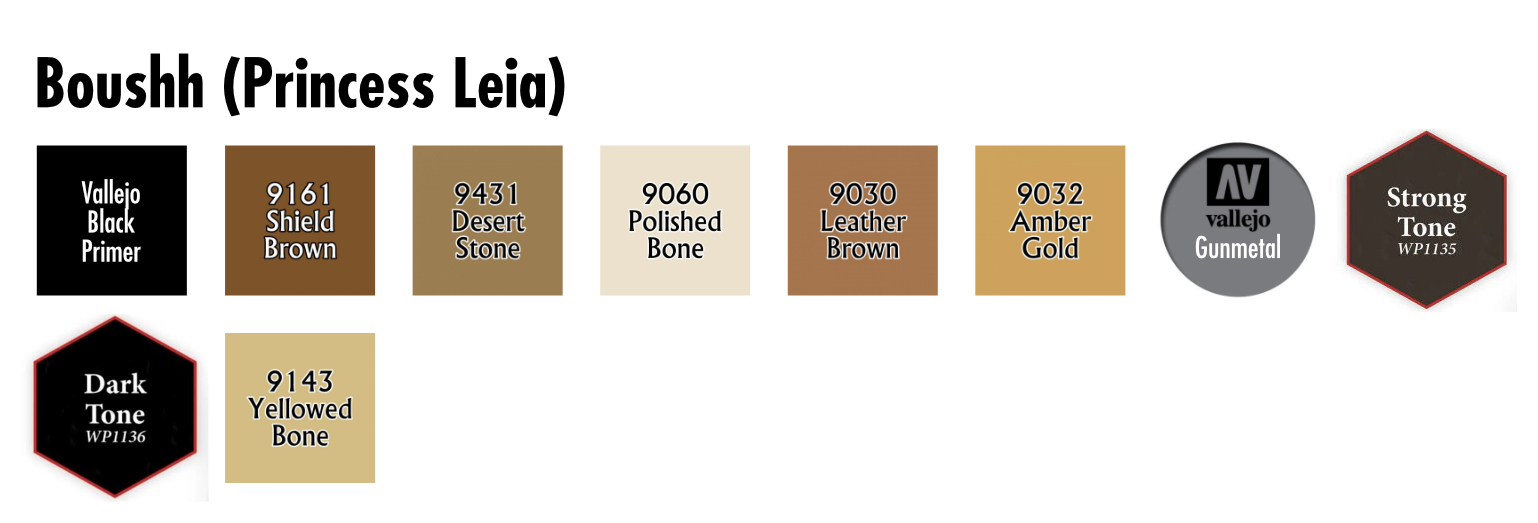
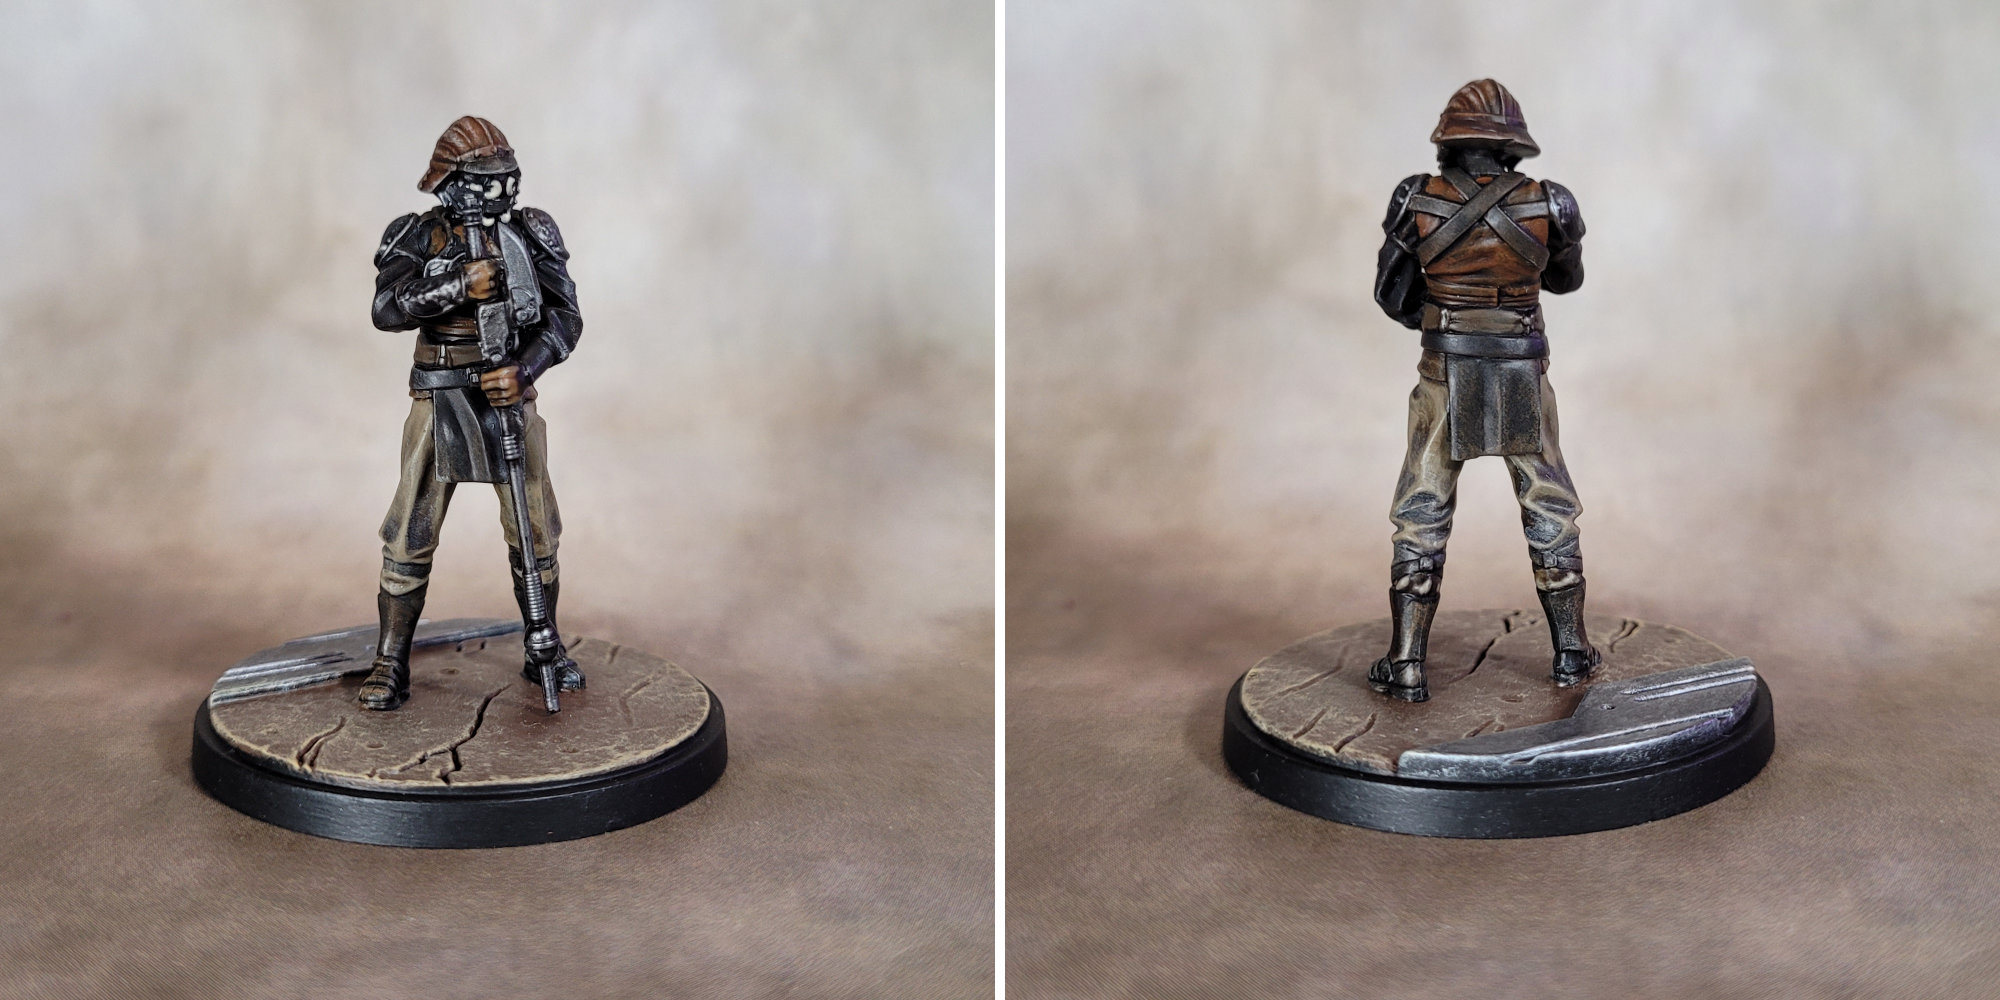
I went with helmet-on for this model, perhaps holding out hope that we might one day get an alternate stat card detailing the actual bounty hunter whose clothes fit Leia so well. I started by drybrushing the whole model in Reaper Shield Brown, but this was mainly just to reveal the texture and details through the black primer. The drybrushed brown acts as a base for the character’s innermost layers: the pants, lower sleeves, and the waist and neck areas that we see under the shoulder pads.
I planned to use a fair amount of washes on this model, and I find that they tend to pool awkwardly on cloaks. I painted in the cloak with Reaper Desert Stone, followed by a drybrush in Reaper Polished bone, doing this first so I can later paint over any other areas of the model where the drybrushing spills over.
From here it was just a question of going in with different browns, tans and metallics for all the details: Reaper Leather Brown for the shoulder pads and some of the boot detail, Reaper Amber Gold for the upper sleeves, tunic, glove fingers, and boots, and Vallejo Gunmetal for the staff, helmet, backpack, thermal detonator, glove knuckles, and the clasps on the boots and bandolier strap. The “snout” of the helmet was done in Leather Brown mixed with a bit of Shield Brown, and the top was left in the original drybrushed Shield Brown. Then a wash in Army Painter Strong Tone (Dark Tone for the metallic areas) to fill in the shaded areas. After the washes had dried I did a very light drybrush with Reaper Yellowed Bone, just a dusting really to bring out some edge highlights.
Lando, Inside Job
Also known as Tamtel Skreej, at least according to the 1990s Star Wars Customizable Card Game.
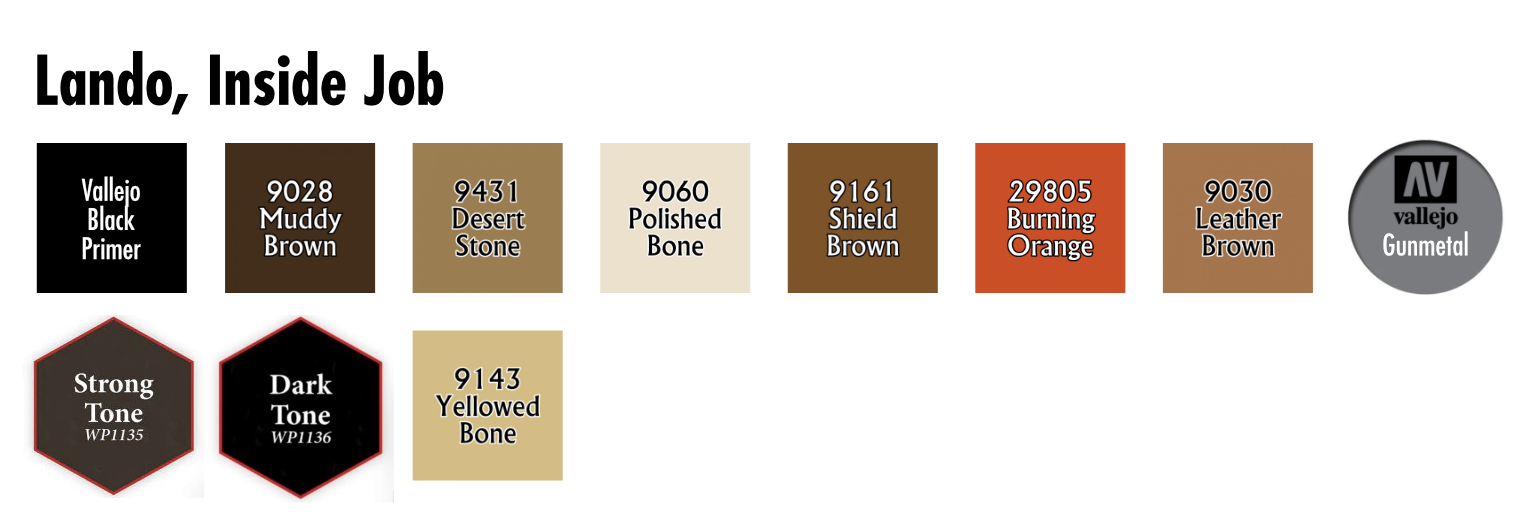
Lando was painted more or less the same way as Leia. This time the base color was Reaper Muddy Brown drybrushed over the black primer, which was retained for his sleeves, boots, and various belts and straps. His pants were painted in Reaper Desert Stone mixed with a bit of Reaper Polished Bone, with the belt flaps in Reaper Shield Brown. The tunic he wears under all the straps was done in Reaper Muddy Brown mixed with just a bit of Reaper HD Burning Orange (another discontinued color that I’m going to miss when I run out). The helmet was done in Reaper Leather Brown with details of the mask picked out in Vallejo Gunmetal and Reaper Yellowed Bone. The shoulder pads, chestplate, gauntlets and force pike were done in Vallejo Gunmetal, and his hands in Reaper Muddy Brown with a bit of Yellowed Bone mixed in to lighten it up just a little.
Finally, a wash in Army Painter Strong Tone for the cloth and Dark Tone for the metallic bits. After that had dried, I did a very light drybrushing of Yellowed Bone to bring out some highlights.
R2-D2, Inside Job
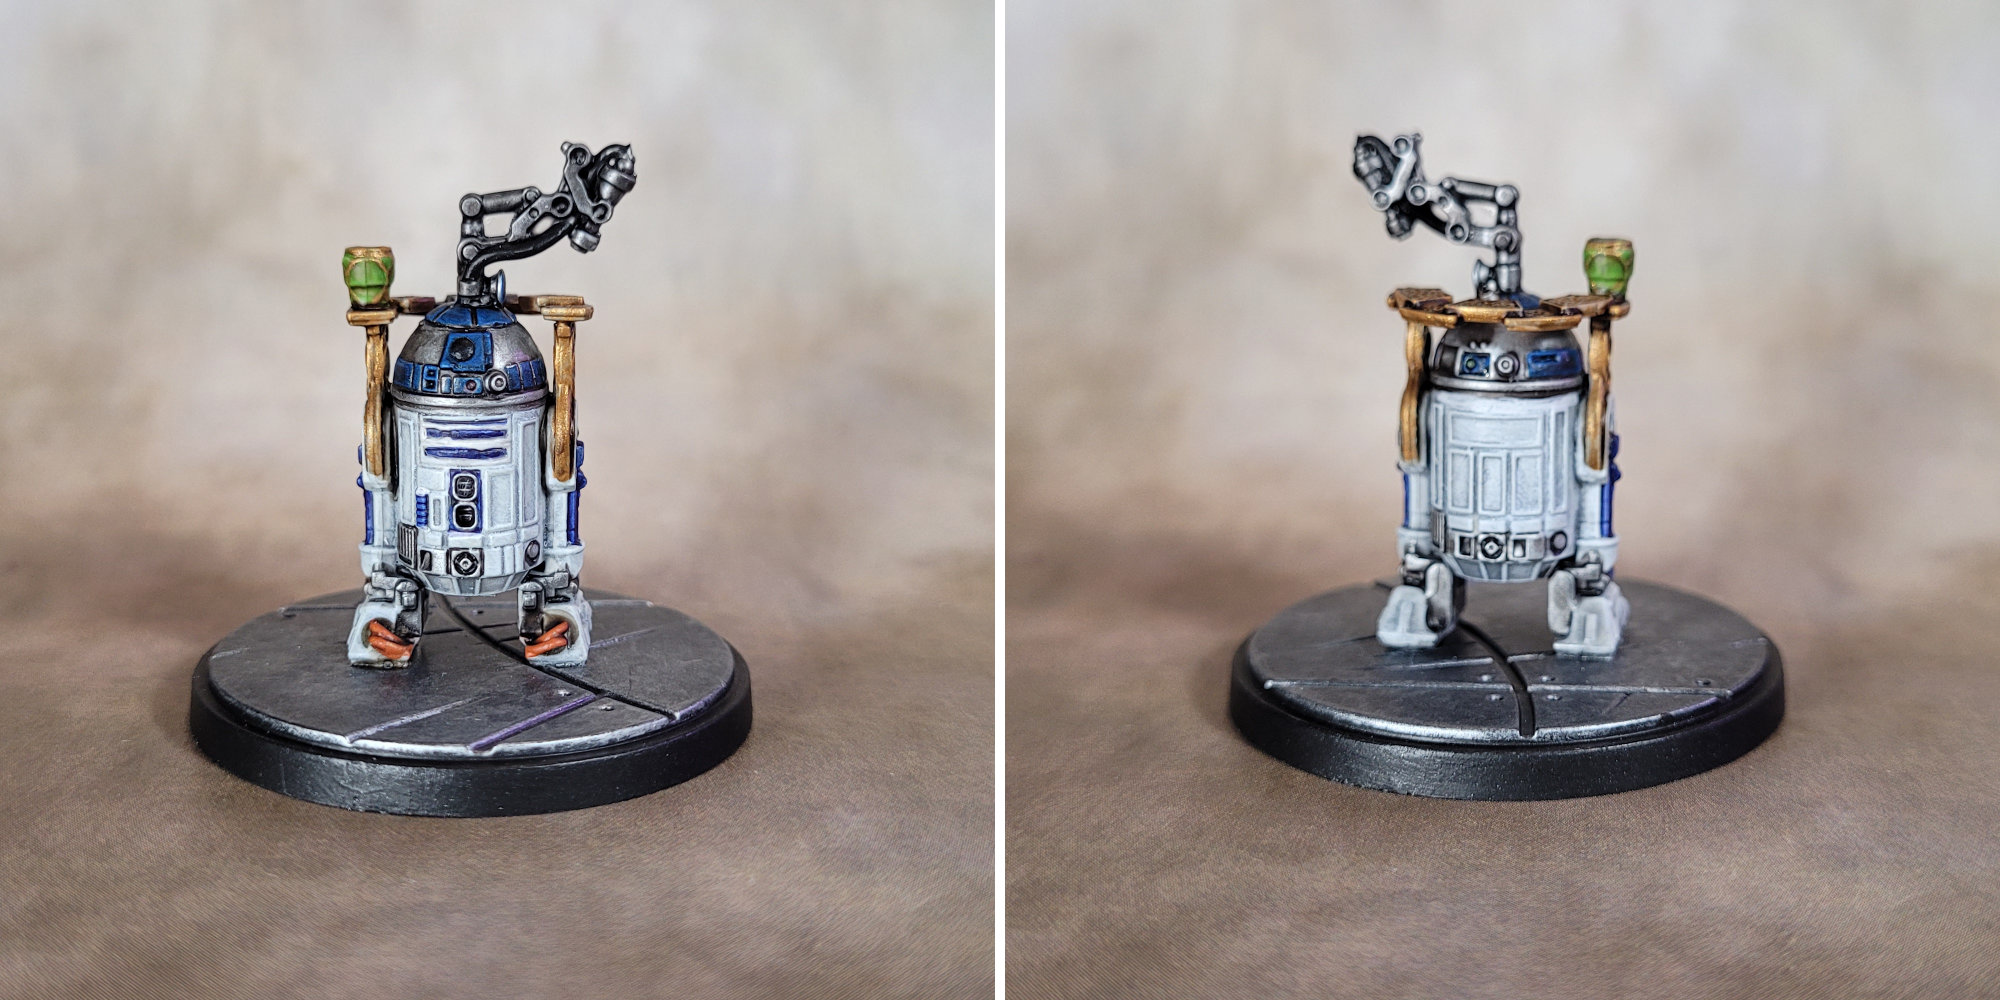
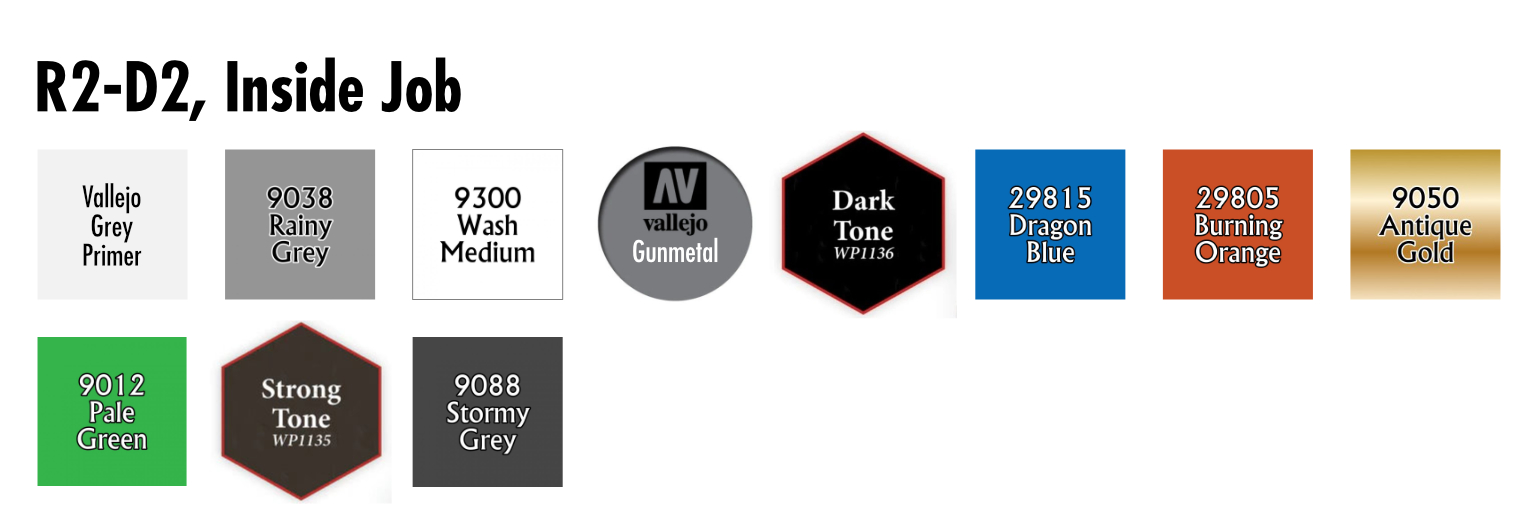
R2 was the most challenging model in this set for me. He’s very small, and has a lot of detail that needs to be sharp and crisp. The Vallejo grey primer is very light, so I actually needed to darken things down just a little to bring out the details on R2’s torso. This gave me my first opportunity to play around with some Reaper Wash Medium that I bought a while ago. I mixed the wash medium with Reaper Rainy Grey at roughly 50/50, which gave me a midtone grey wash that I applied to R2’s torso and legs. It worked a treat, filling in the recessed areas and bringing out the detail like a wash is supposed to do.
I then filled in R2’s details, using Vallejo Gunmetal and Reaper HD Dragon Blue as needed, going over the gunmetal with Army Painter Dark Tone wash. The wires on R2’s feet were done in Reaper HD Burning Orange.
The serving tray was painted in Reaper Antique Gold, taking a few coats as gold often does. The drink on the tray was painted in Reaper Pale Green, and the whole assembly gone over with Army Painter Strong Tone wash. The serving arm was Vallejo Gunmetal with a bit of Reaper Stormy Grey for the hose, then gone over with Army Painter Dark Tone wash.
Finishing Up
As usual, I gave the models a day to completely dry and then varnished using Army Painter brush-on Matt Varnish, thinned with a few drops of water.
The models in this squad pack were fun to paint, with a lot of interesting little details that make them ideal for washes and drybrushing, both time-saving techniques that will give you good looking miniatures without too much effort. I’ve got my fingers crossed that we’ll eventually get some palace guards for this squad to go up against, or maybe even Jabba himself…
Have any questions or feedback? Drop us a note in the comments below or email us at contact@goonhammer.com. Want articles like this linked in your inbox every Monday morning? Sign up for our newsletter. And don’t forget that you can support us on Patreon for backer rewards like early video content, Administratum access, an ad-free experience on our website and more.
