This article is part of a larger series on how to paint Space Marines. To return to that series, click here.
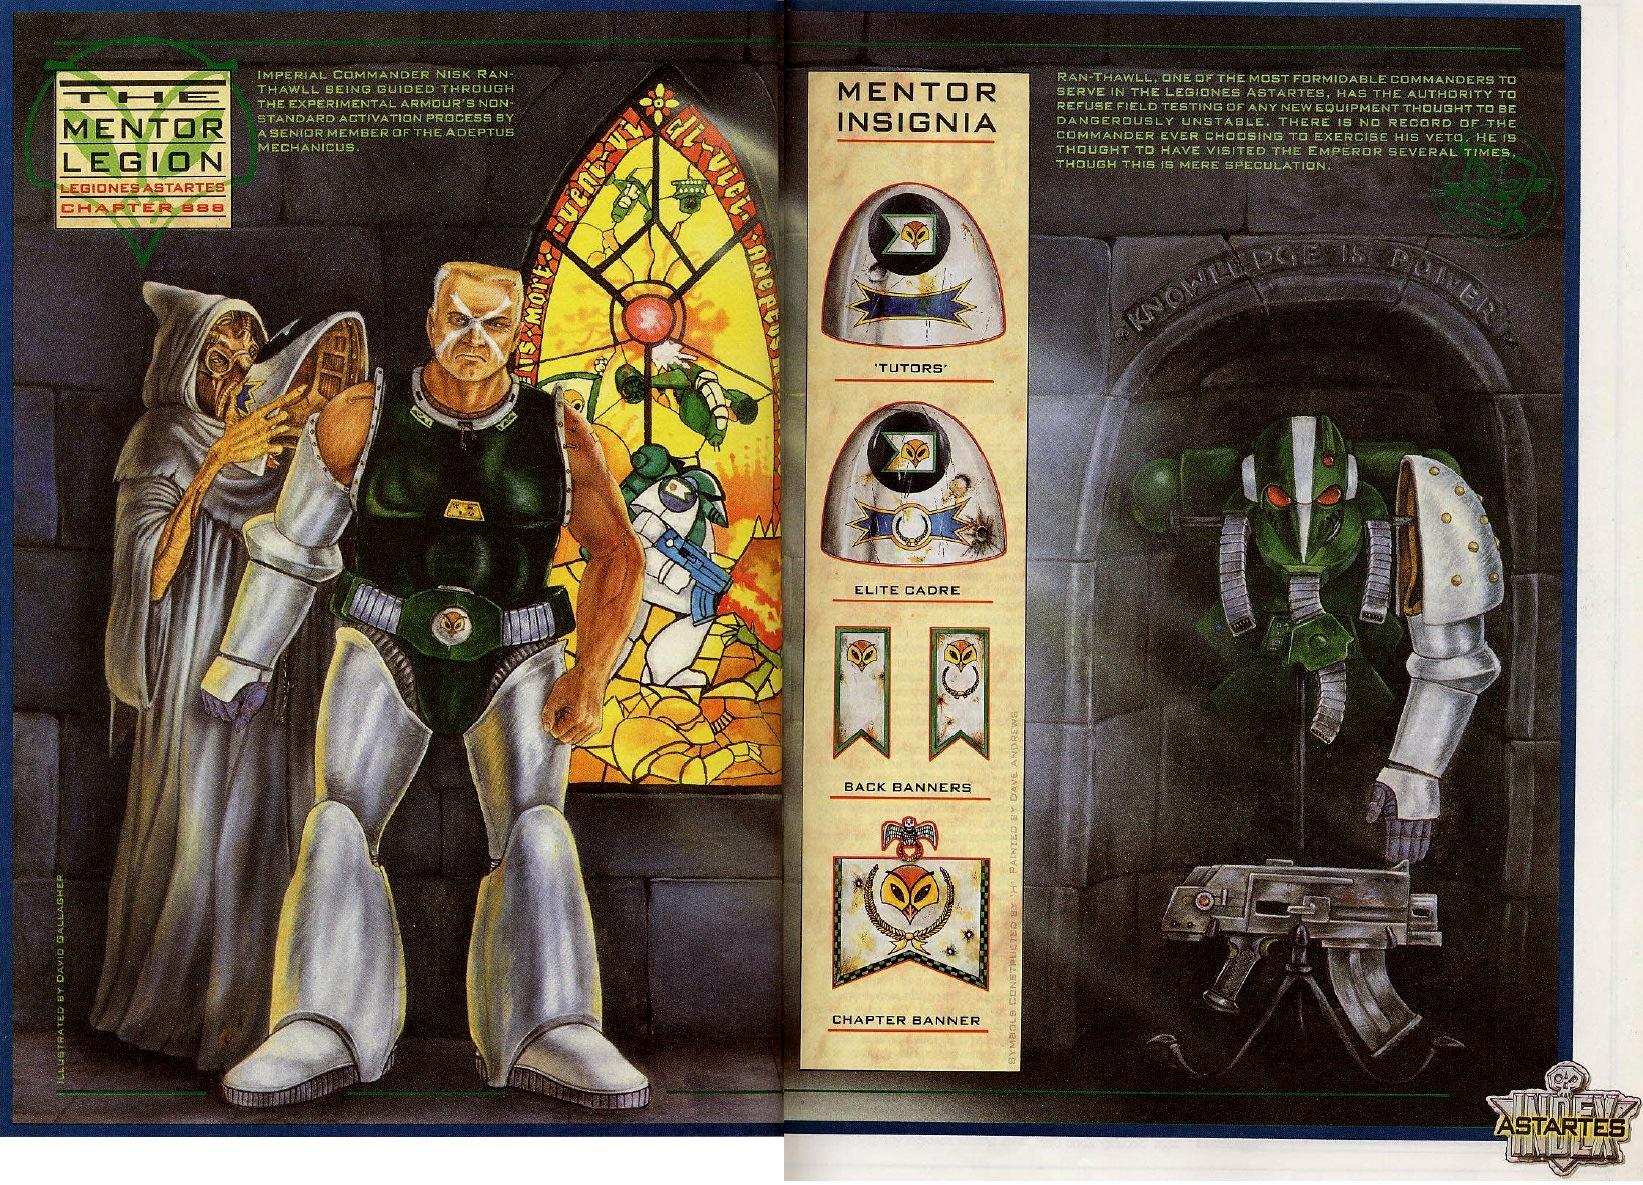
There are few Space Marine chapters I associate more with Rogue Trader than the Mentor Legion. As the recipients of the second ever Index Astartes article, they were one of the earliest chapters to get their heraldry and background written up. While the specifics have changed (as has just about everything about 40k since the 80s) the Mentor Legion gimmick has largely remained the same. Even as recently as the excellent Spear of the Emperor, they’re a chapter characterized by advanced technology who regularly attach themselves to other Imperial fighting forces.
I also recently acquired the Base Set of Pro Acryl paints from Monument Hobbies, and I wanted to give them a test drive. With most of my existing paint schemes already dialed in, I figured this would be a great place to try them out. All colors are theirs unless otherwise noted. Will I be Crylpilled by the end of this? Read on to find out!
Heraldry - Click to Expand
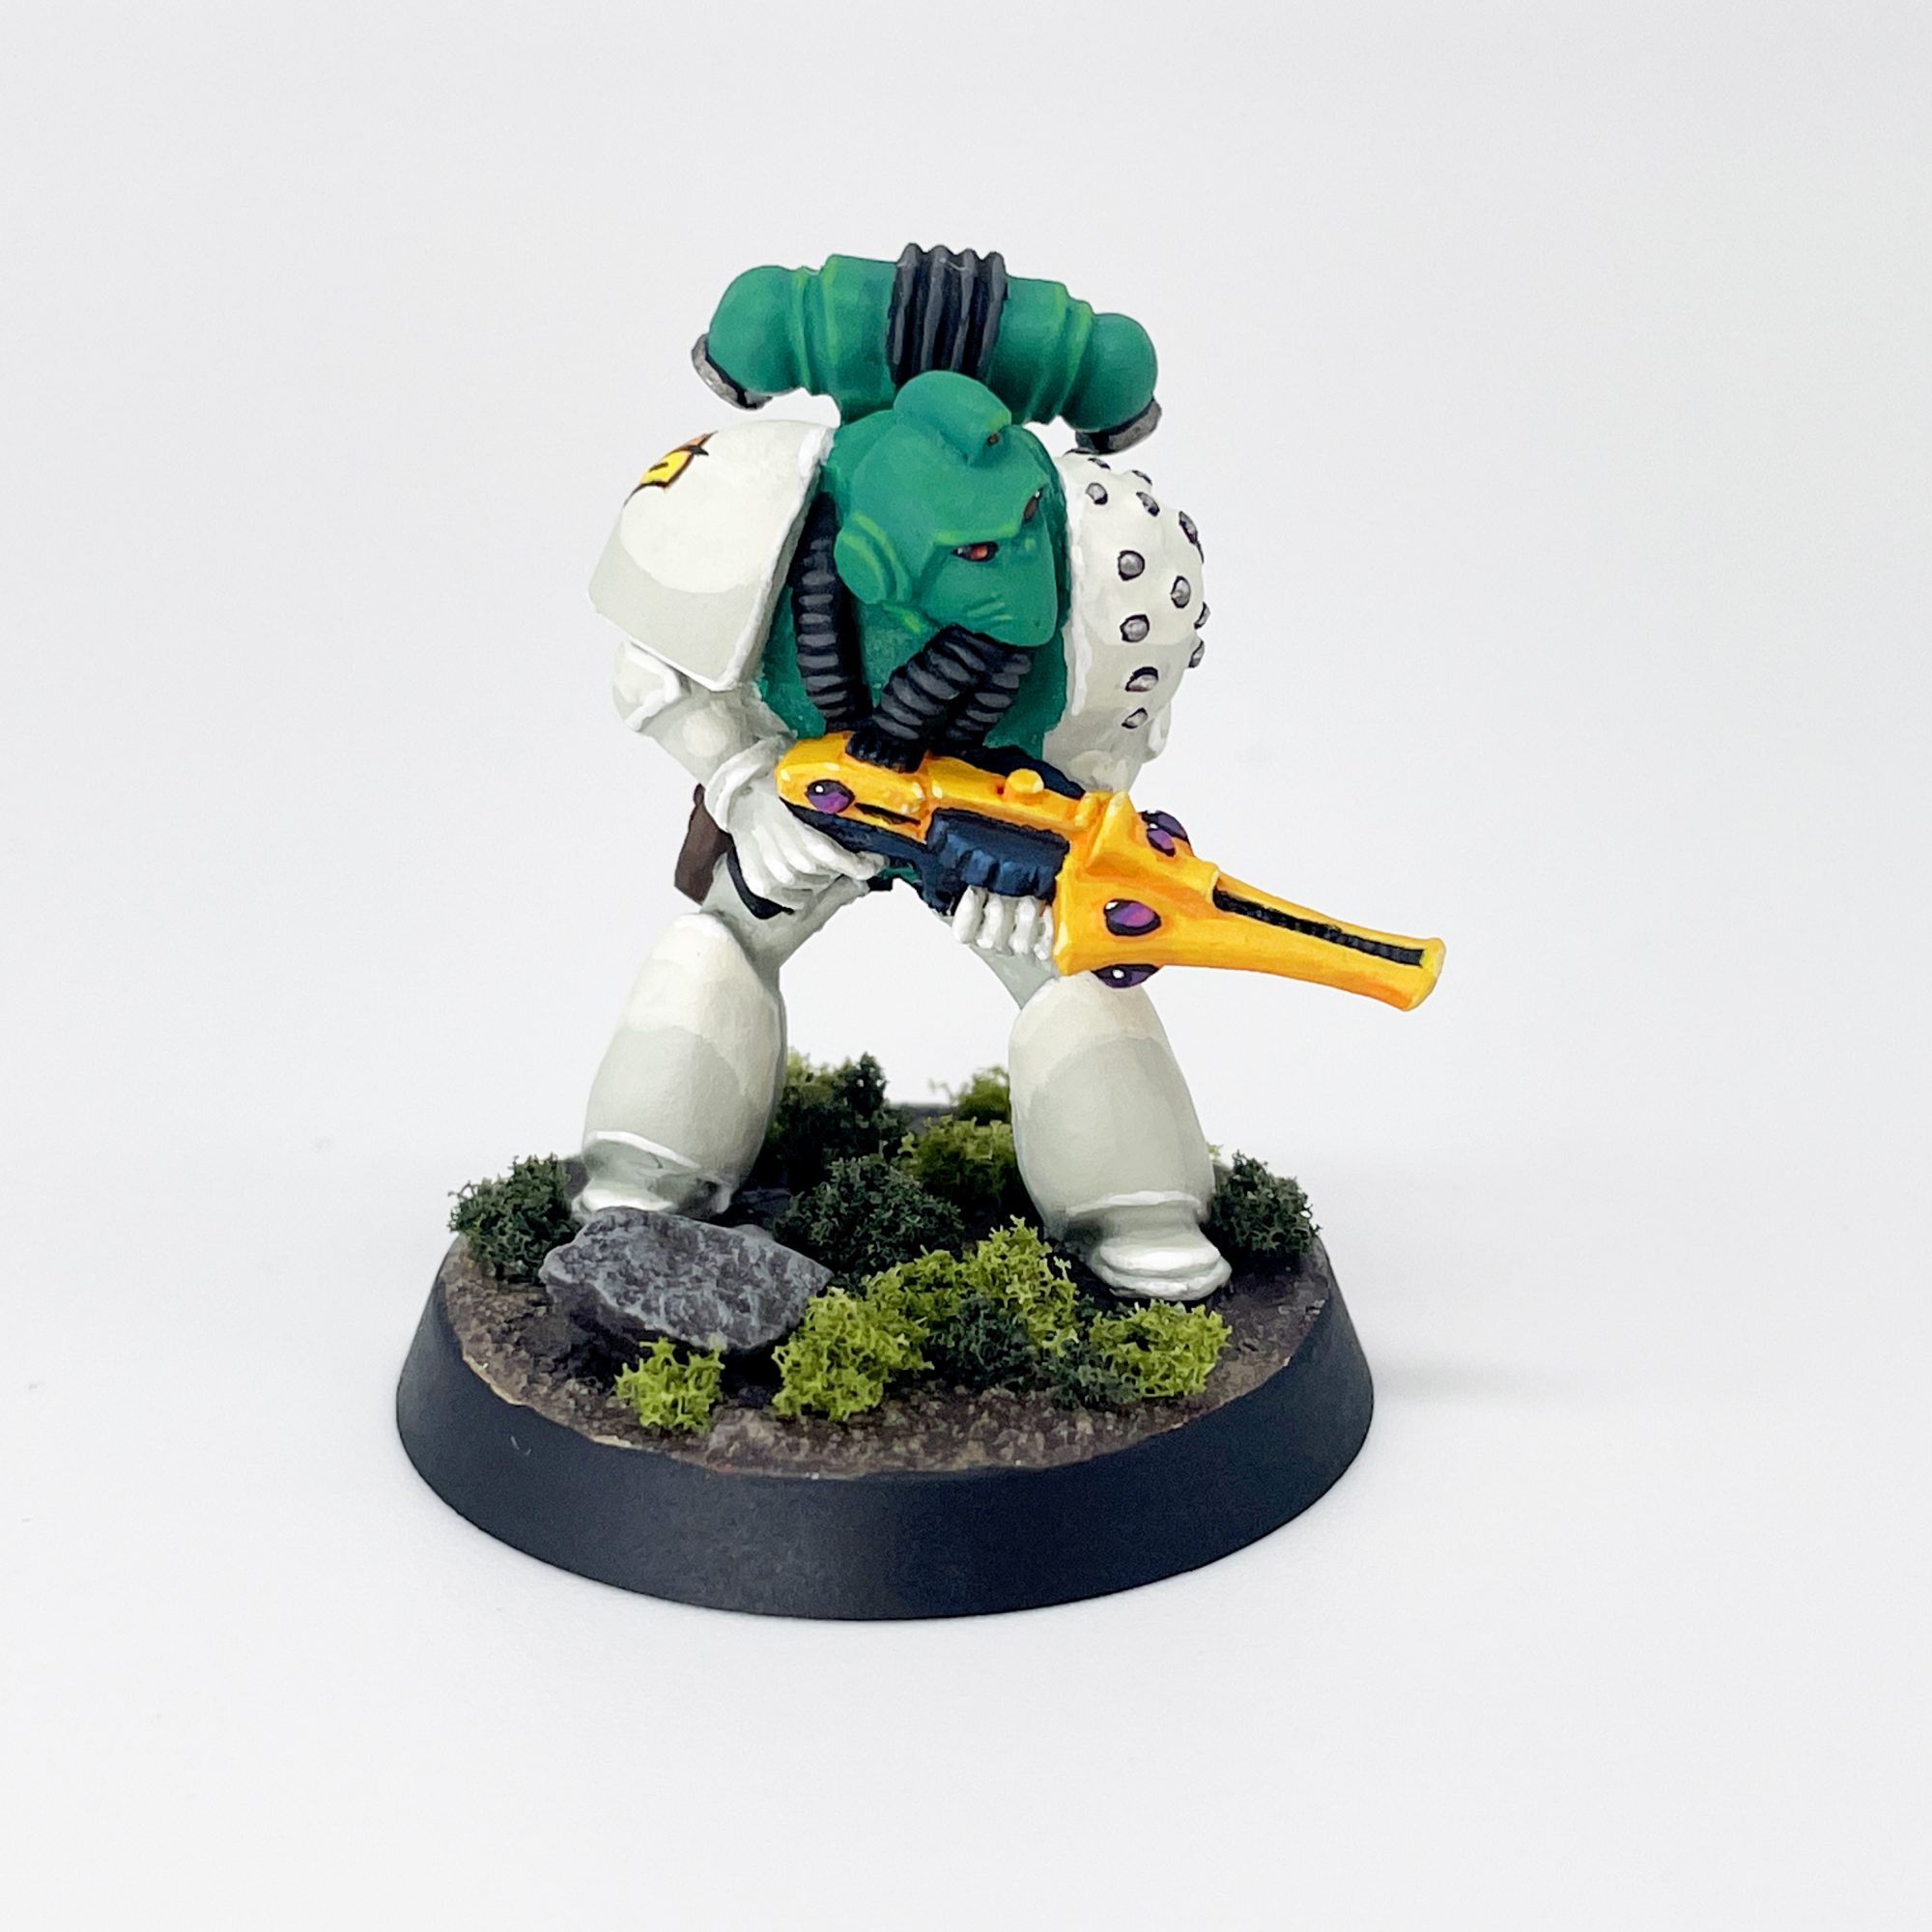
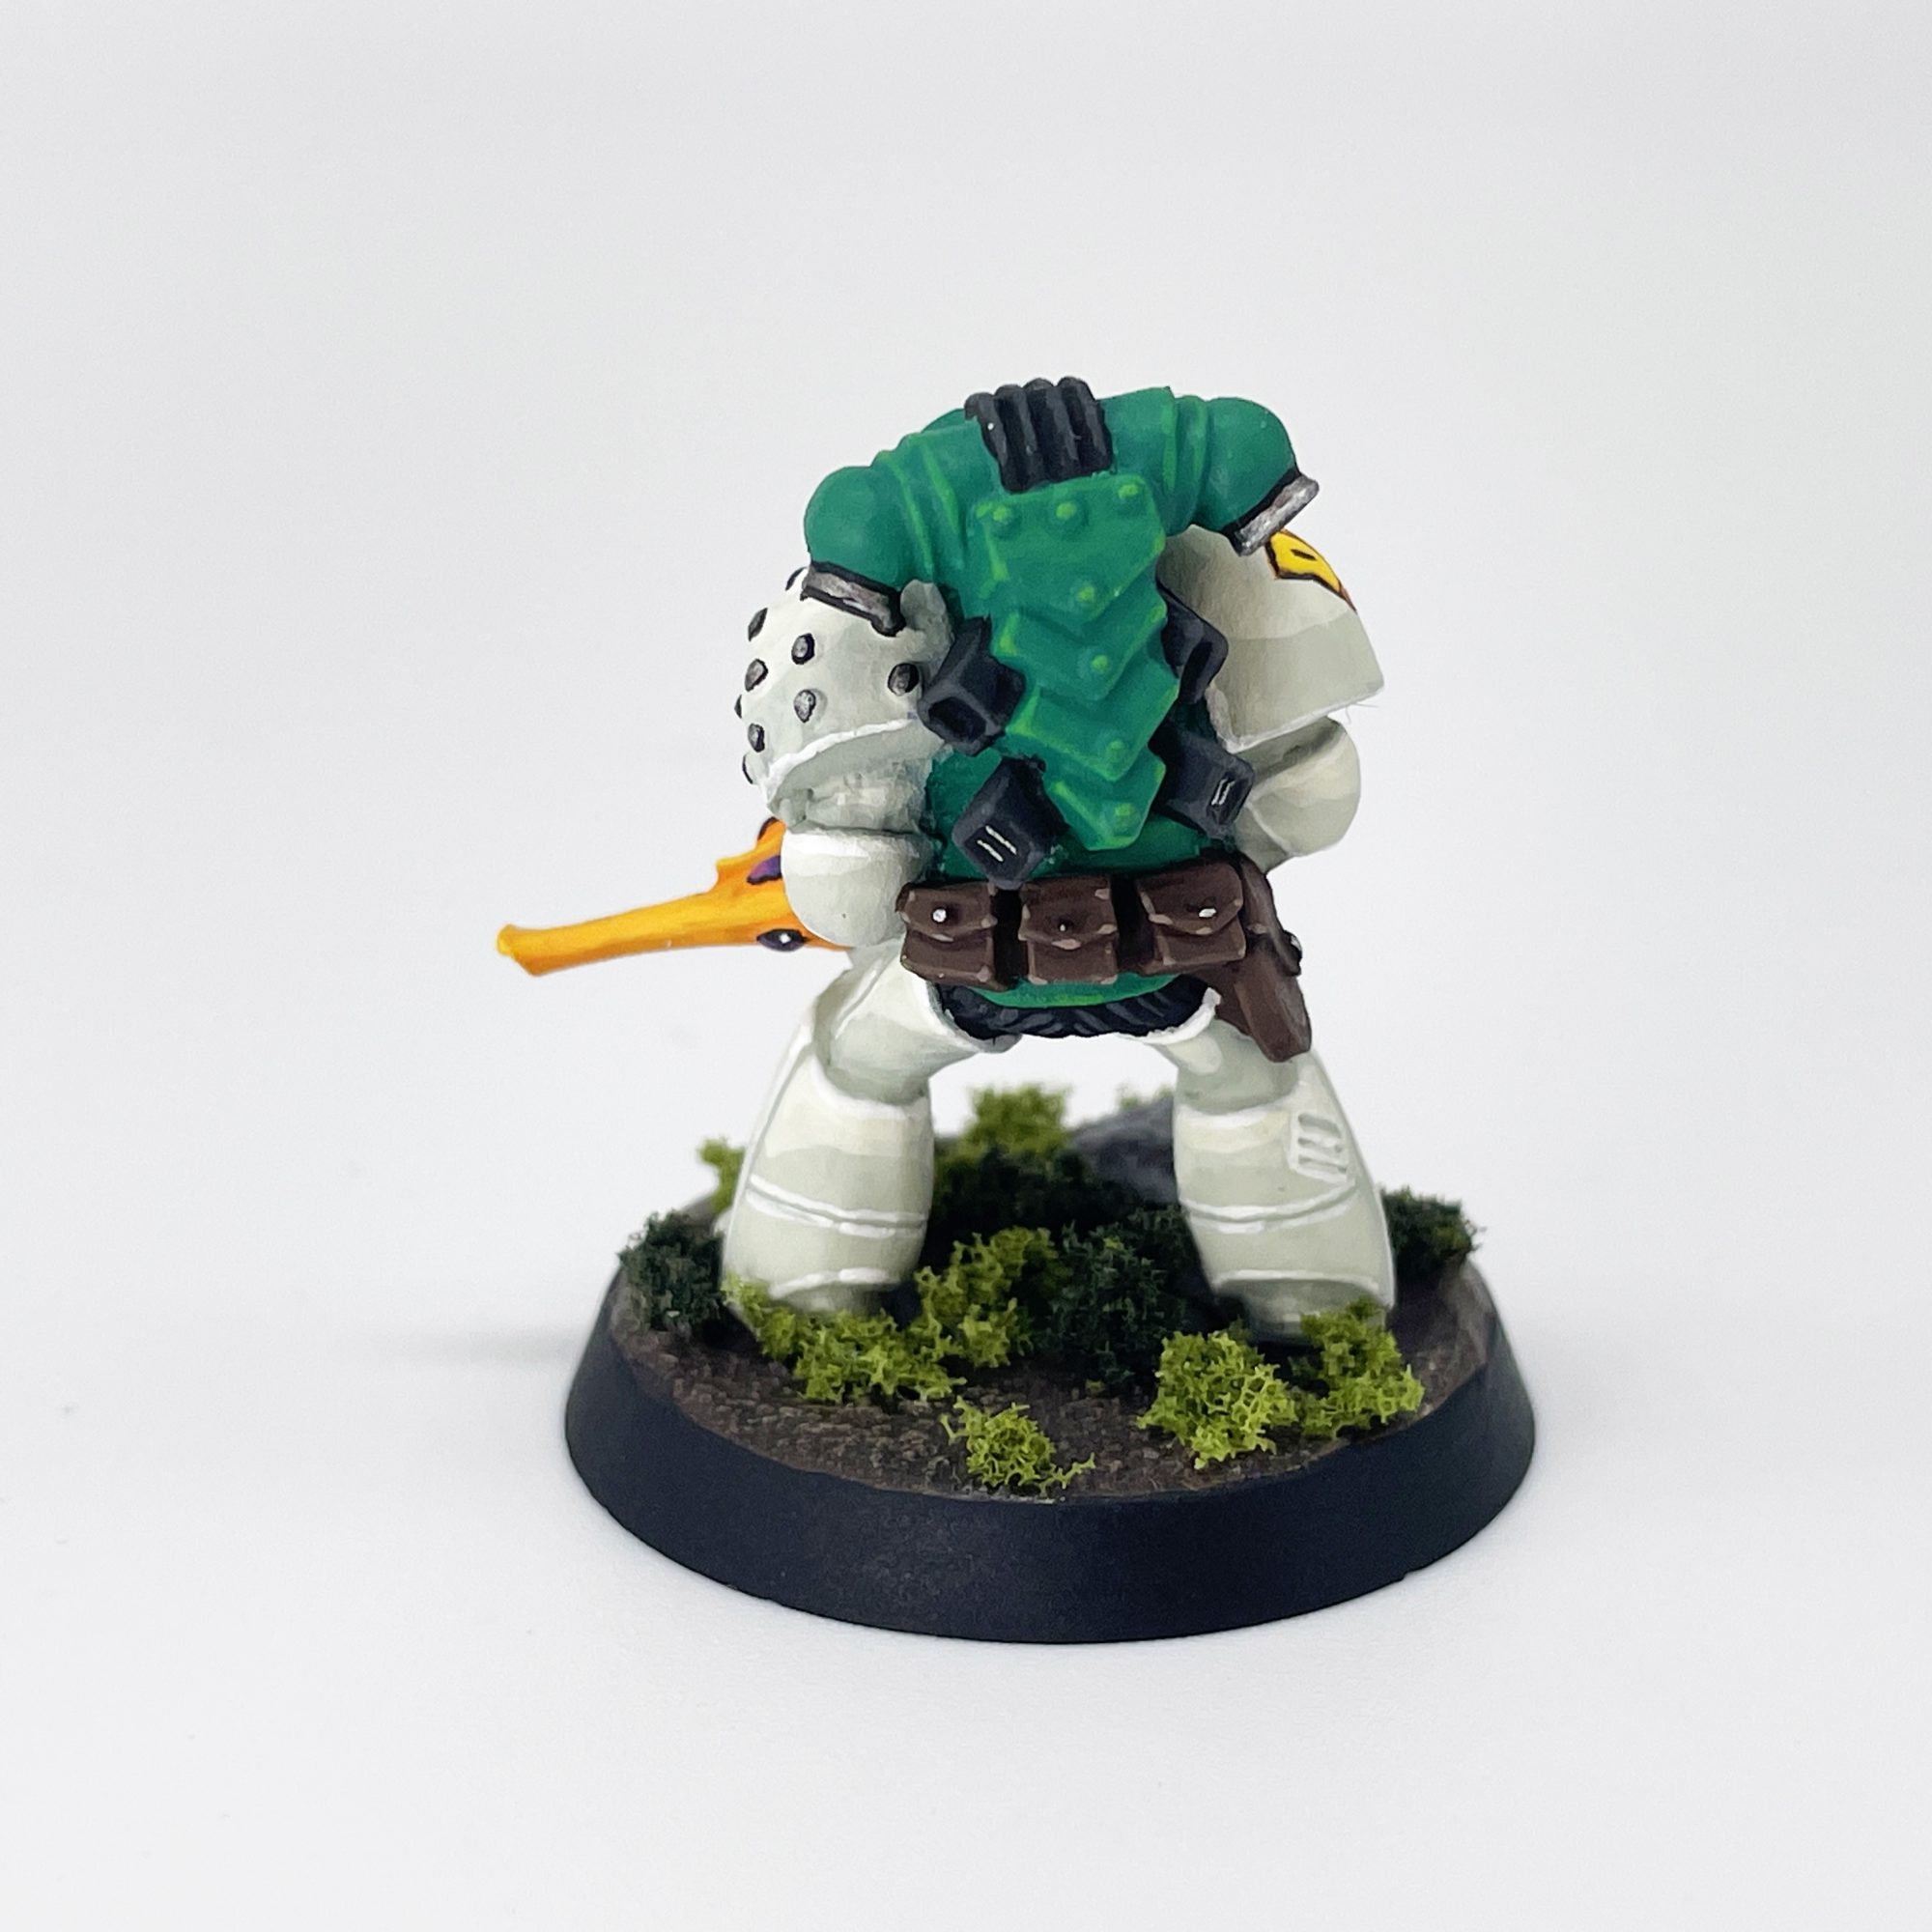
The Mentor Legion is defined by two colors – green and white. Generally it’s a medium-bright green torso, codpiece, helmet, and backpack, and white arms and legs. Red lenses, black piping, and metallic weapons cover the rest.
I won’t walk you through the specifics of my basing because it is nothing special, just some texture paste and drybrushing. I did most of my basing before painting, with some green clump foliage added later as was the style at the time. Contrary to popular belief the 80s wasn’t all Goblin Green bases, but in the Rogue Trader rulebook and contemporary photography it was generally a more realistic brown or grey with some green flock. I’d just recommend tackling any washing or drybrushing of your base before painting the model to avoid spillover onto the white armor.
I’ll also give the warning that this tutorial involves mixing colors and a wet palette. You could just go straight from one color to the next and do traditional edge highlights, but I wanted to try something akin to Mike Mcvey’s painting tutorial in the ‘Eavy Metal paint guide from 1994. If I’m going old school, I’m going to fully commit to the bit. This technique is known as Volumetric Highlighting, and it generally aims to replicate lighting by emphasizing the shape of what you’re painting. Here is an illustration that may help before we put paint to model:

Naturally, I’ll edge highlight afterwards to more strongly define the details of the model. I am an Edging Enthusiast, after all.
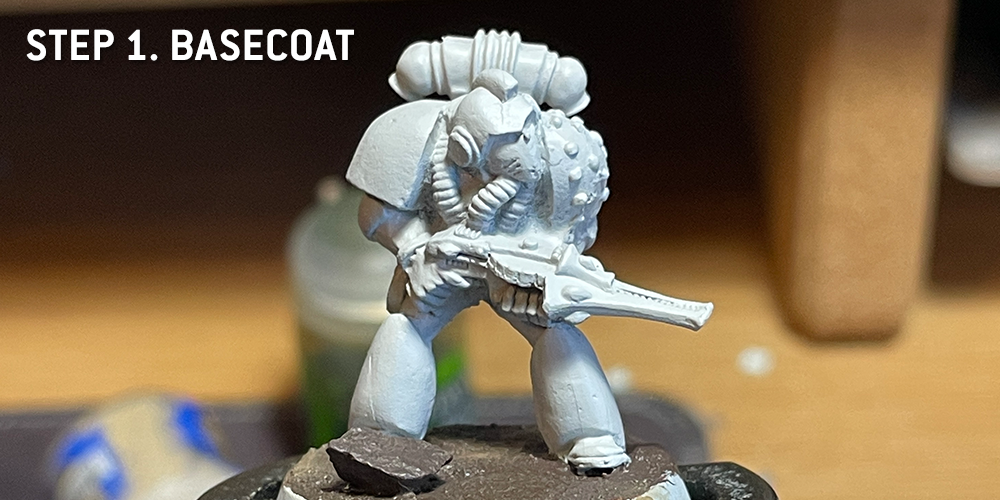
Step 1. Basecoat
I started with a primer coat of Grey Seer spray from Citadel, but any light grey to white will do. If I was a smarter man I would then have covered the entire model with my primary base color – ProAcryl Bright Warm Grey – but I have never claimed to be very bright. You might also see me block in some colors as I go along out of sequence, don’t worry about it.
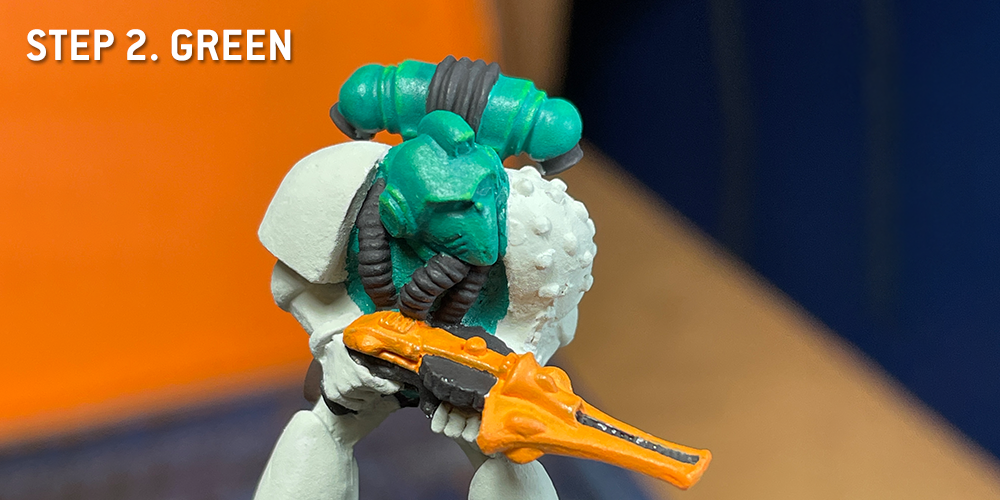
Step 2. Green Armor
I started with the green on this model, as I was most excited about it and I like working from the inside out. I started with a basecoat and layered progressively lighter shades of green, focusing the lighter colors on raised areas and leaving the darker colors in the recesses. I lastly did an edge highlight, then an extreme edge highlight on the highest and sharpest points. I repeated this process on most colors, but will note when I did something differently. I also wouldn’t sweat it if your ratios are slightly off, we’re vibing here.
- Green Armor
- Basecoat: 1:1 mix of Green and Jade
- Layer: 2:1 mix of Green, Jade
- Layer: 3:1 mix of Green, Jade
- Edge Highlight: Green
- Extreme Edge Highlight: 1:1 Green, Golden Yellow
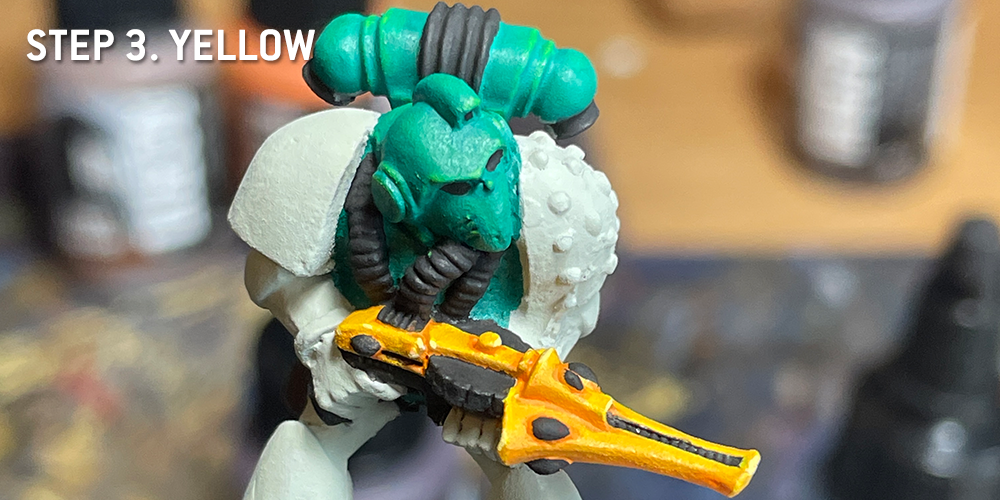
Step 3. Yellow Weapon Casing
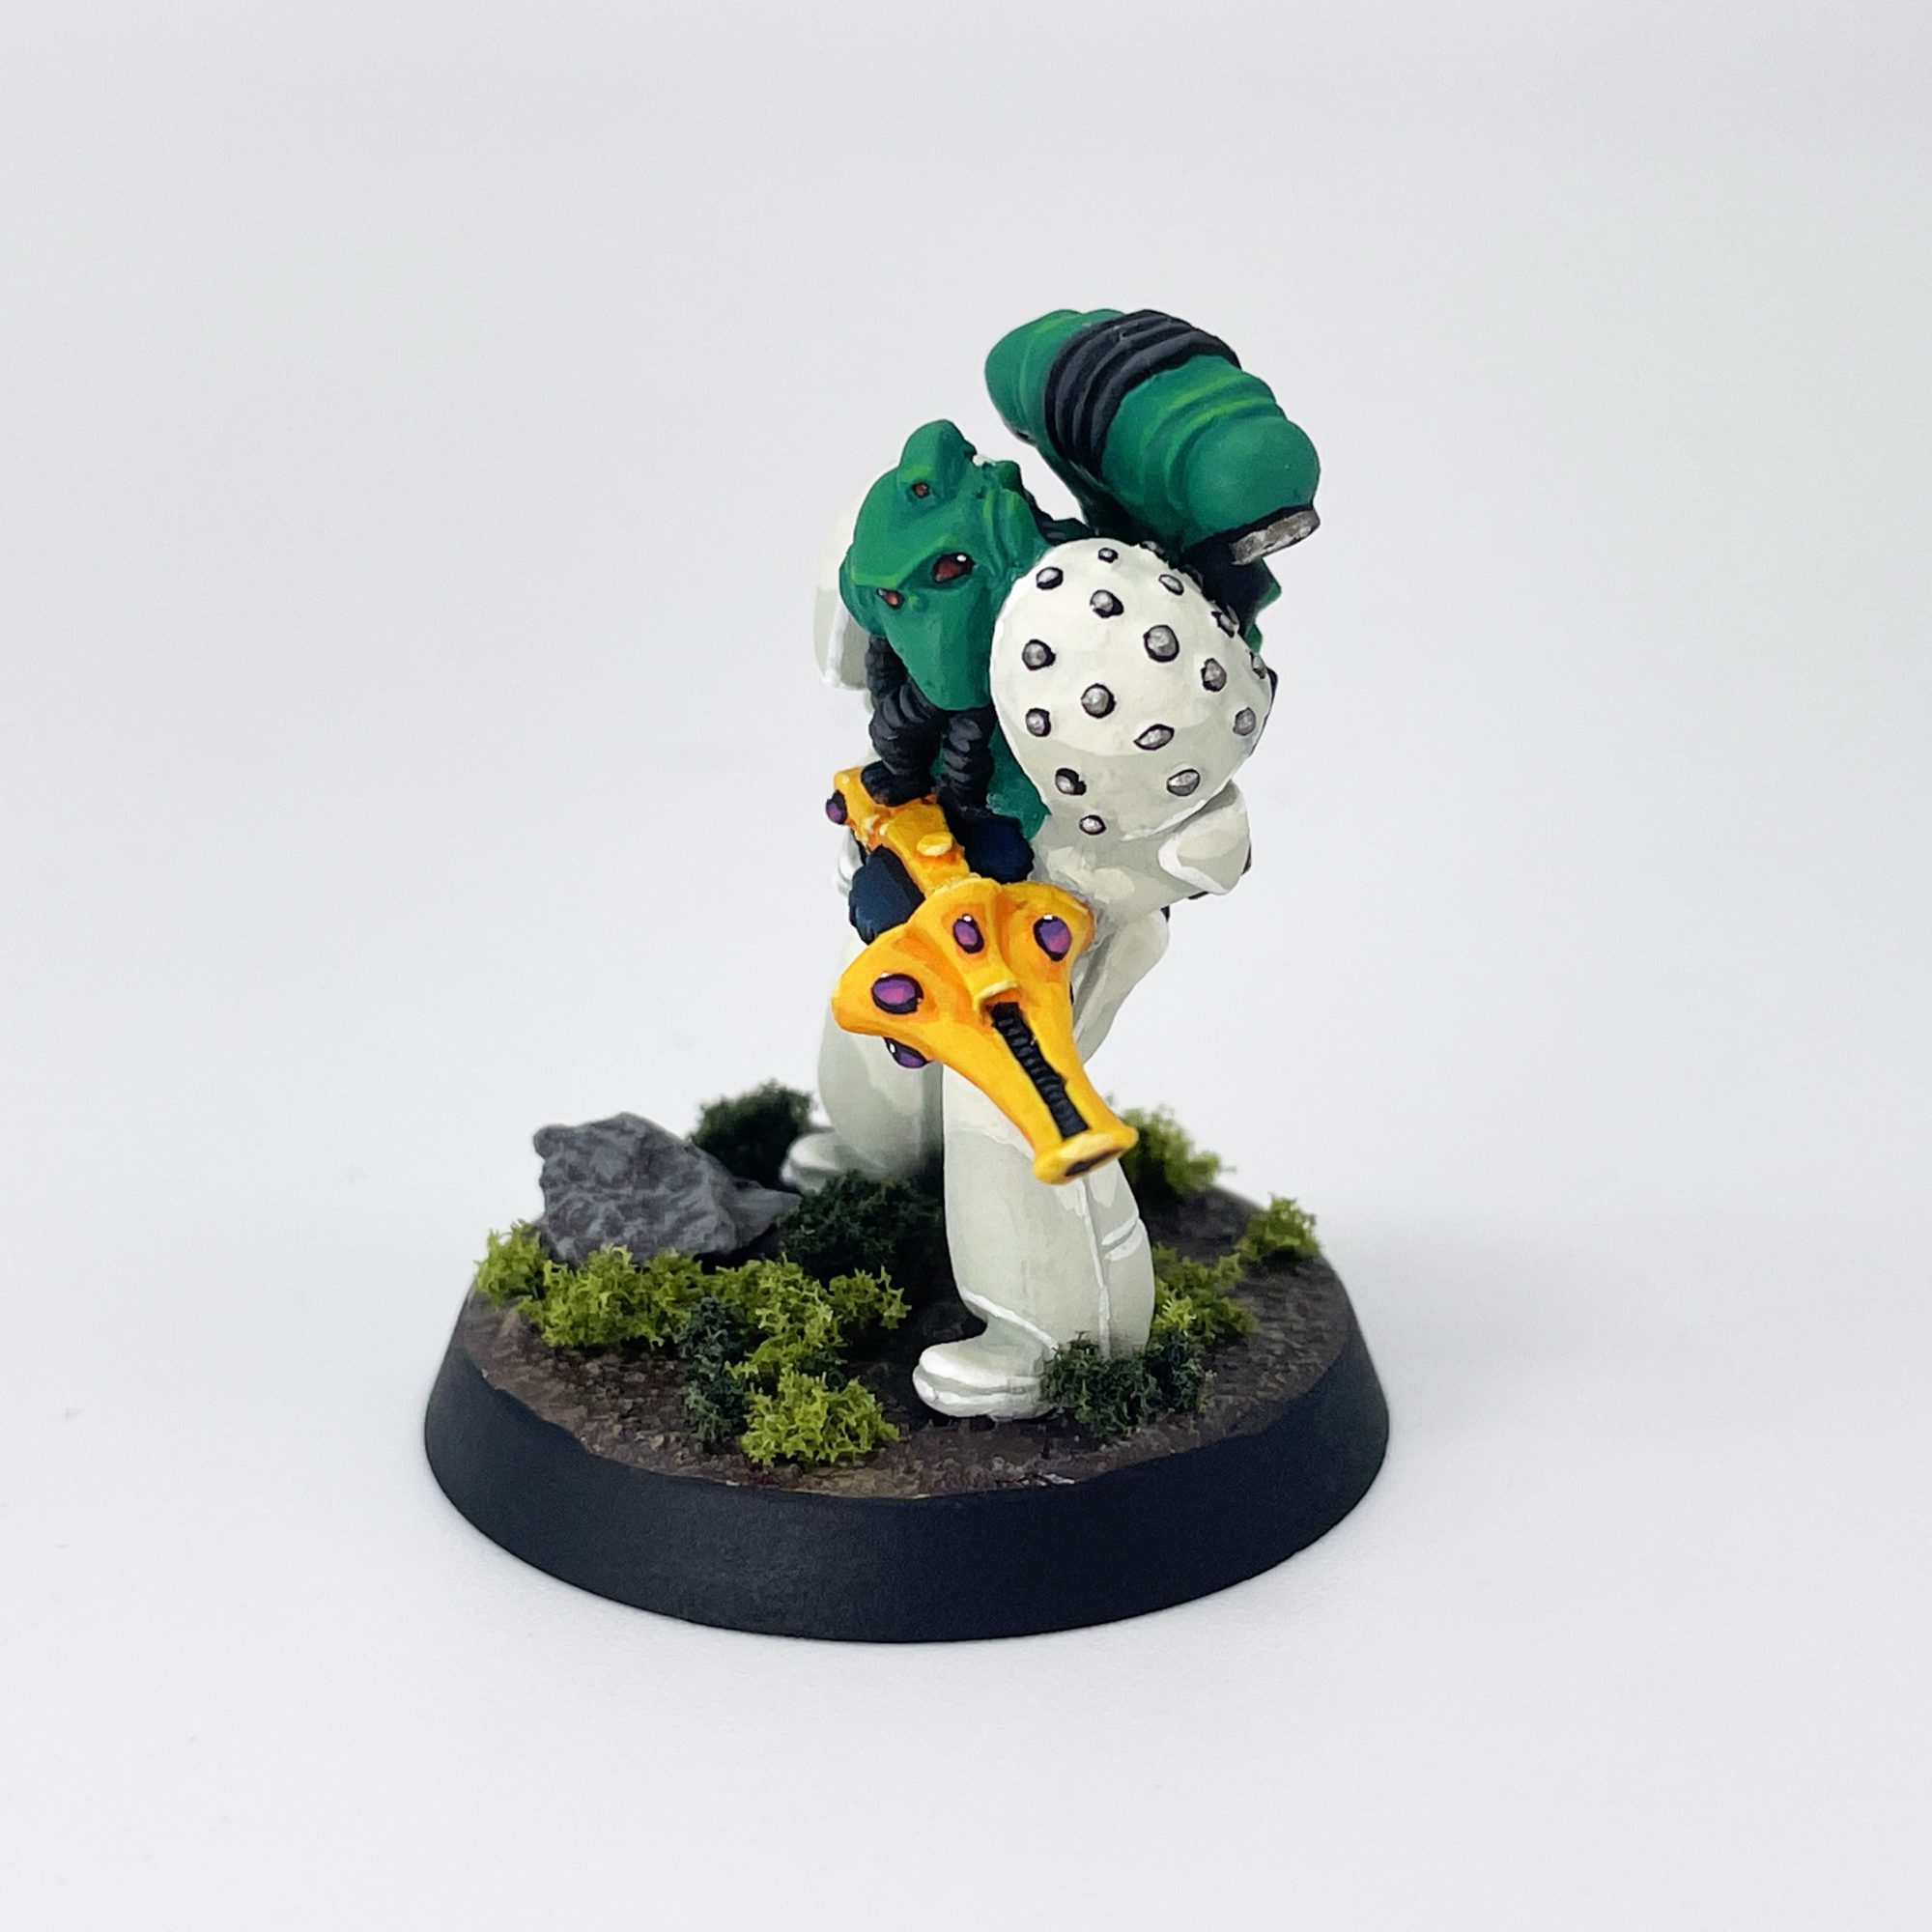
Photos from the time often showed Mentors with either black or gunmetal weapons. I’ll have some notes on how to paint those colors in this article as well, but I wanted something with a load more contrast, so I did yellow instead. This was a common color on Eldar weapons of the time, and since this trooper has a Shuriken Catapult, that made sense to me. I also made a point to leave the orange on the underside and around the gemstones and doodads to really push the shading.
- Yellow Weapon Casing
- Basecoat: Orange
- Layer: 1:1 mix of Orange, Golden Yellow
- Layer: 1:2 mix of Orange, Golden Yellow
- Layer: 1:3 mix of Orange, Golden Yellow
- Edge Highlight: Golden Yellow
- Extreme Edge Highlight: 1:1 mix of Golden Yellow, Bright Ivory
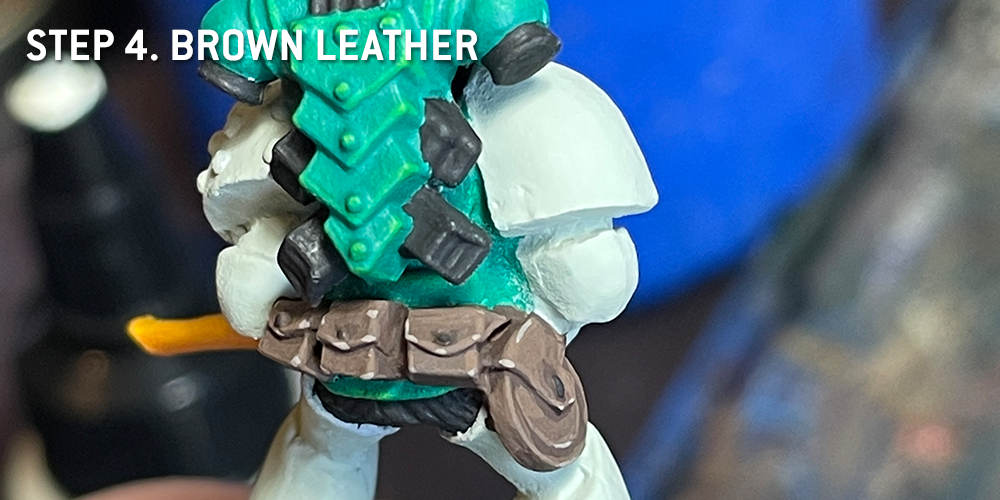
Step 4. Brown Leather
I wanted a bright, warm leather color to stand out from both the piping and the armor, so I started with a medium brown – Dark Umber. This will of course be using more volumetric highlighting, but leather is a soft surface especially well suited to it.
- Brown Leather
- Basecoat: Dark Umber
- Layer: 1:1 mix of Dark Umber, Light Umber
- Layer: 1:2 mix of Dark Umber, Light Umber
- Edge Highlight: Light Umber
- Extreme Edge Highlight: 2:1 Light Umber, Bright Ivory
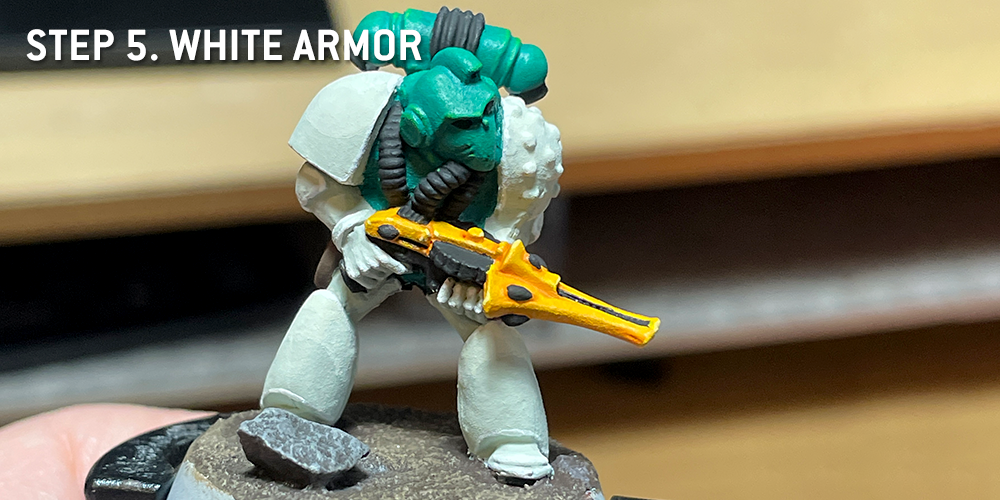
Step 5. White Armor
Let’s save this for late in the game to avoid cleanup. We are going to go through the same process as we did with the green armor. For contrast’s sake, we’re going with a warm white to counter the cooler green tones. It’s also important to save pure white for highlights. If you start from a pure white, there’s nowhere to highlight up to.
- White Armor
- Basecoat: Bright Warm Grey
- Layer: 2:1 mix of Bright Warm Grey, Bright Ivory
- Layer: 1:1 mix of Bright Warm Grey, Bright Ivory
- Layer: 1:2 mix of Bright Warm Grey, Bright Ivory
- Edge Highlight: 1:1 mix of Bold Titanium White, Bright Ivory
- Extreme Edge Highlight: Bold Titanium White
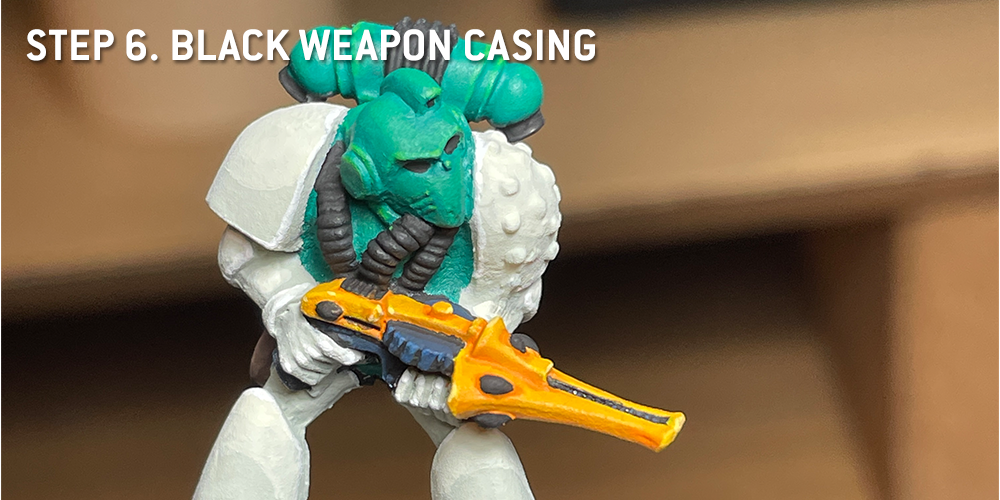
Step 6. Black Weapon Casing
There is some black on this weapon, namely on the drum magazine and handle of the gun. You could paint the entire weapon this color if you so chose, and I likely would for a bolter or other Imperial weapon. The final highlight was kind of a rough estimate; I had some white on my palette and just used it for expediency. Faded Ultramarine would absolutely work in its stead.
- Black Weapon Detail
- Basecoat: Coal Black
- Layer: 1:1 mix of Coal Black, Dark Grey Blue
- Layer: 1:2 mix of Coal Black, Dark Grey Blue
- Edge Highlight: Dark Grey Blue
- Extreme Edge Highlight: 3:1 Dark Grey Blue, Bold Titanium White
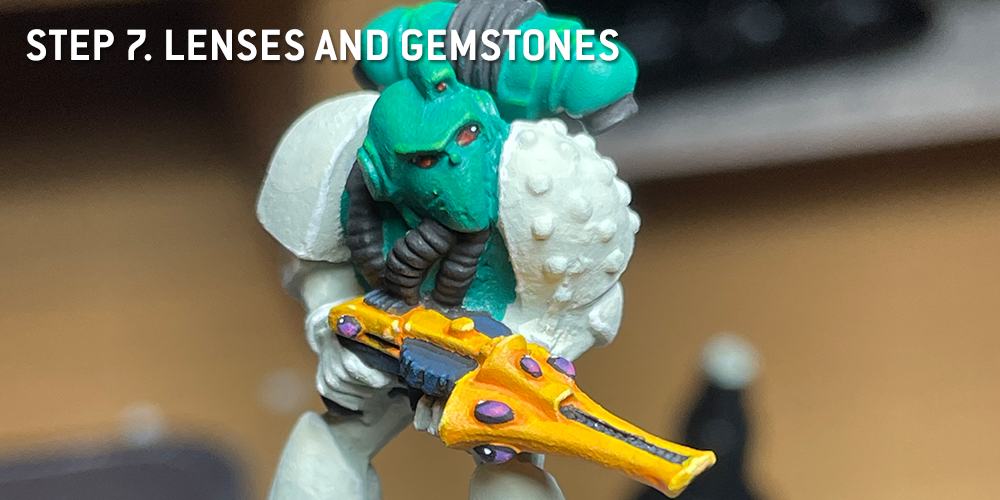
Step 7. Lenses and Gemstones
I wanted to save these for later, as I genuinely love painting them and they’re a fun little victory lap for the model. Mentors usually have red lenses for their eyes, and that was an easy way to add more interest and warmth to the model. To emphasize both the alien nature of the Shuriken Catapult as well as contrast the yellow, I went with purple gemstones instead. As you’ve possibly noticed, I blocked these out in Coal Black early in the painting process so I’d be starting from a blank canvas. The goal with painting both is to paint progressively smaller and brighter halfmoon shapes towards the bottom or inner edge of the glass, with a white dot at the very top in an area you leave black. Rob’s written more, better words about this if you want a refresher, or you can just look at these images to get an idea of what’s going on.
- Red Lenses
- Basecoat: Coal Black
- Layer: Burnt Red
- Highlight: 1:1 Burnt Red, Bold Pyrroic Red
- Highlight: Bold Pyrroic Red
- Highlight: Orange
- Dot: Bold Titanium White
- Purple Gemstones
- Basecoat: Coal Black
- Layer: Purple
- Highlight: 1:1 Purple, Magenta
- Highlight: Magenta
- Dot: Bold Titanium White
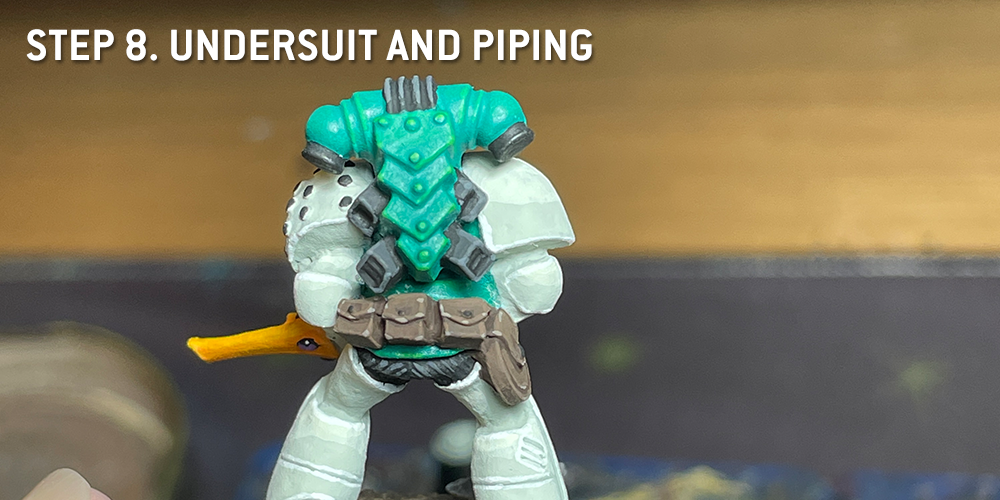
Step 8. Undersuit and Piping
We want to have a different black here to distinguish these materials from the weapon. While starting from that same base of Coal Black, we’re going to go a little warmer. This also is just going to be some traditional edge highlighting, as there isn’t really the surface area to do the volumetric highlighting we’ve been doing thus far. I also painted the lower backpack vents like this with a single blended layer.
- Black Undersuit and Piping
- Basecoat: Coal Black
- Optional Layer: 1:1 Coal Black, Dark Warm Grey
- Edge Highlight: Dark Warm Grey
- Extreme Edge Highlight: 2:1 Dark Warm Grey, Bright Warm Grey
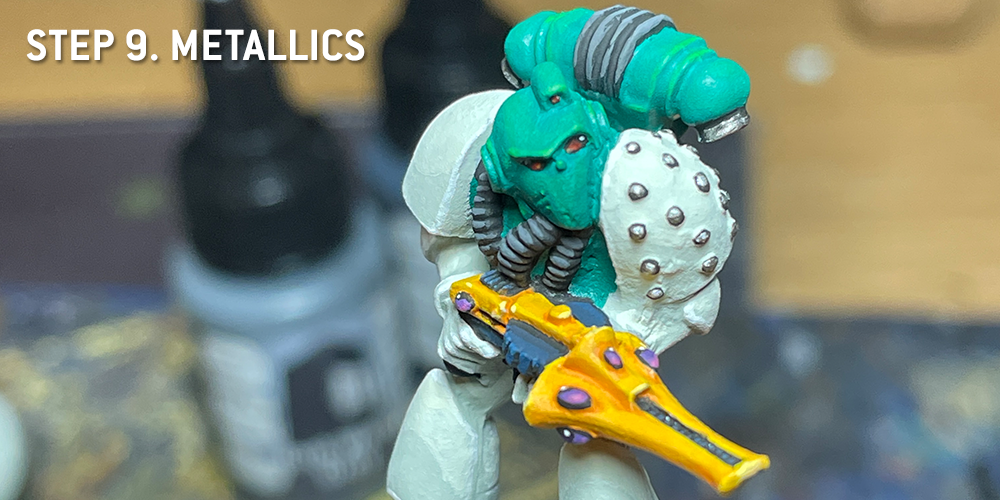
Step 9. Metallics
There aren’t too many metals on this model because he’s using an Eldar weapon, and I always imagine those as more organic or plastic than metal. However, he’s got bonding studs on his pauldron and some details on his backpack to fill out. These are also the only Citadel colors I’m using today. We’re going to let the Coal Black basecoat do the shading for us and skip the need for washes.
- Silver Details
- Basecoat: Coal Black
- Layer: Boltgun Metal
- Highlight: Stormhost Silver
Step 10. Chapter Badge
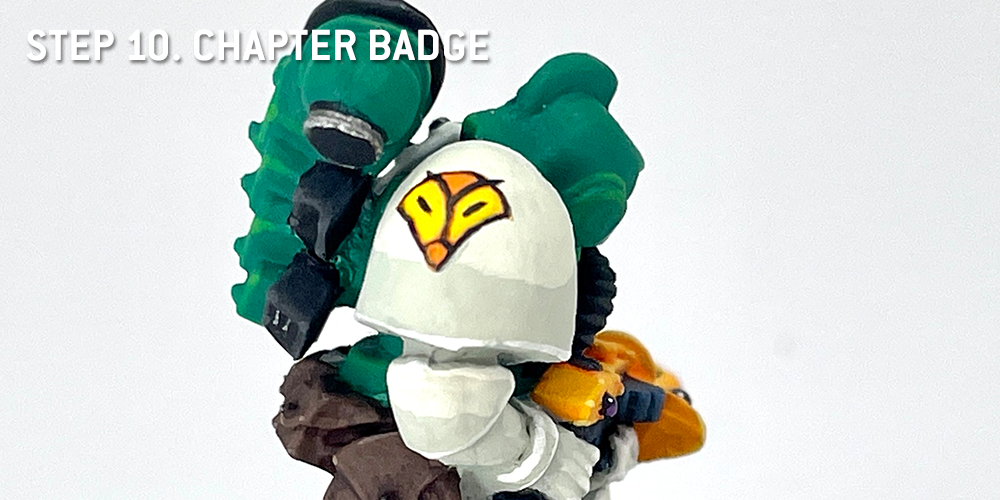
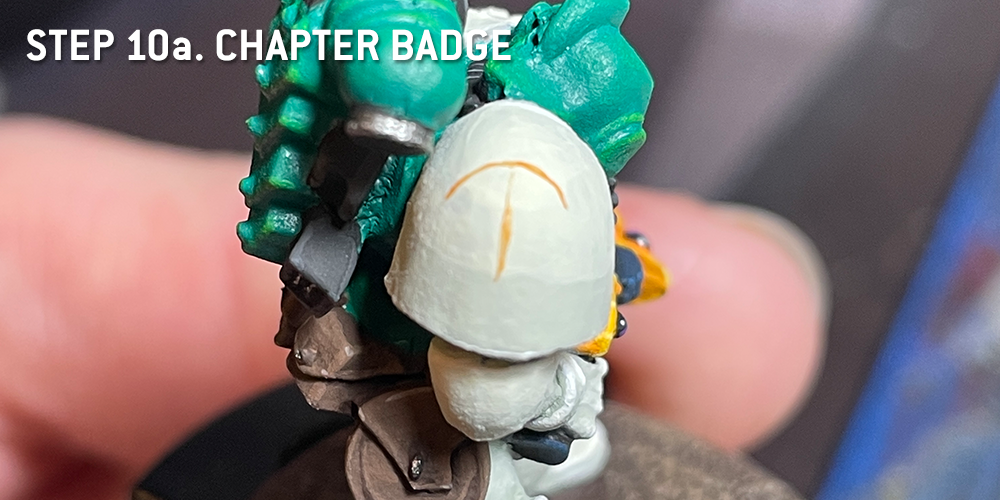
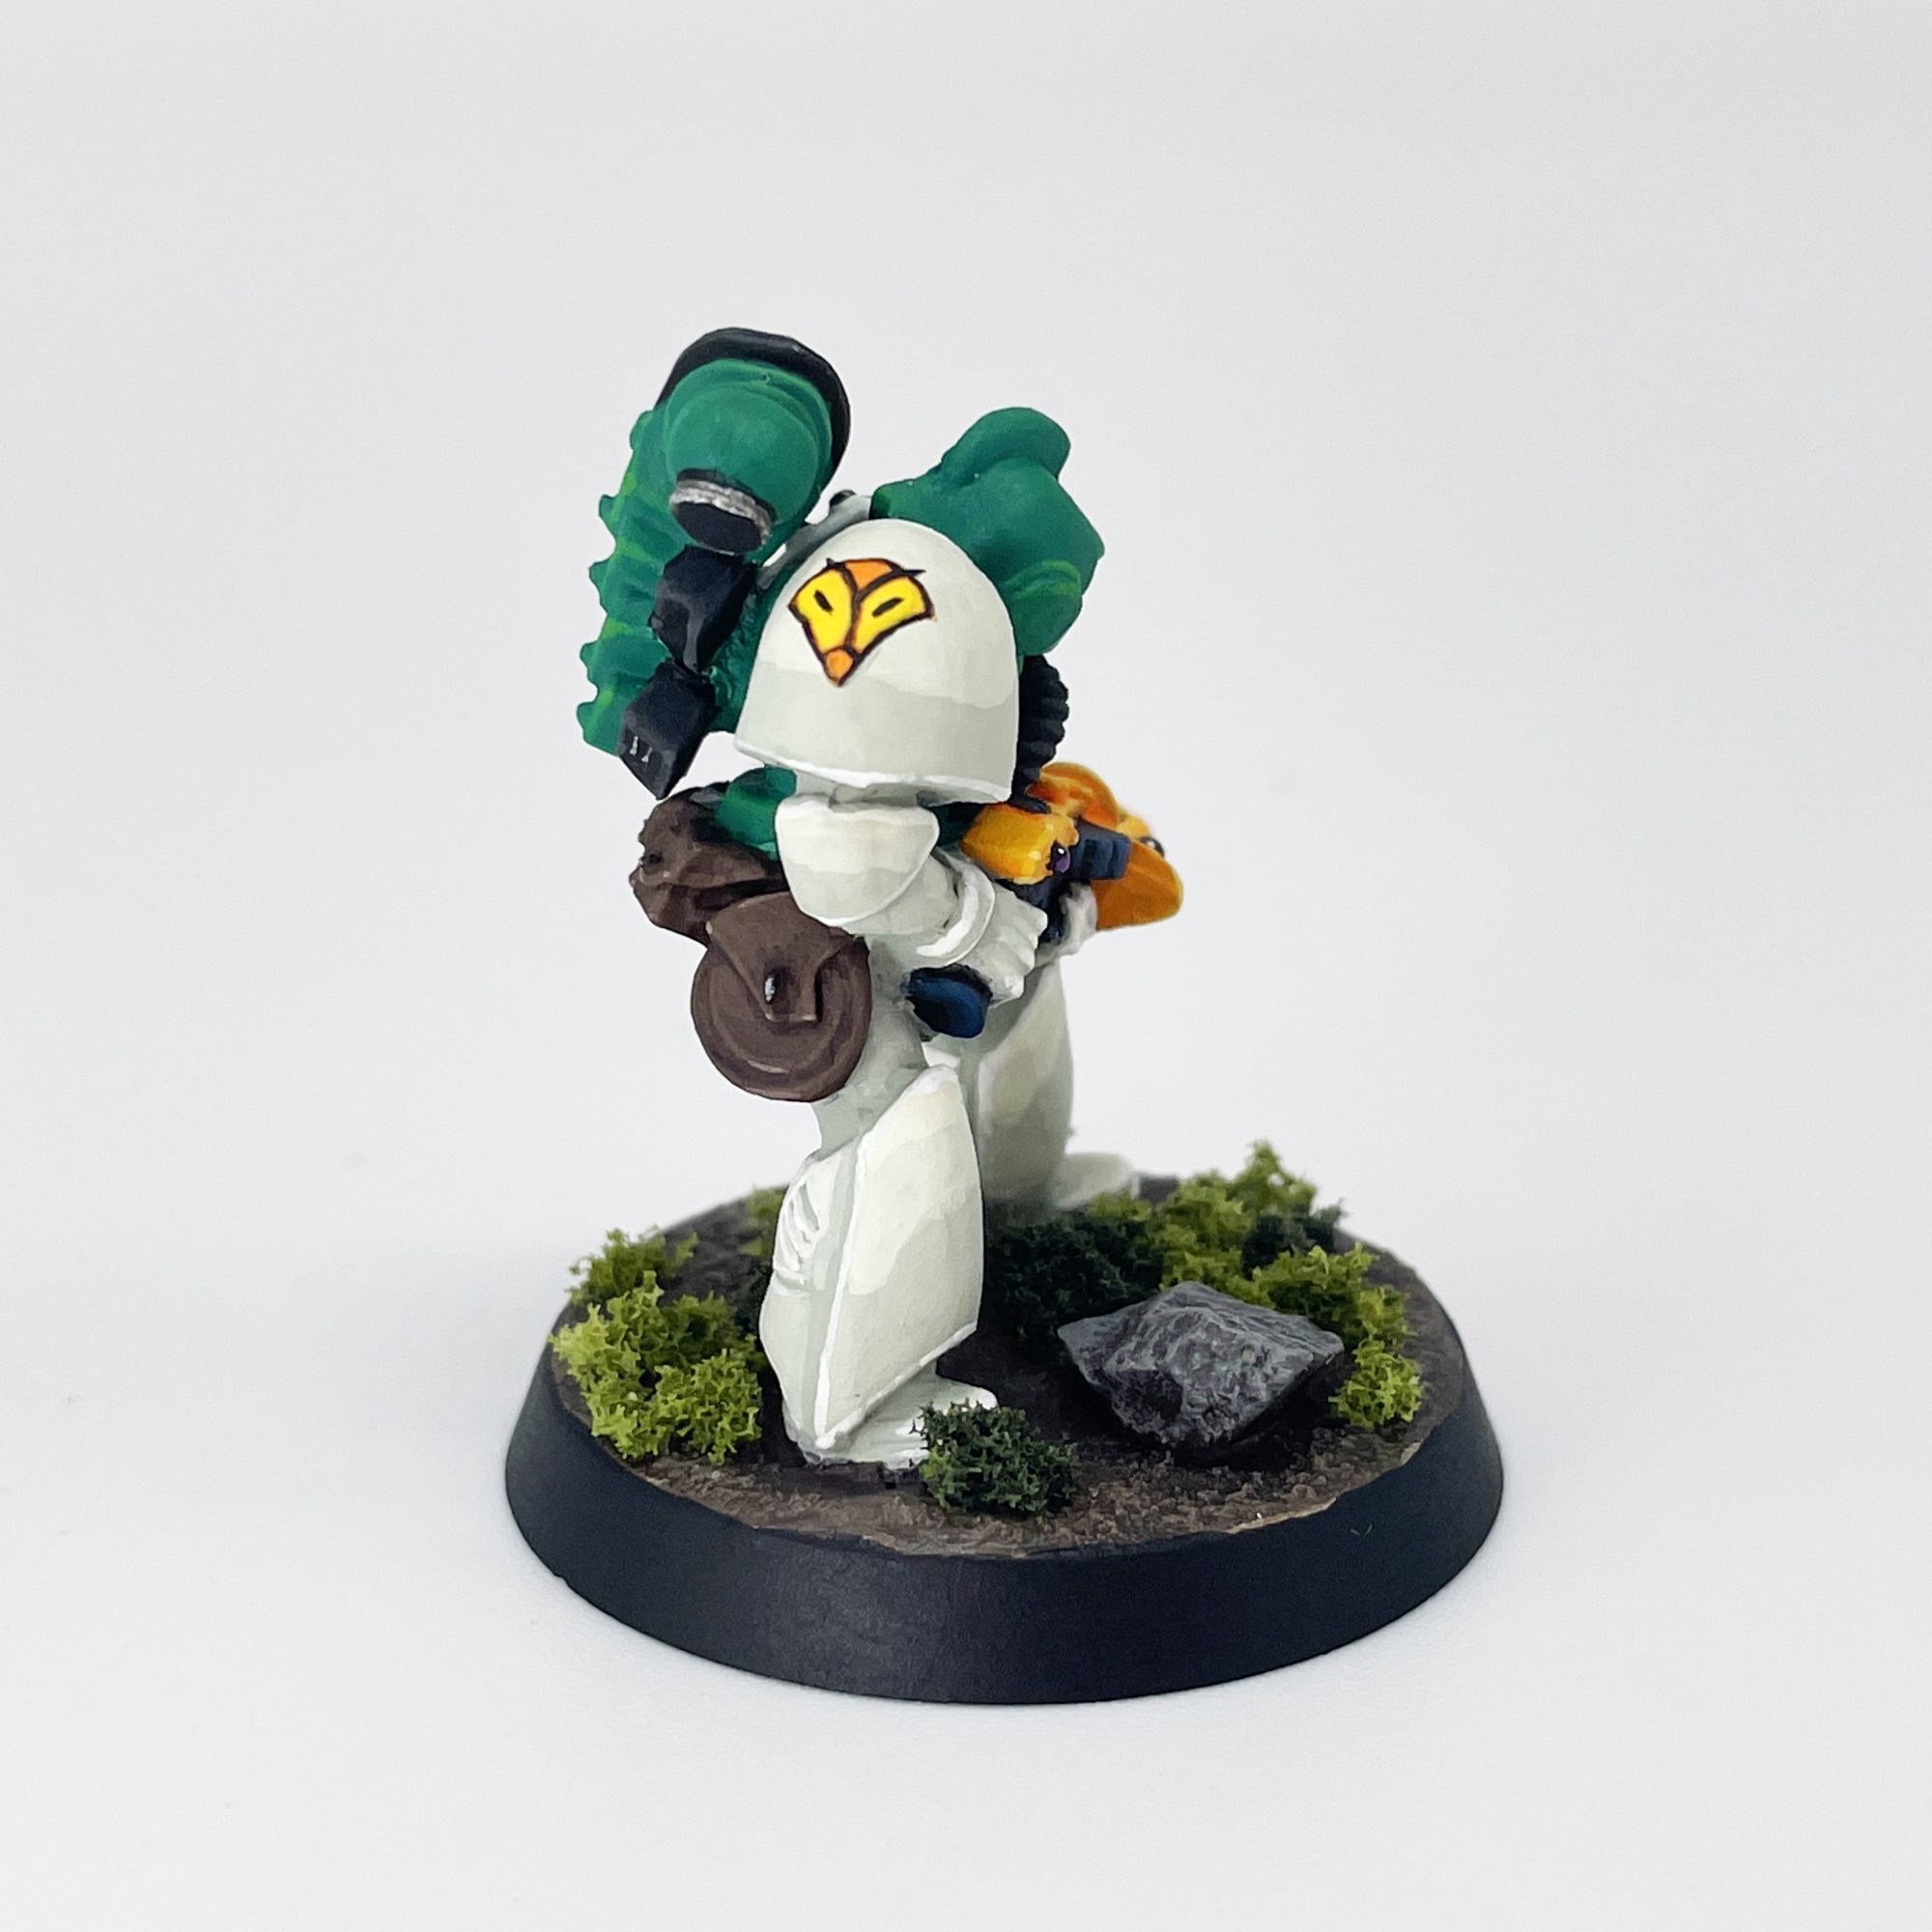
As there are no decals from the time for the Mentor Legion chapter badge, I thought I’d freehand my own. Fortunately, some Rogue Trader imagery exists for them, and the badge is fairly easy for a newcomer to freehand. Of course, other folks have made transfer sheets for home printing, but we’re extra here at Goonhammer, and strong proponents of just going for it. I promise you, despite the subject matter, that I will not just tell you to simply Draw The Owl. You could also go fancy and highlight this too but I’m keeping it simple.
Step 10a: Using slightly thinned Orange, draw a vertical line centered on the shoulderpad, and then a half circle above that, which will define the top of your badge.
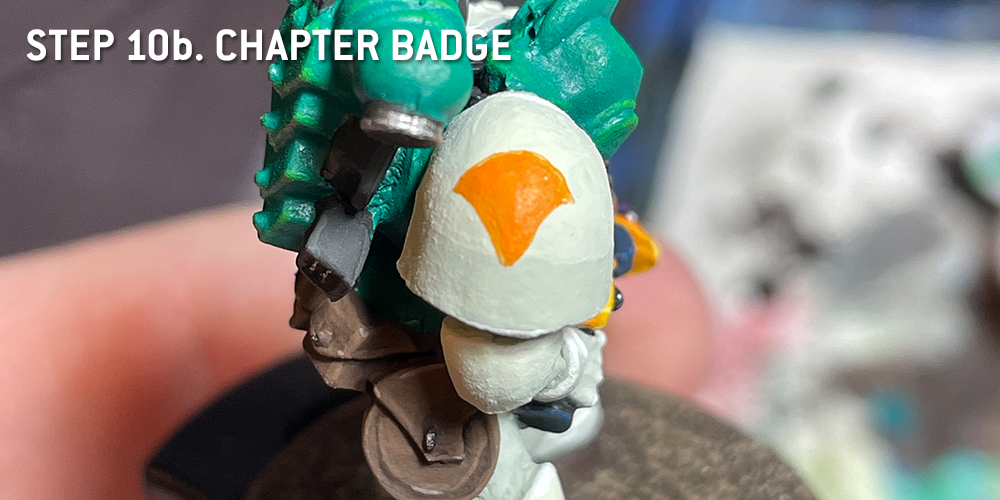
Step 10b: Connect the bottom corner and the two top corners by painting arcs between them. You could do straight lines, but the arcs are more pleasing to my eye. Fill them in with Orange afterwards. This may take a few coats to get smooth. It should look kind of like a slice of pie.
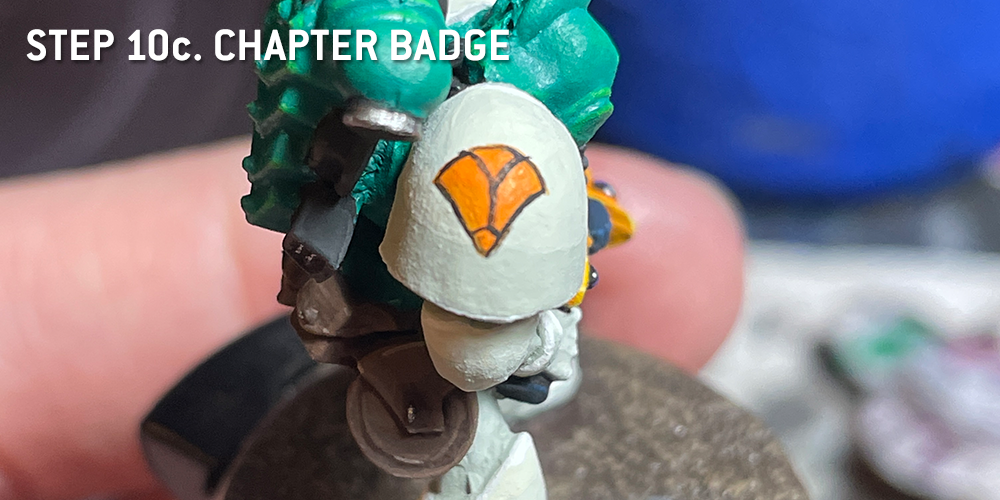
Step 10c: Outline the shape in Coal Black, and draw a short vertical line in the middle again. Paint the lines spoking outward, and use the images for guidance.
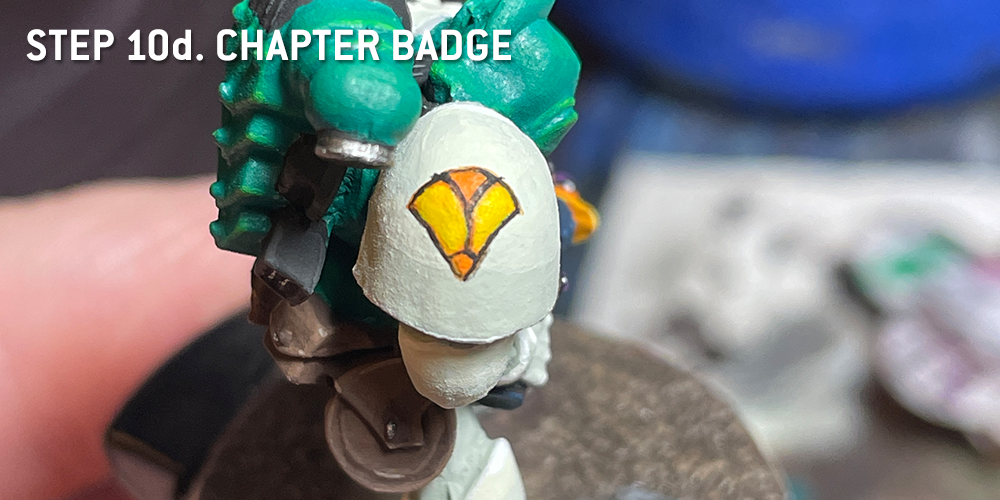
Step 10d: Fill in the two horizontal chunks of the design with Golden Yellow. This may take a few coats.
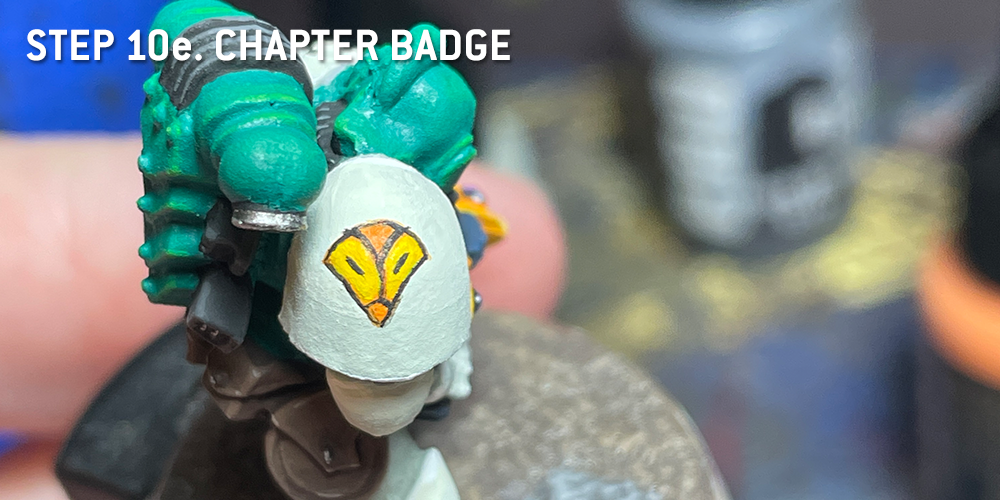
Step 10e: Paint two diagonal lines for the eyes of the owl. Redefine the outline with Coal Black and do any cleanup you need to do.
Step 11. Varnish And Look At Your New Son
Metal chips pretty easily, and I want to protect my work. As this is old lead, I chose to varnish it with Citadel’s Munitorum Varnish. With that, our Marine is done!
Have any questions, feedback, or some Oldhammer gold(hammer) of your own? Drop us a note in the comments below or email us at contact@goonhammer.com.
This article is part of a larger series on how to paint Space Marines. To return to that series, click here.


