In our How to Paint Everything series, we take a look at how to paint different models, armies, and materials, and different approaches to painting them. In this article, we’re exploring how to paint plasma weapons and the faint glow of their dangerously charged contents.
One of the most iconic weapons in the Imperium’s arsenal, Plasma has been used by Astartes, the least popular Guardsmen in their squads, and Inquisitorial Weirdos alike since before the Great Crusade, and by Chaos Space Marines since the opening volleys of the Horus Heresy. For accepting the minor risk of dying horribly, any trooper can be equipped with the burning fury of a small-ish sun, melting holes in virtually any armor and reducing either themselves or their target to slag. 8th Edition added the tactical choice of using the Coward’s Charge, which doesn’t even kill you anymore and therefore sucks, or flipping the fire selector to Bravery Mode, adding extra strength and damage to your attacks at the cost of becoming extremely cool.
SRM’s Method
In classic form, I have a method I started doing in 2008 and only the colors have changed. It’s important to pick a contrasting color that you don’t use a ton of on your models – for instance, if the trim or weapon casings on your Marines is red, don’t go for red plasma. In the case of my Ultramarines, I went for a magenta mostly using the pinks I use on my purity seals, just highlighted higher and shaded deeper.
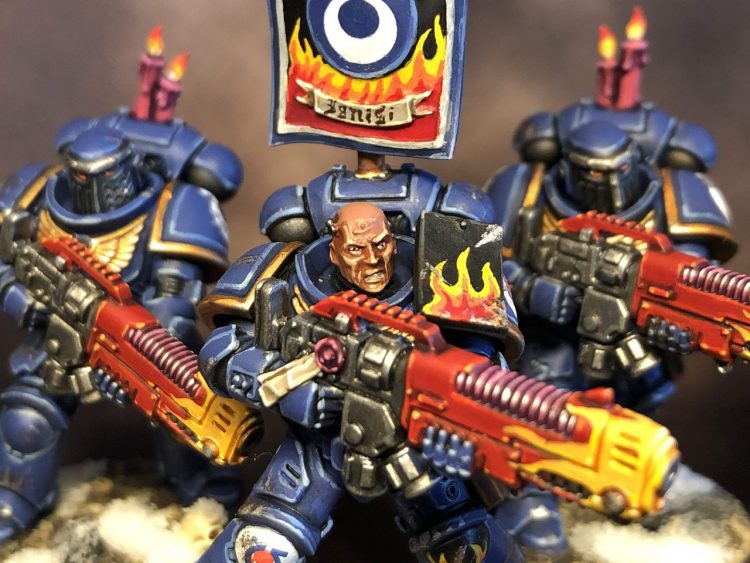
The secret here is just to be careful and take your time. The wash will emphasize the space between each coil, and pool at the bottom, giving you some natural shading and an easy color divide from the rest of the weapon. For the highlights, make sure your paint isn’t too thin, as it will flow into the space between the coils. If this happens, quickly load up your brush with clean water and flood the space, then mop it back up with a dry paintbrush. This means I usually use paint straight out of the pot instead of from my wet palette. Once you have the two highlights in, a tiny spot of white at the corner of each coil will really bring it home.
Magenta Plasma Coils:
- Screamer Pink
- Druchii Violet wash all over
- Pink Horror highlight on the coils
- Emperor’s Children highlight, focusing on the upper half of the coil
- White Scar highlight, just on the very corners
This could be repeated with just about any trio of fairly saturated colors and a wash, like Caliban Green, Warboss Green, and Skarsnik Green with a Biel-Tan Green wash, or Evil Sunz Scarlet, Wild Rider Red, and Firedragon Bright with a Carroburg Crimson wash. Mess around and give it a go!
Basement Knockaround Energy by Greg
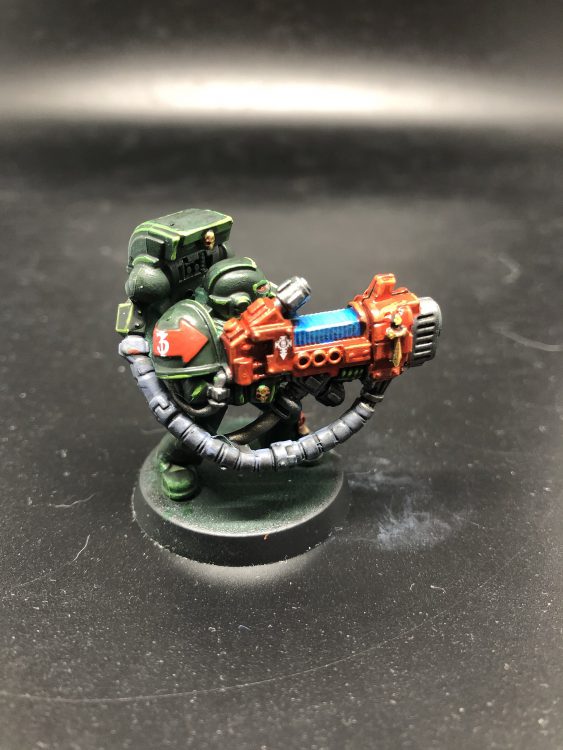
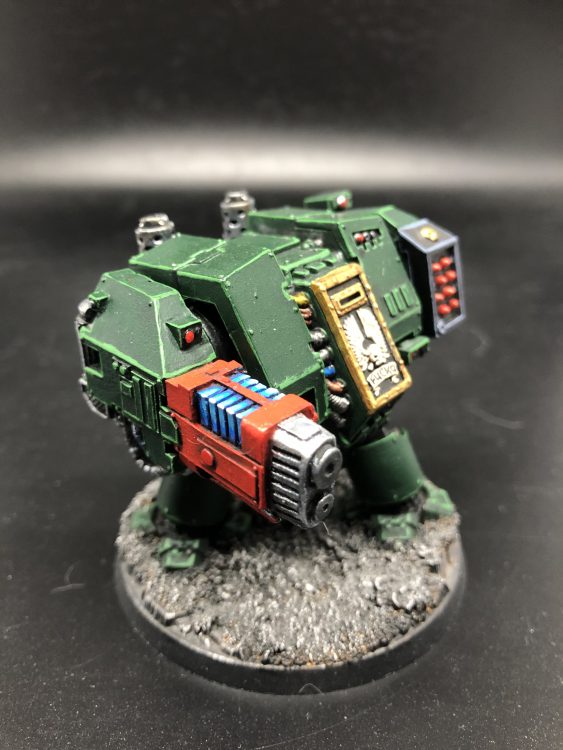
It was inevitable that, by playing Dark Angels and not being very smart, I’d have to paint a lot of plasma coils, and after a few attempts at different methods, I’ve settled on this one. It’s easy enough to pull off, and following the advice of SRM to contrast it against the rest of the model, the vibrant blue pops nicely against the dark green armor and the red of the gun casing. Unlike SRM though, this method does not require you to be careful or take your time, because that’s not what I’m about.
- Basecoat the plasma coil with VGC Magic Blue.
- Layer over the middle part VGC Electric Blue – you’ll want to leave some of the darker blue showing around the edges, but how much is left as an exercise to the reader.
- Do a fine edge highlight with the white of your choice. Actual white this time, not the usual light grey.
Incidentally, this is the same basic color palette and layering that I use on power swords, and it’s as easy and underwhelming there as it is here.
Painterly Plasma Coils by Felime
I have two methods for painting plasma coils for you. This first method uses a brush and is well suited to painting coils with a color transition without too much fuss. For the example I’ll be using a red-orange glow with the brightest parts a bright yellow.
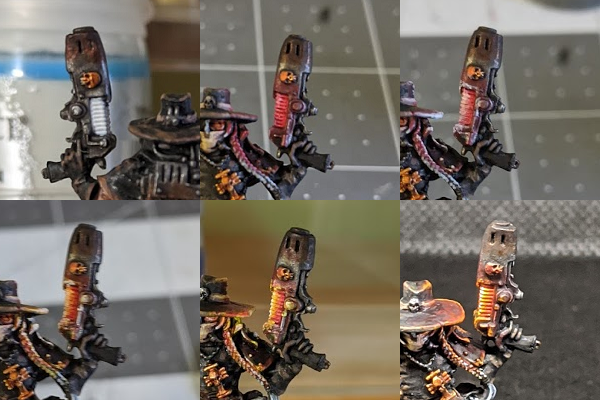
For this you will need a white, along with a transparent red, orange and yellow. In my case I used VGA Gory Red, VGC Orange Fire and Golden High Flow Acrylics Hansa Yellow Medium. While a variety of colors will work well for this as long as they thin well to a transparent state (So most reds, yellows, and oranges), I’d avoid any colors that aren’t full saturation. I’ve tried this with Carroburg Crimson as the red, but using colors that aren’t as bright muddies the effect greatly.
- Paint your coils white as a base
- Thin down your red with water or medium, and glaze a transparent layer over the white.
- Highlight some of the coils further towards the top with white again
- Glaze over with thinned orange
- Repeat the highlight of white even further towards the peaks, then glaze over with yellow
- Finally, dot the very peaks of the coils with pure white
You can apply this to many different color combinations. Green to yellow would work equally well, or any others you can come up with. I won’t discuss OSL at length here, but this technique does lend itself well to those techniques as you can use the same paints and techniques to control exactly where the color shines on your model. A less saturated wash such as Carroburg Crimson is very useful for washing the non glowing parts of the model, letting you tint the model without the super bright colors taking over as much in the recesses.
Quick and Dirty Airbrush Plasma Glow by Felime
Have an airbrush? Want to make your plasma toting models less boring without doing any actual work but don’t need them to be perfect? Have I got the technique for you!
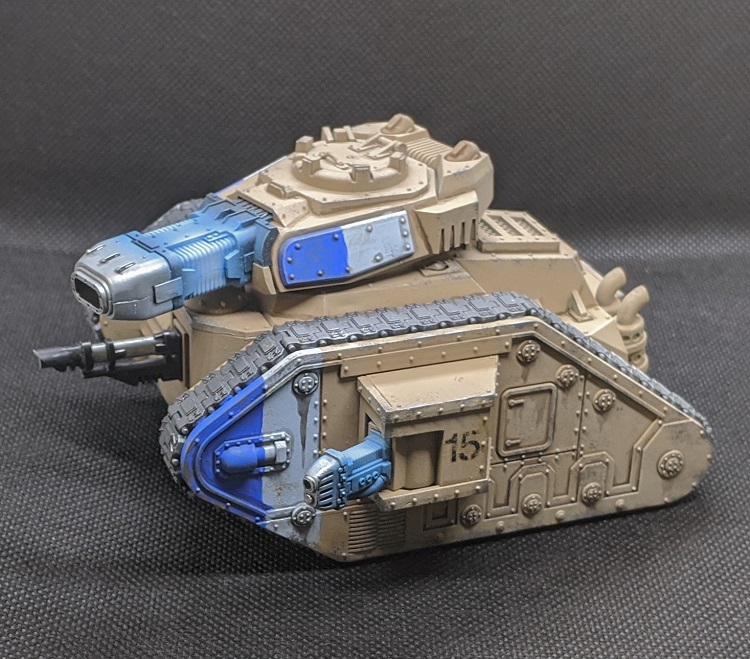
- First, hit the general surroundings of the plasma coil with a thin layer of a dark version of your plasma coil color. In this case VGA Imperial Blue.
- Airbrush the coil itself as well as the sections directly next to it with a light version of your coil color. In this case VGA Electric Blue.
- Airbrush the center of the coil with white. (VMA White here.) The other steps are pretty forgiving, but it’s good to be careful here and work gradually so you don’t accidentally go too far.
- Last, thin down your dark original color a lot. I’d recommend using Lahmian Medium or some other medium that flows well. Carefully wash the corners and edges of the plasma coil with this mix to add a little bit of visual separation between the coils and the outside. You don’t need to do very much, but a tiny bit of darkness in the corners adds a great deal to the effect
RichyP’s GłowSL Plasma
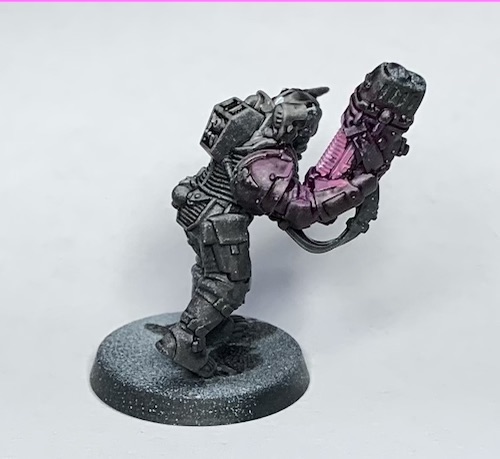
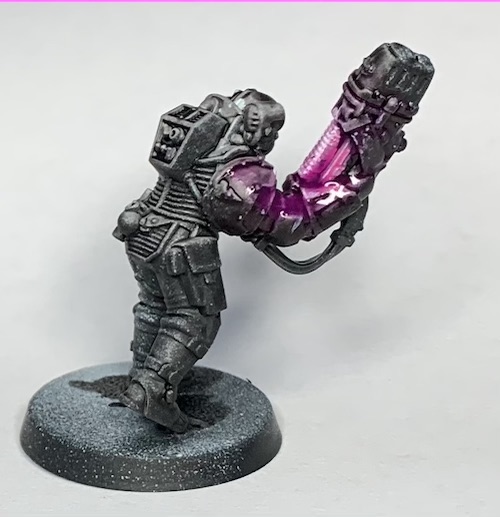
A while back I did a step by step on doing a blue plasma gun glow on a Death Guard Plague Marine, find the article here. It looks like this:

Here are some more glowing plasma guns:

This time I thought I’d try it using inks instead, and nobody seems to like doing purple plasma so I’ll do that instead.
What you’ll need:
- A primed model, ideally with a dark colour scheme
- Purple Ink, but a dark purple paint would work too
- Pink paint
- White paint
Step 0:
I went with a black->grey zenithally primed guard mini, aiming the lighter colours around where the glow would originate. (This is probably overkill and can be done by drybrushing greys in the area around the glow before step 1).
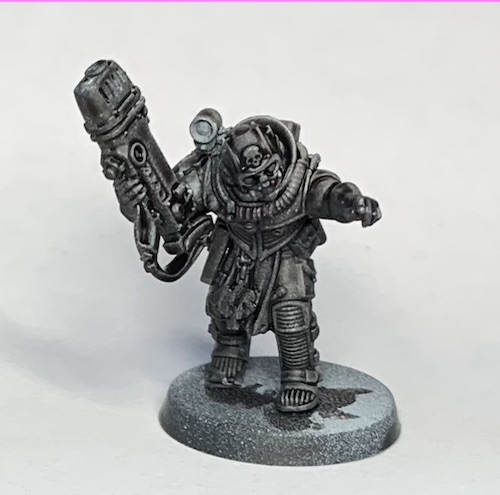
Step 1
Thin some ink (I used Daler Rowney Violet Ink) about 1:3 with water (3 parts water to 1 part ink). Then paint it over the whole area you want the glow to affect, including over the black areas for a nice free gradient.
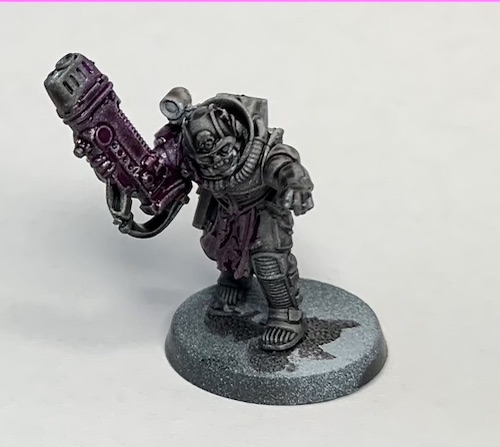
Step 2
Paint some pink over the plasma coils, paint some on the closest areas to the glow too. Add a load of water to it and apply it thinly over the closest parts to the coil, it should dry almost transparent.
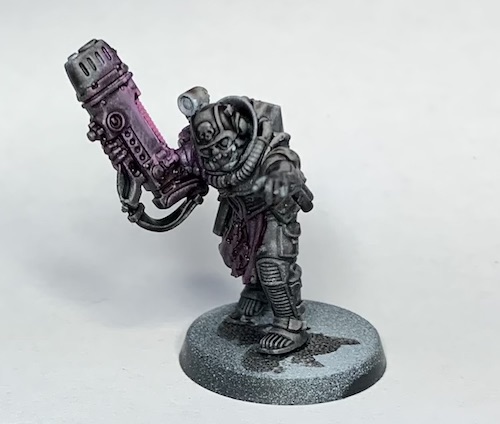
Step 3
Paint the upper edge of the coils pure white, by running the edge of the brush over the top edge at about 45 degrees. Apply some more thinned purple ink over everything once more. Apply neat purple ink in the recesses of the glowing area to fake the shadows.
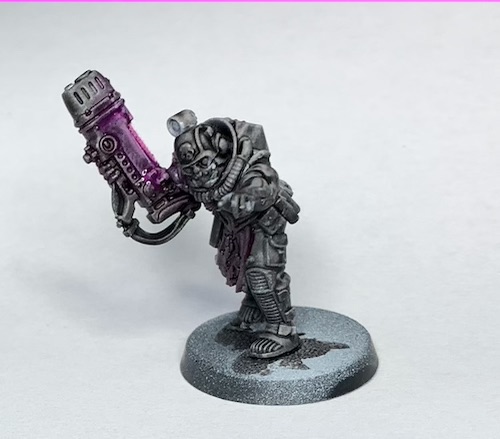
Step 4
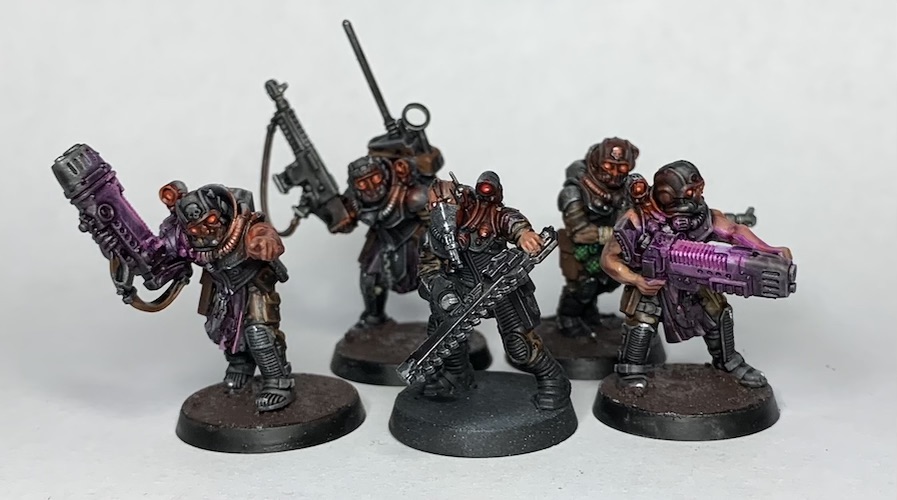
I painted the rest of the model after the glow because I wanted to do a red one too so he would fit in with the rest of his unit who all have sinister red glowy bits.
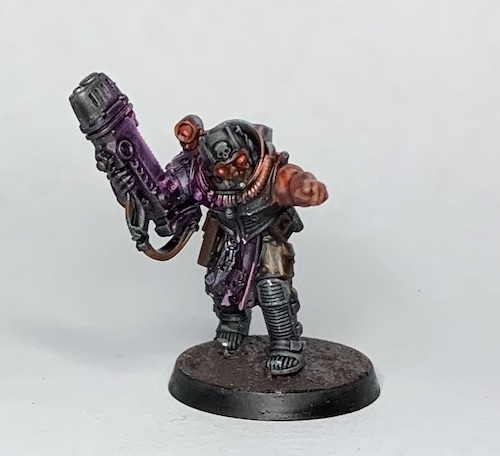
Step 5
Put him with his friends and take a picture.
Other combinations
Green
- Drybrush the area in greys and white (white on the coil),
- Paint everything in Warp Lightning Contrast,
- Hit edges and coils with Moot Green
- Paint a thin line of yellow on the upper edge of the coil
Red
- Same drybrush as the others
- Paint everything in Flesh Tearers Red Contrast
- Troll Slayer Orange on coil and closest edges
- White on edge
- Go over everything with Gryph Hound Orange Contrast
Blue
- Same drybrush
- Paint everything in Arkhelian Green Contrast
- Edge in Blue Horror
- Paint over everything in Aethermatic Blue.
Have fun blinding your foes with glowing Plasma, right before the wielder blows their arm off with it.
Always Be Supercharging
That wraps up our look at plasma weapons. Regardless of which method you use for painting them, remember the most important rule about plasma weapons: Only cowards refuse to fire on supercharged mode. In the meantime, if you have any questions or feedback, drop us a note in the comments below or email us at contact@goonhammer.com.

