In our How to Paint Everything series, we take a look at different armies of the Warhammer universe, examine their history and heraldry, and look at several different methods for painting them. In this article we’re looking at how to paint Object Source Lighting (OSL) on minis.
Object Source Lighting, or OSL as it’s more commonly known, is a technique where your model is painted in such a way as to represent the light coming from one or more sources on the model itself, i.e. your model holding a torch is painted to look like it’s being lit by the torch, or the glowing plasma coils on the gun it’s holding.
When done correctly, you can create the impression that a part of the model is glowing, giving off colored light that tints the objects around it. This can be done with pretty much any color, and can be done regardless of whether you have an airbrush (though having an airbrush can certainly make some parts easier).
Understanding Light
Look I’m going to start with some reference photo discussion. I promise you OSL is not as hard as you think, though – bear with me and at the end I’ll show you an incredibly quick and easy way to accomplish the effect on most models without having to worry too much about these complicated light examples.
There are basically two components to doing OSL: The first is planning your light source, and the second is blending. The first requires a lot less practice, so we’ll start there. Any OSL project starts with an understanding of what your light source is and how the light it is casting will impact the object around it.
The best way to start here is to look at reference photos. I’ve pulled a few choice options off of RawPixel’s large library of public domain images. Generally when we do OSL we’re looking to do more dramatic effects, and so when you’re looking for reference photos it can be helpful to pull images of people in low lighting.
So how do we use this to understand how we’ll be putting light on a model? Well, let’s start with one of the photos:

There’s some cool stuff going on with this photo, where the woman is mostly being lit with white light. One of the things I specifically want to point out is the shadows – where the light does and does not reach. Generally speaking, unless there are any mirrored or very reflective surfaces around the subject, the light being cast is going to “stop” (yes I know this isn’t what actually happens but for our purposes it’ll do) when it hits a solid object. The space behind that object will then appear to be a shadow if you’re in a low-light situation.
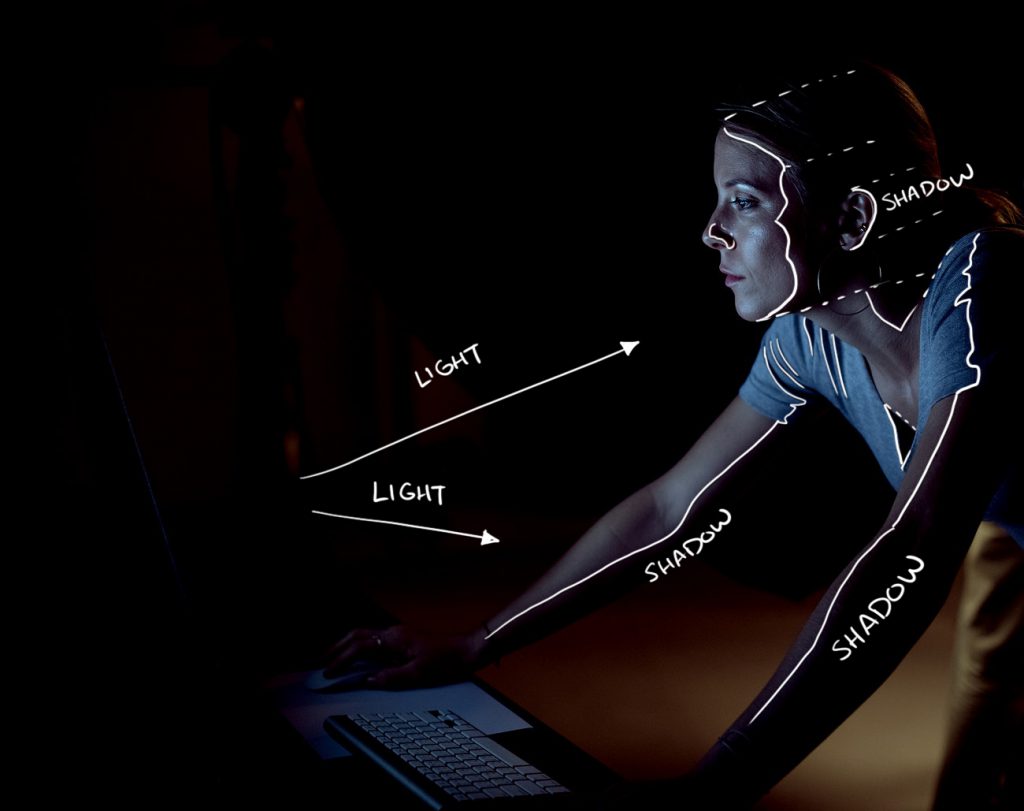
Here I’ve outlined the general contours that are creating shadows. In this case the woman’s ears stick out from either side of her head enough to catch the light going past her face, but block light to the parts behind them, so it looks like they’re just sticking out of nowhere. This is important to consider when you’re painting OSL because you’re basically going to replicate this for whatever light source you’re trying to “cast” onto your models – once you know the direction your light is coming from, you’re going to paint “outward” from that point. Also, the light emanating from a source is going to catch all the raised areas as it moves past — which is very similar to what you are doing when you drybrush a surface. We’ll come back to that in a bit.
Different Colors of Light
When you’re working with white light, objects will generally look like whatever color they normally are – they absorb the other colors and reflect the color they appear as, etc. But when you have colored light, that will tint everything, making something appear to be a single color:
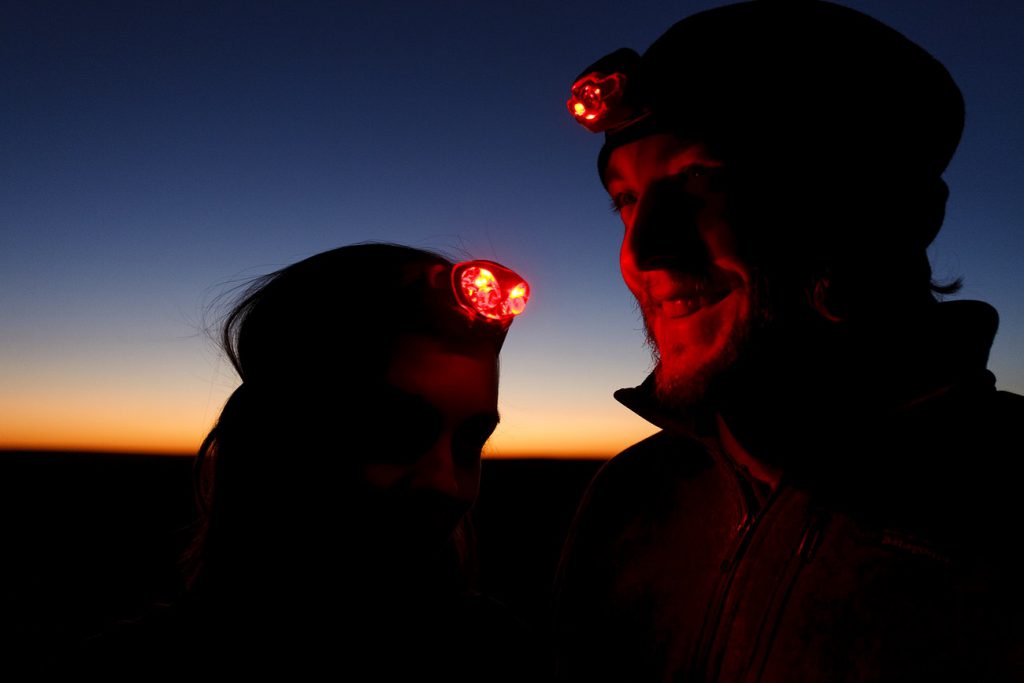
Advanced Note: Unlike with white light, there’s only one color of light to reflect when the light itself is tinted, and so that means that objects that aren’t that color will appear very dark, or black. So when you’re shading those areas – such as a red light going onto a green or blue surface, consider darkening them unless they’re highly reflective.
However most of the time we do OSL we’re doing a colored light source against a model that’s generally in regular lighting (white light). In those cases, only the part lit by the source will be tinted, and the rest will appear lit normally by whatever other source.
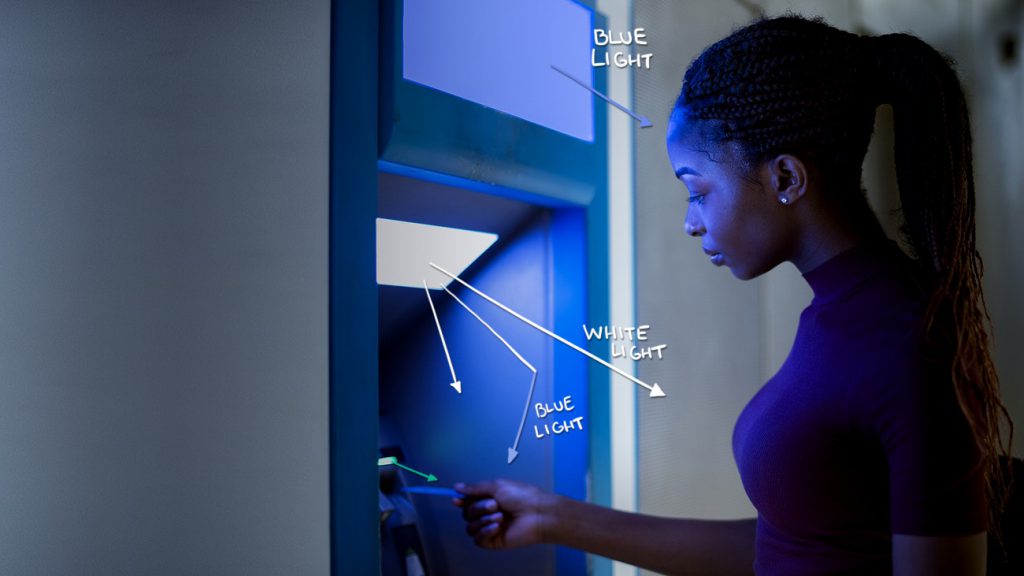
In this example we have two different light sources: A blue light above the woman’s head that’s lighting her blue, and a white light from the ATM that’s lighting the rest of her, and you can see the difference in how that affects the color of her forehead and hand in the photo above. There’s also a separate thing going on where the blue wall of the ATM is doing some tinting, but that’s kind of besides the point. The point is, we can paint a model normally when it’s going to be in white light, and then apply OSL color on top of that to get a specific effect.
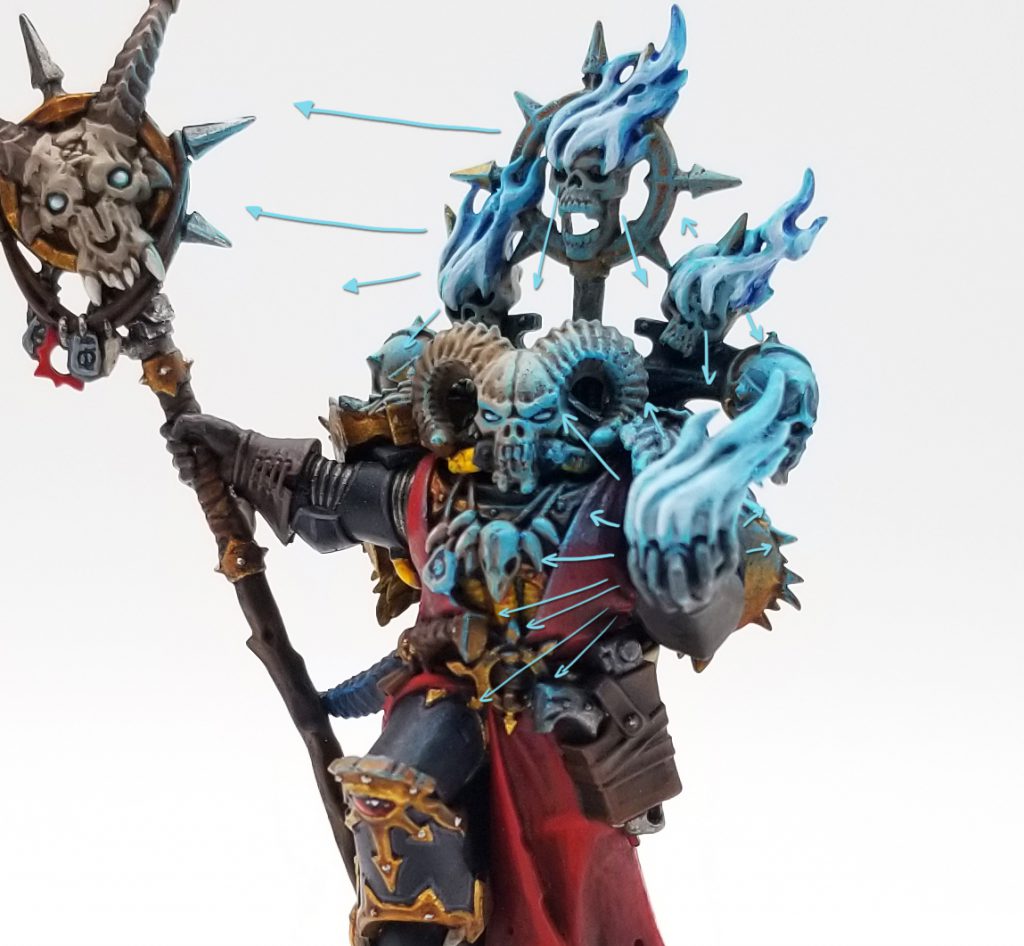
The same is going to be true when you paint your own OSL models. For my Master of Possession I started by painting the model normally, then adding the blue. This is a complicated model with multiple light sources (the flames, which required several different directions.
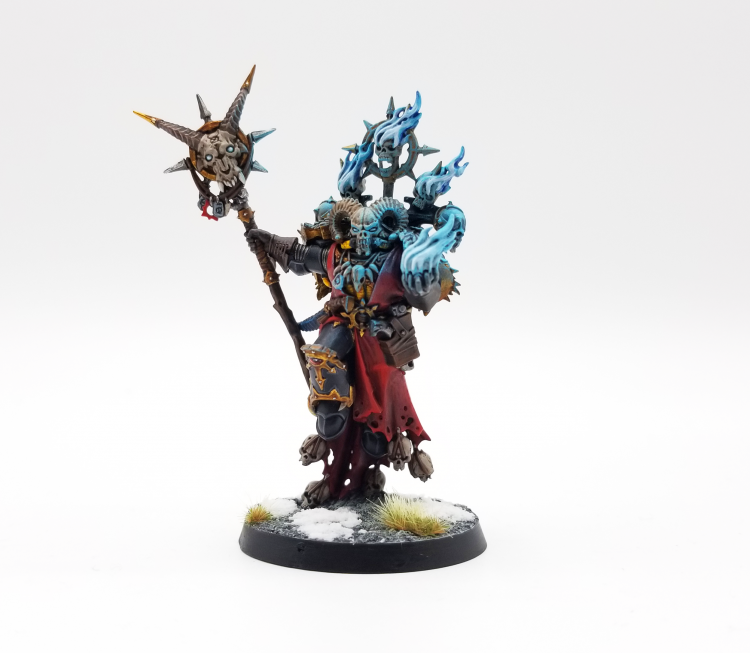
If you take a closer look, you can see where my light is coming from across the model, and where it’s getting blocked by his hand and other objects. It’s faint, but I also have some slight highlighting on his leg armor, where his leg is raised and in the path of the flame’s light.
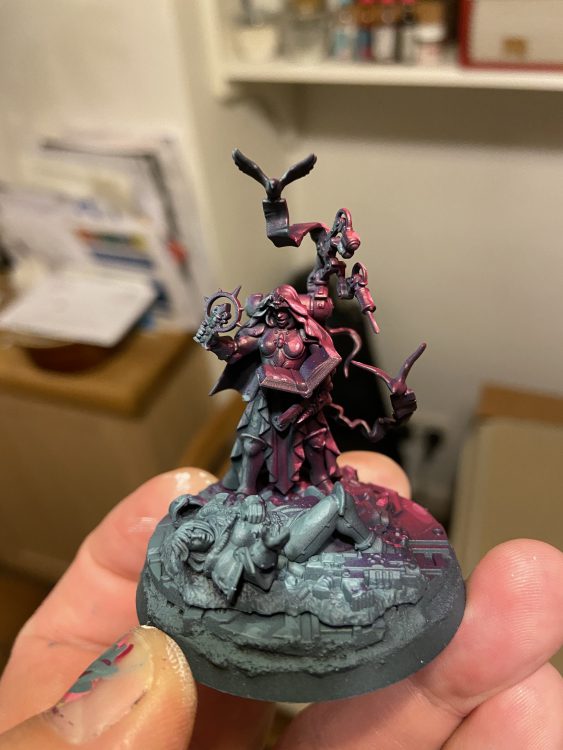
Or if you’re going very extreme and doing two strong opposing colors you can do your whole model as if it’s being lit from two directions and give it a monochrome or duochrome effect:
Once you know the direction the light is coming from, the next step is the execution part, which mostly means learning how to blend your light color with the other colors of your model effectively. This is naturally where having an airbrush is the most useful, since in a lot of ways you can treat paint spatter the same as light and use your airbrush to achieve very smooth fades and gradients. I don’t have an airbrush though, so I’m going to walk you through a quick and easy way to do this by hand.
TheChirurgeon’s Quick Method to Doing OSL
Alright let’s talk about my TOP SECRET method for doing very quick and easy OSL. Seriously you can do this on most models in about 15 minutes.
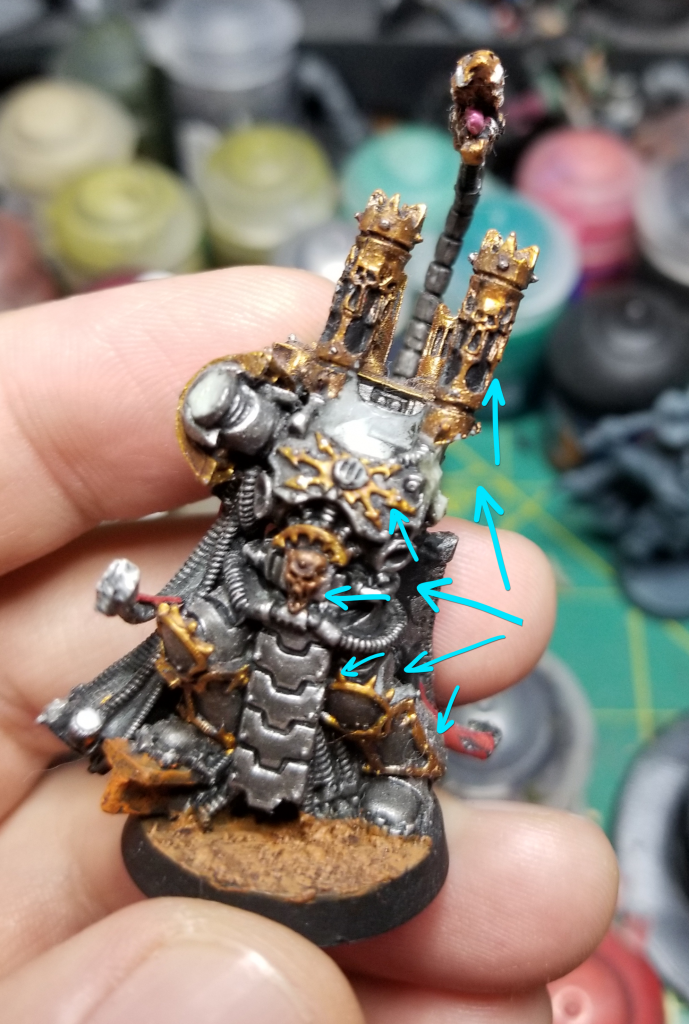
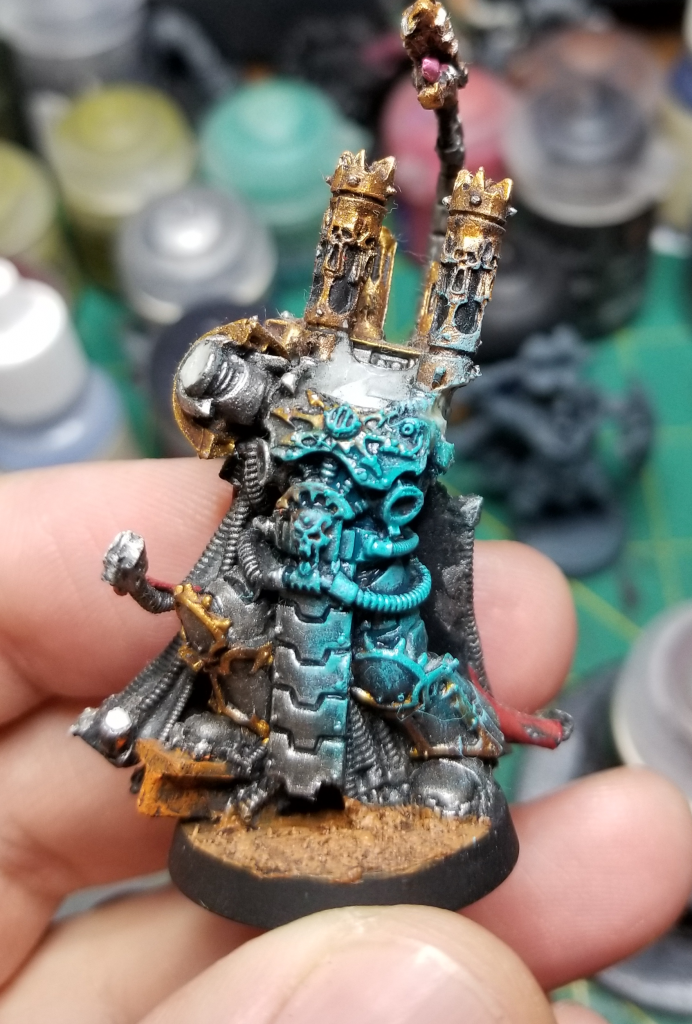
Alright, back to our reference photo stuff – start by figuring out where your light source is coming from. I did this as an example for one of our patrons on the Goonhammer Discord (to which all $5 patrons have access), and the nearest model I had available to test it on was the remains of a stupid finecast Warpsmith whose mechatendrils had long since broken off in a way that made it not worth fixing. Good thing there’s a new model coming!
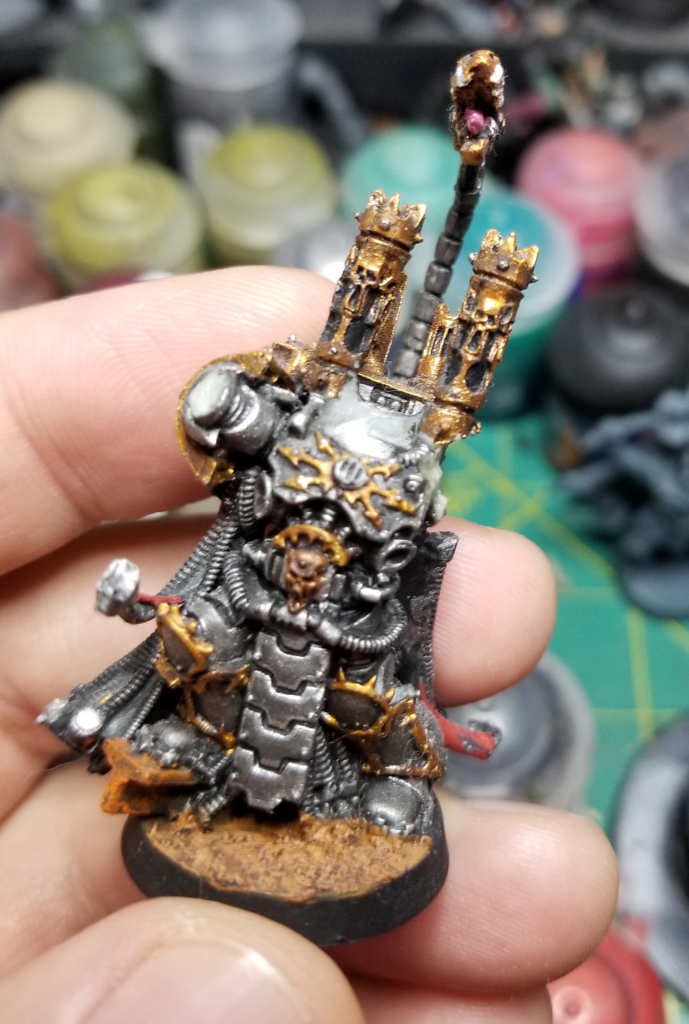
I originally painted this model to be an Iron Warriors Warpsmith back in like 2013. He broke apart when I moved and I decided a good time to fix him and repaint him was “never.” Finecast sucks and I hate it. The key thing here is that I’ve already painted the model normally – he’s painted like I’d paint him if he wasn’t being lit with OSL. that’s important. Next I need to plan my lighting.
For this I’m going ot paint this as though there’s a light source coming in from his left side, right about hip level. That means light’s gonna go up and down from there, and a bit across his chest and waist.
Step 1: Drybrushing
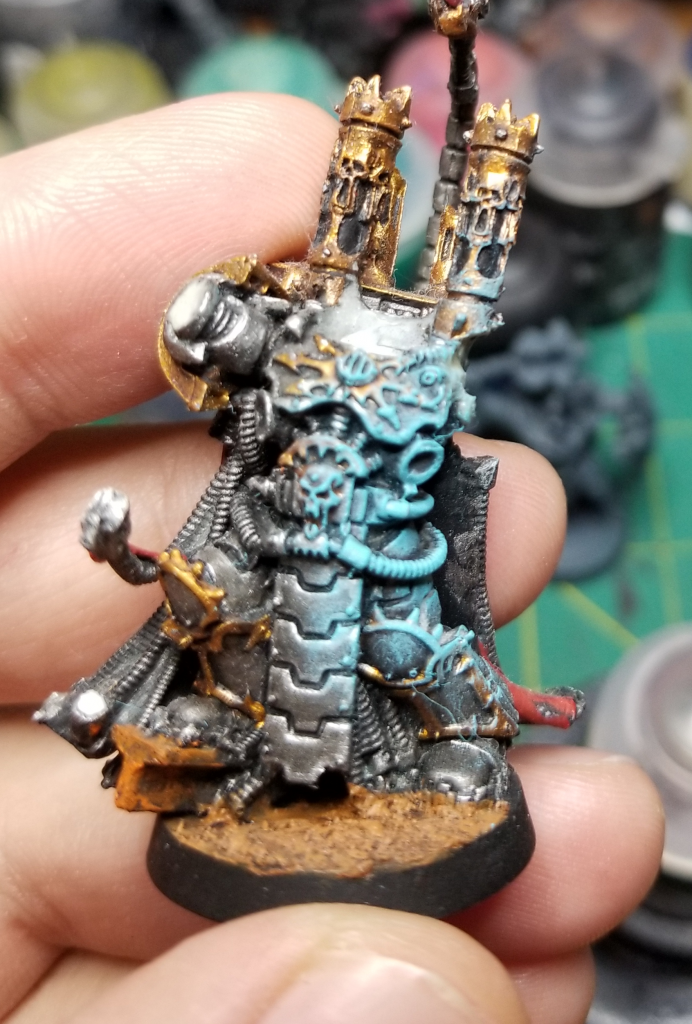
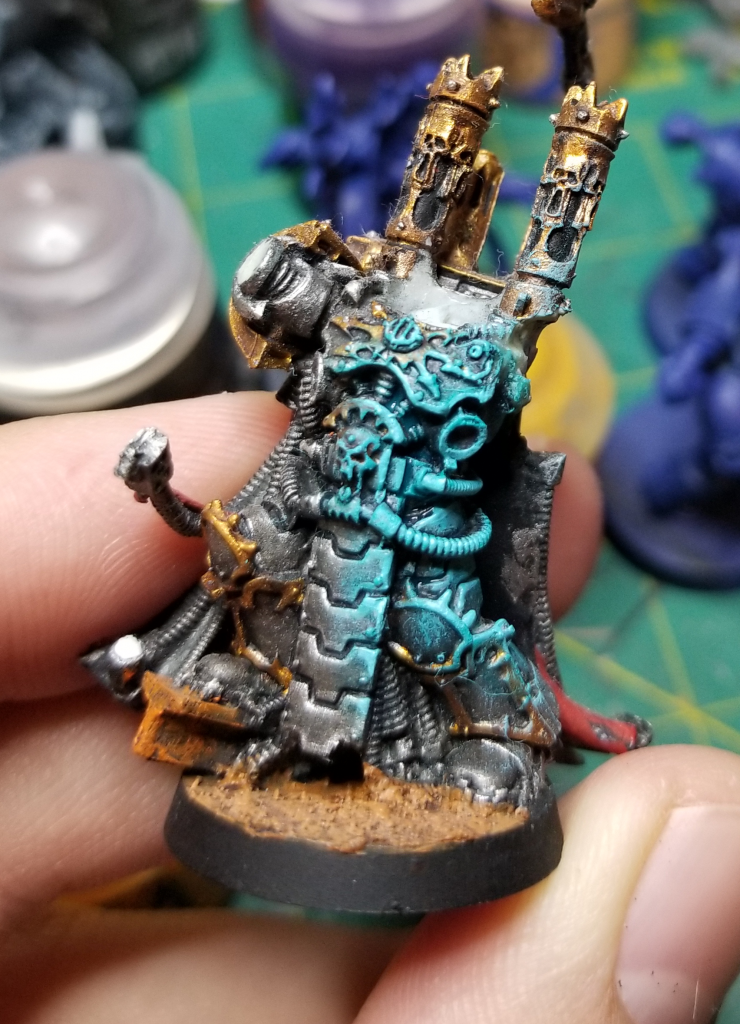
The first step is to drybrush the main lighting color I want. I’m going with Baharroth Blue here, which is just an awesome shade to do this with. As I do this I’m trying to brush exclusively in an “outward” direction, meaning my brush only goes outward – I never bring it back the opposite way as I paint. This ensures I won’t accidentally paint the “wrong side” of an object. I also go heavier on the parts closer to the light – more light will saturate these areas and “get in” to the crevices here.
If you think this looks good enough as-is, hey you’re not wrong. I’ve done many models where I stopped at this stage – it’s great on plasma coils and depending on how your model is painted, this may be good enough. If you did this and want to stop here, go nuts. If you want to get a little extra for a real dynamite effect, however, it’s time to do some blending.
Step 2: Wash Blending
Next comes blending. If I’m trying to do this the really complicated, nice way I’ll do a lot of custom mixing and wet blending to get smooth blends on every surface the light hits. But if I want to do this quickly, I’ll use washes or Contrast paints to do the job for me. Here I’ve basically just taken a liberal wash of Aethermatic Blue and applied it to the areas I drybrushed and then some, again working outward and being sure to get in all the recesses near the light source. This does all of my blending work for me.
Note that Aethermatic Blue and Baharroth Blue work extremely well for this. Other colors – especially reds – are much stronger and using Blood Angels red may give you too much tint. Consider looking at shades/washes or thinning your contrast paints before you use them in this step if you’re working with reds. Try some different stuff generally, though. Glazes also work very well for this.
Step 3: Highlights
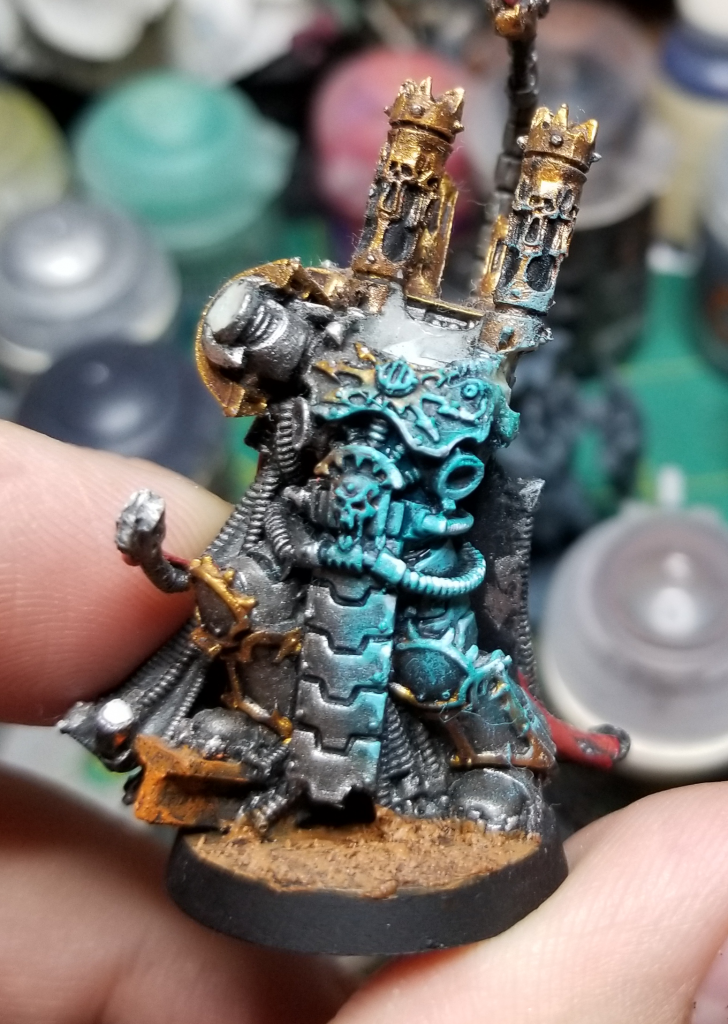
Next up I’m just going back and hitting the edges with Baharroth Blue, my original drybrush color. I could drybrush this again, but I only want to do a bit of edge highlightint this time around, hitting the edges nearest to my light source. This will cause those edges to pop and create a haloing effect.
Step 4: Final Highlights
Lest step. Now I’m gonna do some very small edge highlights with my lightest color, which in this case is Reaper Ghost White, but in GW terms would be Ulthuan Grey. This is a light blue offwhite that gives me some extra shininess and really hammers home the effect.
And there you have it! 15 minutes to achieve that, if you don’t count the time it takes to paint the rest of the model.
Taking the Next Step
If you’re looking to go even harder on this, the next step is to put a bit more work into your your shadow effects to increase the contrast, and to improve your blends on the lit areas. Contrast paints will generally work great on metallics and other lightly-colored areas, but the big challenge is that they can only darken those surfaces, so to get your best results you’ll need to do some actual blending to make those lit areas work. An example of this is the Ahriman I recently painted, where I needed to blend Baharroth blue and Screamer Pink on the robe to get the highlighted parts right.
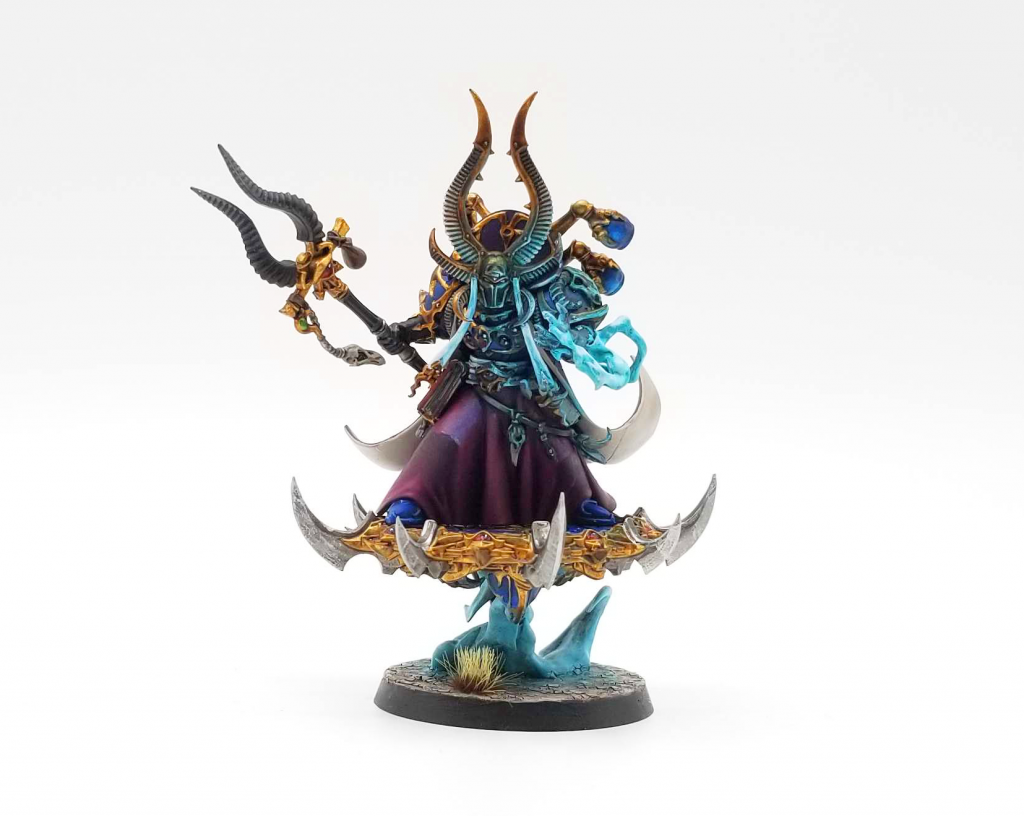
I’ve also increased the contrast here by shading parts that weren’t in the light, in order to make it even more visible where the light stops and to add shadows to the model. I did this using Drakenhof Nightshade. In the image below, I’ve pointed out a lot of the spots where I applied this wash to shade the model and make the effects more dramatic. Spots on the other side of the red lines are where I shaded with Drakenhof.
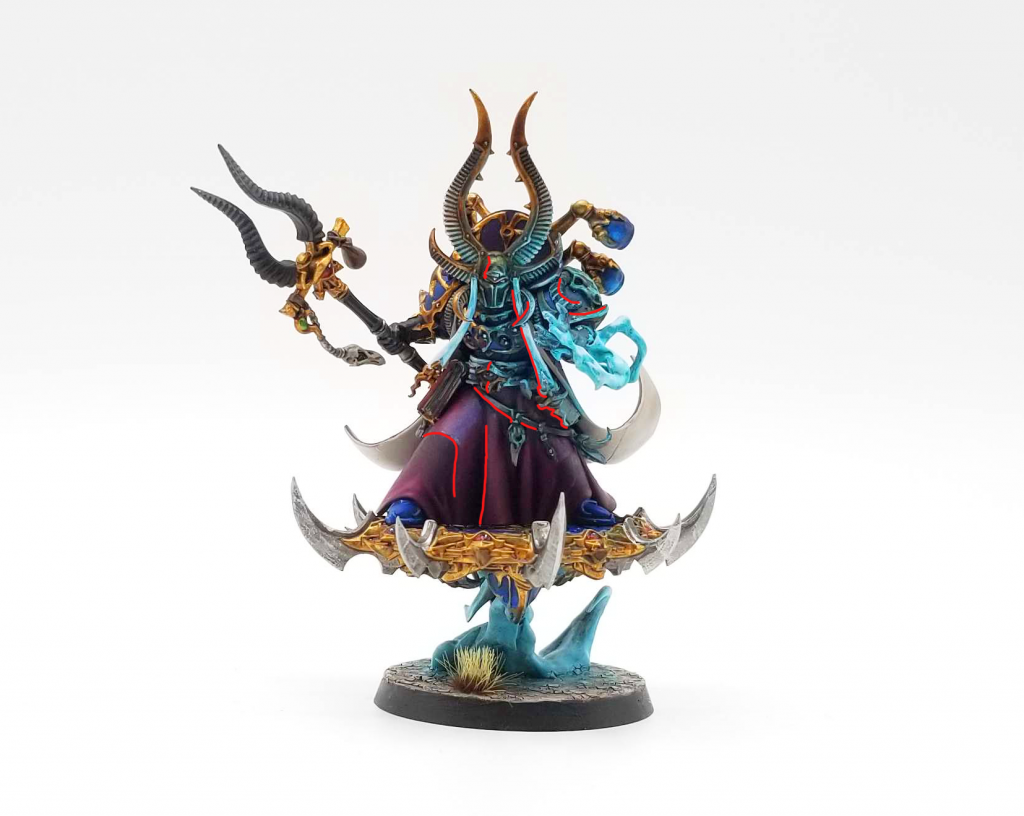
The other thing I added here were slight highlights on the orbs on the backpack, and when doing the gemstones I shaded the stones with drakenhof and then dotted them with Baharroth blue – note that the gemstones as a reflective surface will reflect the color of the light coming in to an extent, and the dots you make on them should point the same direction – toward the light source.
Other Colors
You can do this with any color, though blue is by far the easiest I’ve found. That said, you can do this with red and other colors. Reds tend to be much stronger, and a little goes a long way. This one was done with Mephiston Red, Evil Sunz Scarlet, and Carroburg Crimson.
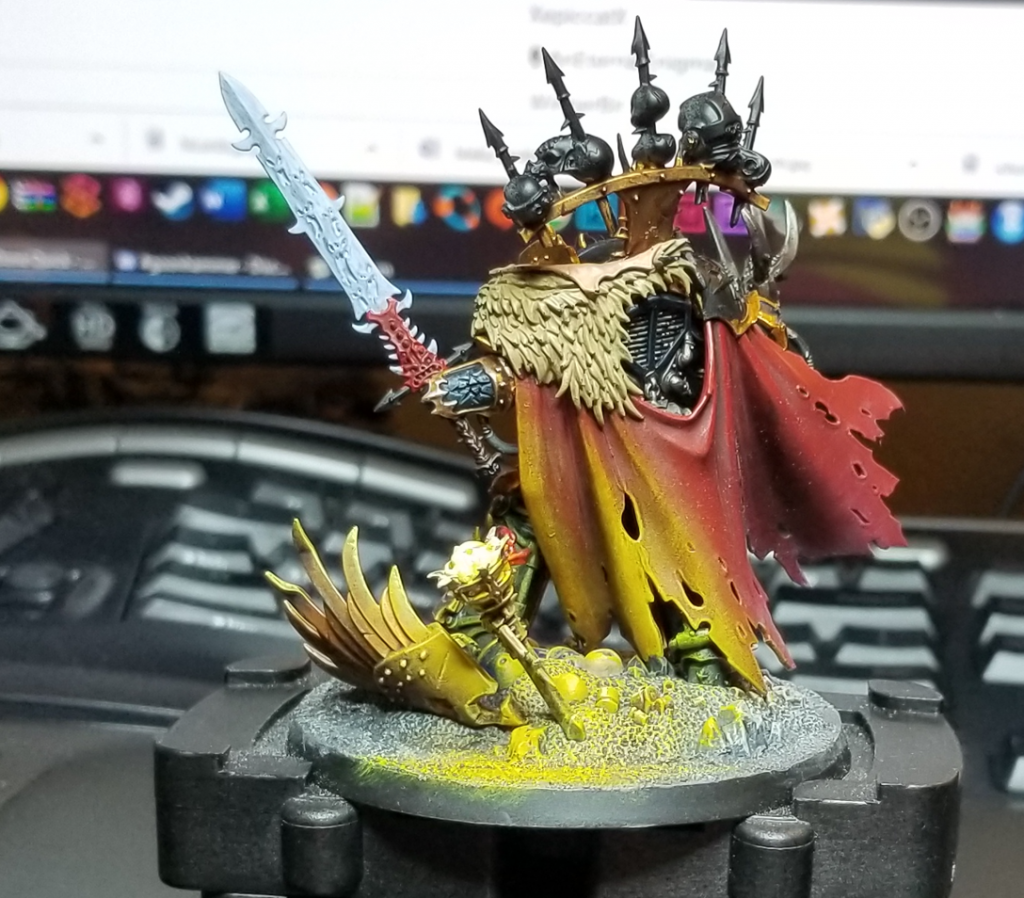
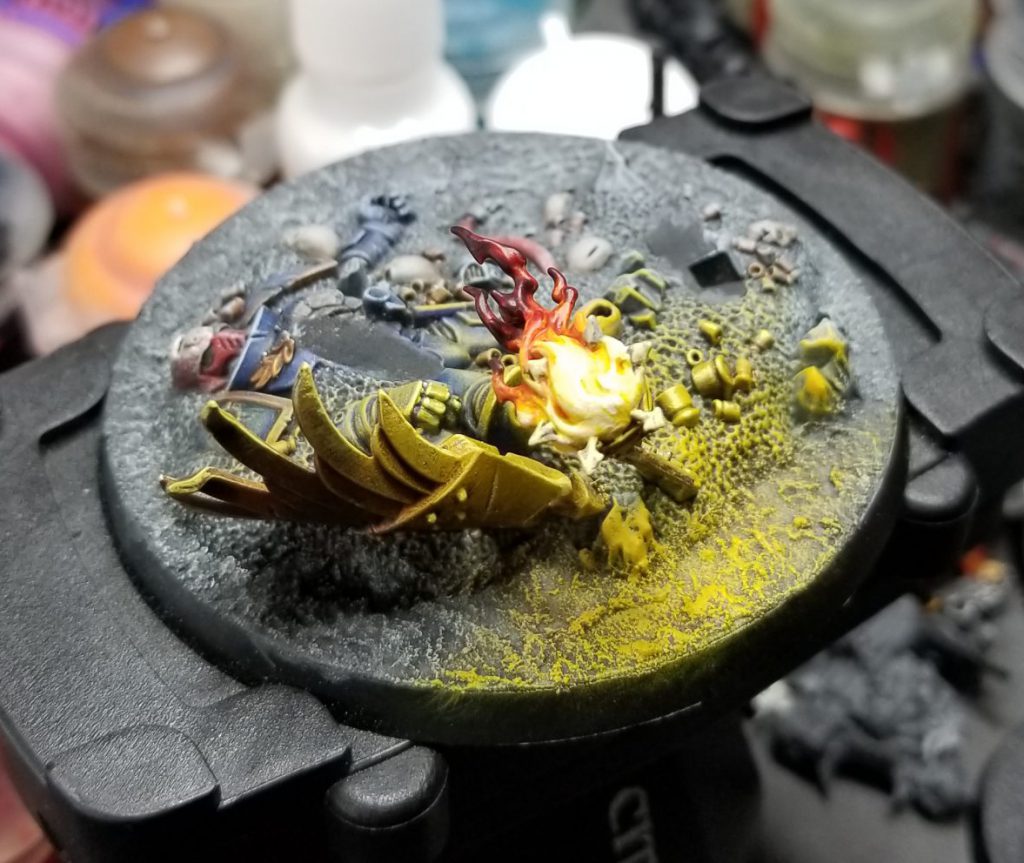
And similarly, when I did my Abaddon the Despoiler I used yellow hues on the cape and base from the flame. For those I used Flash Gitz Yellow and Iyanden Yellow for the blending.
Note that when I painted the base I use directional lighting from the torch; when I drybrushed yellow onto the base I avoided doing the area under the broken aquila where it would have blocked the light from the torch.
Otherwise, I’m basically using the same method to paint OSL here, albeit with some slightly more complex blending work being done on Abaddon’s cape.In today’s How to Paint Everything we talk about the basics of Object Source Lighting (OSL) and talk about a very quick and easy method for achieving solid OSL effects in about 15 minutes.
RichyP’s Quick-and-Dirty (20 min) Method
Resident Goonhammer quickpainting madman RichyP has also written on this topic a couple of times, with thoughts on how to do quick effects in a variety of colors.
RichyP: Here’s a few models that I’ve painted that have featured some form of glowing or reflected light
Yellow Glow
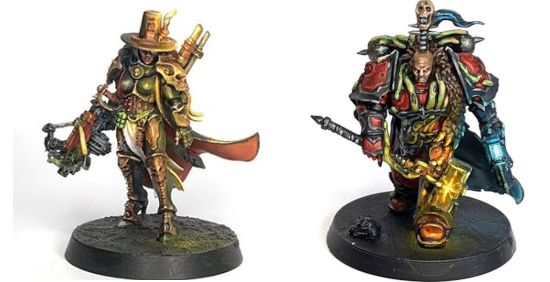
- Wash the glow area in thinned Mournfang Brown
- Layer on some very thin Troll Slayer Orange
- Edge highlight with Flash Gitz Yellow
- Paint the Light Source in Dorn Yellow
- [optional] Tidy recesses with a thin wash of Mournfang again
Green Glow
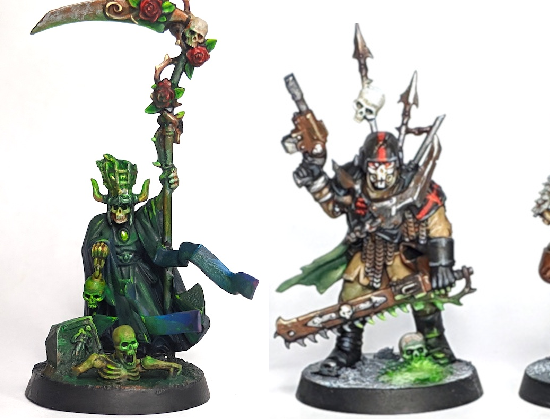
- Wash the areas around the glowing sources (in the case the skulls and the hat) in thinned Intermediate Green (Vallejo), any dark green should work.
- Layer on the same colour on the flat surfaces
- Highlight the edges in thinned Moot Green
- Paint the light sources in Flash Gitz Yellow
- Wash recesses with Biel Tan Green
Red Glow
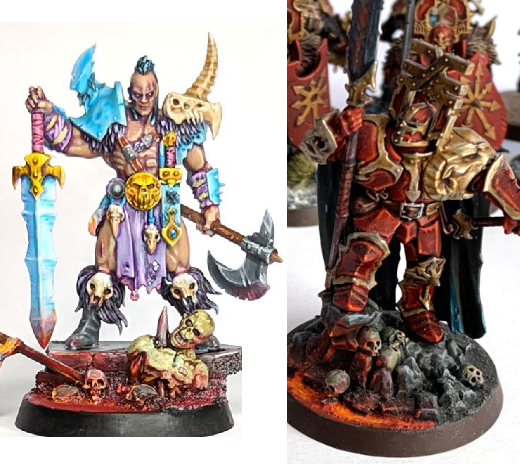
- Paint the lava in Mephiston Red, then use the same red but thinned on the edges of the reflection.
- Glaze over everything in Bloodletter, wash the same areas in Carroburg Crimson.
- While the Carroburg Crimson is still wet on the base, drop some Flash Gitz Yellow in to the edges so that it bleeds into the wash giving you a cheap gradient.
- On the most extreme edges of the reflections, paint some Troll Slayer Orange.
- [optional] If you want to go brighter, paint/bleed Dorn Yellow into the wet wash, and add a dot of it to the closest areas to the lava (see the skull and underside of the pole on the Darkoath Chieftain for an example).
Blue Glow
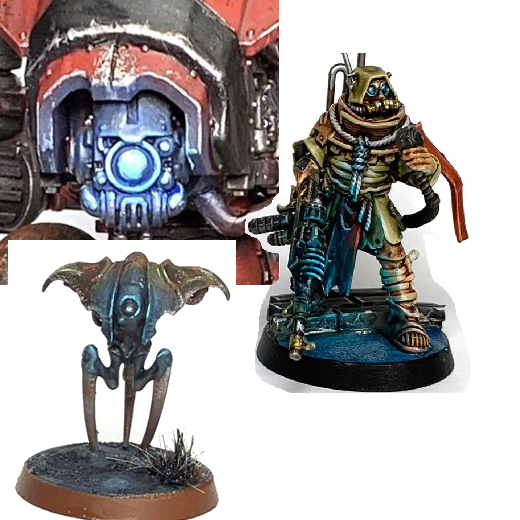
This is the method from the original article; in the case of the the Spindle Drone and the Ad Mech guy I used Incubi darkness and Drakenhof as the the washes for the darker areas, with Baharroth and Blue Horror as the lightest points.
For the step by step of this approach scroll down a bit, for a newer faster (and slightly more teal) version for today’s Contrast generation scroll down a bit more for that instead.
Painting Blue OSL without Contrast Paints
Stage 1 – Minute 0
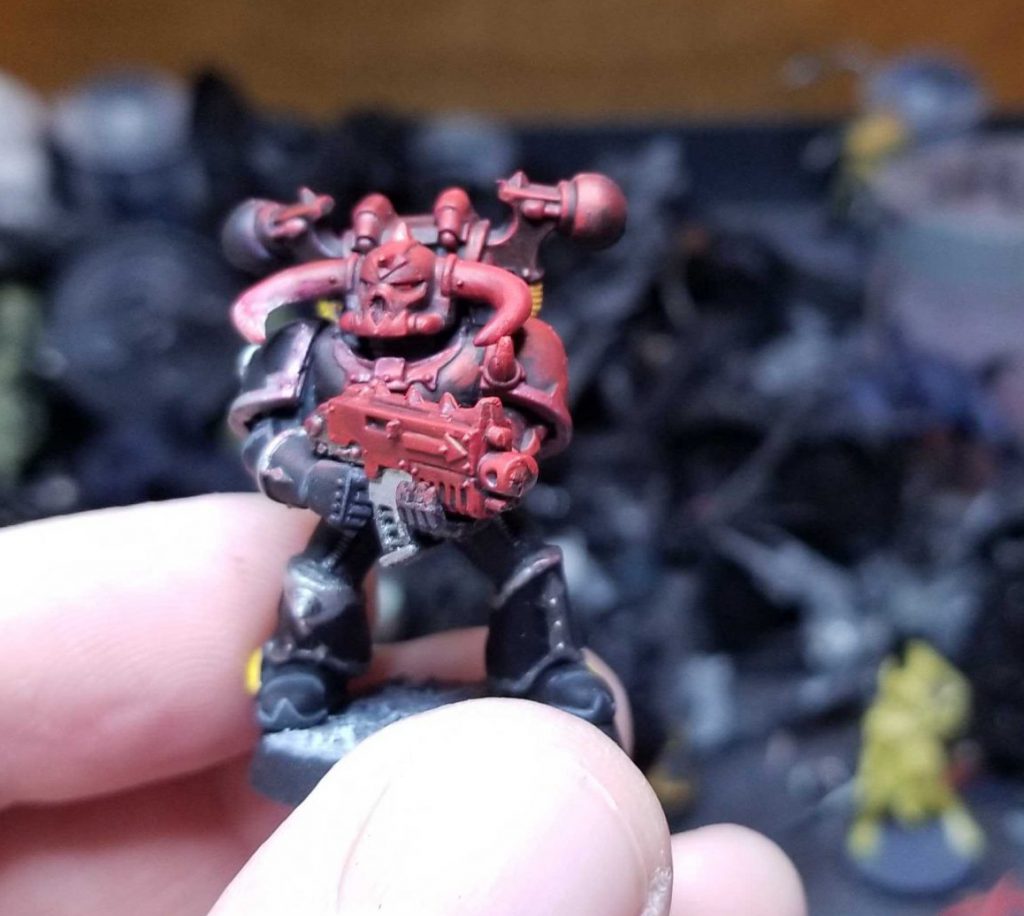
First things first, go and find a suitable candidate, or paint one and come back here to stage 1. I chose a Plague Marine I painted a while ago, because he has a plasma gun and they get real hot apparently.

Here he is, all lacking in glow and wonder. Let’s fix that…
Stage 2 – Minute 0 – 3ish
Ok, the first two stages will cause panic as they don’t look good at all and you’ll regret starting on the path to en-“lighten”-ment (hurr). Take your bright tone, in my case that was the Baharroth Blue and thin it as normal. Now apply it over the light source (the plasma coil), on the edges of any raised plates, armour, spikes, rims etc… that would face the light source, not too much but enough that it looks something like this:

(I told you it would look bad at this point, even on stage 2 it’ll look worryingly like a bad idea).
Stage 2 – Minute 3-5ish
Apply your wash over the areas where the light would hit the model, and especially in the recesses in those places (even though technically it wouldn’t hit there). Also apply it over the edges of the light source.

Notice the shade over the chest area, around the plasma and over the metals on the gun and shoulder pad/neck/face etc.. It still looks sketchy I know, but trust me the next step is the best bit. Use a hairdryer now to save time.
Stage 3 – Minute 5-10ish
Make sure stage 1 is dry before doing this bit (hairdryer is legit a pro hobby purchase). This is the trickiest bit now as you run the risk of flooding the model. Make a super thin mixture of water and your intermediate shade (VMC Intermediate blue in my case) eyeballing it i’d say about 5:1/6:1 water to paint. Now get some on your brush, but wipe off excess so it doesn’t run and apply it all over the areas where the light hits, including over the previous colour.

Holy cow, magic right? The intermediate glaze will tint the areas where the colour hits but keeps some of the original colours showing through, it’s why we started with the lightest colour and worked backwards, it also makes it look nice and fuzzy just like a glow.
You can see the glaze best on the chest, face and on the metal parts of the gun nearest the light source.
Stage 4 – Minute 10-15
Now go back to your original colour/bright tone (Baharroth Blue for me, always) and do a few highlights in the centre of your original ones for instant stage 2 highlights. Only do this on the bits that would reflect the best, (metals and hard edges such as shoulder pad trims). Also do it on the edges and the inner ridges of the plasma coil or whatever light source you’re using.

Notice the brighter bits have a slightly lighter tint now (most clear on the arm and edge of plasma coil in this picture)
Stage 5 / Final Stage – Minute 15-20
The only colour we haven’t used yet is Ulthuan Grey, let’s rectify that. Repeat the last step but ONLY apply it to the light source and maybe on the tiniest part of the shiniest surfaces (shoulder pad and the very centre of the edges of the gun metal bits). Don’t over do this bit, the more you use, the LESS light the glow will look.

Here Ulthuan Grey was only used on the plasma coil rim, and the lower corner of the shoulder pad closest to the light source (also a single dot on tentacle as it’s almost touching the gun, and in the centre of each of the 3 ridges of the arm.
Painting Blue OSL with Contrast Paints
Step 0

After painting most (if not all the model) make sure that the source of the glow is painted or primed in Wraithbone. Also say hi to the completed one in the background. I painted a majority of the rest of the models as I wanted to add an OSL glow around the surrounding areas, and with Contrast paint working like a glaze having the colours underneath tint is a massive bonus.
Step 1

Next up, I painted the weapons I wanted to be “power weapons” in Aethermatic Blue (the bows and the long swords). Behold the power of Contrast(™); when applying the Contrast paint be sure to pull the paint away from the middle of the weapons towards the lower and upper parts as this will give you a lighter middle section making it look even brighter there. To be honest they look pretty power weapony already, but I’m known for going OTT on many things so why stop there…
Step 2

Next up I painted some of the Aethermatic Blue on parts of the model that are close to the weapons to give a reflected light effect. On the faces and cloth only apply small amounts, whereas on the metal areas you can go overboard and add a couple layers.
Step 3

Apply some white paint to the centre of the brightest reflected areas e.g. uppermost raised creases in the cloth a line parallel to the arrow etc..
Step 4 / Final Stage
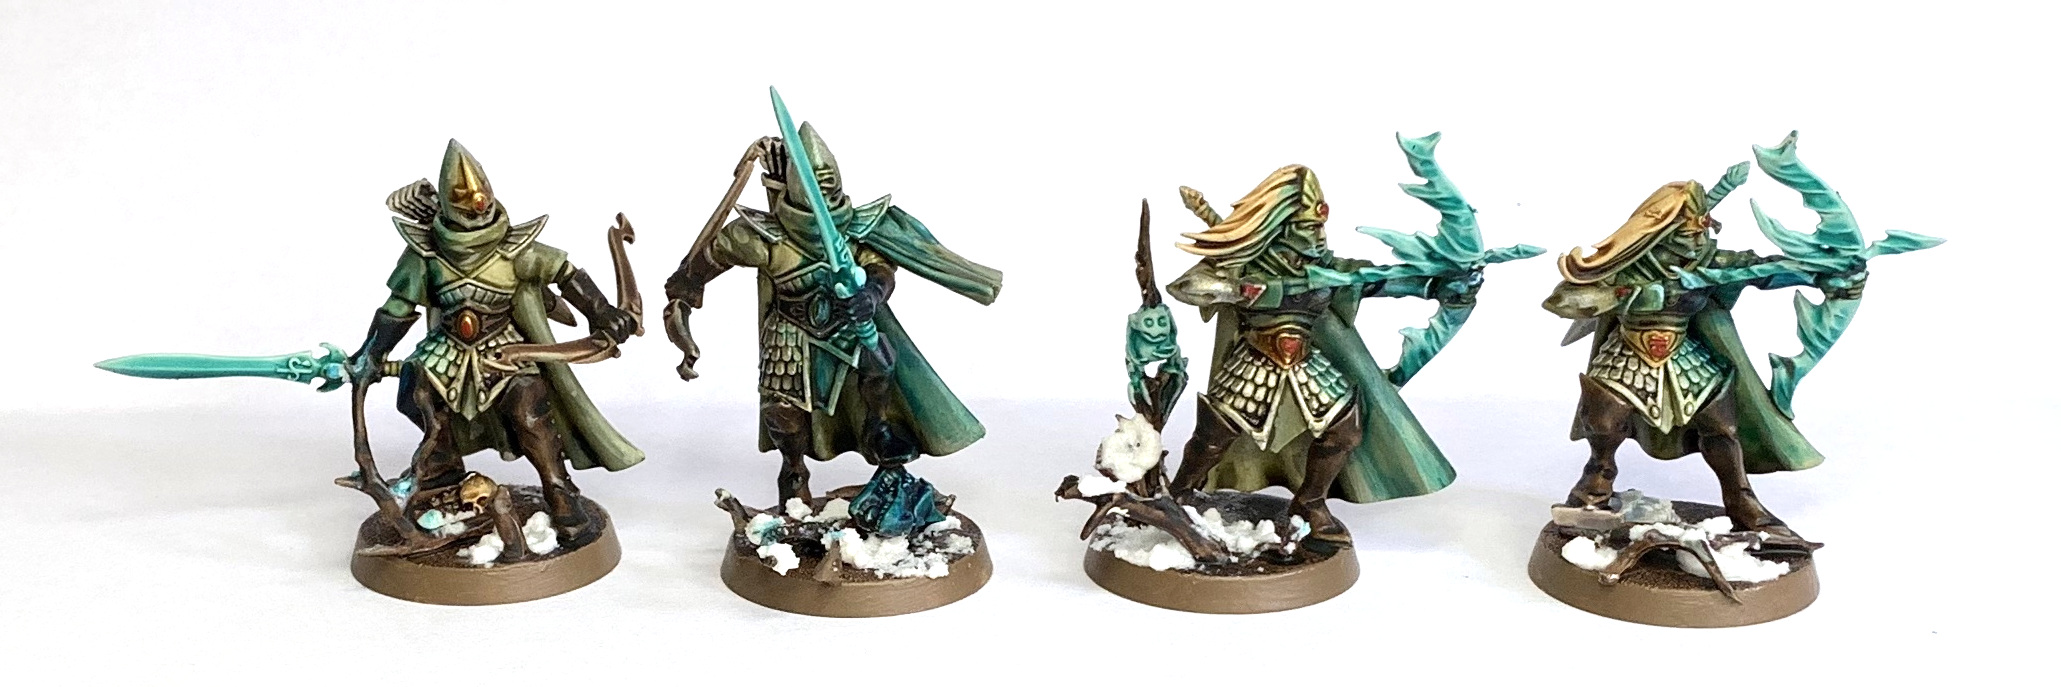
Finally cover the white areas in thinned Aethermatic Blue, and add some Arkhelian Green to the deepest recesses of the reflected light for the full effect.
Here’s a bonus of a full unit of 10 in all their glowy Power Weapon glory..

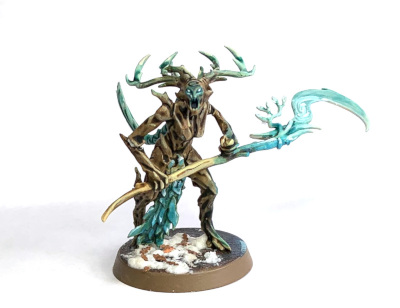
And a Branchwych done the same way but with some pure white added over the Aethermatic for a more blue-white effect:
Bonus 2 Stage Glowing Eye Lenses
Step 0
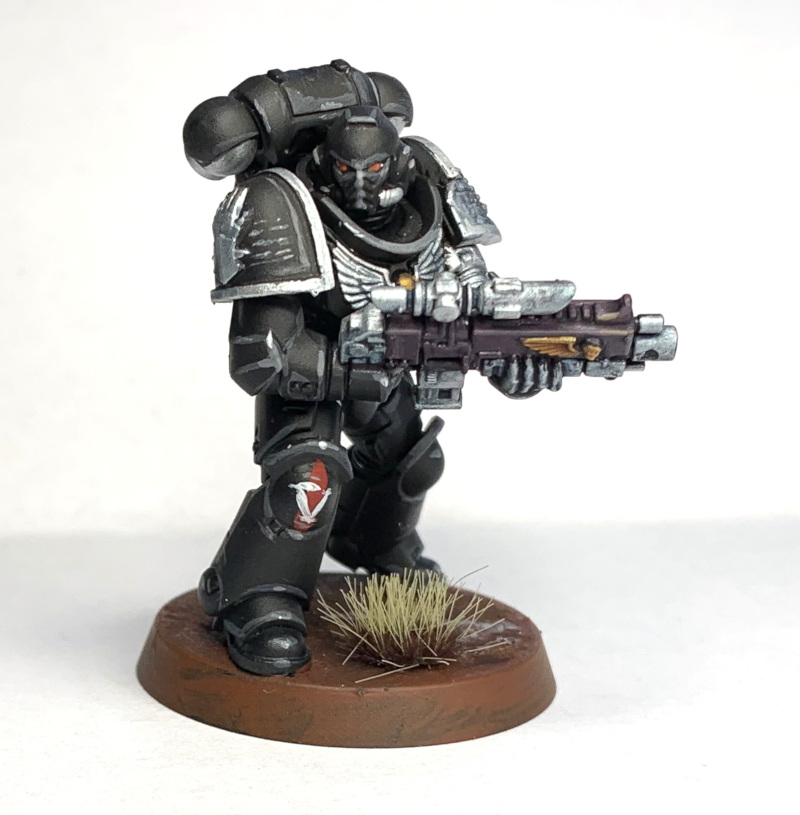
Take a painted Space Marine or suitable candidate for glowy eyes. If you haven’t done an edge highlight under and around the eyes you’ll need to do it at this stage so that the Contrast paint can tint it. For green paint the lenses moot green or something bright.
Step 1
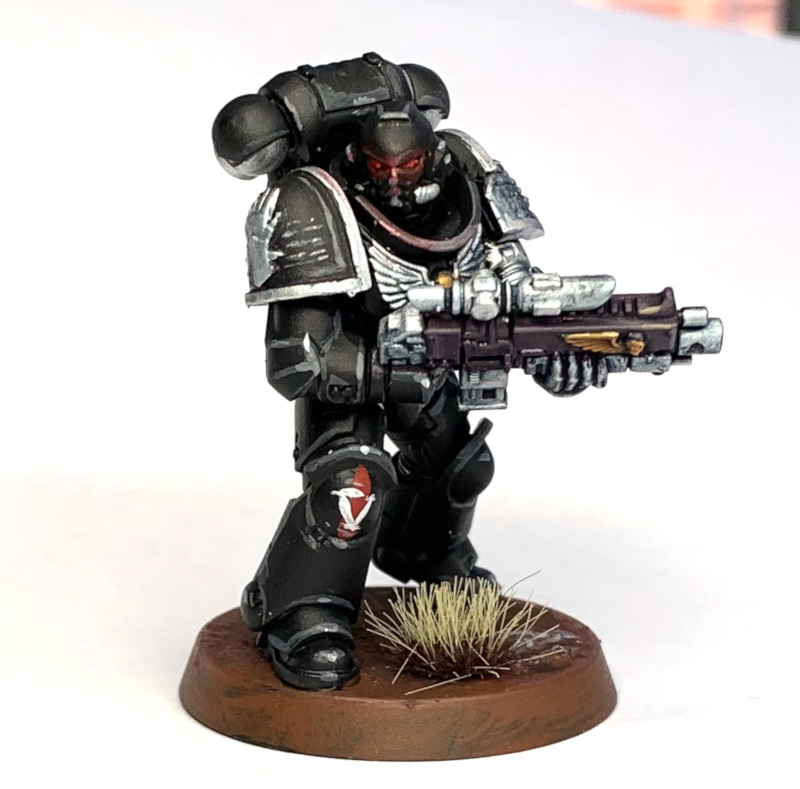
Cover the eyes and the reflected areas in Blood Angels Red, for green I’d use Warp Lightning, and blue Arkhelian Green (I know).
Step 2
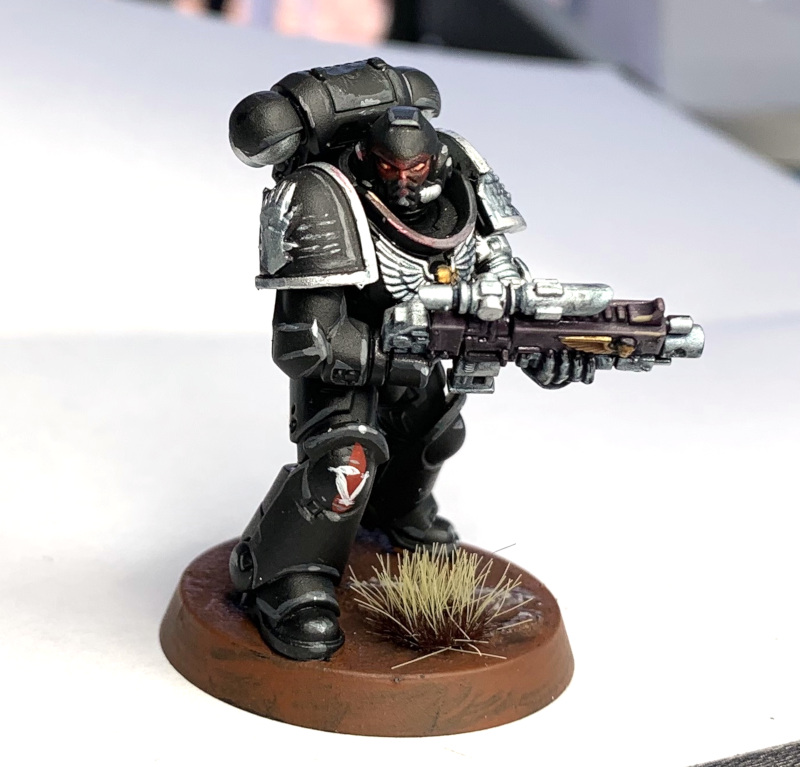
Paint Lugganath Orange into the centre of the lenses and on the extreme edges of the reflection. Note you may need to break the seal on the paint as it’s probably never been used before. If you don’t have Lugganath, then any orange with a bit of Ulthuan to desaturate it would work fine.
Final Thoughts
OSL can be a daunting technique to take on, but it looks more complicated than it is in most cases. It’s one of the best reward-to-time-investment ratio techniques you can learn in the hobby however, and there are enough opportunities to use it in nearly every army that you’ll find reasons to use it over and over. Keep the basic principles in mind, look at reference photos if you need, and keep at it!
Have any questions or feedback? Drop us a note in the comments below or email us at contact@goonhammer.com.
