
Hey Everybody, in today’s How to Paint Everything we will be covering the third version of James “Logan” Howlett for Marvel: Crisis Protocol, the brainwashed killing machine, Weapon X!
Folks who’ve been around Marvel Comics for a while will know that this version of Wolverine comes from the 1991 story “Weapon X, which tells the tale of how Logan was bonded with adamantium and subjected to brainwashing experiments. If you’ve not read it, I highly recommend it.
As far as the painting side of things goes, we will be working on a lot of flesh tones this time around as Weapon X is just sporting a pair of shorts. I’ll go over some quick and dirty non-metallic metals and how to paint snow quickly.
Let’s get to it!
Painting the Skin
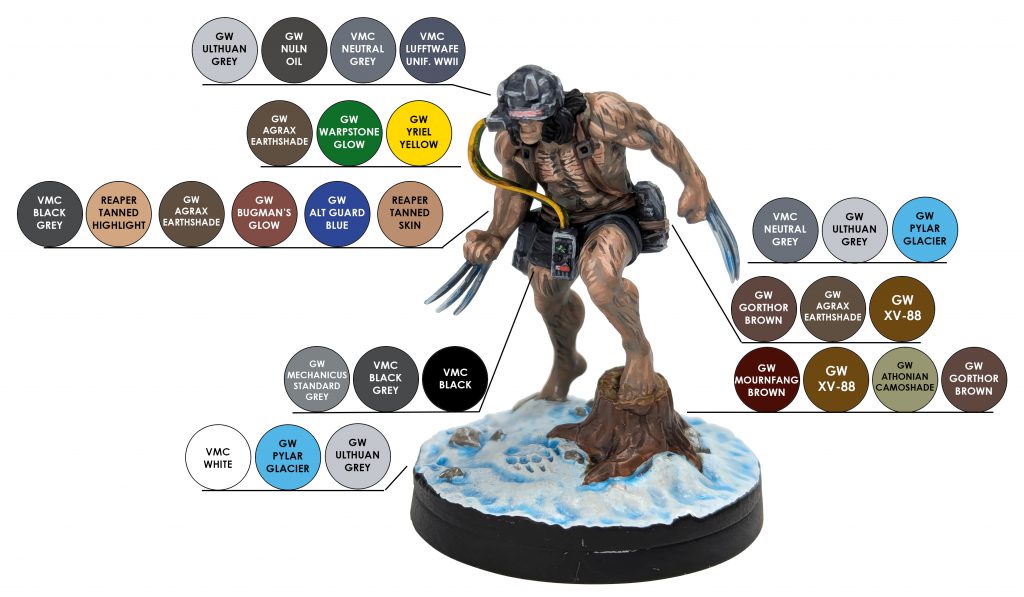
Generally when I paint skin I like to mix in some blue and red tones into the flesh tone to help give it some visual interest. This time I decided to lean heavier into the blue tones to try and make him feel cold.
I started with a basecoat of Tanned Skin mixed with Altdorf Blue and then added in more Altdorf Blue to the mix for the shadows. I cleaned up the raised areas and any spots that would have more light shining on it with the original mix and then started Layering a mix of Tanned Skin and Bugman’s Glow onto the muscles and high points. From there I made a wash of the previous mix plus Agrax Earthshade. Once that wash is dry, I started highlighting it with mixes of Tanned Skin, Bugman’s Glow and Tanned Highlight. Finally the hairs on his body were painted with a mix of Tanned Skin, Altdorf Blue and Black Grey.
- Basecoat: Reaper Tanned Skin: Citadel Altdorf Blue
- Shadows: Previous Mix: Additional Citadel Altdorf Guard Blue
- Clean Up: Reaper Tanned Skin: Citadel Altdorf Guard Blue
- Layer: Reaper Tanned Skin: Citadel Bugman’s Glow
- Wash: Reaper Tanned Skin: Agrax Earthshade
- Layer: Reaper Tanned Skin: Bugman’s Glow
- Highlight: Reaper Tanned Skin: Reaper Tanned Highlight
- Highlight: Reaper Tanned Highlight
- Hairs: Original Basecoat Mix: Vallejo Model Color Black Grey
Painting His Shorts
His shorts were painted very simply. I started with a basecoat of Black Grey, followed by Black in the recesses and shadows and finally a highlight of Mechanicus Standard Grey.
- Basecoat: Vallejo Model Color Black Grey
- Shadow: Vallejo Model Color Black
- Highlight: Citadel Mechanicus Standard Grey
Painting the Helmet and Diagnostic Gear
All the silver metals of the helmet and diagnostic gear were painted in a simple type of non-metallic metal. I started with a basecoat of Luftwafe Uniform WWII, which is a nice light blue grey. I then added layers of Neutral Grey and a mix of Neutral Grey and Ulthuan Grey before washing it with Nuln Oil. Once the wash was dry, I gave it an edge highlight with Ulthuan Grey.
- Basecoat: Vallejo Luftwafe Uniform WWII
- Layer: Vallejo Model Color Neutral Grey
- Layer: Vallejo Model Color Neutral Grey: Ulthuan Grey
- Wash: Citadel Nuln Oil
- Highlight: Citadel Ulthuan Grey
There’s not a ton of leather to paint on him, and I wanted to keep the strapping fairly simple. I started with a basecoat of Gorthor Brown, gave it a wash with Agrax Earthshade and then finished it off with a highlight of Gorthor Brown mixed with XV-88.
- Basecoat: Citadel Gorthor Brown
- Wash: Citadel Agrax Earthshade
- Highlight: Citadel Gorthor Brown: Citadel XV-88
The wiring going from the helmet to his belt mounted monitor was painted with Yriel Yellow and Warpstone Glow before being washed with Agrax Earthshade.
- Basecoats: Citadel Yriel Yellow & Citadel Warpstone Glow
- Wash: Citadel Agrax Earthshade
Painting the Adamantium Claws
To make the claws seem brighter than the other silver metals, I started with a basecoat of Neutral Grey and gave them an edge highlight with Ulthuan Grey. I followed that up with a wash of Pylar Glacier, the same color I’ll be using on the snow, and finished it off with another edge highlight of Ulthuan Grey.
- Basecoat: Vallejo Model Color Neutral Grey
- Edge Highlight: Citadel Ulthuan Grey
- Wash: Citadel Contrast Pylar Glacier
- Edge Highlight: Citadel Ulthuan Grey
Painting the Stump
The tree stump that he is standing on was painted with basecoats of Mournfang Brown on the bark and XV-88 for the meat of the trunk. I then washed it all with Athonian Camoshade. Once the wash was dry, I gave all of it a quick drybrush with Gorthor Brown.
- Basecoat: Citadel Mournfang Brown & Citadel X-V88
- Wash: Citadel Athonian Camoshade
- Drybrush: Citadel Gorthor Brown
Painting the Snow
In order to keep the snow as bright as possible I made sure to be as neat as possible when painting near the base to keep the Skull White spray primer clean. If I needed to do clean-up, I painted over the areas in question with Ulthuan Grey. To get the blue tint to the snow, painted thin coats of Pylar Glacier onto the base. And then to finish it off I stippled the snow with White to give it some texture.
- Basecoat: Citadel Skull White Spray Primer
- Clean Up: Uthuan Grey
- Wash: Citadel Contrast Pylar Glacier
- Stipple: Vallejo Model Color White
Special thanks to Atomic Mass Games for providing Goonhammer with the Weapon X and Maverick character pack. These guys are out now, just ask your friendly local game store for availability. Did you pick them up? If you did, hit me up on Twitter/X (brushwizard), Instagram (brushwizardry), or if you’re a member of the Goonhammer Discord server share them on the dedicated Marvel: Crisis Protocol channel.
Have any questions or feedback? Drop us a note in the comments below or email us at contact@goonhammer.com. Want articles like this linked in your inbox every Monday morning? Sign up for our newsletter. And don’t forget that you can support us on Patreon for backer rewards like early video content, Administratum access, an ad-free experience on our website and more.
