
Today I have a tutorial all about chrome non-metallic metal featuring that metal tyrant, Ultron from Marvel: Crisis Protocol. He has been given a new lease on life, thanks to the new Cabal Affiliation pack, freeing him from the bindings of the original core box. In this tutorial, I’m going to be showing you how to paint non-metallic metal chrome (also known as sky earth non-metallic metal). We’ll also use a simplified version of silver non-metallic metal to help break up the chrome a little bit and use some fluorescent paints to add a bit of glow to him as well.
Painting the Chrome
Non-metallic metal chrome can be extremely intimidating to start painting; you need to take the things you’ve learned from standard NMM painting and then add a second color to play with while paying attention to highlights and shadows of the two different areas. It gets especially tricky when you need to start adding in reflections of other colored surfaces too. Luckily this version of Ultron is pretty mono-chromatic, which means we can focus on the basics.
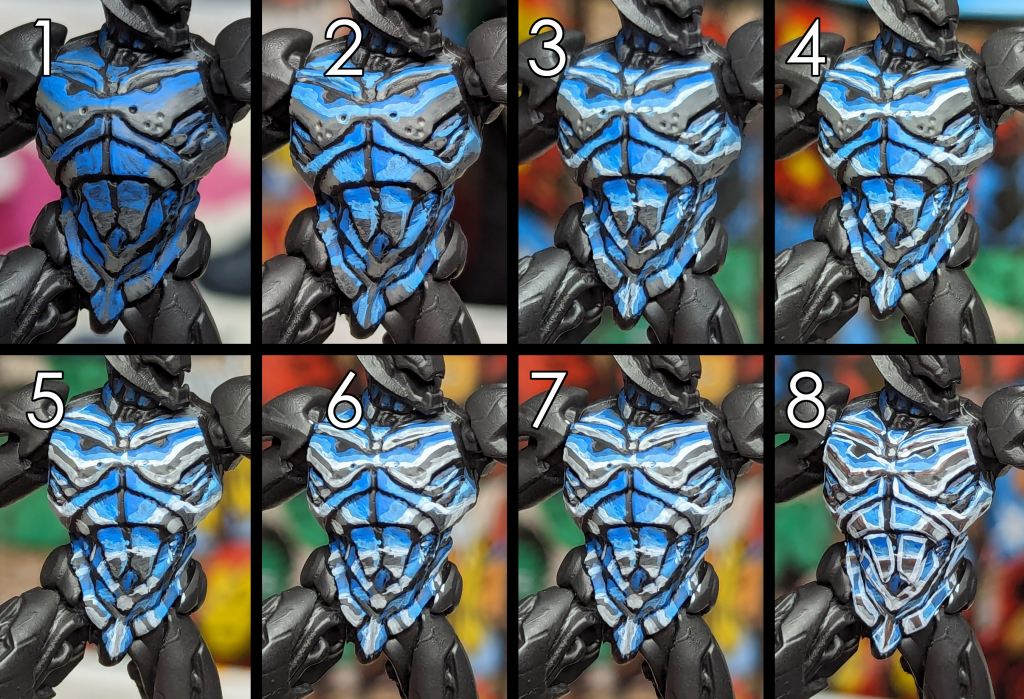
1. Basecoat. Citadel Caledor Sky and Citadel Stormvermin Fur
First off, we’ll lay down a basecoat of Caledor Sky and Stormvermin Fur where we want our main reflections to be. Always be aware of the placement of the horizon line, on flat surfaces it should be parallel with the ground, when you get into curves and tube shapes, this can change.
2. Highlight – Sky Side: Citadel Lothern Blue
On the upper half, paint Lothern Blue from the horizon line upwards. Blend into the Caledor Sky as needed and try to leave some of that color showing.
3. Highlight – Sky Side: Citadel Uthuan Grey
Repeat the last step, this time with Uthuan Grey. Blend it into the Lothern Blue like we did with the Caledor Sky layer.
4. Highlight – Sky Side: Vallejo Model Color White
Finally, add a white line at the horizon line to bump up contrast.
5. Highlight – Ground Side: Citadel Administratum Grey
The ground layer is inverse of the sky layer. This time we are going to leave the middle area alone and highlight from the bottom towards the middle with Administratum Grey. Blend this into the Stormvermin Fur layer near the middle, but leave a decent amount of Stormvermin Fur showing.
6. Highlight – Ground Side: Citadel Uthuan Grey
Repeat the previous step, but this time with Uthuan Grey.
7. Midline – Citadel Rhinox Hide: Citadel Stormvermin Fur
To help push contrast further, darken the horizon line slightly with a line of Stormvermin Fur mixed with Rhinox Hide. It’s totally cool if you get a little jagged with it as well.
8. Edge Highlight – Vallejo Model Color White
Finally, edge highlight with white to finish it off.
Painting the Non-Chrome Metal
As things progress it’ll become pretty clear that the effect needs to be broken up a bit to make it work better. We’ll do this by painting the joints in a grey/silver non-metallic metal. It will also be darker than the chrome areas, which will help with contrast a bit as well. For this we will be doing a very simple NMM silver using Luftwaffe Uniform WII’s wonderful blue-grey as a basecoat.

1. Basecoat: Vallejo Luftwaffe Uniform WWII
Basecoat the hip, knee, elbows, neck and any other areas that you don’t want to be chromed. As you’ll see later, I decided to paint his fingers and palms in this color as well.
2. Layer: Vallejo Luftwaffe Uniform WWII: Citadel Uthuan Grey
Start picking out where highlights will go with a mix of Luftwaffe Uniform WWII and Uthuan Grey.
3. Edge Highlight: Citadel Uthuan Grey
Highlight the previous layer a bit with Uthuan Grey and then edge highlight as needed.
4. Spot Highlight: Vallejo Model Color White
Spot highlight any corners and hard edges that would catch the most light with white.
Painting the Red Glowing Lines
In general, I don’t do a lot of object source lighting on my Marvel: Crisis Protocol miniatures and on Ultron I won’t be delving into that. But that doesn’t mean we can’t make him as glowy as possible. We’ll be using AK Interactive fluorescent paints to give us the luminosity needed to make him feel like he’s killed with energy.
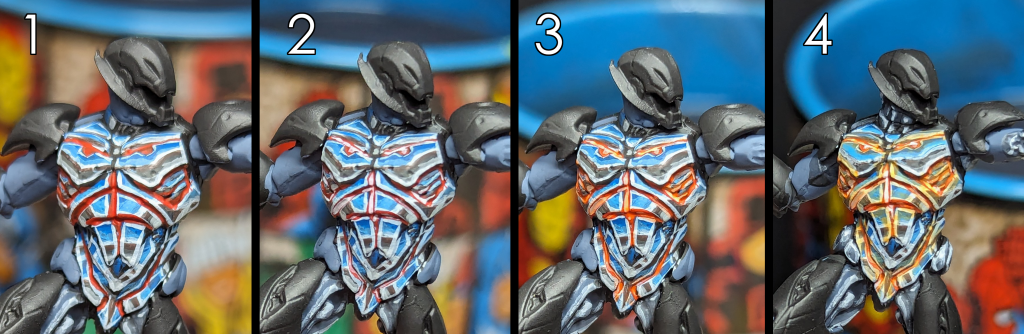
1. Basecoat: Citadel Evil Sunz Scarlet
To start, I lay down a basecoat of Evil Sunz Scarlet to any areas where we want the red-orange glow to be.
2. Center Highlight: Vallejo Model Color White
Paint white into the centers of the lines and any larger areas.
3. Layer: AK Interactive Fluorescent Orange
Apply thin layers of Fluorescent Orange into the entire area, covering both the red and white. I like to make sure that the white is fully covered by the orange.
4. Edge Highlight: AK Interactive Luminous Orange
Finally, along the outside edges of the panel lines I painted Luminous Orange to make it look like it is slightly radiating out from the light source.
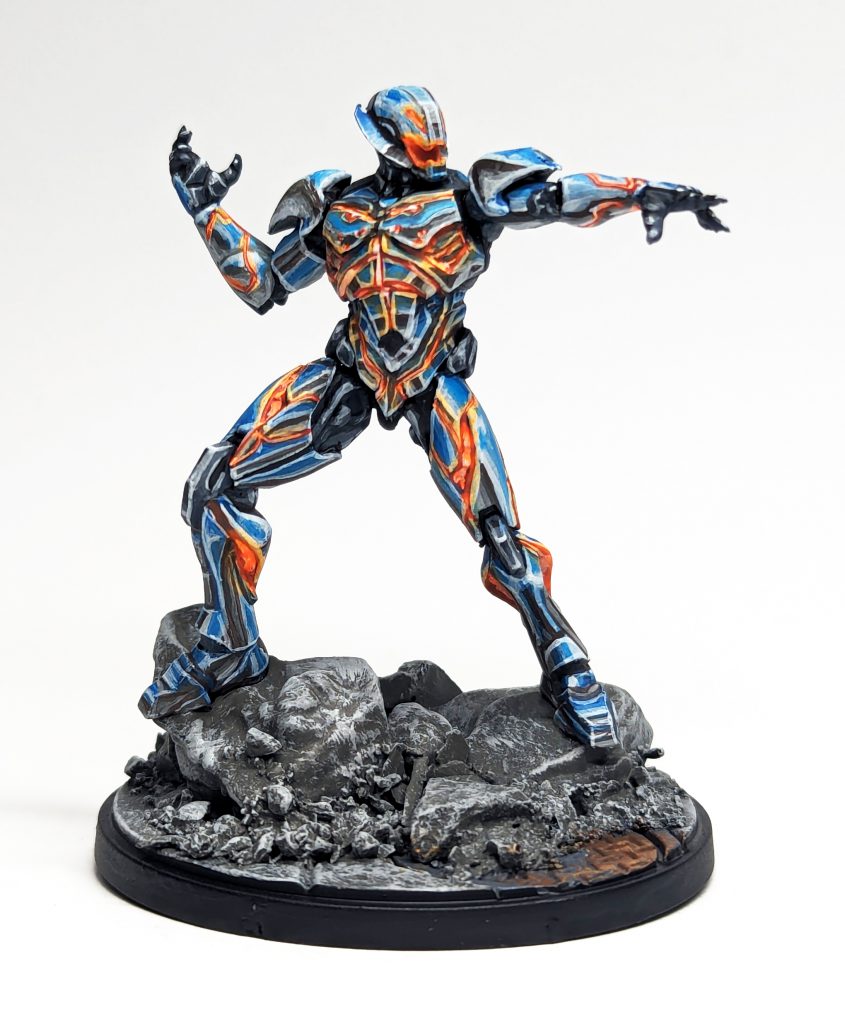
That’s basically how the entire model is painted, some areas will lean more towards the ground color and others will be more sky color. Non-metallic metal doesn’t have to be intimidating, if you break it up into simple techniques and work on understanding how various shapes reflect light. Some shapes might be hard to wrap your head around, I’m still not super happy with his head, for example. But as you look at references and practice, eventually it will get easier to do. Give it a go and have fun with it! If you’re on social media, hit me up on Twitter/X (@brushwizard) or Instagram (@brushwizardry) and share your work, I’m always interested to see what the MCP community has been working on.
Have any questions or feedback? Drop us a note in the comments below or email us at contact@goonhammer.com. Want articles like this linked in your inbox every Monday morning? Sign up for our newsletter. And don’t forget that you can support us on Patreon for backer rewards like early video content, Administratum access, an ad-free experience on our website and more.
