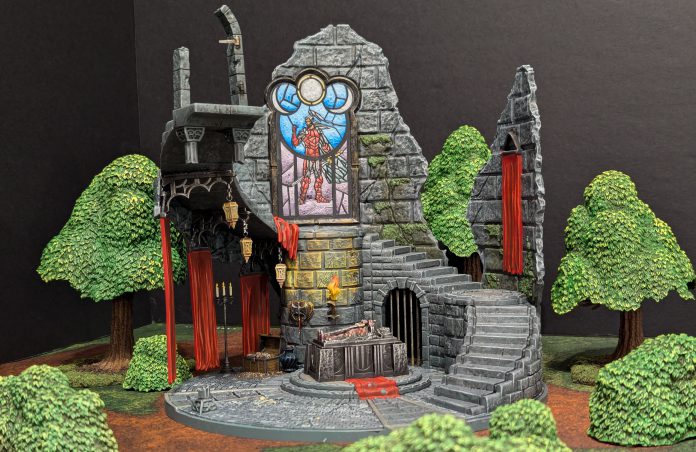
Welcome my mortal friends to today’s How to Paint Everything: Marvel Crisis Protocol, and the Tomb of Dracula! This absolutely massive terrain piece doubles as a scenic base for the Monsters Unleashed character pack, which features Dracula, Frankenstein’s Monster, Werewolf by Night and N’Kantu, the Living Mummy. This thing is packed with details and some subtle (and not so subtle) nods to the Castlevania video game series.
Unlike my usual guides, this time I’m going to split this up into multiple sections each with their own painting chart. We’ll start off with the main structure, followed by the set dressings, the sarcophagus and finally the stained glass window. So let’s get to it, starting with the ruined castle itself.
Painting the Main Structure
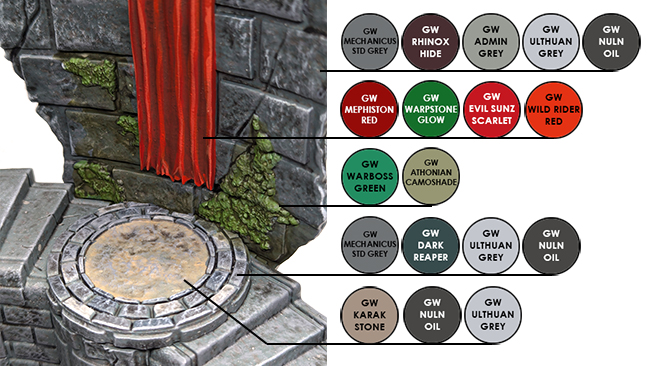
The first section we are going to cover will be the main structure of the piece. For starters the entire main structure was spray painted Mechanicus Standard Grey and then worked up from there. I made sure to paint all of the stone areas before giving the entire structure a Nuln Oil wash and Ulthuan Grey drybrush.
Painting the Rough Stone
To start, we are going to spray paint the entire main structure of the Tomb with Mechanicus Standard Grey spray primer. Next we will give it a bit of texture by speckling the surfaces with Rhinox Hide, Adminstartum Grey, and Ulthan Grey. To do this, dip a toothbrush into thinned versions of these paints and flick the brush bristles to fling dots of paint across the model. Start with Rhinox Hide and repeat the process with Adminstartum Grey, and Ulthan Grey. Once you’re happy with the coverage of these speckles, wash the entire area with Nuln Oil and finally finish it off with a drybrushing Ulthuan Grey. I waited until I was completely finished with the next two sections before washing and drybrushing.
Basecoat – Citadel Mechanicus Standard Grey Spray Primer
Speckle – Citadel Rhinox Hide
Speckle – Citadel Administartum Grey
Speckle – Citadel Ulthuan Grey
Wash – Citadel Nuln Oil
Drybrush – Citadel Ulthuan Grey
Painting the Brickwork
The brickwork areas also started with a basecoat of Mechanicus Standard Grey spray primer, since we previously primed the entire model with this color. I then pick out individual bricks with Dark Reaper and Ulthuan Grey and try to make it as random as I can. This also was washed with Nuln Oil and drybrushed with Ulthuan Grey afterwards.
Basecoat – Citadel Mechanicus Standard Grey Spray Primer
Layer – Citadel Dark Reaper
Layer – Citadel Ulthuan Grey
Wash – Citadel Nuln Oil
Drybrush – Citadel Ulthuan Grey
Painting the Tan Stonework
All of this grey needed to be broken up a bit, so I decided to paint some extra color to the stone areas with Karak Stone. I painted these areas by mixing Karak Stone with Lahminan Medium to thin it down, I then painted it on top of the previously painted areas and let the thin paint mingle with the colors underneath to make it a bit more interesting. After this section was finished, that is when I did the overall wash and drybrushing mentioned in the previous sections.
Basecoat – Citadel Karak Stone: Lamhian Medium
Wash – Nuln Oil
Drybrush – Ulthuan Grey
Painting the Moss
The mossy sections on the walls were painted very simply. I started with a basecoat of Warboss Green, I then washed it with Athonian Camoshade and also painted some of the areas below the moss with it as well to stain the walls a bit. I then drybrushed the moss with Warboss Green again to catch some of the texture.
Basecoat – Citadel Warboss Green
Wash – Citadel Athonian Camoshade
Drybrush – Citadel Warboss Green
Painting the Rusty Metal Areas
All of the metal sections were painted with a basecoat of black and then drybrushed silver, using Leadbelcher. I then added a tinge of orange to it with a drybrushing of Fire Dragon Bright.
Basecoat – Vallejo Model Color Black
Drybrush – Citadel Leadbelcher
Drybrush – Citadel Fire Dragon Bright
Painting the Set Dressings
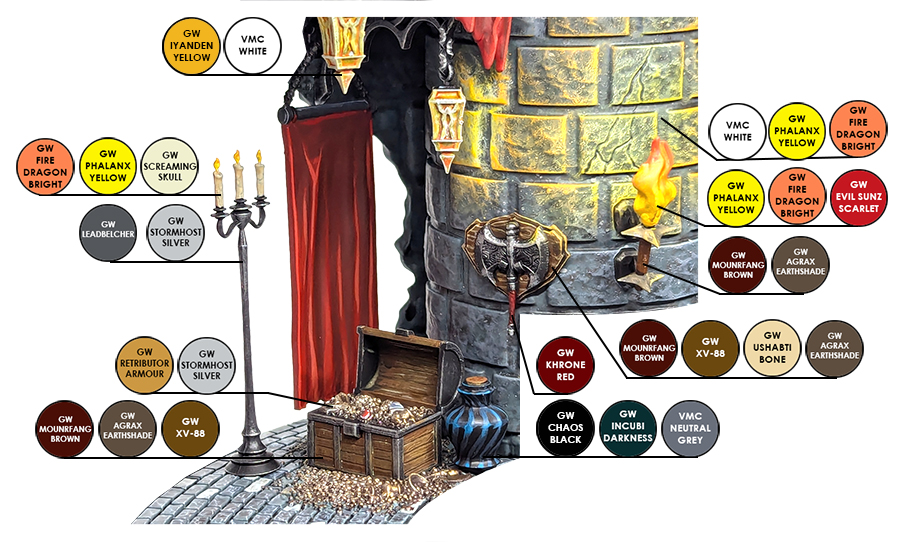
Now that the ruined castle is painted we can move on to all of the small pieces. A note from this section, all of the silver metal areas were painted the same way and with the same colors. I’ve only noted the colors once in the chart below.
Painting the Carpet and the Drapes
I painted these areas similarly to how I painted red capes. I start with a basecoat of Mephiston Red, which might take multiple coats in order to get a nice even red tone. I then mix Warpstone Glow into Mephiston Red to create a darker shade of red and paint that into the recesses and any areas that would be in shadow. Clean up the Mepthiston Red as needed and then highlight it with Evil Sunz Scarlet. Finally highlight and edge highlight with Wild Rider Red.
Basecoat – Citadel Mephiston Red
Shadows – Citadel Mephiston Red: Citadel Warpstone Glow
Clean Up – Citadel Mephiston Red
Layer – Citadel Evil Sunz Scarlet
Highlight – Citadel Wild Rider Red
Painting the Jar
The little black jar was painted black and then highlighted with Incubi Darkness on the raised edges and another highlight of Incubi Darkness mixed with Neutral Grey.
Basecoat – Citadel Chaos Black Spray
Highlight – Citadel Incubi Darkness
Highlight – Citadel Incubi Darkness: Vallejo Model Color Neutral Grey
Painting the Treasure Chest
The treasure chest was primed Chaos Black and then drybrushed with Leadblecher. I then picked out the wood paneling with Mournfang Brown and gave it a quick wash of Agrax Earthshade and XV-88 drybrush. The gold coins were painted Retributor armor and then given an easy highlight drybrushing of Stormhost Silver. I also painted the game stone on the amulet in the treasure pile red with Mephiston Red and Wild Rider Red.
Metal
Basecoat – Citadel Chaos Black Spray
Drybrush – Citadel Leadbelcher
Wood
Basecoat – Citadel Mournfang Brown
Wash – Citadel Agrax Earthshade
Drybrush – Citadel XV-88
Gold Coins
Basecoat – Citadel Retributor Armor
Drybrush – Citadel Stormhost Silver
Gemstone – Citadel Mephiston Red
Gemstone Highlights – Citadel Wild Rider Red
Gemstone Spot Highlight – Vallejo Model Color White
Painting the Wall Mounted Torch
The torch on the wall was painted by drybrushing the sconce with Leadblecher, the torch itself was painted with Mournfang Brown and washed with Agrax Earthshade. I painted the flames the same way I’ve shone them done previously, which was a basecoat of white, a layer of Phalanx Yellow, followed by Fire Dragon Bright and Evil Sunz Scarlet.
To get the glow effect on the wall, I drybrushed the wall white and then did another round of drybrushing with Phalanx Yellow. I then drybrushed the outer paremiter of the glow with Fire Dragon Bright.
Sconce
Basecoat – Citadel Chaos Black Spray
Drybrush – Citadel Leadbelcher
Wooden Torch
Basecoat – Citadel Mournfang Brown
Wash – Citadel Agrax Earthshade
Flame
Basecoat: Vallejo Model Color White
Layer: Citadel Phalanx Yellow
Layer: Citadel Fire Dragon Bright
Layer: Citadel Evil Sunz Scarlet
Lighting Effects
Drybrush – Vallejo Model Color White
Drybrush – Citadel Phalanx Yellow
Drybrush – Fire Dragon Bright
Painting the Wall Mounted Axe
The wall mounted axe was painted very simply. I started with a Chaos Black spray prime and then drybrushed the blade with Leadbelcher and Stormhost Silver, I then painted the grip of the handle Khorne Red and gave it a bit of a wash with Agrax Earthshade. The plaque that it is mounted to was painted Mournfang Brown and the wood grain was created by painting squiggly horizontal lines from left to right with XV-88 and Ushabti Bone. It was also washed with Agrax Earthshade.
Axe
Basecoat – Citadel Chaos Black Spray Primer
Drybrush – Citadel Leadbelcher
Drybrush – Citadel Stormhost Silver
Handle Basecoat – Khorne Red
Handle Wash- Agrax Earthshade
Wooden Plaque
Basecoat – Citadel Mournfang Brown
Grain – Citadel XV-88
Grain – Citadel Ushabti Bone
Wash – Citadel Agrax Earthshade
Painting the Candelabra
The standing candelabra was giving a Leadblecher and Stormhost Silver drybrushing. I painted the candles Screaming Skull and did a simple flame effect using Phalanx Yellow and Fire Dragon Bright.
Metal Stand
Basecoat – Citadel Chaos Black Spray Primer
Drybrush – Citadel Leadbelcher
Drybrush – Citadel Stormhost Silver
Candles
Basecoat – Citadel Screaming Skull
Flames – Citadel Phalanx Yellow & Citadel Fire Dragon Bright
Painting the Hanging Lanterns
Basecoat – Vallejo Model Color White
Wash – Citadel Contast Iyanden Yellow
Drybrush – Vallejo Model Color White
Painting the Sarcophagus
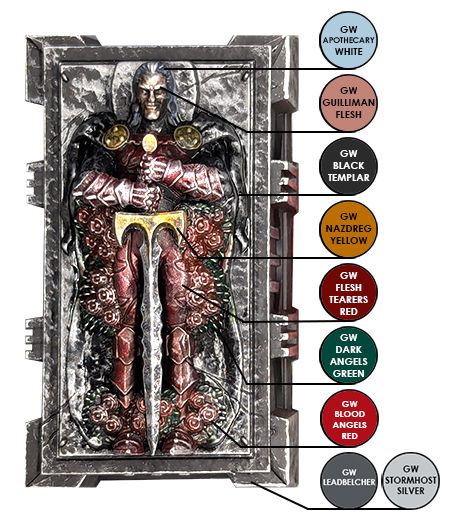
The Sarcophagus was first given a drybrush of Leadbelcher and Stormhost Silver. I then used Citadel’s Contrast paints to apply color onto the sculpture of Dracula. This allowed the metallic flakes of the silver to show through. Once the Contrast colors were all dry I hit it with another drybrush of Stormhost Silver to give it a worn appearance.
Basecoat – Citadel Chaos Black Spray Primer
Drybrush – Citadel Leadbelcher
Drybrush – Citadel Stormhost Silver
Red Armor – Citadel Contrast Flesh Tearers Red
Face – Citadel Contast Guillman Flesh
Hair – Citadel Contast Apothecary White
Black Areas – Citadel Contast Black Templar
Gold – Citadel Contrast Nazdreg Yellow
Greenery – Citadel Contast Dark Angels Green
Roses – Citadel Contast Blood Angels Red
Drybrush – Citadel Stormhost Silver
Painting the Stained Glass
One of the most challenging things I’ve painted in a while has to be the stained glass. I used Citadel Contrast paints for all of the glass colors. The trick was to use very thin coats and build up the color near the bottom of each glass panel, in an attempt to make it seem translucent. Some colors are more pigmented than others, with Shyish Purple being the worst one, I needed to thin that one down considerably with Lahmian Medium. Once the colors were all applied, I painted the leadlining Black Grey and painted the frame work around the window the same as I had painted the other rusty metal areas.
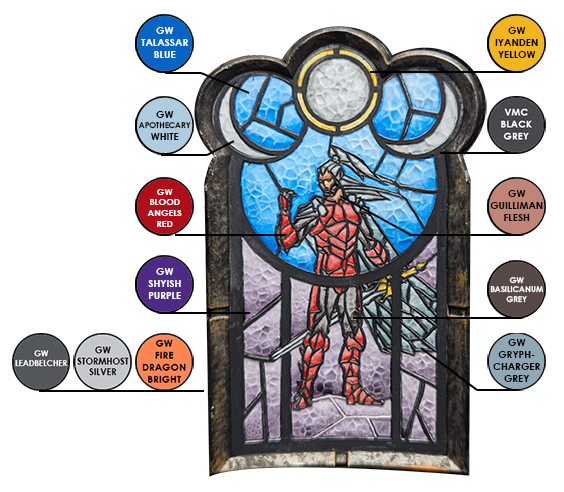
Stained Glass Colors
Red – Citadel Contast Blood Angels Red
Light Grey – Citadel Contast Gryph-Charger Grey
Dark Grey – Citadel Contast Basiclicanum Grey
Yellow – Citadel Contast Iyanden Yellow
Purple – Citadel Contast Shyish Purple
Blue – Citadel Contast Tallasar Blue
White – Citadel Contast Apothecary White
Leadlining – Vallejo Model Color Black Grey
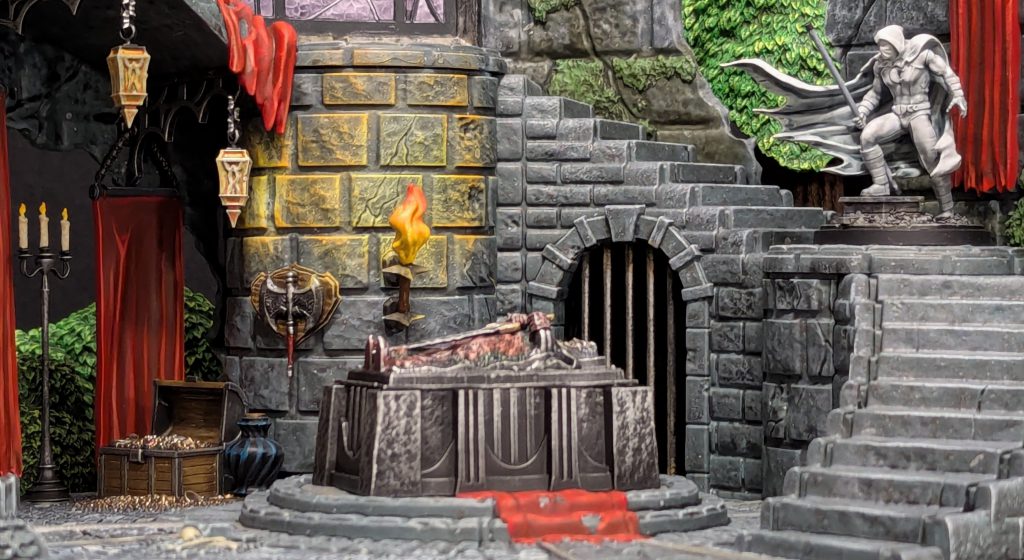
The Tomb of Dracula is now complete! What a massive terrain piece this is. It’s packed with details and is a great centerpiece for a Crisis Protocol table. I’m not certain that I will be using it for a game table though, since one of the hanging lanterns on this one has already broken off during painting. I’d be concerned about wear and tear during travel to he game store. But, for home games I would definitely consider an Transylvanian countryside table to showcase it.
Thanks again to Atomic Mass Games for sending this amazing kit our way! The Tomb of Dracula and Monsters Unleashed boxes are now available, check with your local gaming store for availability! Have you painted them up? If so hit me up on the socials, you can find me over on Twitter/X (@brushwizard) and Instagram (@brushwizardry). If you’re a member of the Goonhammer Discord server, be sure to share them in the Marvel: Crisis Protocol channel there as well.
Have any questions or feedback? Drop us a note in the comments below or email us at contact@goonhammer.com. Want articles like this linked in your inbox every Monday morning? Sign up for our newsletter. And don’t forget that you can support us on Patreon for backer rewards like early video content, Administratum access, an ad-free experience on our website and more.
