

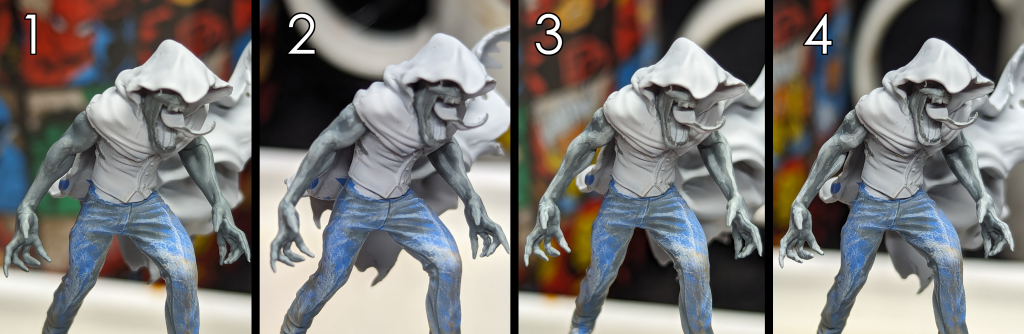
Parker Robbins, the criminal mastermind also known The Hood, is the subject of today’s How to Paint Everything. Much like Ant-Man and the Wasp before him, Hood was one of the first models in Marvel: Crisis Protocol that was given two separate character models to represent his different forms, a human form and a demonic Dormammu powered form. In today’s tutorial, I’ll be going over how to paint both forms of The Hood. Both models share a few similar features, such as the titular hood, white undershirts, jeans, and his shoes, you can use those steps for both models. I’ll go over how I painted the demon’s skin and features, Parker’s leather jacket, skin tones and the mystical fire he’s enveloped in.
Painting the Jeans
Let’s get this party started with his blue jeans. Denim comes in various shades and for these fellas I decided to go with a lighter color for them. In general, I tend to be a fan of light color denim when I do wear jeans and figured it would be fun to use a light blue to contrast with the darker colors on him.
For this we are going to start with Calgar Blue as a basecoat, we’ll shade it by playing the color theory game and adding in some Jokaero Orange, and then we will add texture with drybrushing.
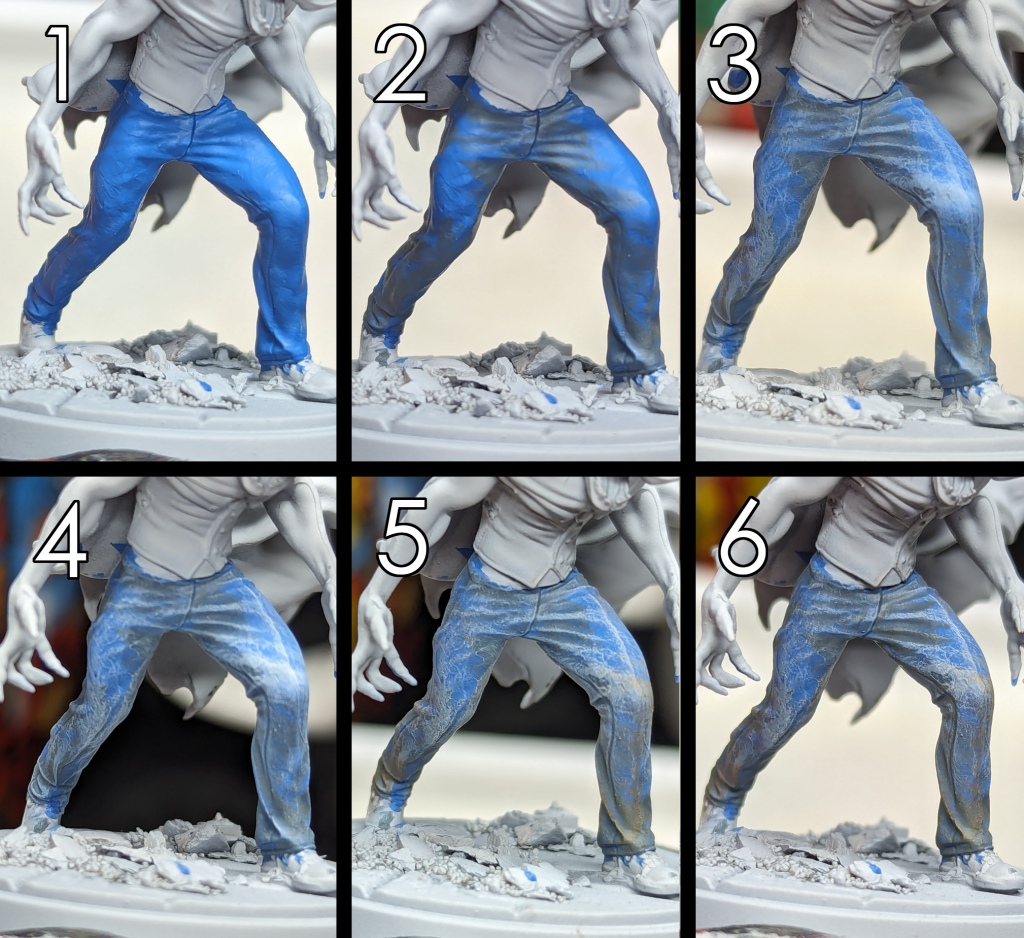
1. Basecoat: Citadel Calgar Blue
Lay down a nice even coat of Calgar Blue.
2. Shadows: Citadel Calgar Blue: Citadel Jokaero Orange
Mix a small amount of Jokaero Orange into the Calgar Blue and paint it into all of the recesses and areas that would be shaded, such as the underside of the legs and behind the cape.
3. Drybrush: Citadel Calgar Blue: Citadel Ulthuan Grey
Lightly drybrush all over with a mix of Calgar Blue and Ulthuan Grey.
4. Drybrush: Ulthuan Grey
Do another pass of drybrushing with Ulthuan Grey. I went a little heavier on the knees to represent wear.
5. Drybrush: XV-88
Focus around Ankles and on the knees and then lightly up the legs. Hit any areas where you want to add a bit of dirt staining
6. Darkline: Citadel Calgar Blue: Citadel Jokaero Orange
Finally touch up your shadows as needed with your Calgar Blue and Jokaero Orange mix.
Painting the Demon Skin
The Hood’s demon form seems to have a greyish skin tone. I really liked the mix I used for the shading of his jeans and decided to use that as a base coat for the Demon’s skin. I then mixed Ulthuan Grey into that mix to lighten it up, with a final highlight of Ulthuan Grey.
1. Basecoat: Citadel Calgar Blue: Citadel Jokaero Orange
We’ll start with a solid base coat of Calgar Blue mixed with a slight amount of Jokaero Orange. This will give us a nice greyish blue to start with
2. Layer: Previous Mix: Ulthuan Grey
Add a small amount of Ulthuan Grey into the previous mix and paint it on the raised areas, being sure to leave the previous color showing in the recesses.
3. Highlight: Previous Mix: Additional Ulthuan Grey
Add a bit more Ulthuan Grey to the mix and repeat the previous step.
4. Highlight: Ulthuan Grey
Finally, highlight the highest points of the skin with pure Ulthuan Grey.Painting the Demon’s
Painting the Demon’s Mouth, Tongue & Teeth
His demonic form has a gaping maw hanging out from under the hood of his cloak. I didn’t get pictures of these steps, unfortunately, but we’re going to use some simple steps to paint it up so it shouldn’t be a huge problem. I’ve split that up into sections to make it even easier. We’re going to use Tuskgor Fur for the basis of the mouth flesh and then we’ll mix in a few other colors for the highlights and tongue meat.
I painted the interior of the mouth with Tuskgor Fur and highlighted it with Bugman’s Glow.
1. Basecoat: Citadel Tuskgor Fur
2. Highlight: Citadel Bugman’s Glow
The tongue was painted with a mix of Tuskgor Fur, to tie it to the mouth coloring and Wazdakka Red. I then did a simple highlight with that same mix with Emperor’s Children added in.
1. Basecoat: Citadel Tuskgor Fur: Wazdakka Red
2. Highlight: Previous Mix: Citadel Emperor’s Children
I didn’t want the teeth to be pearly white, so I used a mix of Ulthuan Grey and Morghast Bone for a base coat, a simple highlight of Ulthuan Grey and then defined the spaces between teeth with Rhinox Hide.
1. Basecoat: Citadel Ulthuan Grey: Citadel Morghast Bone
2. Highlight: Citadel Ulthuan Grey
3. Dark Lining: Citadel Rhinox Hide
Painting Demon’s Vest
Since he’s hunched over, the likelihood of seeing much of the vest is slim, so I opted to make it really simple and gave it a base coat of Mechanicus Standard Grey, I darkened the shadows with Black Grey and then did a simple highlight of Mechanicus Standard Grey and Ulthuan Grey.
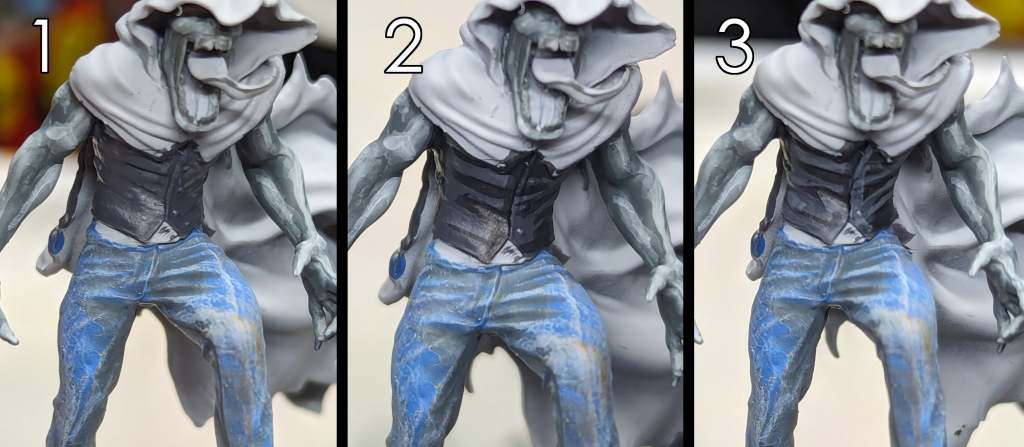
1. Basecoat: Citadel Mechanicus Standard Grey
Basecoat the entire area with Mechanicus Standard Grey.
2. Shadows: Vallejo Model Color Black Grey
Reinforce shadows with Black Grey. Try to darken any areas that would be fully hidden from light, based on his hunched posture.
3. Highlight: Citadel Mechanicus Standard Grey: Ulthuan Grey
Highlight all of the folds in the fabric with a mix of Mechanicus Standard Grey and Ulthuan Grey.
Painting the Undershirt
The undershirts were painted with a very simple two step process of a base coat of Ulthuan Grey and a wash Apothecary White Contrast paint, much like the demon’s mouth, I didn’t get pictures of this one, since it’s just two steps.
1. Basecoat: Citadel Ulthuan Grey
Basecoat the white shirt areas with Ulthuan Grey
2. Wash: Citadel Contrast Apothecary White
Hit the shirt with Apothecary White Contrast paint to give it a bit of shading and definition.
Painting the Shoes
Looking at his shoes, I realized that they look a bit like Converse Chuck Taylors, so I had to go that route with them. I do love a good pop culture reference in my MCP. I decided on black and white Chucks, since it seemed to fit with the character the most.
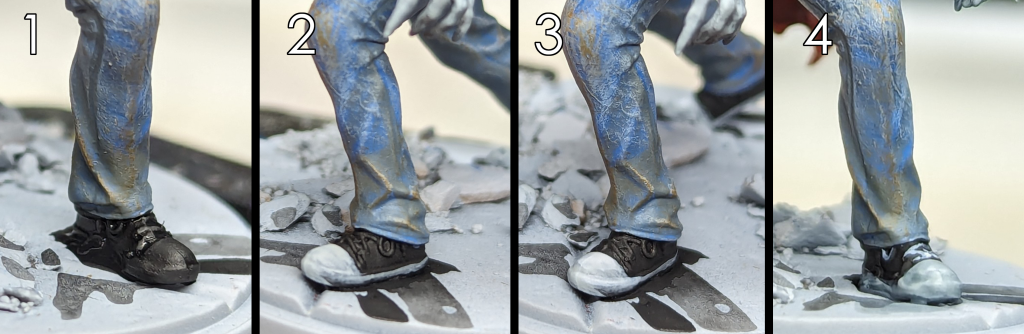
1. Basecoat: Vallejo Model Color Black & Citadel Ulthuan Grey
Basecoat the main body of the shoes with black and then paint the toes and soles with Ulthuan Grey.
2. Highlight: Vallejo Model Color White
Highlight the white areas of the shoes with White.
3. Wash: Citadel Contrast Apothecary White
Wash the white areas with Apothecary White to help give them a bit more definition.
4. Layer: Vallejo Model Color White
Finally try your best to pick out the laces of the shoe with White.
Painting the Cape
For the cape we are going to start with a base coat of Mehpiston Red and then shade it by mixing in Warpstone Glow green for some color theory shenanigans. From there we’ll do any touch up work and start highlighting it with Evil Sunz Scarlet and Wild Rider Red.
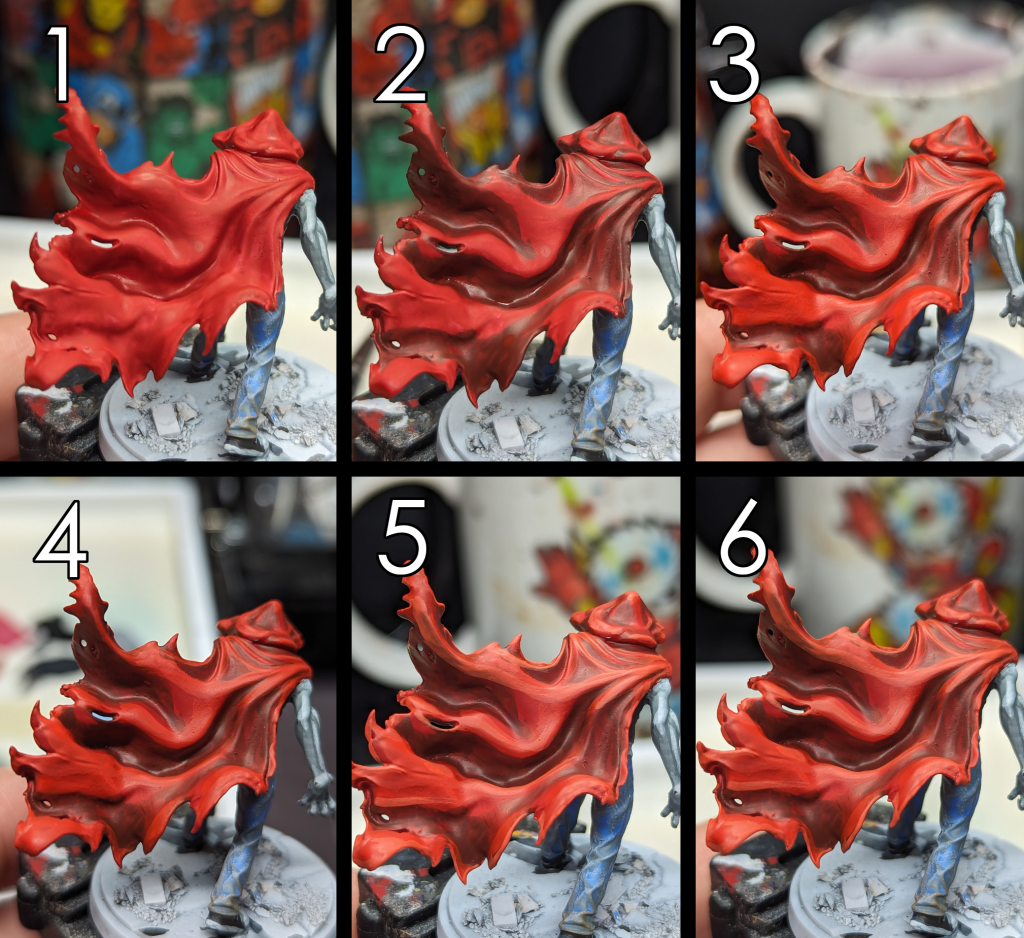
1. Basecoat: Citadel Mephiston Red
Lay down a smooth base coat of Mephiston Red, we want as even coverage as possible. I like to paint my reds over white to add to the vibrancy of the paint as well.
2. Shadows: Citadel Mephiston Red: Citadel Warpstone Glow
Mix a small amount of Warpstone Glow into Mephiston Red to create a darker red tone and paint that into the recesses and underside of the cape.
3. Touch-Up: Citadel Mephiston Red
Touch up the original red basecoat as needed with Mephiston Red.
4. Layer: Evil Sunz Scarlet
On the high points of the folds and areas that will catch light, lay down a layer of Evil Sunz Scarlet.
5. Layer: Wild Rider Red: Evil Sunz Scarlet
Repeat the previous step, this time with a mix of Evil Sunz Scarlet and Wild Rider Red.
6. Edge Highlight: Wild Rider Red
Finally, edge highlight the tops of the folds and edges of the cape with Wild Rider Red.
Painting Black Leather
Black leather can be intimidating, but we can make it happen with a few simple steps. We’ll use the old standby, Incubi Darkness, for the main color of the leather, mix it with some black for the basecoat and then highlight it with Teclis Blue and Ulthuan Grey. If we push contrast enough, it will give us the look we are aiming for.
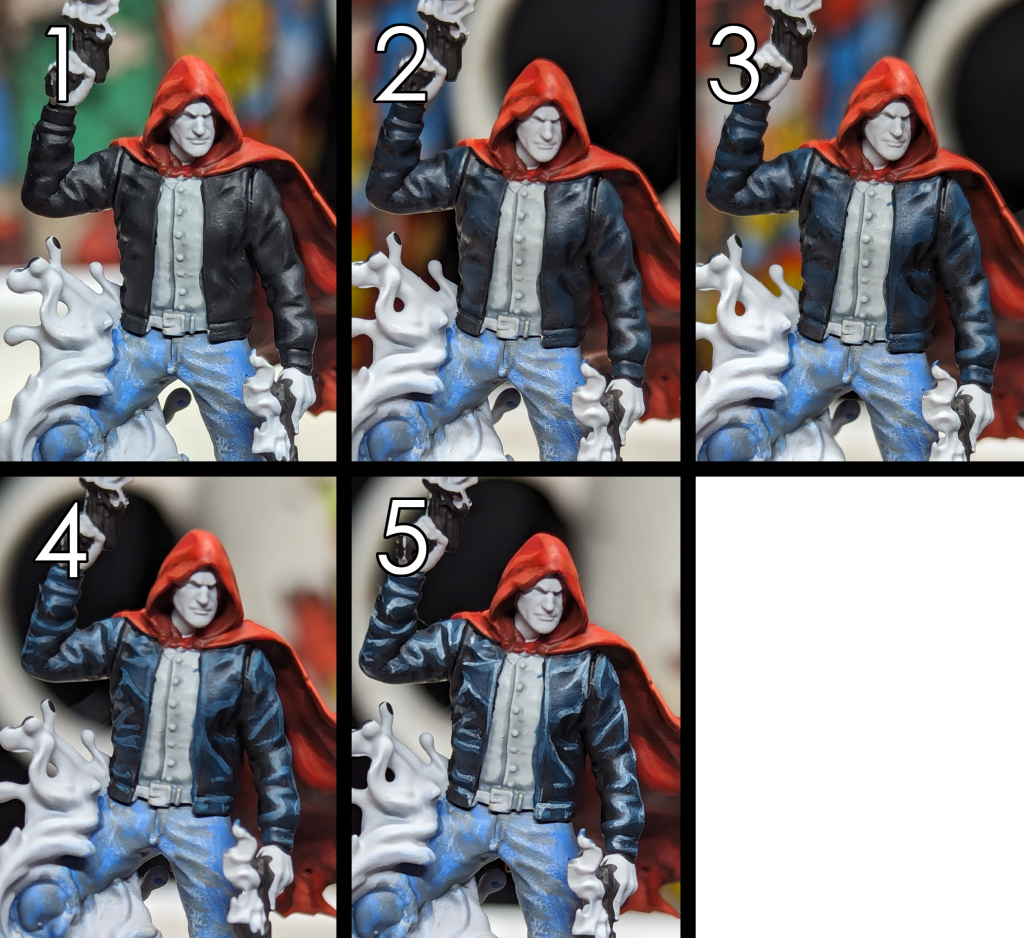
1. Layer: Vallejo Model Color Black: Citadel Incubi Darkness
Basecoat the entire area with a mix of Black and Incubi Darkness. We don’t want the black to overpower it too much, so be sparing with it and try to aim for a darker blue-green hue.
2. Layer: Citadel Incubi Darkness
On all of the high points and upper areas, paint pure Incubi Darkness. Be sure to leave the previous layer showing in the recesses.
3. Layer: Citadel Incubi Darkness: Teclis Blue
Mix Teclis Blue into Incubi Darkness to create a highlight color and layer that on top of your previous layer, be sure to leave some of the previous color showing as well.
4. Highlight: Previous Mix: Citadel Ulthuan Grey
Mix a small amount of Ulthuan Grey to the previous mix and do another small highlight.
5. Spot Highlight: Ulthuan Grey
Finally, do a very small highlight on the ridges of any folds to make the leather pop.
Painting the Human Skin
There’s not much of Parker Robbins’ skin showing while he’s in human form, but we can at least make it interesting as we can. For this we will be using Reaper’s Tanned Skin as the base. We’ll then add in some blue and red tones to help make the skin more interesting buy mixing it with Citadel’s Altdorf Blue for cool tones and Citadel’s Bugman’s Glow for some warm tones. With those down, we’ll give it a glaze of Tanned Skin mixed with Agrax Earthshade to tie them together a bit before adding a simple highlight to it with Reaper’s Tanned Highlight.
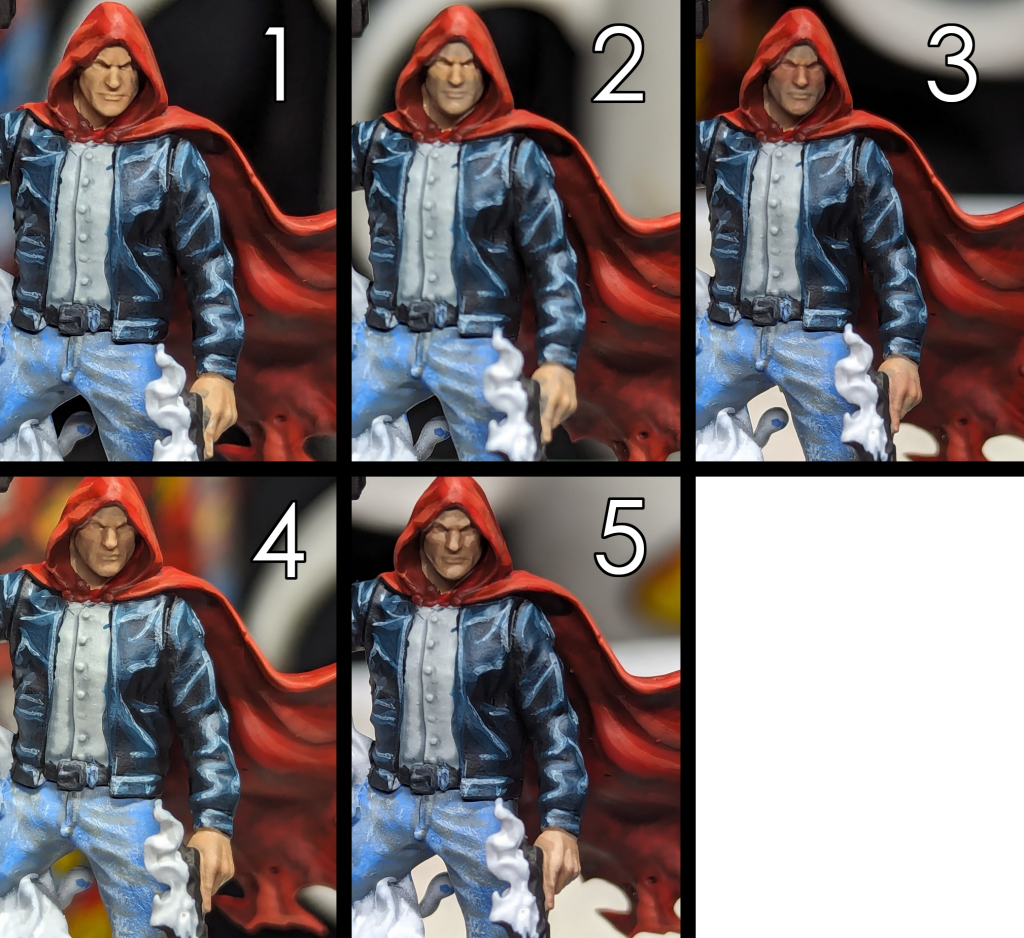
1. Basecoat: Reaper Tanned Skin
To start, I’ll lay down an even basecoat of Tanned Skin on any areas that will be flesh tone.
2. Layer: Citadel Aldorf Blue: Reaper Tanned Skin
Layer on the cool undertones to the recesses and shadowed areas of the skin and lower half of the face.
3. Layer: Citadel Bugman’s Glow: Reaper Tanned Skin
Next we’ll layer the warm undertones on to the cheekbones, nose, fingers, and knuckles.
4. Wash: Citadel Agrax Earthshade: Reaper Tanned Skin
Mix a bit of Agrax Earthshade into the Tanned Skin and paint a thin wash over all of the skin tone areas to bring back the tanned skin coloring, while letting the undertones give it some color variations.
5. Highlight: Reaper Tanned Highlight
Finally do one last highlight pass with Tanned Highlight on any high points, such as the nose, chin, brow and cheekbones.
Painting Mystical Fire
Hood’s human form has a flame portal effect going on and while we could paint it like your bog standard flame effect, I like the idea of painting it weird colors to add to his vibe. I’d previously painted Doctor Voodoo’s spell effect in this manner and really liked it, and since they were boxed together I figured, why not?
For this we are going to use AK Interactive’s Neon color set, but you can probably use any similar fluorescent paints you have available. We’re going to mix blue and magenta together to create the purple base color and then add in more magenta and yellow to create the highlights, which will push it towards an orange color. Since they are all fluorescent colors it will keep that vibrancy too, which is fun.
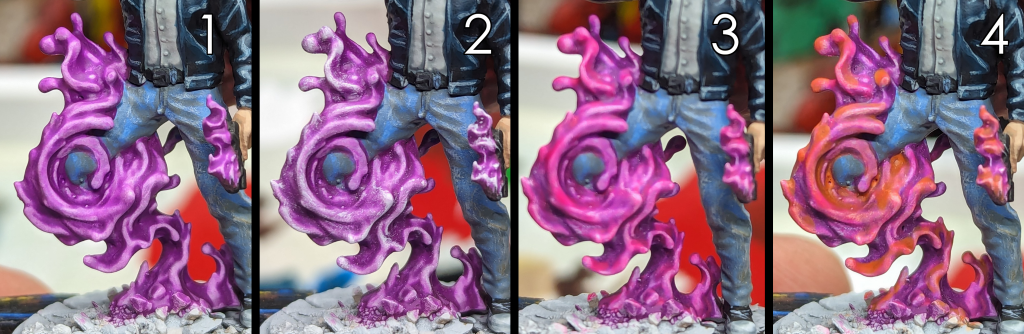
1. Basecoat: AK Interactive Fluorescent Blue: AK Interactive Fluorescent Magenta
Mix Fluorescent Blue and Fluorescent Magenta together to create a purple tone. Lay down a smooth base coat of your new purple color, it may take a few layers since neon colors seem to be a bit thin.
2. Drybrush: Vallejo Model Color White
With the basecoat fully dry, lightly drybrush the raised areas of the flame effects. You can go heavier on the actual flames if you wish.
3. Layer: AK Interactive Fluorescent Magenta
Paint Fluorescent Magenta over all of the areas that have been drybrushed with white.
4. Layer: AK Interactive Fluorescent Magenta: AK Interactive Fluorescent Yellow
Finally, mix a bit of Fluorescent Yellow into the Fluorescent Magenta and paint this mix onto any high points. I also painted it into the center of the portal.
Now, with the fire done, we’ve finished The Hood and he’s ready for the gaming table and display cabinet! He was a pretty fun model to work on, my favorite parts being the fire, Chuck Taylors and denim. I’m hoping to get some action with him soon, I think he might make a good addition to my Midnight Sons.
Have you painted The Hood? If you’re on social media, hit me up on Twitter/X (@brushwizard) or Instagram (@brushwizardry) and share your work, I’m always interested to see what the MCP community has been working on.
Have any questions or feedback? Drop us a note in the comments below or email us at contact@goonhammer.com. Want articles like this linked in your inbox every Monday morning? Sign up for our newsletter. And don’t forget that you can support us on Patreon for backer rewards like early video content, Administratum access, an ad-free experience on our website and more.
