
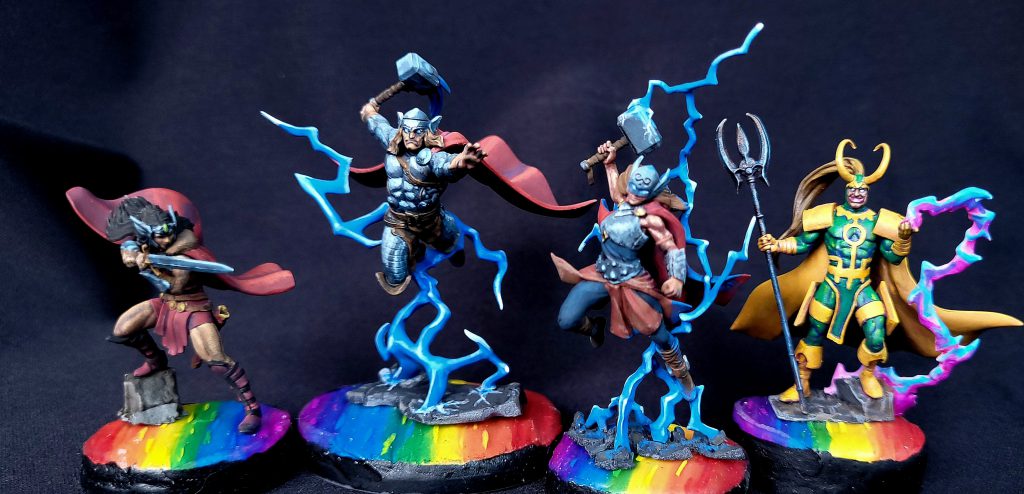
The Asgard finally get some reinforcements so it’s time to get some paint down. Thank you to Atomic Mass Games for providing these sculpts to us.
I consider myself a slightly above average painter. No Golden Demons in my near future but I take time with my painting and enjoy the process.
I recently got my hands on a Scale 75 ‘Essentials Basic Colors Set’ and having read several articles on color theory recently decided that I wanted to paint this box up entirely using the paints in this set. The paints included are:
- SC00 Black
- SC01 White
- SC13 Dubai Brown
- SC20 Basic Flesh
- SC28 Orange Leather
- SC36 Blood Red
- SC40 Sol Yellow
- SC51 Mediterranean Blue
Theoretically with only the red, yellow, blue, black and white we should have enough here to paint anything and create any color. Painting this box up has been an experiment in that. I did have to cheat a little for some colors, specifically a couple of fluorescent paints and Nuln oil for some shading but will go into more detail with those further on.
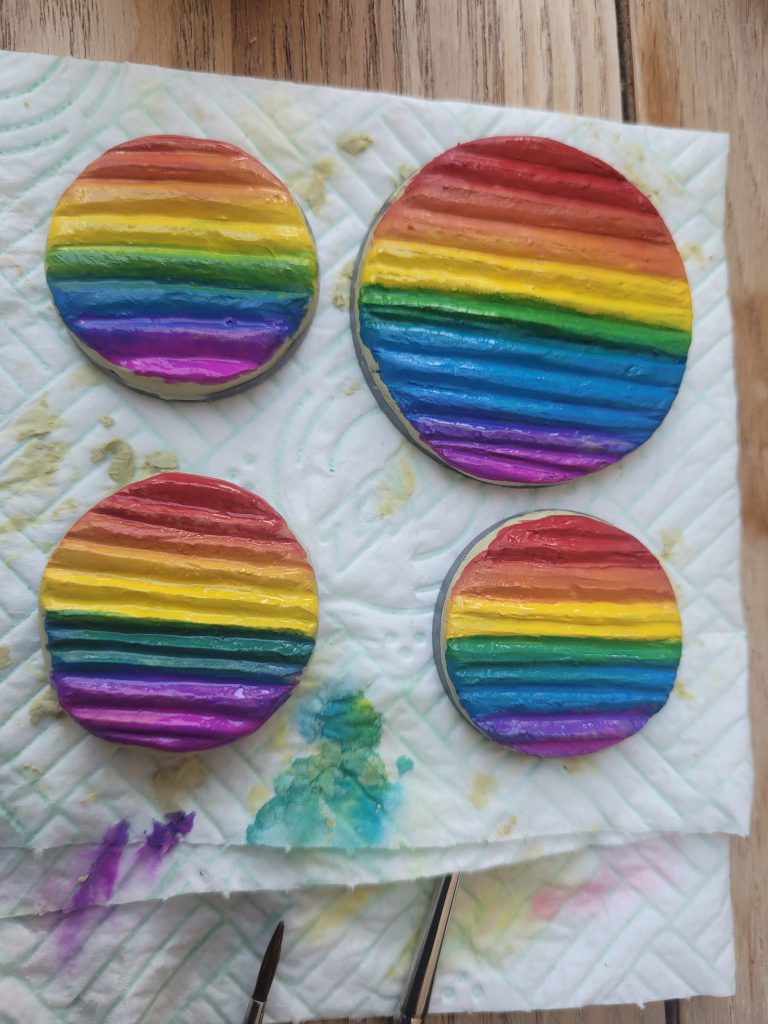
Rainbow Bridge Bases
Step one of these models was to make some rainbow bridge bases. It felt very appropriate making these bases back in pride month, the Asgard are allies to all.
I used Milliput to entirely cover each base using a rolling pin to make sure it was flat. I then used a triangular sculpting tool to cut into the Milliput making triangular channels in the surface (see below). Once it had cured I used a triangular file to file into the surface as pure Milliput is easier to manipulate once it has dried. When i made my first set of Rainbow Bridge bases I used the effect that comes with Heimdall as a stamp to press into the Milliput. Unfortunately I couldn’t find that part in my bits box to try again but if anyone does have it that would be an alternative method here.
Once everything was dry and filed down I proceeded to paint. What I should have done was prime everything grey. I didn’t prime the milliput because in my head I was going to pour resin on it so there wouldn’t be danger of it peeling. The problem i immediately found was that un-primed it was quite porous so took a lot more paint to get a solid color than i wanted. Don’t do what I did, prime the Milliput if you are going to try this!
To start painting I arranged my colors on my wet palette in the standard rainbow order of ROY.G. BIV. i.e. Red Orange Yellow Green Blue Indigo Violet. Of course only using the starter set colors i was limited to Red Yellow and Blue. I added in a fluorescent Violet from Golden SoFlat. Arranging them in order with space between meant I could ensure that I had all the full rainbow spectrum on each base.
Once I was happy with the paint I moved on to using resin. I used some UV resin from Amazon and masking tape to mark out where the resin would sit. The cheap Amazon UV light I bought had broken but luckily I had a much more powerful source of UV – the sun – so left them outside to cure.
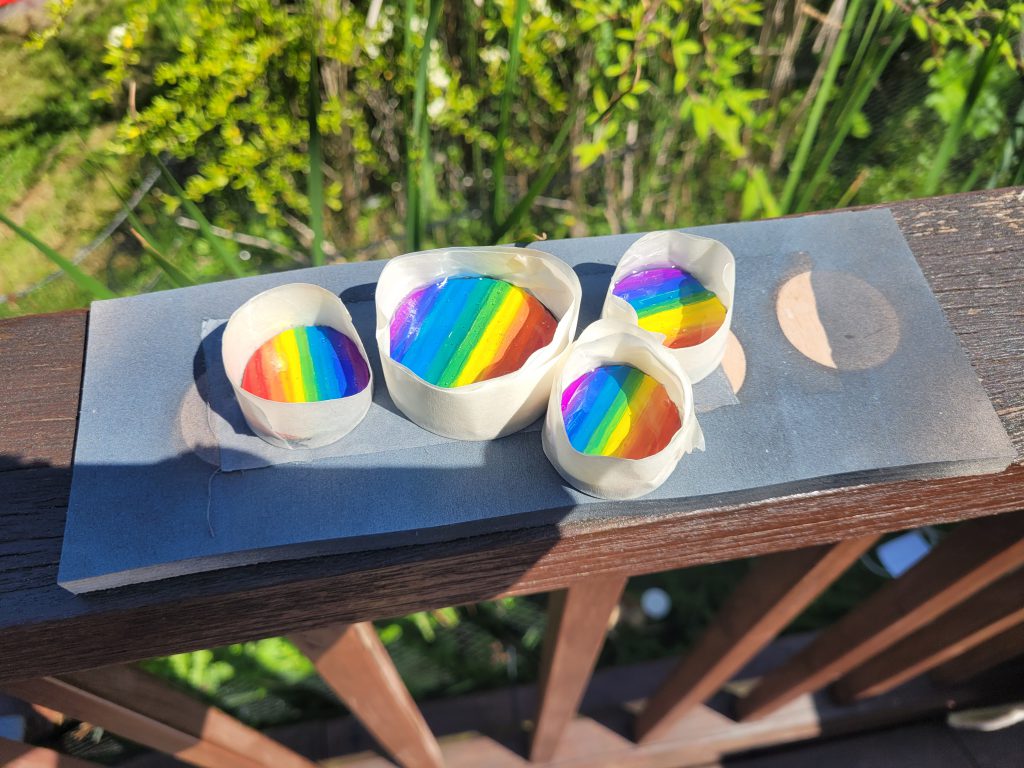
Once cured the resin had formed an irregular shape so I cut and filed it back until I was happy. I also added some final straight lines of colour to emulate the movement of the rainbow bridge and that was the bases done!
Models
For all the models I first assembled and did a base coat with black spray primer and zenithal with grey primer to help give more definition.
Loki, Prince of Lies
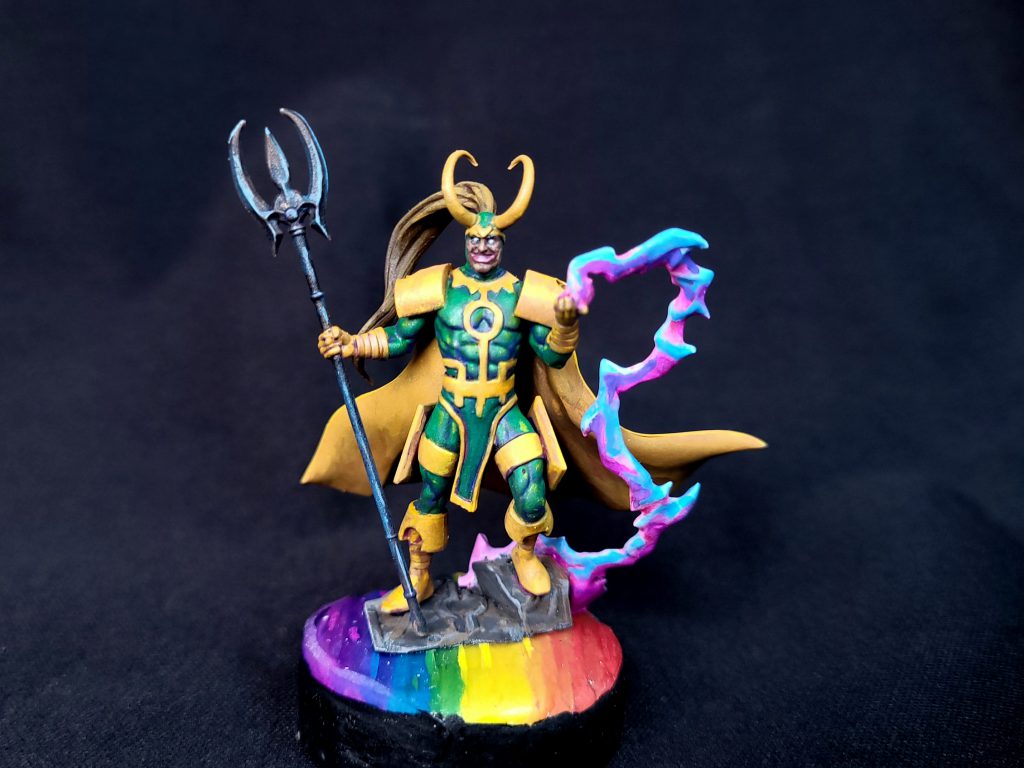
Although I had originally planned on challenging myself by painting everything using only the Scale Color starter set box. Loki is the Prince of Lies and didn’t abide by those rules. As he needed to end up in bright colors, Loki was under-painted first. The areas that would eventually be green were painted McCragge Blue and the areas that would end up yellow were base coated in Emperor’s Children pink. The dark blue under the green means that the darkest areas will keep that blue tinge. Similarly the pink under the yellow mean that when you glaze yellow over the top the darkest areas will end up with an orange tone.

I then began glazing Averland sunset over the yellow areas waiting on each layer to dry fully before moving onto the next. It takes several yellow coats to start to get a good coverage. The trick with yellow seems to be multiple thin coats. It helped when i was painting him that it was a sunny day so i could get him to dry quite quickly.
For the Magical effect I used scalecolor Magenta and transitioned between blue magenta and white. I focused the white areas to only where the ‘corners’ on the magic were.
Capes
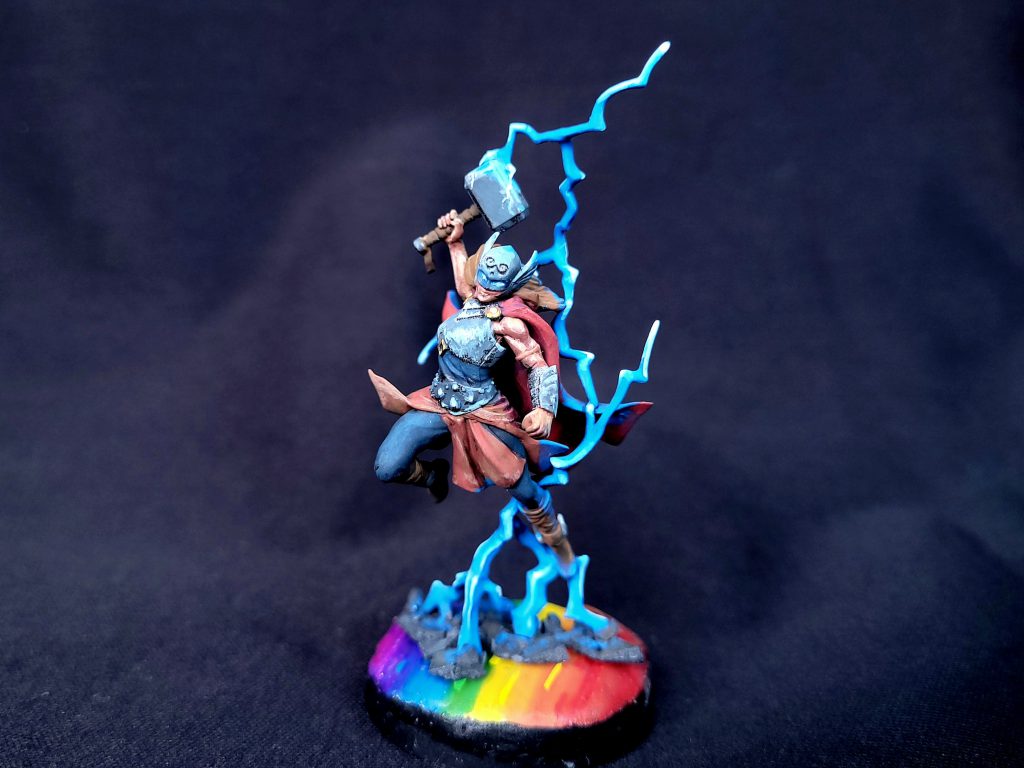
I used the same recipe for the capes of Mighty Thor, Lady Sif and Thor Hero of Midgard. Starting with a base layer of pure Blood Red all over the capes I then shaded the deeper areas by wet blending in a 70:30 mix of Blood red and Mediterranean Blue. The highest areas of the capes were done with a 70:30 mix of Blood Red and Sol Yellow. The theory here being that I try to use full saturated colours to shade with which makes the overall effect more striking. Had I mixed with Black or White for the recesses and highlights the colours would be less pronounced.
Lightning Effects
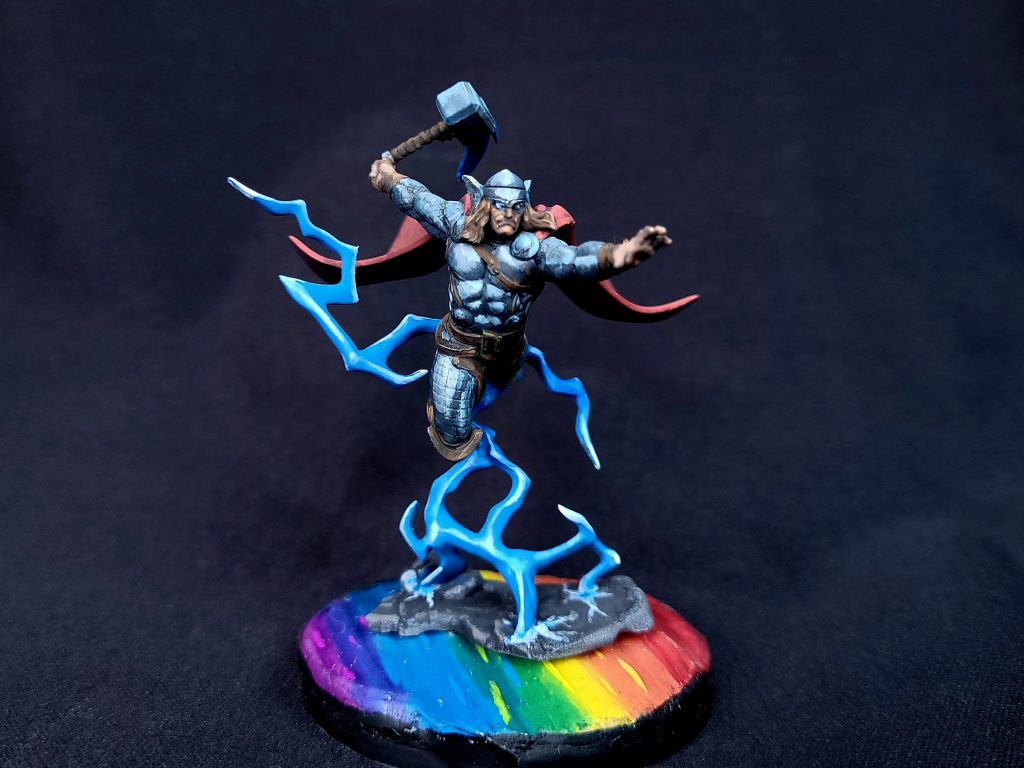
For the lightning effects i started with a base layer of Mediterranean Blue all over. I then mixed more and more white toward the edges with pure white at the ‘corners’ of the lightning. Despite having just said that white de saturates the colours the reality of lightning is that it is primarily white but pure white isn’t as visually interesting as blue so this is a slight compromise. As a final step I glazed Mediterranean blue on the models themselves closest to where the lightning hit.
Metals
For the metallic steel elements I followed the tutorial by Juan Hidalgo Miniatures called ‘Stipple your way into an easy NMM Effect‘. Starting by mixing a dark blue-Grey all over the metallic areas and stippling lighter and lighter grey on the highlights. The important thing with stippling in this way is to keep the paint relatively thin. This helps to blend each area together easier.
I painted the metals in this way across all the armour as well as the sword of Lady Sif. I finished the metals off with a little Nuln oil in the deepest recesses.
Flesh Tones
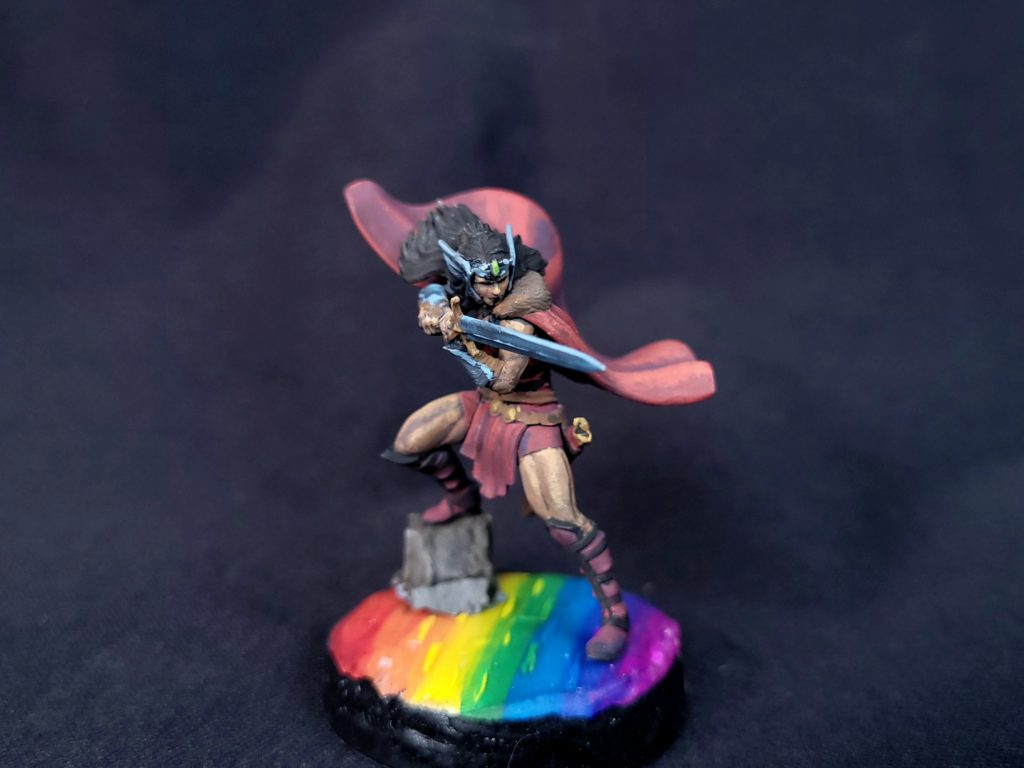
For all the flesh tones I began with a base of Dubai Brown over all the areas that would be flesh. I then sketched out the highlighted areas with Basic Flesh. I blended the two together pushing the highlights more with a little Sol Yellow. Finally I hit the deepest recesses with Reikland Flesh shade and that was the main areas finished.
And with that those are the main areas of the New Asgardians done. Thank you to Atomic Mass Games for providing the models to us.
Have any questions or feedback? Drop us a note in the comments below or email us at contact@goonhammer.com. Want articles like this linked in your inbox every Monday morning? Sign up for our newsletter. And don’t forget that you can support us on Patreon for backer rewards like early video content, Administratum access, an ad-free experience on our website and more.
