
Welcome to today’s How to Paint Everything: Marvel Crisis Protocol. Today I am taking a look at the Battle for Asgard Terrain Pack, which features a bunch of terrain that you can use to create an Asgard themed table for your games of Marvel: Crisis Protocol.
Since most of these pieces are stone, I decided to try something new this time around and went with Citadel Contrast paints over a zenithal prime. That means I started with a spray of black primer and then from above I used a lighter primer color. This allows the recesses and downward facing areas to retain the black primer and gives the Contrast paint some extra contast between shadows and highlights.
One area that I didn’t list in my painting steps was the interior of the (NAME OF SMALL DOME THINGS), which were just sprayed with Army Painter Deamonic Yellow before I finished assembly. I then taped the openings off before doing the rest of the priming.
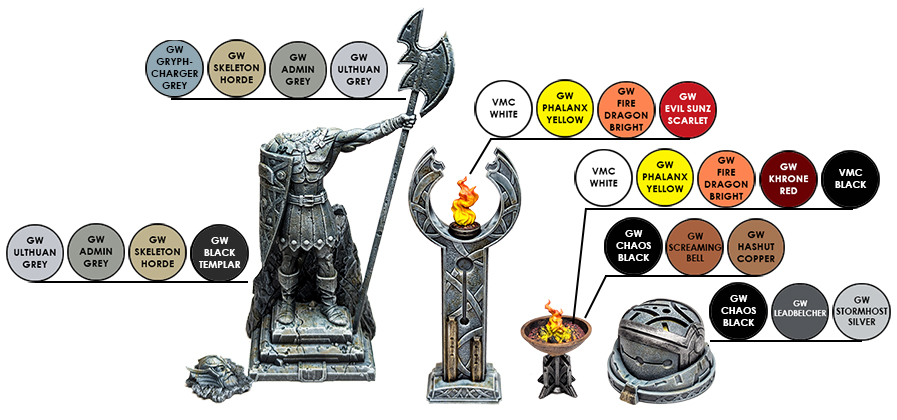
I’ve included a handy dandy paint color chart below that references all of the colors used in the steps below. Lets get to it and get this terrain painted!
Painting the Stonework
To start I sprayed all of the terrain that features stonework with Chaos Black spray primer, followed by another spray prime from above with Grey Seer spray primer. The stonework was then washed with Gryph-Charger Grey Contrast paint and while still wet I added some Skeleton Horde Contrast paint in various areas to give the stone a bit of color variation. Once that was completely dry I then did two rounds of drybrushing, first with Administratum Grey and second with Ulthuan Grey.
Zenithal Prime: Citadel Chaos Black Spray Primer: Citadel Grey Seer Spray Primer
Wash: Citadel Contrast Gryph-Charger Grey
Layer: Citadel Contrast Skeleton Horde
Drybrush: Citadel Administratum Grey
Drybrush: Citadel Ulthuan Grey
Painting the Rough Stone
Since we’ve already primed the entire model, we will use that zenithal priming to our advantage again while painting the rough stone areas. These areas were painted with an all over wash of Citadel’s Black Templar Contrast paint, while it was wet I used Skeleton Horde and splotched it around to give the stone color variation. When all of that was fully dry I then drybrushed it with Administratum Grey and Ulthuan Grey.
Zenithal Prime: Citadel Chaos Black Spray Primer: Citadel Grey Seer Spray Primer
Wash: Citadel Contrast Black Templar
Layer: Citadel Contrast Skeleton Horde
Drybrush: Citadel Administratum Grey
Drybrush: Citadel Ulthuan Grey
Painting the Metals
Silver Areas
All of the silver areas needed to be repainted black before I could begin drybrushing them. I started with a drybrushing of Leadblecher and then followed it up with another drybrush layer of Stormhost Silver to give it some highlights.
Basecoat: Vallejo Model Color Black
Drybrush: Citadel Leadbelcher
Drybrush: Citadel Stormhost Silver
Brazier Copper
The copper color of the braziers were painted by drybrushing Screaming Bell over black and then highlighting it with a drybrush of Hashut Copper.
Basecoat: Vallejo Model Color Black
Drybrush: Citadel Screaming Bell
Drybrush: Citadel Hashut Copper
Painting the Fire Effects
Burning Coals
All of the burning coals were basecoated with white. We are going to be working wet on wet, meaning e will be adding the next color to the area whle the previous one is still drying. That way the colors mix together a little bit at the edges. I then painted the area with Phalanx Yellow near the center, followed by Fire Dragon Bright and finally Khorne Red near the outside edges. Once it was all dry, I drybrushed the coals with Black.
Basecoat: Vallejo Model Color White
Layer: Citadel Phalanx Yellow
Layer: Citadel Fire Dragon Bright
Layer: Citadel Khorne Red
Drybrush: Vallejo Model Color Black
Flames
From a White Basecoat, add a layer of Phalanx Yellow. While the yellow is still wet, paint on Fire Dragon Bright, starting at the top and letting the two paint mix together as you work. Finally, while the orange paint is still wet, paint Evil Sunz Scarlet from the top down and let it mix with the orange a bit. Touch up as necessary while its all still wet.
Basecoat: Citadel Skull White
Layer: Citadel Phalanx Yellow
Layer: Citadel Fire Dragon Bright
Layer: Citadel Evil Sunz Scarlet
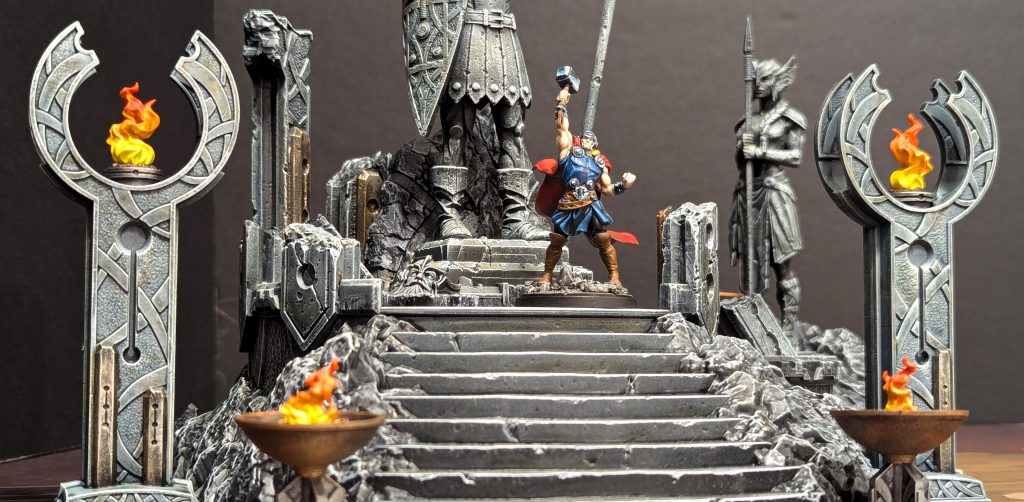
There you have it, with a bit of Contrast paint and drybrushing we were able to quickly get these pieces table ready for games in Asgard! Honestly, the most difficult section to paint might be the flames, but even then its relatively simple to do and looks good for gaming purposes.
Thanks again to Atomic Mass Games for sending these our way! Have you painted them up? If so hit me up on the socials, you can find me over on Twitter/X (@brushwizard) and Instagram (@brushwizardry). If you’re a member of the Goonhammer Discord server, be sure to share them in the Marvel: Crisis Protocol channel there as well.
Have any questions or feedback? Drop us a note in the comments below or email us at contact@goonhammer.com. Want articles like this linked in your inbox every Monday morning? Sign up for our newsletter. And don’t forget that you can support us on Patreon for backer rewards like early video content, Administratum access, an ad-free experience on our website and more.
