In our How to Paint Everything series, we take a look at different armies of the Warhammer universe, examine their history and heraldry, and look at several different methods for painting them. In this chapter, we’re looking at several ways to paint Lumineth Realm Lords.
Who are the Lumineth Realm-Lords?
The Lumineth Realm-Lords are the final project of Teclis, one of the best high elf mages of The World That Was. After ascending to godhood he made a few attempts at creating a race of people to replace the high elves who were lost in The End Times. The Idoneth Deepkin were an early stab at it, which he wrote off pretty quickly. The Lumineth were his most promising projects, though not without some challenges along the way. The elves discovered Aetherquartz, solidified minerals of the Light of Hysh, the realm of light in which they lived in. It allowed them to function at increased capacity, and avoid sleep, but drained their emotions and created a volatile society in which everyone sought to compete with each other and secure more Aetherquartz.
The Lumineth broke into civil war and when the dust settled, Teclis and Tyrion were very cross! Teclis taught the elves how to reach symbiosis with Hysh instead of trying to steal its resources. The Lumineth are now a pseudo-religious society seeking to attain harmony with Hysh rather than dominate it, with hundreds of temples dedicated to “The Aetherpact”.
For those less familiar with Age of Sigmar but who have fond memories of Warhammer Fantasy, the Lumineth Realm Lords represent a reimagining of the classic High Elf aesthetic for the new game. You’ll see a lot of similarities among the ranks of spear and bow wielding elves and the cavalry, but the range also has some novel things going on, with a strong geomantic theme, including mighty mountain-aurochs elementals and a few units themed after them. Pick them to paint if you like building armies primarily out of humanoid soldiers and enjoy robes, sleek armour and ornate weaponry.
Where to Read More
As the newest faction in the Age of Sigmar, there’s a bit less available for reading about the Lumineth Realm-Lords, but if you’re looking for fiction on the faction, Realm-Lords by Dale Lucas is the place to start and potentially the only place to go. It’s not highly reviewed, though.
Painting Lumineth Realm-Lords
The Lumineth Realm-Lords offer painters a lot of different materials to work with, combining billowy robes with bright metal armor, blowing hair, and gemstones.
Wings’ Method
“But Wings”, I hear you say, “you don’t play Age of Sigmar”. Well no, but:
- People keep telling me how great it is.
- I really, really like Elves. This isn’t just a bit, it’s an Aesthetic.
While picking up some stuff from the local GW one day I spotted the Auralan Wardens box in the new releases section and with the above in mind I decided to do an experiment. The three things holding me back from getting into AoS have been:
- Not having any army where I loved the aesthetics. That is now resolved.
- Worrying that I wouldn’t be able to make the models look good at all. I’m not the world’s greatest painter, and AoS is generally a step more intimidating than 40K, with lots of faces and fine detail.
- Worrying I wouldn’t be able to paint the models fast enough to realistically build an army alongside writing commitments and maintaining my 40K competitive lists.
Since tournaments aren’t running right now I’m not under any real pressure to get 40K stuff done, so it seemed like a good chance to put items two and three to the test.
Assembling the Models
Like most modern GW kits these largely came together really nicely, and are beautifully detailed. The only thing I didn’t super love is that the moldlines on the torso piece run through the middle of the armour shoulder plates, meaning that you need to be very careful to remove them cleanly. The other thing that stood out is that the spears are collossal, the posing on the box really doesn’t do justice to just how huge they are. I spent a lot of time painting them worrying about accidentally snapping one.
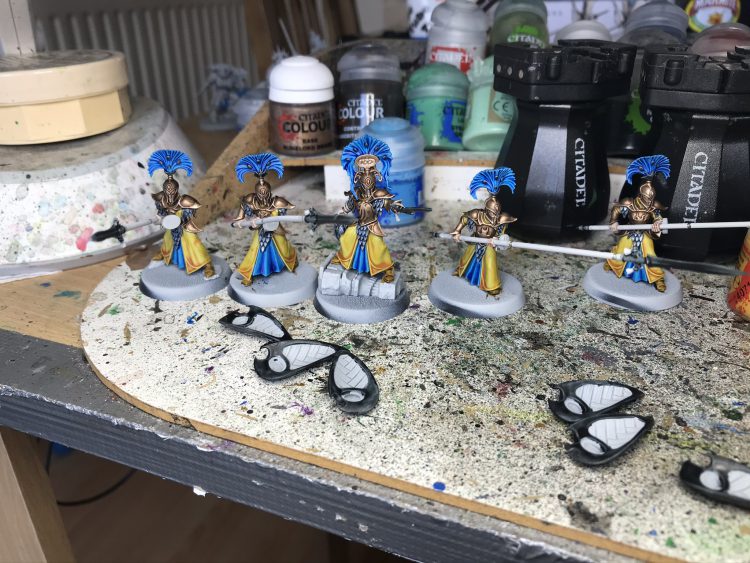
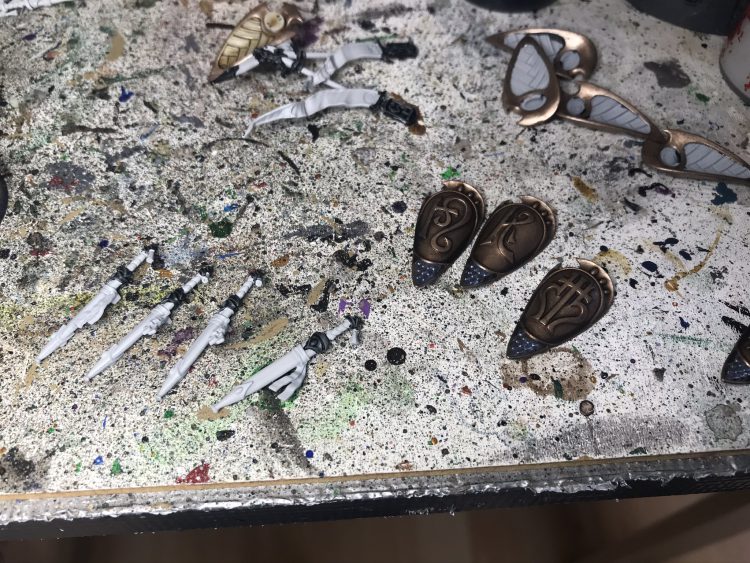
I left the shields and back scabbards off the models for ease of painting, and also left the gigantic back-banner/shield piece off the squad commander.
Priming
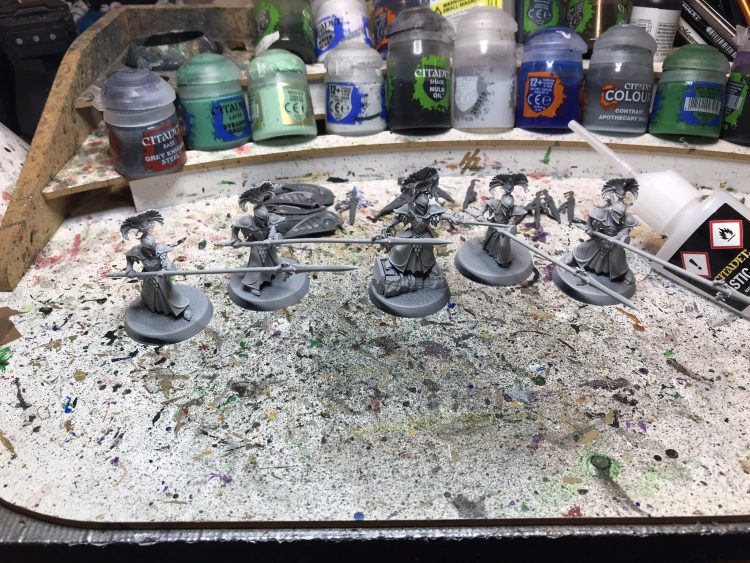
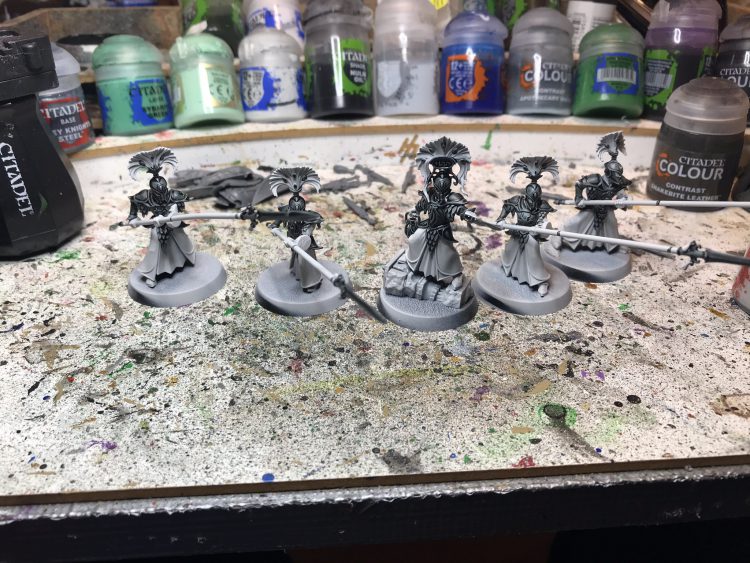
Since the goal was to see if I could come up with an efficient method for doing these, that naturally meant I was planning to use contrast, so I primed everything in Grey Seer with the exception of the front of the shields, which I sprayed black out the gate because they were going to end up all metal.
The Plan
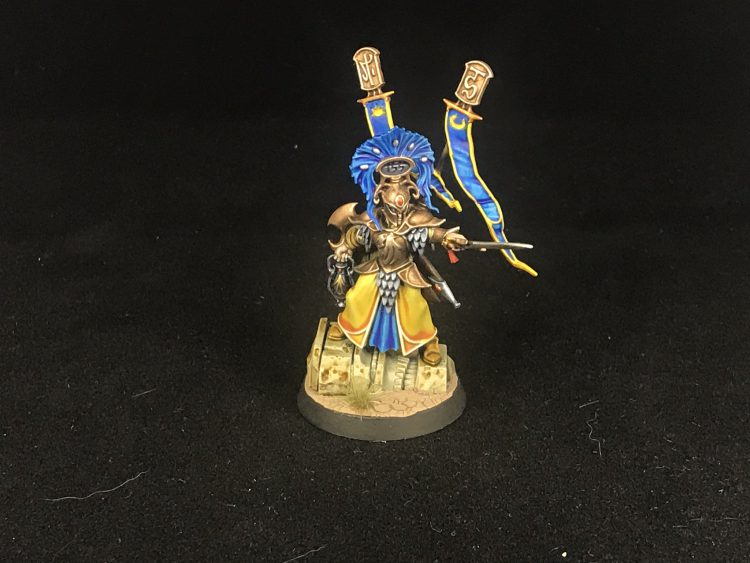
I had originally toyed with using a variant on one of my tried and tested colour schemes (I can give you purple, dark green and sometimes turquoise), but decided to be a bit bolder and try something new. I honestly like the scheme on the box art, but trying to do flowing white robes and enamelled plate for my first AoS scheme seemed like maybe biting off more than I could chew, so I decided to do something along the lines of Iyanden for the robes and decorative pieces, and go with brass armour. Runelord Brass has fast become one of my favourite paints, giving a really helpful second “neutral” metal alongside Leadbelcher, so that felt like it made sense for that.
After thinking things through a bit, I ended up intending to do:
- Brass plate armour with stormhost silver trim.
- Blued steel scalemail.
- Yellow outer robes.
- Blue inner robes and plumes.
- Gold and silver detailing.
- Red gems.
This plan largely survived contact with the actual painting, with the only exception being that I quickly discarded the idea of doing the silver trim on the armour, as it’s nightmarishly fine. Happily, the techniques I ended up using for the armour meant it didn’t really detract from the models, as we’ll ge to.
The Process
Step 1 – Blocking in Future Metals
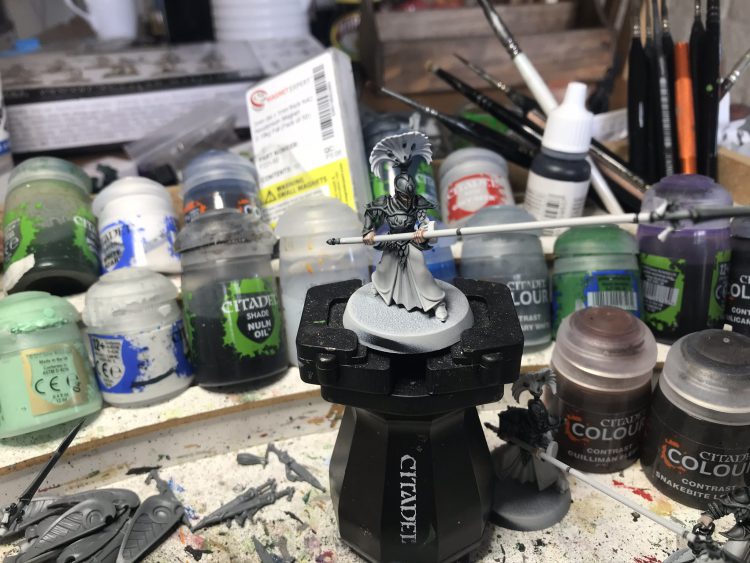
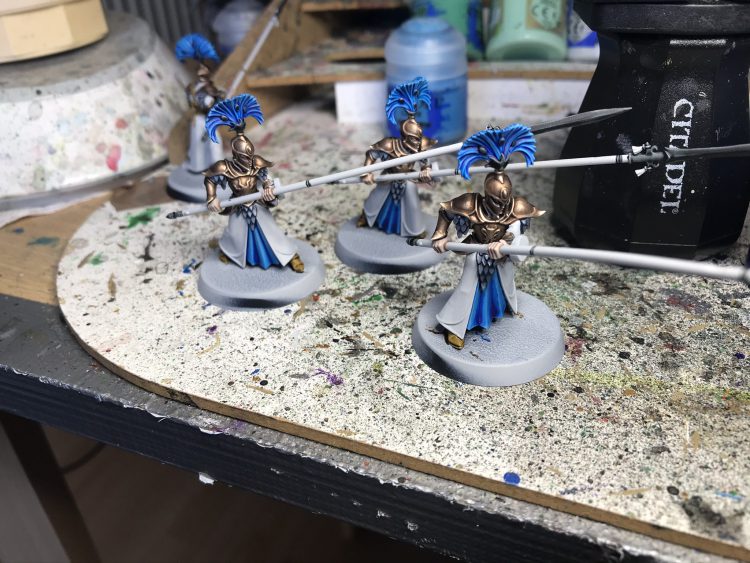
The first thing I always do when painting something with contrast is to take all the areas that are later going to be metalic and block them in with thinned Black Templar. Metallic paint straight over white tends to look naff, but I’ve found that a coat of thinned Black Templar (or Wyldwood for gold) provides a good enough foundation for them and is much faster than trying to do an even coat of Abaddon Black.
Step 2 – Skin
I have very shaky hands, so I tend to try and paint “up” – if there’s somewhere that I’d have to reach a brush into past other components, I’d usually rather paint it first. in this case, I wanted to get the skin done before working further on the helmets, so I applied this now. I just did a thinned coat of Reikland Fleshshade straight over the contrast primer for this.
Step 3 – Blocking in Metals
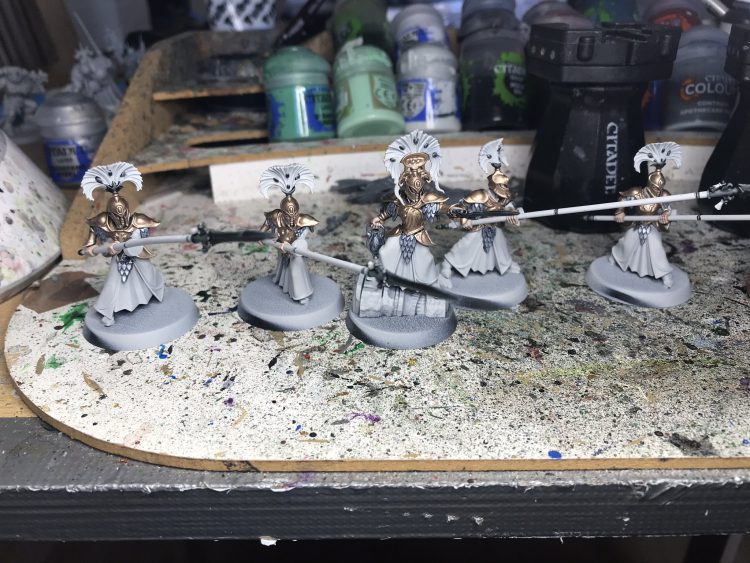
With that out of the way, it was time to do the base coat for the two main metal colours, Runelord Brass for the plate and Grey Knight Steel for the scale. I also based the leader’s flask with the Steel.
Step 4 – Wash Metals
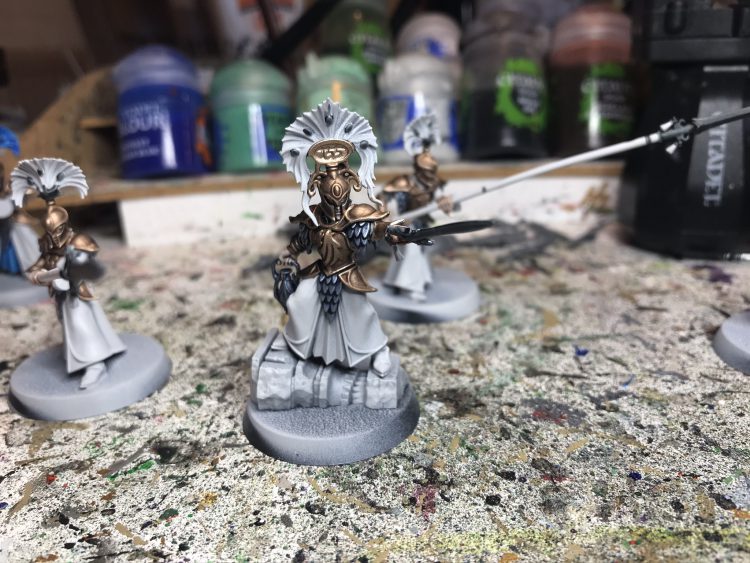
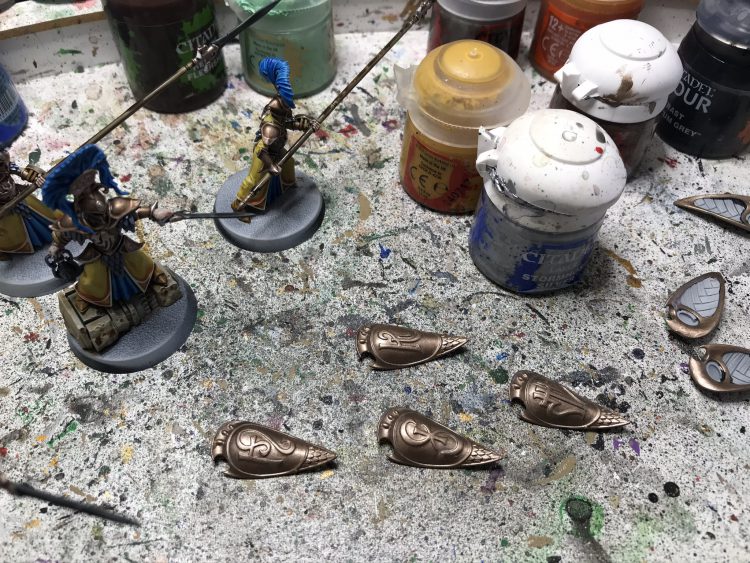
Next, I applied Agrax Earthshade to the plate and Drakenhoff Nightshade to the scale. Good news – both these sections take washes incredibly well, full-on liquid talent hours. This is where I abandoned the plan of doing the trim in silver, because it wasn’t going to be needed to make this look good and I genuinely felt I was more likely to mess the effect up than make it look better. Instead, I applied a highlight of Canoptek Alloy to some of the more extreme ridges and the chest emblems, and job was a good ‘un on that front.
Step 5 – Inner Robes and Plumes
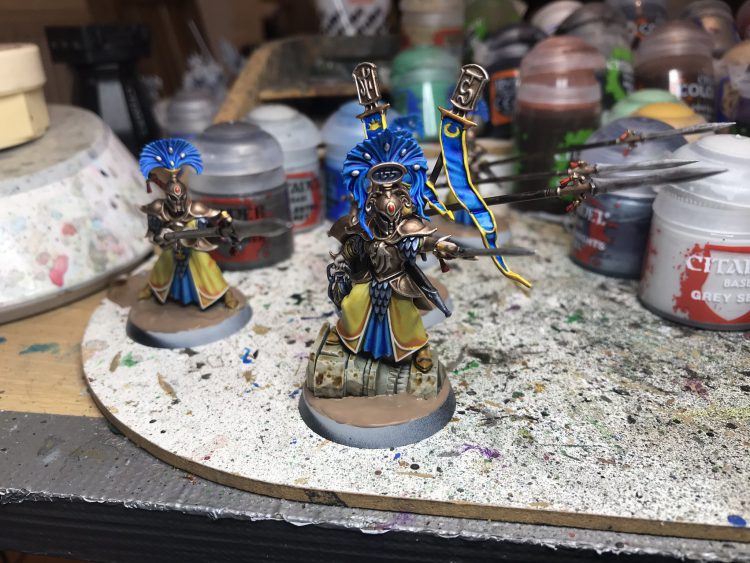
Time for some colour. After quickly hitting the boots with thinned Snakebite Leather, I used thinned Talassar Blue to paint the inner robes and plumes. With the Robes, I made sure that the only place the paint pooled was in the deepest part of the recesses, and went back to make sure the darker colouring was spread all the way up those. The plumes pretty much just worked, and I gave the tips a very light drybrush with Imrik Blue.
I will say at this point I was slightly torn on having a go at keeping the robes white, because I liked the brass/blue/white look a lot. In the end I decided to stick to the plan, but the models as they were had a real classical mythology vibe, which I kind of liked.
Step 6 – Outer Robes
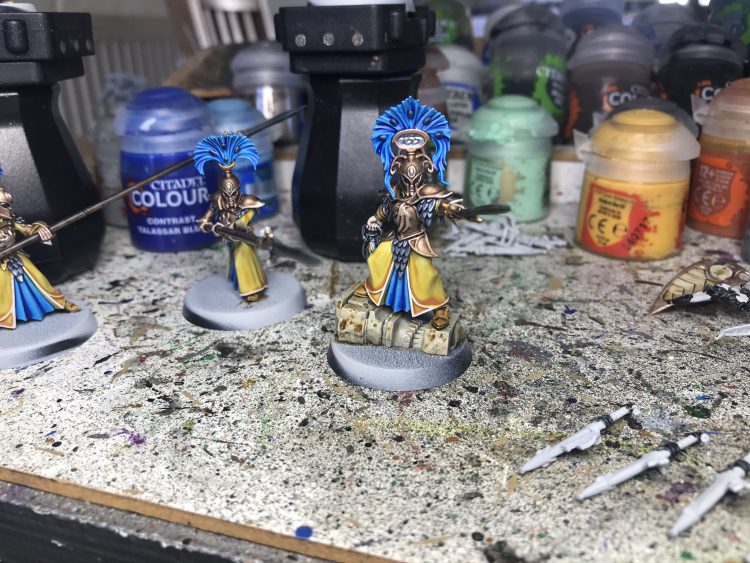
Moment of truth here – can we make yellow look nice? Turns out yeah, Contrast (Iyanden Yellow here) is magic – thinned it down, made sure to only let it pool next to the raised trim, and it looked good! I later went back and painted the trim in Grey Seer to give really nice bright definition, and here it’s a lot more forgiving than on the armour. As you can see, the shields were also having the metals on the back blocked in, and the woven fibres would later just be hit with thinned Skeleton horde so they weren’t blank.
Step 7 – Equipment and Detailing
This is where things break down into a whole bunch of tiny, bitty steps, and honestly is where the dream of doing an army of these kind of died. As an experiment there was a lot of satisfaction into putting a bunch of work in to picking out all the different surfaces and materials here, but it took ages and one of the things I struggle with is seeing how I could have done much less without it ending up looking off.
For various pieces:
- Shields: same techniques as the armour.
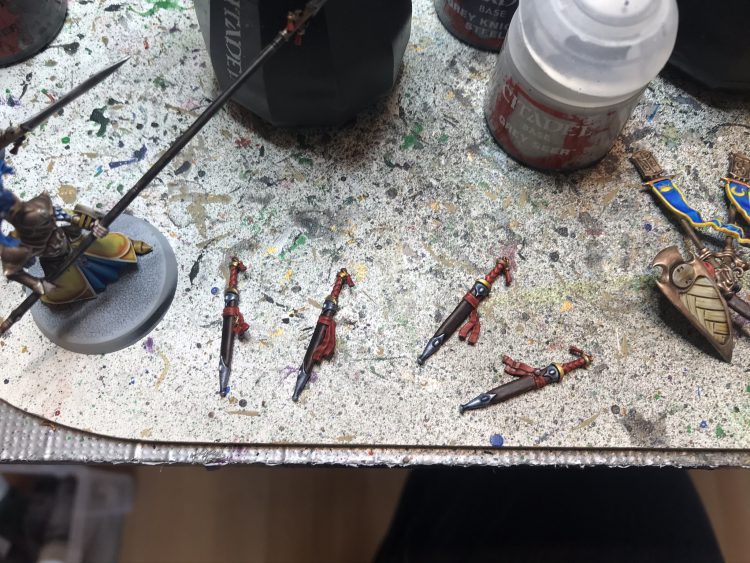
- Spears: For the hafts I hadn’t purchased a pot of Wyldwood yet, so did some inadvisable science with Doombull Brown, contrast medium then Skeleton Horde/Basilicanum Grey washes till it looked right. It eventually worked, but I don’t recommend it, and would just use thinned Wyldwood in the future. The blades are Leadbelcher highlighted with Stormhost then washed with Basilicanum. Tassels just Blood Angels Red over the primer.
- Gold Detail: Retributor Armour lightly washed with Druchii Violet. If it ain’t broke, don’t fix it.
- Swords: Doombull Brown/Contrast Medium for the wood (but as above, thinned Wyldwood if doing it again), Grey Knights Steel > Drakenhoff for the silver, gold and red as above.
- Eyes: Washed around the area with Basilicanum Grey to darken, then applied tiny spots of white and tidied up with thinned Kislev Flesh.
- Back Banner: Thinned Talassar on the interior, Iyanden Yellow then highlights with Flash Gitz yellow on the rim. The only thing I wish I’d found some way of doing better is the recessed symbol, which I did in yellow but came out looking a bit anemic. Not sure what else I’d try, but if doing another squad or coming back to these I’d mix it up. Maybe orange? The metal plates at the top followed the same recipe as the armour.
Finally, forehead gems were Stormhosted then had very thinned Blood Angels Red applied.
Step 8 – Basing
For the bases, after applying thinned Skeleton Horde to the column I went with an option I hadn’t used before in Agrellan Earth. This worked great, but it was a bit alarming to use for the first time because it took ages to dry and crack. Came out perfectly in the end, but definitely be prepared to have patience. Finally, I finished things off with some Middenland Tufts. Once that was done, I went over the rims in black and…
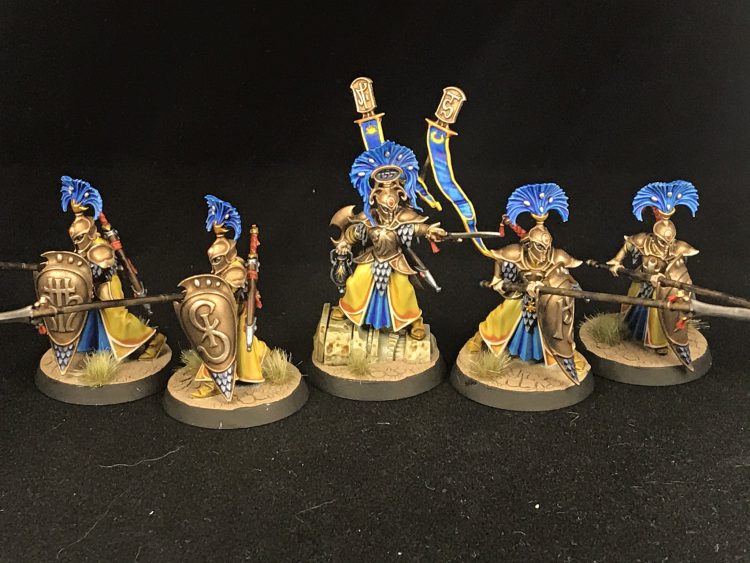
The Finished Product
Conclusions
So the good news is that I’m thrilled with how these came out, and they’re easily among the best models I’ve ever painted. The bad news is that my concerns about how long it takes were well founded – I could comfortably have knocked out multiple 40K squads in the time it took to do these five models, and I don’t think going back to do more would be much faster even with the techniques all planned out. Nevertheless, it was a genuinely fun experiment, and if you’re in this hobby for the painting these models are fantastic to work with.
Silks’ Method
Assembling the Models
I did my normal thing of building the whole army (although due to the rather staggered release this actually fell into two parts). I tend to do this because I want the army to have identical colours and since a large part of this was going to be mixing up paints and airbrushing I wanted to do all of that in one go.
Like Wings, I left the shields off the models. I actually left them on the sprue, knowing that I could repaint the contact points fairly easily.
When I paint models I always tack them onto the base with a tiny dot of superglue. This means I can pop them off when the model is painted and do the base seperate from the model and reattach the model afterwards. Sometimes it doesn’t work and I need to replace the base after it breaks pulling the model off, but most of the time it’s fine.
Priming
I almost always default to black and a dark red scheme definitely reinforced the need to do that.
The Plan
When I start a new army I spend weeks and weeks trying to find a colour scheme I like. I do this mostly through Pinterest, I create a mood board (you can tell I’ve been married twice…) and search for examples of well painted models I like (not necessarily from that army). In this case, since Lumineth are a brand new army I searched old Warhammer Fantasy High Elves for inspiration. If you’re interested, you can see my saved boards here
About the only things I was set on was that I’d be doing Non Metallic Metal. I’m going to sound weird here but I find painting NMM (albeit a fairly basic form) much easier than using real metallics! Since I’d be doing a lot of gold I decided a dark red would work nicely with it so painted up a test model and experimented with the colours until I was happy.
The Process
Step 1 – Airbrushing the Red
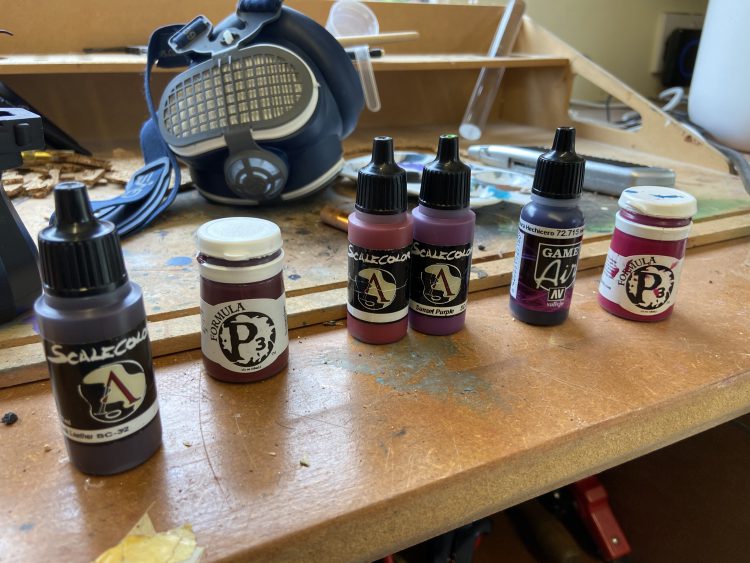
This was a bit of a convoluted recipe. For my test model I started with Black leather from Scale 75 but decided to skip that stage in the rest of the models. Instead, I started with P3 Sanguine Base, which is a lovely brown red colour. P3 paints are some of my favourite to use through an airbrush and they have a really excellent selection of colours you won’t find anywhere else. I then mixed Scale 75 Deep Red and Sunset Purple 50/50 and gave the models a zenithal spray, leaving the sanguine base in the recesses / underneath. To reinforce the shadow colours I used Vallejo Hexed Lichen and then gave a last detailed highlight with P3 Murderous Magenta. I use Hexed Lichen and Murderous Magenta on almost every project I do, they’re such a great combination!
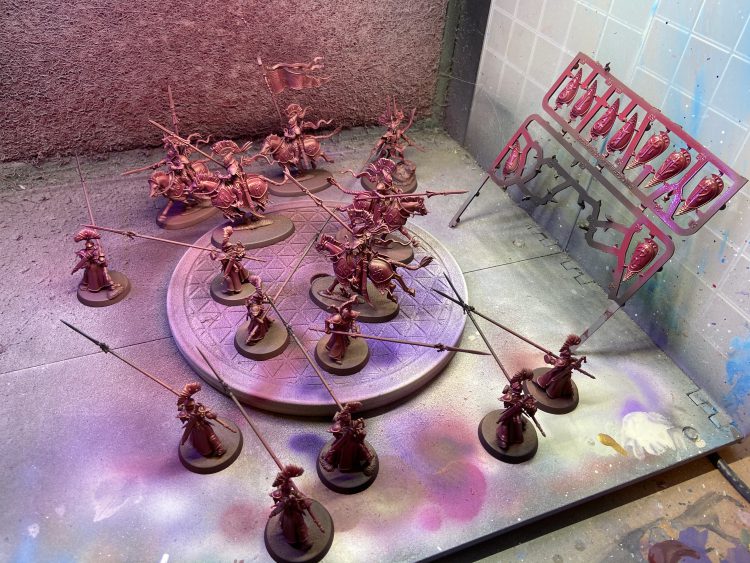
Step 2 – Blocking in “Metals”
I have a tried and tested NMM gold recipe from my Custodes army but decided that I wanted the Lumineth to be a proper “shining” company, so started with Mournfang Brown and skipped the Rhinox Hide I normally start with. This was an exercise in tedium, especially with all of the trim, but it’s probably easier to paint Mournfang brown over red than it is to use Retributor gold so I’m saving time!
I painted the Steel with a dark grey, I think in this case it was Scale 75 Anthracite Grey.
Step 3 – Highlighting the “Metals”
My NMM approach is fairly simple. Mournfang Brown base, highlight with XV-88, highlight even more with Balor Brown then Zamesi Desert. Each highlight goes in places I think should catch the light such as the middle of a curve or the protuding edge. As always, it looks naff and like you’ve wasted your time at this point. Then I add a dot of Dorn Yellow and suddenly it looks metallic and shiny. It’s my favourite part of painting and is very satisfying.
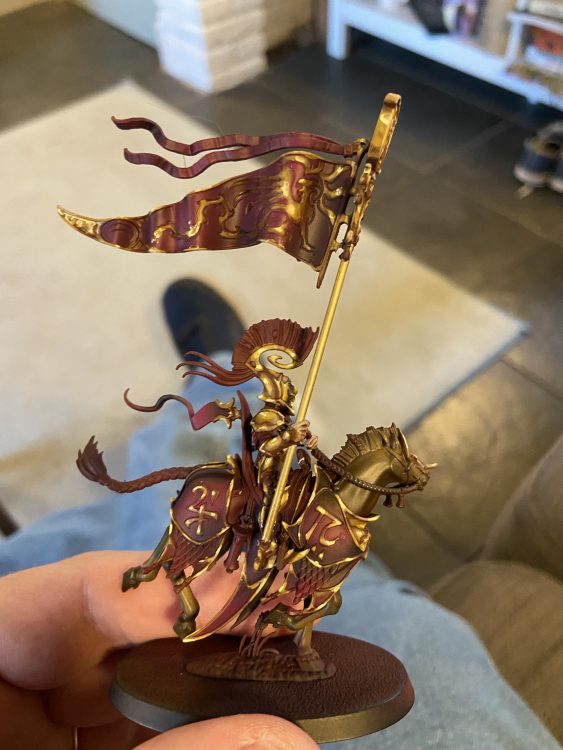
I quite like this photo because the banner pole is an unpainted brass rod I used (after snapping the plastic banner pole with my hulk like hands) and it actually looks the same colours as the NMM I’ve painted!
Step 4 – Hair, Gems and Tassels
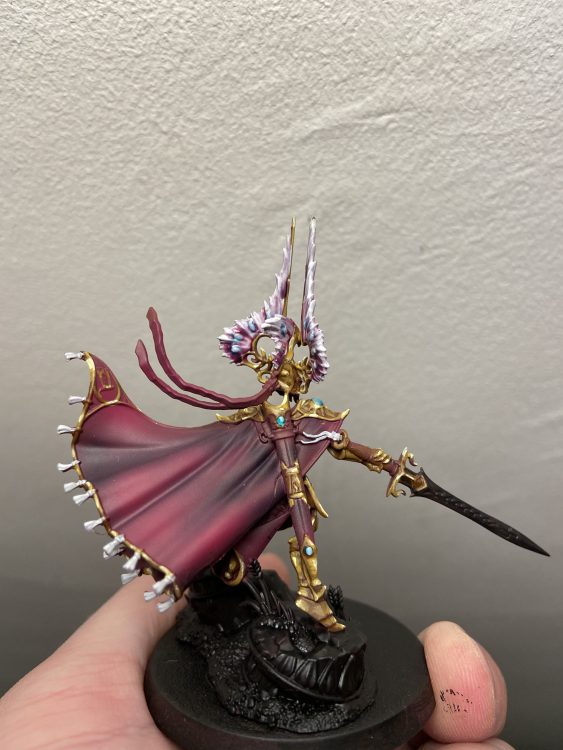
I gave all the hair, gems and tassels a couple of coats of Corax White. The tassels stayed this colour, but the gems got a coat of Aethermatic Blue whilst for the hair I used Volupus Pink closest to the head, then Magos purple further out. The hair was then highlighted with Corax White.
Step 5 – Skin
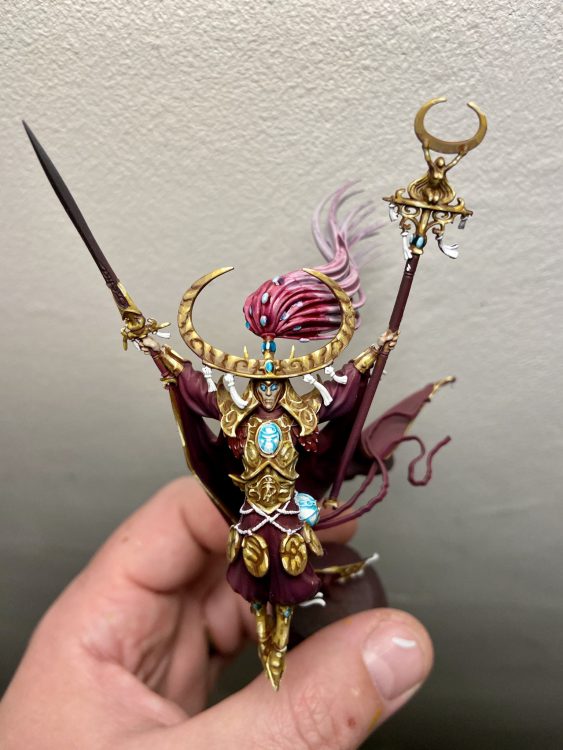
I went with a very simple pale skin. I painted the skin areas Rakarth Flesh, washed with Fleshtone and re highlighted with Rakarth Flesh. It’s very basic but with such small amounts visible it’s all I felt I needed to do.
Step 6 – Scales
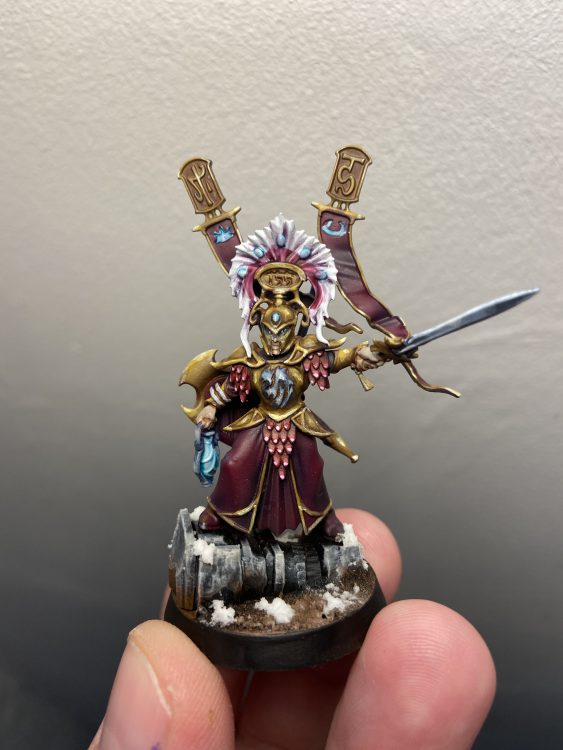
I gave the scales a coat of Scale 75 Deep Red, then highlighted them with Mephiston Red, Wild Rider Red and Fulgrim Pink on the very tips
Step 7 – Steel NMM
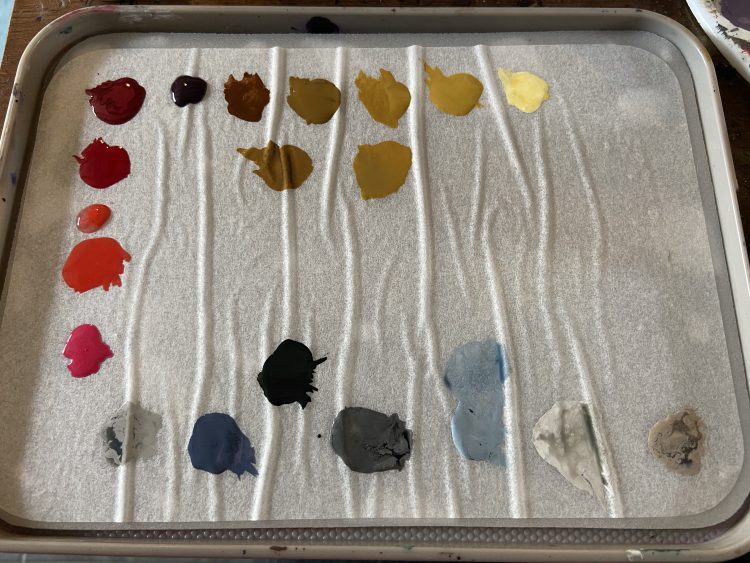
For the steels I did the same using a blue grey selection of paints. I must admit I’ve forgotten exactly which, although I suspect it was the “Space Wolf” selection of GW colours. Here’s a picture of my wet palette so you can see the rough progression I was using. For weapons I edge highlighted in white. For glowing runes I painted in some Corax White and used Aethermatic Blue again.
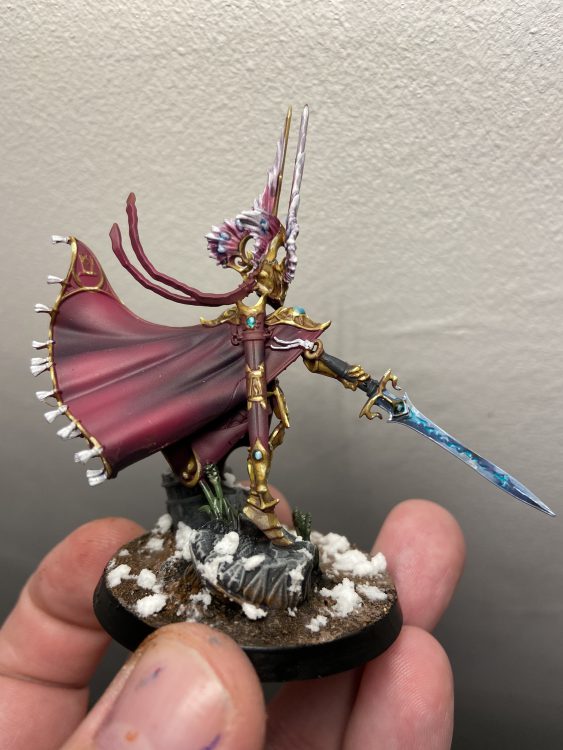
Step 8 – Final Details
I painted all of the straps Corax White or Brown depending on whether I thought they were leather or cloth, and added eyes by painting them black then adding two tiny white dots.
Step 9 – Basing
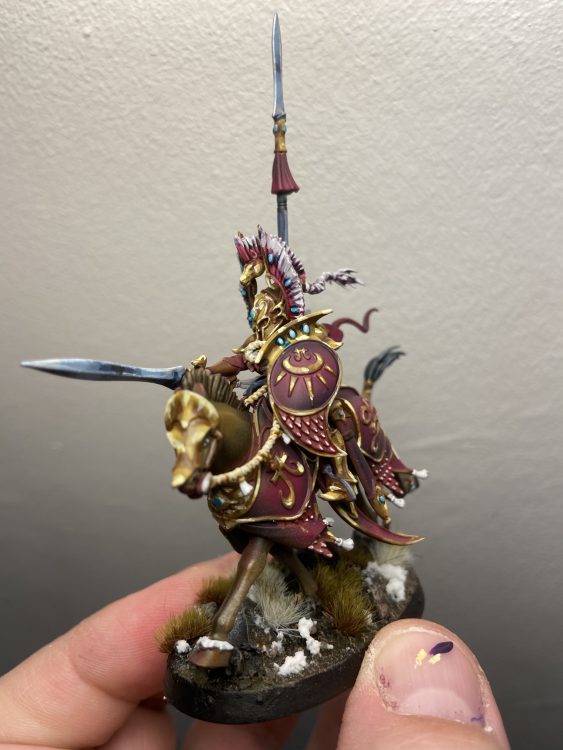
I glued some Gamer’s Grass Basing Rocks to the bases and then covered the rest in texture paint. The colour didn’t matter as I then primed it all black and drybrushed the rocks various shades of grey, the mud various shades of Brown and then added some Gamers Grass tufts and texture paint snow.
Conclusions
I was probably pretty lazy with some parts of these models like the gems and the tassels, but I’m really happy with the combination of red and gold, and since they’re such large parts of the model I’m really happy with how they turned out!
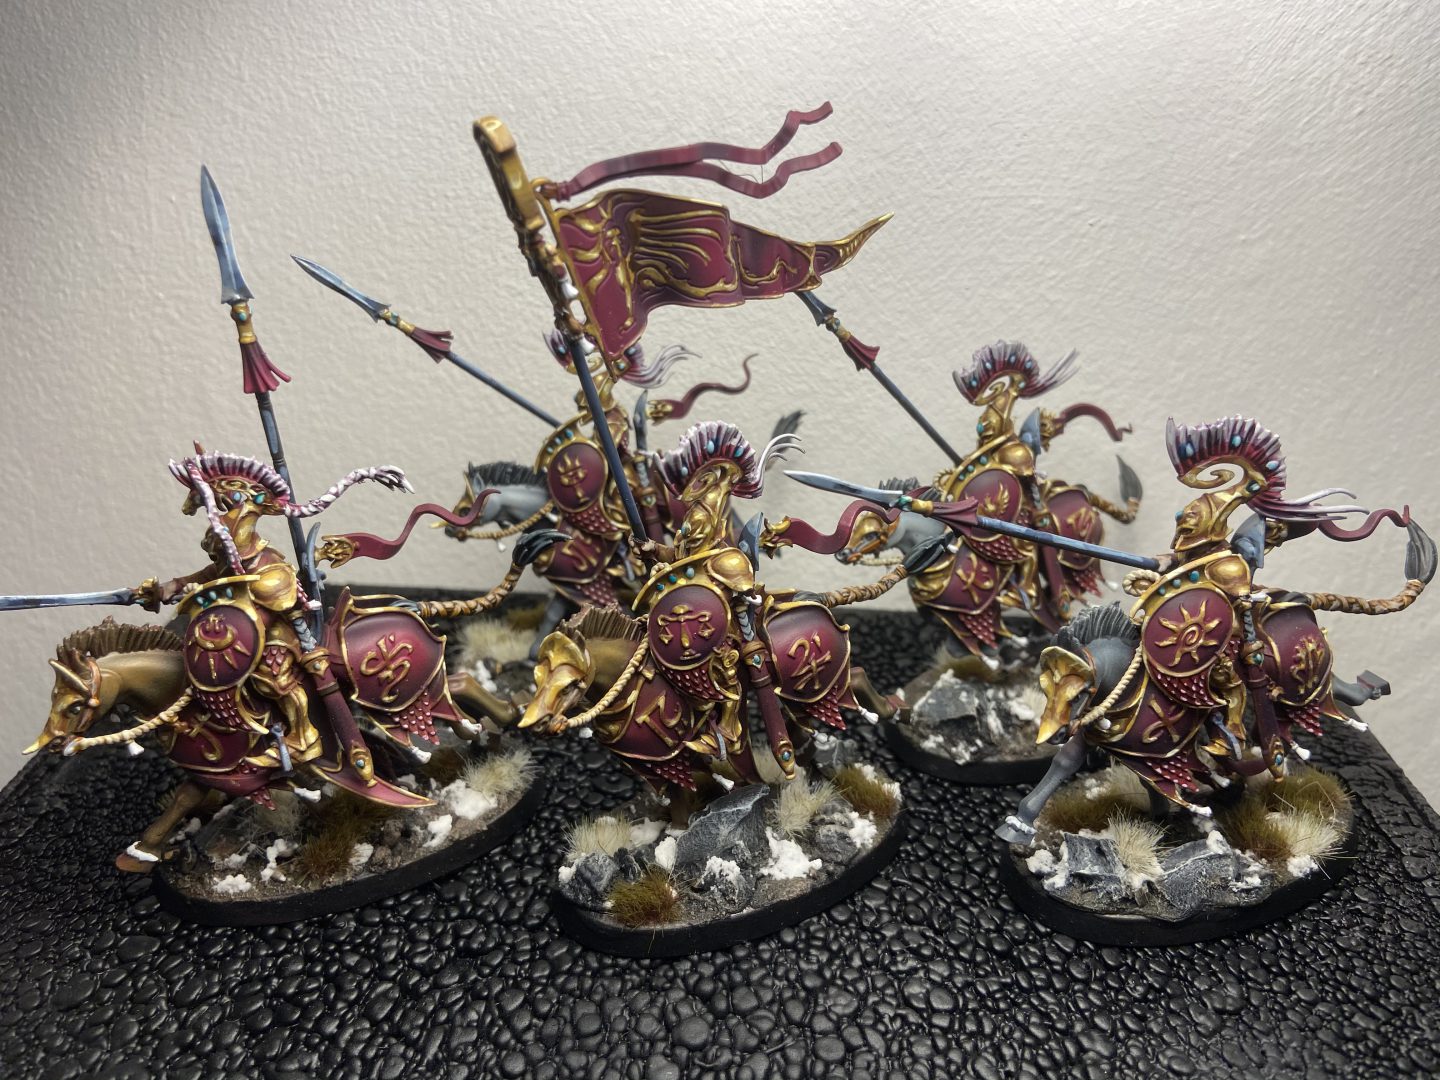
That wraps up our look at how to paint Lumineth Realm Lords, though we may add more methods here in the future. As always, if you have any questions or feedback, drop us a note in the comments below or email us at contact@goonhammer.com.

