In our How to Paint Everything series, we take a look at different armies of the Warhammer universe, examine their history and heraldry, and look at several different methods for painting them. With the release of Engine War we’re looking at the forces of the Chaos Daemons, and this instalment is dedicated to Grandfather Nurgle.
Who are the Daemons of Nurgle?
Nurgle, or “Grandfather Nurgle” as he’s affectionately known by his followers, is the god of decay, disease, pestilence, plagues, and despair. Nurgle is the third of the Chaos gods, and his followers are blessed with rotting flesh and bodies wracked by perpetual disease. Although Nurgle is the god of death, he’s also the god of rebirth – where new life springs from the decay he brings. Nurgle and his followers are known to be mirthful, and more Nurgle models have big toothy grins than any other faction. Nurgle’s chief enemy is Tzeentch, the god of change. While Nurgle’s focus is decay and ruin, Tzeentch works against Nurgle’s vision of decay and inevitability with his plots and schemes and focus on constant change rather than the reality that everything ends the same way.
Nurgle’s daemons come in all shapes and sizes, from tiny nurglings to hulking Great Unclean Ones. They’re all decomposing or rotting to some extent, but they’re also blessed with preternatural vitality and toughness, able to shrug off wounds that would fell a normal being. They’re also incredibly gross, covered in boils, pustules, rotting flesh, and typically pictured with open abdomens and entrails spilling out.
Where to Read More
If you want to read more about Nurgle and his followers, check out these books:
- Dark Imperium and Plague War by Guy Haley. These books focus on Guilliman’s battles against the Death Guard and Mortarion’s forces, but also feature several notable daemons, including Ku’Gath Plaguefather.
- The Call of Archaon series for Age of Sigmar features several stories about the maggotkin of Nurgle, such as Blood and Plague and Beneath the Black thumb.
Playing Nurgle Armies
For more on Nurgle armies, check out Start Competing: Chaos Daemons for Warhammer 40k and Kill Team Tactics: Chaos Daemons for kill team. We haven’t covered Nurgle forces in Age of Sigmar yet, but stay tuned for that.
Painting Nurgle Daemons
Nurgle Daemons are perfect for a new painter – They offer a ton of variety, but they’re very forgiving and take to Contrast paint very well. We’ll talk about a few different ways to paint them, but ultimately the big things you’re going to have to figure out are how you handle grime and snot on your minis.
TheChirurgeon’s Method
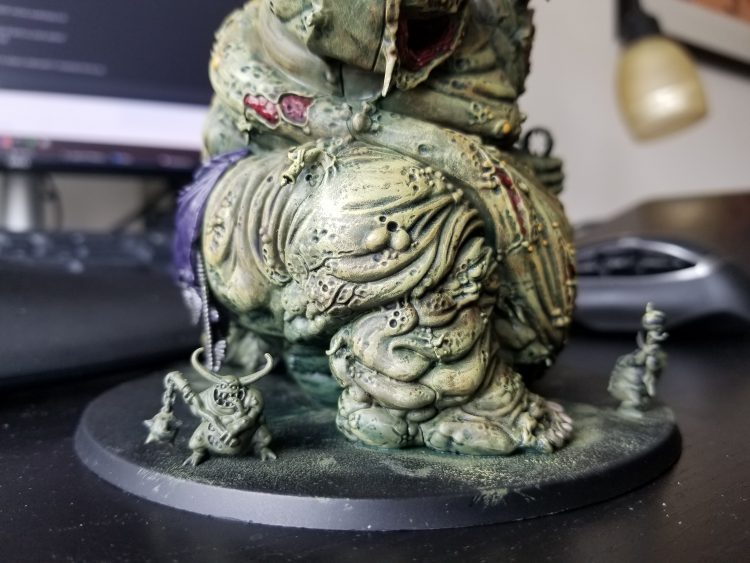
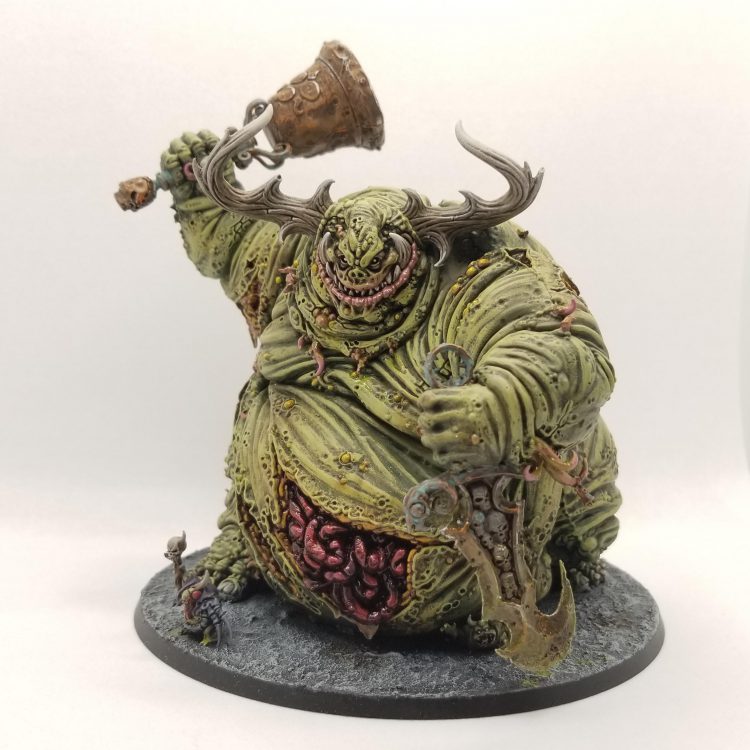
I started painting Nurgle Daemons to accompany my Death Guard. Recently, I’ve started fleshing them out into their own army and really taking on some of the bigger models they have to offer, which meant painting my Great Unclean One.
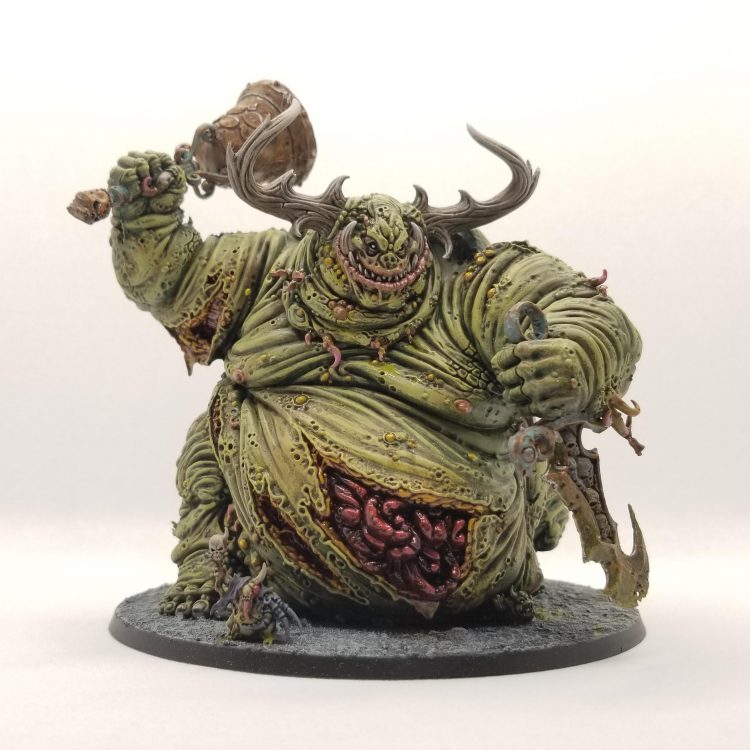
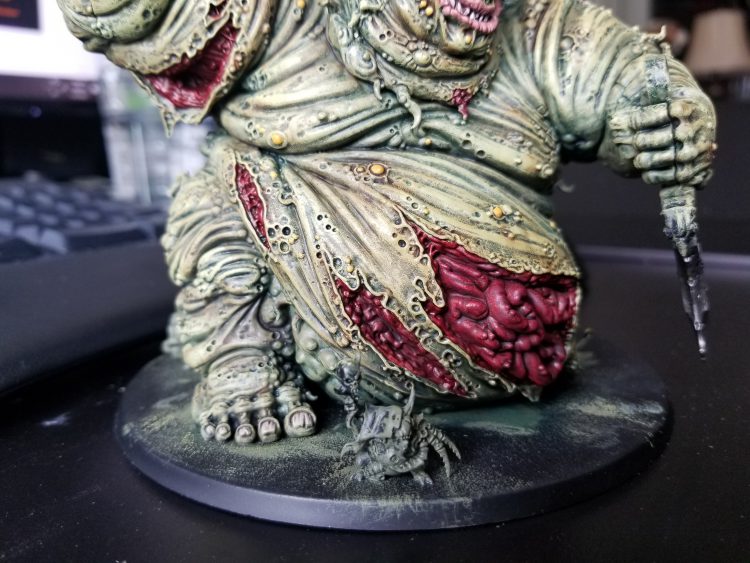
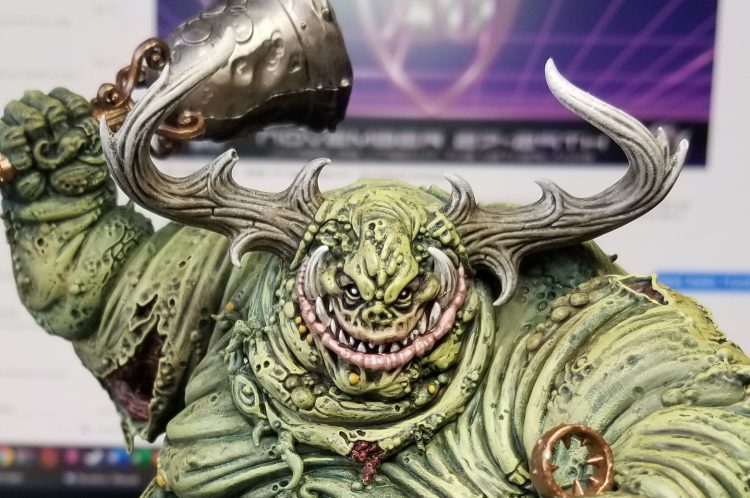
The process starts by priming the model with Abaddon Black. Always prime black. After that I laid down a base coat of Castellan Green, then washed it with Nuln Oil and drybrushed it with Castellan Green again. Then I drybrushed that with several layers of Death World Forest, Death Guard Green, and Ogryn Camo, working my way upward and making sure I hit higher parts of the model with lighter colors. Because the skin has lots of folds and wrinkles, it’s more forgiving for this process, and we’re going to cover the rest later on to make the drybrushing work less visible.
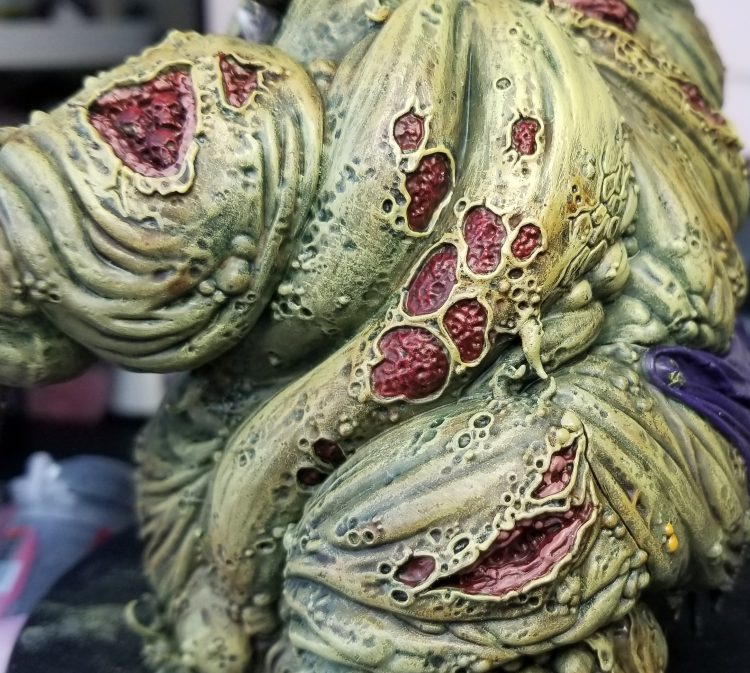
After I lay down these colors, it’s time for shading. I cover the model in liberal coats of Agrax Earthshade and Reikland Fleshshade to tint the skin and give it more color depth. These go on haphazardly, but I’ll pool around the sores and add streaks in key places like below open sores and wounds to give it the skin a stained appearance from whatever was seeping out. I’ll also add a bit of Coelia Greenshade where I want more green hues.
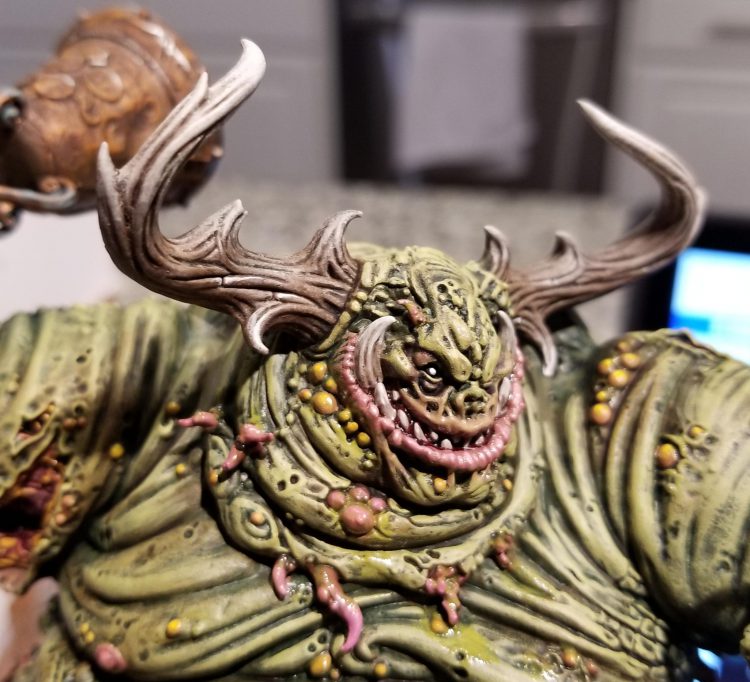
Next I start hitting the pustules with Averland Sunset. I want these to be bright on the final model but I’m gonna cover them with Nurgle’s Rot, which will tint them green so I need them to be bright yellow. I add a dot of Flash Gitz Yellow to them as well.
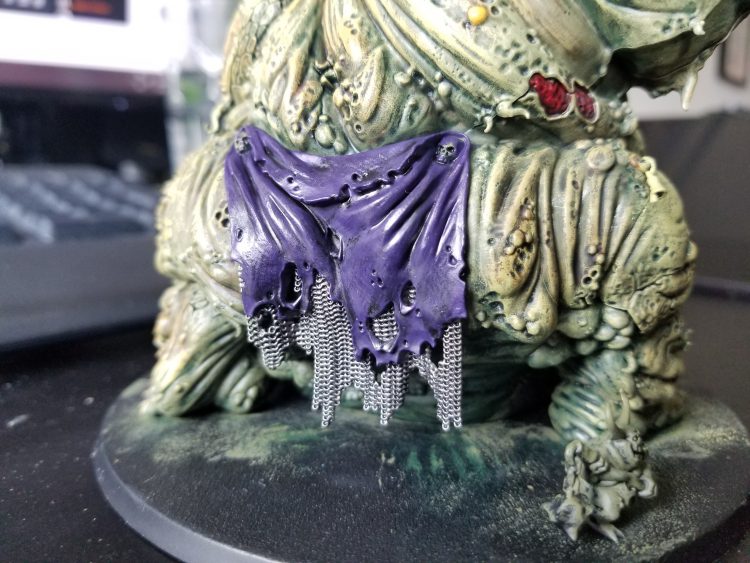
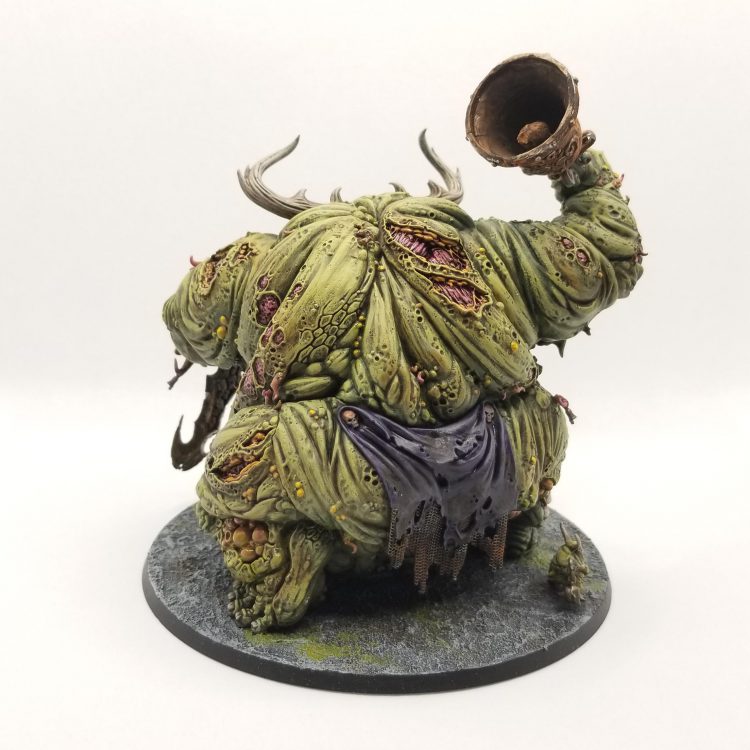
The loincloth in back gets a base coat of Duruchii Violet while the toenails and fingernails are painted Rakarth Flesh. Anything metal like the chainmail gets a base coat of Leadbelcher. Both get washed with Nuln Oil and Agrax Earthshade. After that I go back and edge highlight the areas where the skin is broken using Ogryn Camo.
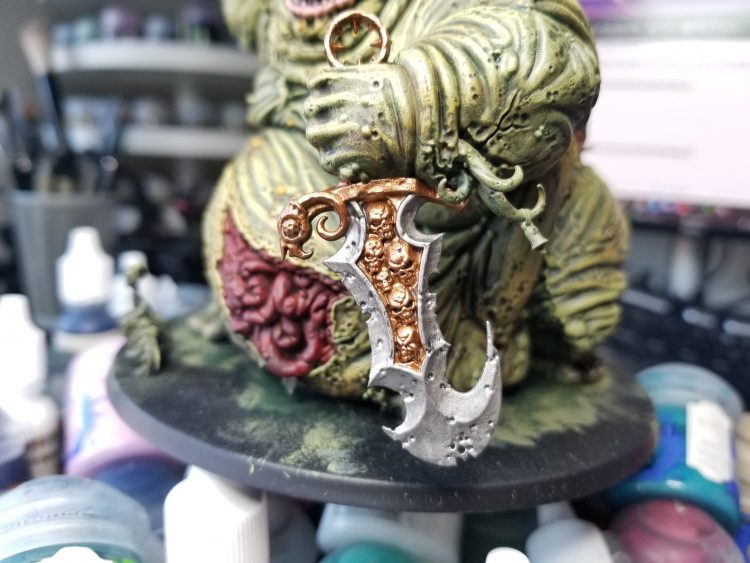
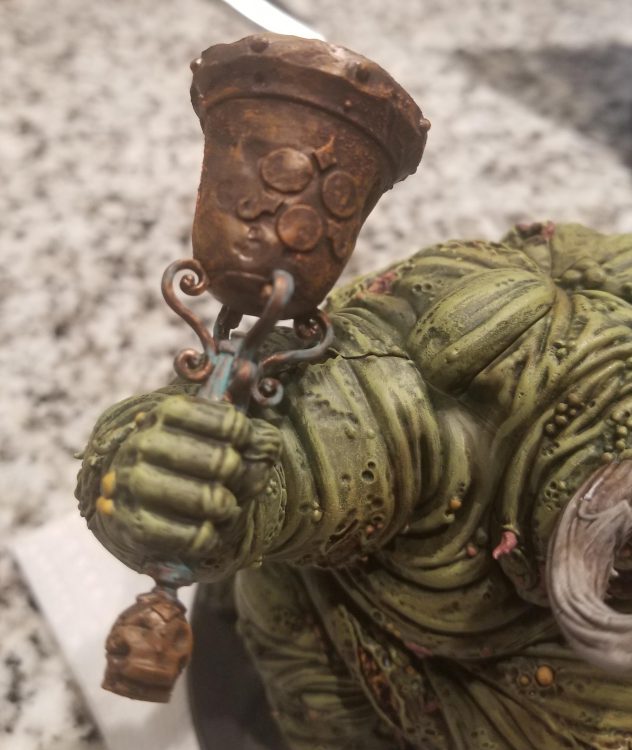
The bronze/copper bits get a base coat of Balthasar Gold. I’m going to come back and wash them and the Leadbelcher parts with heavy coats of Agrax Earthshade.
OK, time for these open sores and entrails.
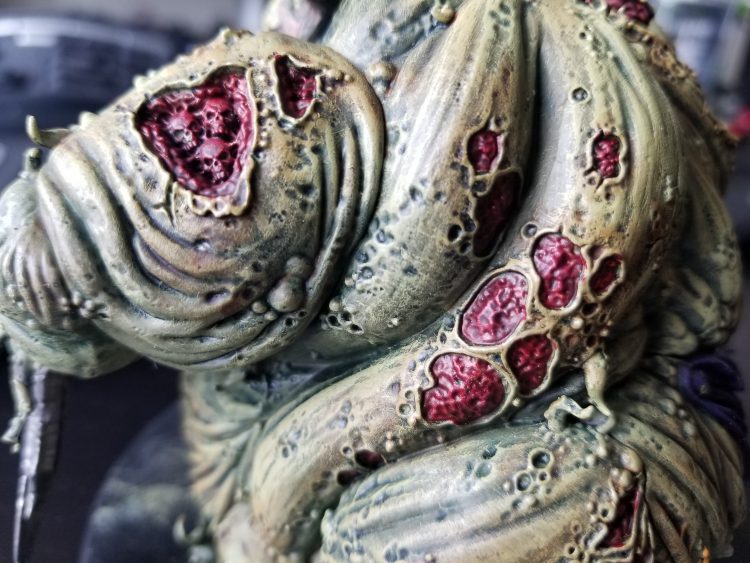
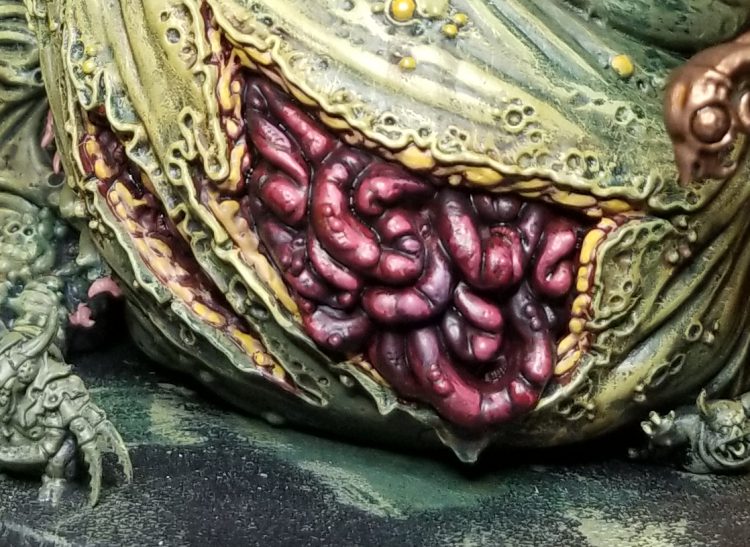
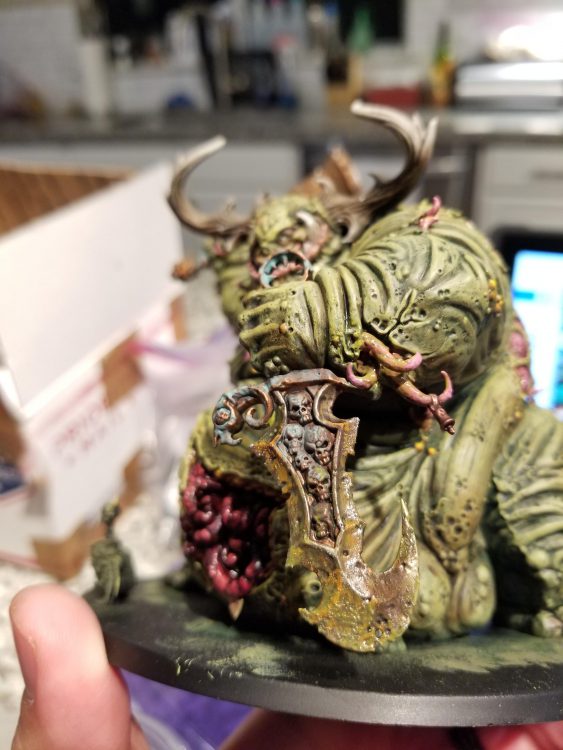
The open sores and entrails are painted with a heavy coat of Contrast Blood Angels Red. I hit every part of the model that’s an open wound or has entrails leaking out. This is the base color, but we’re going to need to make this darker and add more variety.
The next step is the subcutaneous tissue. Basically all that padding between the Great Unclean One’s skin and his innards is thick greasy layers of fat, and typically that’s got a yellow hue to it. I start by painting it with Bugman’s Glow.
I drybrush that over the flesh of the sores. I’m also going to use Bugman’s Glow to paint all of the tentacle bits coming out of the Great Unclean One’s body in various spots. I’ll highlight the raw muscle with Bugman’s Glow as well.
Next I paint over that with a 50/50 mix of Bugman’s Glow and Averland Sunset, then do a final highlight with Averland Sunset to get the yellow look I’m going for. The entrails also get painted at this point; I wash them with Carroburg Crimson and Duruchii Violet, working in splotches rather than a uniform tone. This gives them a dark purple hue. I’m going to work that back up, mixing Blood Angels Red with Emperor’s Children Pink to get the lighter colors. When I’m done, I cover the whole thing in a thick coat of ‘Ardcoat, which makes it appear wet.
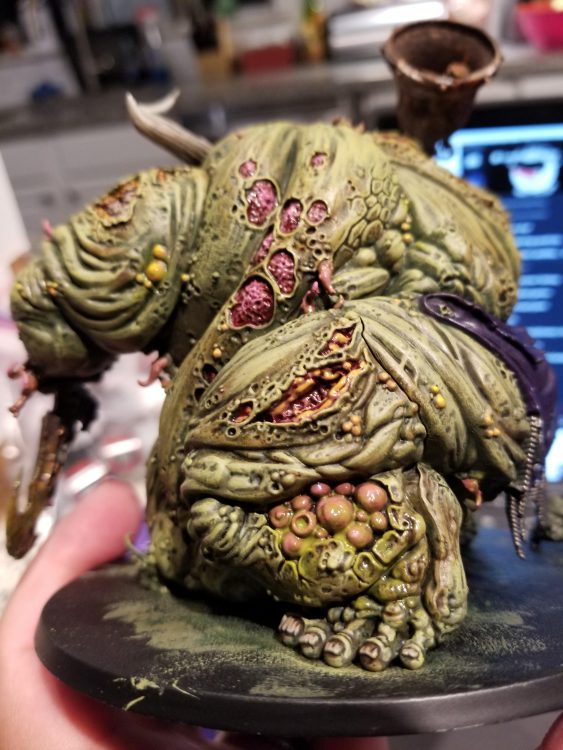 For other pustules I paint those with Bugman’s Glow, then highlight them with a mix of Bugman’s Glow and Emperor’s Children Pink. I’m also going to hit most of these with Nurgle’s Rot later, but I’ll go very heavy in areas I really want the effect to stand out.
Now for the face.
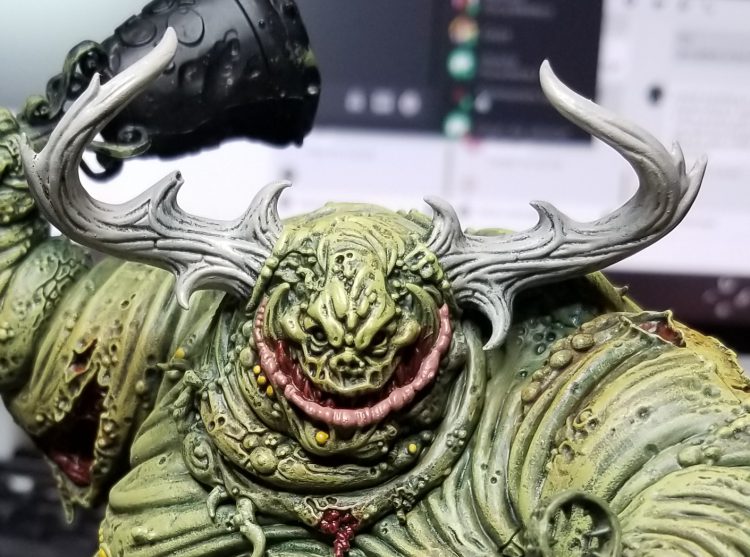
I paint the mouth with Contrast Blood Angels Red and do the base coat on the lips with Bugman’s Glow. The horns and teeth are Rakarth Flesh.
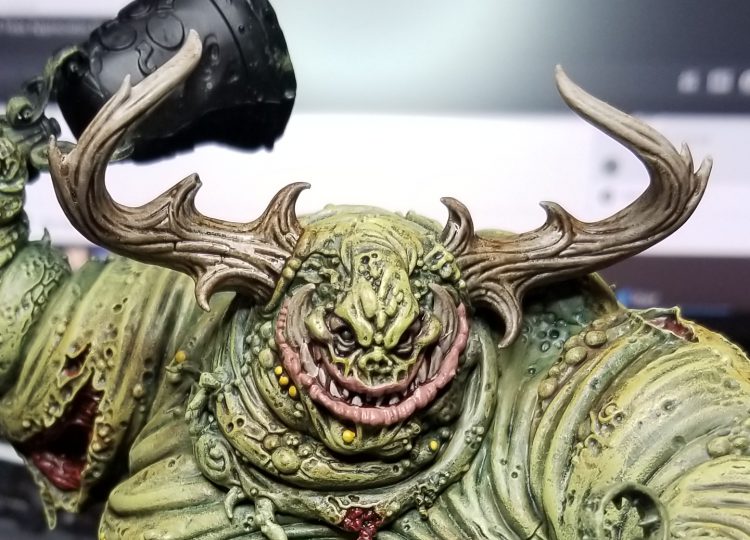 I wash all of it with Agrax Earthshade. I want the eyes to have a bit of a sunken look, so I wash them with a tiny amount of Duruchii Violet. The horns get a second coat of Agrax, working my way down the horns. I want them to be darker at the base than the tips. I also higlight the lower lip with a mix of Bugman’s Glow and Emperor’s Children pink. I have to do the same for the upper lip, but I blend that into the face by doing a mix of Emperor’s Children Pink and Ogryn Camo. I also pick out some of the raised details on the face with Ogryn Camo.
Time to do tthe eyes with a spot of white. I also edge highlight the under-lids and smooth out the transitions on the upper lip. I do a final set of highlights on the bottom lip with a 50/50 mix of Emperor’s Children and Reaper Pure White to give it a glossy look. My boy has beautiful, kissable lips. I highlight the teeth with Rakarth Flesh and then Reaper Polished Bone. I’m going to do the same on the horns eventually.
Final details on the face. I pick out the rest of the tentacles and pustules with Bugman’s Glow, then highlight them with Emperor’s Children. I also pick out the edges on parts of the horns with Reaper Polished Bone, and I pick out the blisters with Averland Sunset. I coat the mouth in ‘Ardcoat to give it that wonderful “wet” look, and then I hit the pustules and blisters/pimples with Nurgle’s Rot to give them a snot-covered gloss.
Back to the dagger. After the Agrax Earthshade wash, I hit the bronze parts with Nihilak Oxide. Then I cover the iron/silver parts with splotches of Typhus Corrosion. Once that dries, I drybrush it with Ryza Rust, then I edge the metal parts with Ironbreaker. The last step is to coat the whole thing in Nurgle’s Rot to give it that virulent sheen. You do not want to get cut by that thing.
The bell is much the same process, though I’ll hit this with Typhus Corrosion as well to give it an aged patina.
After that, it’s time for final touch-ups. I look for any spots I missed, add some final edge highlights, cover the exposed flesh parts in ‘Ardcoat to make them look slick and wet, and hit all the tentacles/oozy bits with Nurgle’s Rot. I’m super happy with how this model turned out, and it was a blast to paint. It may be my favorite model in the GW range and I can see myself painting another.
BONUS: Nurglings!
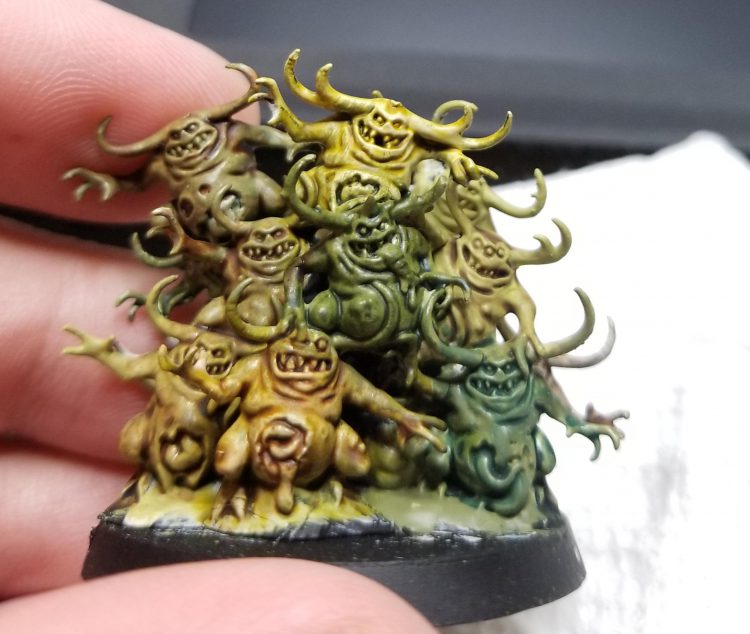
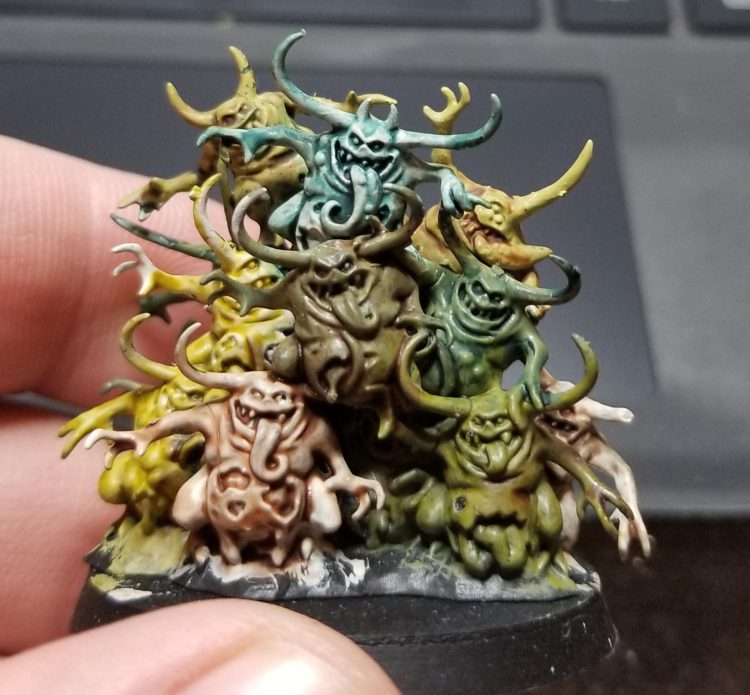
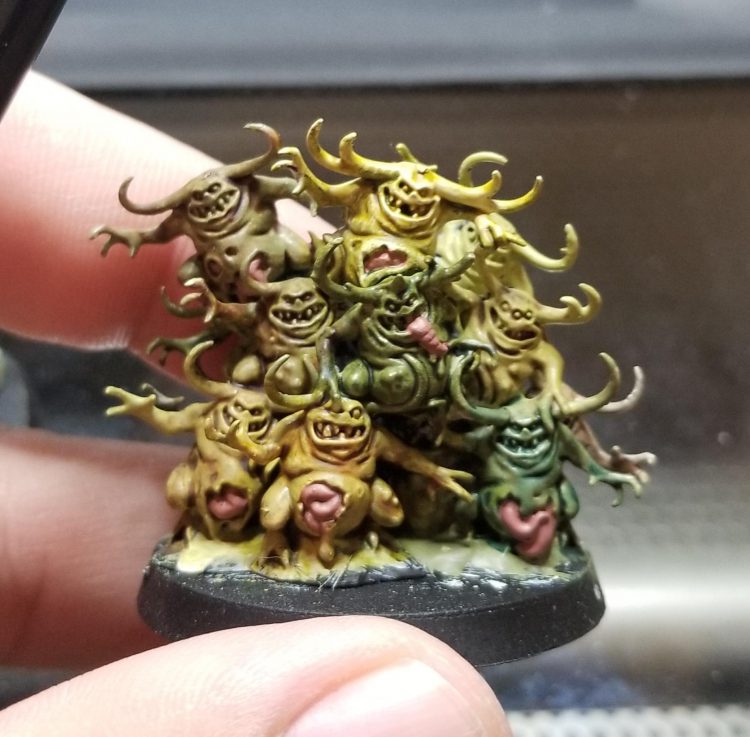
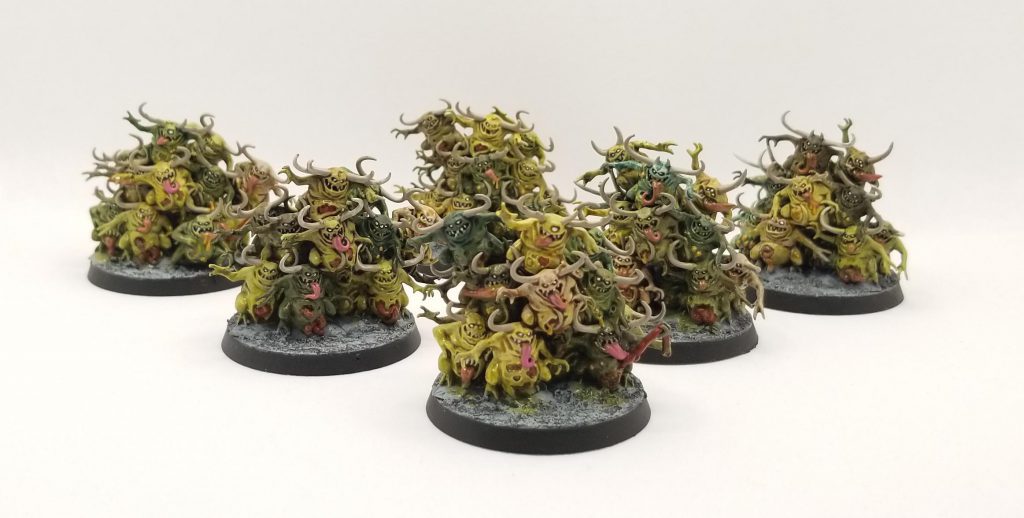
Also, I painted some Nurglings. These are way faster, but let’s talk about the process.
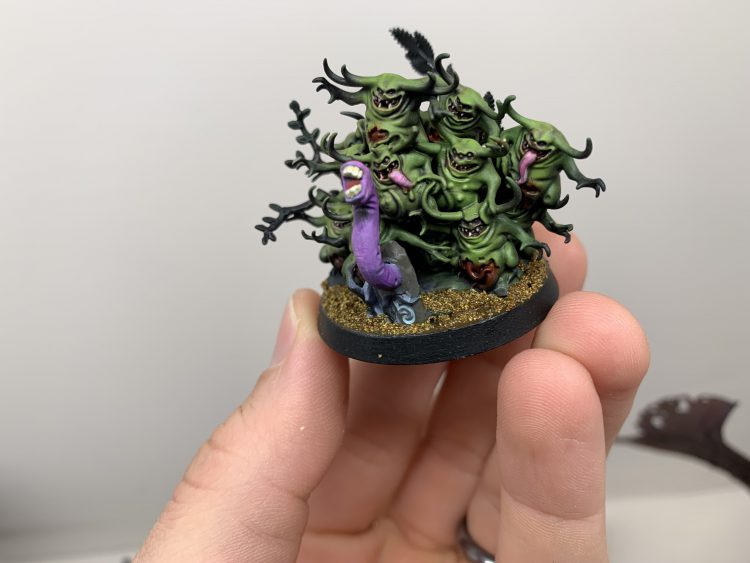
Basically my goal for Nurglings is to get them all different colors to add some variety. I start by priming black, then I basecoat the nurglings with a mix of Wraithbone, Ogryn Camo, and Rakarth Flesh. These are the three “base” shades I use.
The next step is to wash them heavily. I use a mix of Agrax Earthshade, Reikland Fleshshade, Contrast MilitaruM Green, Coelia Greenshade, and Contrast Plaguebearer Flesh. I play around with different combinations and styles, and at this point I’m not worried about overlap or mixing colors.
Next I hit the innards and tongues with Bugman’s Glow or Blood Angels Red. I highlight the tongues with Emperor’s Children Pink, edge highlight the skin a bit, dot the eyes with Reaper Pure White, and hit the horns with Rakarth Flesh. The goal is to not spend too much time on these, especially since I need to paint 9 of them. The end result works pretty well, though, giving them a lot of variety to look at and not making them look like uniform blobs.
Corrode’s Method
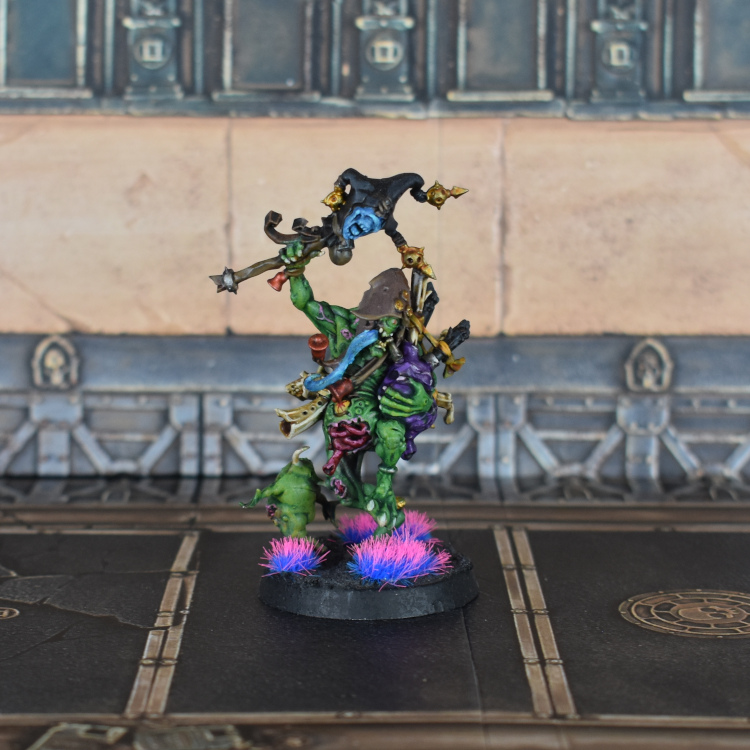
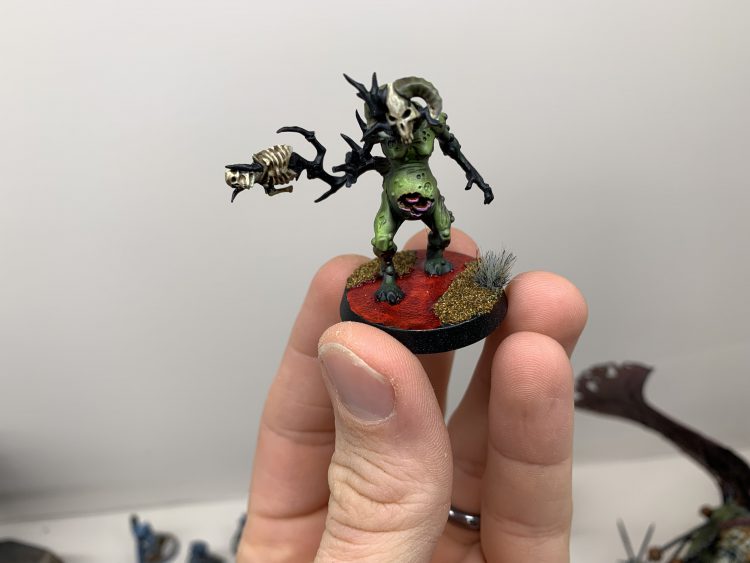
The Sloppity Bilepiper is one of the best-named units in Warhammer, and it’s great fun to paint, too. I started by priming Wraithbone and then washing the whole thing in Wyldwood, which gave a nice brown base to start from. The main part of the model is the skin, which was going to be green, so I heavily drybrushed the skin Waaagh Flesh, then Warboss Green, then Skarsnik Green, with an additional yellow layer on the Nurgling to make it a bit lighter. The skin on the Bilepiper itself also picked up a couple of yellow highlights in the knuckles and on some of the other highest edges. This was all washed Biel-tan Green. The guts were painted Emperor’s Children Pink (was were the ragged edges of flesh around them, as you can also see on the other open wounds e.g. on the knee) and then washed Carroburg Crimson to give them a real bloody feel. I think I also gloss varnished them. The veins were similarly picked out in Emperor’s Children Pink.
The rest is just picking out details. I got to use some colours I rarely find a place for, such as the bells in Warplock Bronze, and also a variety of different browns. With so many different elements it’s helpful to try and tie some of them together visually so they don’t clash – so the ethereal jester face and tongue in blue, the ties on the bag pipes/eyes/jester hat bells in yellow or gold, the other bells in Warplock Bronze, and so on. There’s also a fair amount of bone in there – a couple of pipes, the claws/nails, the teeth, the little horn he carries on a strap, and I think on the back some of the spines as well. I got to play with doing some different browns and things too, which was fun! Like my other Chaos models, this guy is based with the Gamer’s Grass alien grass tufts, which add an extra weird and suitably Chaotic dimension.
Charlie A’s Method
Nurgle daemons are very forgiving and fun to paint. You can incorporate bright and dark colors, nearly on a whim, to experiment and learn. The best part about painting Nurgle daemons is that, even when you mess up, if it looks cool, Papa Nurgle can justify it. Plus you get an excuse to heavily use weathering and other effects! Let’s get into it.
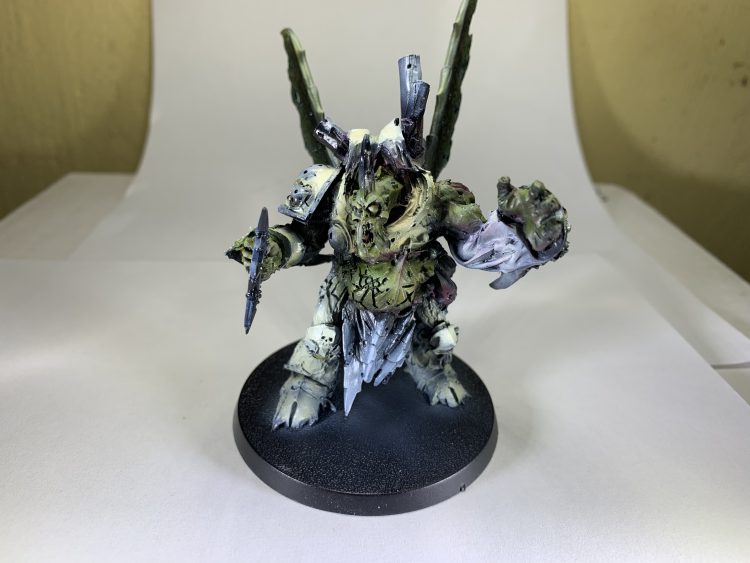
I know what you’re thinking. This isn’t technically a Nurgle Daemon. This is a Daemon Prince of Nurgle. Get over it. It’s got the Nurgle Daemon skin we’re looking for. To get the skin to the above-pictured state, I’ve zenithal highlighted the whole model with white ink, anti-zenithal low-lighted with purple ink (i.e., shot purple ink up, onto the underside of everything), then applied Elysian Green straight on (i.e., not at an upward or downward angle, just straight on). Lastly, I mixed 50/50 Elysian Green with Menoth White Highlight and sprayed directly down. You can see the shadows and highlights are somewhat exaggerated and some of the wound recesses are purple too.
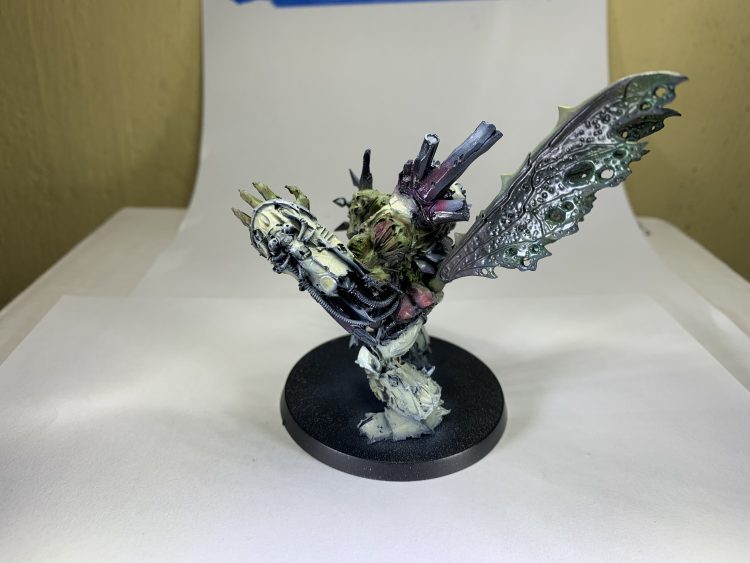
Next, we magically cut to a stage where the armor and skin look better. Pay attention to the skin tones. The shadows have been further darkened with purples, reds, and browns, while the highlights have been further brightened with creams and greens. The skin itself is less desaturated thanks to green ink, which is transparent and allows us to tint the color gradient underneath. The wound on the stomach (along with several other points of interest on the skin) has been darkened (reddened) to look inflamed and highlighted with bright pink spots. Gross!
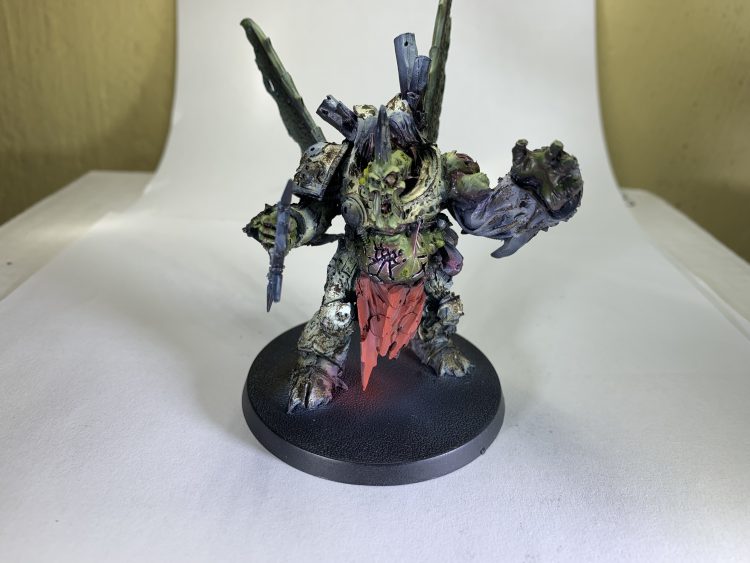
The key to visual interest lies in large part with contrast. By making the darkest areas darker and the brightest areas brighter, as seen above, we try to make the model more interesting to look at. Nurgle also lends itself very well to contrasting colors (red/purple and green, which lie on opposite/nearly opposite sides of the color wheel) which brings in another form on contrast.
And now draw the rest of the fucking owl…, er Daemon Prince. We can see the details have been completed, grime added, blood splatter added (Blood for the Blood God), and the model has been “framed” via its base. The skin has been tinted a little more towards “green” and a bit more saturated. A few more shadows darkened too.
Using the general approach of starting with highlights/lowlights, basing Elysian Green, working up to a desaturated cream highlight, adding green saturation via an ink, then painting the details works for any other Nurgle model too, such as Plaguebearers and Nurglings. Try to make your darks super dark and your brights super bright, while choosing colors that create visual interest, and it’s hard to go wrong.
Beanith’s Contrast-Smooshing Adventure
Oh look, it’s a scale model of the humble Australian house fly.
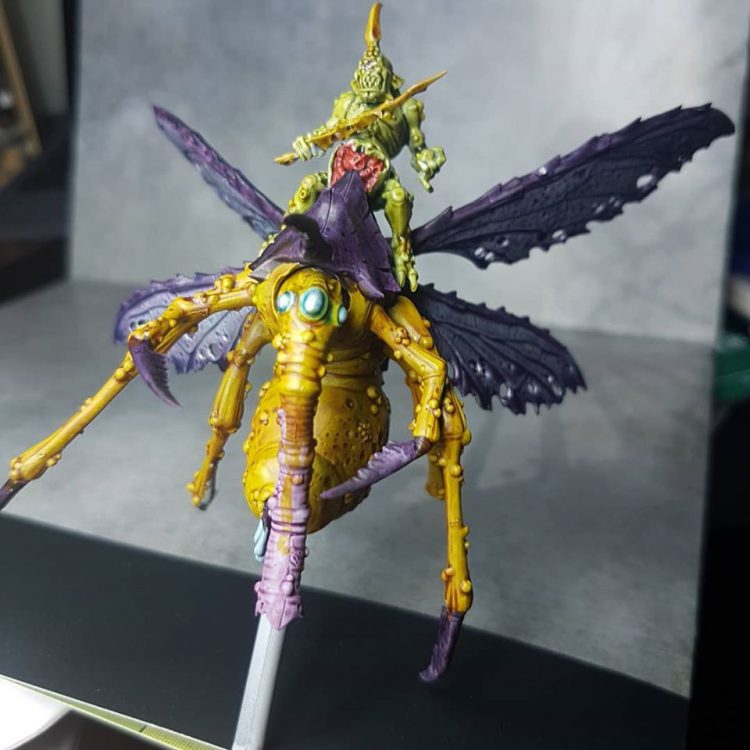
These guys are practically made for Contrast. You can almost smoosh them faster than building them. To make my life easier, I’ve mounted Mr Buzz Buzz on an old paintbrush handle because flightstands are evil flimsy little bastards of a thing sent down to earth just to mess with us. I’ve left those aside for my friend to deal with.
Starting from a Grey Seer Spray undercoat as usual, I’ve painted the body with Contrast Nazdreg Yellow.
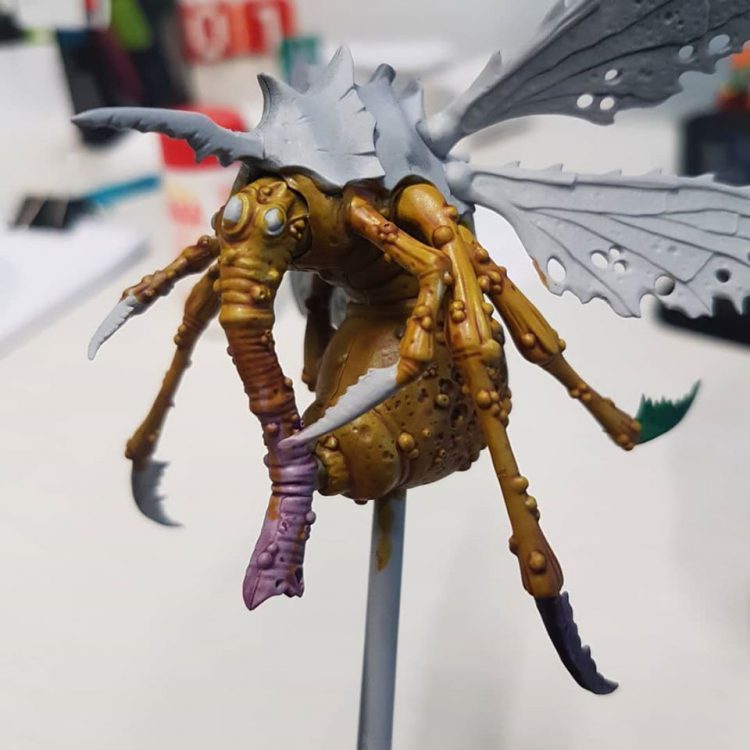
I then chose to use Contrast Shyish Purple for the Carapace and Claws.
Here I experimented with some various Contrast colours over Runefang Steel Layer on the wings trying to find a new shimmering effect on the wings. I’ve tried Contrast Ork Flesh, Contrast Plaguebearer Flesh, Contrast Magos Purple and Contrast Aethermatic Blue.
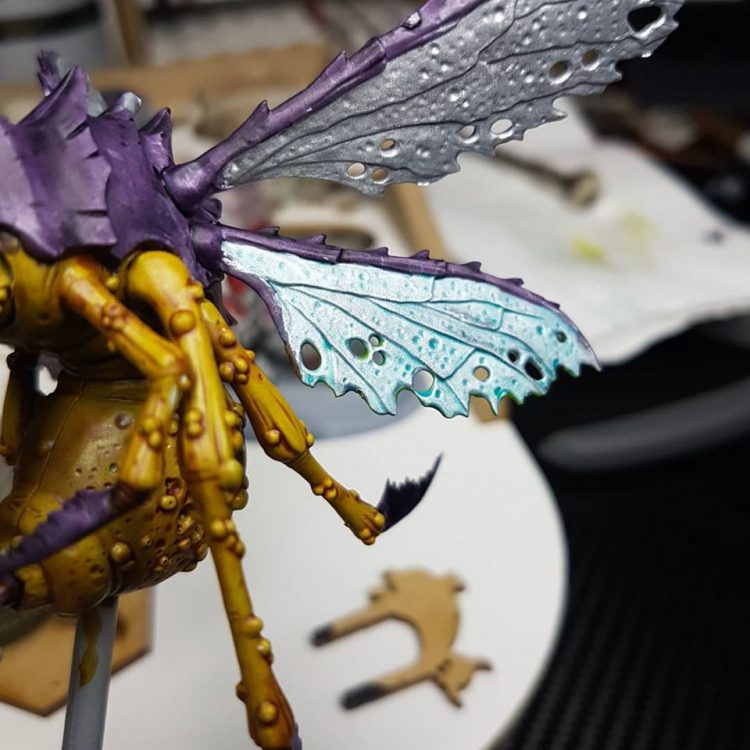
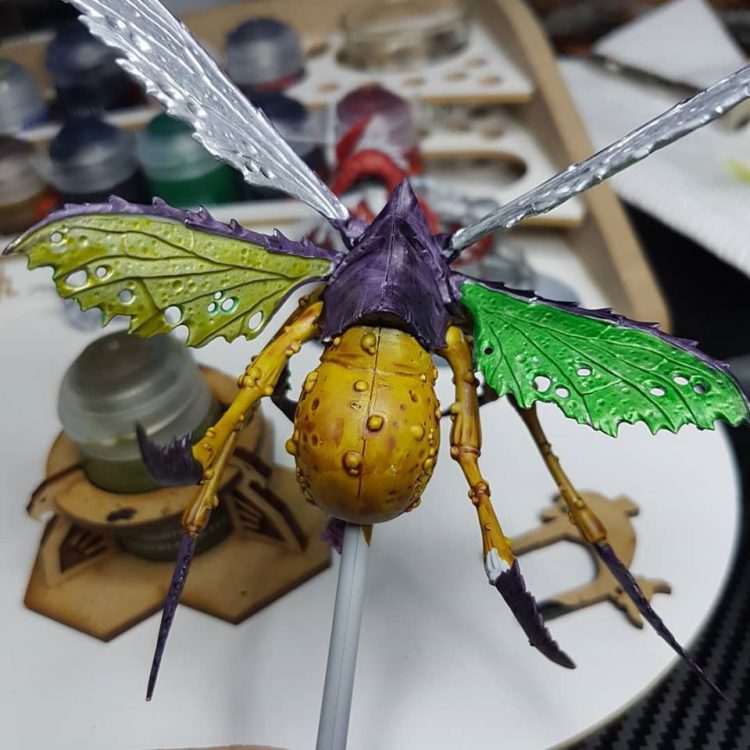
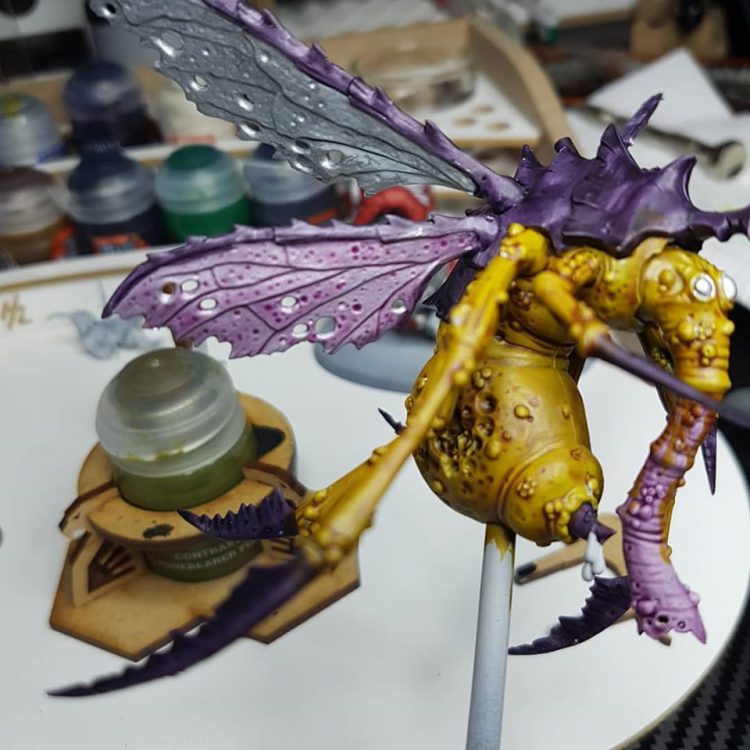
I eventually settled on a combination of Contrast Aethermatic Blue followed quickly by Contrast Magos Purple in a first time attempt at wet blending,
After that, it was just Contrast Plaguebearer Flesh on the Plaguebearer with some Contrast Blood Angels Red on the guts.
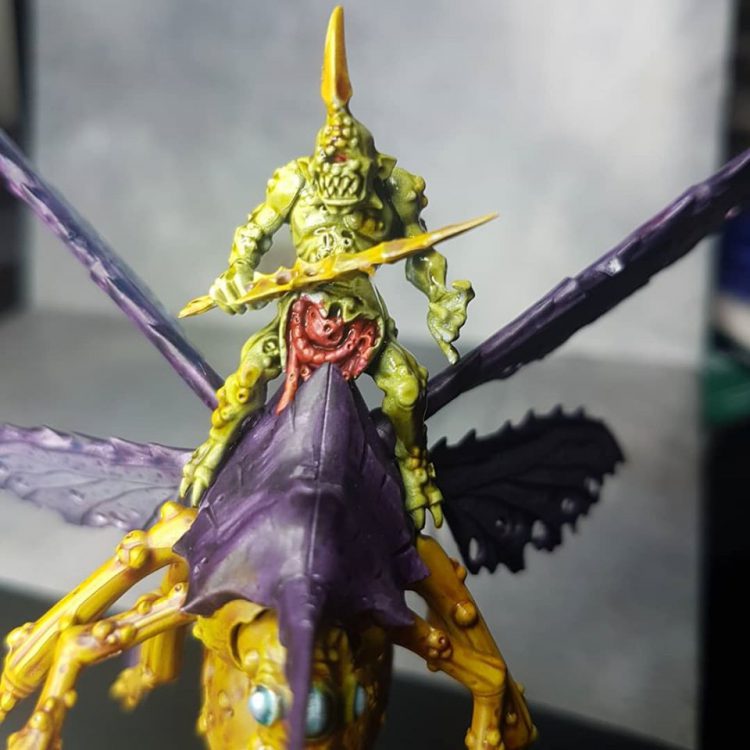
Bosh, the first of three Plague Drones ready to flit about the field and your untidy desk buzzing merrily away ready for “checks notes from Start Competing Chaos Daemons” smash into your foes in hand to hand and wreck face.
Brandon Fox’s Method
So my good friend ‘Fabius Bile’s backpack’ asked me if I would write something for his weird nerd blog about my method for painting Nurgle Daemons. My first thought was “lol, what ‘method’”, followed quickly by ‘shit, how DO I paint my Daemons?’. Well, random internet dweller, after much searching I found the answer and it’s However I Goddamn Please, and that’s kind of what got me into Nurgle in the first place.
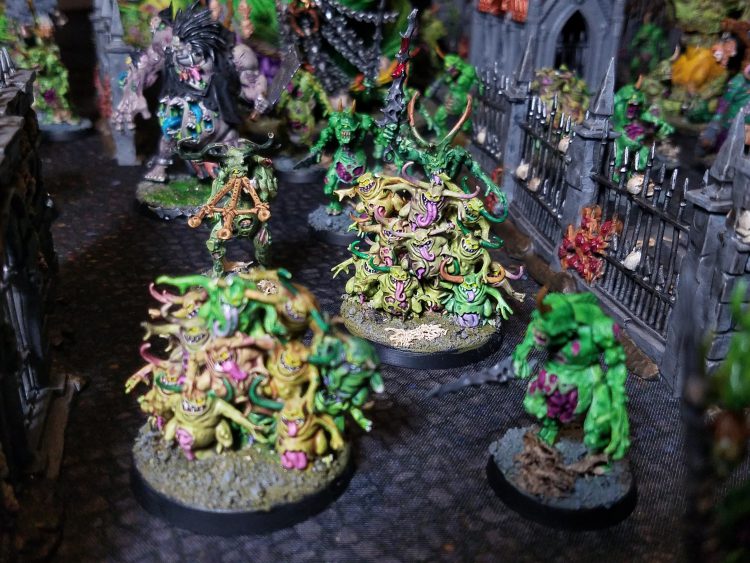
When first learning about the four Chaos gods, what stuck out to me about Nurgle was how much he loves his subjects. Nurgle sees all his little minions as equally valid and equally important, from the smallest Nurgling to the Greatest of Unclean ones. They each carry their own diseases and serve their own role in the plague horde, but none is more or less valued, none more or less worthy of Nurgle’s love. And equality and love are things we can all get behind, right? RIGHT?
I found very quickly when starting this hobby that I not only am bad at consistency, I also find little joy in it. Painting the same exact thing over and over quickly starts to feel like a chore more than an enjoyable hobby session. However, my fellow rotting flesh pile, there is no need for strict uniformity in the horde and that is the key for how I paint my army. So, rather than take you through painting one full Space Marine that you can follow step by step for 30 uniform bros (not to kink shame, if that’s your thing you do you), I will take you through how I generally paint various features of my daemons. You can then adapt them to your own minis in whatever ways pop your pustules. Remember, there’s no wrong way to eat a [COPYRIGHT INFRINGING STATEMENT REDACTED]
I should note that, against recommendations of everyone I know, I prime all my minis white. I’ve done black but, overall, I find the white makes the colors brighter and pop more. The black gives a ‘grittier’ feel maybe, but in an army prone to darker dingy colors of rot and decay that can end up with a dark, muddy feeling model. There’s nothing saying that disease has to be dark – the diseases teem with a life all their own. It doesn’t have to be all rot and decay – they don’t call them bright bruises for nothing.
Skin (or what’s left of it)
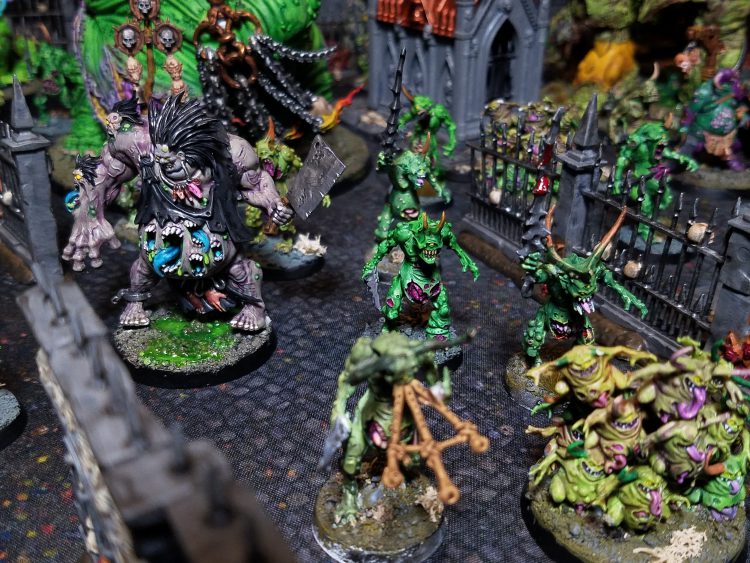
I did opt to go with a classic green for my army for the sake of my opponents. While a wacky blue horde of Plaguebearers sounds super fun, there is some relief for the person you’re playing to see a blob of green and go ‘OK, Nurgle, got it’. And after my very first army being Star Wars minis counts as Eldar, I kind of owed it to my friends to do something a little more straightforward. I do think some concepts of rot and disease in your standard Nurgle fare are very terran centric – what would a diseased tau look like? A rotting Ork would likely not be green, what would that look like? I encourage you, future corpse, to take a swing at it! Nurgle will love you for trying.
What I start with is two or three colors – I generally like Vallejo Sick Green and Scorpion Green, and Army Painter Poisonous Cloud, but also will use Vallejo Foul Green, Deep Green, and Olive Green. I can’t stress this enough: IT REALLY DOESN’T MATTER. What I do is pick two of the greens and just mix ‘em together in no specific ratio, just until the color makes me feel good, then go to town base coating the good fleshy bits. For a horde of plaguebearers I will refill my color puddle with varying amounts of the colors I have picked, because a few different shades of green within the horde is going to 1) add some variance and 2) not be that noticeable from one model to the next, especially after the wash. For a Character or larger single model like a Great Unclean One I’ll pick a 1:1 or 1:2 mix of two colors so it doesn’t end up looking splotchy, but even that wouldn’t be the worst thing. And also so I can remember what I did.
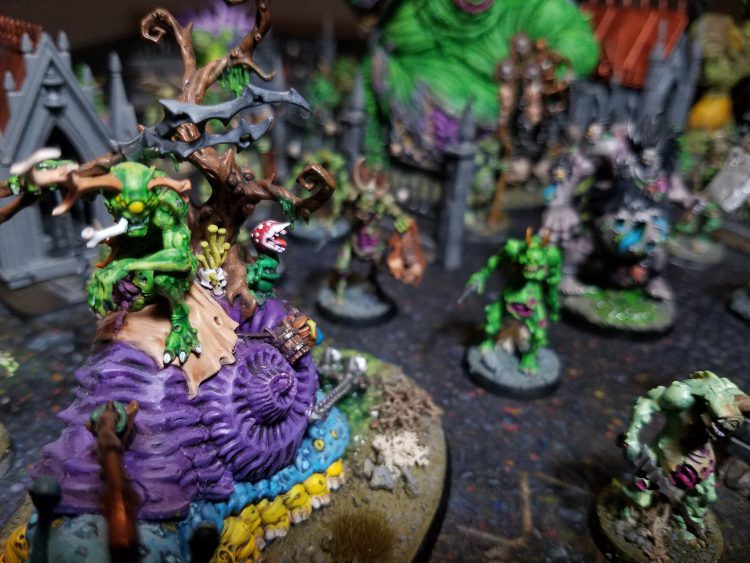
Then we wash the dirties. For the hordes and the Nurgling piles I tend to pick every wash I own. I have probably tried them all at this point, and I can’t say any haven’t worked. I think I use 5-6 different washes, and just pick clusters of dudes to wash those colors. Using 5 washes on 30 plaguebearers that’s 6 each color, which gives you enough of a mix that your horde looks varied but still like they belong together. Same thing with the Nurgling piles – I picked a few in each pile to wash each color to make a nice mix of teeming mischief makers. If you want names, I’ve used the Biel-tan Green for that classic green look, Agrax Earthshade for a nice dirty look, Reikland Fleshshade or even Carroburg Crimson for a more gritty/bloody look, Druchii Violet over green makes a grey sort of flesh color, and I’ve even used the Drakenhof Nightshade and Coelia Greenshade on the Nurgling Piles. One thing I’ve learned is the lighter the greens you base coat with the more varied effect the washes will have.
For the highlights I tend to use either the Scorpion green on its own or a mix of that and the Poisonous Cloud, depending how light the base coat is and how much contrast I want with it. I’ve also found that not fully mixing the two colors, or even not fully mixing one color if it has a few pigments, makes a fun little splotchy effect on the highlight. Again, this is the beauty of Nurgle – it doesn’t have to look perfect and polished. In fact, it’s better if it doesn’t!
Guts, Muscles, and Tongues
I like to start with a nice dark purple – I’ve got a Vallejo Warlord Purple or a Xereus purple that work well. Generally, then I like to wash with a Red like the Carroburg Crimson – that nice mix of Purple guts and Red blood filling in the crevices. This works for all of these things, as it’s all kind of the same rotting innards, and the same undercoat helps tie them all together as coming from inside the carcass. I like to start dark because it would be dark and poorly lit inside the body. For muscles I like to go with the Screamer Pink. It’s a nice reddish purple that gives the idea of muscles without being too bright of a red that it would look like a fresh, bleeding wound. I like to think of these as rotting more than bleeding wounds, but hey I’m not your supervisor.
For guts I have no idea what I’ve done for sure. I’ve probably layered over the purple some Dechala Lilac, the Screamer Pink, or Vallejo Squid Pink, or any mix of those three. And I mean either mixed together, layered on top of each other, or both. I have no idea what looks best, because I don’t remember! But if you recall my main point, it doesn’t matter! Call it different stages of rot, different gut diseases, older or newer wounds, terran guts vs. eldar guts, doesn’t really matter. Find something that works, or find 3 somethings that make you happy, and keep trying. Plaguebearers are the best for experimenting with this, as you can just move on to the next one trying new colors until something looks right. You can even cover it up with some Blood for the Blood God technical if it looks really bad and you hate it.
For tongues I’ll usually do the Squid Pink to finish it off, gives it that nice pink tongue look. The same will work for tentacles or other fleshy growths that you want to distinguish from the main mass. But really any colors would work just as well – I just like to start dark at the base and move to light at the tips. I did some nice Blue tongues in the same style on my warlord for the Astradus campaign. I don’t want to say his name, he’s a very litigious misfit.
Horns, Claws, and Teefs
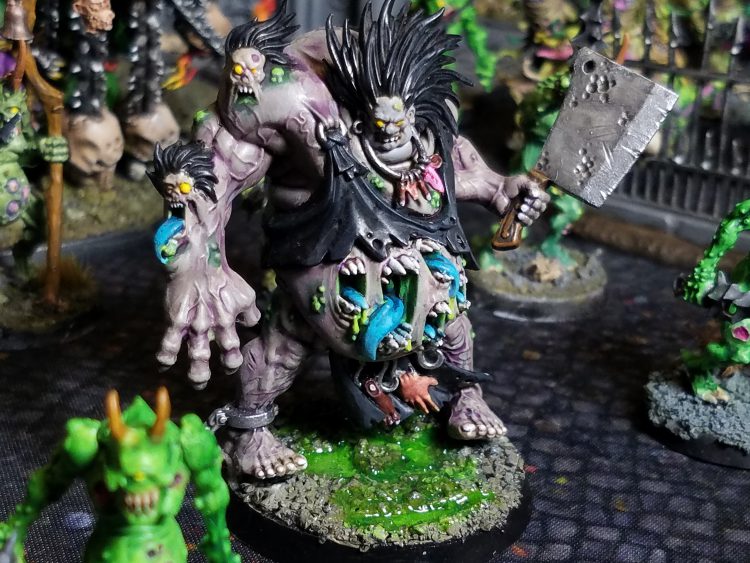
This is one where I am particular – PSYCHE I’M TOTALLY NOT. I use Army Painter Banshee Brown for most of the teeth and claws now because I found it and I like it. I am sure there are other off white or bone type colors, but I like this one. When I started painting I was using standard white, so there’s a mix of white and off white in my army, which is what I like anyway. I wash them with a nice Agrax and then highlight with some more white or Banshee brown. Nothing crazy. I use the same Banshee brown for any exposed bone as well.
For Horns I generally use Banshee Brown, Skrag Brown, or Deathclaw brown. I do like to get a bit fancy sometimes. I like to try and wet blend from a Deathclaw Brown or Skrag Brown up to the Banshee for a nice little growth gradient. I’ve done a few where I start with a Vallejo Beasty Brown or Charred Brown to the Deathclaw and then to the Banshee for a real shift in colors. You can help with this gradient by doing a second wash on only the darker part of the gradient after the first has dried. I have also found you can get some interesting effects if you use a second color wash before the first has dried completely – like doing a Reikland or Carroburg over the Agrax just at the very base where it comes out of the flesh. Just make sure to wash your brushes so you don’t cross contaminate your wash pots.
Eyes

I hate eyes. Seriously. I got these big meaty hands (an art teacher of mine called them bear paws once). I paint the whole damn eyeball yellow, wash with Agrax, then dot the middle with yellow again. I have never and will never paint a pupil. For Daemons that works fine – spooky possessed glowy eyeballs. Maybe go with a milky white blind cataract eye, or Evil Horse Eye all black (seriously, horses have creepy eyes). If I can’t paint real eyes why should you have to? Eyes, ridiculous.
Weapons
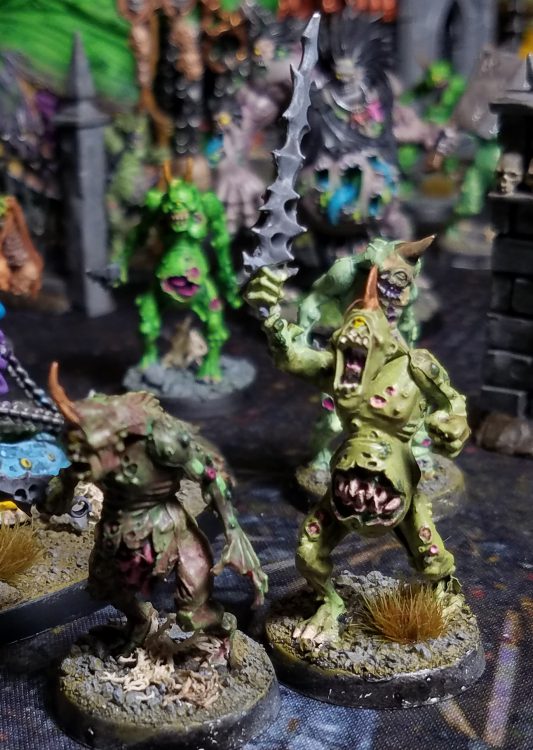
The swords that my plaguebearers have I paint a basic grey. I use the Vallejo London grey because it’s the color I already own. My concept was that they just have sharp rocks that they hit you with. They’re washed with Nuln Oil and any highlights are done with more of the same grey.
Metals I pretty much only do one of two colors – Silver for most metal chunks and Brass for trim and accent bits. Vallejo Gunmetal for silvers washed with Nuln Oil, and Balthazar Gold washed with Agrax for brass. Each highlighted with the same color. This is mostly for lack of owning other metallic colors more than anything. I only recently picked up some of the Nickleback Oxide (or whatever) and have used it on the brass which makes some nice corrosion effects. I’ve used some of the Typhus Corrosion as well, on the silvers. It’s OK too, but adds more of just a dirty look than a corroded look in my opinion.
Wounds, Blisters, and the like.
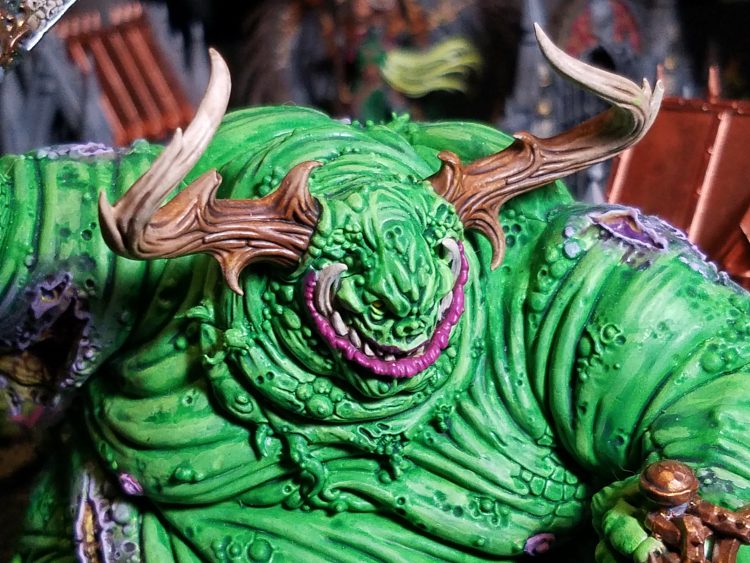
For my Great Unclean One there was a layer of fatty tissue around a big wound. I took a chance and painted the Poisonous Cloud which is a very light yellow-green and washed with the Carroburg Crimson (or maybe it was the Fleshshade. I should write things down). The result was a very good looking fatty-pus layer, or at least I think it came out well. I also dry brushed some of the Dechala Lilac around the wound to give it a bit of rot and bruising look.
For boils and such I have used a nice bright red to pop out the blisters and contrast with the greens. I use the Evil Sunz Scarlett for this and use the same for anywhere I need blood in a fresh wound. I’ve also used just a brighter green, like a blister stretching the skin ready to pop. Most of it will look fine if it’s uniform on a single model, and you could pick a few that look good for a few different rots across your horde.
I do also like to make my lips and nips a nice pink. It just feels right and looks creepy. Weird green goop monster all ‘give granny a kiss’ with its pink lips. DISTURBING. A hulking, stinking, green mass charging toward you, nipples pink, glistening, and erect. HORRIFYING. Remember kids – infect their hearts AND their minds!
What other features have I painted? WHO KNOWS! It probably doesn’t matter, and I definitely forgot how I did it. I probably shouldn’t have been drinking while I wrote this! But good life choices don’t lead you to Warhammer, so cheers! Hope you enjoyed, and maybe even learned something!
Have any questions or feedback? Drop us a note in the comments below or email us at contact@goonhammer.com.

