Special thanks to Para Bellum for providing review material. If you want to get 10% off and support Goonhammer, make your Conquest purchase by clicking here for US/Canada or here for EU/rest of world and enter code “goonhammer” at checkout.
Welcome to Dinoctober, a mystical month unrelated to our sad modern calendar, where through a callous disregard for the sanctity of calendars Goonhammer is pleased to offer you so, so many weeks of wonderful W’adrhŭn goodness! Who needs other factions when you can have the grandest faction concept in all of wargaming history: orcs on dinosaurs. Who play like elves. For some reason. This week Magos Sockbert is joined by General Cross and and Robert Bass to talk about how we paint our W’adrhŭn for Conquest: the Last Argument of Kings!
Robert Bass
If you want to paint big bulky brutes and giant dinosaurs, the W’adruhn are for you! Nearly all the models in the range feature plenty of bare arms, legs and chests with great muscle definition, and you can never go wrong with a classic green skin tone. I am going to walk you through my ‘no Contrast paint’ method for painting green skin with only one green paint.
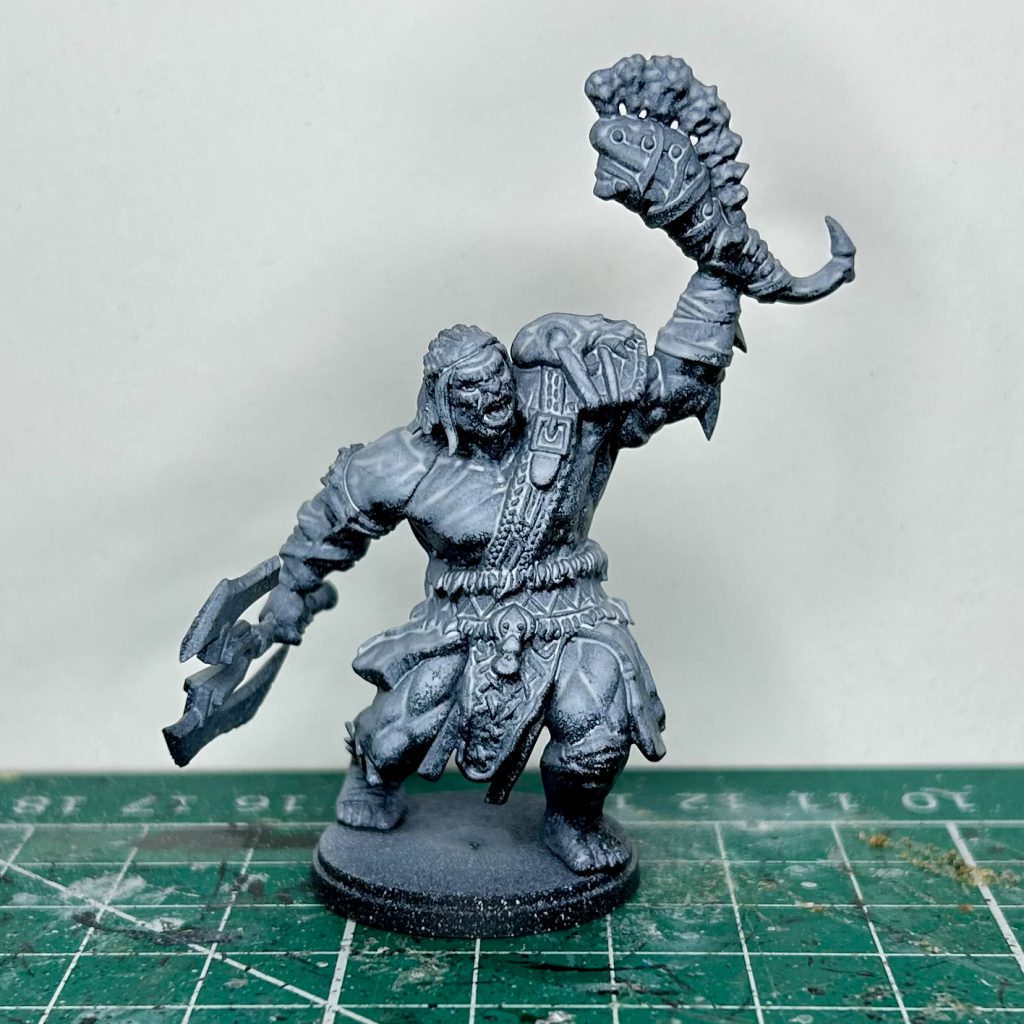
I like to start from a black prime with rough grey zenithal. This is mostly to help me see any details whilst painting that I might otherwise miss. I like to use Vallejo Surface Primers Black & Grey through a cheap portable airbrush, as these cover great whilst being more cost effective than rattle cans. Also they can be brushed on if you don’t have an airbrush!
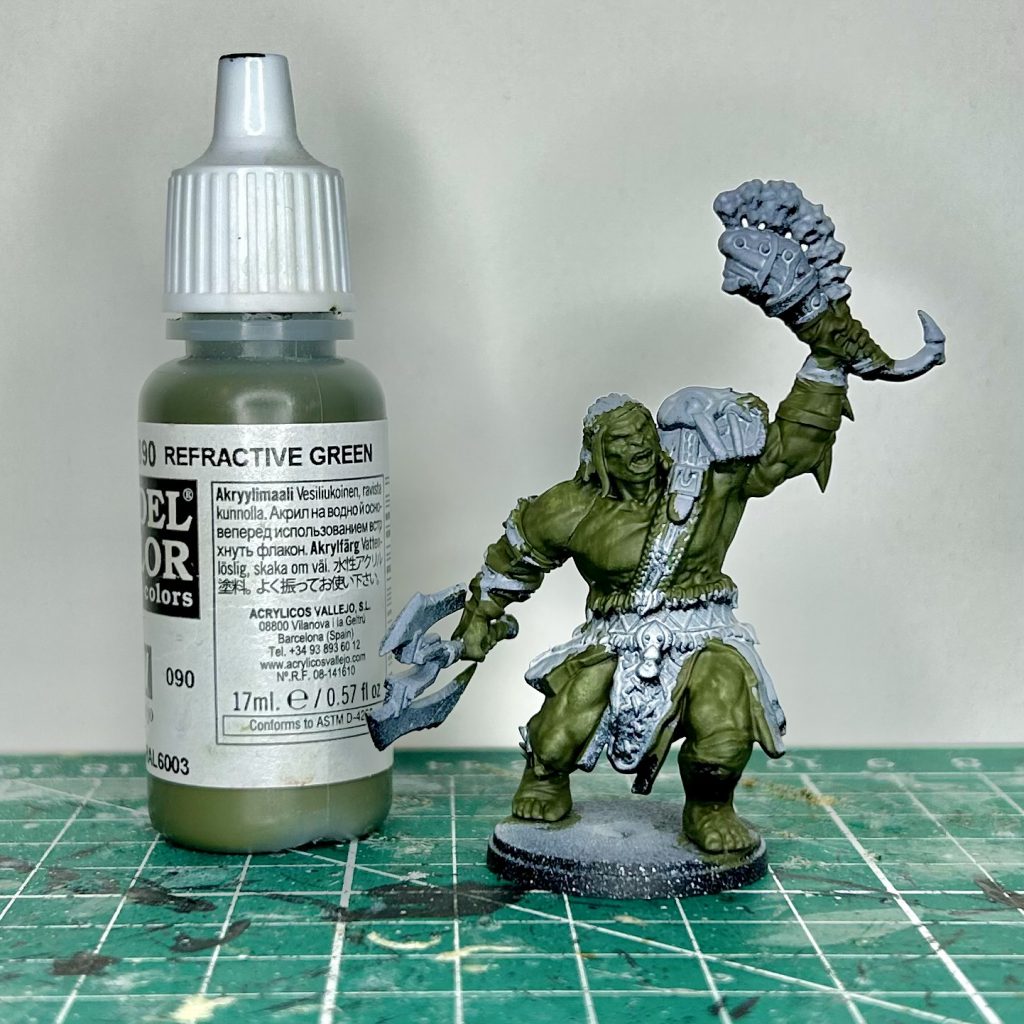
I use Vallejo’s Refractive Green for my base layer. Use a big old brush and be messy! I find this is a great green for Ork/W’adruhn skin, as it isn’t too vibrant or bright and almost feels natural for an (albeit green) skin colour, plus it covers great with one coat!
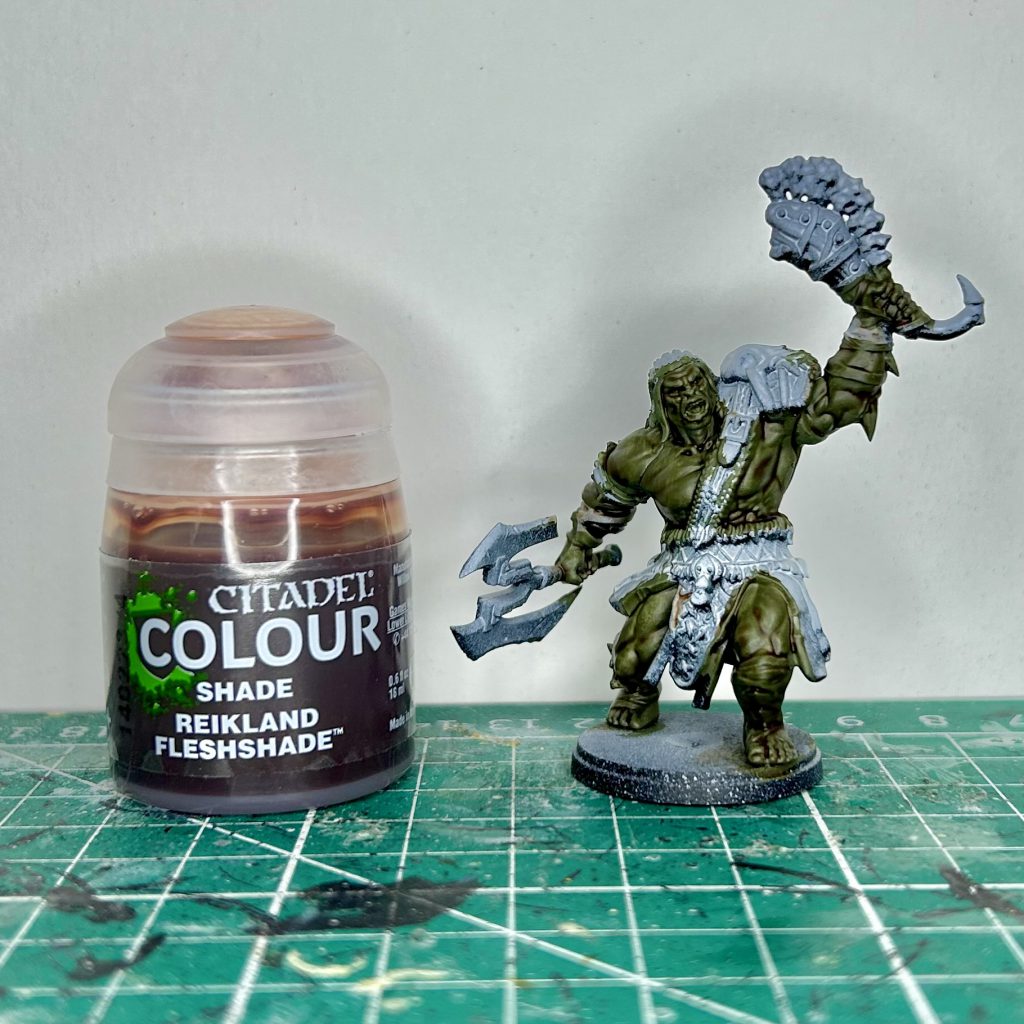
Next cover all the skin with Citadels Reikland Fleshshade. This will give the skin some warmth and natural tone, and help prepare us for the next stages.
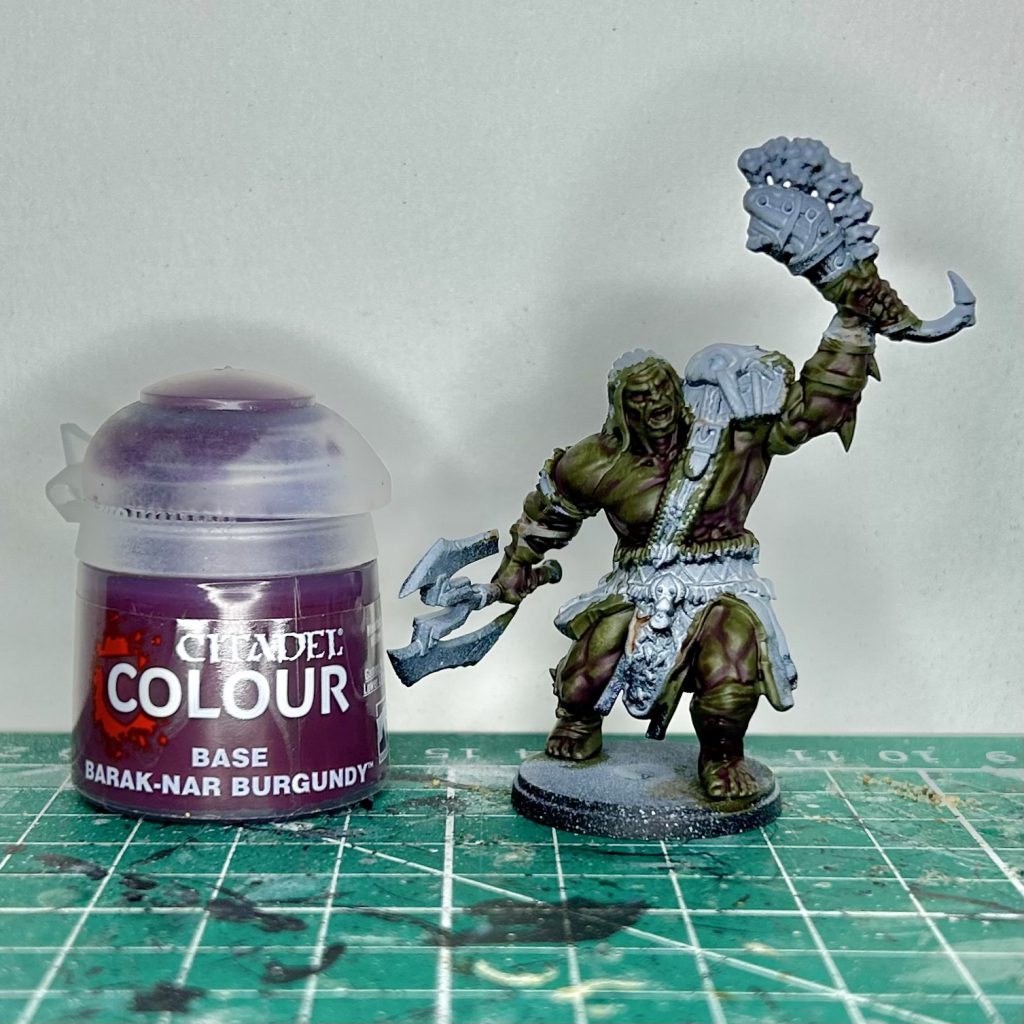
Time to add some purple to our green skin! Using Citadels Barak-nar Burgundy, water it right down and start to glaze this around the recesses and shadows. Use the previous wash to help pick out where the darkest areas would be, focusing on the deeper muscle grooves, and under the arms, legs, chin and lower abdomen.
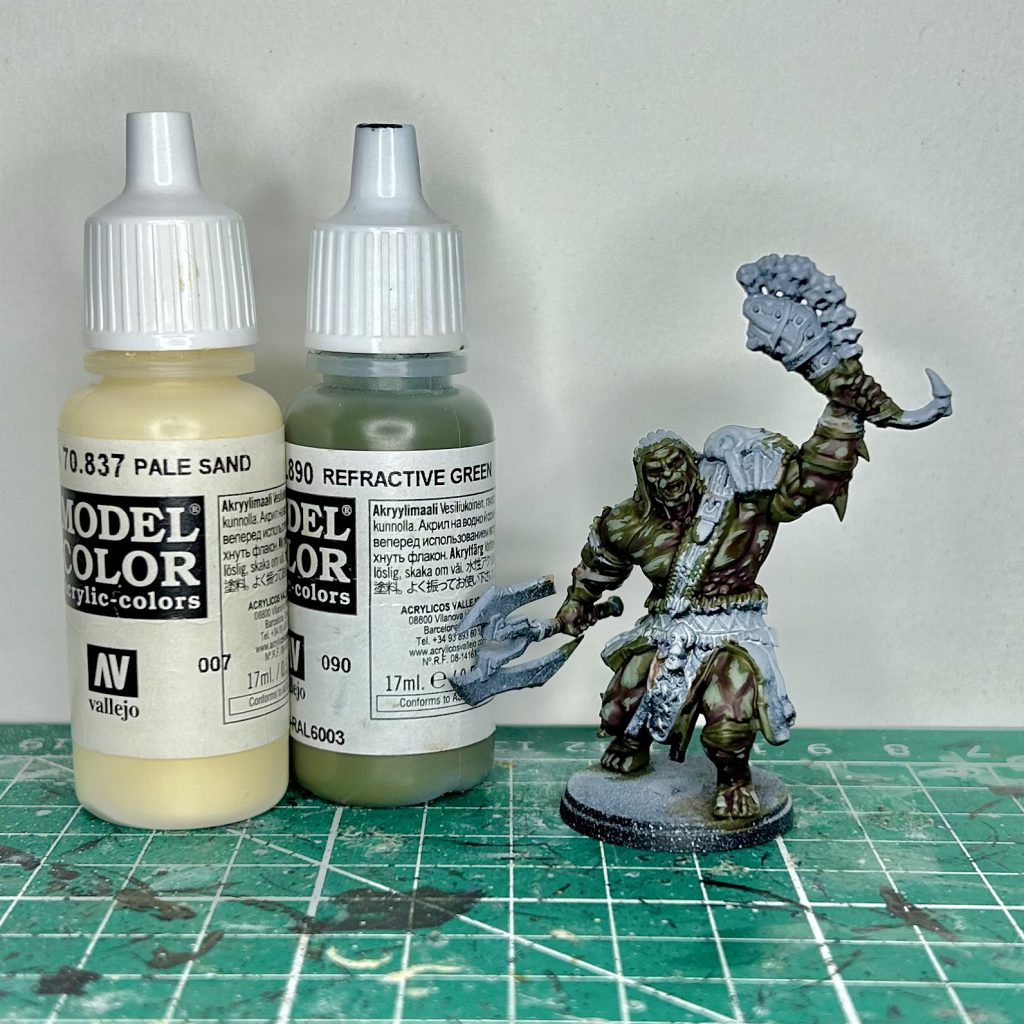
By this point the model might be looking quite dark, but we are ready to start bringing in some highlights and brighten it up again. Using a mix of Vallejo’s Refractive Green and Pale Sand, start blocking out where you want your highlights. Focus on the raised areas of the muscles, avoiding any of the recesses. The highlights will look messy at this stage but be brave and explore the model, picking out any areas that would pick up light, or any muscles you want to help make pop!
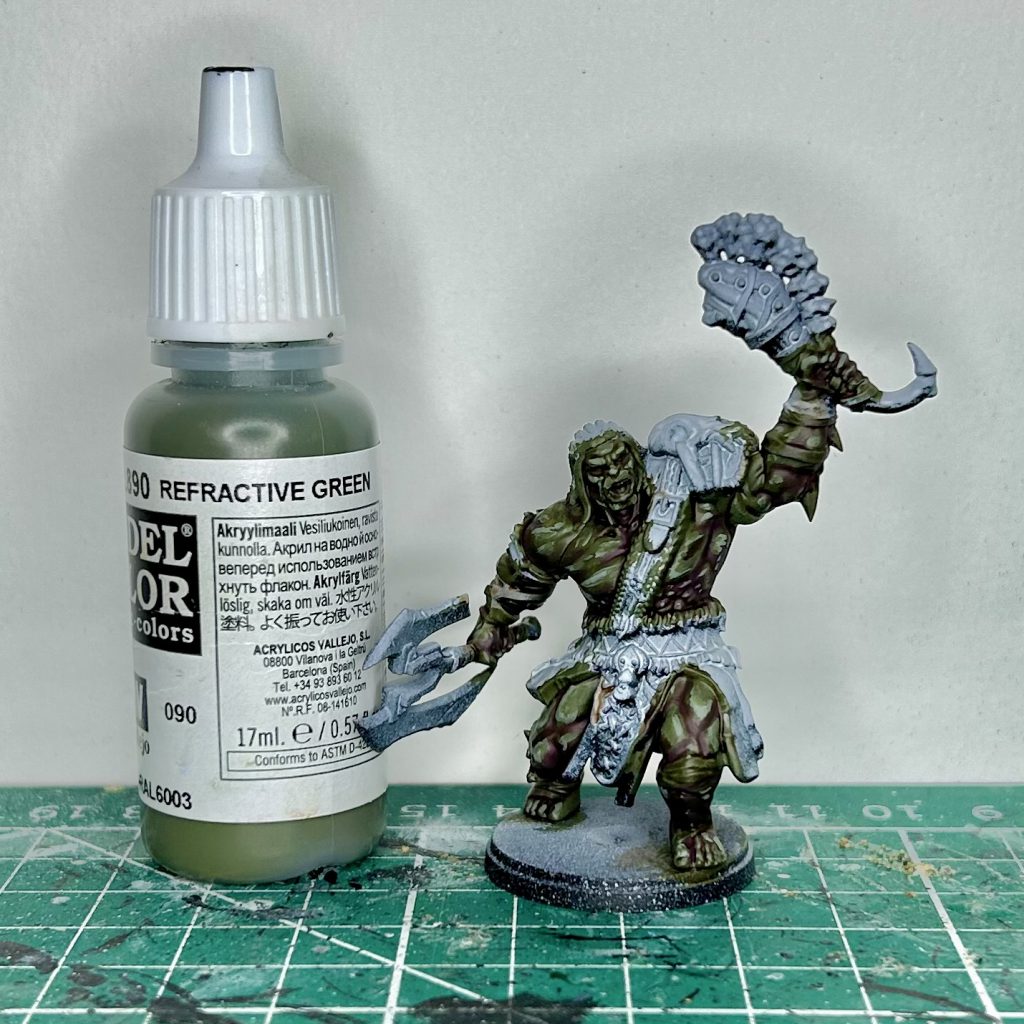
Now going back to Refractive Green, water this down a little and start to knock back the highlights and tidy up the skin. We can also use this stage to bring some green back to the darker areas, where we might have been too heavy handed on the shadows. At this stage can I find myself playing with the paint, going back to my Green/Sand mix or Purple adding shadows and highlights back in, only to take them away again. Just remember that it is only paint, and you can always change your mind if you don’t like something!
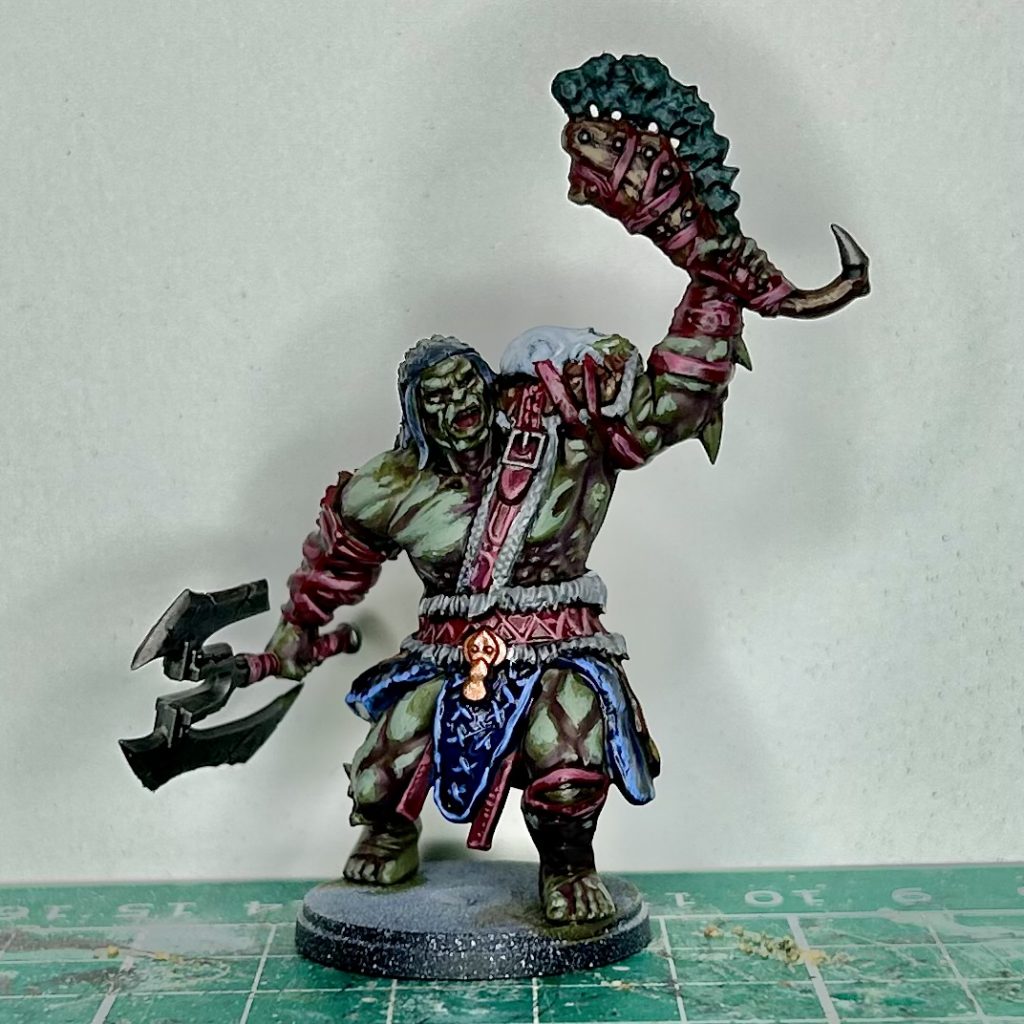
I like to keep things simple when it comes to fabric, wood, or metallics. Just a simple base layer, wash and rough highlight. Often I do like to add the highlights before the wash, as I find this helps blend them in a little, and then I add another ‘smaller’ highlight over the top. I also like to keep my highlights ‘scratchy’ when painting fabric/leather/wood as this helps give the model some texture and interest and makes the materials look worn and used. I tend to keep things colourful yet natural, using mostly reds, blues and brown for these materials, but honestly use whatever you think looks good and suits your army as a whole.
Painting bone is possibly one of my favorite subjects to paint. It can be so quick and easy and really provide some nice contrast to a model. Again I don’t do anything too special, using the base/wash/highlight combo. My bone recipe uses Vallejo’s Buff to base, Sepia Wash to wash (duh!), and Pale Sand for highlights.
Vallejo’s Sepia Wash has been a new addition to my paints, where previously I would use Citadels Seraphim Sepia. I found that the new formula for Seraphim Sepia has become too ‘yellow’, and though it will dry darker I often find that thinner layers will just stain the surface yellow and not provide much depth. Vallejo’s version has been great, providing a darker and more natural looking shade for bone.
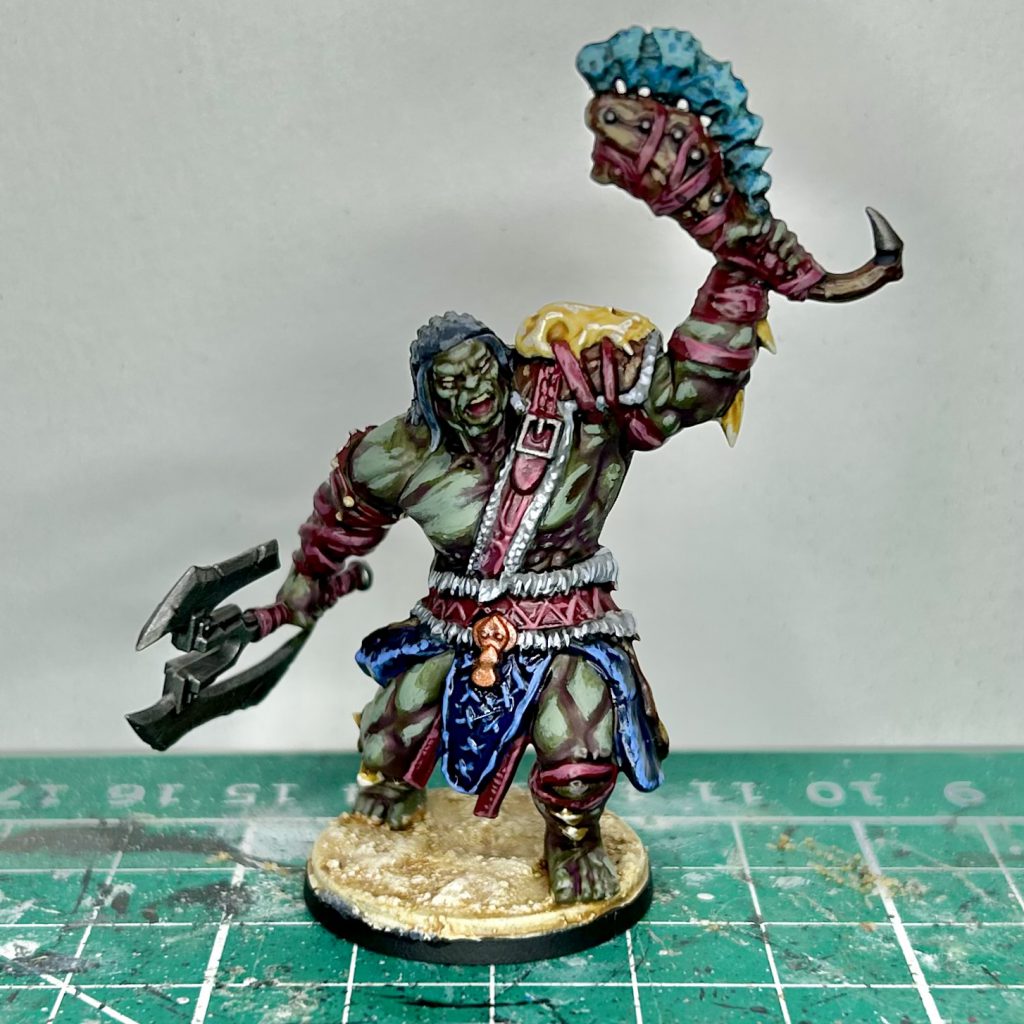
Be sure to spend some time cleaning up any areas you are not happy with or adding any details you may have missed, but don’t dwell on it too long! You have an entire army to paint after all and any little errors will get swallowed by the tide of W’adruhn Braves and Blooded, or your opponent will be too distracted by the amazing Tontorr that just arrived on the table! Finish off your models with your basing materials of choice. I like to use a sandy texture paint with Sepia wash and Pale Sand highlight throughout my army.
Once done your green skinned lad will be ready to chant his way across the battlefield with the rest of the tribe! If you are anything like me, you will be humming along with each activation! (and yes, that chant will either be the Jurassic Park theme song, or whatever annoying tune has been stuck in my head all week. Sorry to my opponents who will also have to suffer!)
Magos Sockbert
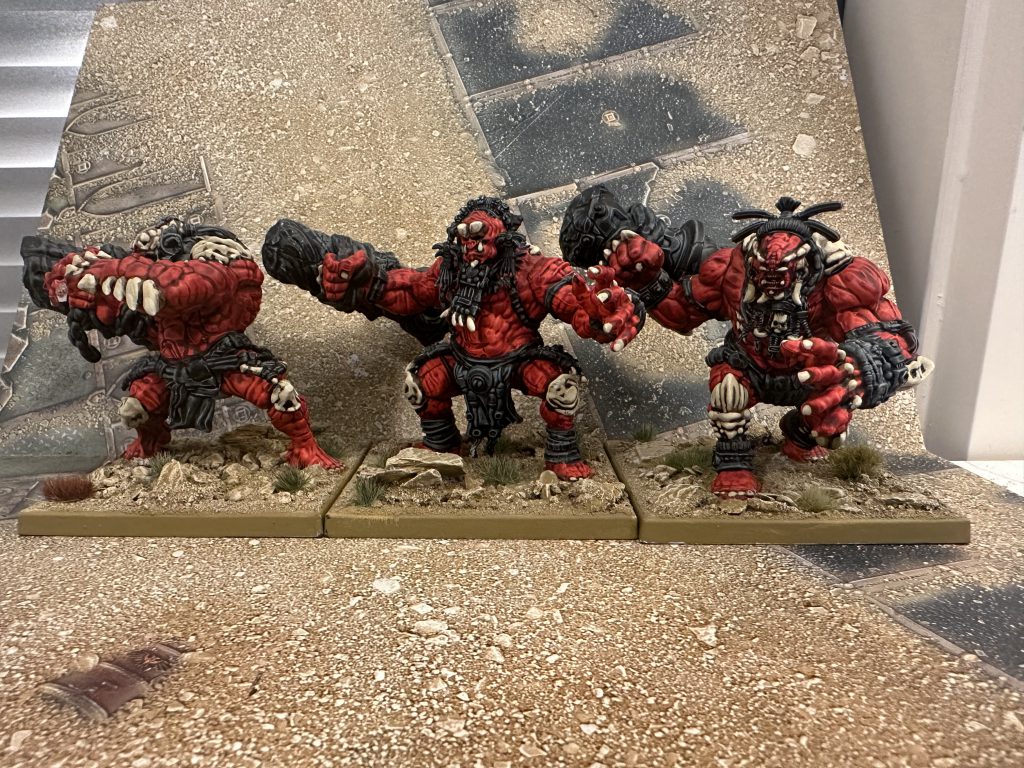
So while Robert up there has gone for, yknow, “good” as his painting goal, I’m much more in favour of a slightly more… swift and simple approach. In my growing age as a millenial I’m more and more attracted to bright colours, like some sort of bird of paradise.
Starting off with a simple prime, White Scar has become the go-to for me, even for contrast; when applied well, it’s a bright colour with a smooth coat, letting the contrast flow cleanly across it. Sadly, you’ll notice some of my Wadrhun are a lot darker than others; this is because I did not apply it well, the primer coat was fuzzy, and the resulting paint pooled rather than flowed. It doesn’t look… great, up close, so it’s something I’m looking at fixing when I have time. That being said, when done well (proper temperature and humidity, let it dry between coats) White Scar remains the best. Failing that either Grey Seer or Wraithbone are good options, with a slight preference for me for Wraithbone for the warmer undertone.
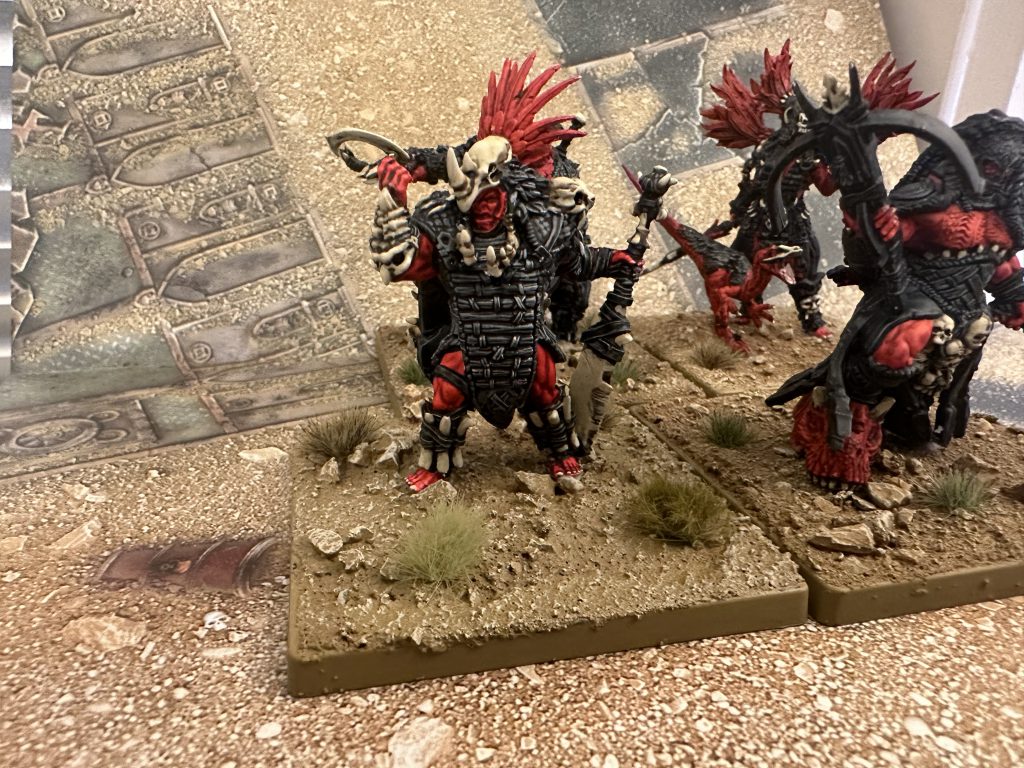
Black Templar contrast goes next, blocking in all the clothing and, well, anything that isn’t skin or feathers (natural textures) on the models. There’ll be a few places where this and the following red are swapped, largely to avoid massive single colour blocks or to draw attention to a unit leader, but by and large if it isn’t skin, bone, feathers or steel, it’s black. If it is those things, it’s Blood Angels Red. Don’t worry if you get it on the bone, you’ll paint over that in a minute, just make sure there’s a clean line between the black and red; painting at speed, it’s easy to overlap the two.
Now black and red alone are striking, but pretty boring for a whole army. The detail comes from the bone, stone and steel (because if it was just bone it wouldn’t be a lot of the model) and any interesting little bits you may want to draw attention to. You don’t have to paint everything this way; steel shields I don’t do this way because it’s a bit overwhelming, and you’ll notice even in the same unit not all weapons are painted the same, which gives a bit of visual variety. This is by far the longest and most fiddly bit of this ‘quick’ painting method, but it really draws everything together; the abstract colour scheme clashes super well with the more organic detail you’re about to do. Base everything here with Zandri Dust, then wash them all with Agrax Earthshade. Ushabti Bone is next, and you’re going to do the traditional GW thing of only layering the highest parts of the model; and I really mean that here. You almost need to half paint some areas, so you see the bottom dark brown of the Agrax washed Zandri, then areas where the Ushabti is thinnish, then solid Ushabti, and a few point or dot highlights of Screaming Skull.
Together, this is by far the longest part of the process but a) makes the whole thing work and b) isn’t… actually that long to do, compared to fully painting whole models this way. Remember to paint your orcs’ nails too; it really finishes the model off. Some bits, like the Tontorr and Drum Beast boney howdah plates and their attached trumpets and horns, don’t really work this way because it would take forever, and we’re here for speed, so these went through multiple rounds of drybrushing instead. They look a lot more natural, to me, but hopefully not in any way that draws attention away from the model. Paint your dinosaur eyes white to give them a spot of focus on the face, and you’re done!
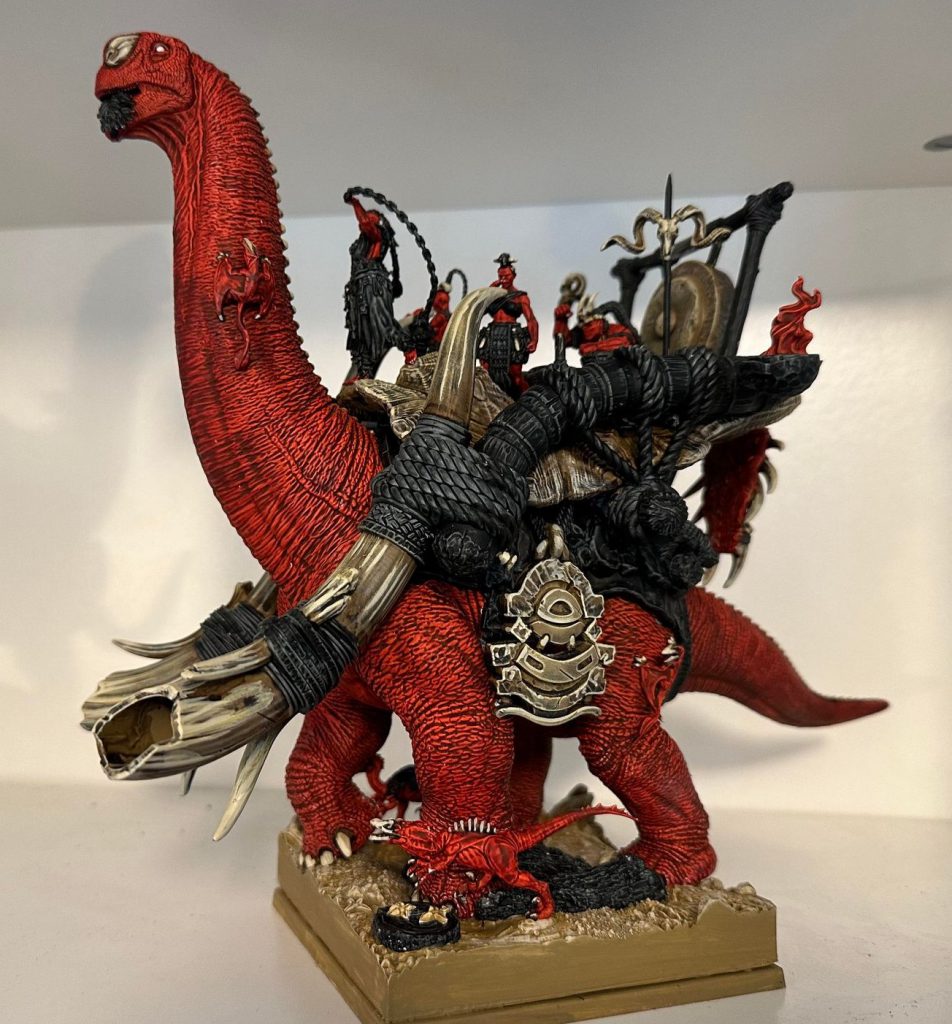
Because I tend to base three models to a stand, I’ll fill in the gaps in the unit trays by placing spare disc bases in the slots and filling it up with water effects. Just pour it in, let it dry, and now you have a nice flat square base; or, if you’re a bit sloppy like me, a slight hill, which honestly makes the base look a bit more uneven and thus more realistic. Basing is simple sand, undercoated Tallarn Sand (the edges are painted the same) and drybrushed Tyrant Skull and Terminatus Stone. At this point I glue the models to there (with much swearing as they tend to fall over, and gluing to uneven sand can be a bit of a paint), before, where possible and not universally, using a matte varnish over the whole model. I’ve been trying to use Testors Dullcote but it’s hard to find these days. I do this because the normal GW paints I used on the bone and steel have a slightly satin or gloss finish, so you’ll want to bring it all together again.
After that it’s some grass tufts and tears of your enemies as you throw multiple Tontorrs at them, and you’re done!
General Cross
If you’re playing Conquest, you know that you’re not here to paint one or two models. You’ve got dozens of models to get on the table and look fantastic in big Regiments, so its a great chance to crack out your speed painting techniques where you can. Good news is, with such nice models and on a big scale game this is quite a forgiving system for batch painting models and keeping a little extra time for your character models!
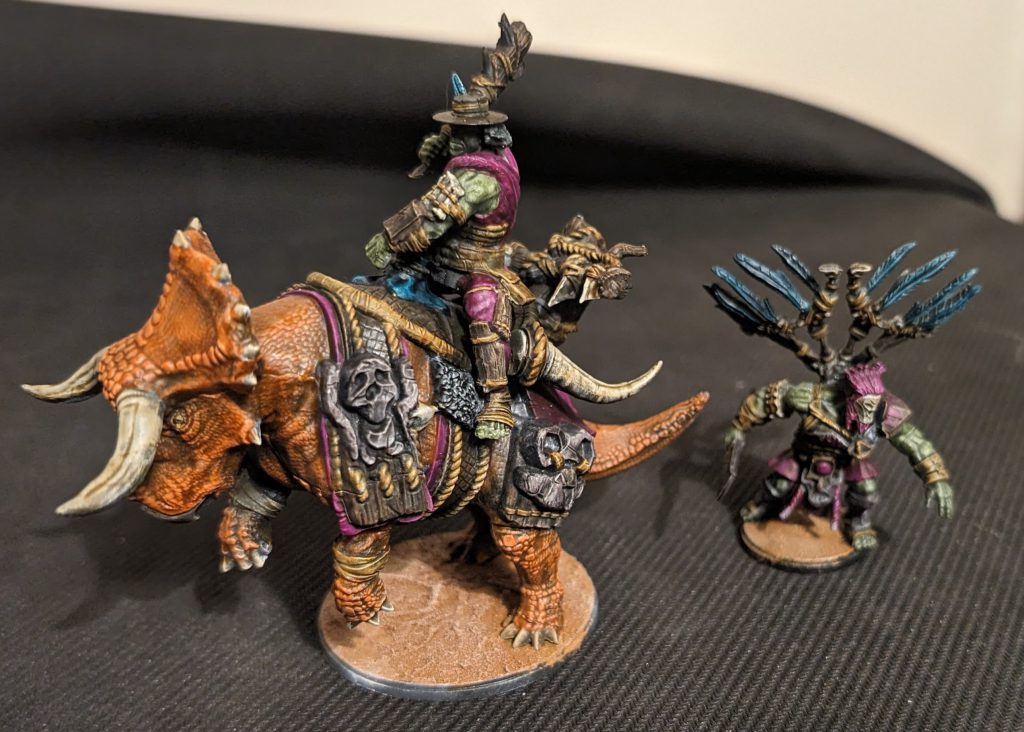
My scheme is unapologetically Slap-chop, and I can’t recommend it enough for getting your models to a painted stage and saving you time to spend on your favourites. I prime in Colour Forge Matt Black, followed by a zenithal spray of Colour Forge Standard Grey. I prefer the spray can to dry brushing the grey as it gives a solid mid layer for the Contrast to show up on, and it’s much faster! A drybrush of Vallejo White and you’re good to go.
I spent a while testing different greens and browns as the wood, leather and skin are a main colour everywhere. I settled on Militarum Green for the skin for a more muted tone, Snakebite Leather for a warm dusty strap colour and then Wyldwood for the wood elements. After that I wanted a bold contrast colour to ‘pop’ on the table, and Sigvald Burgandy pairs really nicely without being so vibrant that I summon Batman with my Joker theme army.
The remainder of colours is whatever took my fancy, saving some favourite reds, blues and oranges for my dinosaurs and accent colours like the feather patterns. Finally, the base is a healthy coating of Vallejo Brown Earth texture paint, drybrushed with Vallejo Pale Sand and a heavy wash of Army Painter Soft Tone. I’d like to get some grass tufts to add too at some point as I think that will help the bases look a little more finished on the centerpieces.
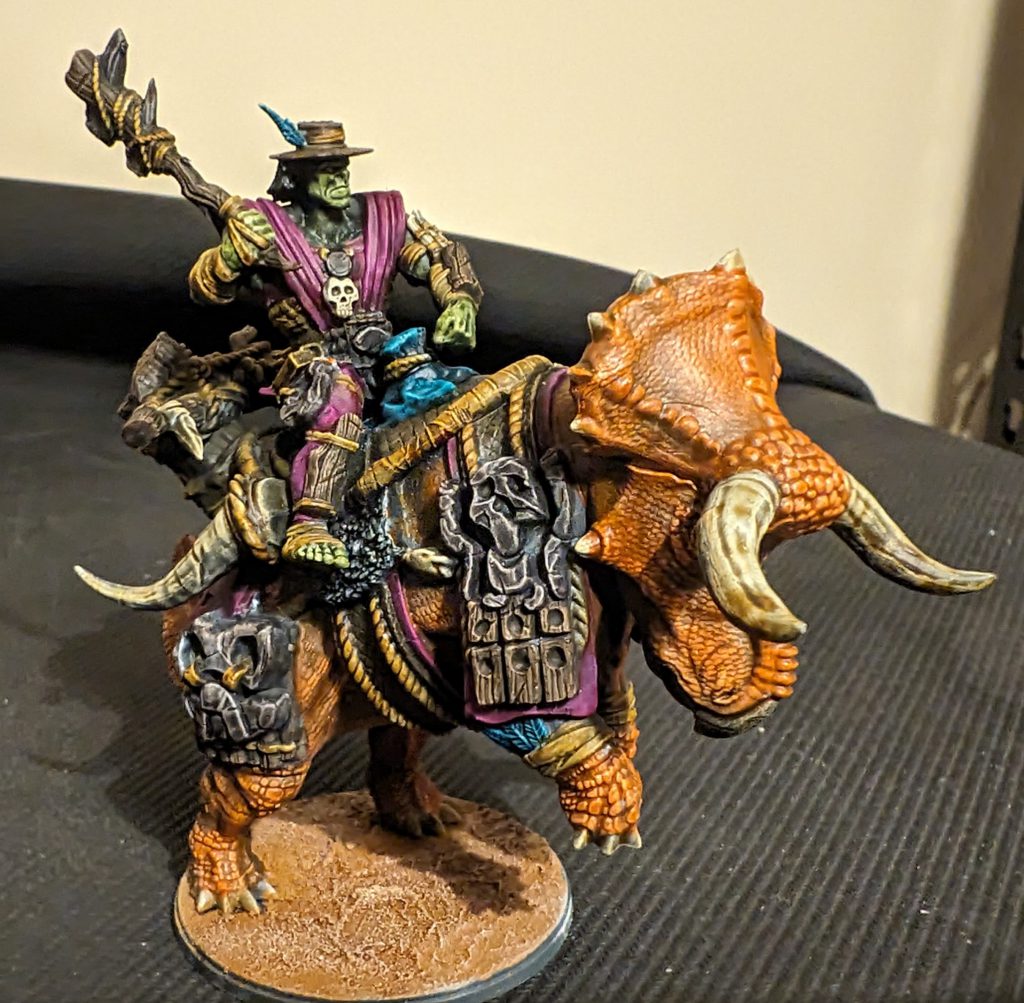
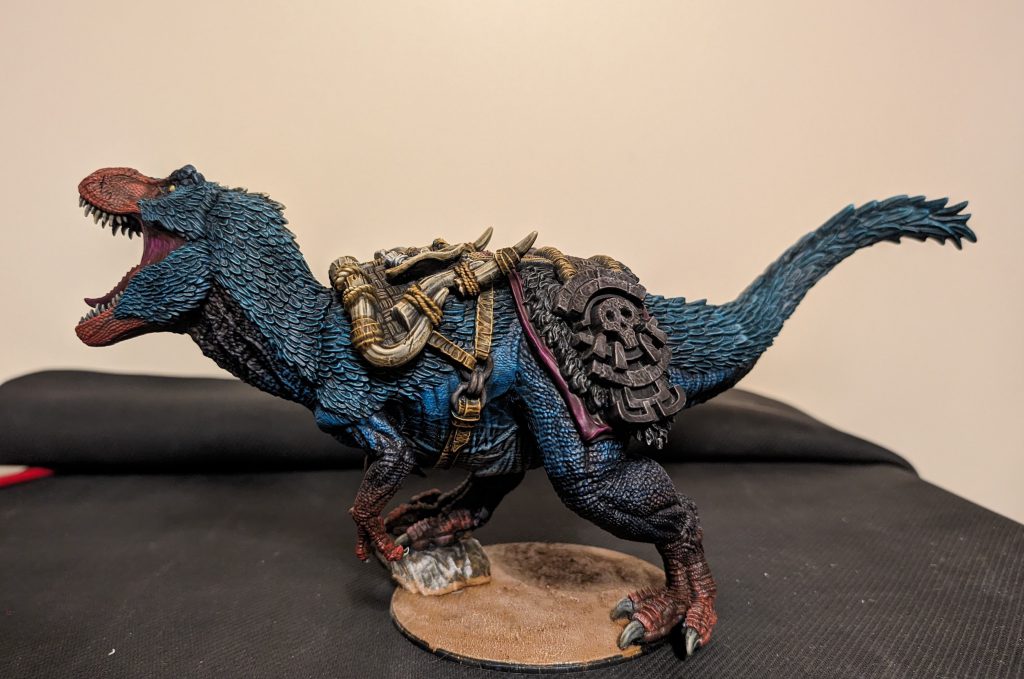
Some people assume that because you’re using Slap-chop, you’re not pushing yourself as a painter because of how simple it is. I’d like to share with you how Slap-chop gave me the confidence to try wet blending, which has become my favourite part of this army and is prominent on all my carnivores.
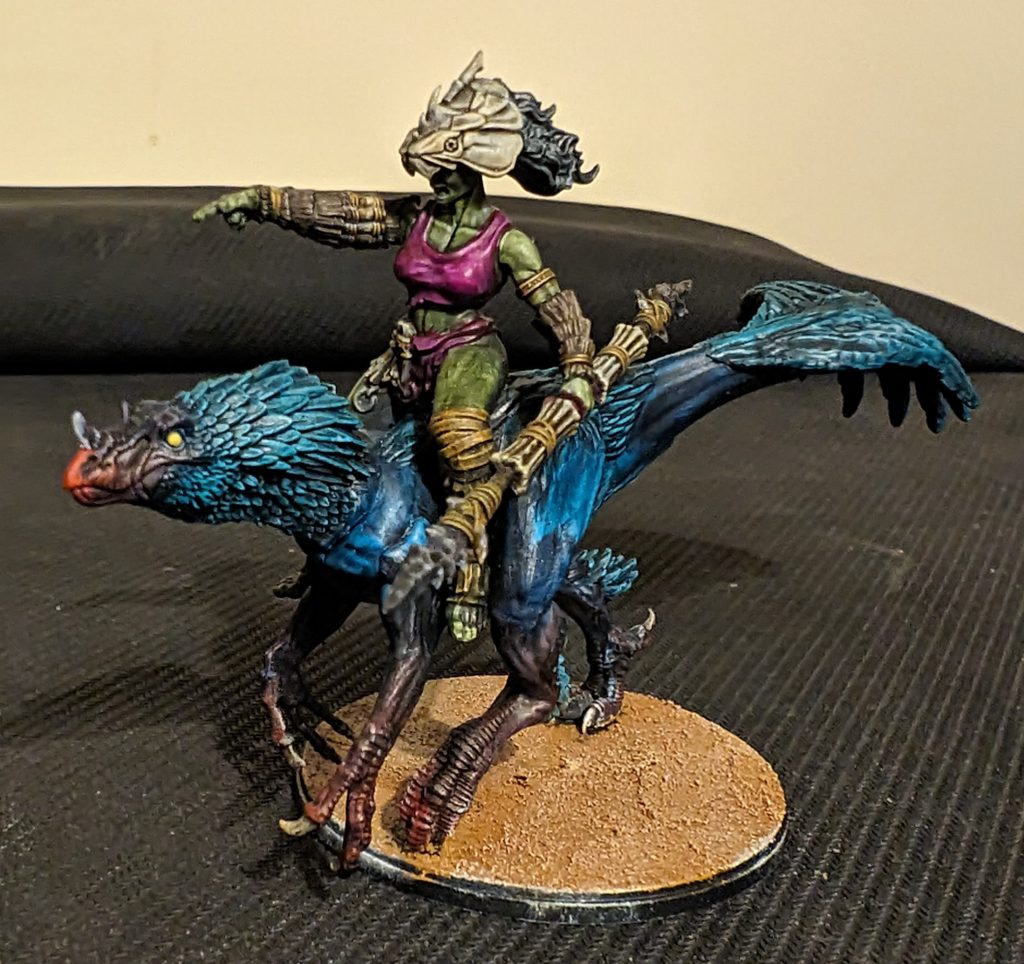
First, thoroughly remove any mold lines and prime the model as described above. Don’t be afraid to go heavier on the white if you’re using stronger contrast paints like me, you’ll need it to get best effect. Then, decide which parts of the body you want to be clearly each coleur. In this example, I wanted the lower quarter of the tail to be Blood Angels Red and the body itself to be Akhelian Green. You should have a little gap between the two areas.
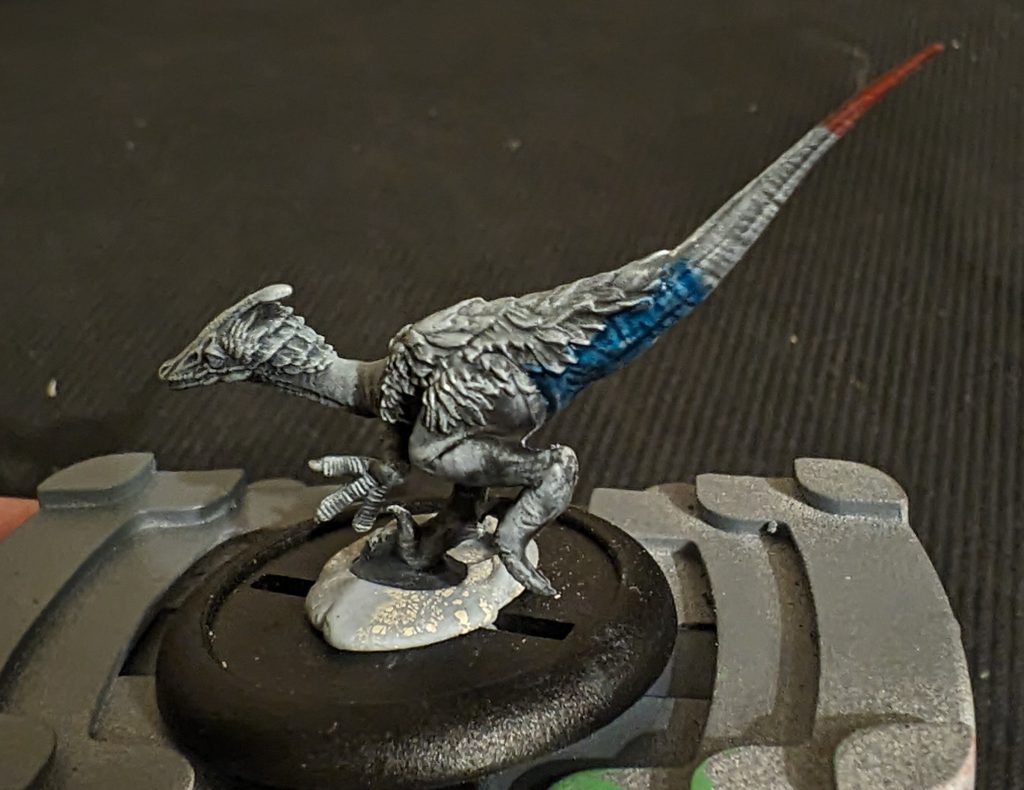
Now’s the fun part! Make sure you have two separate paintbrushes, one for each paint you use. Paint almost up to the line with a heavier coat than you would normally use for the area so you can see its wet, and quickly do the same with the second colour.
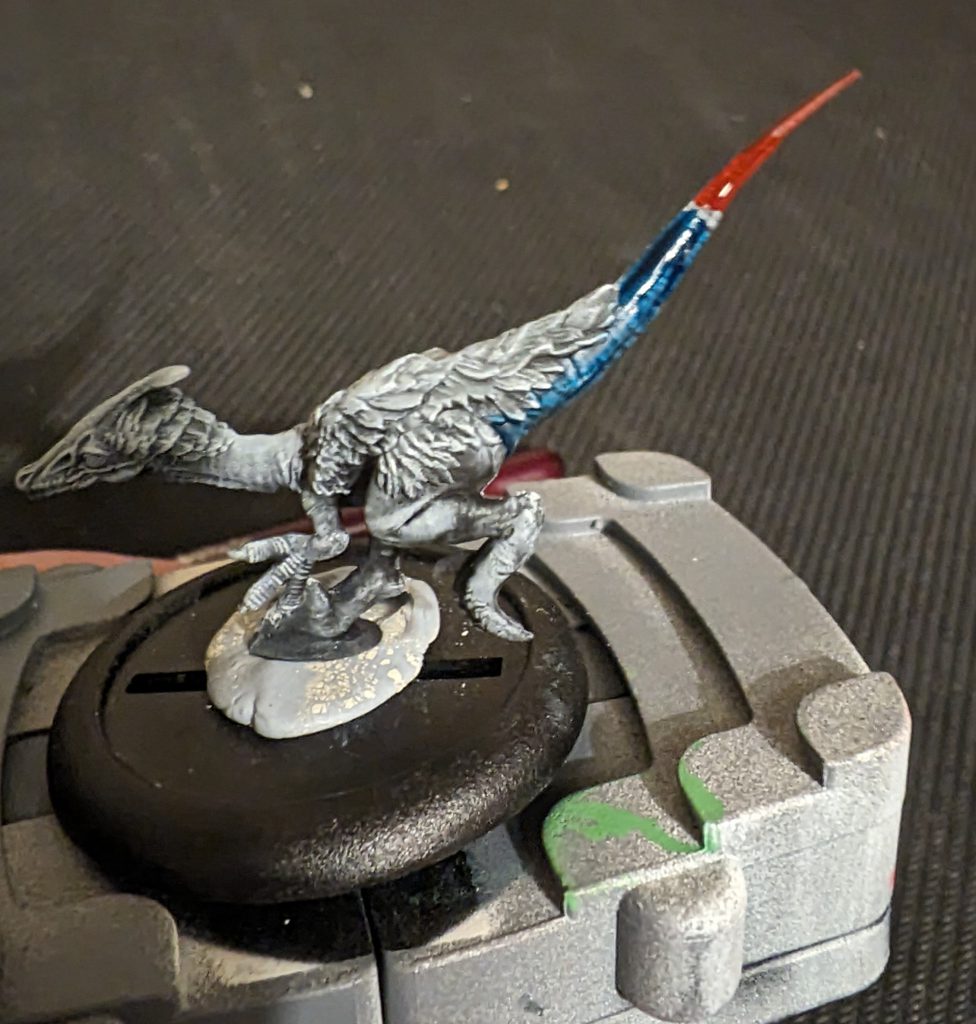
Using your weaker colour (in this case, Akhelian Green), draw your brush in long strokes into the wet area of the first paint. Keep the same motion going and you’ll blend the colours together until you end up with three stages of colour in the middle; colour 1, colour 2 and the mixed colour.
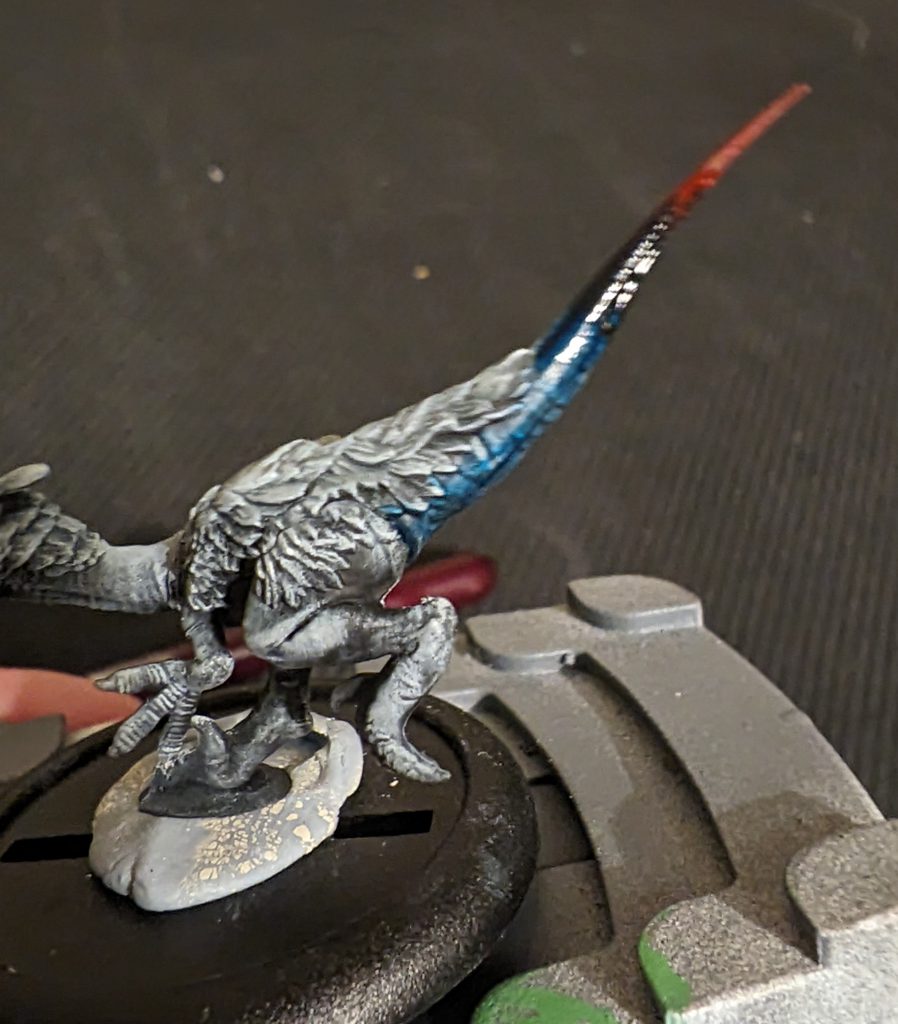
As the mix is still wet, go back to your original paint and use the same method on the edge of the mixed colour. Once you’re happy with the effect, repeat it on the other end. Keep feathering the edges back and forth until you’re happy with the overall effect!
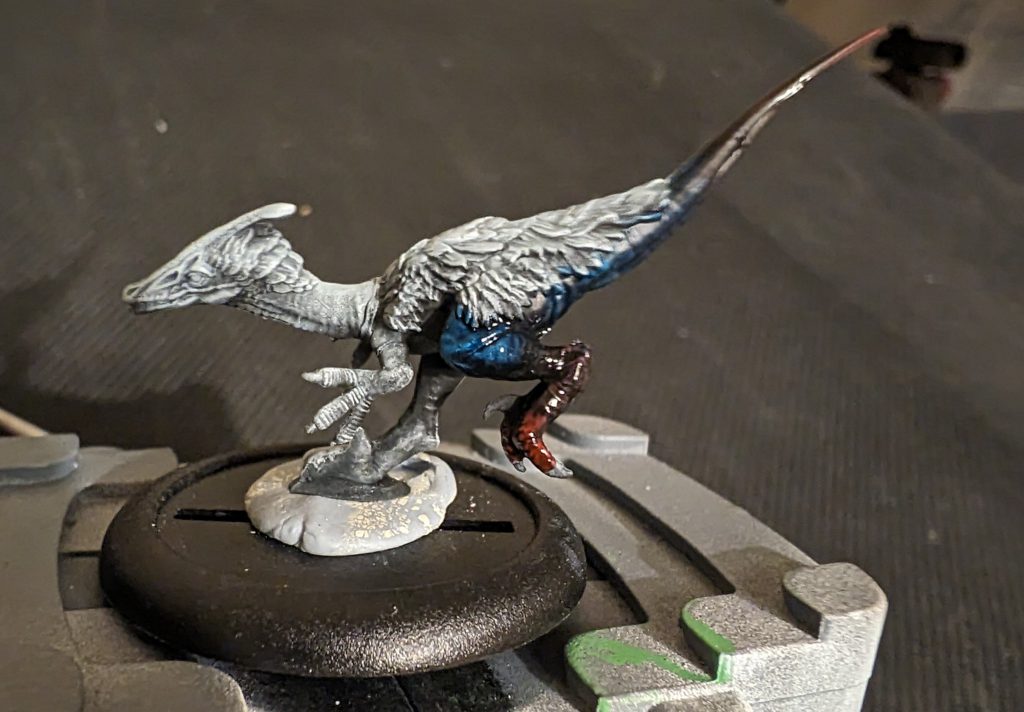
Contrast paints are really forgiving for trying our cool colour transitions like this because of how long they remain wet for. As you can see below, it works on even bigger dinosaurs! I also used it for my Scion of Conquest to get a flame effect on his censer too.
Enjoy our thoughts? Check out the rest of our Conquest coverage here, and make sure to check back next week for the next article in our Dinoctober series, a whole month (we swear) of focus on the W’adrhŭn!
Special thanks to Para Bellum for providing review material. If you want to get 10% off and support Goonhammer, make your Conquest purchase by clicking here for US/Canada or here for EU/rest of world and enter code “goonhammer” at checkout.
