
Possibly one of the best characters to come out of the original Marvel: Crisis Protocol core set, Baron Zemo is the third model we are covering from the Cabal Affiliation box. This time we’ll once again be using the black-grey recipe from Red Skull for his pants, I’ll also go over how to paint brown leather and some simple non-metallic metal gold and silver that won’t eat up hours attempting to paint it.
Painting the Purple Areas
Zemo’s mask, shirt and gloves are a fairly bright magenta color, we’re going to get this result by mixing Xereus Purple and Screamer Pink together for a basecoat, eventually highlighting up to pure Screamer Pink and through to Emperor’s Children pink.
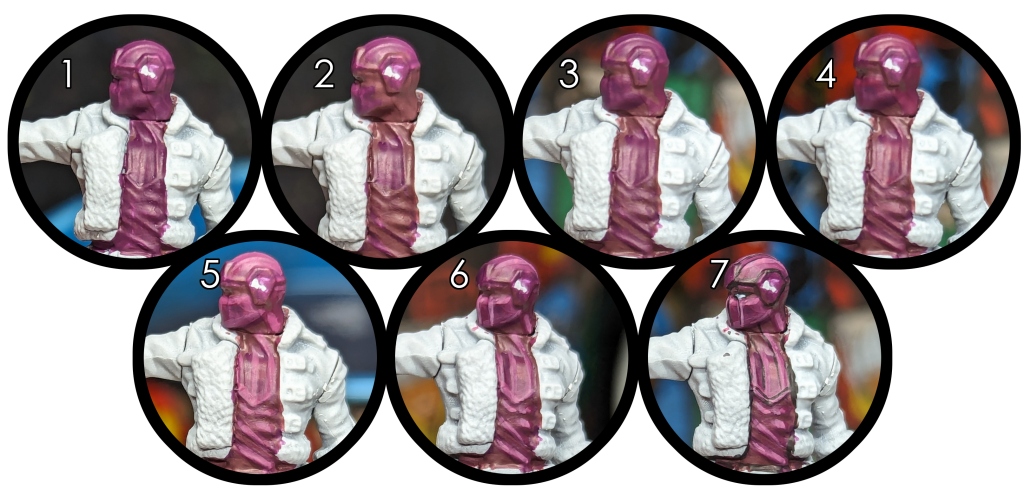
1. Basecoat: Citadel Xereus Purple: Citadel Screamer Pink
Mix Xereus Purple and Screamer Pink together into a roughly 50/50 mix. Paint all areas that will be purple with this mix.
2. Shadows: Citadel Xereus Purple: Citadel Screamer Pink: Citadel XV-88
Next we’ll paint the shadows into place and we’re going to add some XV-88 to the previous mix. Paint all of the undersides of the purple areas and any recessess with this mix.
3. Layer: Citadel Xereus Purple: Citadel Screamer Pink
Go back to your original mix and do any touch up needed on the high points.
4. Layer: Citadel Screamer Pink
Paint the high points and top of his head with Screamer Pink
5. Highlight: Citadel Screamer Pink: Citadel Emperor’s Children
Mix some Emperor’s Children pink into the Screamer Pink and start highlighting the ridges in the shirt, top of his head, face, and hands.
6. Highlight: Citadel Emperor’s Children
The final highlight is pure Emperor’s Children, go easy with it and focus on the cheekbones, ridges and tops of hand fabric folds.
7. Dark Lining: Vallejo Model Color Black
Finally, I take a bit of black and paint that along the headgear and in the recess lines on his mask and shirt.
Painting his Pants
Just like with Red Skull and Crossbones we are going to use Vallejo Model Color Black Grey as the basis for the pants, we’ll keep black to just the recesses and use some lighter greys to highlight them. Since they are regular fabric and not leather or vinyl we won’t go up to white for highlights, stopping short to keep them from looking reflective.
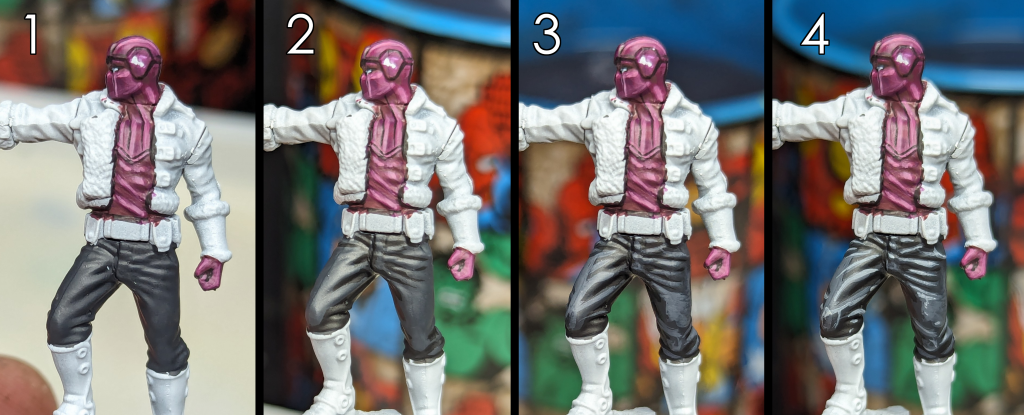
1. Basecoat: Vallejo Model Color Black Grey
We’ll start with a layer of Black Grey on the pants, use thin coats until you have even coverage.
2. Shadows: Vallejo Model Color Black
I’ve painted the recesses between the folds in the fabric with Black. I could have tried to leave the recesses black during the previous step, but I feel doing it this way gives me more control over things. I also painted the areas under his arms and the underside of the legs black as well.
3. Highlight: Citadel Mechanicus Standard Grey
Next up, we highlight the ridges of the folds with Mechanicus Standard Grey, you can also highlight the larger smooth surfaces.
4. Edge Highlight: Citadel Administratum Grey
Finally I do a thin line and edge highlight with Administratum Grey to make the tops of and ridges in the cloth pop.
Painting Brown Leather
Brown leather is one of my favorite types of leather to paint, its a bit more forgiving than doing black leather and you can use the translucent properties of thinned paint to your advantage to give the effect of tanning and surface imperfections. We’re going to start off with a basecoat of one of my favorite Citadel colors, Rhinox Hide and work it up with Mournfang Brown and XV-88. This will allow the contrast to help sell the effect too.
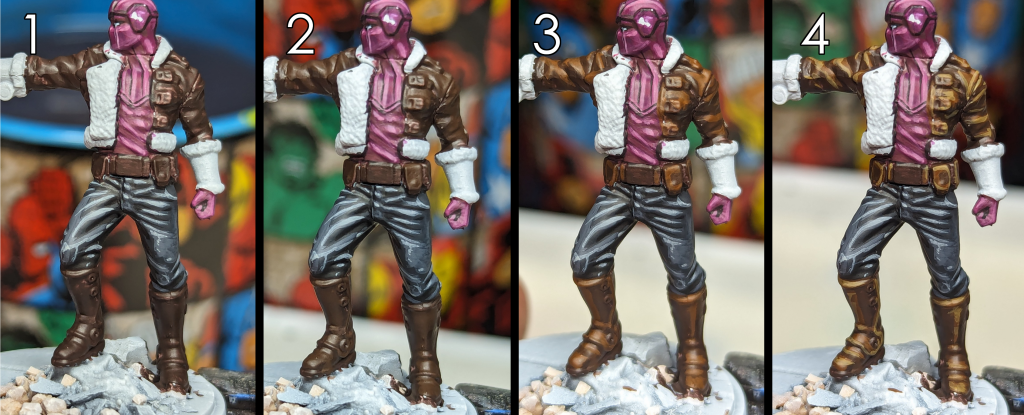
1. Basecoat: Citadel Rhinox Hide
Lay Down a nice smooth basecoat of Rhinox Hide on the coat, belt and boots.
2. Layer: Citadel Rhinox Hide: Citadel Mournfang Brown
Mix Rhinox Hide with Mournfang Brown to create a nice in-between color and paint that on, trying to create the illusion of light hitting it. On the boots especially, try to leave some of the Rhinox Hide showing on the calf sections and sides of the foot.
3. Highlight: Citadel Mournfang Brown
Go over those same areas with pure Mournfang Brown, leaving some of the previous layer showing underneath.
4. Highlight: Citadel XV-88
Highlight the same areas with XV:88 and use it to highlight the edges of the bags, and folds in the coat and the trim of the boots.
Painting the Bracers and Fur
We aren’t going to spend a lot of time on the bracers or fur. The bracers will be painted with Rakarth Flesh and then shaded with a bit of Xereus Purple mixed in. The fur will all be painted with Ushabti Bone, given a recess wash with Seraphim Sepia and then drybrushed with Wraithbone to catch the texture a bit.
Bracers
I didn’t get a picture of the progress on the bracers, but it’s really very simple.
1. Basecoat: Citadel Rakarth Flesh
Lay down a nice even base coat of Rakarth Flesh on the bracers.
2. Shadow: Citadel Rakarth Flesh: Citadel Xereus Purple
Mix a tiny amount of Xereus Purple into Rakarth Flesh and paint this onto the undersides of the bracers to give the effect of shadow. Try to feather out the edge so it blends into the base layer a bit, that way you don’t have a stark line between colors.
Fur
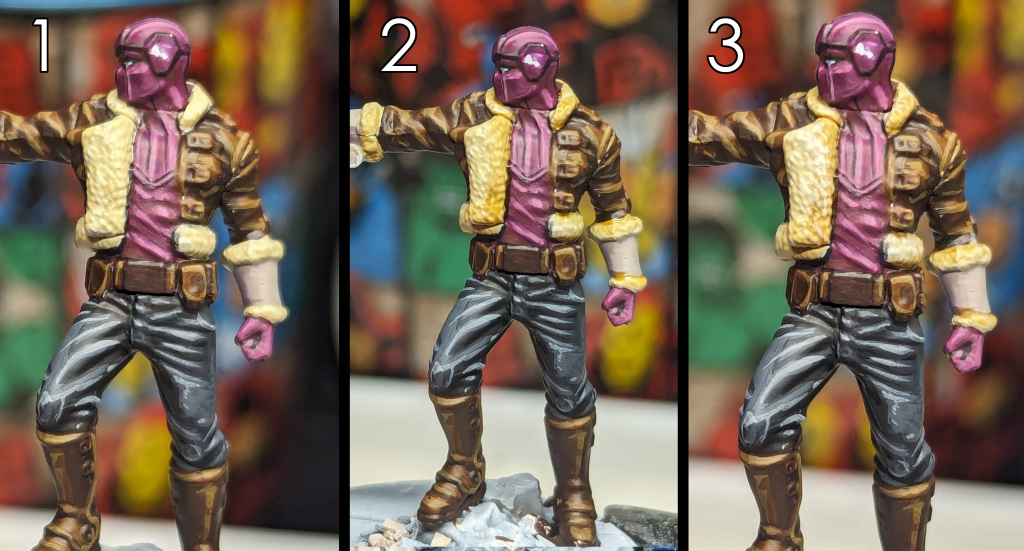
1. Basecoat: Citadel Ushabti Bone
Basecoat the fur on his jacket and bracers with Ushabti Bone.
2. Wash: Citadel Seraphim Sepia
Dilute Seraphim Sepia wash and paint it into the edges of the fur areas, try to feather out the wash so you don’t end up with a harsh line where the washed areas meet the non-washed areas.
3. Drybrush: Citadel Wraithbone
Drybrush the fur with Wraithbone to pick out the texture of the fur.
Painting the NMM Gold
Non-metallic metal can be extremely intimidating, NMM gold can be even more so. Luckily, the key to NMM is to have enough contrast from your darkest shadow to your brightest highlight and ensure you have proper highlight placement. Zemo only has his headgear and hilt/crossguard of his sword to do, so we can try to make it as simple as possible. We’re going to be using Rhinox Hide again for the basecoat and then use XV-88, Yriel Yellow, Phalanx Yellow and White for the gold effect. This is probably my simplest way I’ve found to get a NMM Gold effect for tabletop models without having to spend hours blending layers back and forth.
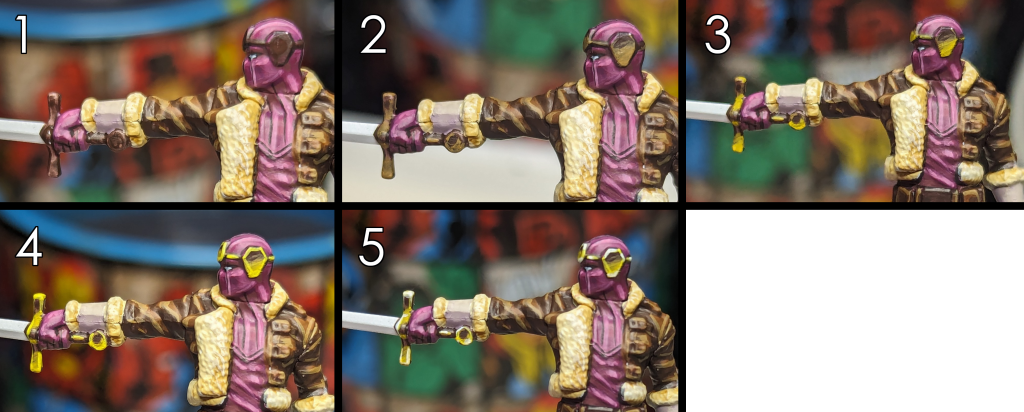
1. Basecoat: Citadel Rhinox Hide
Basecoat the headgear and sword hilt, we want a nice uniform coat, since parts of it will be visible later.
2. Layer: Citadel XV-88
Paint a layer of XV-88, creating a gradient from XV-88 to Rhinox Hide. If you need to paint multiple passes of XV-88 until you’re happy with the coverage and do any Rhinox Hide touch ups if needed.
3. Layer: Citadel Yriel Yellow
Layer Yriel Yellow on top of the XV-88, feathering it out before you fully cover he XV-88
4. Edge Highlight: Citadel Phalanx Yellow
Edge highlight with Phalanx Yellow on all of the hard edges
5. Spot Highlight: Vallejo Model Color White
Highlight the corners and the edges that will catch the most light with white.
Painting the NMM Silver
The final thing we’ll do is some quick and dirty non-metallic metal silver next. We’ll try to keep it as simple as possible as well, this is a gaming piece after all and we aren’t trying to win any major awards with it. NMM Silver tends to like bluish hues, so we’ll start with Luftwaffe Uniform WWII, which is a pretty nice bluish grey. From there we’ll reinforce the shadows with Dark Reaper, another slightly darker blue-grey. Then after a Nuln Oil wash, we’ll work up the highlights with more Luftwaffe Uniform WII, Uthuan Grey and White.
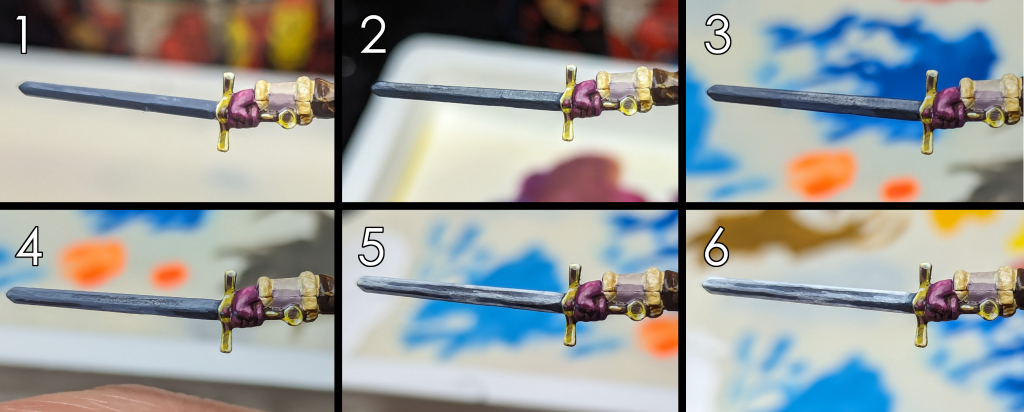
1. Basecoat: Vallejo Model Color Luftwaffe Uniform WWII & Citadel Dark Reaper
Lay down that Luftwaffe Uniform WWII, nice and smooth, like with the NMM Gold and Rhinox Hide, parts of this will be visible later. On the bottom half of the sword blade, paint it Dark Reaper.
2. Wash: Nuln Oil
Wash the blade with Nuln Oil. This will darken both the base colors and allow us to use Luftwaffe Uniform WWII again as a highlight color.
3. Layer: Vallejo Model Color Luftwaffe Uniform WWII
On both the top and bottom halves of the blade, paint Luftwaffe Uniform WWII to start creating the illusion of light reflecting on the blade.
4. Layer and Edge Highlight: Uthuan Grey: Luftwaffe Uniform WWII
Mix a small amount of Uthuan Grey into Luftwaffe Uniform WWII and reinforce the highlights, also edge highlight the edges and center line of the blade.
5. Layer and Edge: Uthuan Grey
Repeat the previous step with pure Uthuan Grey.
6. Spot Highlight White
Finally edge highlight the blade near the tip and along the blade where the highlights are to add bright reflections.

That’s pretty much it for Baron Zemo. All that is left to do is paint the base and he’ll be ready to dash and slice his way across the game table! We have one more model to paint from the Cabal Affiliation box and that is Ultron! In that one I’ll be going over how I paint non-metallic metal chrome, so be sure to keep an eye open for that soon. If you’re on social media, hit me up on Twitter/X (@brushwizard) or Instagram (@brushwizardry) and share your work, I’m always interested to see what the MCP community has been working on.
Have any questions or feedback? Drop us a note in the comments below or email us at contact@goonhammer.com. Want articles like this linked in your inbox every Monday morning? Sign up for our newsletter. And don’t forget that you can support us on Patreon for backer rewards like early video content, Administratum access, an ad-free experience on our website and more.
