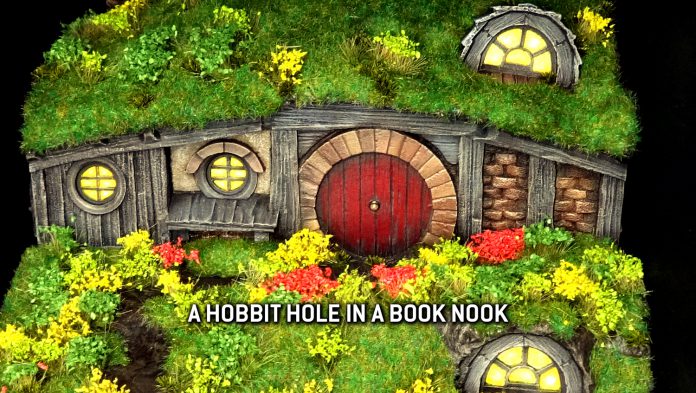
Sometimes, just occasionally, it’s nice to bend the skills of a wargamer towards something cosy and adorable. When my dear friend and inveterate wannabe-hobbit Drew finally got the keys to her first house, my wife Alex suggested we buy her a hobbit hole for the wall-o-bookshelves she was dreaming of.
“Buy her one?” I asked incredulously, watching as Optispouse Prime scrolled past various mass-produced nooks. “We’re making our own, with flapjack and taters.”
Today, then, I’ll share what I did, what worked, and what you should do differently, just in case you too know someone who needs a hobbit hole of their own.
Who This Tutorial Is For
The word ‘intermediate’ feels like a copout, but: established hobbyists should find my work easy to replicate, while beginners might be able to follow along, but could find it trickier. To help beginners, I have not assumed any prior knowledge, and will either describe the techniques used or link to the relevant resources. I am assuming you already own a decent number of paints, specifically browns, greys, blues, and a few yellows, but I’m not using that many colours. In terms of techniques, it’s 95% drybrushing and 5% glazing. Happily, the Goonhammer Hobby 101 series has you covered if you aren’t sure how to do that.
This is not a gaming terrain tutorial, but some of the tips here might be useful. Ultimately, I was able to take a number of structural shortcuts I would never use on a terrain piece, since this is not intended to tolerate the rough handling that gaming terrain receives.
What You’ll Need
A Frame
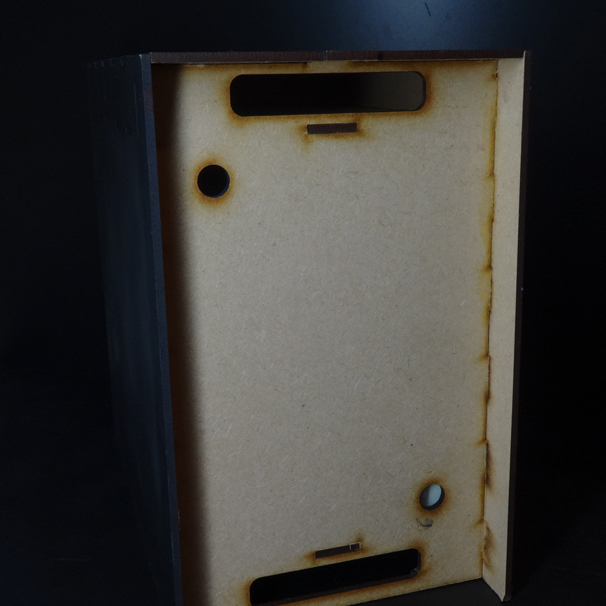
You can get precut MDF nooks, and that’s what my wife and I bought since I have the carpentry skills of a one-eyed goose. We bought one with room to store lighting and a battery pack in case Drew fancied making alterations of her own. We got this one because it’s a few millimetres wider than Forgeworld’s Hobbit Hole kit.
Forgeworld’s Hobbit Hole Kit
This is a Games Workshop resin kit, albeit a simple one – just some components to be added to a hill, really.
Expanded Polystyrene Sheets, or Insulation Foam Sheets
I had some expanded polystyrene sheets hanging around because I am a NERD, and recognise the value of a standing stock of such things. There’s an argument for sturdier foam, and I would’ve used it if I had it, but at least this is easier to cut and carve.
Modelling Compound
This is a paper-based compound you can use to form landscape texture, available from Geek Gaming. I’m sure there’s competitors out there, but this is the one I’m aware of, and they ship worldwide.
A Strip of Cardboard
You’ll want this to form a lip over the roof of your hobbit hole. I used some card from a cereal box.
Static Grass & Tufts
Whichever colours float your proverbial. The flowers and bushes I used are all from Gamer’s Grass. The static grass itself is from WWScenics.
Acrylic Paint & Primer Spray
Well, duh. You really don’t want me to provide an itemised list here, but I’ll mention some if not all of the paints I used in the painting section later on.
PVA Glue
Any brand will do, unless it’s suspiciously cheaper than its competitors.
Optional: Geek Gaming Matt Sealant Spray
You can absolutely use watered down PVA glue poured into a trigger spray bottle, but this was easy, and more matte.
Optional: Cocktail Sticks
These can be used to easily affix resin hobbit hole components to the foam terrain while the glue cures, and makes life a lot easier in exchange for next to no money.
Construction
Prepare the Resin
First, the resin will need to be washed in lukewarm water with some detergent. Give them all a thorough but gentle scrub with an old toothbrush, then leave them to dry overnight.
The resin components will have some extra bits of resin stuck to them (these are called ‘gates’ as they’re where resin entered the mould). You’ll need to remove these with a razor saw. They’re pretty easy gates, as Forgeworld goes, but obviously you might need to fill a few holes with putty.
Build-a-Box
I did this while waiting for the resin to dry, so that I could use it as a jig to ensure the terrain was built to fit inside it. You can use PVA or wood glue to help the box be a whole bunch sturdier. After that, I spray painted in black, knowing in advance that I’d need multiple coats since MDF is pretty absorbent. You could also paint it by hand, which would probably be cheaper and more intelligent, but neither cheapness nor intelligence are big elements of my brand identity.
Why black? Well, MDF doesn’t exactly boast the visual charm of actual wood. Plain black hopefully keeps the attention on the contents of the box. That said, I think you could get very creative with decorating the front plates of the box itself. I just didn’t have any actionable ideas that’d be ready in time, so black it was.
Foil
We’re going to be doing some fairly wet and messy things to this hobbit hole (nice) so we want a shape-holding, waterproof layer between the terrain and the famously absorbent MDF box we’re putting it in. Baking foil is perfect for this. The foil allows the terrain to slide in and out whenever needed, to check the fit while also being able to access the whole piece. Line the box with a single piece of foil to ensure no leakage onto the box itself. Don’t worry about having to fold it over – no one’s going to see it from the inside.
Styrene & Markup
It’s time to lay down the basic landscape. My thinking was this: The hobbit hole itself is very small, so we need to gain some height to avoid having a mostly empty box. Now look, there’s an argument for having a much shorter box, but this is what I had to work with.
I cut some styrene to size and layered it up, using a long knife to shape it. This is the stage I would absolutely go back and redo if I could. For one, I’d build off something more solid than styrene to enable the path to start lower to the ground. Hardboard is great for this, I just didn’t have any and blundered onward.
The objective here is to create a switchback path so that you can get some elevation; you want the hobbit hole’s door to be halfway up the box, and that means getting some height without things being too steep.
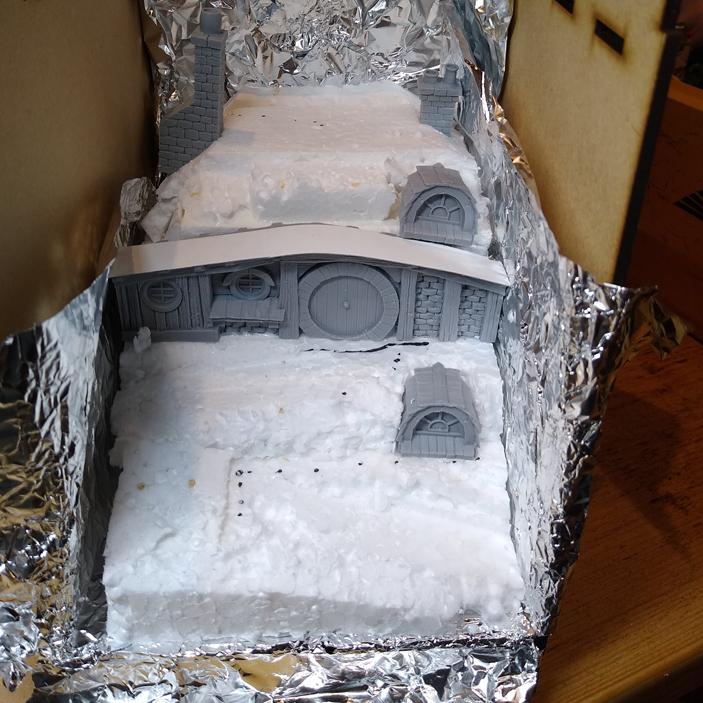
In this photo, you can see where I’ve used a marker pen to draw around where I need the path to go as a very rough guide. There’s no need to be very precise here, since all of it is going to get covered up in the next step.
Once you’re happy with all the shapes, and have slid them into the box to check it all fits, it’s time to glue it all together.
- Slather PVA glue between the layers.
- Skewer the styrene in place with diagonal cocktail sticks (so the layer’s can’t separate).
- Slide the whole thing into the box to check it still fits, using the foil to prevent getting glue inside the box.
- Remove the structure from the box AND the foil, then leave it to dry for approximately nine million years. If you don’t have that long, then 48 hours should do.
The resin components aren’t actually glued in place – instead, I drilled holes into their underside, stuck cocktail sticks in them, then skewered them in place in the styrene. They’re going to get sealed in with the compound later. The hobbit hole got three cocktail sticks, while the other components just got one each.
Card
This is the point where you want a strip of card over the roof to give a bit of structural support for the impending compound stage. You don’t want a big overhang, just enough so that the wooden beams sculpted into the resin hobbit hole look like they’re supporting the earth above rather than sticking out the front of your terrain. You can stick this strip down with superglue.
Compound
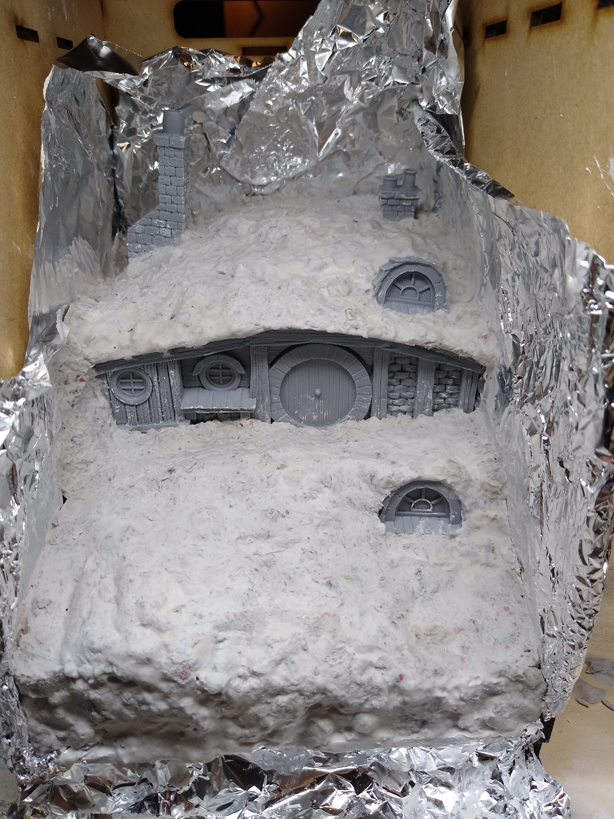
This stuff is very simple to use: mix 2 parts compound to 1 part water (I used a mixing bowl and some gloves) and then, once it’s thoroughly and evenly mixed, slap it on your terrain and shape it with your gloved fingers. If you want to bulk out a big shape, use less water. If you want smoother details, use more water.
This stuff doesn’t stick to things particularly hard, which means it’s easy to remove if you accidentally smear it on any of your resin components, even after it’s dried. This is also very much the stage where, once you’ve applied it all over, you’ll want to stuff the whole thing – foil and all – back into the box, to ensure you’ve applied compound around the edges, filling in any gaps between the terrain and the box.
The compound will benefit from 48 hours’ drying time. You can slide the whole thing out of the box and remove the foil after about half an hour to help with the drying process.
Seal It All
The whole project will benefit at this point from getting a spray of thinned PVA glue, just to give the surface a bit of extra resilience. You’ll also want to wrap the exposed styrene bottom and sides with masking tape, so that it won’t dissolve as soon as you hit it with your primer spray. I saved on masking tape by using some of the now redundant tin foil – you can apply a rectangle of foil to the base, and just tape down the sides.
Painting
Prime
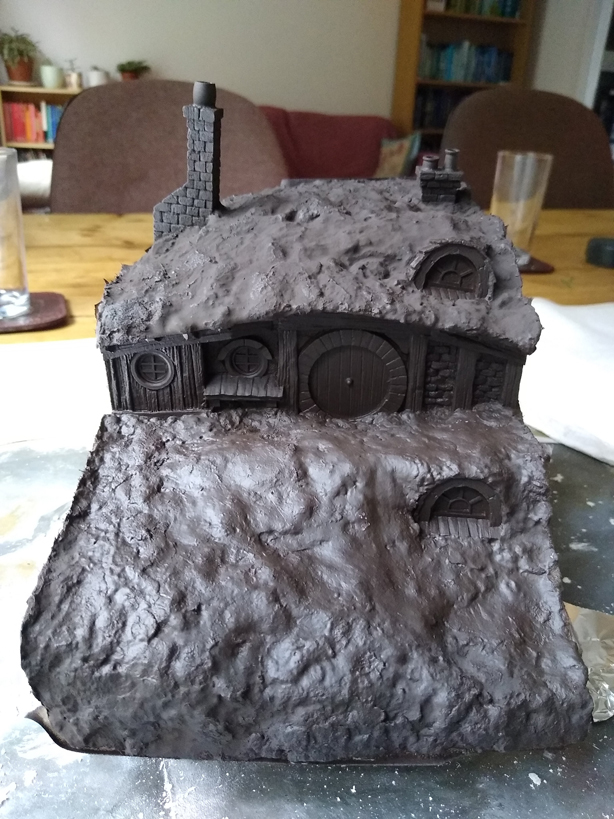
I primed the project with Colour Forge’s Hyrax Brown – a nice dark brown that means I can just drybrush colours over the top, and that’ll tie the whole thing together a little.
Painting
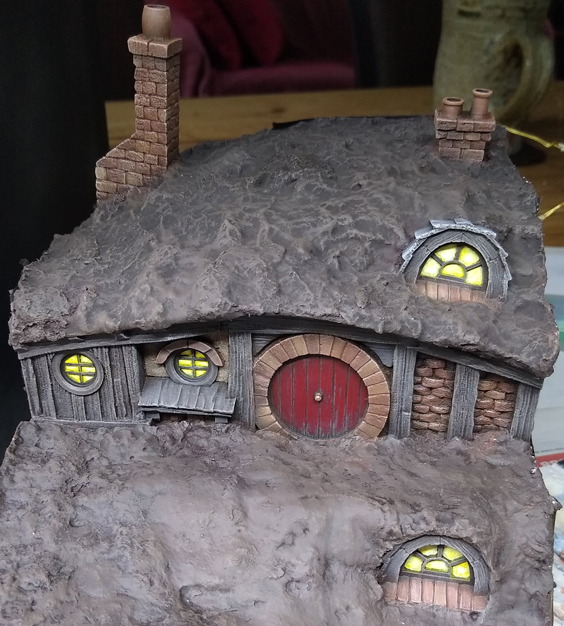
This was pretty quick – maybe an hour or two – and very satisfying. I have the entire piece a drybrush of Vallejo Earth (similar to Citadel’s Steel Legion Drab, I think, but more matte). I then started picking out details.
- The plaster – of which there’s just a tiny bit around one of the windows – was given a heavy drybrush of Vallejo Earth.
- The wooden areas got a drybrush of the Army Painter’s Filthy Cape, which is a light grey with a slight brown tinge to it.
- The roof slates got a drybrush of Citadel Dawnstone, then Astronomicon Grey.
- The bricks were given a heavy drybrush of Citadel Mournfang Brown, and then had tonal variation added by drybrushing random individual bricks with different colours:
- Skrag Brown
- Bugman’s Glow,
- A 1:1 mix of Skrag Brown and Averland Sunset
- A 1:1 mix of Skrag Brown and Cadian Fleshtone
- The wood, bricks, stone and plaster were all given a light drybrush of the Army Painter’s Skeleton Bone. Any cream/bone colour will do for this – it’s just to pick out the edges and tie it all together.
- The door was given a single, deliberately patchy coat of red paint, getting more patchy towards the bottom to imply flaking paint. I used a 1:1 mix of the Army Painter’s Chaotic Red and Dragon Red, but honestly any colour will do for this bit. I then lined in the door’s planks with Reaper’s Brown Liner, but Agrax Earthshade or Rhinox Hide would do fine.
- The windows were painted pure white, then given a glaze of Yriel Yellow, keeping it extra thin towards the middle of the windowpanes, then finally a 2:1 glaze mix of Yriel Yellow and Wild Rider Red towards the edges of the windowpanes. At this point, here’s how it looked:
Foliage
It’s all pretty brown at this point, and while I love an early 2000’s videogame as much as the next millennial, this is meant to be adding colour to Drew’s shelf, and the green green grass of the Shire is going to be doing the heavy lifting.
You can get a bajillion different shades of grass, but I went with predominantly 2mm Autumn Grass, occasionally sprinkling in some 2mm North Euro Grass, both from wwscenics.com. These two shades are very close, but a little tonal variation makes a big difference to my eyes.
If you’ve not used static grass before, you can buy costly applicators, but it’s not essential. Just paint a layer of PVA glue onto a section of your terrain, then dump static grass on the area, firmly pat it down, and tap off the excess. If you want to blend two different colours, sprinkle on the first shade, tap off the excess, then sprinkle on your second shade. Just be sure to firmly pat down that second colour to ensure thick coverage. Since the surface of PVA can start curing fairly quickly, I worked in discrete sections – maybe a sixth of the piece at a time.
I knew I was going to need space to apply lots of tussocks, so I left lots of little empty spaces in my grass. For bigger areas you might not bother to do this, but today, we’re doing artisinal small-batch hobbit holes.
Once all the static grass is down, it’s essential that it’s sealed. I sprayed on the Geek Gaming matt sealant – make sure the grass is soaked; that way, it’s never shedding all over the bookshelf. While the sealant calls itself matte, it’s probably somewhere between satin and matte, so you might want to mask off the hobbit hole itself before spraying. Once you’ve sprayed the sealant, take the masking off and use a clean brush to wick off any blobs of sealant that have used capillary action to invade the premises.
It’s at about this point that the hobbit hole has a patchy lawn, but things are starting to look pretty cute. Time to absolutely swing for the cosy fences.
I used a mixture of self-adhesive flowers and bushes from Gamer’s Grass, which are simple enough to use: peel them off, and stick them down. Tweezers can help with this, since you can poke the underlying adhesive without flattening the foliage itself. Keep going until your hobbit hole looks so verdant that you’re cooing and squeeing like a tweenager who’s just acquired their first Sylvanian Family.
On the roof-hill, I also used some grass tussocks, just to imply a shift toward a more windswept area than the more sheltered foliage further down.
The Skybox
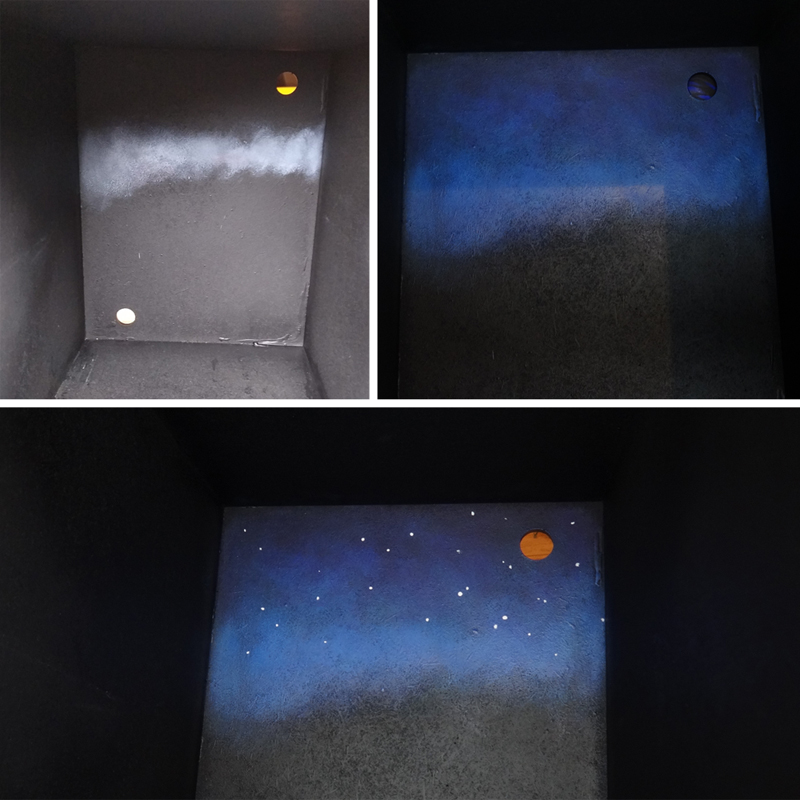
The thinking here was that, since the back of the book nook will get quite dark, a nighttime scene would work best. However, any colour going over a black primer will deaden itself horribly, so I started off by marking out where the hill met the back of the box, then drybrushing white paint over that area, at random, as though painting clouds. This is purely to make the next layers more vibrant.
I followed up with a variety of blues, primarily the Army Painter’s Deep Blue, but with a bit of AP Crystal Blue and Coat D’Arms’ Wizard Blue towards the bottom, so that the white was completely covered. If you’re struggling to cover the white, try thinning your blue paint a little so that you’re almost stippling a glaze on with your drybrush technique. With the blue down, I introduced some of Citadel’s Naggaroth Night towards the top. Again, all this is just drybrushing over the previous colours so that you get a slow fade from bright blue at the bottom to dark purple at the top.
After that, it was a simple matter of taking some pure white and applying dots for stars. Happily, the high contrast means the stars still show up even when that part of the book nook is in shadow.
Smoke
This was very easy – I just took some cotton wool, teased it out, then popped a dab of superglue inside the chimneys to secure it in place.
Affixing the Terrain Inside the Box
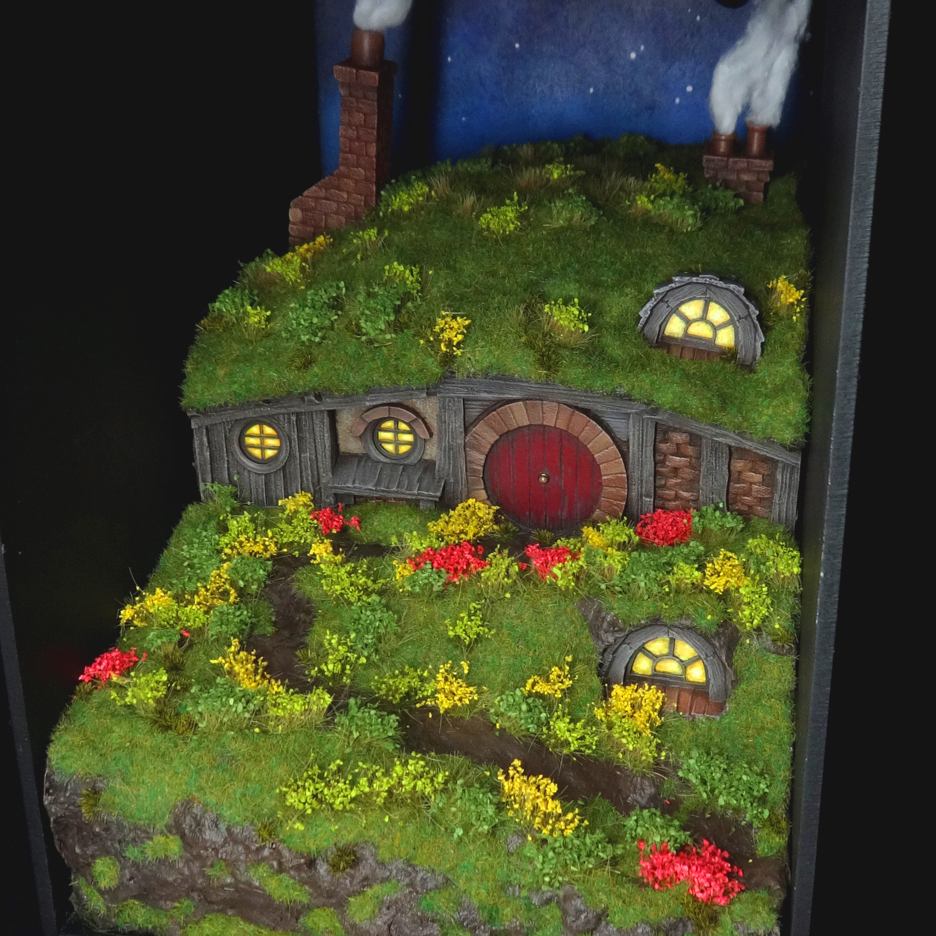
This didn’t have to be strong, just strong enough to hold the terrain in place in case someone’s moving the nook, or turns it upside down, or whatever. I just used a hot glue gun to apply glue to the inside of the box, where the bottom of the terrain would sit, and plonked the terrain into the box. And lo, the cherry was fixed atop the icing.
Lessons Learned
For a first and only attempt, I’m pretty happy, but it wouldn’t be honest to pretend I haven’t learned some lessons.
First, a base board for the terrain would be helpful, even though it’s going into a wooden box. Hardboard would be best I think, since it’s easy to cut. This would’ve helped structurally, particularly since the compound and the styrene are strongly not load-bearing materials.
This would in turn have allowed me to adjust the topography. I’m not wild about the vertical earthen surface on the front; it takes away from the vibrancy of the thing. Had the path started lower down (since I wouldn’t have needed a “structural” layer of styrene), that would’ve meant starting at ground level. I could also have rounded off the hill on the left, since it would’ve then looked okay to apply grass to it.
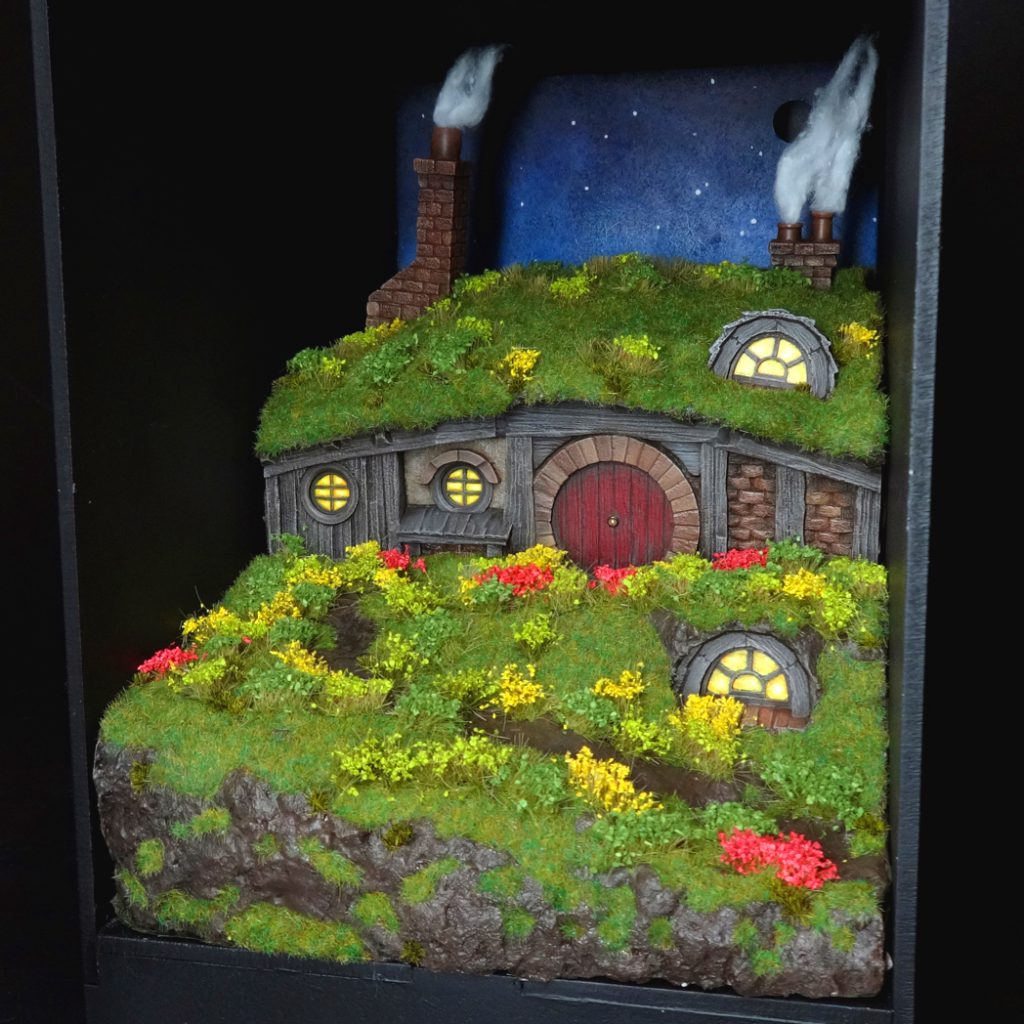
I also think the pink-red flowers clash with the red door, so maybe some other colours would’ve worked better there. Indeed, I think maybe fewer flowers and more bushes would’ve been the move.
The tall chimney works well when added to the side of a hill, but doesn’t make much visual sense here – I think I should probably have either skipped it, or chopped it down to be the same height as the other one.
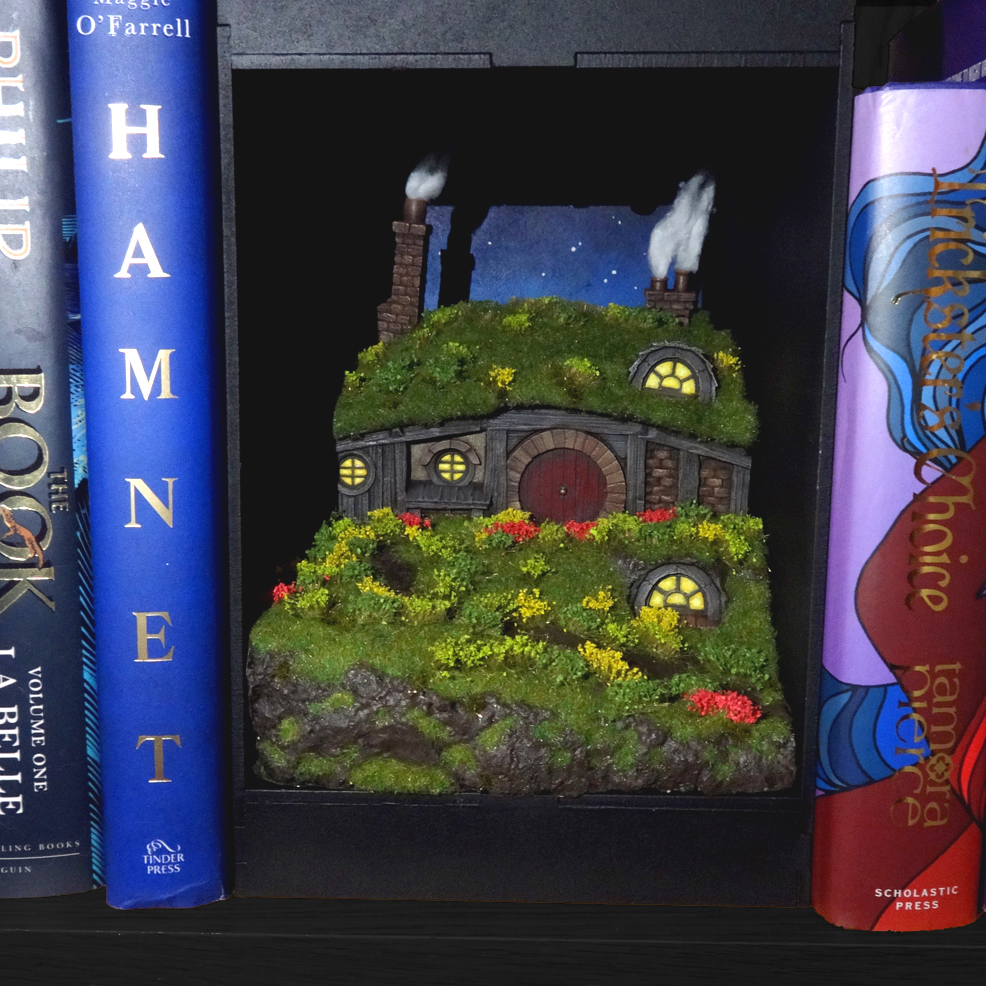
Finally, there’s the matter of the two black panels on the front of the book nook itself. They add a certain amount of darkness to the shelf, and if I’d had more time and more intelligent ideas, I imagine someone else could do something much cooler with those spaces. Maybe making it look like a giant book spine, interrupted by the hobbit hole itself, or maybe doing some lettering over the top. If you do something like this, please do share it in the comments or to contact@goonhammer.com so that I can fawn enviously over your more creative approach. Perhaps one could even line the sides of the nook with pages (or fake pages) from the appropriate chapters of The Hobbit or The Lord of the Rings.
Have any questions or feedback? Drop us a note in the comments below or email us at contact@goonhammer.com. Want articles like this linked in your inbox every Monday morning? Sign up for our newsletter. And don’t forget that you can support us on Patreon for backer rewards like early video content, Administratum access, an ad-free experience on our website and more.
