
Over the years the Goonhammer crew have put together a vast and expansive library of painting guides. Appropriately titled “How to Paint Everything” we’ve got schemes and recipes for 100s of models. They all, however, assume you know the difference between wet blending and glazing or what the hell “zenithal” means. Welcome to Hobby 101. This series will lay the groundwork to teach you the fundamentals and best practices to make your models shine.
The Hobby 101 series is sponsored by The Army Painter.
Layering is one of the most fundamental techniques for painting miniatures. There’s a lot of fancy tricks for increasing your speed (washes, dry brushing, contrast paints), but your quality will never be better than your ability to throw down some layers of paint.

The simplest definition of layering is applying some paint over some other paint, such that at least some of the previous paint is still visible around the edges. Each time you do this is a layer, and each layer covers a little less of the previous layer.
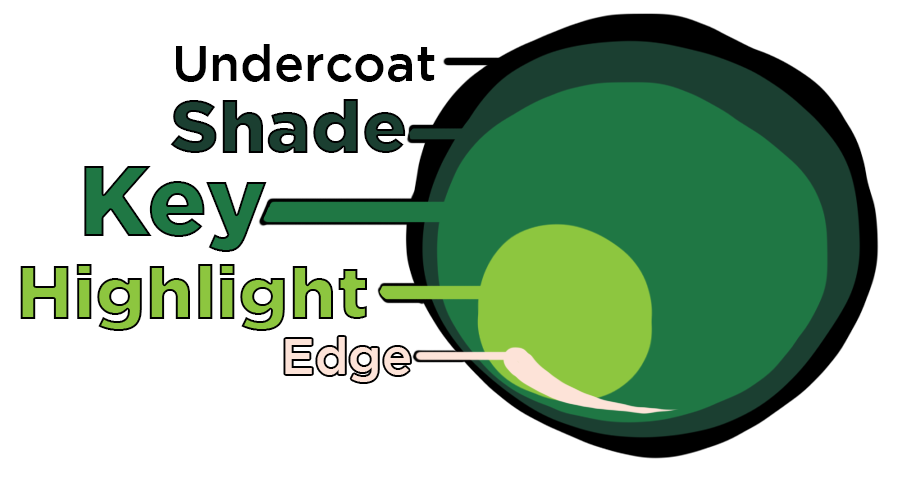
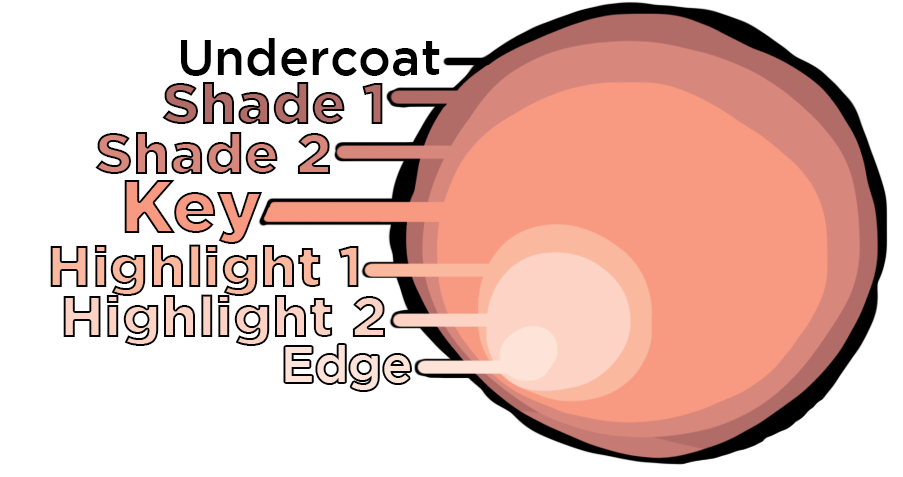
I categorize layers into three types:
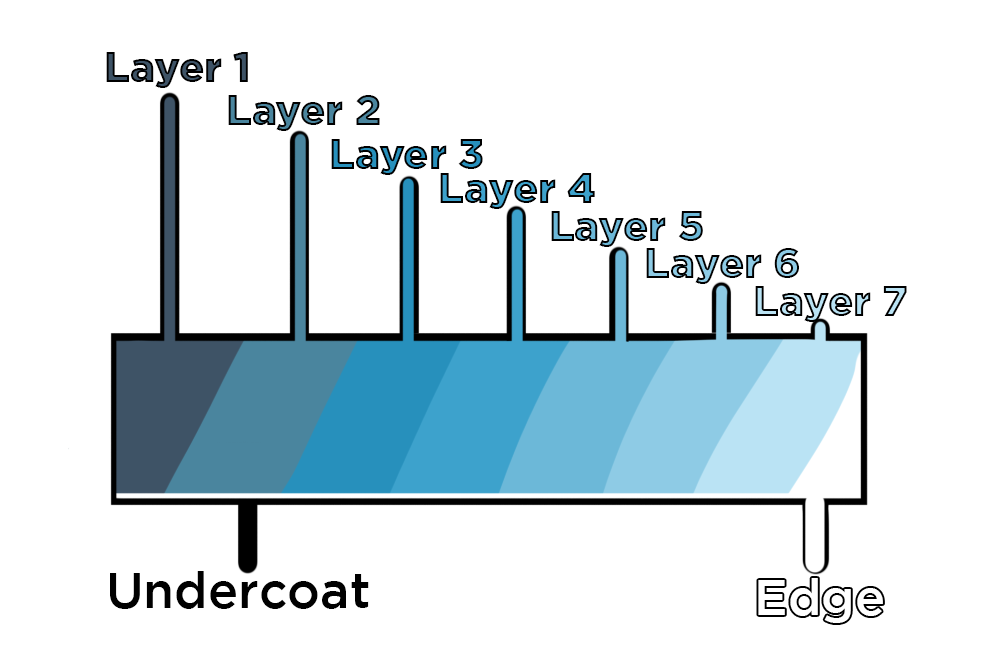
- Shades: These layers come first and are for shadows. Each shade layer gets mostly (but not entirely) covered up by the layer above it, and provide a foundation for subsequent layers. You can have many shade layers.
- Key: This layer is for the color you’re trying to evoke. It sits on top of the shade layers, mostly covering them. Consider it “home base”. The key layer will be the most visible layer. There is always only one key layer.
- Highlights: These are lighter layers that sit on top the key layer. They are for highlights. They are small and don’t cover very much of the lower layers. You can have many highlight layers.
This is not formal terminology, its just how I have personally come to think of it. Layers are applied in order of dark to light. So shades first, then the key, then highlights. If you’re a bit confused, don’t worry, we got plenty of diagrams and examples coming up.
Painting with Three Layers
I consider three layers (a shade, the key, and a highlight) to be minimum viable product, and it works well for most 28mm miniatures. Start with the shade. Once it’s dry, we cover it mostly with the key, leaving the shade visible in the recesses of the miniature. After the key is dry, we’ll put a smaller highlight layer on top in the raised areas. These highlight layers are usually discontiguous, like a little archipelago of paint.

But wait! What about our undercoat or primer? Our undercoat can participate as a layer if it’s darker than the darkest shade. This is one reason why I (almost) always prime my miniatures black. By leaving the undercoat exposed between different areas, you get a free “blacklining” effect. This added contrast can really give your colors more visual punch.
And what about edge highlighting or specular highlights? These are optional and usually done with white or an off-white. Edge highlights often cuts across many layers and is intended to emphasize a shape. Let’s take them into account.
Let’s paint a classic goblin using the three layer system. Start by priming black. If you’re painting the eyes, do that before you do anything else. Then we add our shade layer. Next comes the key, mostly covering the shade. Next comes the highlight layer, just on the most raised areas. Finally, we add some final edge highlights of very light pink on the knuckles, nostrils. tip of the of the nose, etc.
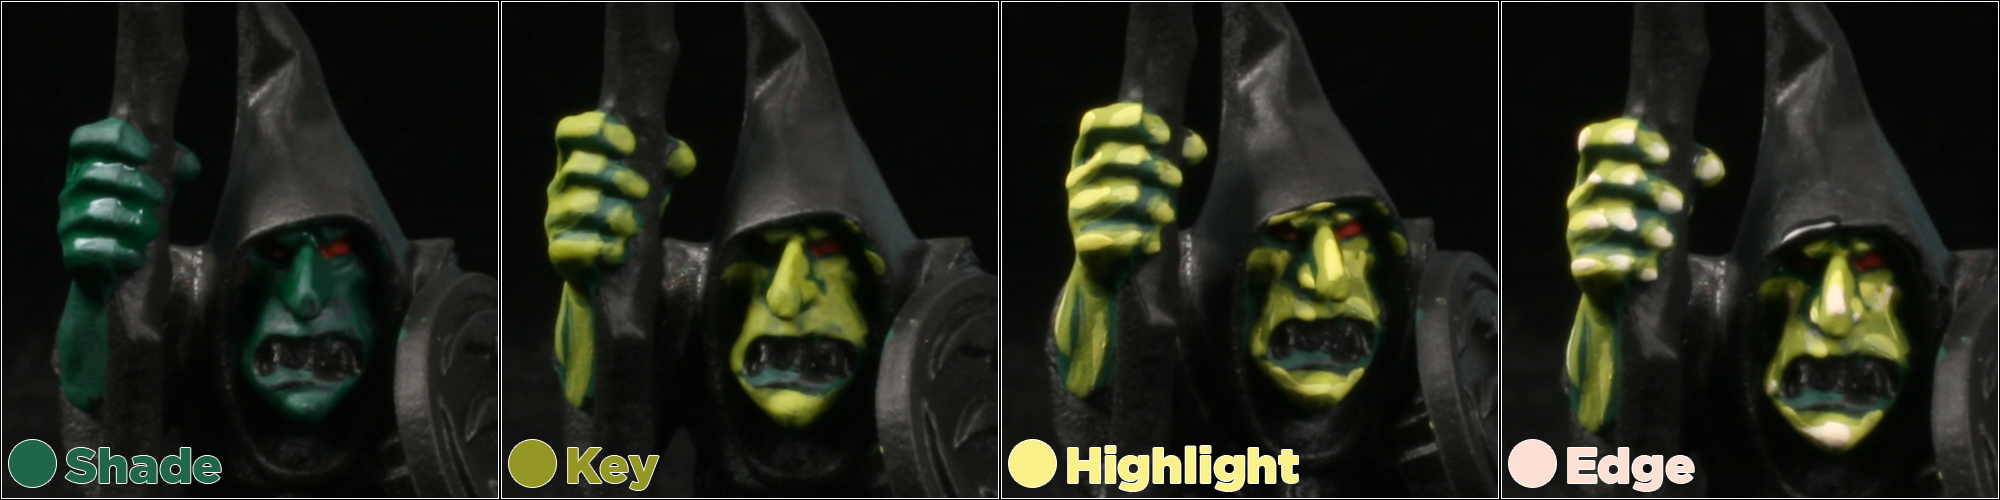
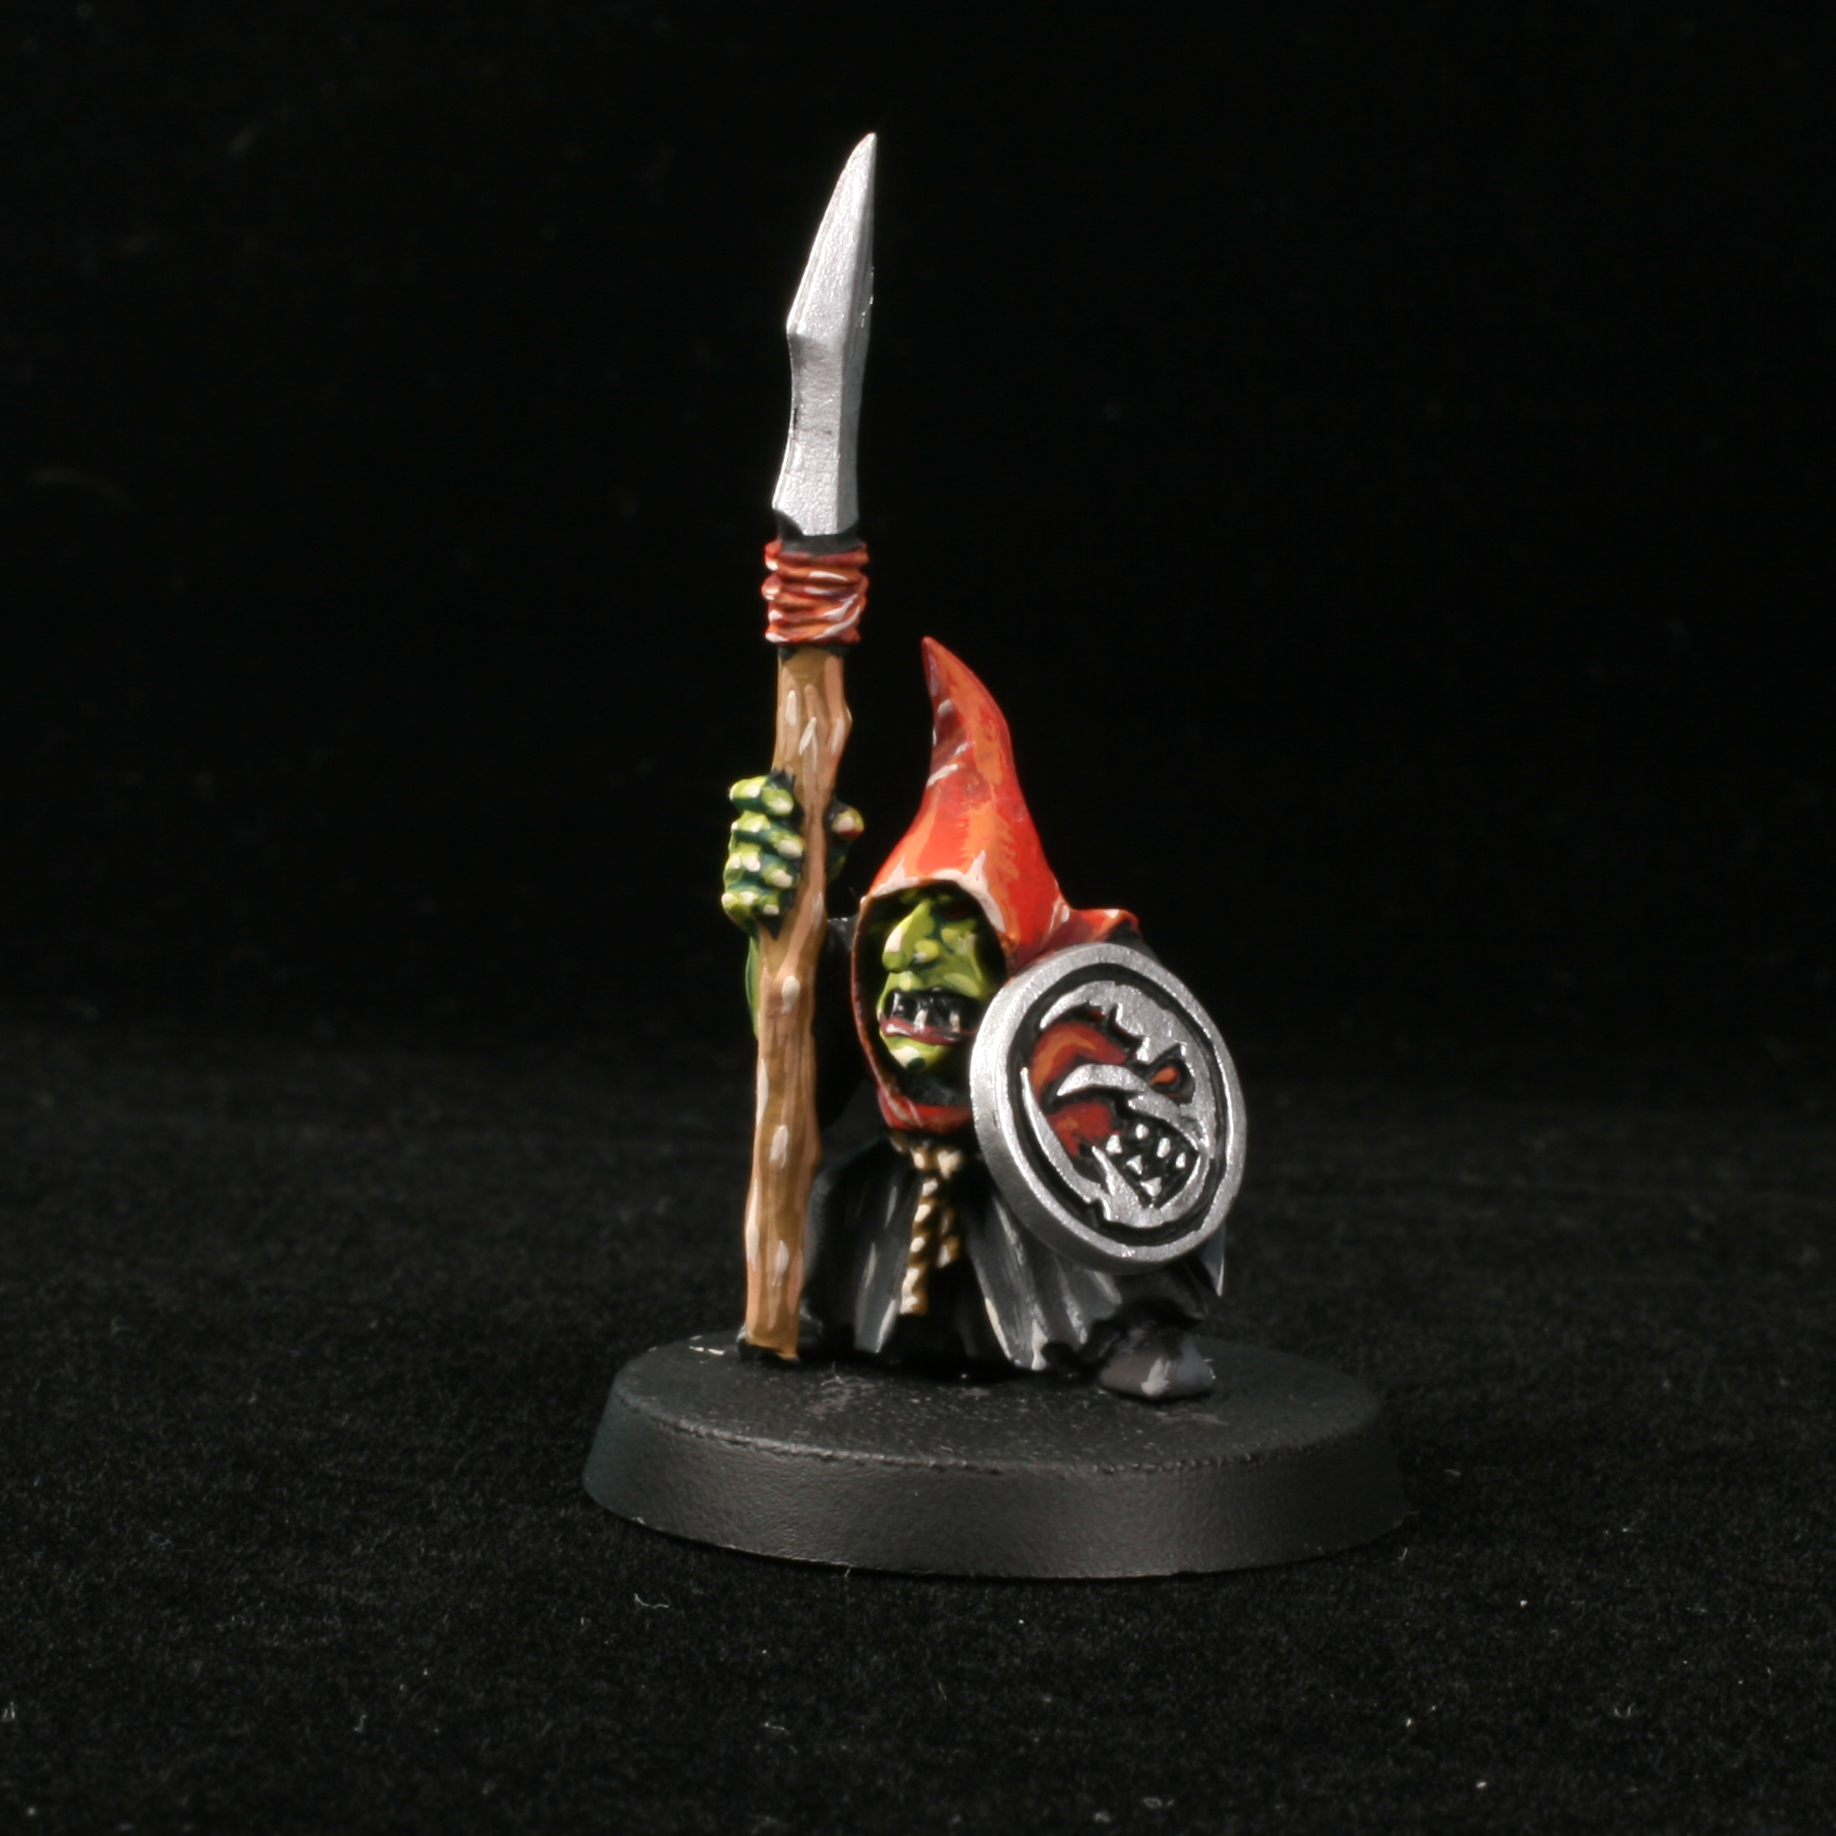
Finish up by picking out the spear’s wooden haft, lips, teeth and belt. Unfortunately, our layering toolbox is not yet equipped to deal with the flat, metallic surfaces of the spear head and shield, so for now I just use some silver metallic paint. We’ll come back to this with some new techniques later in the article, but this is a perfectly fine place to consider this miniature finished.
Adding Additional Layers
Sometimes three layers just don’t blend well enough. We can get smoother transitions by adding more shade and highlight layers (remember there’s only one key layer). The easiest way to add more layers is with more paint bottles. One bottle to one layer.
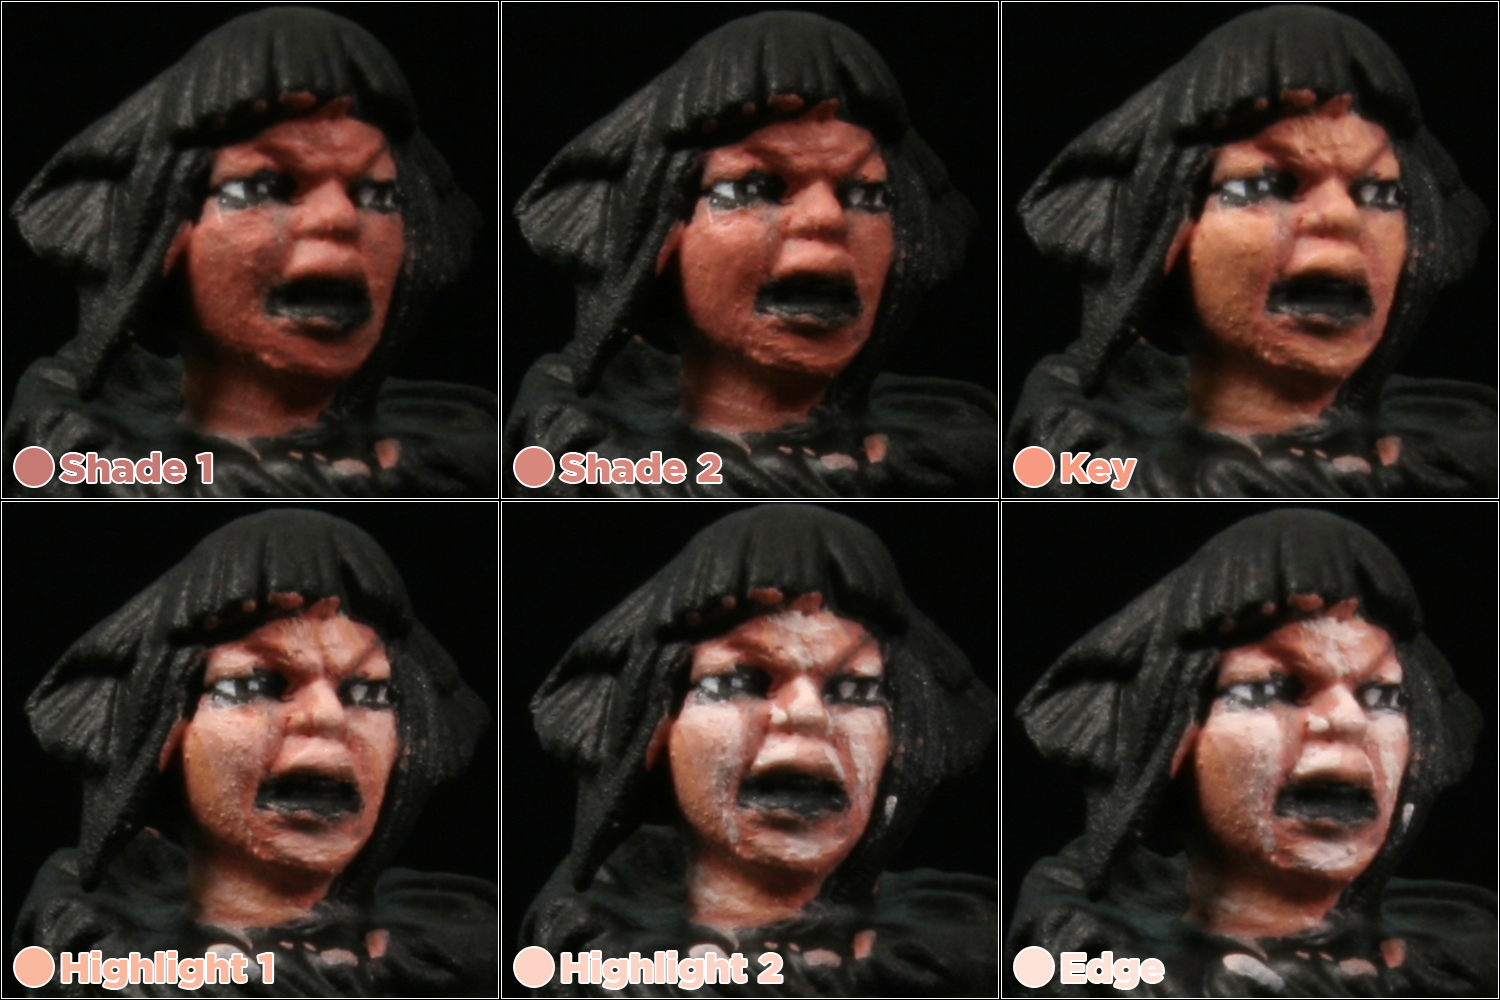
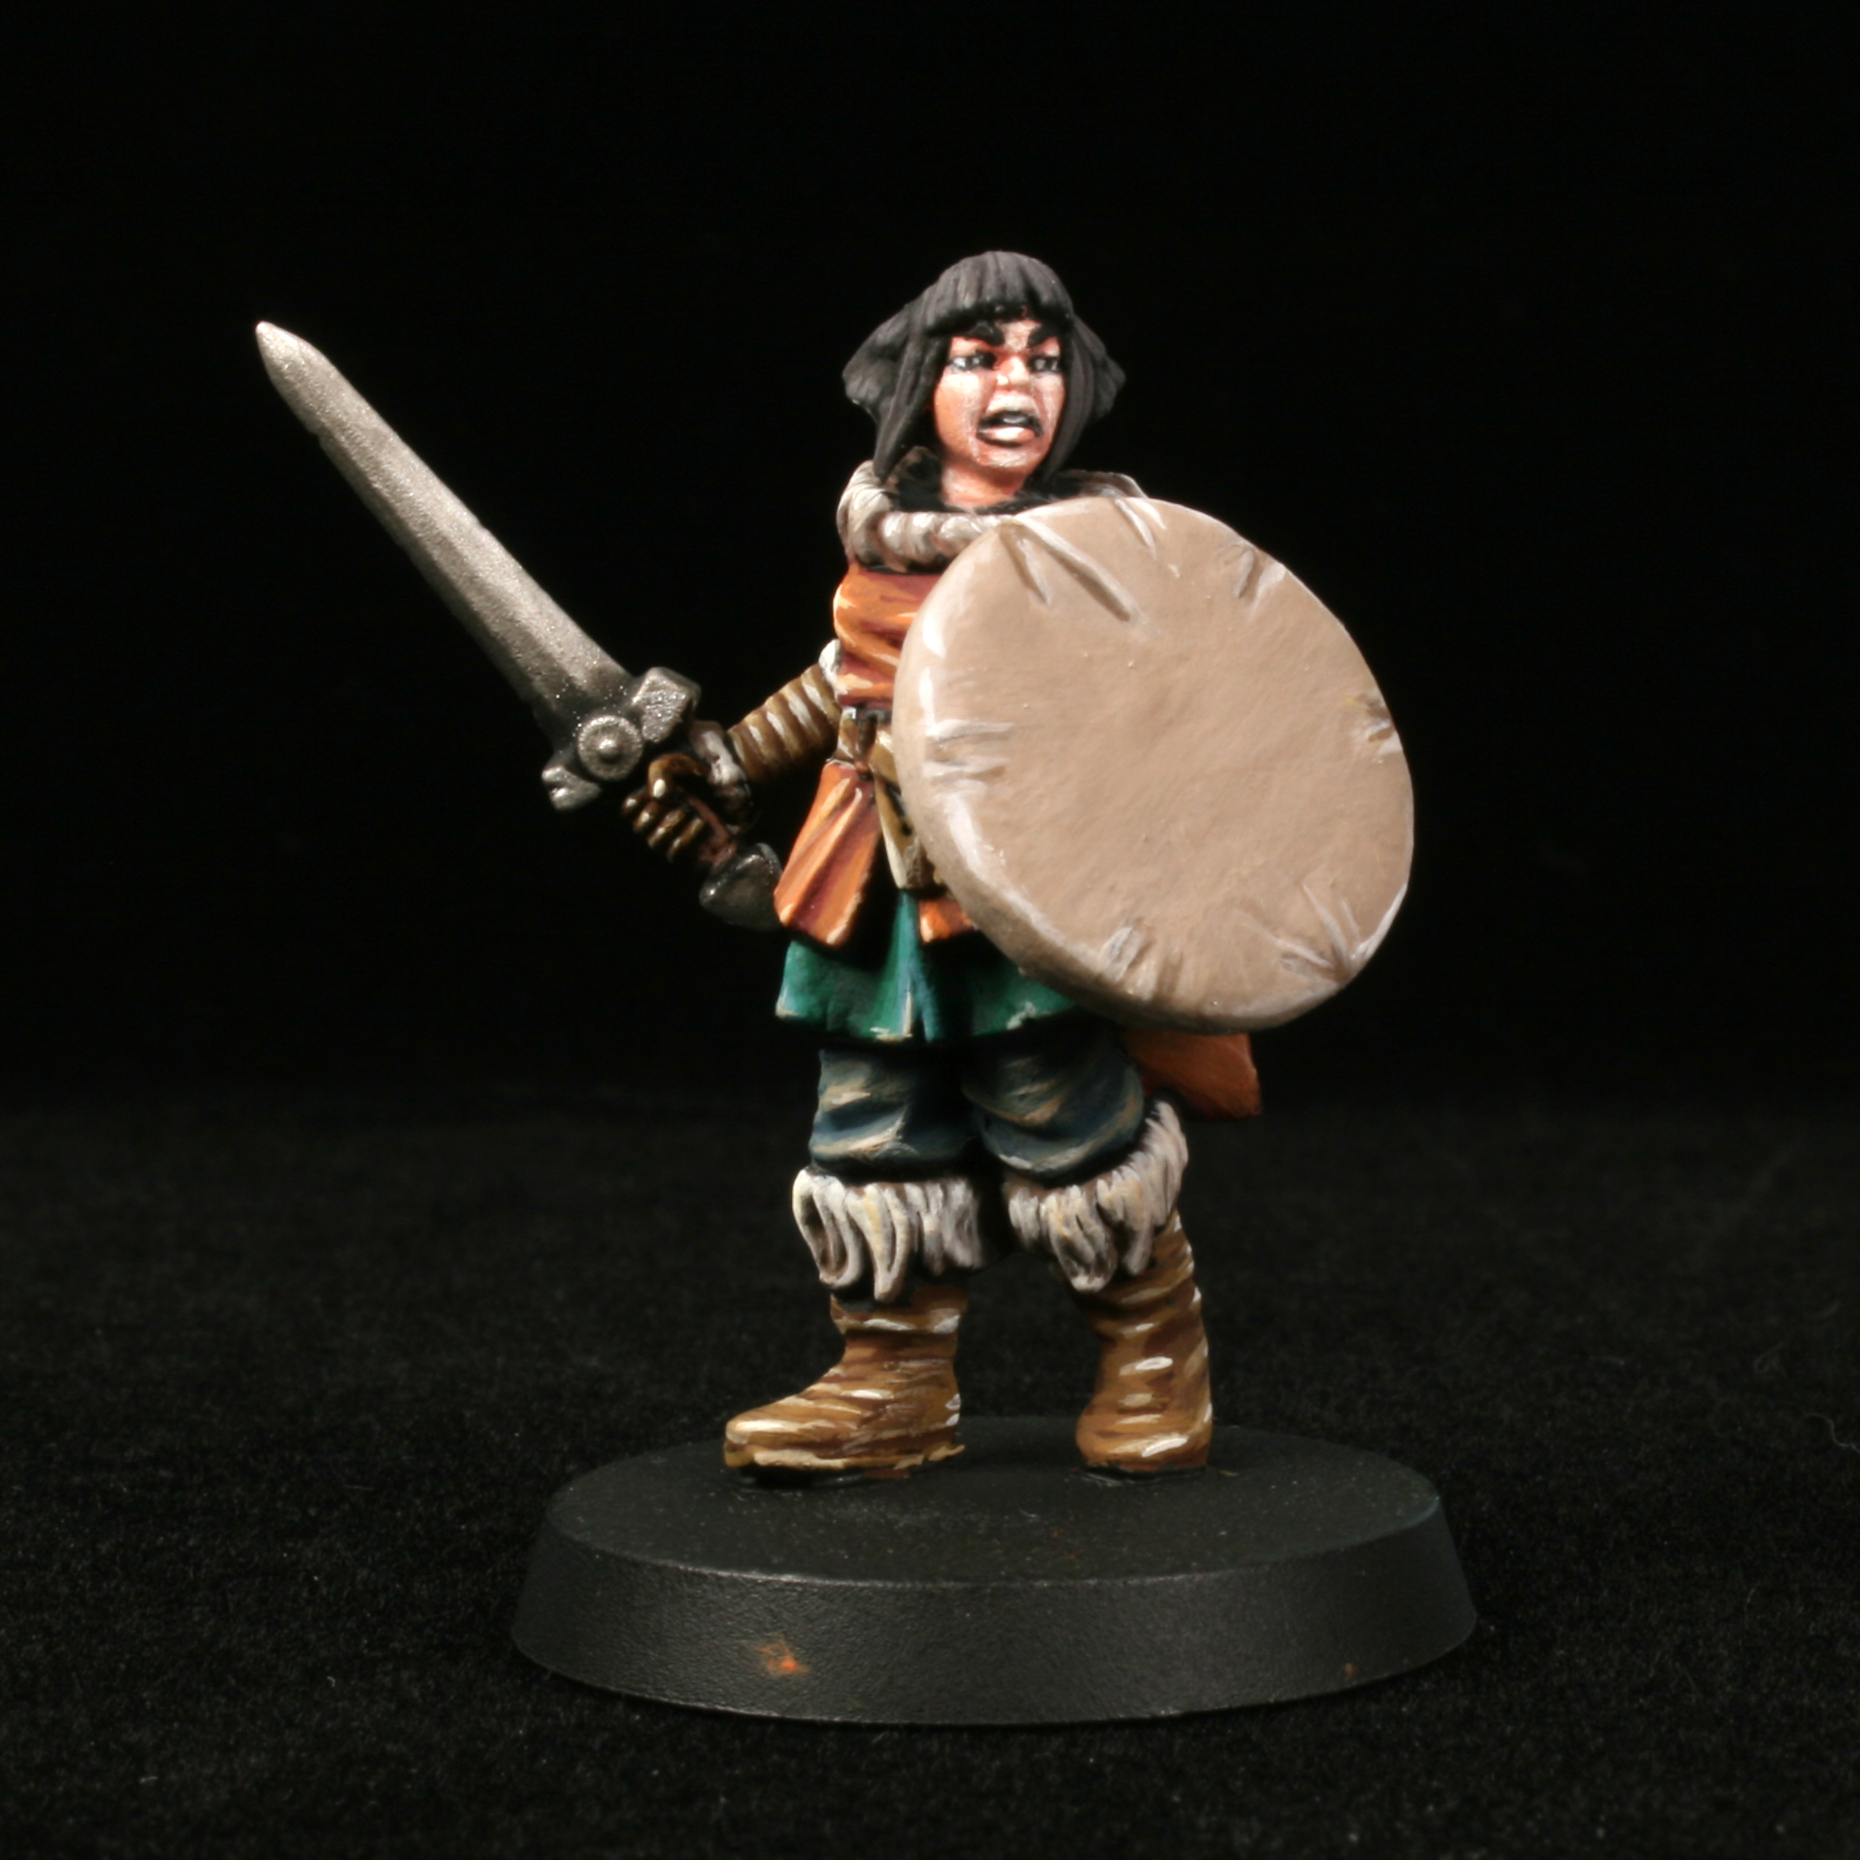
The Warpaints Fanatic line of paint is well-suited to layering in this fashion. There are six colors in each family, and you can layer up from dark to light efficiently with them. We’ll use the Fanatic line’s Moonstone Skin, Agate Skin, Barbarian Flesh, Ruby Skin, Opal Skin, and Pearl Skin on a barbarian built from North Star’s Frostgrave Barbarians II multi-part plastic kit.
We’ll use five layers on the flesh (plus our black undercoat underneath and a specular highlight). I paint around the eyes, leaving a sliver of the black undercoat around them.
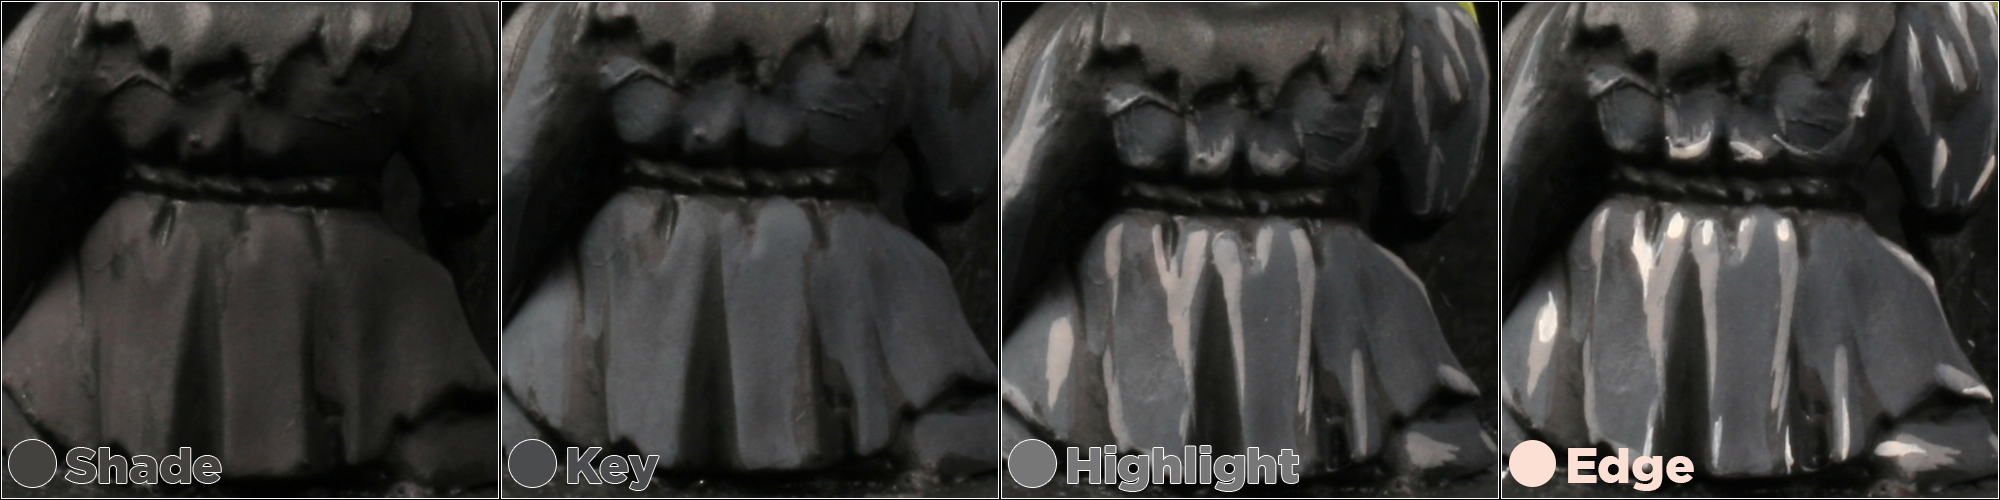
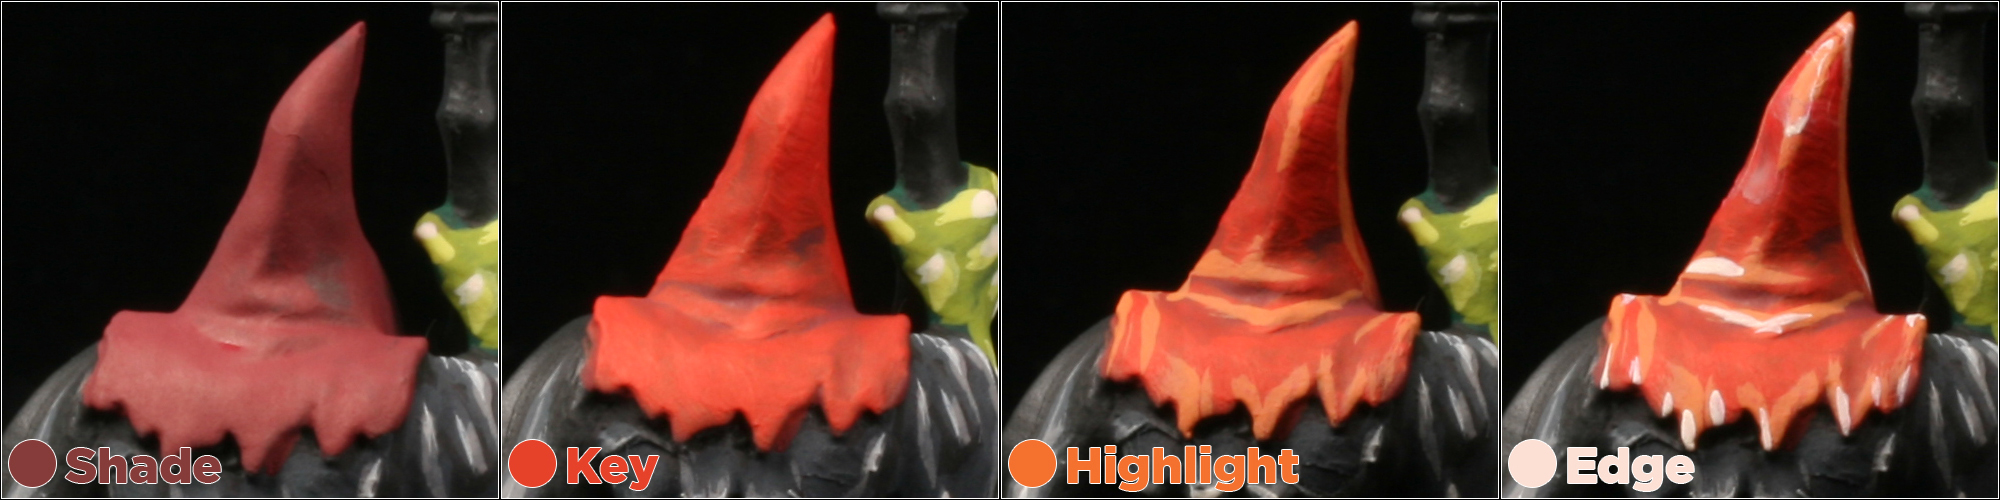
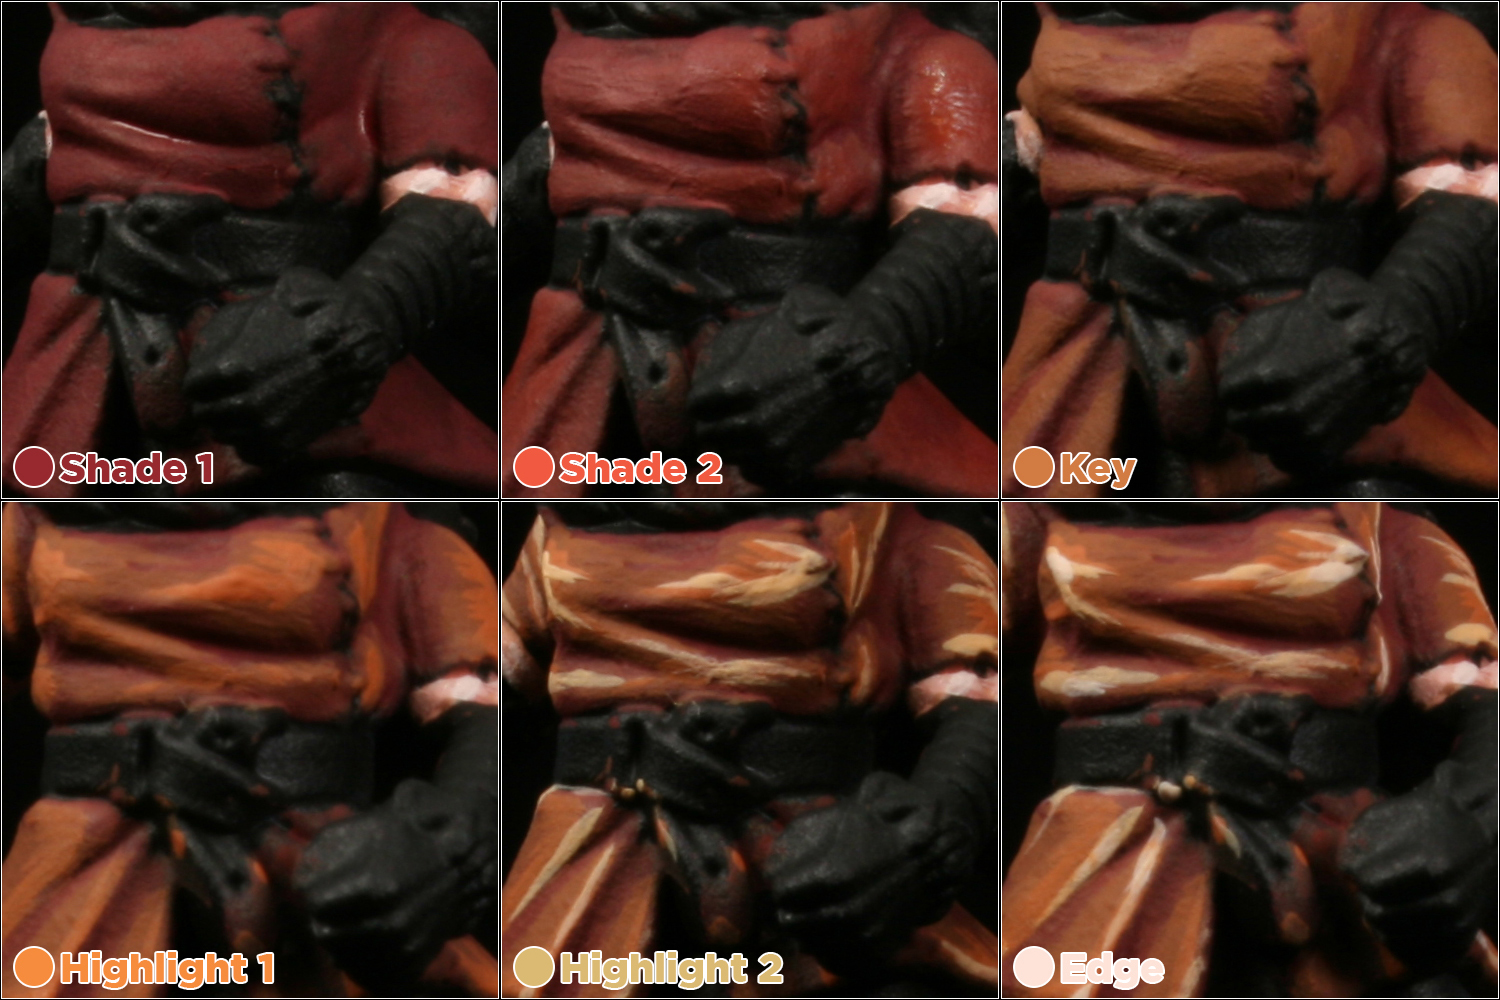
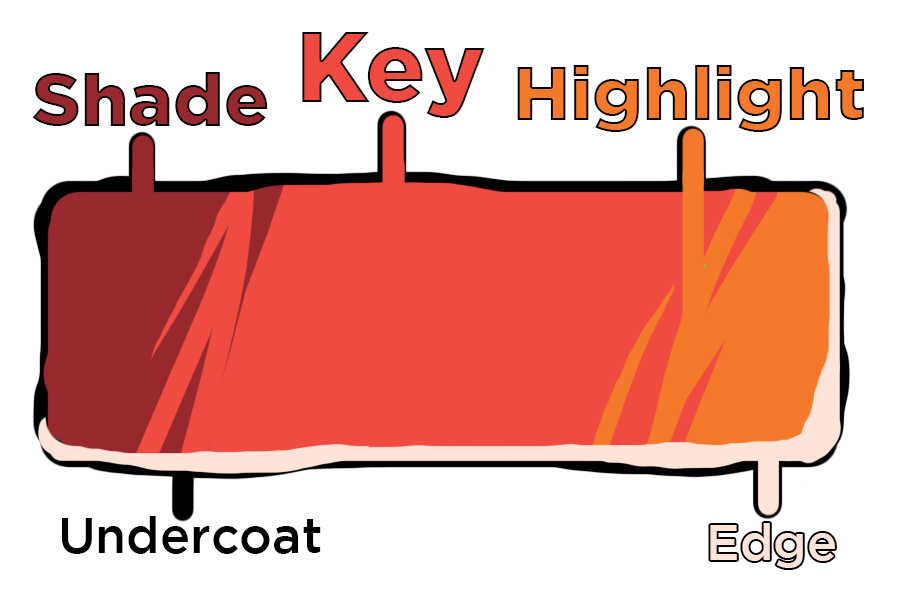
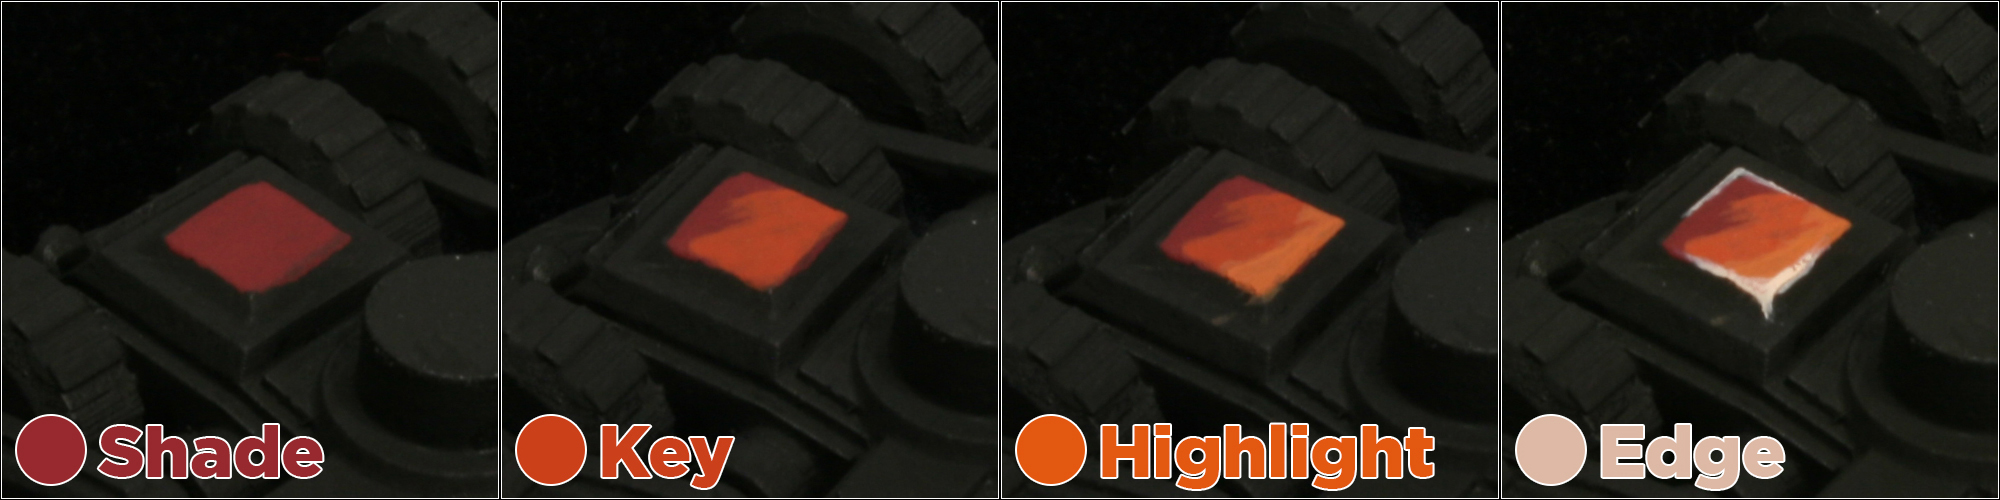
For her shirt, we’ll do five layers and an edge again: dark reds for shades and shift to orange browns for the keys and highlights.
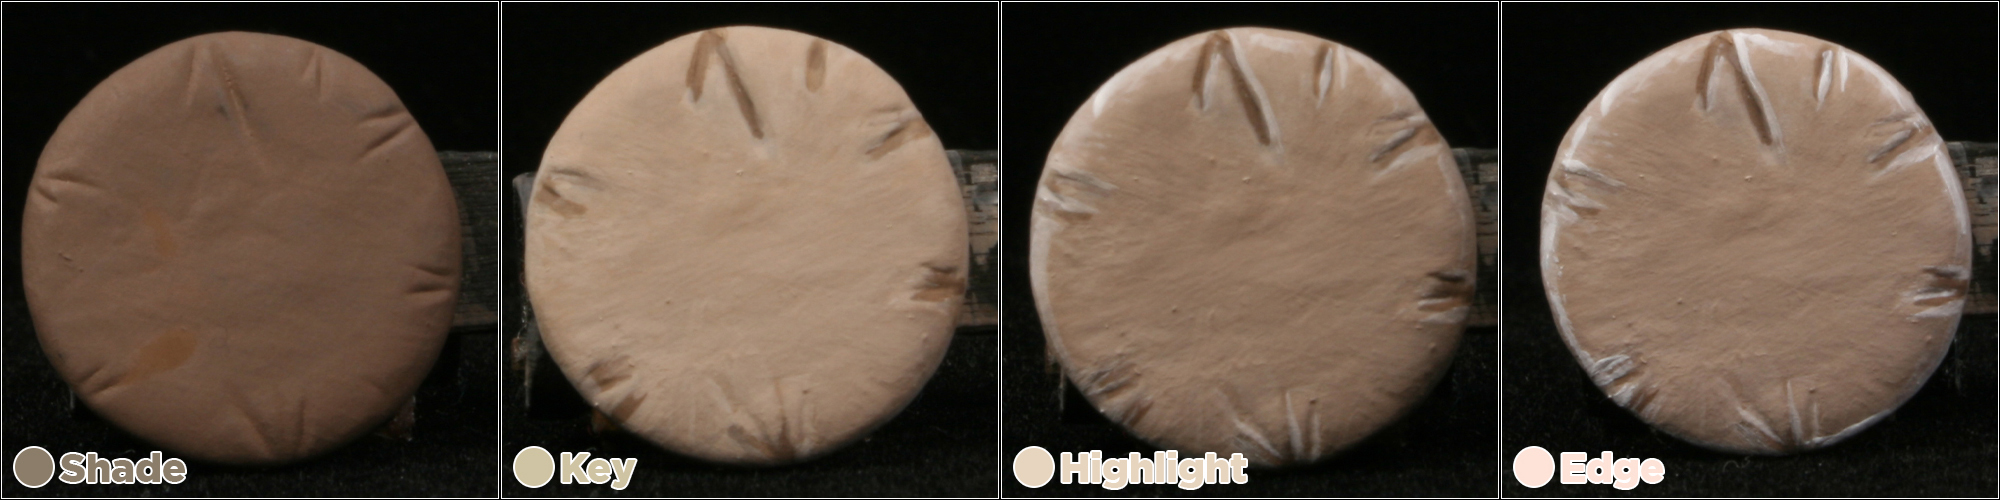
Our barbarian has alot of details that are small or simple enough that 5 layers and an edge is overkill. For the shield, I fallback to 3 layers just like our goblin buddy from earlier.
I finish up the sword with some silver and a dark wash. This miniature is tabletop ready, but we’ll return to it later after we learn some more about layering to give it some more personality.

Obviously an article about layering must, itself, have layers. If you’re a layering beginner, this is a great place to stop reading and go paint some layers. But if you’re ready to advance to the next level, consider that layers have several variables that can be manipulated: shape, color, spacing, and opacity.
Layer Shape
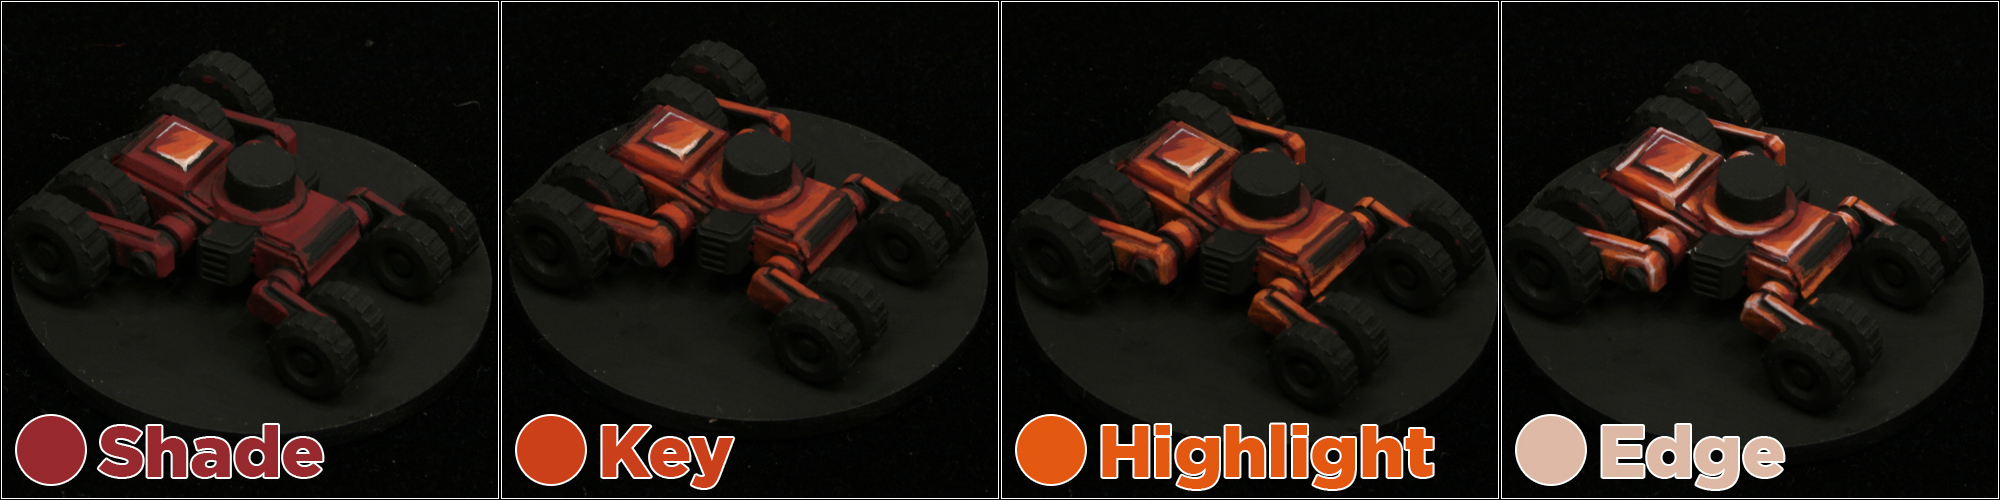
The goblin and barbarian miniatures have lots of organic contours to inform us how to shape our layers. The lighter layers occupy higher topography. We get the layers’ shapes “for free” from the sculpt. But now lets tackle a model which is mostly flat surfaces, a common situation for vehicles, buildings and weapons. Its up to us to imagine meaningful shapes to our layers.
For flat surfaces, I often shape the layers going from dark on one side to light on the other, with a diagonal gradient. This is not a realistic effect, but it is a very striking one. Kinda like a comic book or illustration.
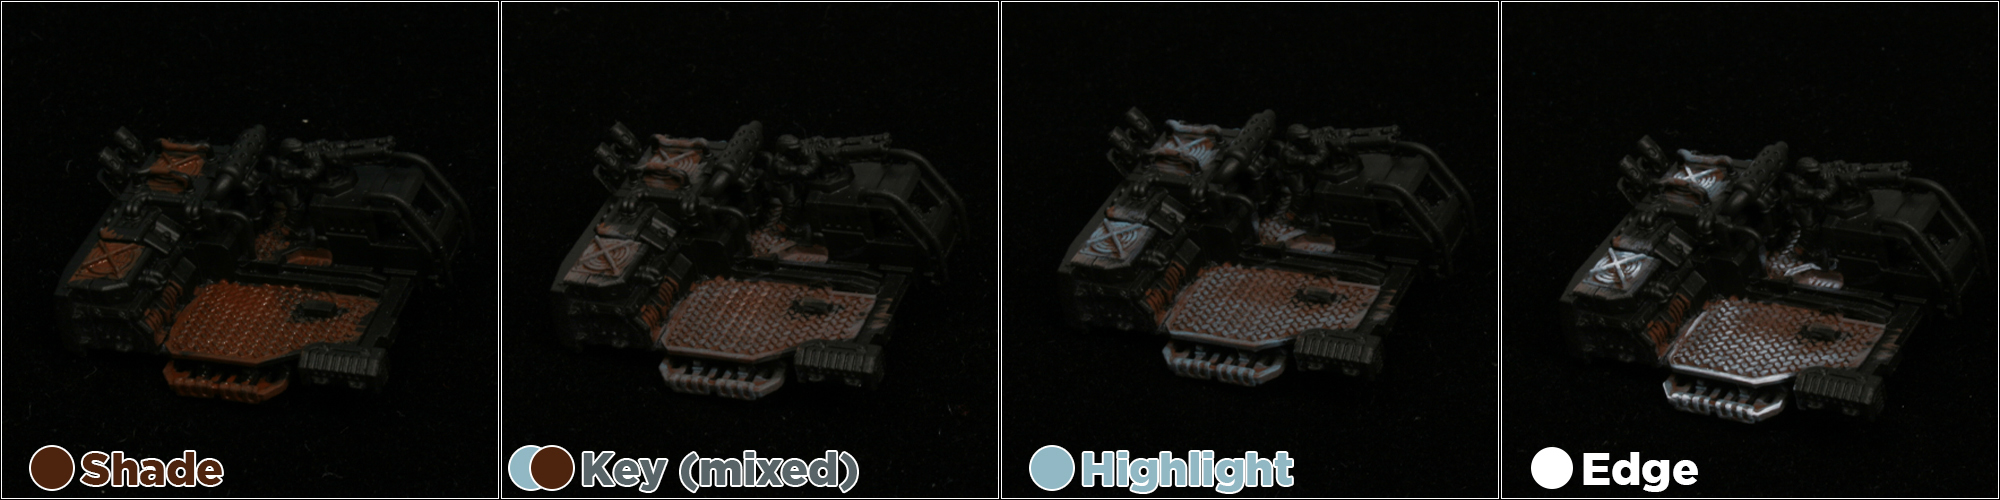
Let’s paint some layers on a 6mm Sandcat vehicle from Iliada Games Studio. We’re gonna start with just one panel, so we can show the process. Be sure to note the feathering on the layer shape.
Of course, we’re not gonna do this one panel at a time.
Finally, we do the tires and details. I often weather vehicles like this with little scratches using the edge and shade paints.
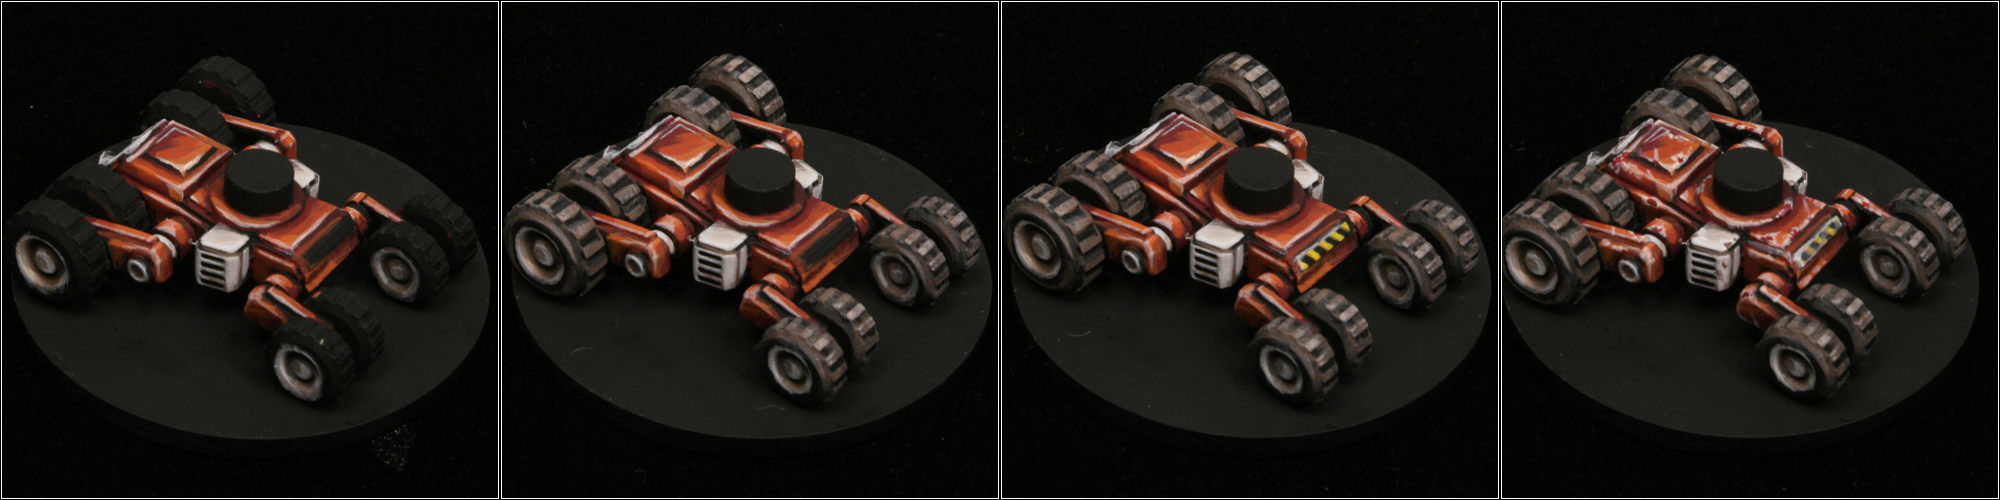
The top half of this vehicle is painted the same way as the bottom. I attach the halves with a tiny amount of blue tack so that the top can swivel. Neato!
Layer Color
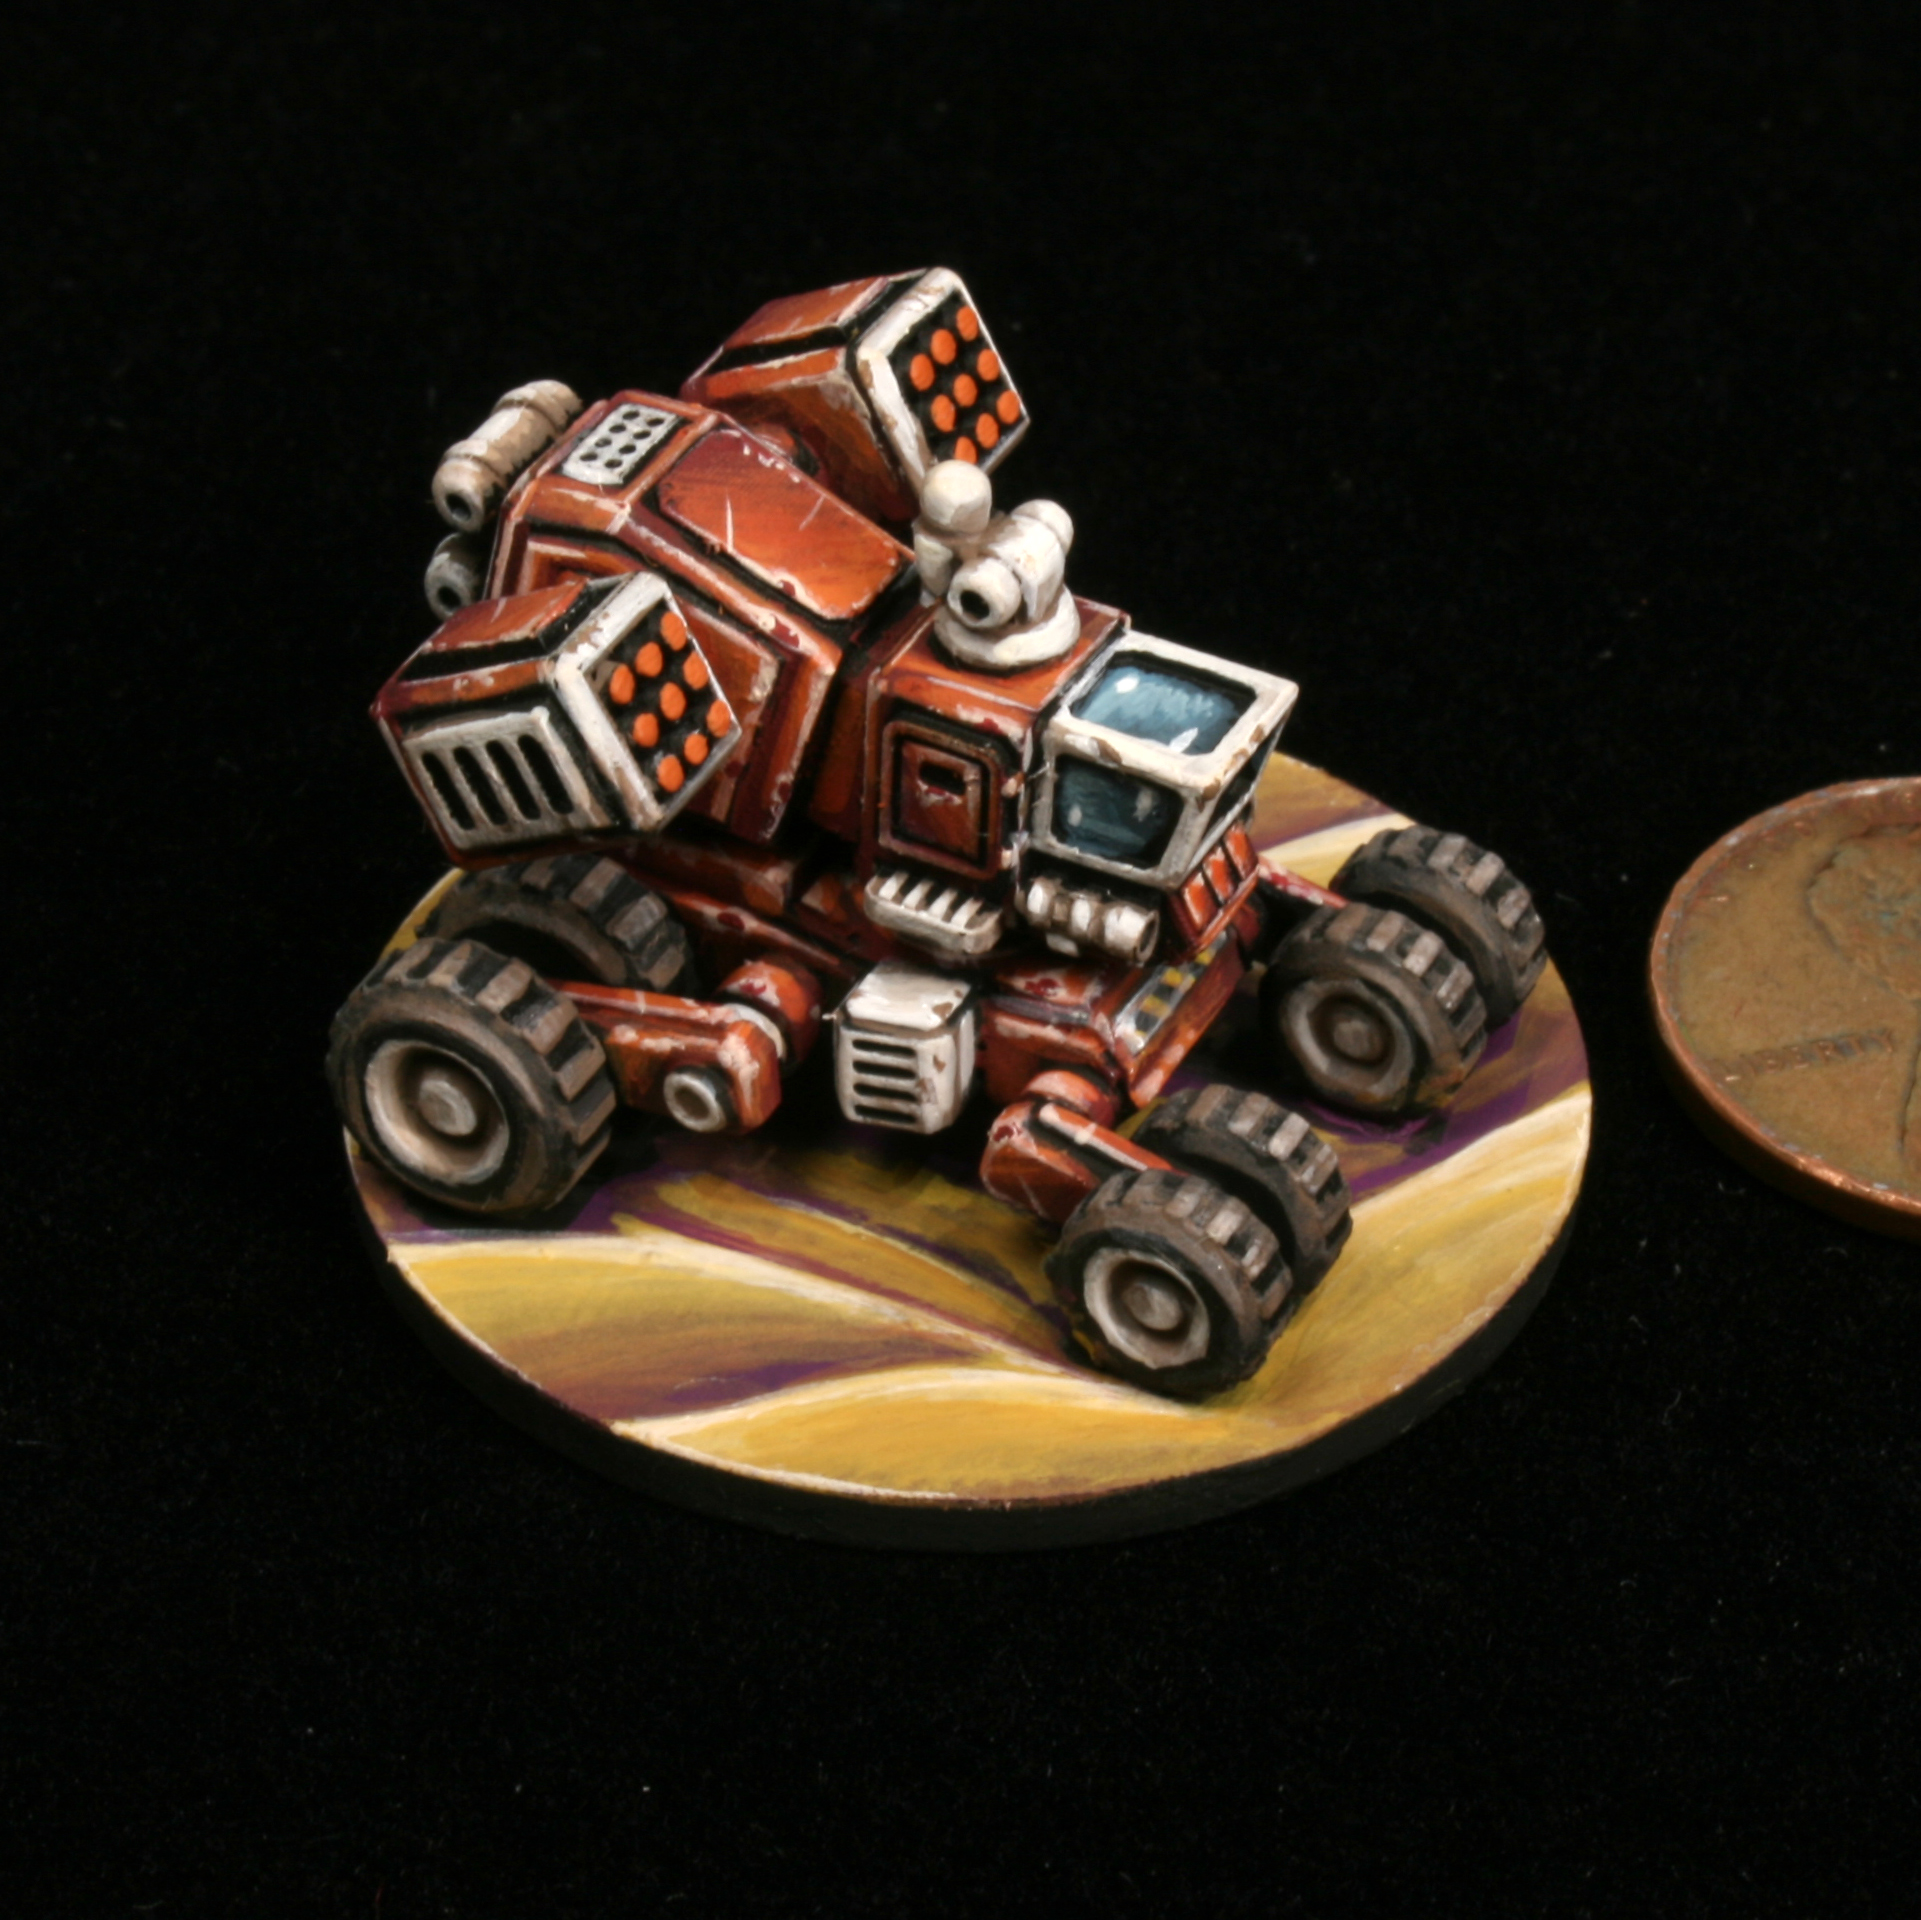
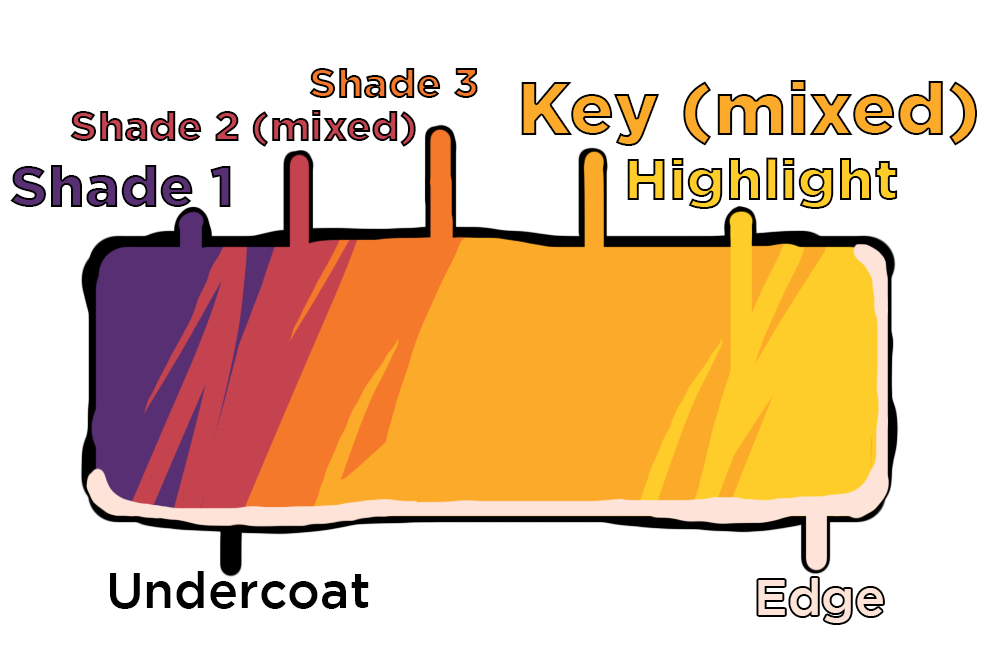
Up to now, we have been using one paint bottle to one layer. Our goblin used a dark green, a medium yellow green, and a light yellow green; our barbarian’s skin used six different flesh tone paints. A great way to start, but this can be a limitation because each paint bottle must be similar to the ones next to it in the layer order. If you’re willing to mix some transitional colors on a palette, you can open up some really funky, rich schemes. Let’s get wild and use a saturated purple as our shade against a yellow-orange key. If you haven’t been using a wet palette so far, you will definitely need one for color mixing!
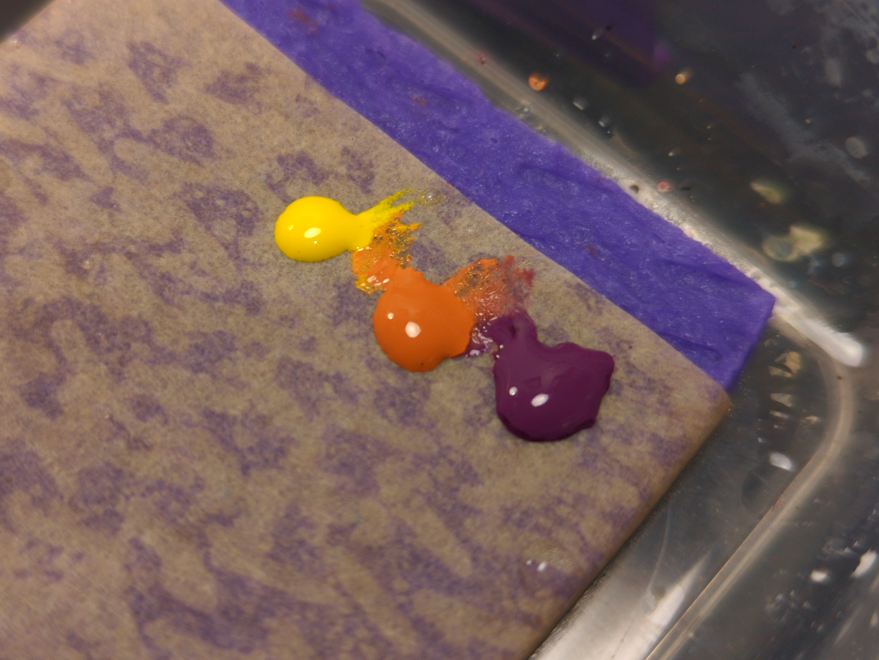
We’re gonna use this evocative palette on a 6mm Ram Wagon from The Lazy Forger.

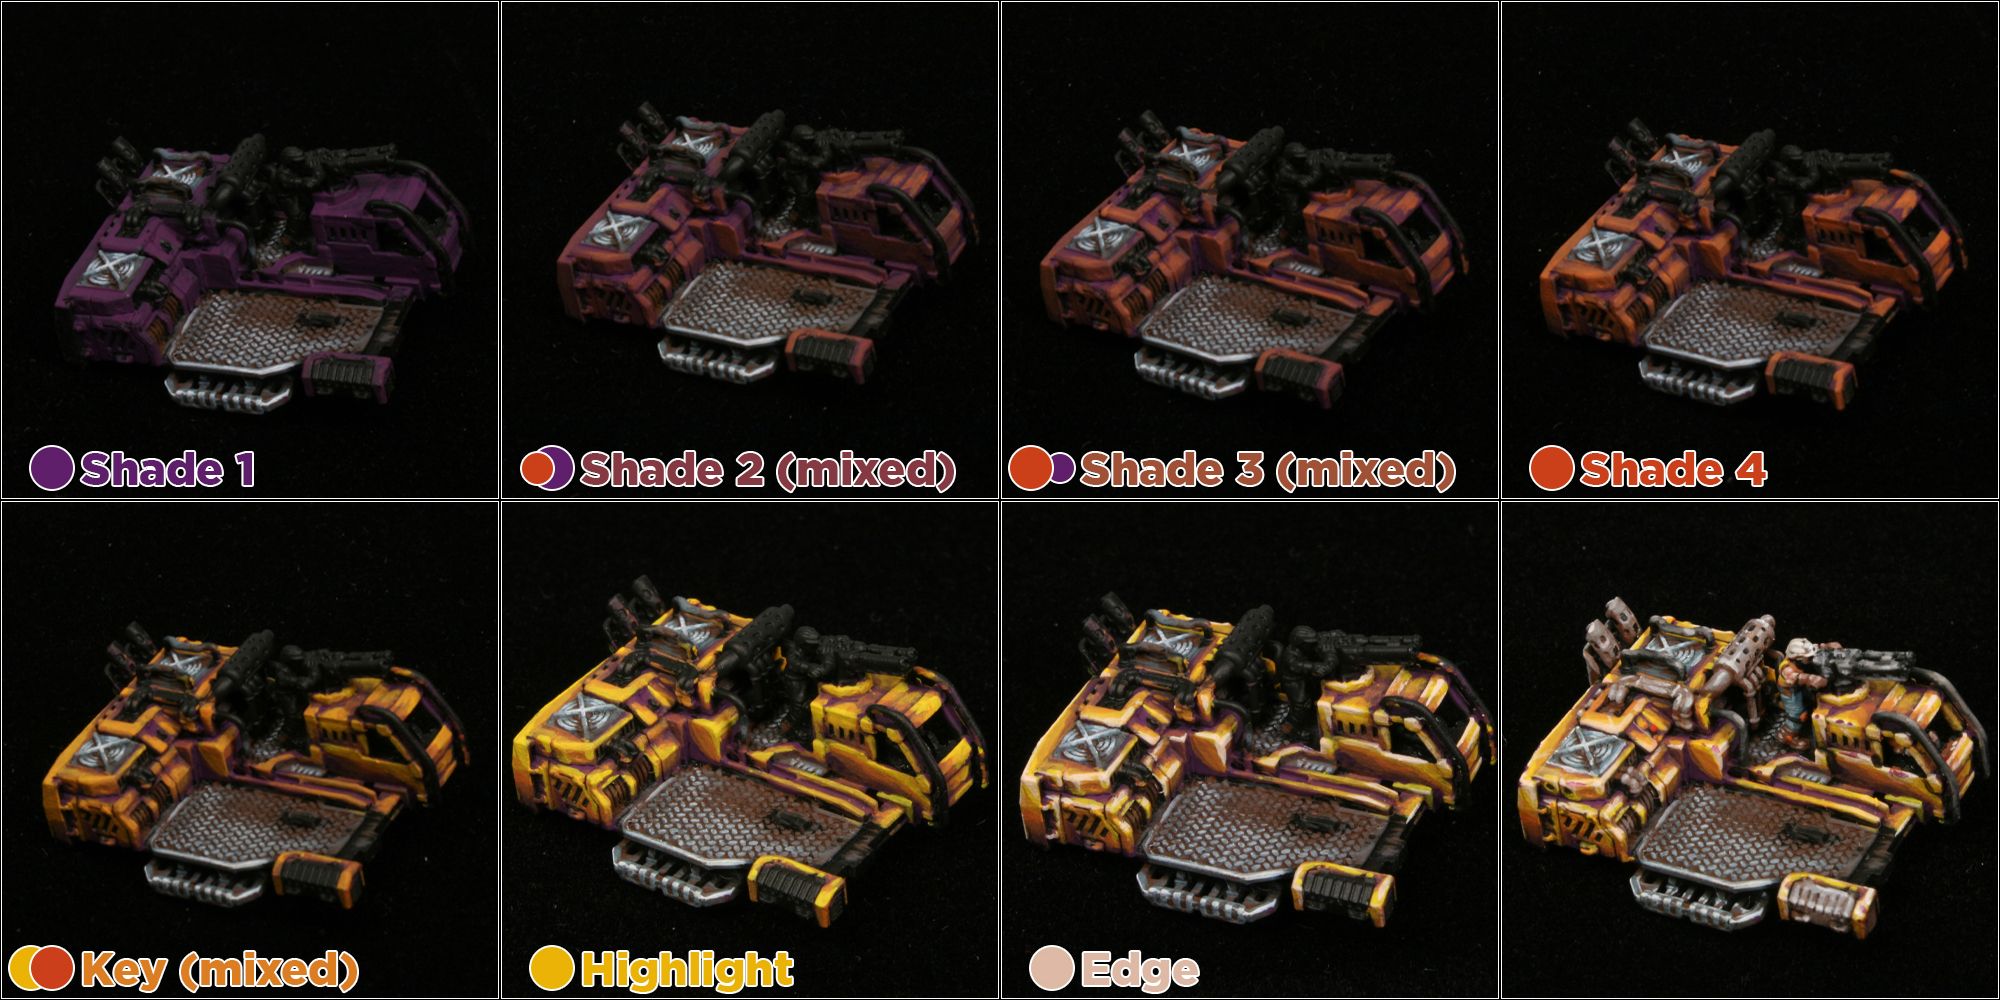
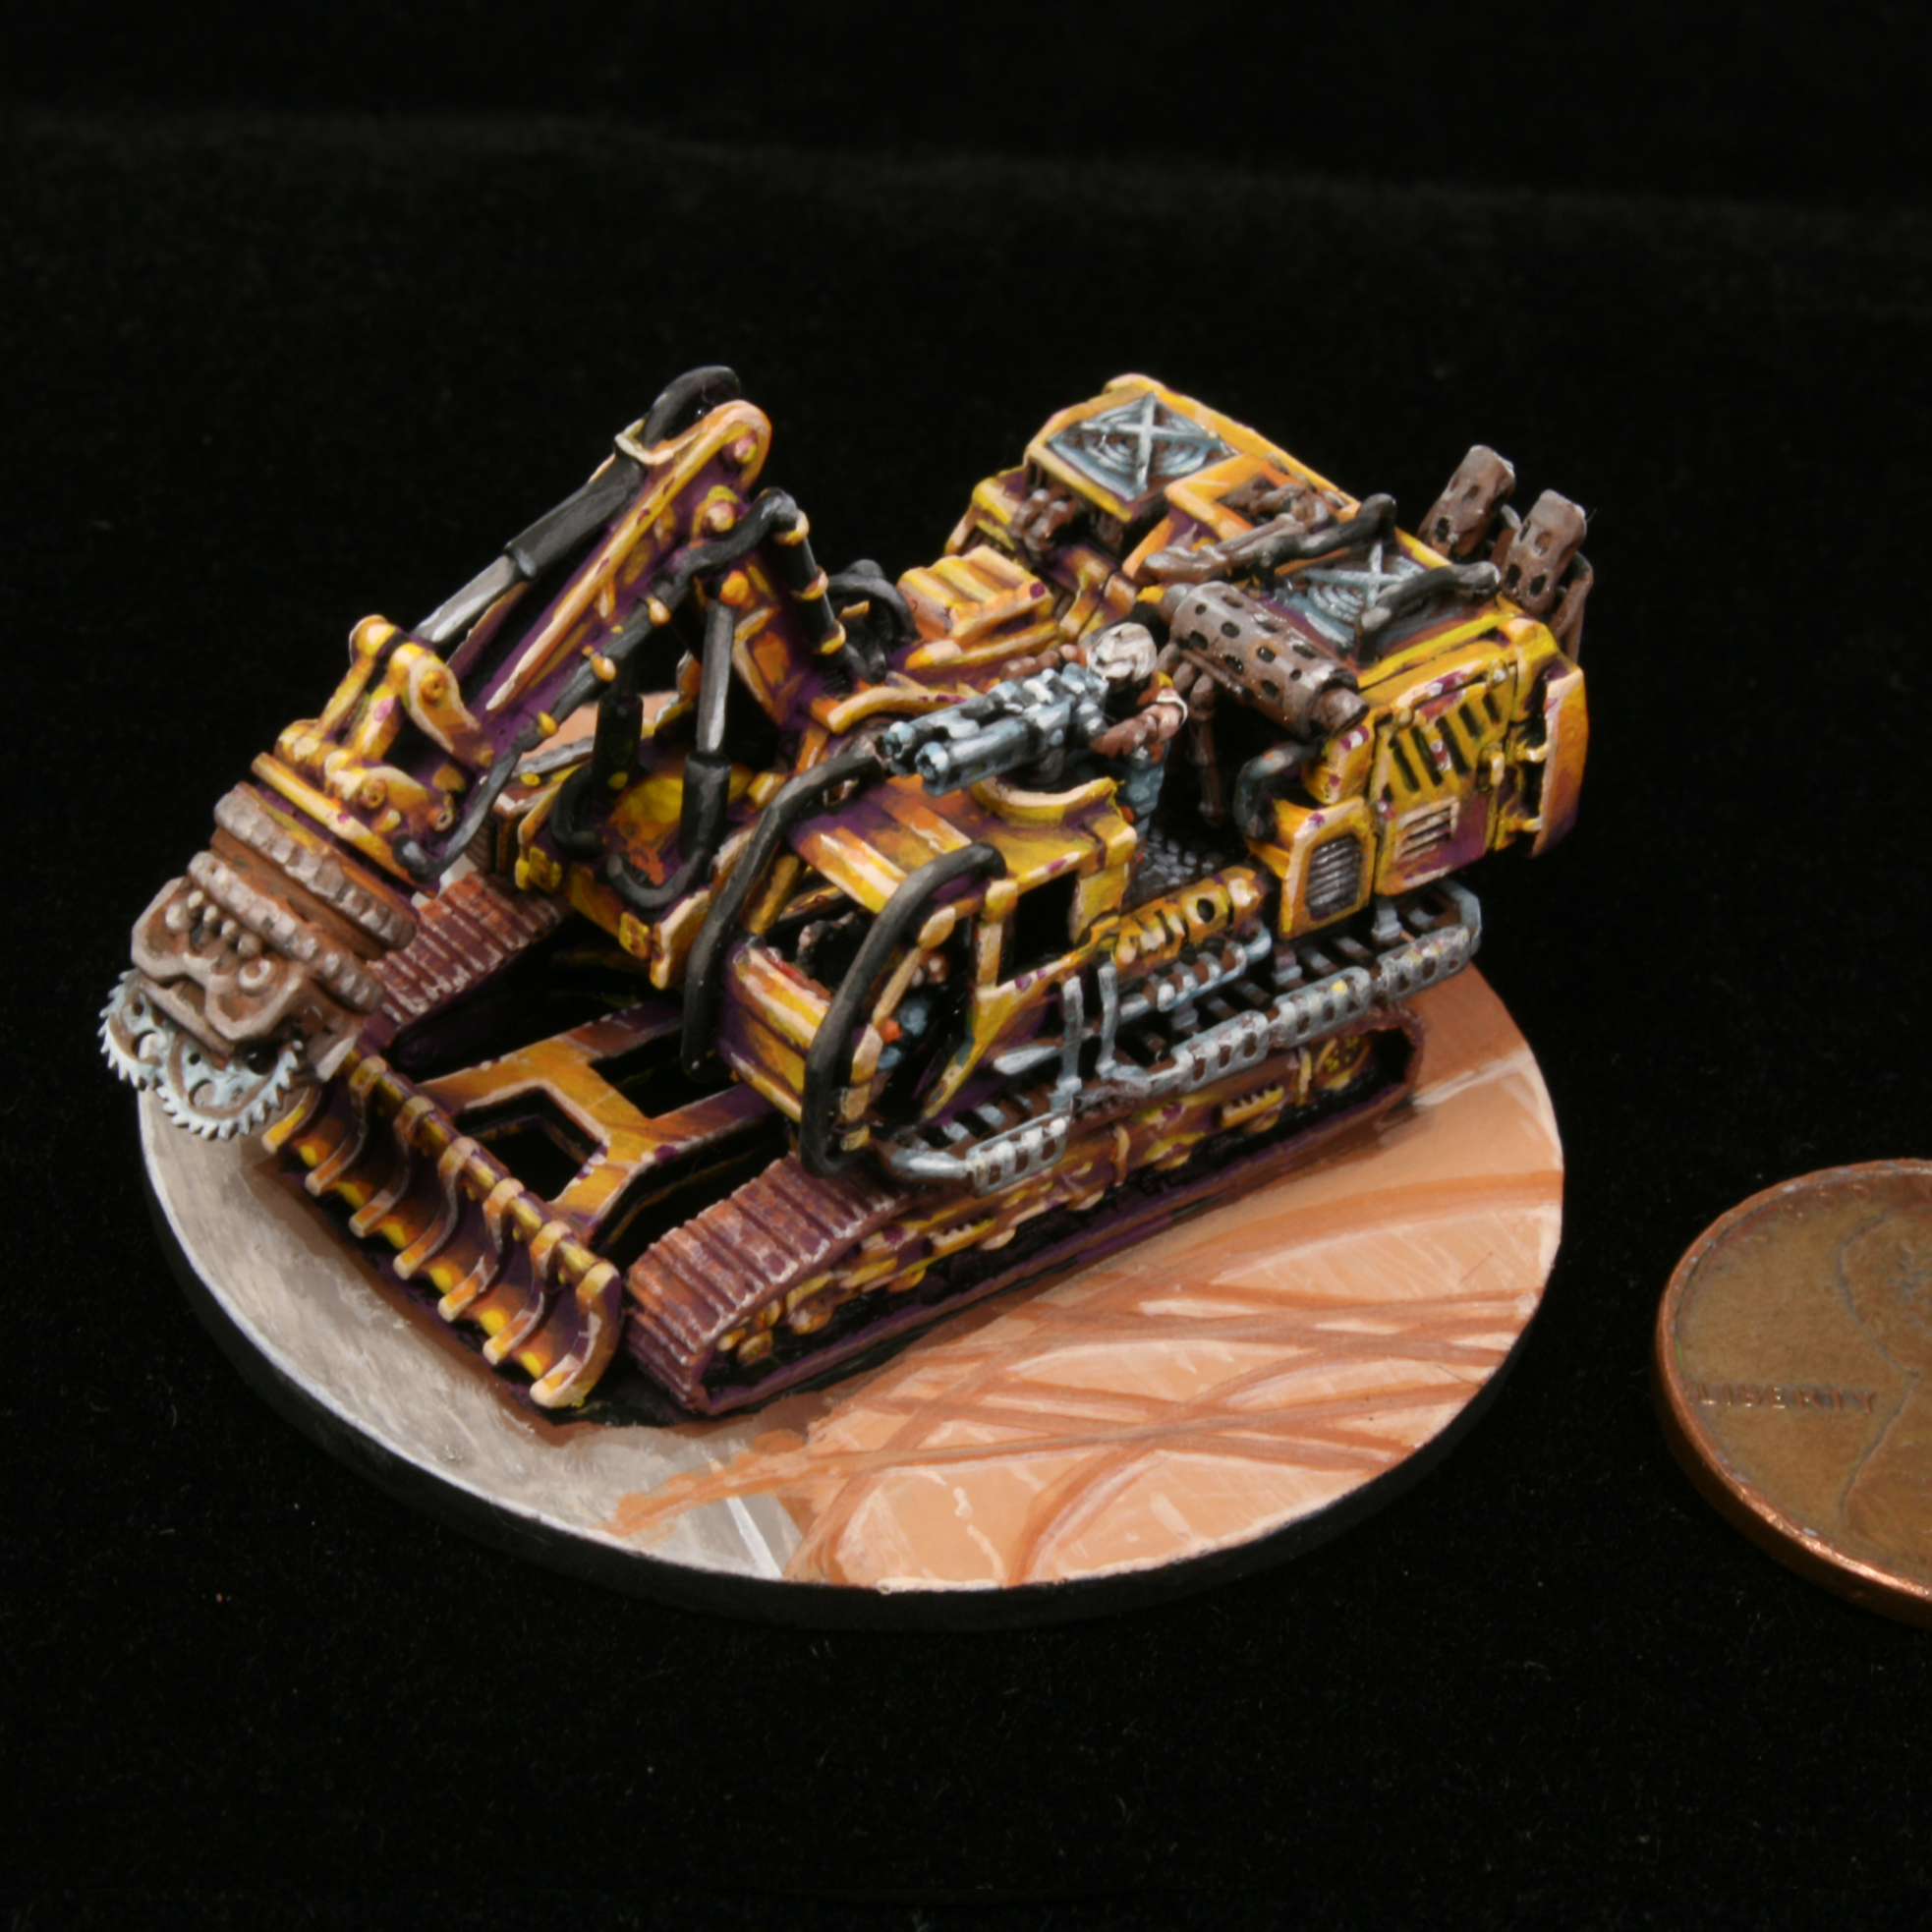
I only used about 10 different paint bottles on this miniature. Mixing paints keeps the color palette laser focused.
Layer Spacing
So far we’ve used the key, shade and highlight layer system, with the key layer controlling the color. But perhaps no particular color should be dominant, making the transition itself the center of attention. We can drop the key, shade and highlight layers and instead use a series of evenly spaced layers. They transition from dark to light, and can shift in hue as they go. You’ll definitely want to be mixing paint for this one.
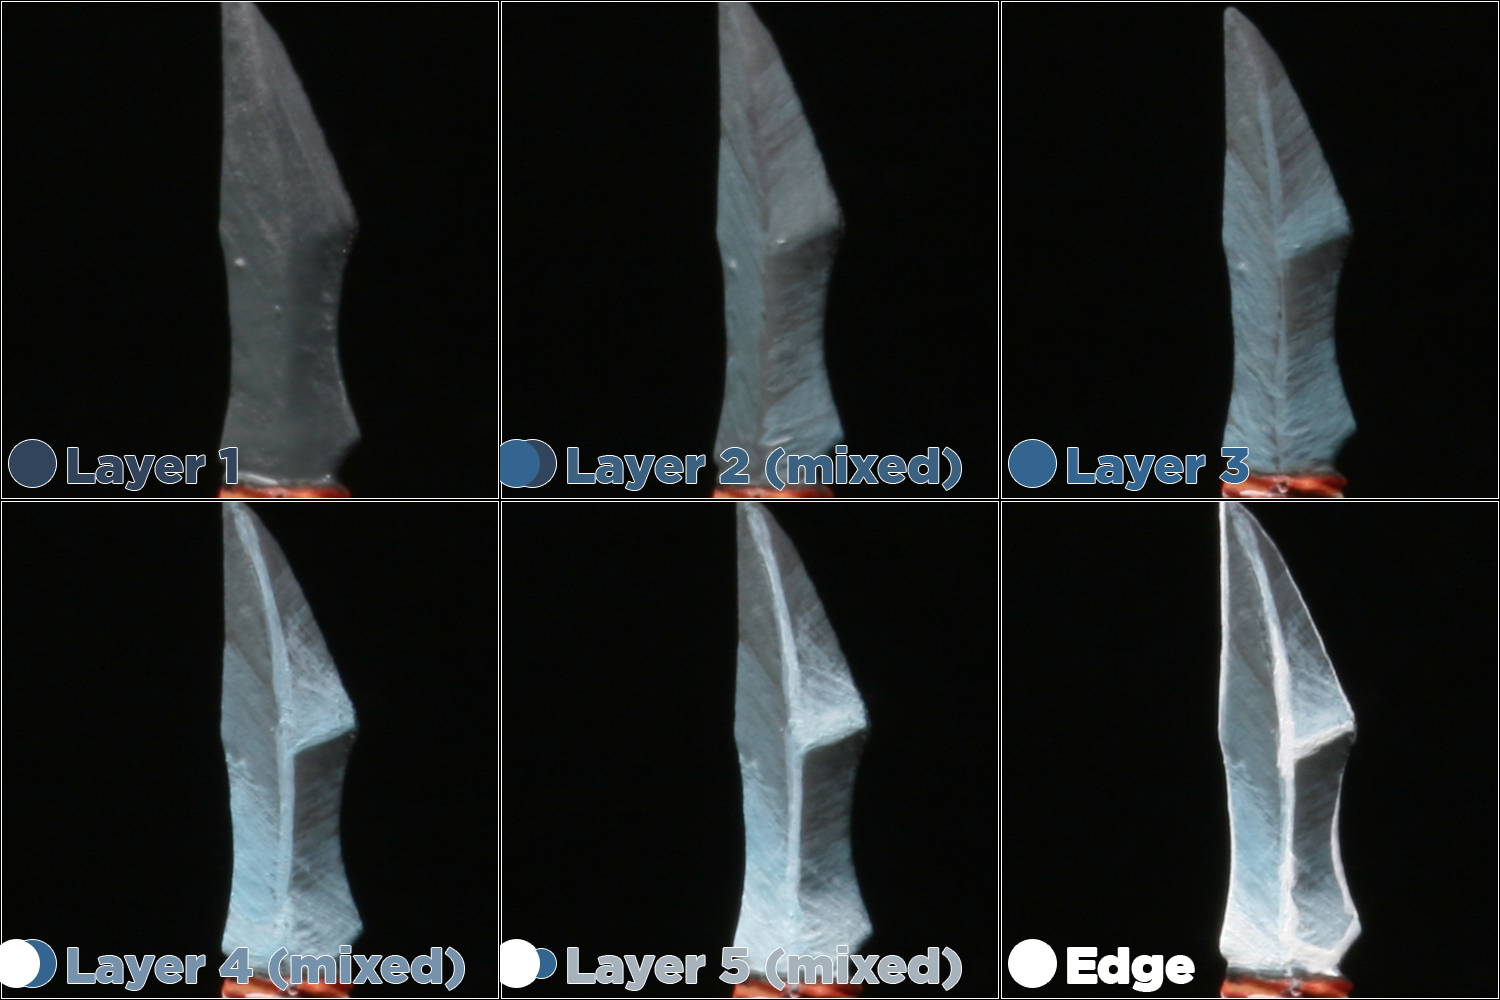
We’ll use layer spacing and color mixing to gussy up our goblin from earlier. To get that metallic look, the layers need go from very dark to very light.
We’ll do the shield similarly, but with different colors and pushing highlights to the middle of the shield instead of against the side. This will give the shield a brassy look.
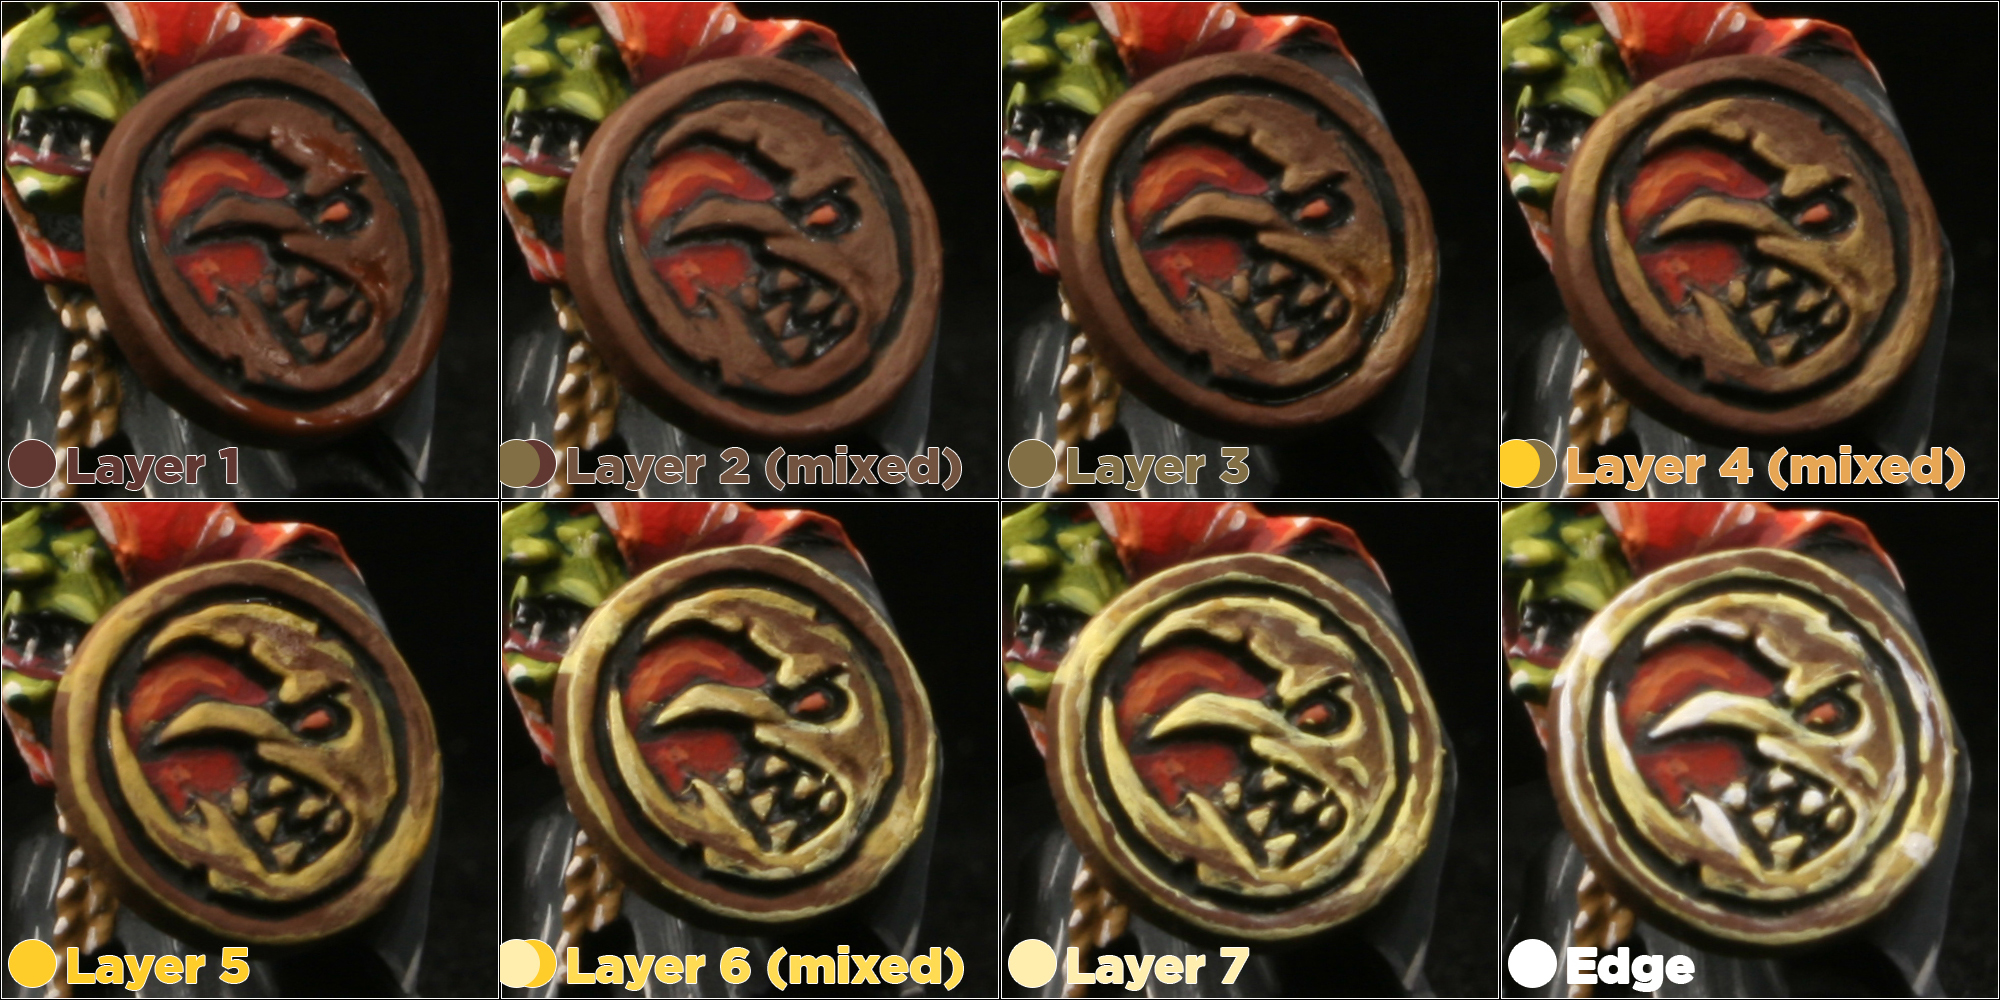
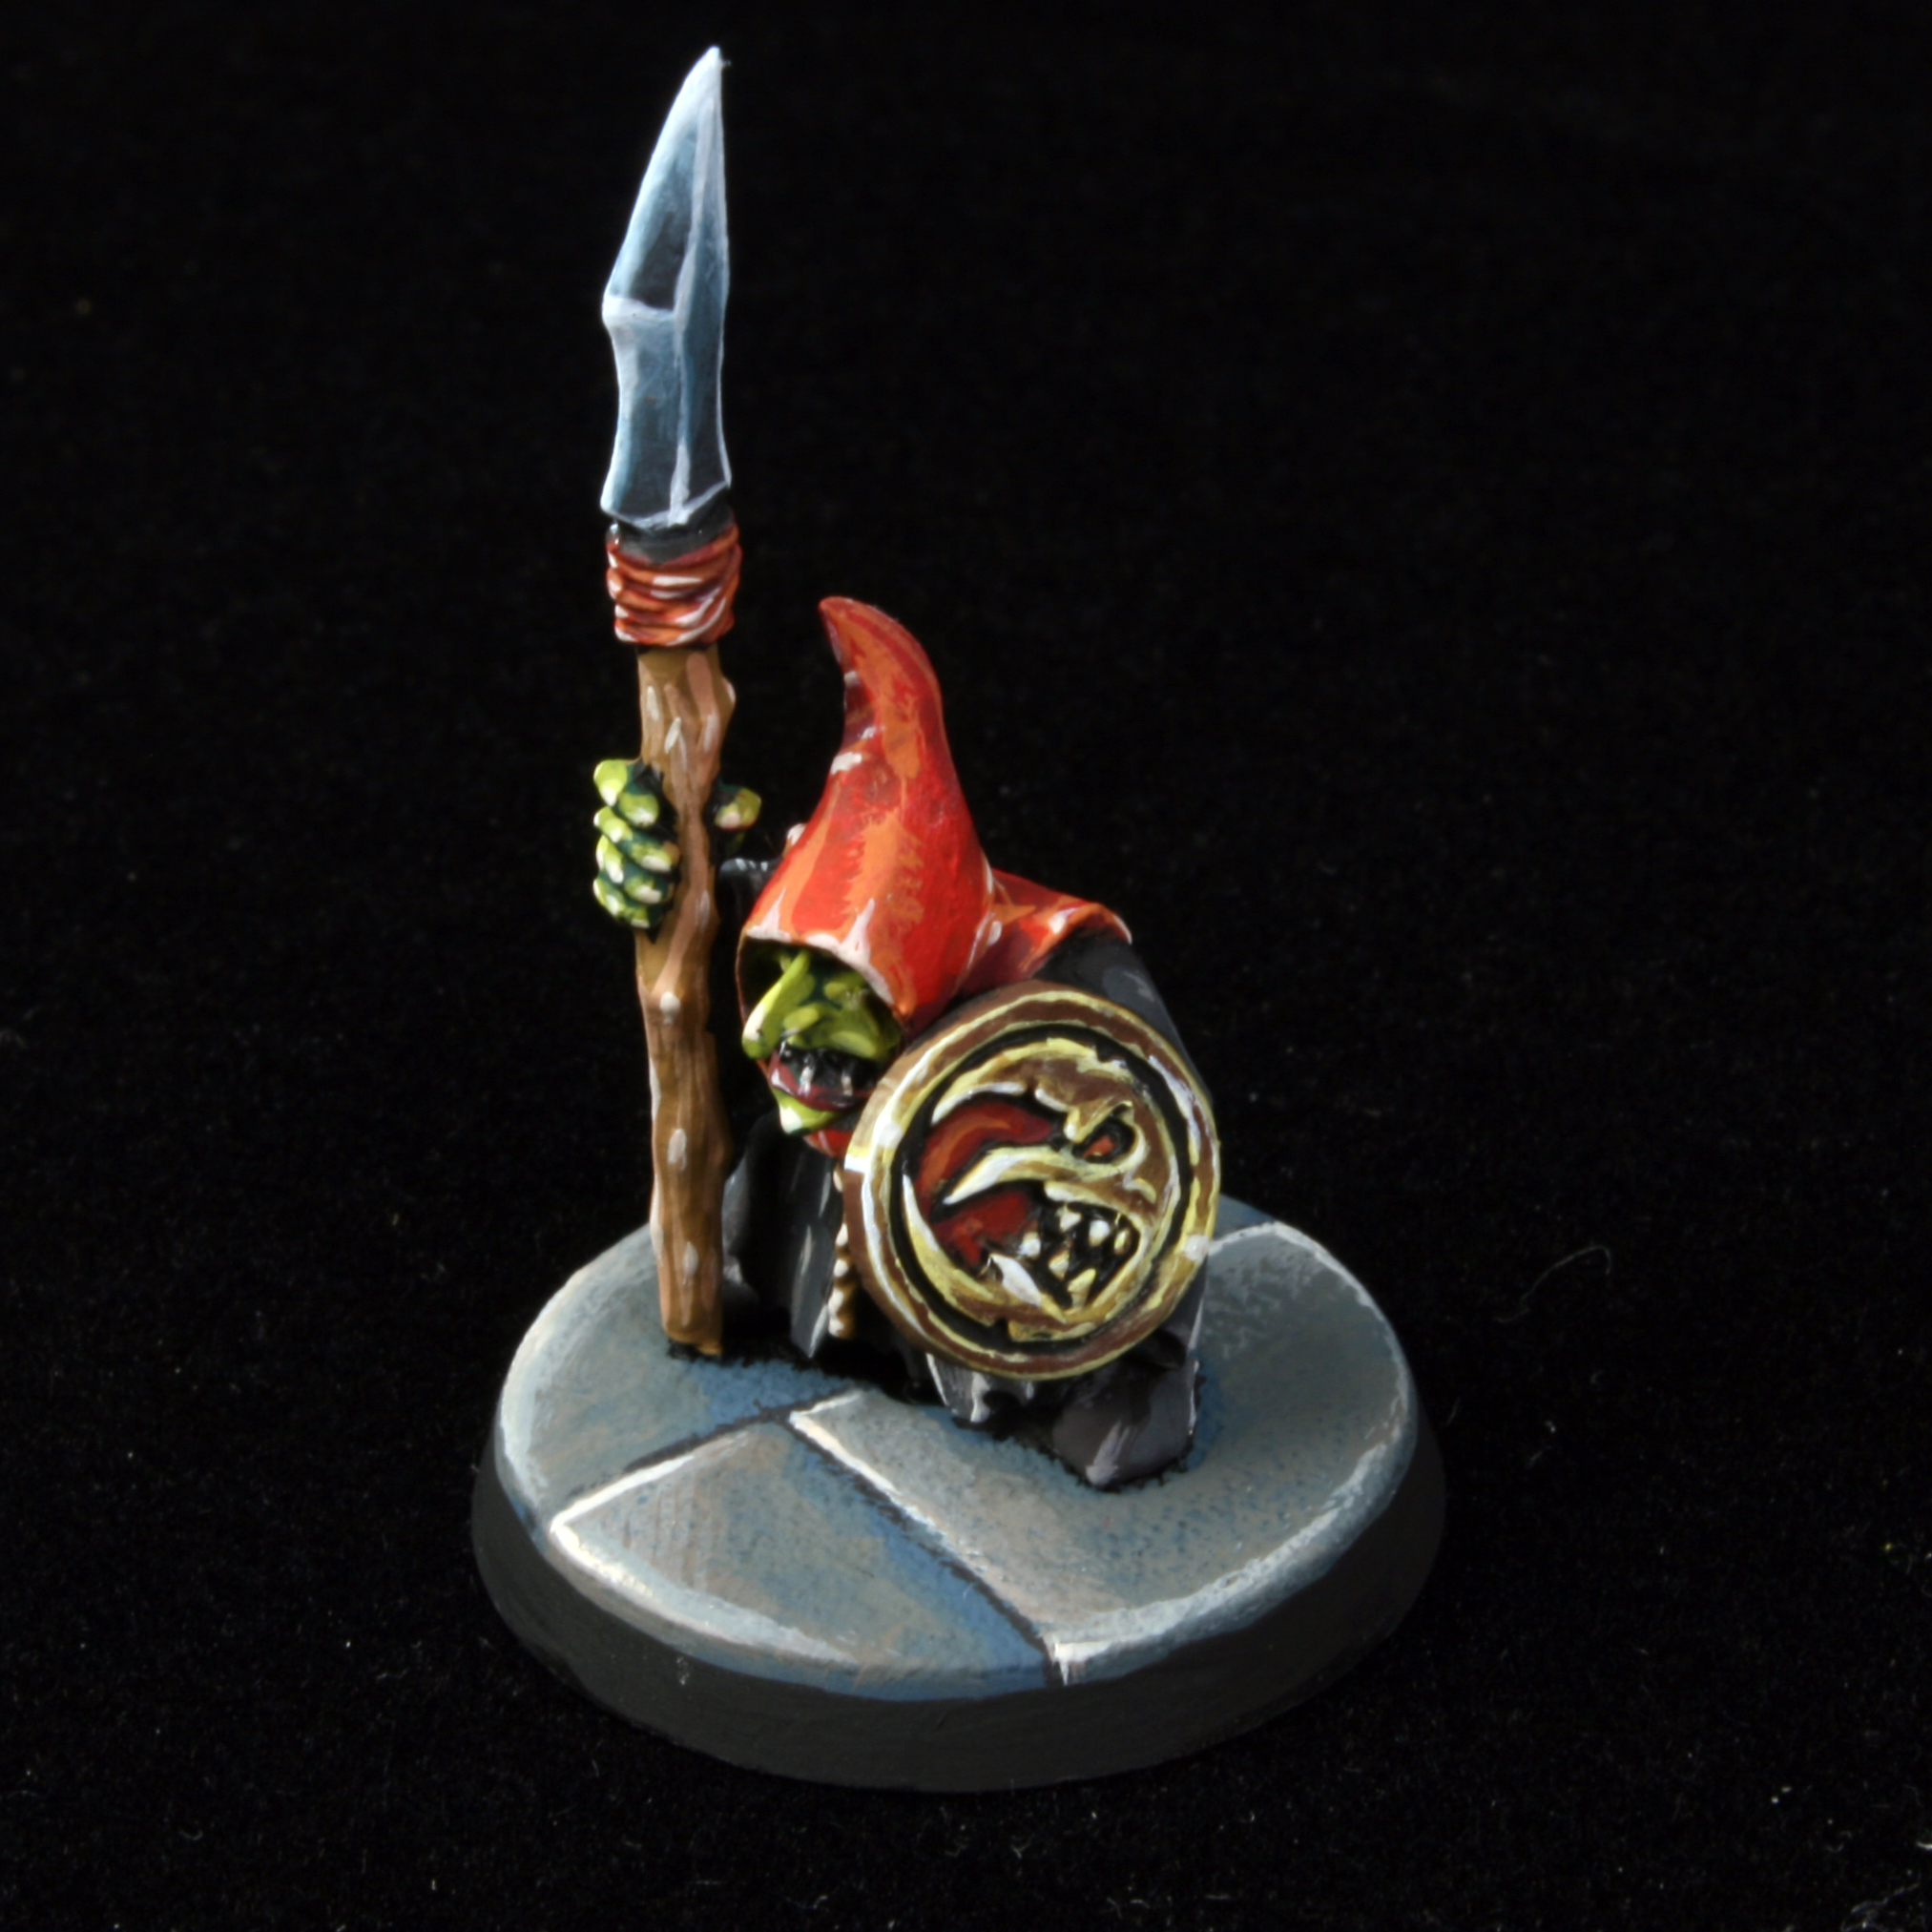
This goblin is ready for the dungeons. Rather then using metallic paint, you can layer like this for an evocative look. You can tightly control where your highlights go and introduce a lot of color to your metals. It’s cartoony, sure, but in my opinion it fits the style of most miniatures very well. Once you master this kind of layering, there’s not much you can’t do to a miniature!
Layer Opacity
You can apply layers that are translucent instead of being fully opaque. Each layer can let the layer behind it peek through it. This kind of work is best done with adding medium to your paint to make glazes, but messing with mediums are beyond the scope of this article. For small areas, you can also accomplish this effect with plain water. Reduce your paint’s opacity by thinning it with water. The more water in the mix, the less opaque the layer will be. As long as its not too wet to behave properly, you can layer with it.

Importantly, layering with reduced opacity lets you increase the number of layers without adding more paint bottles or mixing new colors. With patience, you can use this to get some extremely smooth blending. Its also useful for special effects, like making gleaming cockpit glass and glowing lasers.
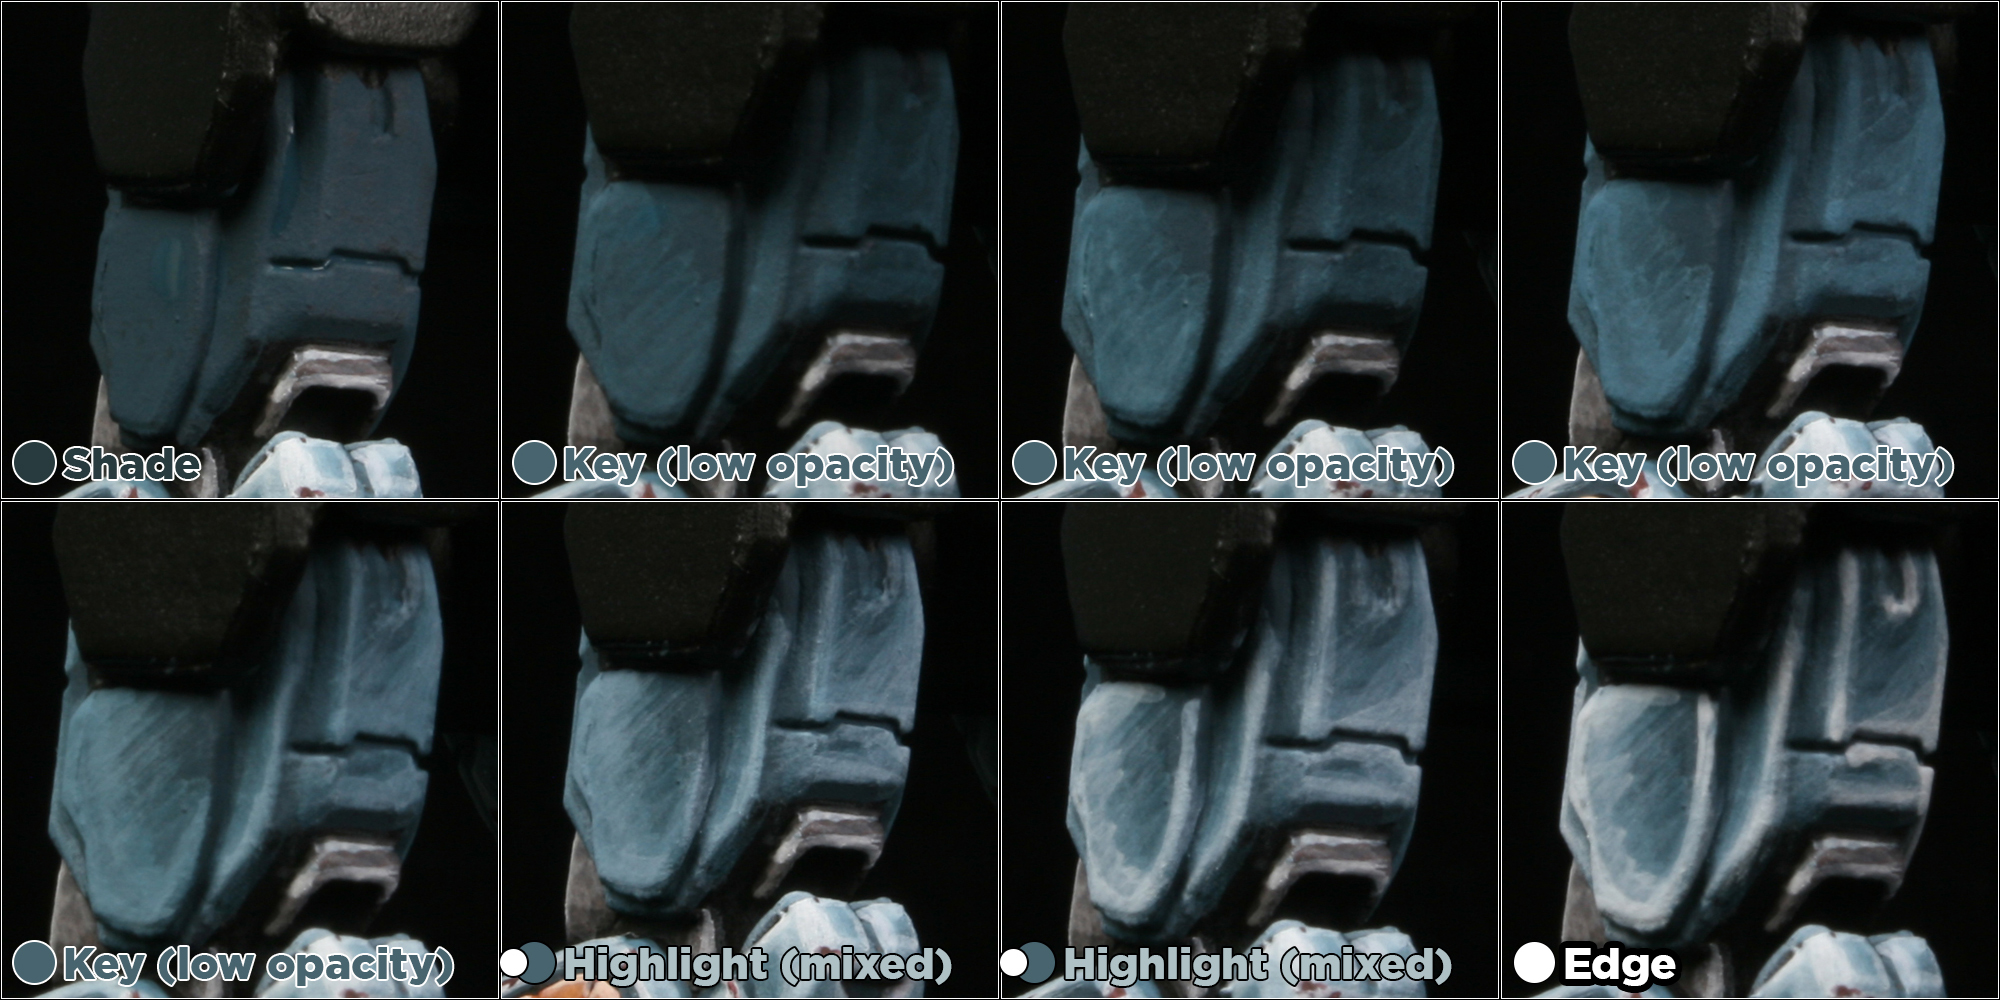
Let’s use some reduced opacity layering to paint some Battlemechs! Start with the cockpit.
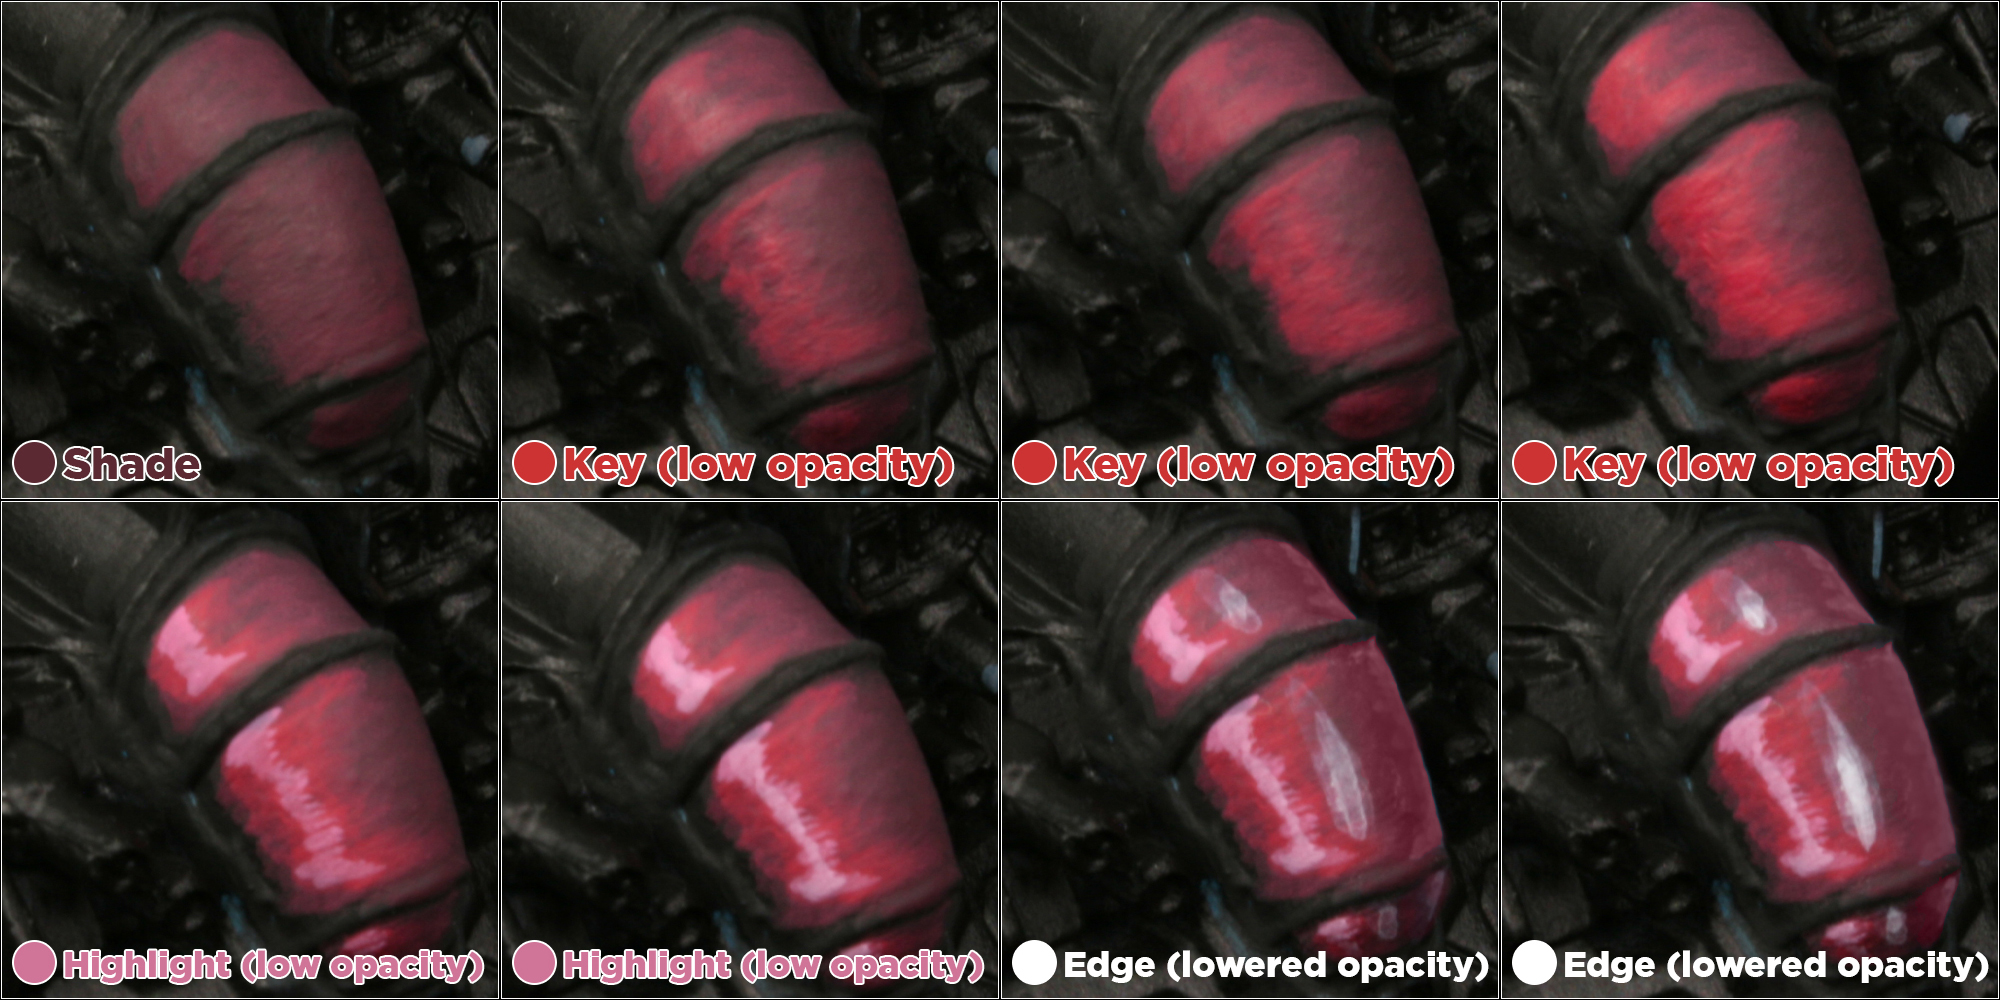
A different mech needs some glowing effects. A green glow from the cockpit and a red glow from a laser blaster.
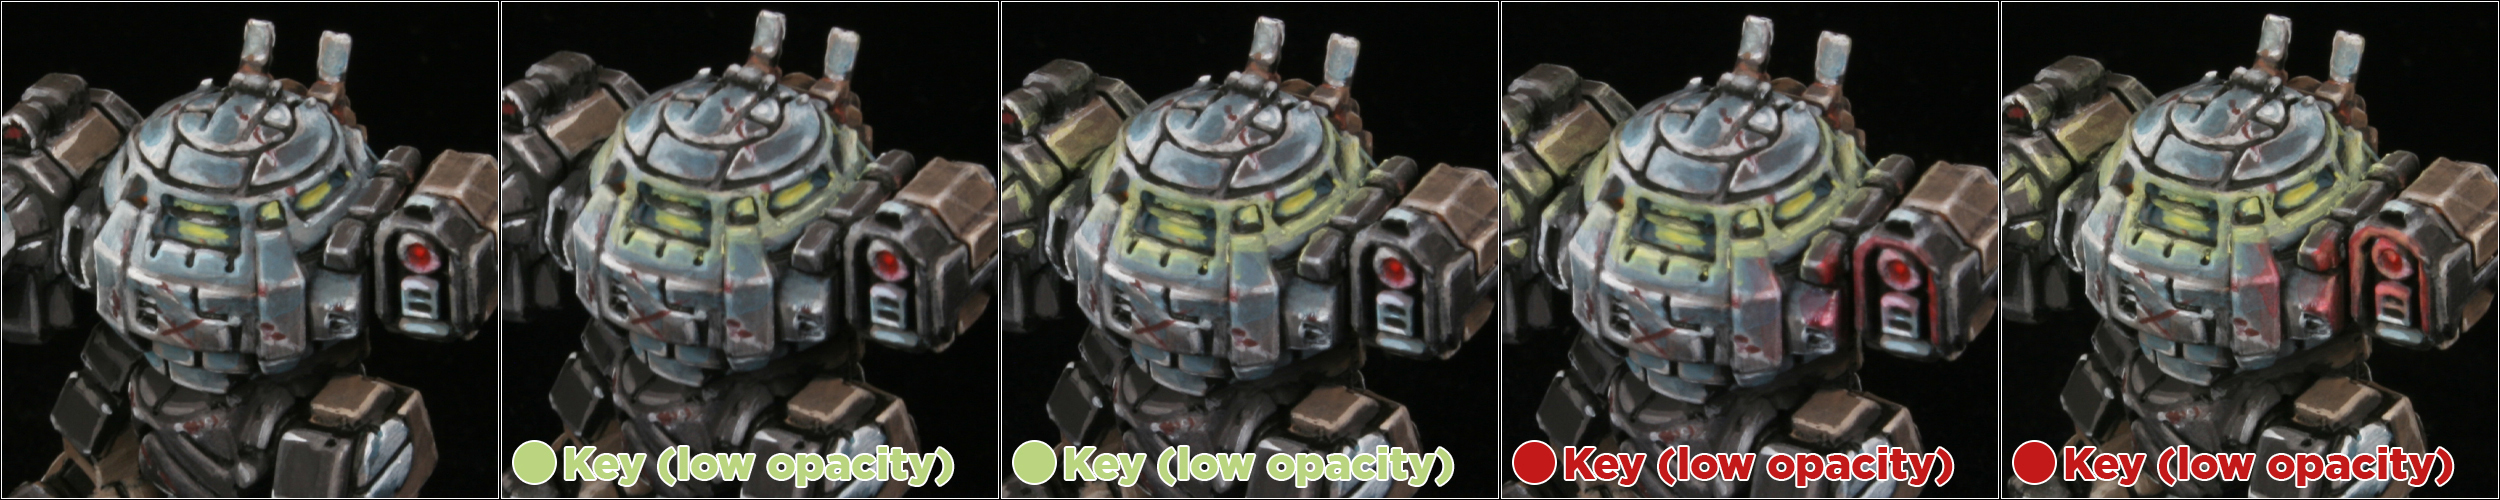
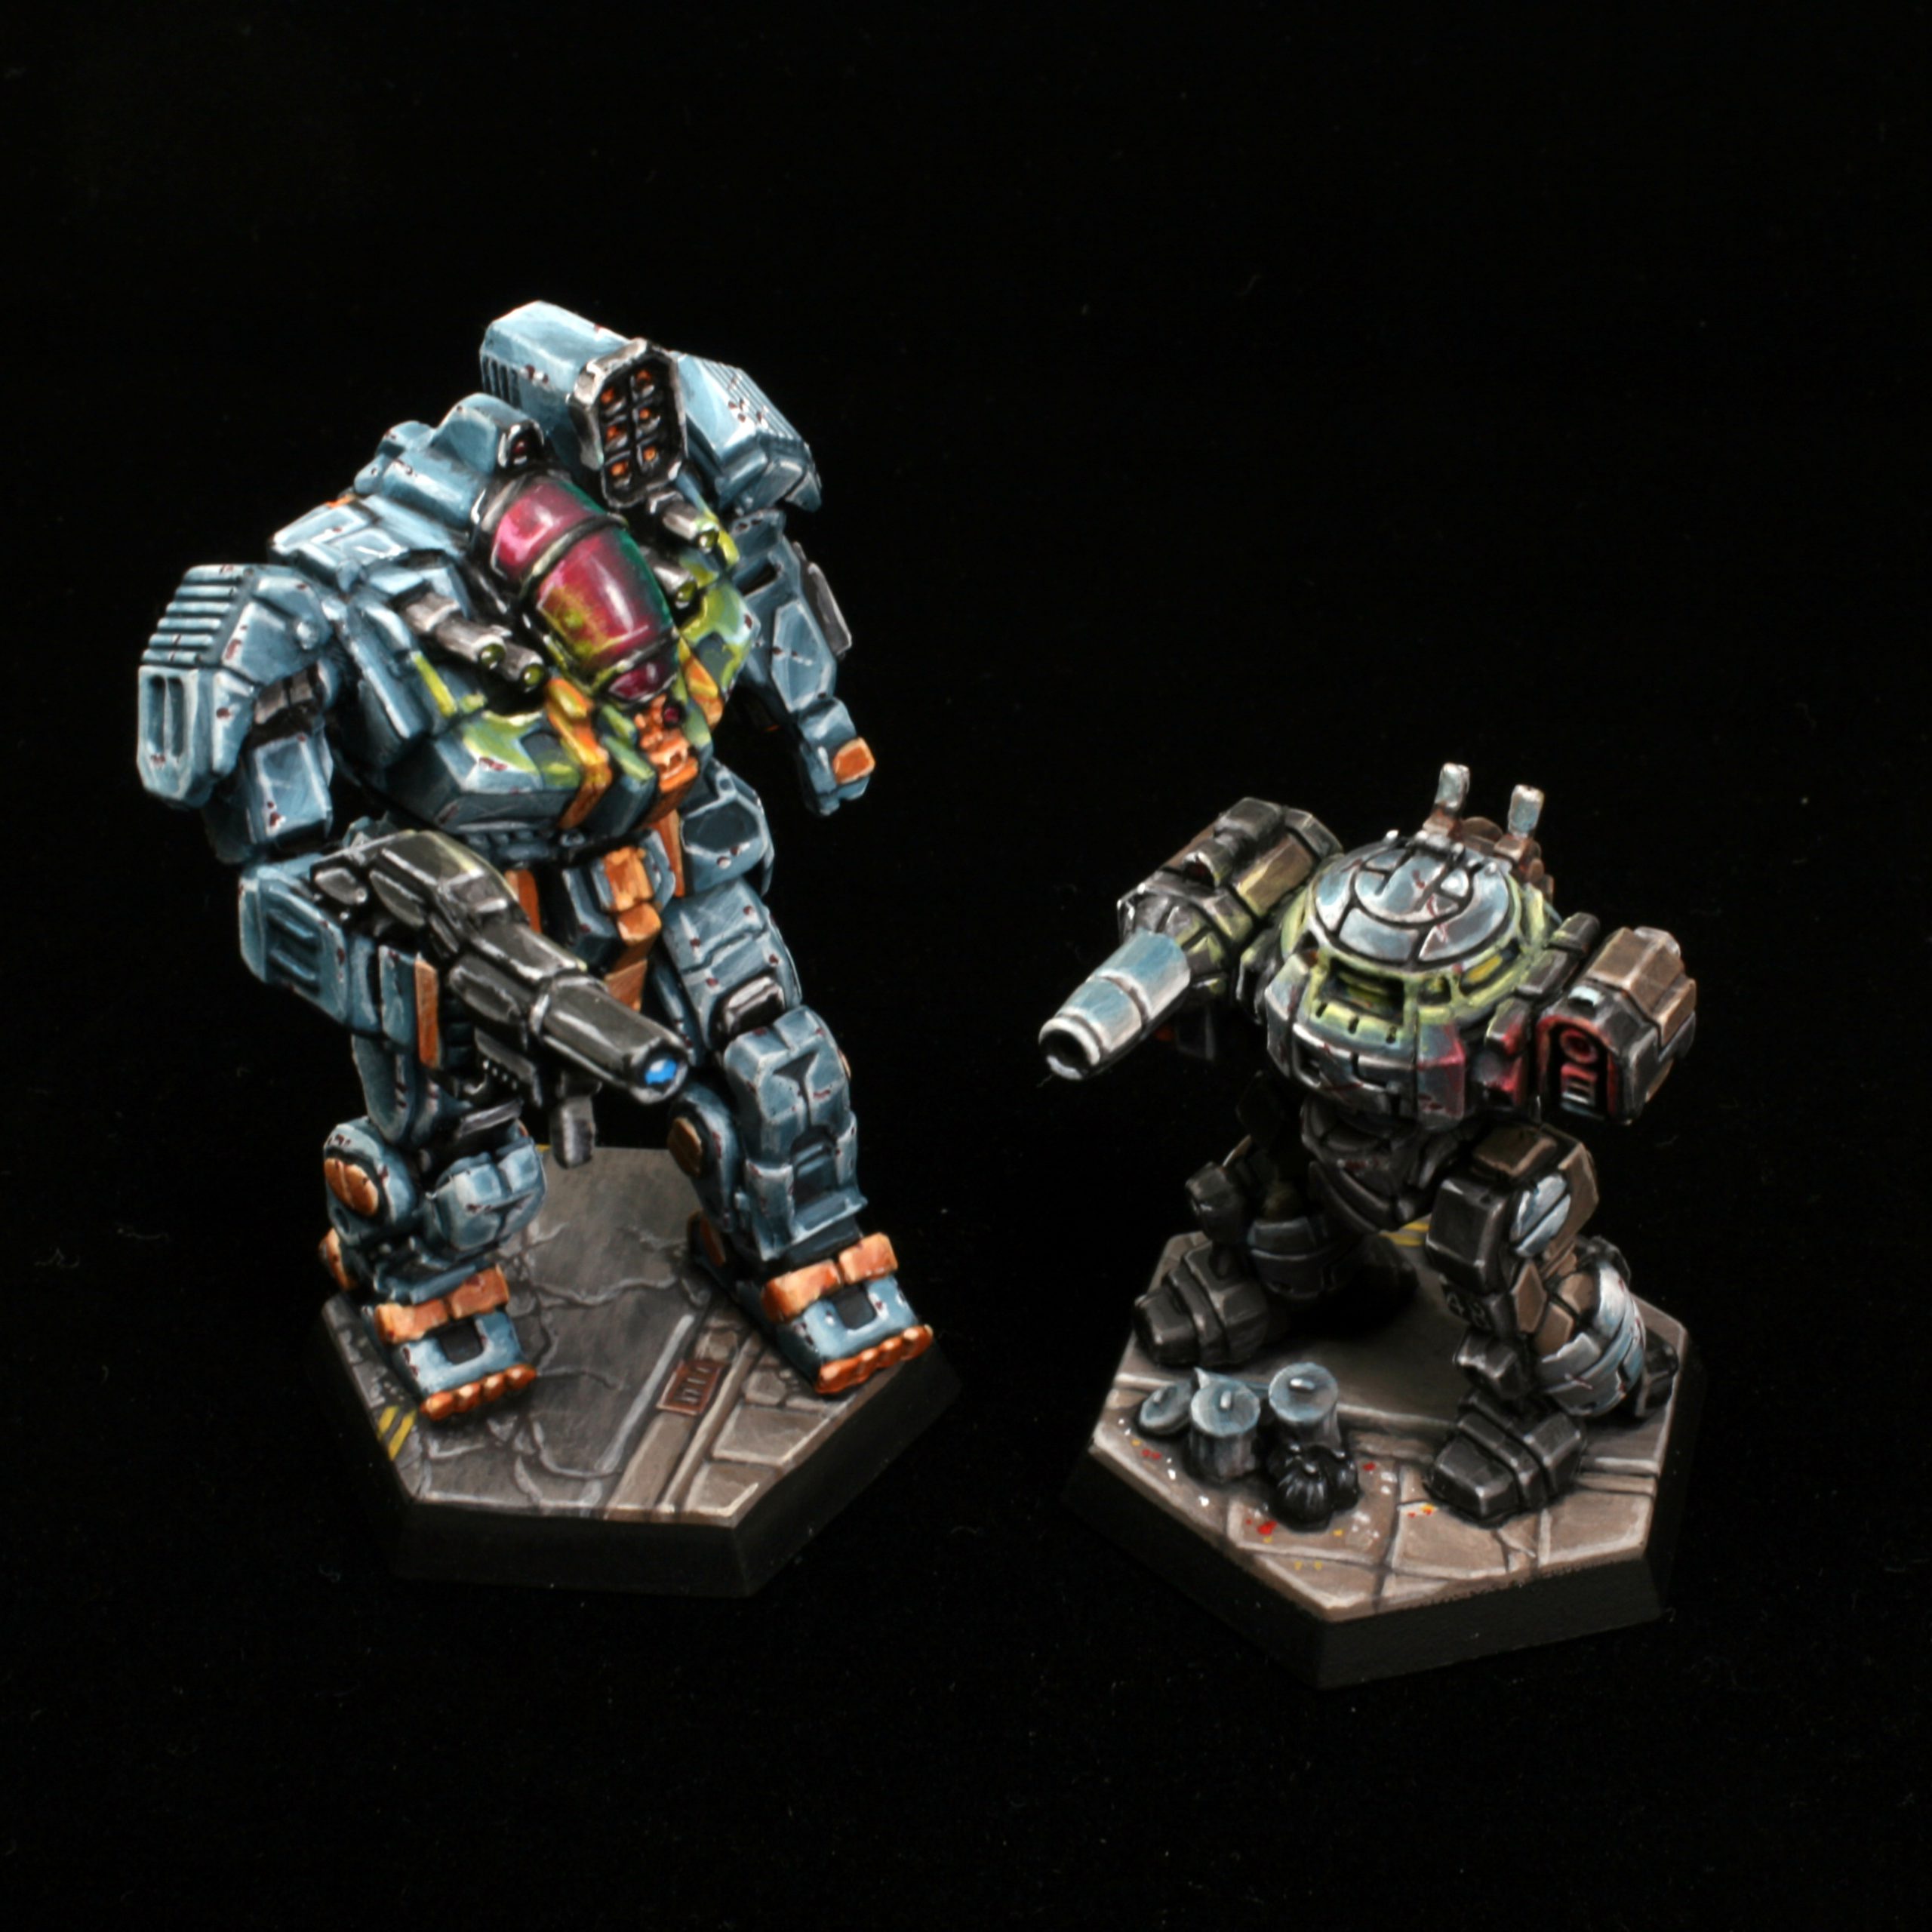
By layering with reducing opacity, we can get alot of mileage out of a single paint bottle. The glow effects only use one paint each, and the blue paneling on both mechs is done with a mere three paint bottles.
Putting It All Together
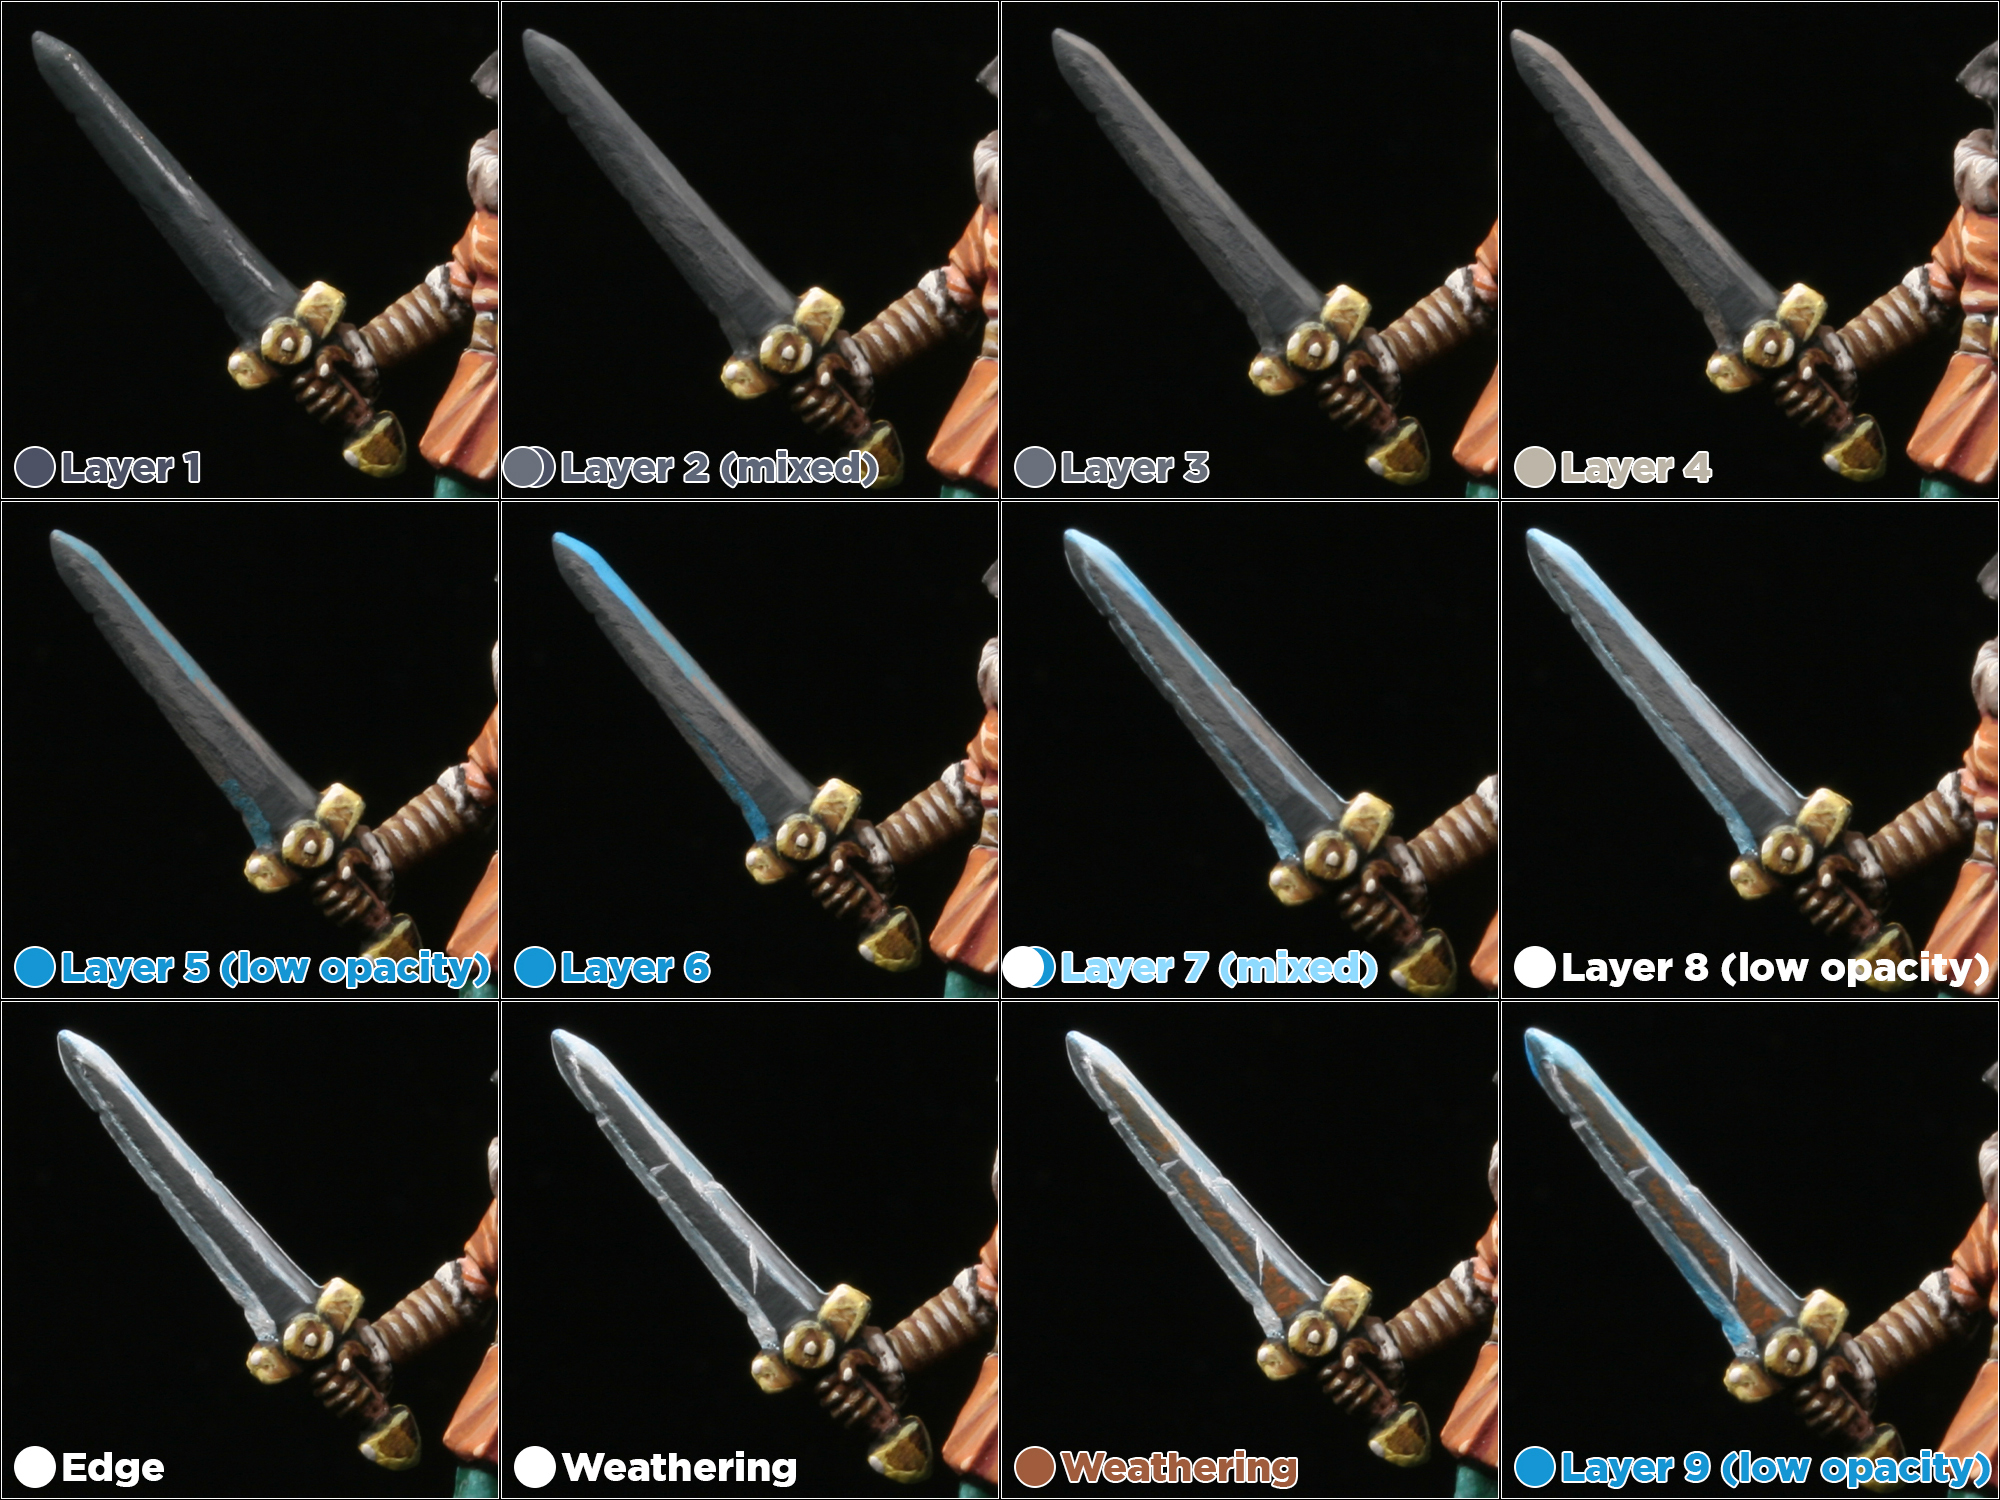
Let’s level up our barbarian with all our new layering tools. We’ll use color mixing, spacing and reduced opacity to keep the number of needed paint bottles down and give the sword a reflective sheen.
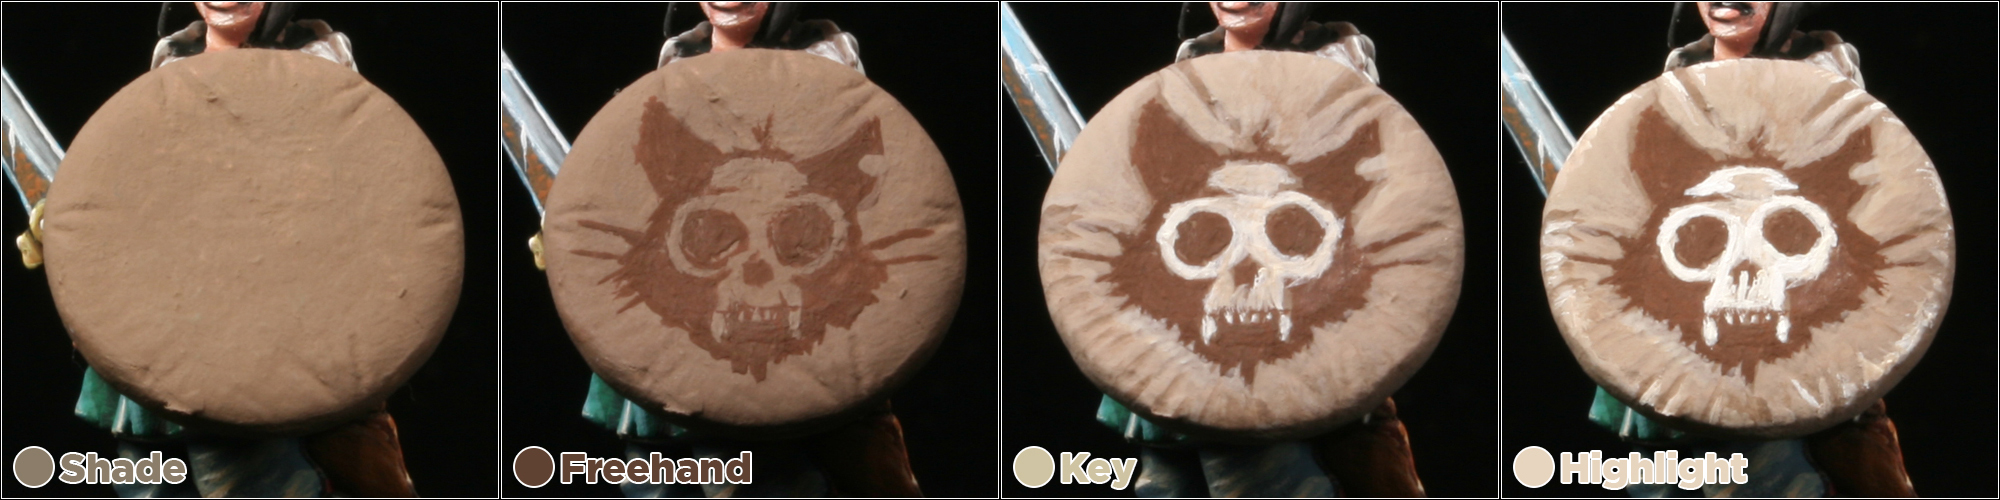
 The shield needs some work as well. If you’ve got some drawing skills, then another way to define layer shape is with some outlines. If you can get some line art down, then you can simply layer inside it.
 A snow base brings it all together. Time for some Frostgrave!
Conclusion
Layering is a bedrock technique for painting miniatures, and hopefully this long guide has been helpful to you in learning to layer. Layering can be a simple as using three different paint pots, or a complex mixture of altering shapes, opacity and paint mixing.
If you’ve clicked through those galleries, you might have noticed that I’ve employed several “advanced” techniques like non-metallic metal, object source lighting, cockpit jeweling, and free-handing, though I never called them out as such. This article is not a guide for those techniques, but I wanted to illustrate that they are really just particular forms of layering. If you can layer, then these techniques are within your grasp.
Happy layering!
Have any questions or feedback? Drop us a note in the comments below or email us at contact@goonhammer.com. Want articles like this linked in your inbox every Monday morning? Sign up for our newsletter. And don’t forget that you can support us on Patreon for backer rewards like early video content, Administratum access, an ad-free experience on our website and more.
