
And now for something completely different. In a meta completely dominated by Space Marines, T’au continue to have a solid showing and repeatedly place in the Top 4 of major events. Why is this? Part of it is that they have a solid set of rules emphasizing a highly focused style of play, and part of it is that armies that aren’t capable of dealing with that style of play are at risk of getting annihilated while they are forced to deal with T’au where they are strongest. In this article we’ll explore this space and look at the math behind it, as well as discuss some of the choices that T’au players might have to make in list building.
The T’au are the most shooting-oriented army in 40K. They have a massive number of long-range, high-yield weapons, abilities to severely mitigate incoming assaults, and the drones capable of rendering even the most powerful shot irrelevant. A T’au castle is rightly feared for its ability to withstand incoming attacks and annihilate threats at range, and while this style of play may not necessarily be the most fun to play against its effectiveness cannot be ignored.
Drones and Saviour Protocols
The key to keeping a T’au force alive is the use of drones to protect the valuable units. The wording of this rule has been particularly challenging and continues to change. As of the latest FAQ (version 1.4, located here), this is how they work:
When resolving an attack made against a Infantry or Battlesuit unit whilst that unit is within 3″ of a friendly Drones unit, if the wound roll is successful, you can roll one D6; on a 2+ that Drones unit suffers 1 mortal wound and the attack sequence ends.
On a 2+ the attack sequence ends, regardless of whether the shot was from laspistol or a volcano cannon. Note that the attack must have a successful wound roll to be subject to this rule. This means that effects which don’t require a wound roll (such as the Smite power) will still go through. Similarly effects which occur on a hit, but subsequently experience a failed wound roll, will work on the target. Inexplicably those same effects would transfer to the drone on a 2+ if the wound roll was successful. The T’au player also has the option to not use the protocol if the player wishes to preserve a drone for a more devastating attack. Often the attack is redirected to a Shield Drone, which also has a 5+ Feel No Pain.
Let’s look at a fairly contemporary scenario; a Space Marine Repulsor Executioner taking on a T’au Riptide using its Heavy Laser Destroyer. For the sake of argument we’ll assume that the RepEx is firing twice and is fully supported in a high quality castle with Captain (re-roll 1s to hit), Lieutenant (re-roll 1s to wound), and Chaplain/Iron Father/Iron Hands Psyker/Master of the Machine Techmarine/etc allowing it to hit on a 2+. The XV104 Riptide Battlesuit (BATTLESUIT, not VEHICLE, sorry Imperial Fists) is T7, 14 wounds, and has a 2+/5++. For the sake of expediency we’ll assume that the Riptide is not pumping its invulnerable save to a 3+ in exchange for a mortal wound. We’ll look at two scenarios. In the first scenario the Riptide is inexplicably exposed and has no drone protection. In the second scenario the Riptide effectively has an infinite supply of sacrificial drones.
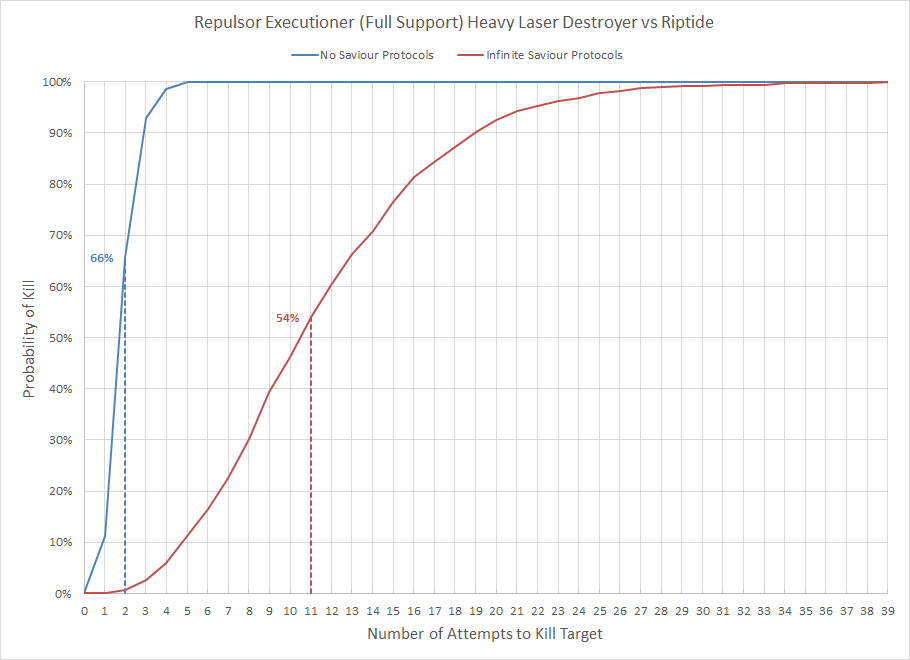
Saviour Protocols reduced the average number of wounds dealt per turn from 8.1 to 1.3, an 83% reduction in output. Now obviously this scenario requires a little suspension of disbelief in the form of infinite Drones, but the chart makes it painfully clear how much of an absolute pain in the ass Saviour Protocols can be if the player is not prepared for them. The Riptide could be even more difficult to kill if it gave itself a 3+ invulnerable save, but that comes at the expense of being able to shoot less, and the best defense is a good offense. In competitive play this means incorporating some means of targeting a model that’s relatively weak, almost certainly out of line of sight, and extremely resilient (the combination of 4+ invulnerable save and 5+ Feel No Pain effectively triples the number of attacks required to kill a Shield Drone). There are a variety of options for doing this.
Adeptus Astartes: Deredeo Pattern Dreadnought, Thunderfire Cannon, Whirlwind, Primaris Eliminator
Adeptus Mechanicus: Secutarii Peltasts, Skorpius Disintegrator
Astra Militarum: Basilisk, Bombard, Heavy Mortar Battery, Heavy Weapon Team, Heavy Quad Launcher Battery, Medusa, Wyvern
Chaos Knights / Imperial Knights: Ironstorm Missile Pod
Craftworld Aeldari: Night Spinner
Death Guard: Plagueburst Crawler
Grey Knights: Anything given Astral Aim
T’au: Smart Missile Systems
Tyranids: Hive Guard
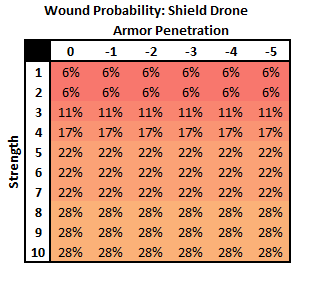
Rather than explore the impact of these weapons individually, it’s easier to look at the entire spectrum as a function of strength and armor penetration. The wound chart below does just that, looking at the full spectrum of potential threats. The ideal anti-drone weapon fires a lot of shots, a high strength (ideally at least 5), and either a -1 AP or the ability to ignore cover. While the Drones do not have the INFANTRY keyword they will still be fully obscured and therefore benefit from cover. It’s in the T’au’s player best interest to find these weapons and eliminate them, while opposing players will find their lives to be significantly more difficult if they lack weapons which can do this. Notably the Thunderfire Cannon is extremely good at this task as it gets 4d3 shots at S5 that ignore cover. The Whirlwind, while nasty with 2d6 S6 shots, does not ignore cover so make sure your Drones are getting that 3+ save if your opponent isn’t in the Devastator doctrine.
Advanced Targeting System
The Advanced Targeting System (ATS) is an option available to many BATTLESUIT units, including Commanders and XV8 Crisis Battlesuit squads. It improves every weapon by -1 AP, but comes at the expense of points and a slot that might otherwise be dedicated to a weapon. Typically the benefit of adding more attacks is better than the benefit of modifying probability, but is there a scenario where that’s not the case? We know from the first article in the series that the expected value for damage is a function of shots and probability using the following two equations:
![]()
![]()
![]()
![]()
So is there a scenario in which the effect of changing the save is better than the effect of changing the number of shots? If we compare the expected damage of each scenario we can quickly find out which one will be more effective. Because we’re only comparing two variables (number of shots and probability of save) we can simply set all of the other values to 1. It doesn’t matter if we’re firing a fusion blaster or a burst cannon because both scenarios use the same gun.
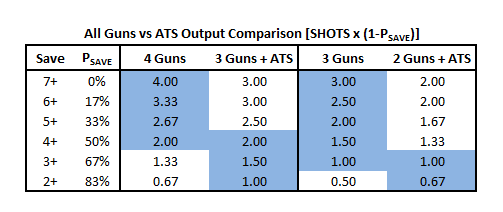
The results show that for Commanders, Advanced Targeting System is inferior against saves of 5+ or worse, a wash against saves of 4+, and superior to a fourth gun against saves of 2+ or 3+. Note that those saves are not the original save of the target, but the modified save after Armor Penetration. For XV8 Crisis Battlesuits the only benefit is against 2+ saves. There is no scenario in which you would want to use ATS on plasma rifles or fusion blasters. Against power armor it would be worth considering for the airbursting fragmentation projector, burst cannon, cyclic ion blaster, flamer, and missile pod. It is also cheaper than any weapon the flamer, which it is equal to. The ATS is an optimal choice for targets with a 4+ (Commander) or 3+ (XV8) save or better after the weapon’s armor penetration is applied (not including the ATS).
Heavy Rail Rifle vs High-Yield Missile Pods
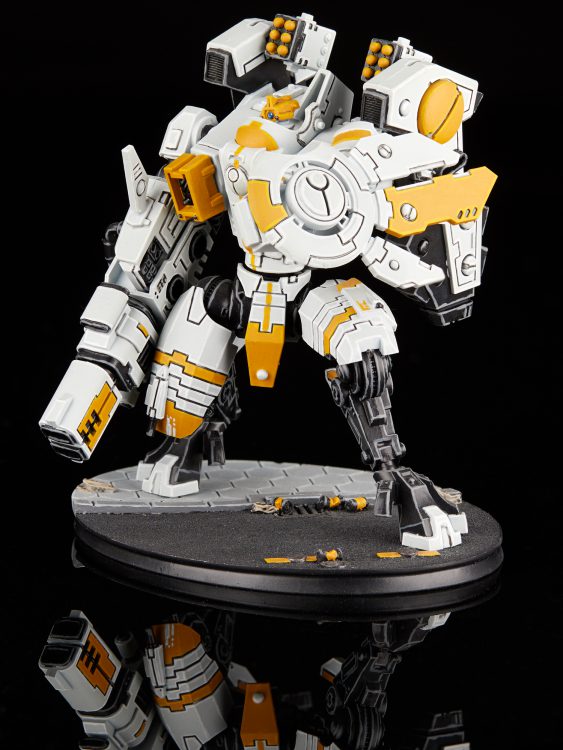
In addition to looking admittedly very cool the XV88 Broadside Battlesuits have access to a pair of very nasty weapons. The heavy rail rifle first two shots at S8, AP -4 and 1d6 damage that also deals a mortal wound on a wound roll of 6+. The alternative is a pair of high-yield missile pods which fire 8 S7 AP -1 shots that deal 1d3 damage. In similar analyses quantity has been a preferred option so we’ll see if that’s the case here. Since the AP is so low on the missile pods we’ll assume that the Broadside is taking an ATS.
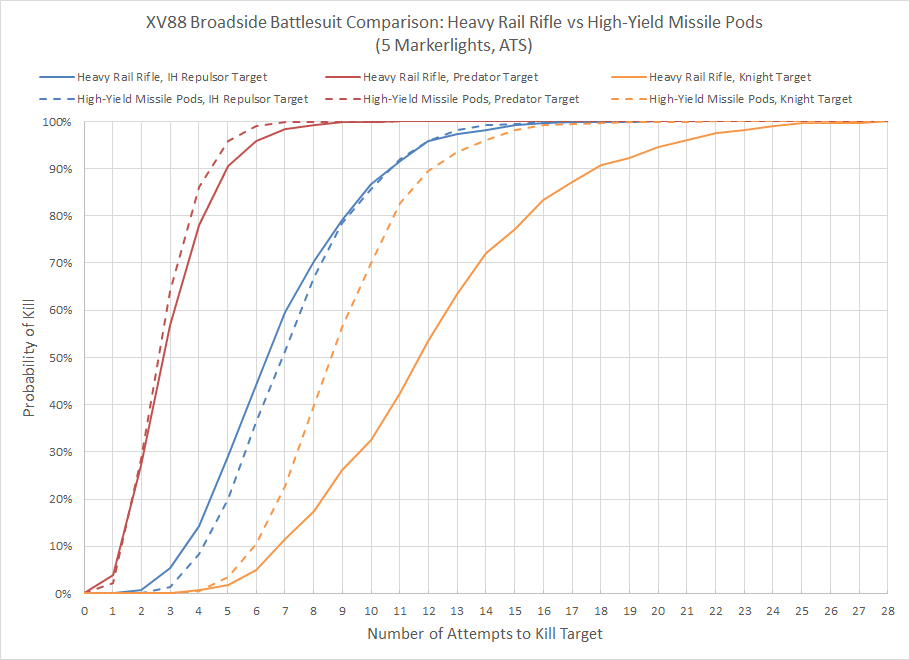
Against the Predator and Knight targets the missile pods are the superior choice, and while the heavy rail rifle did better against the IH Repulsor target the difference was negligible. The extra shots of the high-yield missile pod make it the superior choice against nearly every target, particularly with an ATS added. These numbers confirm the results seen in competitive play, where successful players that use XV88 Broadsides use high-yield missile pods and the ATS option. Missile pods also have the benefit of being vastly more effective against larger units like Primaris Marines.
Ion Accelerator vs Heavy Burst Cannons
The XV104 Riptide Battlesuit is an extremely popular unit. Three often form the center of a T’au castle, protected by swarms of Drones and layers of screens to minimize any threats. It is also one of the most lethal units in the T’au book. Players have two options for the main gun. The first is a heavy burst cannon, which will slaughter Marines with 12 (or 18 with a Nova-charge) S6 AP -1 shots dealing 2 damage each. The second is the ion accelerator, which gets 1d6 (or 6 shots with Nova-charge) S8 AP -3 1d3 damage shots which can be overcharged to S9 and a flat 3 damage. As with XV88 Broadside Battlesuits they’re generally seen with an ATS to add a further -1 to AP.
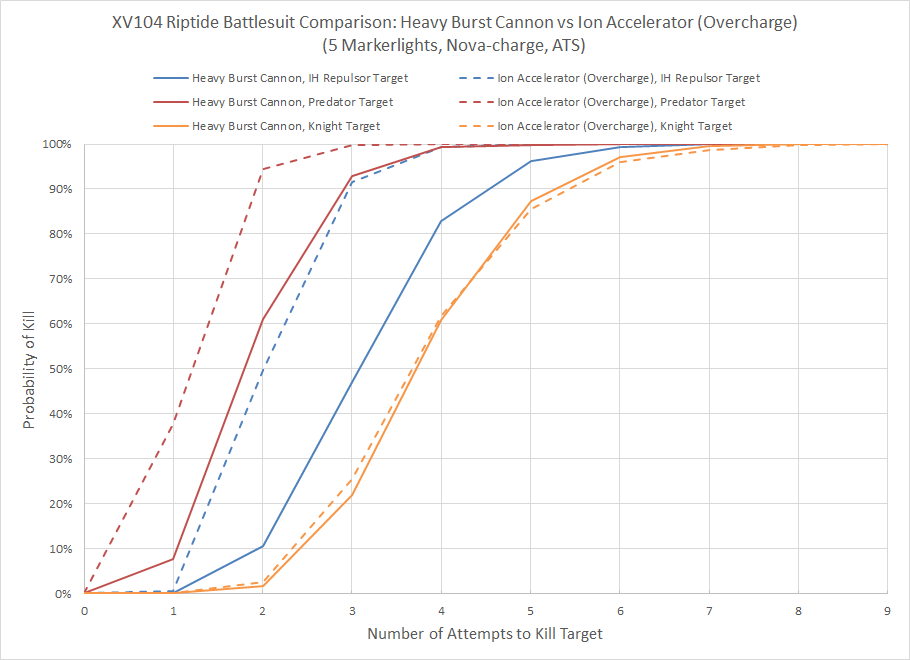
In spite of the extra shots, the combination of higher strength, armor penetration, and damage give a roughly 30-40% edge for the overcharged ion accelerator against the Predator and Repulsor targets. Where the heavy burst cannon has an advantage is against the Knight, which has an invulnerable save that nullifies the additional armor penetration. The heavy burst cannon also has significantly more utility against anything with a toughness of 6 or lower. It absolutely mulches Primaris Marines.
Conclusion
Hopefully this article is helpful for T’au players as well as those who wish to stomp them into a fine bluish-grayish paste. Through a simulation we got a taste of exactly how much of an impact Saviour Protocols has on the survivability of protected units, as well as an analysis on the best weapons to directly take out shield drones even when they’re hidden. We saw the specific scenarios where the benefit of the Advanced Targeting System is better than an additional gun; against units making a 3+ or 2+ save after AP is applied. For the XV88 Broadsides an analysis of the various main weapon options confirmed that the high-yield missile pods are almost always the best choice over the heavy rail rifle. And we ran the numbers on the options for the XV104 Riptide and found that while the overcharged ion accelerator is better against large multi-wound targets, the difference may not be enough to offset the utility of the heavy burst cannon against lighter targets.
If you have any questions or comments, feel free to drop a note in the comments below, or email us at contact@goonhammer.com — we’re always looking for new things to analyze in Hammer of Math.
