
This week’s Hammer of Math looks at the calculus behind when to best utilize certain Stratagems and Enhancements to protect Imperial and Chaos Knights.
If Knights have one thing going for them (and usually they have more than that), it’s that they’re cool as hell. Giant, striding behemoths wielding tank-size weaponry capable of laying waste to entire lines of enemies are always fun, and the fact that said big stompy robots also have a distinct vibe just makes things even better. The Chaos Knights players in particular always seem to really have a good time with their models, customizing them in ways that would likely put someone on a watch list if they weren’t there already for being a filthy heretic.
As one might expect with Knight armies, the low model count means that protecting each unit becomes critically important. Excluding Forge World, knights come in three sizes:
- War Dogs and Armigers Have T10, 12 Wounds, and a 3+ save/5+ invulnerable save against ranged attacks.
- Bigger Knights like the Gallant and Desecrator come with T12, 22 Wounds, and a 3+ save/5+ invulnerable save against ranged attacks.
- Castellan/Tyrant Knights are tougher still, with T13, 24 wounds, and a 2+ save/5+ invulnerable save against ranged attacks.
While on the surface that seems pretty beefy, those armored hulls can melt quickly when they have the combined weight of an entire army shooting at them, not to mention toughness-and-save-bypassing effects like Grenades and Tank Shock Stratagems, or effects like Devastating Wounds. And when one fourth of your army is tied up in a single unit, you need that unit to survive.
So it’s good news that both Imperial and Chaos Knights each have access to three options to make them more resilient against incoming ranged attacks:
- They can use a 1 CP Stratagem to improve their invulnerable save from 5+ to 4+ against ranged attacks for the duration of the phase.
- They can leverage a CP re-roll to get another shot at making a save.
- They can use a 40-point Enhancement to reduce the AP of all incoming attacks by 1.
One of the most interesting ongoing debates among knight players is around the utility of improving the invulnerable save, often just referred to as “rotating shields” in reference to the Rotate Ion Shields Stratagem. Too many times a player has spent 1 CP on improving a knight’s invulnerable save only for that investment to wind up being pointless when the unit died anyways. So some players assert that saving one CP for a re-roll is the superior strategy – this may mean taking more wounds on the whole, but your odds of passing a single 5+ invulnerable save with a re-roll are marginally better than just having a 4+ invulnerable save, and you can hold the Command Re-roll for when you absolutely need it, rather than having to use it before hit rolls are even made. This affords you the ability to just react to an opponent and potentially save CP instead of spending it on a hopeless situation.
The question is: Is there a point at which it makes more sense to save your Command point for a re-roll instead of simply boosting the invulnerable save against everything? Where is that point, exactly? And as a follow-up, is there a point where you’re better off just not bothering to rotate ion shields because the target is going to die regardless?
In order to answer this question there are three things to consider:
- The expected wounds that would be dealt to target based on hitting and wounding the target,
- the wounds remaining on the target, and
- the number of attacks coming towards the target.
The reason that the wounds and incoming damage are important is because at some point protecting the target is irrelevant; it’s going to die no matter what you do. From a probability perspective the CP re-roll improves the Save from a 33% chance of success to a 55.2% chance, while the Rotate Ion Shields/Diabolic Bulwark Stratagem is a flat 50% boost, to a 50% chance of saving, but valuable over more attacks. One third of the time the re-roll doesn’t need to be used, allowing it to be saved for a potential future roll, or letting you keep the CP to spend on something else. Because the 5+ save roll isn’t terribly likely the probability that you will be able to save a CP re-roll beyond two or three shots is miniscule. However you also get to wait for the moment you’ve actually failed a save, rather than having to hope the number of shots and their severity warrants the use of something like Rotate Ion Shields.
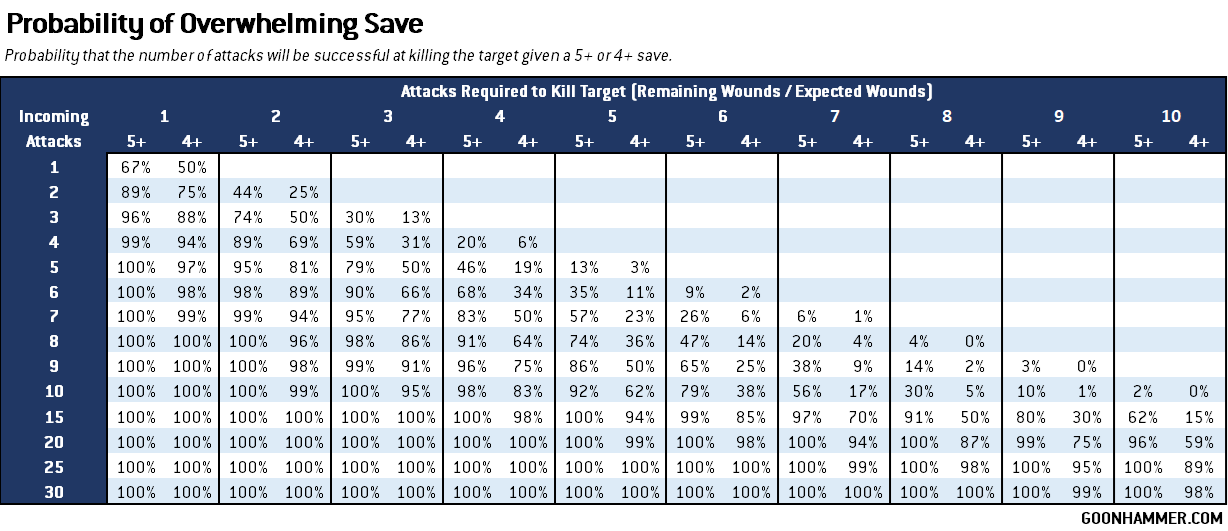
On that note, what about when you shouldn’t bother rotating ion shields? What we can do is look at some common profiles and see how many shots it takes before things aren’t worth doing. Our target of opportunity will be an Armiger because, in general, the larger platforms require so much damage that unless the knight is grievously wounded the extra save will have a significant impact. The Armiger has 12 wounds at T10. The chart below will serve as a reference. To use the chart, select the column that’s associated with the number of attacks required to kill the target given the probability to hit, wound, and damage. Then look at the row associated with how many incoming attacks the target should expect. The probabilities at the intersections of column and row are the probabilities of death for a 4+ and 5+ save courtesy of a binomial probability calculation.
That’s a lot, so rather than refer to the chart over and over, let’s just walk through some common guns, talk about how they’re likely to cause damage, and the best way to handle them. After that, we can double back on what this all means and how to use this in a game.
Railguns
Whether you’re looking at the T’au or the Votann versions, the Railgun is a universal bastard. Generally hitting on a 2+ and wounding on a 3+, it can re-roll either the Hit or Wound roll and has a good chance at getting [DEVASTATING WOUNDS] off. The D6+6 damage profile has a 1-in-6 chance of one-shotting the Armiger platform, otherwise it’s guaranteed to happen in two shots. Including the re-roll this translates to an 83% chance of hitting and wounding, for an average of 1.5 shots to kill the Armiger. So using the chart above we use the 2 column and see how the probabilities change based on the number of incoming attacks. For 2 shots at the Armiger, rotating ion saves decreases the chance of dying from 44% to 25%. For three shots the chance decreases from 74% to 50%.
Ion Accelerators
An overcharged Riptide Battlesuit can throw out 6 shots which generally hit on a 3+, wound on a 5+, and deal 4 damage each. Each shot will deal an average of 0.89 wounds, so 13.5 shots are required to kill the Armiger. Assuming 3 Riptides fire 18 shots, using the Rotate Ion Shields in this situation reduces the probability of dying from 23% to 2%.
Godhammer Lascannons
The Godhammer lascannon hits on a 3+, wounds on a 4+, and deals an average of 4.5 points of damage. That means each of the two shots from the lascannon will average 1.5 wounds, requiring 8 successful strikes to kill the target on average. If three Land Raiders attack the target with 12 shots rotating ion shields will decrease the chance of dying from 63% to 19%.
Putting All of This to Use
There’s a lot here to take in and the math is pretty complicated – we’ve only scratched the surface of what is an incredibly complex problem involving conditional probabilities and game states – one key upside to the Command Re-roll strategy of “Let’s see how the dice fall and I’ll re-roll the last save” (remember to slow roll your saves when doing this!) is that if you can’t affect the outcome, you can keep the CP by declining to spend it, but there are times where you’d rather have a living knight much more than an extra Command Point.
The biggest takeaway here is that the closer the number of attacks is to the average number required to kill a target – and the more which are coming in – the more valuable it is to use your Rotate Ion Shields or Diabolic Bulwark Stratagems to change your invulnerable save to a 4+. This requires some planning on your end – you need to think about not just what kinds of incoming shots will hurt you, but how many of them will actually be coming in, and how many will be at AP-2 or better. Triple Riptides are a good example here – three firing at your knight is exactly the kind of situation where you’d want to rotate shields, while taking a single lascannon shot or multi-melta is a place where you’re better served holding your CP for a Command Re-roll on a failed 5+ save.
This also highlights that there’s some strategic value in rotation/bulwarking as well – you can only protect one unit per turn this way, and so doing this may simply cause an opponent to direct their firepower elsewhere. This is a double-edged sword of course: An opponent can just bait you into using the Stratagem on a lower-priority target, then pivot to a different target. Or if they think you’re anticipating that, they can direct firepower to one target at a time and get you to take a shot or two you might not have taken. The mind games are an interesting game theory challenge we may revisit in the future.
Thanks for reading! If you have any questions or comments feel free to email us at contact@goonhammer.com. That’s also the best way to suggest topics for future articles.
