In Hammer of Math we take a weekly look at different statistics questions in Warhammer, run the numbers, and come up with the answers.
Grotmas is out, the Guard Codex is in! Or at least, it will be in another two weeks, when the new boxed set drops. Or rather, it will be at some point after that when the standalone book drops along with final points and the FAQ. It’s complicated.
What’s not super complicated is the math in the new book. There are a lot of units in Codex: Astra Militarum, but on the whole there aren’t that many stats problems worth a deep dive. That said, there are still a few things worth looking at so in this article we’ll take a look at a few common stats questions Guard players may have playing the new book.
Take Aim! vs First Rank, Fire! Second Rank, Fire!
Orders are the bread and butter of the Astra Militarum but there are two effects that have an impact on your ranged output. Take Aim! Improves the Ballistic Skill of your unit by 1, while First Rank, Fire! Second, Rank Fire! (FRFSRF) increases the attacks of your rapid fire weapons by 1. Given that a unit can typically only be affected by one at a time, how do these compare to each other when applied to a unit of Kasrkin? I ran the numbers for six lasguns and four overcharged plasma guns, shooting at MEQ targets.
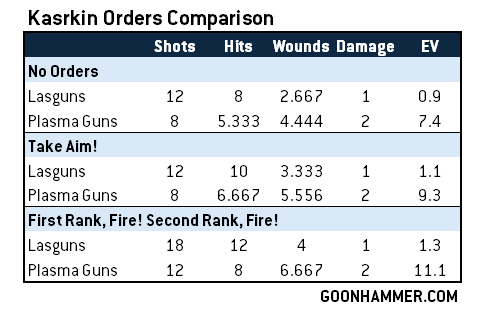
The math here is pretty simple: Take the extra shot. An extra shot is always going to be better than improving your BS from a 3+ to a 2+, but it’s worth noting that this math changes as your BS or roll to hit worsens: At a 4+ to hit, the values are much more even, and at 5+ to hit they level off entirely (should you find yourself on a 6+ to hit, improving your BS by 1 is slightly better than an extra shot). That said, even when your expected value is the same, the extra shot will always have higher upside (and variance), so your mileage there may vary.
The Impact of Born Soldiers on Overwatch
If there’s something I’ve learned the hard way too many times against Guard, it’s never to underestimate the Overwatch capabilities of the Rogal Dorn. But what I’ve often found is that this is less about the Dorn – though it doesn’t hurt – and more about the fact that it scores Lethal Hits against MONSTER and VEHICLE targets. how much of a difference does this make, though? Let’s take a hypothetical look at a Rogal Dorn firing overwatch at a Rhino crossing its path, assuming it’s within 12″:
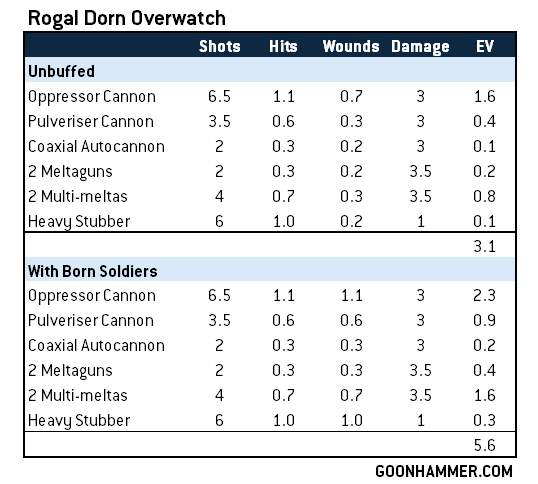
Against a Rhino that hasn’t moved into Melta range, you’re looking at nearly doubling your output, and if your target is in Melta range, you can expect something more like 7 damage on average with your shots. There’s a ton of value here in removing the wound roll from the process, particularly for the melta guns that only wound on a 4+ against T9 targets. Against harder targets your expected value without Born Soldiers drops to 2.6 expected wounds. Of course, against weaker targets your odds are better – against a T4 target you’re likely to be hitting 4.6 wounds per volley. That’s pretty solid if you just need to overwatch a solo character off the board, making moving around dorns a dicey prospect.
Artillery
From a math perspective, the most noteworthy new unit is the Artillery Team, who come on a very large base and an option of heavy mortar, heavy quad launcher, siege cannon, or multiple rocket launcher, all with INDIRECT FIRE, HEAVY, and BLAST. They all have 48″, so the question is: Which of these is the best at clearing off your opponent’s home objective and forcing them to commit better units to it? Let’s compare several different common home babysitter units.
For the purposes of this exercise, assume all guns are remaining stationary and under the effects of the Take Aim! Order, and so will be hitting on 4+ with their indirect fire.
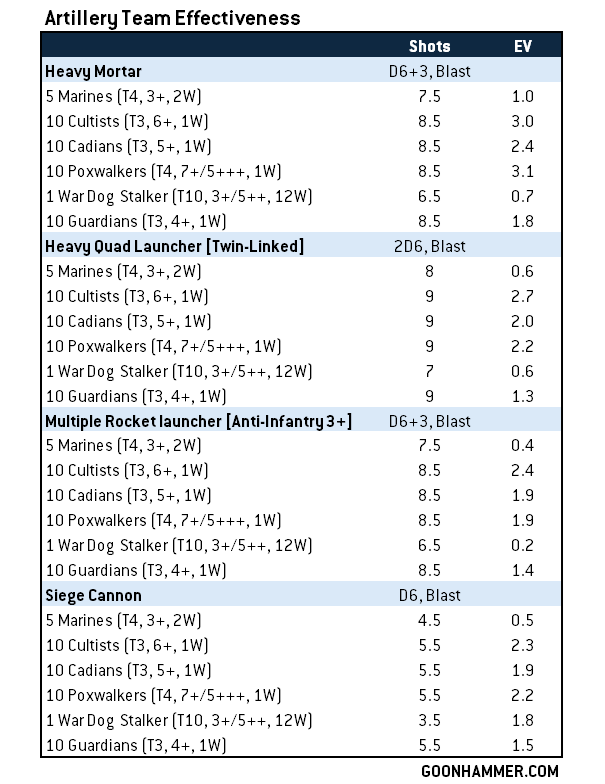
The value here varies by threat, to be certain, with the big determinant being whether your targets have 2+ wounds or just a single wound. The Heavy Mortar tends to have the best overall performance of the bunch, owing to a solid shot count, S8 AP-1, and 2 damage, while the Siege Cannon gives you the best results if you’re trying to crack a War Dog (S12, AP-2, 3 damage) – but those aren’t particularly reliable. The Heavy Quad Launcher tends to punch above its expectation due to having twin-linked but ultimately you’ll get the best results from just going heavy mortars.
And in case you’re wondering, a trio of regular mortars will do more damage against everything on this list except for the marines and War Dog. The upside here is that anything hit by an Artillery Team has to take a Battle-shock test, and that can have quite a bit of value on its own. On that note, the multiple rocket launcher’s ability to give -1 to that test against an INFANTRY target isn’t as bad as it looks – forcing Cultists to try and make an 8+ to keep performing an action can be a pretty tall order.
Final Thoughts
That’s a relatively quick look at three of the biggest stats questions from the new book but there’s likely to be more worth diving into at some point – the weapon options on some of these tanks are pretty crazy, so that’s an angle we may look at. That said, most of the bonuses are the standard re-rolls and +1s to hit/wound that make for pretty easy decisions. Which overall is a good thing – as our look at the Artillery team showed, even when it looks like there’s a clear winner there are reasons to consider the other options, and they’ve done a solid job with the internal balance as it relates to weapon options.
Have any questions or feedback? Drop us a note in the comments below or email us at contact@goonhammer.com. Want articles like this linked in your inbox every Monday morning? Sign up for our newsletter. And don’t forget that you can support us on Patreon for backer rewards like early video content, Administratum access, an ad-free experience on our website and more.

