In our continuing series on the American Civil War, this week sees the Goonhammer Historicals team bringing you a review of the “Pickett’s Charge” wargame rule set from Reisswitz Press.
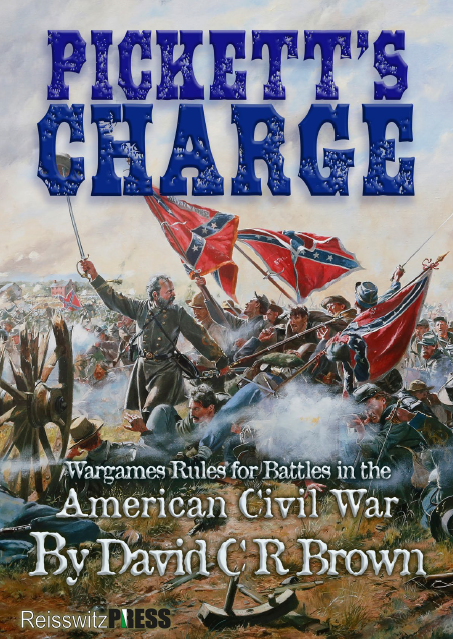
Released in 2016, Pickett’s Charge is the brainchild of veteran game designer Dave Brown, known for other rulesets such as General de Brigade, Battlegroup PanzerGrenadier, General D’Armee, and most recently O Group. The game is published under the Reisswitz Press label, which is a sister publishing house to Too Fat Lardies, and like Lardies authors Richard Clark and Nick Skinner, Brown places a lot of his game design emphasis on the difficulties of command and control.
But whereas Lardie games tend to focus more on the skirmish or tactical scale, Dave Brown has gone the other direction – BIG! While the basic unit of fire and maneuver is the regiment (or battery, in the case of artillery), command decisions in Pickett’s Charge begin at the brigade level, with the rule set really intended for games at the division and even corps scale. This is in keeping with the idea that a commander should be concerned with what is happening “two levels down” in the command structure, with the players sitting in the role of divisional commanders.
Figure Scale
While ostensibly scale-independent, Pickett’s Charge is intended for miniatures of anywhere from 6mm to 28mm scales. All distances for movement or firing range are given as a pair, the first value in centimeters (for use with 15mm scale) and the second in inches (for 28mm scale). If you’re playing at 6mm or 10mm, simply use the value given for the 28mm scale, but apply it in centimeters instead of inches. For example, the basic movement distance for line infantry is listed as 15cm [9″], meaning 6mm or 10mm troops would move 9 centimeters, 15mm miniatures would move 15 centimeters, and 28mm miniatures would move 9 inches. This is a clever way of handling a variety of scales in a way that is succinct and consistent, and widens the appeal of the game – nothing is worse than buying a new rule set and discovering it’s intended for a different scale than the figures you already have.
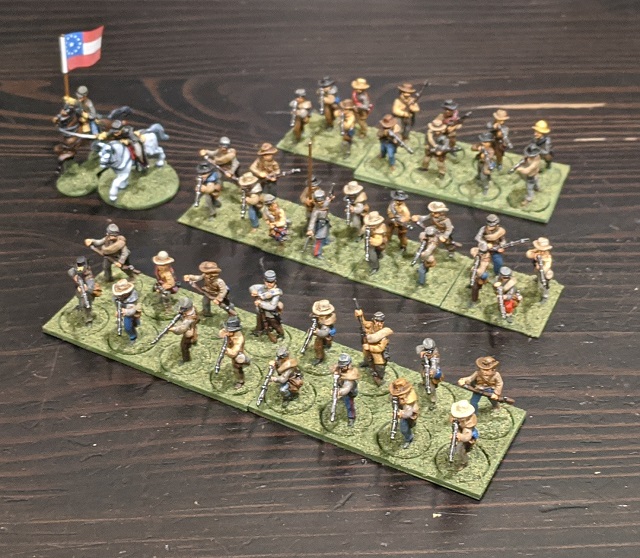
In terms of forming regiments, the game uses multiple bases or stands to comprise a single regiment, with a general rule of thumb that each base represents 75-80 actual men. A single base will generally have 2-4 figures on it. Advice is given on base physical size and/or frontage for various figure scales. A regiment is thus formed of anywhere from three to ten bases. But there’s a catch, which is that the actual number of bases in a regiment isn’t used directly anywhere outside of skirmishing or melee. Instead, regiments are graded into three general classes; small regiments with 3 or 4 bases, standard regiments of 5 or 6 bases, or large regiments with 7 or more bases. Small regiments get a penalty in firing and melee, large regiments get a bonus, but the difference is relatively minor.
One thought on scale versus table size is worth mentioning here – if you are mounting your 28mm figures two-by-two on a base and using the recommended frontage of 15-20mm per miniature, the width of a single base is going to be on the order of 40mm. That means a large regiment of infantry of 8 stands in line formation is going to take up about 12.5″ of space. And that’s just one regiment of typically four or five in a brigade, and you’ll likely have at least three brigades of similar size. If you want to play this game at larger figure scales, you’re going to want a decently large table.
Casualties and Morale
Pickett’s Charge does not use figure removal to track casualties, instead using markers to indicate how many casualties a unit has suffered. And in this sense, “casualty” is a pretty nebulous term, because the casualties sustained by a unit don’t just come from getting hit with bullets. The game rolls together unit losses from men killed and wounded with losses from morale – men slinking off to the rear or “helping the wounded.” Units can even cause themselves “fatigue casualties” if firing too aggressively. If a unit has been “whipped” as a result of either enemy fire or melee action, it will sustain an additional casualty every turn it remains unformed – even if no longer under enemy fire. This represents men deciding they’re done with this war business and slowly melting away, something you encounter quite frequently in the period accounts. And once a regiment suffers enough casualties, it becomes “dispersed,” which is to say, removed from the table. This is the part where regiment size probably matters the most, as bigger regiments can sustain more casualties before dispersing.
Furthermore, because of the time period that this rule set is trying to emulate, there are two other important elements to consider: whether your regiment is “formed” or “unformed,” and whether or not it has lost fire discipline. This is a measure of the coordination that the colonel commanding the unit is able to exert. A formed regiment (in a tight line, standing shoulder-to-shoulder) with good fire discipline will pump out devastating volleys and be much more effective than an unformed regiment (a loose or ragged line) where men are firing at will.
Deployment
In some regards, deployment in Pickett’s Charge is very traditional in its approach – each side has a “deployment zone” on its side of the table where units are placed. The size and location of this zone is generally defined by the scenario, but the rules also allow for both on-table and off-table reserves. Reserves have to be “released” in order to come onto the table (for off-table reserves) or enter the fray, and the number of committed or reserve brigades in a player’s force will have important ramifications for command and control during the game. This is an interesting limitation, and combined with the ability to “redeploy” can lead to force coordination issues very much in keeping with the problems which period commanders regularly encountered. When your left flank starts to roll up like a cheap carpet but your reserves have been allocated to your right, fixing that problem may consume all of your attention – meaning the rest of your force will suffer from neglect. On-table reserves are easier to commit than off-table reserves, but their position and strength is known to your enemy. Off-table reserves are harder to bring into action, but benefit from adding uncertainty (in both location and composition) to your opponent’s tactical consideration.
The system also supports the “Fog of War” through the use of “blinds.” That is, a card that indicates the presence of a unit, but not what that unit is. Blinds can be actual units or phantom units, which is a fun way to add uncertainty to deployment and maneuver in the early parts of a game. The number of blinds each player has is limited, giving another set of interesting decisions to make as to what the players hide versus what they show to their opponents. Rules for discovering what unit might be hiding under a blind – or whether it’s a phantom – are simple and straightforward.
Gameplay
First and foremost, the game is exclusively designed to use 6-sided dice. This makes things very easy, as virtually everyone has some sitting around. And most of the tests in the game are either 1D6 or 2D6, so it’s not like you’ll need gobs of dice – though having as many as 10 or 12 might come in handy when it comes to skirmishing or melee.
Once deployment is finished (more on this below), the game turn is broken down into 4 phases of play:
- Command Phase (simultaneous) – this is where players will issue orders to their brigades and divvy up their precious command resources. This is also the phase where initiative order for the remainder of the turn is determined.
- Charge Phase (alternating) – your opportunity to launch charges at your foe and dislodge them from their works, though as we shall see this is far from certain. This is done in initiative order, with the player holding initiative launching and resolving their charges first. Units that have launched or received a charge can’t move or shoot later in a turn, so timing is key here.
- Movement Phase (alternating) – This is where you’ll move your non-charging units around the field, maneuvering into position to lay down a crashing volley or threaten an enemy’s flank. The player who holds initiative moves all his or her units first, forcing the opponent to react to those movements.
- Firing Phase (alternating) – “Give ’em hell, boys!” This is the phase where all of your careful maneuver hopefully pays off, as you lay down volleys of fire and try to convince your opponent’s forces that perhaps they’d rather be somewhere else. The player with initiative fires first, and since the build-up of casualties reduces the effect of firing this can be a big advantage.
This ordering is interesting, and a little bit of a switch from the kind of move, shoot, assault we see in typical sci-fi games. Because charges have a relatively short range, you will likely be exposed to murderous close range fire at least once before you can come to grips with the enemy – and usually once more during the charge itself!
Let’s look at each of these phases in a little more detail:
Command and Control
This is where the magic happens, and if there’s one area where Pickett’s Charge is unambiguously great, this is it. The game uses a system whereby each turn the players generate a variable resource pool that represents the command and control that the player can exert on his or her forces. Each brigade under a player’s command has the potential to generate a “Staff Officer,” which can then be assigned to various tasks. But this officer is only generated on a 3+ (or a 5+ for brigades in off-table reserves), which means that while you generally have a decent idea how many Staff Officers you’ll generate, you can never be absolutely certain.
Worse, each brigade in your army must test each turn to see whether it is “obeying orders” or “hesitant.” Generally, this is a 3+ roll on a D6, but as a brigade sustains losses and becomes “tuckered out” this gets more difficult. One of the key uses of Staff Officers is to place one with a brigade to help ensure that it passes this test by providing a re-roll. But if you’re assigning your Staff Officers to babysit your brigadier generals, they’re not doing other important things – like rallying your troops, getting a brigade to advance at the double-quick, committing one of your reserve brigades, or launching an intense artillery barrage at the enemy. Some of the more attractive options (like artillery assaults or moving at the double-quick) take two Staff Officers, and very quickly you will grasp that you’ll never have enough resources to do all of the things you want to do. And allocating two staff officers to get a brigade moving at the double-quick means nothing if they end up being hesitant.
And if one of your brigades really starts to get into trouble, it’ll be classed as “faltering,” in which case you’ll need to assign a Staff Officer to it just to keep it from melting away or withdrawing.
This mechanism is fantastic, because it forces the player to prioritize their uncertain resources in an uncertain situation. It’s very true to the period, as once your brigades start to falter your number of available Staff Officers is reduced – meaning you’re spending more effort trying to keep your army from falling apart than you are on taking it to the enemy.
I like this system much better than some of the other ancients games I’ve played, where once a unit fails to obey orders your turn is done. This feels like less of an “all or nothing” problem, because a “hesitant” brigade can still fire and even move – but it won’t advance towards the enemy, nor is it able to launch a charge. Your hesitant units can still have an effect on the battlefield, but they may stand still when you desperately need them to move. This is classic “design for effect,” and in terms of the period hesitancy can come from a variety of sources – incomprehensible orders, lost message riders, timid commanders, poor organization or confusion within the brigade, or a host of other bizarre occurrences that make coordination of large groups of men difficult. This is like Rosecrans at Iuka, wondering why the hell Grant wasn’t advancing to trap the enemy (Grant’s force was eagerly “awaiting the sound of the guns,” but was stopped in an acoustic shadow such that even though there was a pitched battle raging less than a mile away, they heard none of it).
This core uncertainty represents what von Clausewitz called “friction,” and is one if the most engaging aspects of the game. Players will have to make important and interesting decisions that will have consequences that far outweigh simple concepts like weight of fire or force size.
One other hilarious nod to the period is the distinction between “Auspicious” leaders, “West Pointers,” and “Political Generals,” which have noticeable effects on the level of command and control that can be exerted. This issue – which plagued both armies throughout the war – is also carried into the corps level rules, where terrible generals can end up randomly depriving one division of Staff Officers entirely and giving them all to another division.
Determining initiative also happens during this phase, a roll-off with both players rolling 2D6 and subtracting the number of hesitant or faltering brigades. In the event of a tie, the player who had initiative last retains it. Simple and effective.
Movement
Movement is pretty bog-standard for a table-top miniatures wargame – troops have fixed movement rates based on their type. For instance, playing at 15mm scale, a regiment in line moves 15cm per turn while a regiment in column moves 20cm per turn. If a brigade is obeying orders and moving at the double-quick, you’ll add 4D6 cm to this total. This is the only randomness in movement, and while I have come to really appreciate random movement distances, I think the effect of hesitancy on unit movement and firing produces a sufficient amount of uncertainty to keep this phase of the game engaging.
Of importance in the movement phase is keeping your units in formation. Experienced units will be able to do this more easily, but less experienced units or rough terrain will make things more difficult. Where possible, you’ll want to mitigate these effects as much as possible, because as mentioned previously formed troops are more efficient than unformed troops.
Shooting
This is where things start to get crunchy. Firing for line units is accomplished by rolling 2D6 and consulting a table. Strangely, negative modifiers are made to the 2D6 roll itself, whereas positive modifiers generate “Casualty Dice” which don’t affect the 2D6 roll but have a chance to inflict additional casualties on the target unit. The roll is made and the appropriate table effect is applied. So for instance, a large, green regiment of infantry firing at an enemy in cover gets -2 to the 2D6 roll (-1 for being green, the other -1 for a target in cover), but generates two additional Casualty Dice from being a large regiment. If, after modifiers, the 2D6 roll was a 6, the regiment would inflict one casualty on its target. Each Casualty Die has a 50% chance of inflicting a further casualty. Low results on the 2D6 table are bad (things like a loss of fire discipline, which makes future firing less effective), and high results are good, resulting in more casualties or adverse morale effects on the target.
This difference in how positive and negative modifiers are handled takes some getting used to. One subtle effect that isn’t clear on first reading is that it places an upper limit on certain effects; if your aforementioned large, green infantry regiment is shooting at an enemy in cover at long range, it will never force a morale check (colorfully named a “See The Elephant” test) on its target – but a small regiment of regulars might, even if they inflict fewer total casualties.
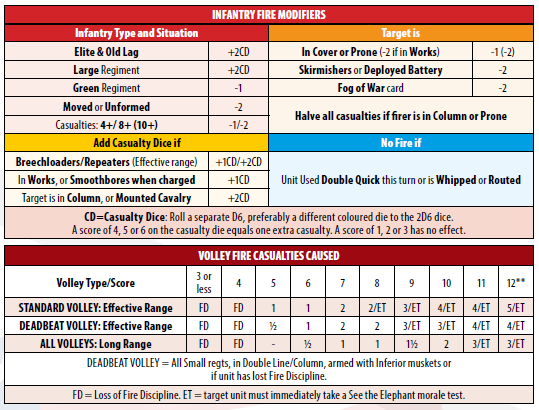
Artillery fire has a similar oddity in that for most of the war, the Union organized its artillery into 6-cannon batteries, whereas the Confederates often fielded batteries of 4 cannon. Fire is handled the same way as infantry – 2D6 and consult a table – and as a result of the different battery sizes artillery fire can generate “half casualty” results. This is weird and requires a follow-up die roll (a casualty is inflicted on a roll of 4-6 or ignored on 1-3) that seems like an egregious detail. It keeps the overall balance between Union and Confederate force organizations however, so while it doesn’t thrill me as a rules mechanic I completely understand why it is there. Artillery fire ranges and lethality vary by cannon type (with smoothbore 12-lb Napoleons firing close-range canister shot being particularly vicious), and the level of differentiation here feels interesting without being overly finicky.
Skirmish firing is one of the few areas in which the actual number of stands in a regiment matters. Units in skirmish order generate a Casualty Die for each stand that fires, but this only inflicts a casualty on the target on a 5+ at effective range and a 6+ at long range (rather that the 4+ for Casualty Dice generated by line infantry in closed ranks).
Charge!
This is where, in my opinion, things get a little hairy. Charging units have a normal move distance, but there is also a random “charge bonus” that gets added based on unit type. After much spelunking, I discovered that this bonus is +1D6 cm [+1D6″] for infantry and +3D6 cm [+2D6″] for mounted cavalry – alas, this was given in the section on Movement, which is actually in the next chapter.
Further, the movement during charge moves has a hiccup in it – in order to be able to launch a charge the target unit much be within your maximum potential range (i.e. your normal movement plus your maximum possible charge bonus – so for mounted cavalry this would be 25 + 18 = 43cm), but you don’t actually move into contact – yet. You stop 5cm [3″] short of your target, then resolve a bunch of stuff and then maybe get into contact. What makes this process less comprehensible is that the rules just tell you to move to the 5cm [3″] point, and never tell you when to roll the actual charge distance. There’s a part where it talks about if your movement was sufficient to make it to this point or not (which in turn indicates whether the charge goes forward at all and whether your unit is formed or unformed when it goes in), but for idiots like me if you tell me to move my unit I will – at which point I won’t know where they were when they started, so knowing how far they’ve come and whether they can reach requires guesstimation or time travel (neither of which is considered particularly “sporting” in tabletop wargaming). We’re pretty sure we’ve sussed out how it’s supposed to work, but reading what’s written in the rules it’s more than a little opaque. The important bit is that this 5cm [3″] position is the place where the defending unit gets to unload on you with fire before you (potentially) get stuck in.
Like infantry and artillery fire, charges are resolved using a 2D6, only this time both players are rolling. Also like firing, there are modifiers, but this time there are both positive and negative modifiers, and it is the result of the two rolls relative to each other that are compared to a table to determine the effect.
One of the key elements in launching or repelling a successful charge is support, either from the flanks or from trailing elements (essentially the “assault column” of the earlier Napoleonic era). Each supporting unit lets you re-roll one of the dice in the 2D6 test, and it is entirely possible that you’ll be able to re-roll a die more than once. If you use a re-roll, however, the second result stands even if it was worse than the previous roll. More supports means a better chance of success. Some units (such as artillery) can contribute fire support – blasting the charging unit on their way in – but don’t provide a re-roll.
Once both sides have expended any re-rolls they want to use and applied any modifiers based on their unit conditions, the net number is compared to the table. This is the kind of thing you’ve likely seen before – for instance if the attacker’s result beats the defender’s by 6 or more, the defender is routed (giving the attacker the option to hold the defender’s position or pursue). The results get worse as the scores switch, and if the defender beats the attacker by 6 or more the charging unit is thrown back before it ever makes contact. Interestingly, the only result for infantry that will produce an actual melee fight is if the attacker and defender draw. Several other results see the charging unit stop and deliver a point-blank volley.
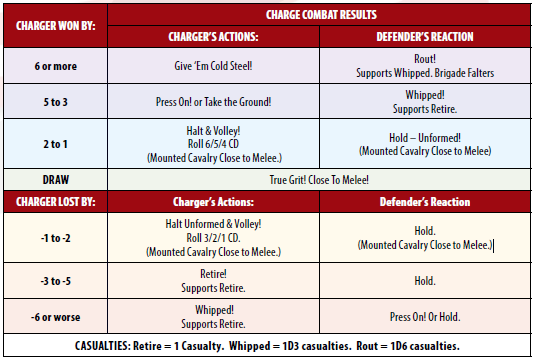
And it’s here that everything starts to make sense. As it turns out, while charges occasionally happened in Civil War battles, actual melee combat was pretty rare. What was far more common was a unit launching a charge and having their target run away, or having the charge disintegrate into a blazing, close-range firefight. For all that the mechanisms are a little arcane and the section a little inscrutable, the final result is absolutely in keeping with the period accounts.
But if the rolls are a draw and you do move those last 5cm to contact? Whoa, Nelly, you’re going to see some dudes die, because each side counts up the total number of stands involved (direct and supporting) and rolls a Casualty Die for each one. Statistically speaking, both forces are likely to completely mangle each other – which is again in keeping with period accounts.
Organization
I’m not going to pussyfoot around it – the order in which rules are presented in this game is almost exactly backwards. My first read-through left me going, “wait, what?” more times than I care to admit. References are made to some important things (such as “Casualty Dice” or “Deadbeat Volleys”) well before they are defined, leaving you wondering just what it is that you are digesting. As mentioned previously, “charge bonus” dice are referenced in Chapter 4 (the section on charge combat), but you have no idea how many you get or how they are used until you read Chapter 5 (the section on movement).
The order of the chapters follows the order of the phases of the game (command, charge, movement, firing), but when you consider that the charge phase includes both movement and firing those sections should probably have been dealt with first. Even in writing this review I found myself re-ordering the topics to make the flow better and make sure I wasn’t referencing concepts that I had not yet touched on. And the lack of even a chapter or page reference for topics not yet defined is unforgivable in a modern rule set. Even something as simple as “The charging unit may move its full distance, plus the distance rolled on its charge bonus dice (see pg 45)” would have been sufficient.
Further, there’s some inconsistent use of terminology. Casualty Dice for instance are consistently applied in that it is a die you roll to see whether you inflict casualties directly on a target unit (without having to consult a table), but the actual die value you need to inflict that casualty varies by circumstance. And I get it, you want to have things weighted appropriately such that their effect on the tabletop is reasonable/realistic, but it’s something that can be easy to miss on your first pass through the rules.
That said, once you have grasped how the rules work, the book has a very handy step-by-step list for each phase of the game. Well-written rules have a tempo and a symmetry to them such that once you know how the designers approach a particular task, more complicated concepts are easier to digest because you learn to recognize how things work. Pickett’s Charge is no exception, and now that I understand the rules as a whole they make loads of sense. I just wish they had not chosen to start the meaty part of the rules with the most complicated part first, as I think this has the real potential to put people off.
Final Thoughts
Organizational issues aside, I am really impressed with Pickett’s Charge as a wargaming rule set. It simply oozes the ambience of the period, more so than games with a broader time range like Sharp Practice 2 or Black Powder. These games might support everything from the Seven Year’s War to the Maximilian Adventure, but with its narrow focus Pickett’s Charge very aptly delivers the feel of Civil War battles extremely well.
A note on troop quality illustrates this very well – most wargames have some notion of troop experience, with various troops being classed as “green” or “regular” or “veteran” or whatever. Almost universally, troops with more experience are better at every aspect of the game in which experience plays a factor. Not so for Pickett’s Charge; this game acknowledges that sometimes the troops with the most experience are the least likely to want to get stuck into a costly close combat. Veteran troops can lay down withering fire from a distance, but are actually harder to coax into launching an assault. In addition to the standard troop quality categories, Pickett’s Charge also has a class called “Old Lags.” These are troops who are just done being soldiers. It’s reserved for cynical veterans who’ve seen some serious shit or troops whose enlistment commitment is over but who have not yet been released from duty – both exceedingly fitting for the period.
As another example, the American Civil War was a time of intense battlefield innovation, and was the first time you had massed ranks of troops – whole regiments at a time – laying down in combat. This is something that few other rules of the Black Powder Era capture, but it’s absolutely part of Pickett’s Charge. Even the vocabulary – terms like “skedaddled” and “catawamptiously chewed up” – really evoke the era. The narrative that springs from games using this rule set would fit very well with contemporary written accounts and diaries, which is something I always look for in a historical wargame.
That said, you’d better like big battles with lots of miniatures on the table. The example scenario in the book (French’s assault on the Confederate-held “Bloody Lane” at Antietam) sports 64 bases of infantry and 4 stands of artillery for the Confederacy and a whopping 81 stands of infantry and 6 stands of artillery for the Union. That’s a single division each (5 brigades for the Confederates and 6 for the Union). Coming from skirmish gaming, I’m not sure I have 81 painted union infantry figures, let alone stands of four. This kind of troop requirement really does lend itself well to smaller figure scales, where individual detail isn’t as important and it’s easy to paint up masses of troops quickly.
But if you have a sizable collection of Civil War miniatures already on hand (or don’t mind painting a bunch), I highly recommend you give Pickett’s Charge a go. The rules are available from the Too Fat Lardies’ webstore, and the PDF-only version is just 16 GBP. The hardcopy version is just 24 GBP. As game rules go, that’s very reasonably priced. So what are you waiting for? Give these rules a go and “Give ’em hell!”
Have any questions or feedback? Drop us a note in the comments below or email us at contact@goonhammer.com.
