
Getting the right tone of colour on your historical uniforms is a problem all to familiar to painters. There’s a variety of tones, from the quality of dyes to the effects of simple chemical processes like sun bleaching, that make colouration hard to pin down. And on top of that, sometimes a uniform’s tone isn’t properly represented by any of the paints available to you and you have to mix your own bottle of paint for that uniform. That was me with the WW2 Italian uniform up until last year. I have since found a new paint from the Warpaints Fanatic range from Army Painter and formulated a new painting scheme to get the colour I want. I already did a painting guide for Italian uniforms a few years back, but now that I have an out of the bottle paint and also more experience, I am going to update that guide and also add some more recipes for stuff like the helmets and leathers.

So what is the magical paint? Evergreen Fog by Army Painter Warpaints. It actually took a while until I realized how well this paint works; in my day job I work at the local friendly gaming store and while stacking the paint rack I happened to be stacking some Evergreen Fog. Turns out the entire triad is surprisingly close to the custom paint mixes I made a few years back. So I took the paints home and gave them a try, here’s the result:
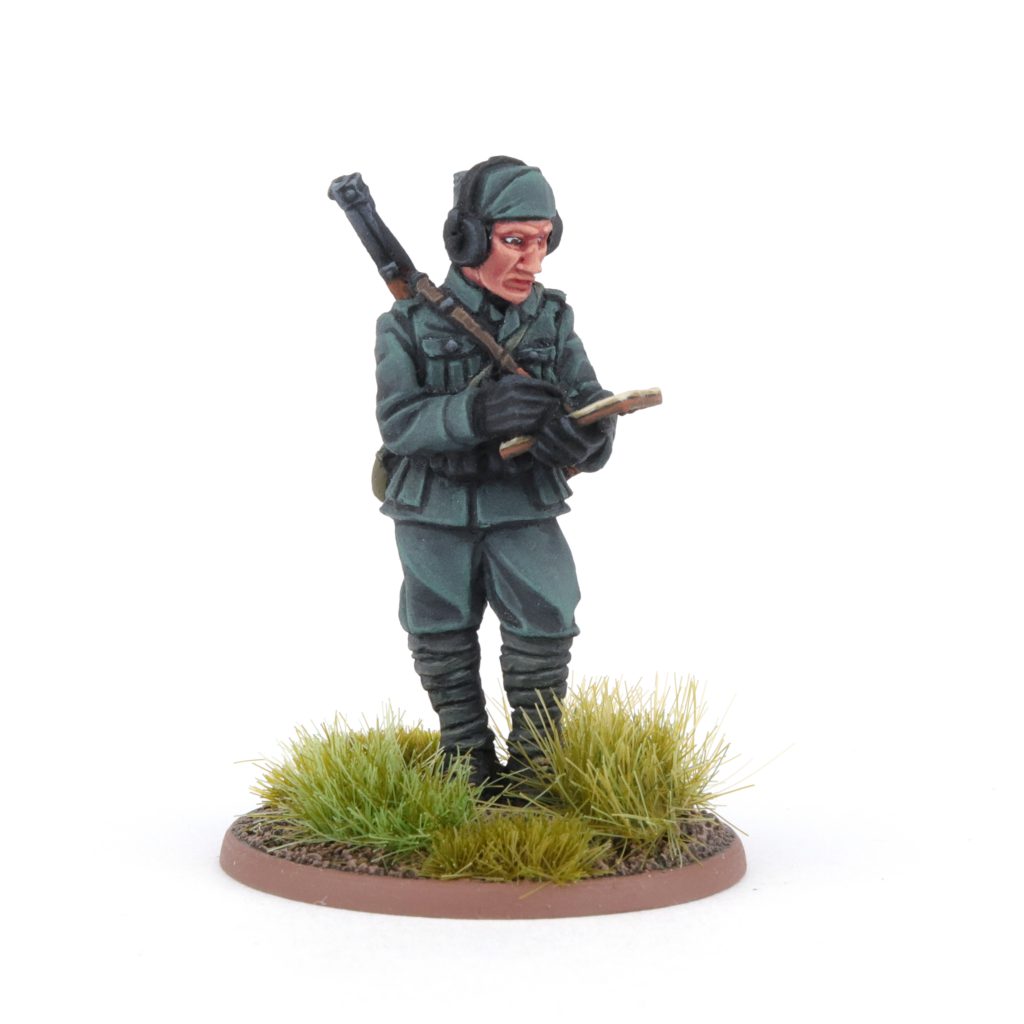
How did I get to this solution? I’m making use of the shadow, base, highlight system of painting that I learned from Ruben Torregrosa’s Painting War series, but instead of making Evergreen Fog our base color, we make it our highlight. You can obviously vary this by introducing other paints from the same triad, but I find if not used sparingly, they make the uniform look less like Grigio Verde and more like mint with a hint of pine. With the approach I went for when painting this uniform, however, it gives you a surprising amount of freedom to vary the shade of your uniform to imitate real life wear and tear such as bleaching or different intensities of dye.
Italian Uniform
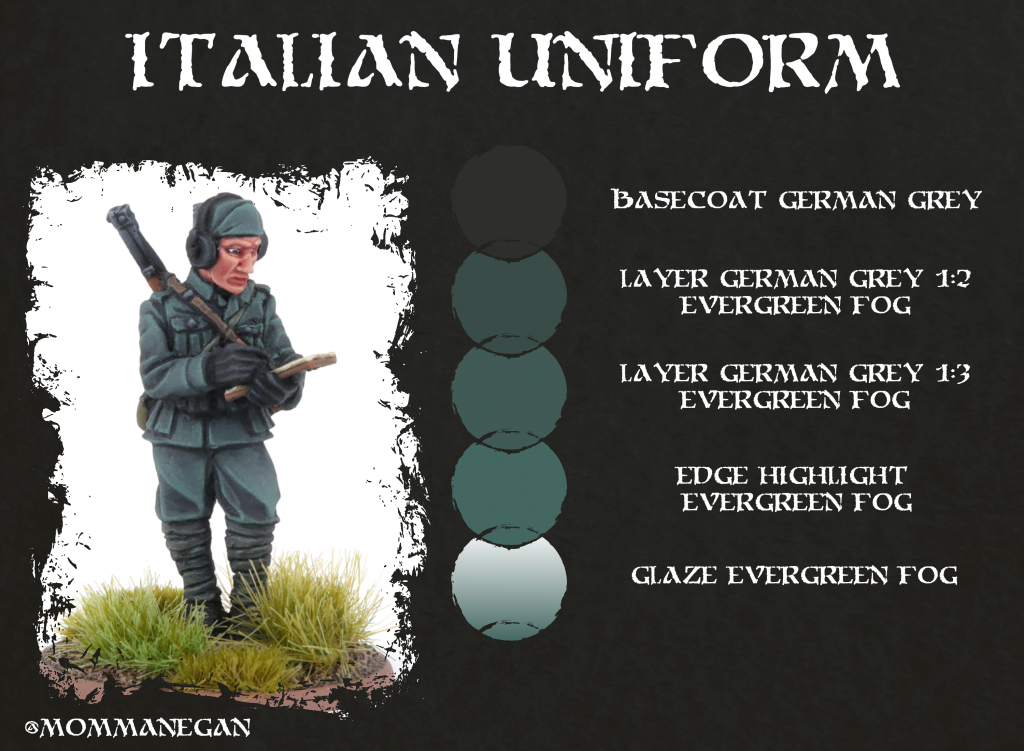
To get some good contrast we basecoat the entire uniform with German Grey from Vallejo. Then we make a mix of roughly one part German Grey and two parts of Evergreen Fog. You could also do a one to one ratio, but German Grey can be very overpowering so we need a bit extra Evergreen to even it out. Once you’ve mixed up the paints you want to generously cover most of the uniform and only leave out the recesses. If you have open creases in areas like the pants, you may want to glaze/feather the mix towards the light. It also helps if you start out by defining striking edges like the knees and lining around piping and seams in the uniform.
The last part is one of the hardest, you’re going to take Evergreen Fog and thin it somewhat and begin by edge highlighting the most raised and sharp edges. Once you’ve created this guide map of highlights you want to heavily thin down the Evergreen and begin to glaze towards those highlights, this will take some time, but you want to make sure the Evergreen is applied slowly with a clear transition towards the highlights. For those who have not yet mastered glazing, you could just add Evergreen to the previous mix and apply it to the raised surfaces, but in smaller areas than before and finish it off with a highlight of pure Evergreen Fog.
Helmets
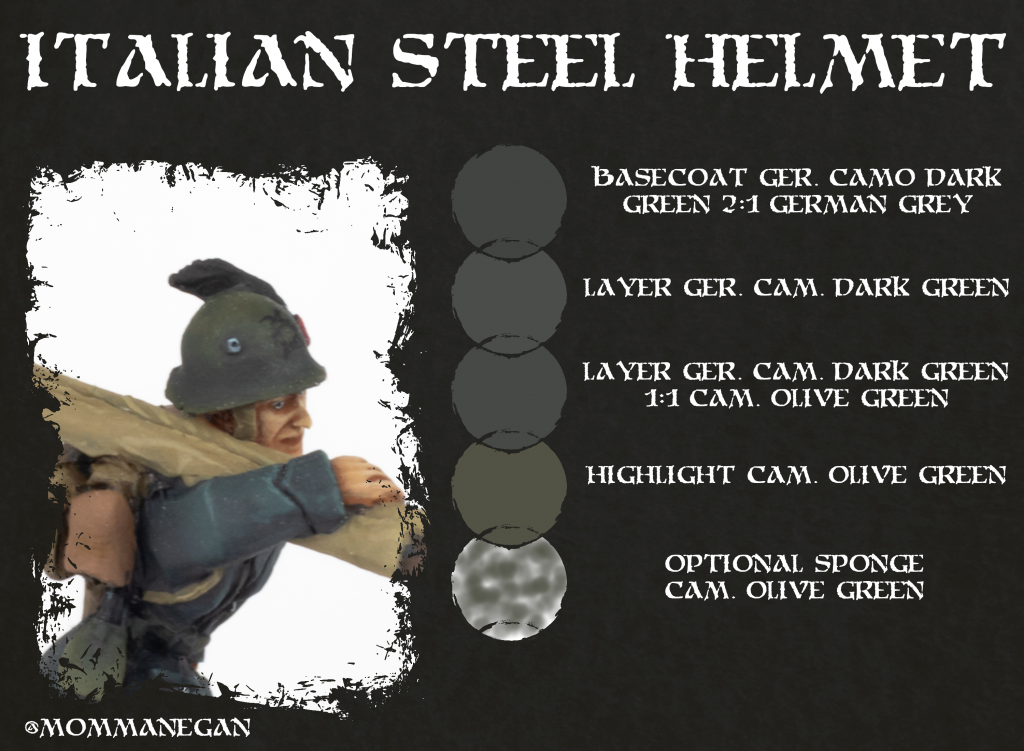
Normally you could just paint the helmets like you would on your Soviets, but since I don’t really paint Soviets, I had to come up with my own recipe.
You want to start by basecoating with a mix of two parts Ger. Camo Dark Green and one part German Grey. Next you want to either mix in more Ger. Camo or make a new mix with a 1:1 ratio, you could also go straight to Ger. Camo Dark Green if you want to be done faster. Apply this mix to the entire helmet but leave out the little crease around the edge, if your helmet sculpt has a very sharp brim you could also aim the highlight towards the crease to mimic the realistic zenithal lighting. After establishing the basic shadows you want to do a 1:1 mix of Ger. Camo Dark Green and Cam. Olive Green and glaze it towards the top of the helmet, making sure to leave only a small band of the previous paint mix as you want a very stark transition of color. Repeat the previous step with pure Cam. Olive Green and finish it off with an edge highlight to the rim of your helmet. If you want to add weathering to your helmet, you can tear off a small piece of sponge(you will most likely find one in you mini’s blister) and dab on small spots of pure Cam. Olive Green.
Dark Leather
While you can use any way to paint leather straps and webbing on your Italians (although you should stick to light reddish and dark brown leathers), I find it helpful to include this very basic recipe, just so you don’t have something to reference if you like the way I paint it.
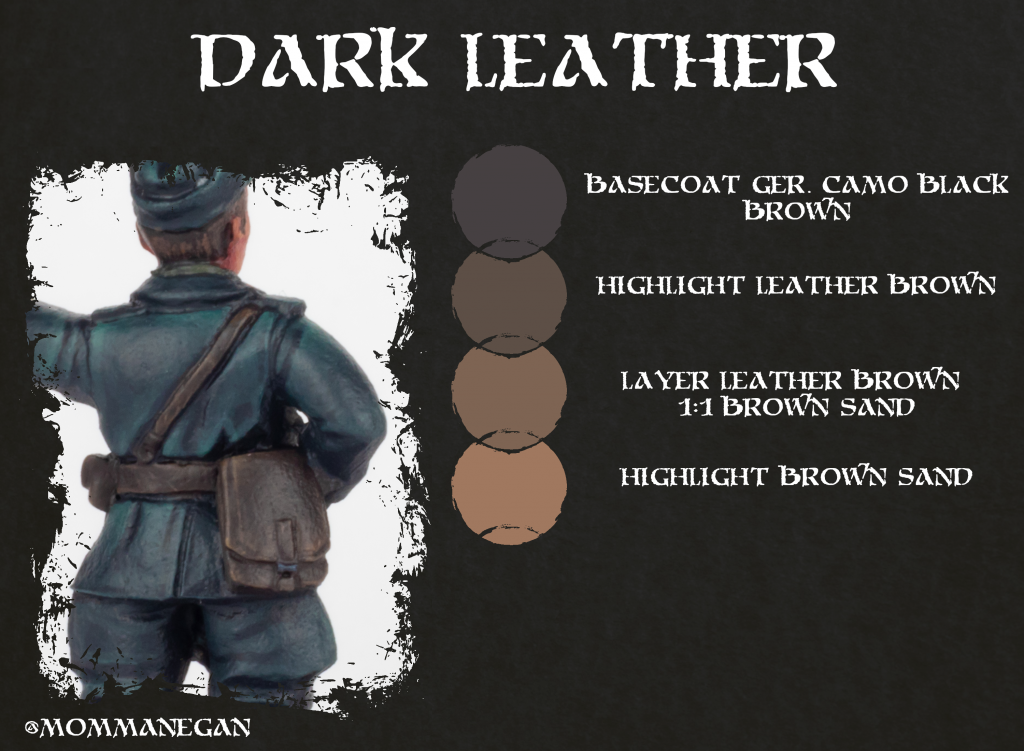
You want to begin with a Ger. Camo Black Brown Basecoat, which can also double as some blacklining if you want to reinforce the separation of materials on your miniature. Next up you want to take some Leather Brown from Vallejo and sketch out the highlights, so obviously all the edges, but if you want a more worn leather look you can also begin to sketch out the tears and cracks in the material with this colour. To round out the fresh leather look you do a final edge highlight of one part of Leather Brown mixed with one part of Vallejo’s Brown Sand. You can just leave your leather here if you want it to look factory new or well kept, but if you want to go with some cracked and damaged leather, you want to take your finest brush and add some pure Brown Sand to the edges and little tears you painted in earlier with Leather Brown. How damaged you want your leather to look is up to you, but I would argue for restraint, or else you belt will look very bright.
And this rounds out my updated painting guide on temperate Italian uniforms, now without the annoying pre mixing of paint! All hail Evergreen Fog!
Have any questions or feedback? Drop us a note in the comments below or email us at contact@goonhammer.com. Want articles like this linked in your inbox every Monday morning? Sign up for our newsletter. And don’t forget that you can support us on Patreon for backer rewards like early video content, Administratum access, an ad-free experience on our website and more.
