
It’s been over a year since Games Workshop dropped their last Crusade book, Pariah Nexus, which brought with it huge improvements over the Leviathan rules that launched 10th edition. Since then a ton has changed – every army has multiple Detachments, Actions are back, and more than half the game’s codexes have released. So we were overdue for a new set of Crusade rules. Cue Nachmund Gauntlet and its new Crusade book, which gives us a host of new rules. But are they any good? Well strap in because in this article we’re going to give you the most detailed review on the internet.
Before we do that, we’d like to thank Games Workshop for providing us with a preview copy of this book for review purposes.
Welcome to the Nachmund Gauntlet
First off, the basics: Creating and maintaining your Crusade Force remains largely unchanged from the Core Rule Book and Crusade: Tyrannic War beyond a couple of cosmetic additions to track Blackstone Fragments. The rules for gaining and spending RP are unchanged, and all the standard Requisitions are back. Similarly, Battle Traits and Battle Scars are earned and removed in the same way, and the generic Weapon Modification and Battle Scar tables here are exactly what you’re used to.
What About the 2023 Grand Narrative?
Eagle-eyed Crusade sickos who attended the 2022 Grand Narrative in Albuquerque will remember last year’s Pariah Nexus book featured a blurb about the lore of the Grand Narrative, giving us a quick recap of those events and their outcome. That doesn’t appear to be the case this time, so if you were hoping to see the 2023 results show up in official lore, it looks like we’ll be waiting a bit longer for that.
The Video Version
If you’d rather watch a recap of this book than read it all, we’ve got you covered with a video version, here:
Nachmund Gauntlet Crusade Battles
Nachmund Gauntlet makes some huge changes to how games are played. Forget skill trees and tracking campaign-specific bafmodads; this is a real big change. These games have a number of new rules to apply to games which change how you’ll build armies, arrive on the battlefield, and what you’ll be doing in games.
Tactical Reserves
Games in Nachmund are played using Tactical Reserves. You’ll split your army into several smaller forces called Waves. The first will be the Primary Wave – the main part of your army which you deploy on the battlefield at the start of the game – and you’ll add two or three Reinforcement Waves which are groups of reinforcements that will arrive later in the battle. The way this is set up you’ll only ever bring in two of your reinforcement waves, so while you can have three, the idea is that you’d choose which two to bring in, giving you some adaptability mid-battle to alter your strategy based on what you need. It’s a kind of “sideboard” mechanic which gives players an incentive to build out larger Orders of Battle and makes those situational units more relevant.
The way you split your army depends on the battle size and your “Formation Stance,” though this is just a fancy way of saying how many points you’ll start with on the battlefield. You have three options per battle size, and these are pretty uniform in that they let you vary how much of your army is in the primary wave by +/- 100 points from half the game total. So for example, in a Strike Force game, you can choose for your primary wave to be either 900, 1000, or 1100 points. Your reinforcement waves will then be either 550, 500, or 450 points each, splitting the remainder in half. This is essentially a way to help armies which might otherwise have a hard time making exact point values work for certain game and wave sizes.
Your Primary Wave is the only part of your army you’ll deploy pre-game, and will be deployed on the battle normally, though it must be deployed on the battlefield – you cannot put Primary wave units into reserves. Then at the start of the second battle round, you’ll pick which of your reinforcement waves to bring onto the table – they arrive as Strategic Reserves. Then in round three, you pick another wave to bring in, and any remaining waves are removed from the battle – they don’t take part in it at all, though if your Warlord was in that wave, they’re considered to have been destroyed (they don’t take an out of action test).
Finally, units in Nachmund Gauntlet battles cannot use the Rapid Ingress Stratagem.
Surgical Deep Strike
One more key wrinkle in the Nachmund Gauntlet missions is Surgical Deep Strike. Do you love Deep Striking into battle but struggle with having to be 9” away, cursing fate as you fail the ensuing charge, being forced to sit and watch as your dreams turn to ash in your mouth? Well in Nachmund Gauntlet, once per turn, a unit arriving via Deep Strike can do a Surgical Deep Strike. This is a special kind of Deep Strike that allows units to be set up within 9” of an enemy unit – anywhere more than 3” from an enemy unit, in fact. When it does so, it has to take a Deep Strike test, rolling 2D6 and subtracting 1 for every enemy model within 9” of the unit (excluding Battle-shocked units and units with OC 0).
Roll a 4+ and you’re good – your unit arrives and can act normally this turn. Roll a 3 and you have to take a Battle-shock test. Roll a 2? Well, you’re just plain Battle-shocked. Roll a 1 or less? Oooooh buddy, now you’ve done it. That’s a Deep Strike Mishap, and you roll on a totally separate table.
The Deep Strike Mishap table offers six possible results, with 1 being the lightest and 6 being the heaviest penalty. You’ll automatically take mortal wounds no matter what you roll – D3 for a result of 1-4, and D6 for 5+ – and for most results you also end up Battle-shocked Then there are the other effects. On a 2 your unit goes back into reserves – the DZ is just too dangerous. On a 4 one enemy unit within 9” can make a normal move of up to D6”, as they anticipated your arrival. Roll a 6? Absolute disaster – you can’t shoot or charge this turn.
Beanith: Finally a call back for the wizened ancient ones amongst us still clutching our scatter dice and vast array of plastic templates reminiscing about the good ol’ days where we could go for years between FAQs. And yes my knee still hurts dang it. Lousy kids and their fancy space robots.
TheChirurgeon: This is a cool system for dropping units in close – it both rewards clever players who want to test their luck going in closer to a unit by only putting 1-2 models within 9” to improve their charge without risking too much, while also giving players a way to just go for it. And the mishaps offer some very fun and narrative drawbacks without providing the kind of brutal results that old Deep Strike could dump on players – results which just made players too afraid to use the ability. This threads the needle and really buffs deep strike units.
Actions
Actions were absent in Pariah Nexus but are back in Nachmund Gauntlet. They function the same way here as they do in Pariah Nexus tournament games, with different timing and conditions for completion. They can’t be performed by units that are Aircraft, battle-shocked, OC 0, or in Engagement Range, and they can’t have fallen back or Advanced and must be eligible to shoot that phase. Actions are a welcome addition, giving more codified rules than just the “can shoot” version we had before, and make leadership a more relevant mechanic.
Strategic Advantage
Finally, there’s one more major change to games played in Nachmund Gauntlet: During any given game, the first player to get to 10 or more VP gets the Strategic Advantage. The only VP that count toward this are the ones you’ll get from progressive objectives, and not end game objectives or being battle ready. When a player gets the Strategic Advantage, the game ends at the end of that battle round.
This is pretty bonkers, and represents the first time we’ve seen a rule like this in tenth edition. It’s also easy to miss if you aren’t paying attention as you read through the Game Sequence section.
To compensate for this, missions in Nachmund Gauntlet tend to be pretty low scoring. As an example, Front-Line Warfare puts six objectives on the table with four in No Man’s Land, and player’s score 1 VP each for controlling an objective in No Man’s Land, plus 2 for controlling the one in their opponent’s deployment zone. That means most of the time it’ll be unlikely a game ends before round 4. That said, this first-to-ten structure gives the player going first a considerable advantage, and there are more than a few missions where the Attacker gets to choose who goes first. That said, this will be mitigated by the Tactical Reserves and Surgical Deep Strike rules – starting with only half of your army on the board will make it harder to spread out and control everything early, and being able to drop in close in a pinch can stop you from losing a game early, even if the risk is high. But even with those changes, we suspect that horde armies like Astra Militarum and Genestealer Cults will have a natural advantage on these missions and even Space Marine Infiltrators may cause problems.
Agendas
There are two sets of Agendas, your standard Agendas, and Agendas specific to Attackers and Defenders. Each of these give you XP as usual, but all of them have an additional clause that also awards SAP. These are neat ways to add a little more tension to the Agenda system, because while usually your opponent has no mechanical incentive to stop you from accomplishing your agenda, letting your opponent be successful here means bad news for the rest of your alliance.
Standard Agendas
- Cut Off the Head is your classic “kill enemy characters” agenda, giving you 2XP per character kill. There’s an extra clause for an extra 2XP for killing Epic Heroes which is a welcome addition considering this mission pack incentivises bringing them. To get your SAP you’ll have to kill the warlord, which shouldn’t be too tall of an order.
- Drive Deep rewards you for ending the battle in your opponent’s deployment zone, giving you 3XP for up to three units who end up there. If you get all three you’ll be rewarded with a bonus SAP.
- Search Drop Site is another return of an old classic, tasking you to do actions on objectives which gives the unit that did it 3XP. If you search three or more objectives, you get a bonus SAP. This might be the easiest way for most armies to get their bonus SAP depending on the mission.
- Strike and Purge gives you XP for having units with the Deep Strike ability kill enemy units, granting bonus XP if you kill them in the same turn they come down. You also get an SAP if you kill 4 units with units with Deep Strike. This is an auto take for armies like Grey Knights or Genestealer Cults that have Deep Strike on all their important units.
- Strategic Dominance is another positional Agenda, asking you to stand in the middle of the battlefield, giving a unit 1XP each turn they end within 3” of the center of the battlefield. If you do it for 4 or more turns you get a bonus SAP. This one’s tough, since it’s asking you to be in the middle of the battlefield for almost the entire game.
Defender Agendas
- Activate Defence Perimeter has you doing actions in your deployment zone to create markers. These markers can’t be within 16” of each other and give 1XP per marker. If you can get 4 markers down you get a bonus SAP. while this doesn’t require going many places, these are full round actions your opponent can stop and you can’t just camp home in the same spot and do it.
- Repel the Foe this one’s easy, just kill stuff, giving you one XP per unit and giving you an SAP if you kill an entire Reinforcement wave. This one’s low risk but also somewhat low reward depending on your opponent.
- Defiant to the End has you mark three units from your army and if they live they get XP with bonus XP if they’re above half strength. If you have that many support units you think your opponent won’t get to, this is a good way to get some XP.
Attacker Agendas
- Symbolic Objectives has your opponent select two objective markers and if you control one or both of them, up to three units in range of them get 2XP and if you control both you get a bonus SAP. Depending on the mission this might be a slam dunk since there aren’t that many objective markers to go after so this is an easy one to keep in your pocket.
- Prime Macro-Ordnance is the attacker mirror to Activate Defence Perimeter, asking you to do full round actions in your opponent’s deployment zone. You get 2XP per action and if you do it twice you get a bonus SAP. This one’s not bad if you’re being aggressive but can be a bit of a tall order since its a full round action.
- Raze and Ruin is an interesting one, giving you XP for killing units in range of objectives with bonus XP if you kill stuff in your opponent’s deployment zone and on an objective. You get the SAP if you control all of the objective markers in your opponent’s deployment zone, which can be a tall order on most missions.

Crusade Blessings
Nachmund gives us the most involved set of Crusade Blessings yet in one of these books – and that’s a good thing. In addition to six standard Crusade Blessings, there are also three each for the Attacker and the Defender, and one based on your army’s faction.
- The Standard set are pretty normal, ranging from High Strategy (start with 2 CP) to Astropathic Communiqué (pick an extra Agenda), though Teleportarium is a clear winner here for the setting’s rules, giving a unit Deep Strike.
- The faction-specific Blessings are pretty thematic; the Imperium gets Drop Zone Denial to prevent an opponent from bringing in a reinforcement wave of your choice on round 2. Chaos gets Warp Assault, which causes battle-shock tests when your units arrive from Surgical Deep Strike. And Clandestine Goals for everyone else lets you pick an Objective marker to get +1 OC around.
- The Attacker and Defender set are interesting; there are a few missions where the Attacker decides whether to go first or second. For Defenders, Counteroffensive Wards gives your opponent -1 to their Deep Strike Tests. While for the Attacker Ground Observers will give your unit +1.
Battle Traits
As with Tyrannic War and Pariah Nexus, Nachmund gives us a new set of generic Battle Traits to work with for different unit types. Here there are tables for Monsters and Vehicles (6), Infantry (6), Mounted (3), Jump Pack (3), Beasts (3), and finally three traits which can apply to any unit, but will only have an effect on units arriving on the battlefield using the Deep Strike ability.
Monster and Vehicle Traits
These traits are solid. Reinforced armor gives you AP reduction against damage 1 attacks, Monstrous Momentum gives you +2” movement, and Titan Slayer gives you re-roll hit rolls of 1 against other vehicle/moster targets, or full re-rolls against titanic targets. These are decent, but nothing crazy.
Infantry Traits
The Infantry traits here are much more involved than what you normally see, with more interesting abilities. Grim Survivors gives you a once-per game ability to get a Feel No Pain 5+ for a phase, or 4+ if you’re below half-strength. Drop Zone Defenders improves your OC and Leadership by 1 in your deployment zone and punishes enemy units arriving within 9” via Surgical Deep Strike with -1 to their tests. Strikemasters lets you spend 1 RP during the battle formations step to give a unit Deep Strike and get +1 to its surgical tests. Tempered in Battle gives you a once-per-game ability to shoot, charge, or perform an action after falling back, and you can do actions even while Battle-shocked. Fleet of Foot gives you re-rolls for Advances and you can Advance and Action, plus if you Advance you can’t be shot with Overwatch for the rest of the turn. There’s some good stuff here, and it’s a little more interesting and thoughtful than “gain Infiltrators” or “re-roll 1s to hit.”
Mounted Traits
Three traits for your bikers and horse riders – Cavalry Outriders gives you Scouts 6”, Evasive worsens the AP of incoming attacks by 1 if you didn’t remain stationary the previous turn, and Shock Cavalry gives you +1 to hit against units below starting strength and +1 to wound against units below half strength. These are fine.
Jump Pack Traits
Three traits – Sleek Interceptors gives your unit auto-advance 6”. Fire Descent gives you free Rapid Ingress once per battle and when you do a Surgical Deep Strike, you do 1 mortal wound to each enemy unit within 6” on a 4+. Take to the Skies gives your unit a once-per-game ability to go back into reserves at the end of your opponent’s Fight phase. This is incredibly powerful, and can notably be done even if your unit is within Engagement Range of enemy units.
Beast Traits
Three traits – Hunting Beasts gives you re-rolls to Advance and Charge rolls, Pouncing Predators gives your unit free Heroic Intervention and when they intervene they gain Fights First (this is straight fire), and Enhanced Endurance gives your unit +1 Toughness. These are very solid, though the number of actual beast units in 40k is pretty small.
Any Unit (Deep strike) Traits
As mentioned, these only affect units setting up with Deep Strike. So they’ll work best on units which natively have Deep Strike, but can work on your reserves units. Drop Zone Veterans gives your unit the ability to re-roll hit and wound rolls of 1 the turn it arrives from Deep Strike, and re-rolls on its surgical deep strike tests. Stealthy Arrival gives your unit Stealth and makes it immune to Overwatch the turn it arrives from Deep Strike. And Precision Insertion gives your unit the ability to set up with Deep Strike once per battle and perform a Precision Insertion when doing so, making it ineligible to charge and giving it +2 to its test.
Battle Scars and Weapon Modifications
The Battle Scars list from Tyrannic War/Pariah Nexus has been replicated here, with the same six options – Crippling Damage, Battle-Weary, Fatigued, Disgraced, Mark of Shame, and Deep Scars. Likewise, the same Weapon mods are back here too.
Crusade Relics
The book has your standard set of Crusade relics, divided into Artificer, Antiquity, and Legendary Relics.
We have four options for Artificer Relics. Strategic Laurels gives you an extra CP on turn one and if the bearer is on the battlefield at the end of the game you get an extra Strategic Asset Point which can be nice if your team is looking for an extra leg up. The Conversion Field gives the bearer a 5+ invulnerable save and lets you bounce back mortals on 6’s to save. This one’s a classic, but there are very few characters in the game that want an invulnerable save and doesn’t have a better one. The Gene-Toxin Autofont makes one of the bearer’s weapons a relic and after they fight, they make something they hit Poisoned until the end of the battle. If something is poisoned, then at the start of each Command Phase you roll a dice for each poisoned unit and do some mortals on a dice roll (1-D3). Honestly, while this is a cool ability, very few things want to be in melee and will have the things they’re in melee with survive long enough for this to really matter, but its a cute pick on a non combat support unit. Lastly there’s the Auto-Medicae which gives the bearer a 5+ Feel No Pain. For those who played Crusade in 9th, you may remember a relic called Artificer Bionics which gave the same thing and was an auto pick in almost every army. The same will be true here.
On the Antiquity side of things we have another four options. Hammer of the Heavens lets you shoot an orbital laser, which is pretty sick. You put a marker on the battlefield in your command phase and then in the next command phase things nearby take some mortals. This isn’t a new mechanic (Space Marines Master of the Fleet comes to mind) and the issue with it is always that your opponent can just walk away from it and it denies you from moving somewhere as well. Next up is Maelstrom Clarion which gives the bearer 12” deepstrike denial, really handy in this format. Displacer Field lets you put something in reserves after being shot, which is again super handy in this format. Lastly Sigil of Psychic Amplification adds 6” to ranged psychic weapons and abilities (3” to aura abilities). This is an interesting one and I’m sure there’s an ability that’s really cool with it. Maybe a knight abominant?
There are three Legendary relics to cap us off and they’re all very strong. Gloaming Mantle gives a unit Lone Operative and Stealth if that character joins a unit they can’t be selected as the target of ranged attacks outside 18”. This is really flexible and can help a lot of units, but one thing that’s very funny is that you can put this on a big knight and have a Lone Operative big guy. Lyreth’s Mirror might be the coolest relic of the bunch. If something teleports within 12” of the bearer its unit can either shoot it or charge it. This rocks and will force your opponent to not get too brazen with their surgical deep strikes. Lastly there’s the Fate Forged Weapon which gives a weapon full wound rerolls and once per game it can get [DEVASTATING WOUNDS] and extra strength and attacks equal to the battle round. This is probably the weakest of the three, but full rerolls plus dev wounds is a potent combo that shouldn’t be overlooked.
The Sangua Terra War: Campaigns in Nachmund Gauntlet
With a new Crusade book comes a new Campaign setting for groups keen to weave together an overarching story as they do battle in their local gaming clubs. Tyrannic War gave us a campaign focused on hunting monsters, with skill trees for units to unlock. Structurally, there wasn’t much to it – campaigns in the Tyrannic War were just a series of missions strung together however you liked. Pariah Nexus gave us a more structured campaign framework, centered around collecting doodads (Blackstone Fragments), and added Strategic Footing as a way to make pre-game plans and attacker/defender matter a bit more. But Pariah Nexus was still more a campaign backdrop than a campaign proper.
Enter Sangua Terra, the Nachmund Gauntlet campaign – and this one is an actual campaign. Nachmund campaigns are split into three phases and have rules for player alliances, handing out rewards based on victories scored each phase and assigning Campaign Victory Points to determine a winner. It’s ostensibly a location-based campaign though not a map-based one, focusing on the war to conquer Sangua Terra’s capital city.
Nachmund Gauntlet campaigns recommend having a Game Master to run things, and recommend assigning a Warmaster for each Alliance.
Alliances
Nachmund Gauntlet campaigns split players into groups called Alliances. You can run with two or three of these, though Nachmund recommends three – Guardians, Despoilers, and Marauders (Beanith: They probably couldn’t use “The Good, The Bad and The Ugly” because it’s probably protected somehow and “The Slightly Less Bad, The Bad and The Frankly Awful” is a little confusing). These are meant to be loosely mapped to Imperium, Chaos, and all the other Xenos races, though GMs are encouraged to build teams however makes sense.
Phases
Over the course of three separate phases of the campaign, your three Alliances will battle attempting to seize control of four Strategic sites that can give your Alliance powerful bonuses if they are both in control of those locations and Secured the Position (reached level 3). The book recommends that Nachmund phases last two weeks if players are playing one game per week, with every player playing two games, but you can adapt these rules to playing over a weekend or going longer.
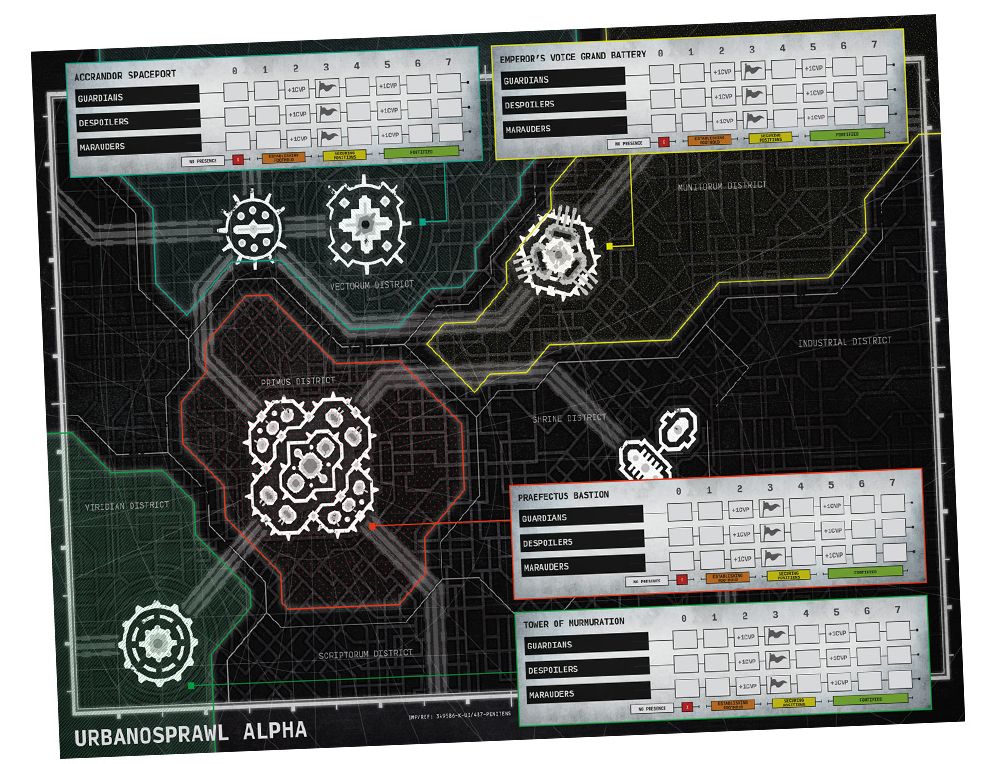
Strategic Sites
In a Nachmund campaign, alliances fight to control locations called Strategic Sites. There are four of these in Sangua Terra and at the start of the campaign all alliances have a Control Level of 0 for each site. As the campaign goes on and alliances win their games at those sites, they’ll increase their control presence – scoring battle points increases your control level over locations, bringing your alliance one step closer to victory (this is done in secret). Higher control values give you a bonus to your Campaign Victory points and give you extra in-game and roster bonuses.
You can also earn Strategic Asset Points from the Agendas in this book. Those are also secretly assigned to one of the four sites. These points go towards scoring your Alliance’s Strategic Goals, which are chosen secretly by your team’s Warmaster at the start of each campaign phase. Those Strategic Goals, if met, will not only affect your control levels of the Strategic Sites but possibly your opponent’s as well.
You will also gain Campaign Victory Points whenever you increase your control of a site to levels two and five. There are also CVP awarded at the end of the campaign to the Alliance holding the Strategic Sites. These campaign victory points are the major key to winning the campaign. But with that said, there are only twelve possible CVP to earn and because of that, if those are tied, ties are broken by the team with control of the most sites. With there being only four sites, if the sides are still tied then you move to the next tie breaker, Strategic Asset Points. Still tied? Well you could try Battle Points but it ultimately you’ve ended up at a stalemate.
Not so secretly, as both the book and us at Goonhammer recommend, you’re really going to want to have a Campaign Master involved to help keep track of all these secret results and who currently has control of which site and has the cool bonuses. That, and also make use of Goonhammer’s very own Administratum, the premier campaign and roster management tool for tabletop wargames. And yes, we’ll be implementing support for Sangua Terra Campaigns pretty soon.
Sangua Terra’s Strategic Sites
While brawling over Sagua Terra, there are four sites of importance… dare we suggest these sites be considered Strategic? Bad puns aside, each of the four sites comes with a site bonus that when your Alliance has control of, will give your team a special bonus in each game played.
- The Praefectus Bastion lets you muster up to four Reinforcement waves instead of the three everyone else gets. You can still only deploy two of them in game but having an extra option can make or break some games.
- Controlling the Emperor’s Voice Grand Battery means you deal D3 mortal wounds to enemy units arriving from Strategic Reserves on a 5+. Normally fairly boring but with the Tactical Reserves rules, you will have a few opportunities to ping a few models in every game.
- The Tower of Murmuration gives your Alliance an extra Strategic Goal to strive for and at the end of that campaign phase, your team’s Warmaster gets to choose which one of the two Strategic goals to discard.
- Rounding them out is the Accrandor Spaceport, should you control this site, your Alliance’s players can perform up to two Surgical Deep Strikes a turn. You can also, once per turn, reroll a unit’s Deep Strike test.
We can see a lot of groups tussling over the Spaceport and the Grand Battery as those seem the most powerful but the more canny Alliances will see that and pick up the Tower or Bunker for a song early on. From there, they have more options to score specific Strategic Goals and score certain Agenda making it easier for them to seize control of the other sites. Your Control Level of a Strategic Site is capped at 7 and can’t drop below 0.
Strategic Goals
At the start of each Campaign phase, your Alliance’s warmaster will secretly choose one of five Strategic Goals for their team, revealing the chosen goal to their team and the Campaign Master only. Each of these goals each have a different requirement that each require your Alliance to earn Strategic Asset Points (SAP) from completing Agendas in each battle that campaign phase. These SAP can then be secretly assigned to a Strategic Site to improve the alliance’s control.
Beanith: I bet Pendulin is going to love coding this for Administratrum.
There are five Strategic Goals available for each phase, of which three are locked to a particular Alliance, which is a nice thematic bonus. These tend to focus on how you interact with and allocate SAP to Strategic Sites, and they can be oddly a little mean at times.
For instance in phase one, the Marauders can take Unopposed Gains Goal, where the requirement is having one or more SAP assigned to sites where other Alliances have not assigned their SAP. If successful, your Alliance gains +1 Control to each Strategic Site where the other Alliances have no presence.
Meanwhile, Recon in Force is available to all three Alliances the only requirement is your Alliance spreading out your SAP to all four sites. The reward gains you 1 Control to each Strategic Site where your Alliances have no presence plus the warm glow of knowing you’ve possibly stooged the Marauders team at the same time. These two are naturally going to compete, since the easiest way to try and score Unopposed Gains is to spread your SAP to all four sites.
In phase two, the requirements become somewhat more difficult to score but the rewards make up for it. An example would be Shifting Priorities, which has you lose 1 Control in each of two sites but gain 3 more Control in another. Raid Supply Lines makes the other two Alliances lose 1 Control in a site if your Alliance manages to assign the most SAP to that site while not increasing their own Control level.
Phase three goals are similar to phase two but with greater risk and reward ratios on offer. Strategic Gambit requires the Alliance to have assigned the most SAP to two sites and as a reward drops your control in one of them by 2 and increases the control in all three others by 1 (for a net of +1). Despoilers can go down swinging with Raze Defences, choosing a site that one of the other Alliances have Fortified (5+ Control Level), and should they assign the most SAP to that site, they reduce the other Alliances’ Control Levels of that site by 1.
Controlling Strategic Sites/End of Phase Scoring
At the end of each campaign phase, the veil of secrecy is torn away, the dust settles and the Campaign Master gets their five minutes of fame by revealing the current standings for each Strategic Site. Starting with the Alliance with the highest over battle points, they increase their control levels of each site depending on how they split their battle points between the sites after each game. Then Alliances reveal their goals and modify Control, leading to a final score.
It’s a somewhat confusing and complicated process, but it’s done this way so control of each site and its powerful bonus goes to the Alliance that gets to Control Level 3 first. After that Alliances can only claim control (and the bonus) by having a higher control level for a site.
For example at the end of phase 1, the three Alliances only can gain a maximum of two Control Levels in a site from battle points alone. That means each Alliance needs to score their Strategic Goals in order to gain the 3rd Control Level needed to hopefully secure a site for their team. This means if two Alliances end up with a Control Level of 3 in the Accrandor Spaceport, the site control and its bonus would go to the Alliance that reached level 3 first.
Beanith’s TLDR Breakdown
- Alliance chooses a Strategic Goal secretly.
- Battle points are earned after every game and then assigned to a site secretly.
- Strategic points are from Agendas and also assigned to sites secretly.
- At the end of each Campaign Phase, control of the four sites are first determined by the Battle points starting with the Alliance with the most points in that site.
- First to three gains control and the site bonus.
- Other Alliances then need to have a higher control to gain control and the bonus.
- Then Strategic points are revealed and depending on the Strategy Goal get the bonus and maybe moving control of sites up and down for other Alliances and themselves.
- Campaign Victory Points are simply gained by getting a site to Control levels 2 and 5
Winning the campaign is scored by having the most Campaign Victory Points. If that is tied, the most strategic sites… still tied? How about the most Strategic Asset Points? Still tied? Congrats, you have achieved the needed stalemate to match the lore for the next campaign book.
Beanith: My much shorter TLDR? I miss Blackstone, rocks are so much less complicated.
TheChirurgeon: Yeah but it’s worth noting that Blackstone isn’t really concerned with whether you win or lose your games, it’s about collecting things. You can – and should – reskin Blackstone as anything you want. Likewise, this is more about providing a framework for a location-based campaign, though I agree it’s a bit more complicated than I’d have expected. It does however solve the issue of “the last team to win a game at location X controls it,” which can lead to lots of back-and-forth with little narrative advancement.
Mighty Champions
The oddest addition to the book is the addition of the Mighty Champions section. These are rules for adding and using Epic Heroes in your Crusade missions, in part to represent the historical nature of the campaign. Adding an Epic Hero ups your Crusade Points total by 1 (which, good), and after you add one to your roster, the GM is supposed to assign one of seven abilities to them. Only one of your Epic Heroes can have a Crusade ability.
These range from the relatively innocuous – Restorative Champions lets you re-roll failed Out of Action Tests for your army – to the downright insane – Front-Line Champions lets your Epic Hero pick any Battle Trait to have and apply to any unit they join for a battle at the start of each battle.
We’re not really fans of Epic Heroes in Crusade – they tend to defeat the purpose of building your own characters using the upgrades and tools at your disposal, plus it’s just kind of lame if three Marneus Calgars are running around the planet. These rules seemed designed to let named characters get in on a little more of the fun in a campaign, and we suppose that’s fine for like, players who feel stuck taking a character like Angron or Leontus in their army to avoid getting tabled, but we’d just as soon leave them on the shelf, or if they’re used as counts-as, just let them go without upgrades.
Playing Nachmund Gauntlet Missions
Aside from the obvious changes to the Mustering your Crusade army thanks to Tactical Reserves, they have included one minor change to the game set up and one major change to the scoring.
The minor change is the inclusion of Step 13 Redeploy Units, (oddly enough right after Step 12 Deploy Crusade Armies) where any of the usual pointy-eared or ridged forehead chicanery redeployment now occurs starting with the Attacker. Then it moves to Step 14 Determine First Turn and finally Step 15 where you will be resolving all the other pre-battle shenanigans.
The major change is the introduction of Strategic Advantage. All of the missions in this book have very low scoring objectives, typically rewarding the player 1VP per objective and only from the start of the second battle round going forward. During your battles in the Nachmund Guantlet, the first player to reach 10 or more VP in a game from Progressive Objectives (Beanith: Every single mission has Progressive Objectives. There are only two missions with an Endgame Objective as well because of spite I assume) is considered to have gained a Strategic Advantage. The game will end at the end of any battle round where a player has gained the Strategic Advantage. Otherwise, play on to the fifth round as normal.
Beanith: Excuse me while I point and laugh at those smug Battle Ready players with their fancy three colours and decorated bases. Battle Ready standard is now only worth 1VP and because it’s only scored after a battle, won’t count towards a Strategic Advantage. To be fair, it still may very well swing you the game by breaking a tie or forcing one.

The Missions
Finally there are the missions. Nachmund offers 15 in total, of which 3 are designed for Onslaught. The remainder are designed primarily for Strike Force, but are billed as playable in Incursion as well. While tenth edition Incursion games use the same board size as Strike Force, if you’re going smaller you’ll need to redraw the maps a bit – but it won’t take a ton of work to condense them.
The Strike Force missions in Nachmund Gauntlet come in two varieties – the first six have symmetrical layouts and objectives, while the latter six are asymmetrical and likely to give the Attacker the choice of who takes the first turn. We’ve already mentioned that these missions are pretty low scoring – most progressive objectives only award 1 to 2 VP per objective marker held or action done, and games end when a player becomes the first to 10 VP. There are still some end game objectives in the mix, but most are progressive, and we suspect that many Nachmund games will end early. Thankfully none of the objectives can be scored on the first turn so games can’t end straight away.
From a play standpoint, the symmetrical missions are set up similar to standard missions, just with fewer points scored. There’s a version of Scorched Earth, a version of Supply Drop, and a version of Unexploded Ordnance, and that last one – Heralds of Vengeance – is one of the real stinkers in the batch.
The asymmetrical set are more in line with the missions we’ve seen in Tyrannic War and Pariah Nexus. There’s a sabotage mission where you are doing actions on objective markers and removing them, a pair of crazy linebreaker missions, and one that has you searching objectives. In several of these the Attacker chooses who goes first, and those missions generally align with situations where the Attacker will be starting on the back foot from a deployment and goals standpoint.
This is especially true for Beachhead Offensive where the Attacker is jammed into a 18” semi circle and the Defender surrounding them with a 4” spitting distance between the two sides. Here the Attacker will almost always want to go first because they will want to drive deep within the Defender’s deployment zone to capture as many of the Defender’s five objective markers as they can while holding tight to their single home objective, and they’ll want to be the first player to bring in their reinforcements.
As always, we recommend having a lot of terrain on every table you play, with spots to hide. There is no moral superiority to be gained in playing on planet Bowling Ball just because “not every battlefield has cover” – Warhammer’s a game first and foremost, and it should be fun for both players.

Final Thoughts
Norman: This ruleset is fully sick and I love Crusade being a place to play a completely different set of 40k rules. I really like the waves mechanic as it makes these battles feel more thematic and gives it better flow. The extra stuff in here is also neat, the Strategic Sites system also gives you some of the taste of a map campaign without the logistical lift. While I like officially having rules on how to use Epic Heroes in Crusade, I still don’t love them being in missions like these since it’s supposed to be about your dudes and the story of your warband. Overall though, I really like the direction here and I hope to see similar creativity in future books.
Beanith: It’s an excellent meaty campaign system which should have plenty of play available to last us until the next campaign book drops. The Tactical Reserves systems took a little while to grow on me but I’m now excited about the idea of people actually increasing their Order of Battles beyond the 2000 point mark to take advantage of having options available to your forces mid game. Super excited to see the Deep Strike Mishap make a return. I always had a great time back in the day with my Terminators scattering off the table or into a giant mob of gretchin.
The Strategic Advantage was a surprise at first but when you account for the Tactical Reserves changes and Rapid Ingress getting kicked out on its ear, games will probably still take the same amount of time to play unless you’re anything like me and consider objectives to be pointless distractions and would much rather be over in my opponent’s zone trying to force feed my Imperial Knight’s fist into their Warlord.
TheChirurgeon: Nachmund Gauntlet is a pretty wild departure from prior books but I’m here for it. Crusade is a great place to play with a completely different set of 40k rules and having multiple waves of your army gives players a reason to smash that “Increase Supply Limit” button and think strategically about how they build and field their armies. The Strategic Sites system is an interesting way to introduce a “lite” version of a map campaign to your campaign, and you’ll want to have at least one map sicko on each team to act as warmaster so they can get a kick out of scheming around SAP allocation. Like Beanith I’m a big fan of Deep Strike mishaps returning and the implementation of Surgical Deep Strikes is pretty cool. The big problem with mishaps back in the day was that the penalties were just too harsh, making you never want to risk it. This is a much better implementation.
On the whole, I like this book, though I do worry that the campaign is a bit too complicated and the missions are extremely intertwined with the campaign system, making it difficult to use if you aren’t going all in. The good news is that we’ll be adding support for Nachmund Gauntlet in Administratum soon so if you want an easier way to run it and track everything, we’ll have you covered.
Have any questions or feedback? Drop us a note in the comments below or email us at contact@goonhammer.com. Want articles like this linked in your inbox every Monday morning? Sign up for our newsletter. And don’t forget that you can support us on Patreon for backer rewards like early video content, Administratum access, an ad-free experience on our website and more.
