
In our How to Paint Everything series we look at how to paint well, everything, with different techniques and approaches. This week, we’re taking a look at Mike’s approach to his studio scheme inspired Old Dominion.
I knew that going in to this, I’d be painting a lot of models. Even with Conquest being at the manageable end of rank and flank games, everything adds up pretty quick, I wanted a scheme that was reasonably striking and simple to execute.
I settled on a combination of dry brushing, and more traditional layering for the Legionnaires, as I really wanted an easy to create the look of Verdigris. Researching online there’s a myriad of techniques to get some great looking Verdigris, including one from our own How to Paint Everything series. None of them really gave me the combination of speed and ease I was looking for, so I started thinking about how it could be dry brushed on in reverse. For the bigger and lower count models, I still wanted reasonably quick schemes, with a couple of higher effort steps and extra detail to make them standout.
Legionnaires
General Preparation
I primed black for this, speed was the goal here and this gives us simple shadows for free. You’ll also want the following:
- a medium sized dry brush and a layering brush
- Verdigris paint, I used Vallejo Game Effects Verdigris (72.135)
- A triad of bronze paints, I used Darkstar Blackened Bronze, Scale75 Victorian Brass (SC-92), and Scale75 Amber Alchemy (SC-93).
- A triad of reds, I used Vallejo Model Colour Hull Red (70.985) and Scale75 Antares Red SC-37, and Vallejo Model Colour Amaranth Red (70.829).
- The skin is painted using Vallejo Model Colour Deck Tan (70.986), Druchii Violet, and white.
- The wood was painted using Scale75 Walnut (SC-29), Vallejo Old Wood (310), and Wyldwood.
The Armour


Top left: Primed black
Top right: Base coat of Verdigris. Perfect coverage isn’t required, the recesses are most important.
Middle left: Stage one dry brush of dark bronze.
Middle right: Stage two dry brush of mid tone bronze
Bottom left: Stage three dry brush of light tone bronze
Bottom right: Example of what this looks like on a shield.
Optional step: Very light dry brush of silver, targeting the high points of your bronze.
The Cloth


Top left: Base coat deep reddish brown.
Top right: Layer mid tone red, avoiding most recessed areas.
Bottom left: Highlight tops of folds, end of fabric, ridges of crest, with orange red.
Bottom right: Another pass of the highlight colour, to reinforce the highlights made previously.
The Skin


Top left: Base coat your off white or warm grey
Top right: Highlight white on the tops of muscles, remains of the nose and cheekbones.
Bottom left: Wash with a purple tone, a dark blue tone would also work.
Bottom right: Re-apply thinned highlights on the cheeks and nose, using white.
The Wood


Left: Base coat of your dark wood tone.
Middle: Layer of the lighter wood tone.
Right: Wash with thinned Wyldwood, or chestnut ink.
With this being my first time heavily relying on dry brushing to complete a model, you may have noticed a couple of sections out of order. I had initially base coated my cloth at the same time as the Verdigris, and no matter how careful I was, this still ended up being a mistake. The normal process for drying brushing is to work from the general, to the specific, and my usual approach for miniature painting is to work outwards. This means base coating things like flesh first, but when you’re dry brushing this can end up being wasted time. I’d recommend finishing all of the dry brushing for the armour before going back to do the more detailed steps using traditional methods.
Karyatids
General preparation
Priming black once again gives us the shadows for free, as we build up detail on top of the primer. With this being a more involved scheme, I had a concept I was keen to try out based on the historical practice of painting carved statues. The idea was to portray the previously devotional statues, painted and adorned, now animate and vengeful. With this in mind, I used an airbrush marbling technique, followed by chipping medium, before applying basecoats to make the statues appear painted.
What you’ll need:
- Medium and small drybrushes
- Dried out wet wipes
- Airbrush set up
- Chipping medium
- Gloss varnish
- Titanium white oil paint and thinners
- White ink
- The same set of Verdigris and Bronze paints you used for the Legionnaires
- A suitable Mediterranean skin tone for the statues
- Your choice of robe colour for the statues
A selection of paints for the marble undertones I used the following Vallejo Model Air paints: Light Gray (71.050), Pale Blue (71.008), and Signal Blue (71.091).
A blue triad or spectrum for the smoke, I used the following Scale75 paints: Sky Blue (SC-50), Caspian Blue (SC-07), and Abyssal Blue (SC-08).
The Marble


Top left: Prime black
Top right: Add patches of your darkest colour, leaving some areas of black exposed.
Bottom left: Add patches of your mid-tone, blending in to the black but still leaving some of the darkest colour and black exposed.
Bottom right: Add patches of your lightest colour, covering and blending the other two while still leaving some variety.


The tighter you can get the wet wipe, the better for this, as you do not want it to slip and the close proximity to the surface will give cleaner lines.
Top left: Wrapping the wet wipe around the main body, go over the area with white ink, and then give the whole thing 30 seconds to dry before removing the wet wipe mask.
Top right: Wrap the wet wipe tight around the head, and repeat the process you used for the body.
Bottom left: End result for the head.
Bottom right: Full shot of the now marbled Karyatid.
At this point, the model should be satin varnished, and then the marbled areas should be sprayed with chipping medium in one vertical coat and one horizontal coat.
Over-Painting the Marble and Chipping


Top left: Airbrush on your skin and robe colours, I didn’t worry too much about being tidy here as I knew I’d be coming back to the smoke and jewellery.
Top right: With a wet brush, begin to gently scrub at the areas of paint you’d like to remove. This reactivates the chipping medium, removing the top layer of paint easily.
Bottom left: Continue this process across the model until you’re happy with the level of wear.
Bottom right: Gloss varnish and then recess shade the cracks using a titanium white oil wash. For this step I diluted Mig Oilbrusher White.
Smoke and Metals


Top left: Airbrush the smoke and weapon areas white.
Top right: Base coat the metal with your Verdigris paint.
Bottom left: Drybrush your dark bronze
Bottom right: Drybrush your mid tone bronze, and then lightest bronze. For the very small areas, I used a regular size 3 brush to pick out the detail.


Left: Heavy drybrush of your lightest, vibrant blue, leaving just the deepest recesses white.
Middle: Drybrush your mid-tone, preparing for the transition to your darkest top colour.
Right: Drybrush your darkest top colour, at the outer edges of the smoke.
When dry brushing smoke, you’re moving from hottest to coldest, and it can take a little bit of time to get your head around this backward highlighting process. Don’t be afraid to go back and forth between these steps as you blend between the stages.
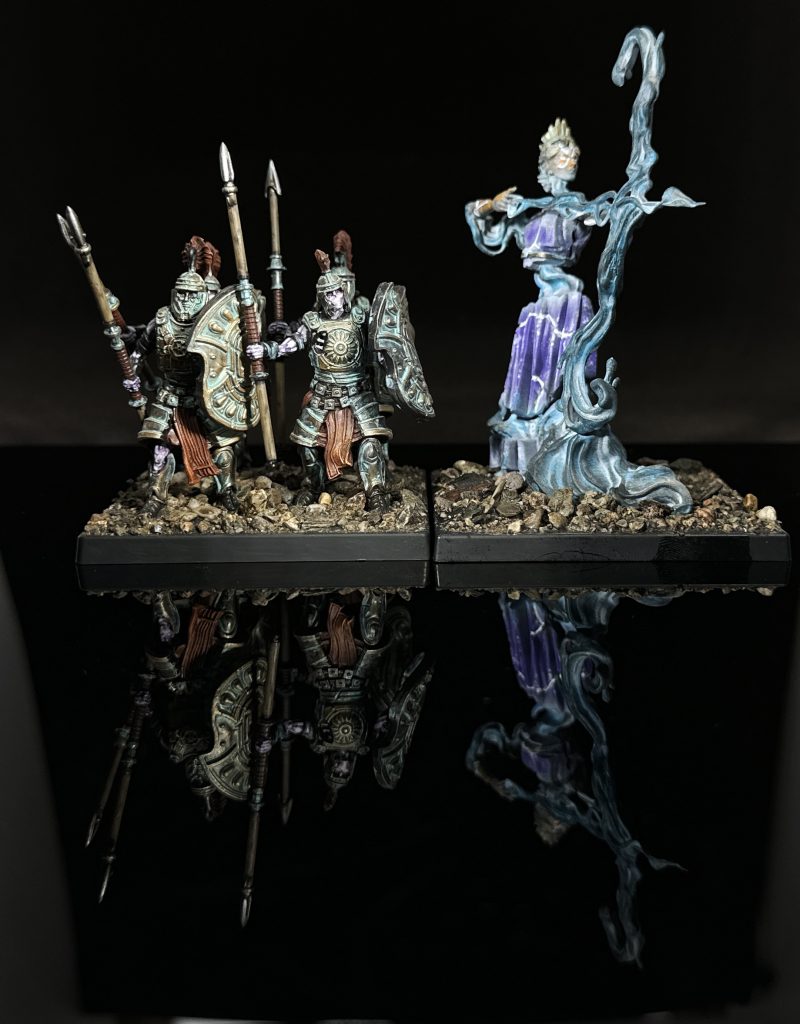
The additional steps to add marbling beneath the painted robes of the Karyatids definitely don’t align with my initial goal of creating some quick schemes to get this army on the table, I feel like the extra effort was worth it overall of the larger model. Even with the extra steps, the overall process went by quickly and I lost myself in it, painting the full unit instead of just the one I needed for this guide.
Let me know in the comments how this guide helped with your own weathered metals and battle worn statues.
As always if you want to get 10% off and support Goonhammer you can make your Conquest purchase by clicking here for US/Canada or here for EU/rest of world. You’ll also need to enter code “goonhammer” at checkout.
Have any questions or feedback? Drop us a note in the comments below or email us at contact@goonhammer.com. Want articles like this linked in your inbox every Monday morning? Sign up for our newsletter. And don’t forget that you can support us on Patreon for backer rewards like early video content, Administratum access, an ad-free experience on our website and more.
