In our How to Paint Everything series, we take a look at different armies of the Warhammer universe, examine their history and heraldry, and look at several different methods for painting them. With the release of War of the Spider and his fancy new model, we’re looking at how to paint the Manflayer, Fabius Bile.

Primogenitor. Clonelord. Chem-master. Manflayer. The former chief apothecary of the Emperor’s Children has many names, often given to him by those who have come to regret their dealings with him. Fabius Bile was actually born on Terra, and after being inducted into the Emperor’s Children legion was one of the 200 surviving warriors that traveled to Chemos to meet Fulgrim after a rampant genetic disease called the Blight affected the legion’s gene seed nearly wiped them out. Bile’s research into the disease ultimately led to discovering a way to detect it in new Astartes and mapping the legion’s genome, helping them rebuild the legion into the paragons of perfection they’d later become. Unbeknownst to many however is that Bile himself was afflicted with the disease, and has yet to find a cure.
During the Great Crusade and the Heresy, Bile turned his chapter’s need for perfection inward, looking for ways to perfect the legion’s warriors physically and improve upon the Emperor’s work. When the legion conquered the Slaanesh-worshipping Laer, Bile learned much from their physiology and used his work to secretly implant Laer organs in Emperor’s Children Warriors, creating some of the legion’s first sonic weapons. He turned that work on himself, using it to prolong his life and stave off the effects of the Blight and its tumor-causing effects.
Unlike his brothers, Bile never fell into the worship of Slaanesh, and views the Pantheon as alien beings rather than gods. Instead he fell further into his work and began creating a new race of beings called “New Men,” designed to be stronger and more resilient than humans, able to hunt and combat Astartes. Working in a secret lab on the planet Harmony in the Eye of Terror, he took to cloning the primarchs, successfully creating several functional clones until his work was destroyed in a raid by Abaddon the Despoiler. In the time since, he’s founded a group of Apothecaries called the Consortium, where he trains others in his talents. Bile frequently travels the galaxy, offering his services to renegade warlords and Chaos Marine warbands who need gene seed and new recruits in exchange for protection and resources, looking for more raw material to build his new race of beings.
Painting Fabius Bile
I picked up Bile on launch day, intent on painting him. There’s just one method here, but rather than focus on different ways to paint Bile, I’m going to talk about some of the key elements, such as the vials, the coat, and the subassemblies I used. I haven’t had time to paint his helper yet, but I’ll add that goober later.
Step 1: Primer
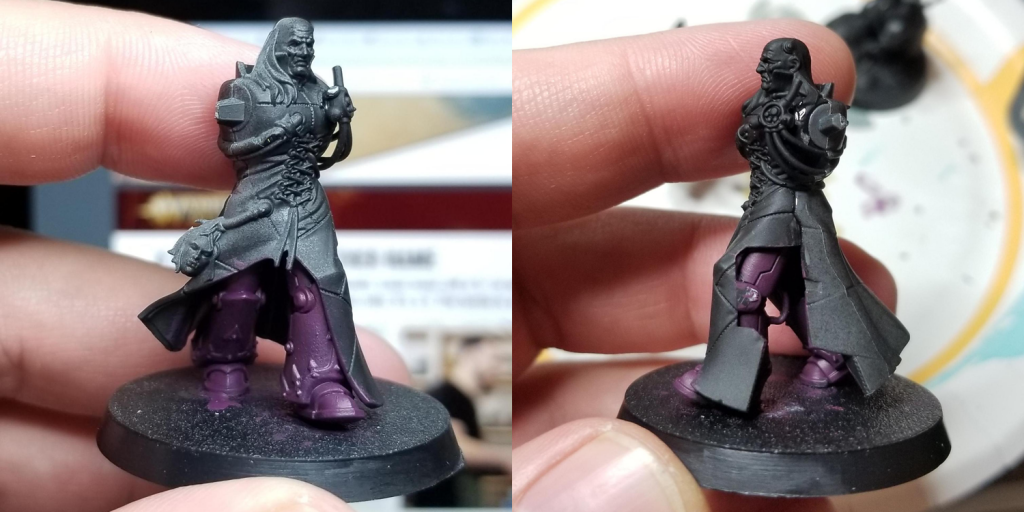
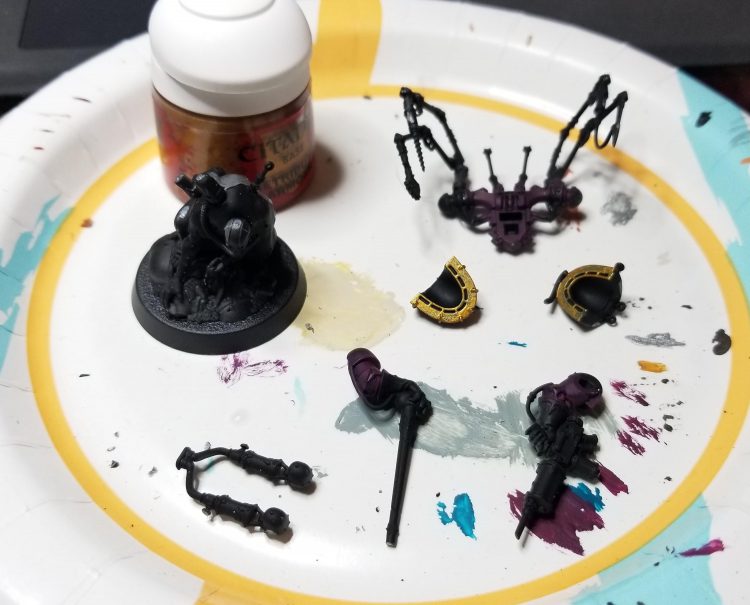
Prime black. Always black. I’ve been staying in Houston recently where it’s insanely humid during the summers, so I primed the entire sprue for this model in my folks’ garage. This helped me avoid that weird dusty grainy effect you get from when humidity causes the spray to clump and also solved some issues with how I was going to prime the recessed bits under the cloak. The downside is you have to scrape paint off contact points before you glue them together to get a good bond and you’ll need to repaint the parts where you cut the model off the sprue.
 Step 2: Subassemblies and painting the model
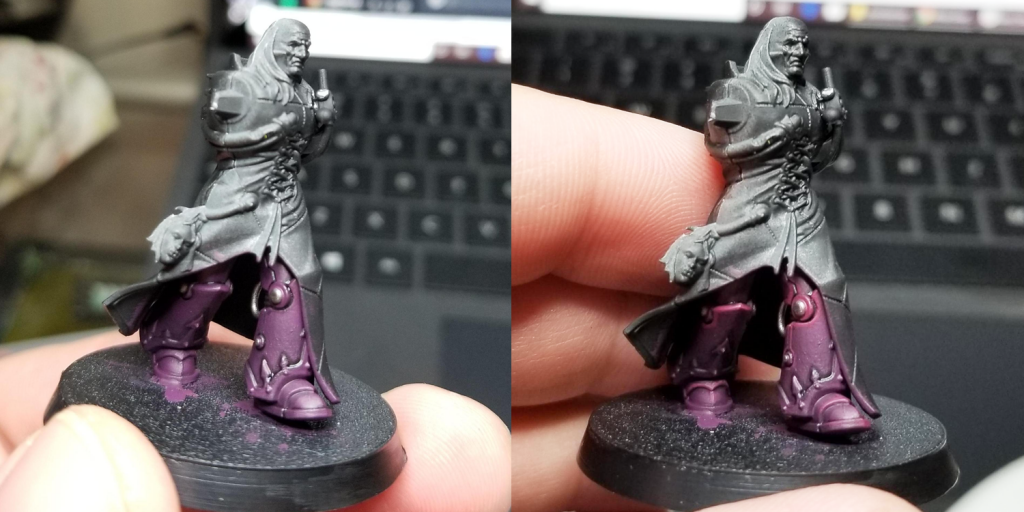
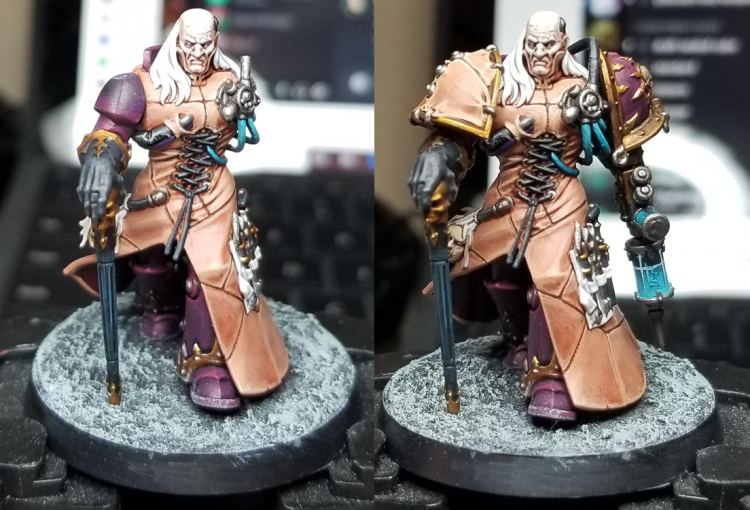
I knew I wanted to work on Bile in a few parts in order to make my life easier and hit some of the harder-to-reach areas of the model. So I started by painting his legs with a 20/80 mix of Naggaroth Night and Screamer Pink, then I put the basic model together with his cloak. I probably should have painted the cloak lining before this step, but I was still able to reach enough of those parts that I felt good about them. There’s a panel on the side of the cloak with his tools that can be glued on separately, and leaving it off allowed me to get good angles on the interior of the cloak and the legs before I glued it in place.
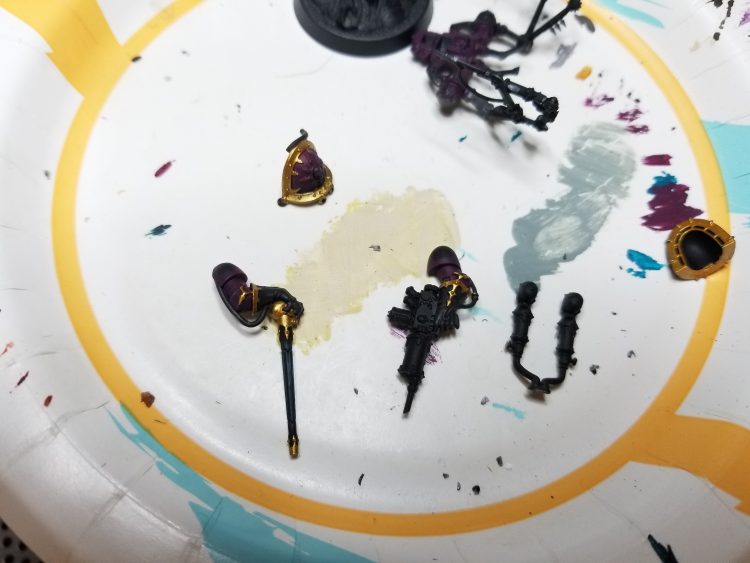
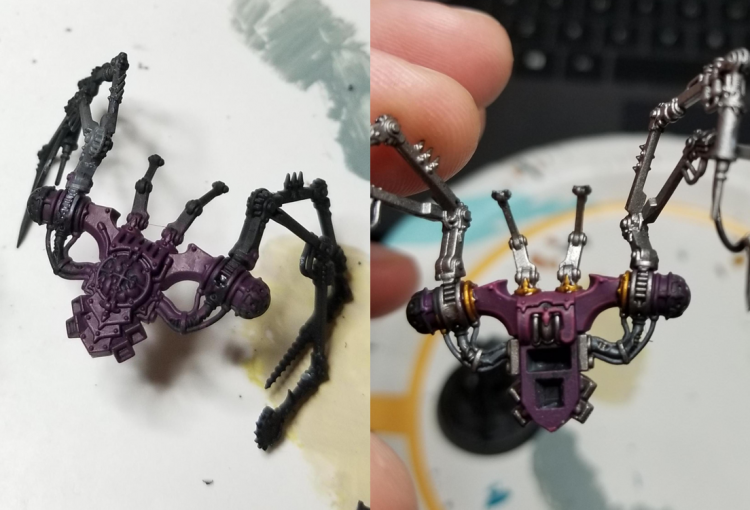
Speaking of sub-assemblies, I’m painting Bile’s body separate from his arms, shoulder pads, and backpack. I want to make sure I get all these parts done well and some of them need good 360-degree coverage. Plus I usually paint space marine shoulder pads and backpacks separate when I really want to go all-out on a model.
Step 3: The Armor
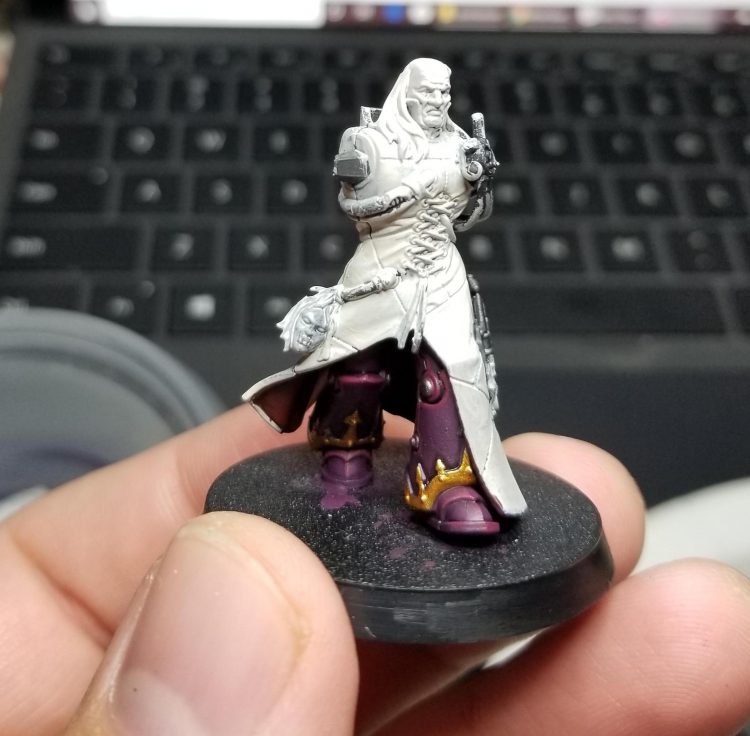
After the base coat on the armor I blend up using progressively more Screamer Pink, then I edge highlighted with Screamer Pink and used Nuln Oil to paint around the edges of the armor trim. I then hit the backs of the knees and the rivets with Leadbelcher adn a coat of Nuln Oil. You’ll see the trim in future steps because I didn’t paint things quite in specific order, but the recipe for that is pretty much what I always do – Retributor Armour base, with a wash of Agrax Earthshade (usually 2 coats), and then edge highlighted with Ironbreaker. The Rivets are also Ironbreaker.
Step 3: The Fabulous Cloak
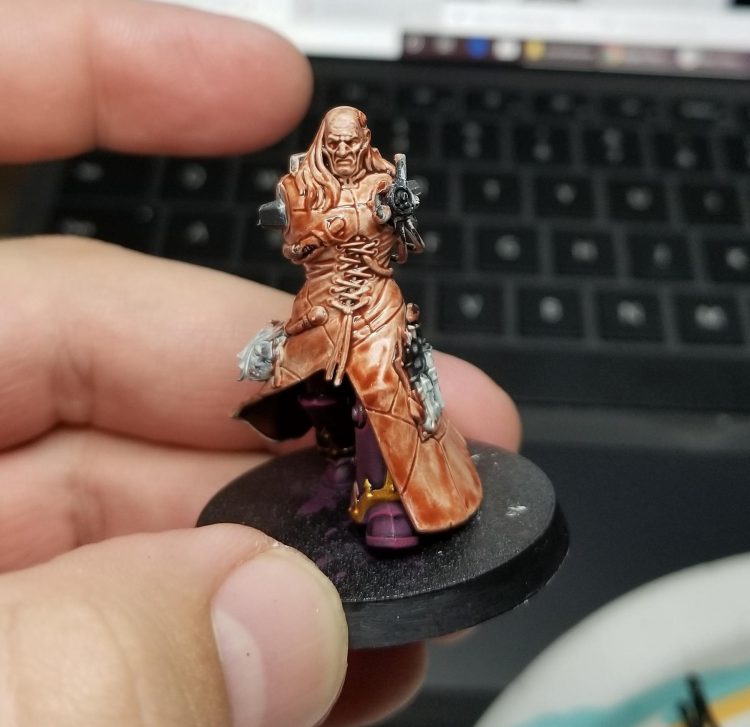
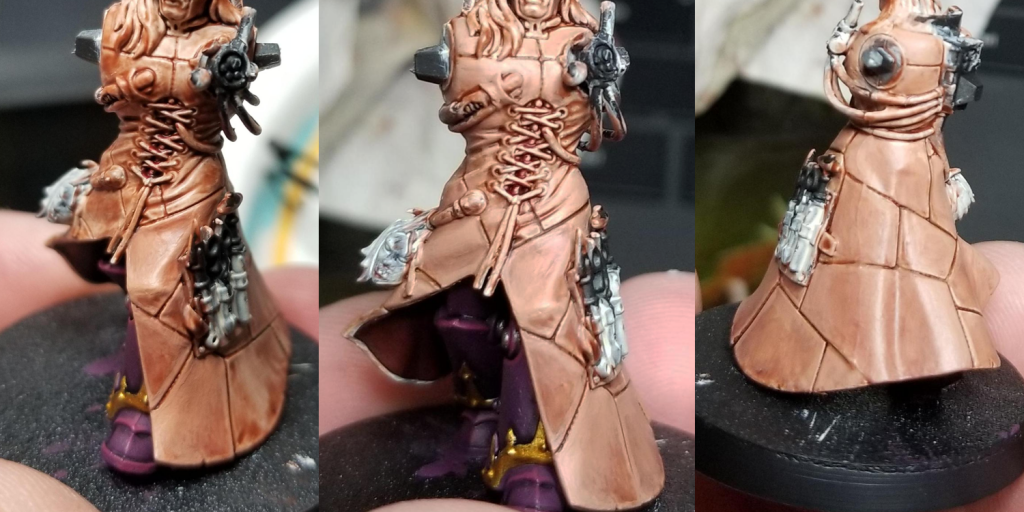
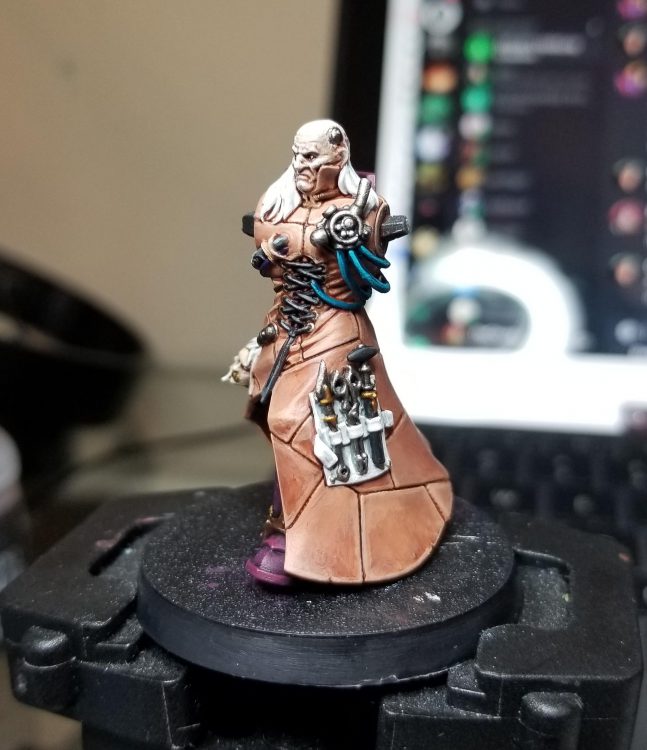
Now for the cloak. I coated the entire thing plus Bile’s face with Wraithbone, then painted the interior of his cloak with a mix of Mephiston Red and Abaddon Black, about 50/50, shaded up with a little more Mephiston Red, then I glued on the side panel of the cloak and made sure to get the edges with some more Wraithbone.
Time for some contrast paints! I painted up Bile’s cloak and face with a hearty wash of Guilliman Flesh Contrast Paint. This gets me the base colors I want and will help give some patina to the cloak later. If you want more of a leather look, I highly recommend checking out How to Paint Everything: Leather by Felime – it’s great stuff.
Time to smooth that cloak out. I start by using Cadian Fleshtone on the panels, and using a small amount of Guilliman Flesh to wet blend some darker colors. Basically the way this works is I lay down a thinned coat of Cadian, the dip my brush in Guilliman Flesh and apply to the lower corner of a panel on the cloak, and start blending from there. I’ll periodically add more Cadian and mix it with Guilliman to get the intermediate shades. The end result is something much smoother but still varied. After I’ve laid down all the panels in this fashion, I hit the seams with Agrax Earthshade to darken them. Then I’ll come back in a bit and use Flayed One Flesh to edge highlight parts of the cloak, especially on the chest.
Step 4: The Head and that Fabulous Hair
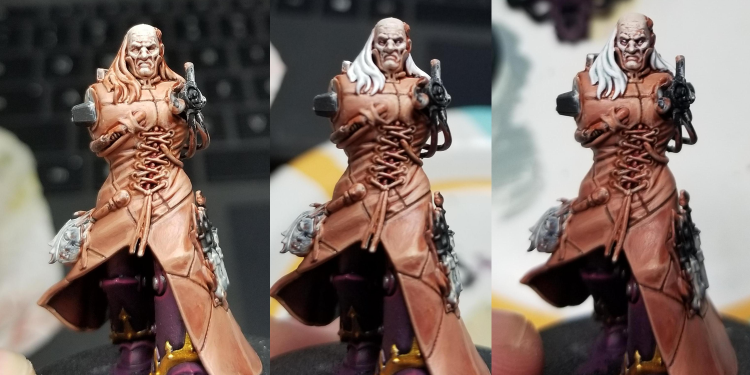
I started by highlighting the head with Flayed One Flesh and Reaper Polished Bone. I painted the area around the eyes with a thin shade of Duruchii Violet to give them a sunken look, then dotted them with a single dot each of Reaper Pure White. I painted the recesses of the face with Agrax Earthshade to give the face more definition, and did the same on the brow wrinkles. When I do this I don’t wash the entire model, but rather use a thin brush and just paint the shade like it’s a paint, directly into the recesses. The goal is to darken those spots without messing up the highlighted areas.
The lip is a mix of Emperor’s Children Pink and Reaper Polished Bone. Then I hit the hair with Reaper Pure White and a coat of Apothecary White Contrast Paint before going back over the strands with Reaper Pure White.
Step 5: Cloak Doodads
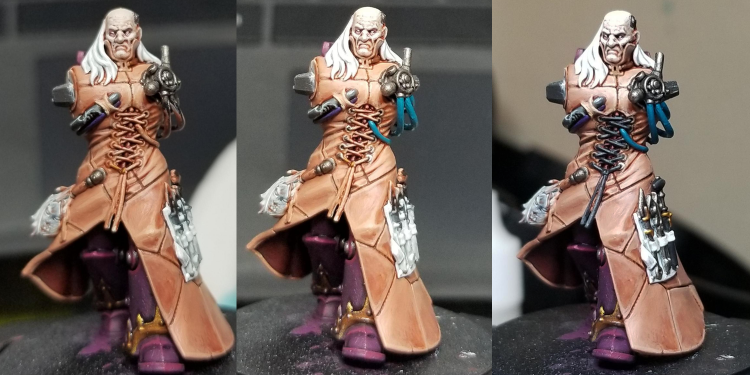
There are a lot of element son the cloak to paint here. The chest machinery gets Leadbelcher base coat washed with Nuln Oil and highlighted with Leadbelcher and Ironbreaker, while the cabling covers are done with Corvus Black and highlighted with Mechanicus Standard Grey. I wash in the recesses behind the corset lacing with Flesh Tearers Contrast Paint and then hit the ringlets for the laces with Ironbreaker, then I wash around them with Agrax Earthshade. The laces are Corvus Black highlighted with Mechanicus as well. It’s a combo I’ll use for all of my dark gray cabling/machine parts on this.
The blue cables are Incubi Darkness and I highlight/blend that up to Sotek Green. I’m gonna be using these colors a lot later for the vials and chemicals on Bile and because these cables run to his backpack, I need the color of them to match his
The head strung on his hip I painted with Flayed One Flesh, then washed with Reikland Fleshshade before highlighting it again with Flayed One and Rakarth Flesh before washing around the eyes with Duruchii Violet. The hair I painted with Wraithbone and washed with Apothecary White Contrast paint before doing the strands with Reaper Polished Bone.
I’ve also cleaned up the cloak a little more and done some edge highlights with a mix of Cadian Fleshtone and Flayed One and in a couple places on the chest, a spot of Reaper Polished Bone. For the tools on his side, I painted the holster Reaper Pure White, then washed it with Apothecary White Contrast Paint and then highlighted it with Reaper Pure White. The tools are mostly Leadbelcher washed with Nuln Oil and highlighted with Ironbreaker and the black parts/handles are done with Coruvs Black and Mechanicus Standard Grey.
Step 6: The Arms
Time to tackle the arms. I paint the armor on these the same as the legs, then hit the rod of torment with Corvus black and edge highlight it with some Mechanicus Standard Grey and a little bit of Incubi Darkness to give it a bluish hue.
 Step 7: Bile’s Magnificent Vials
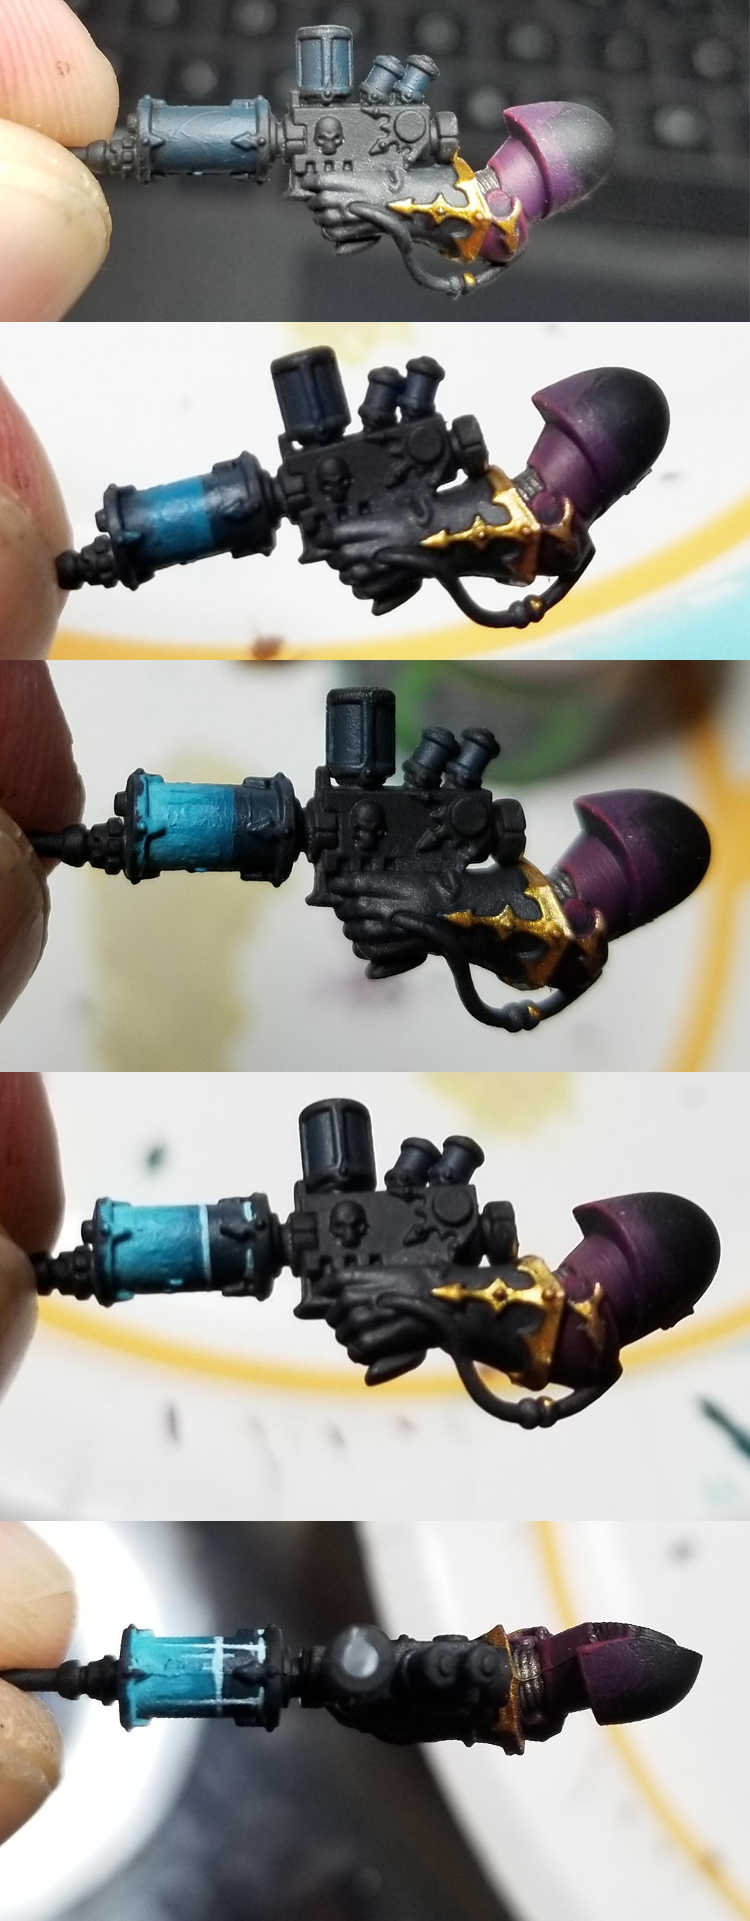
The process for painting vials takes time but is pretty straightforward. I start by painting the full vial with a dark tint that matches the liquid – this is because the glass will take on that color. So for the blue liquid vials I used Incubi Darkness. For the red one I painted later, I used a dark mix of Abaddon Black and Mephiston Red.
Then I paint a line where I want the liquid to begin going around the vial. In this case, I used Sotek Green. I use the trim arrows as markers to make sure I’ve got a straight line – I want the line to be the same distance from each of the arrows as I go around. I shade that up using more and more Reaper Pure White toward the bottom. This gives the liquid a glowing look. As I do this, I paint in vertical lines rather than horizontal bands – this helps give the impression of movement in the liquid. I’ll also add a few dots of Drakenhof Nightshade to look like bubbles.
Once that’s done I use a very light mix of Sotek and Pure White to mark the line where the liquid starts, and I highlight the top of the glass vial as well. Then I do a series of think vertical lines to act as the glass reflection, making sure it crosses the liquid line. Then I coat the whole thing in ‘Ardcoat to give it a glossy sheen, making it look more like glass. After that, I’ll paint the gold trim around it.
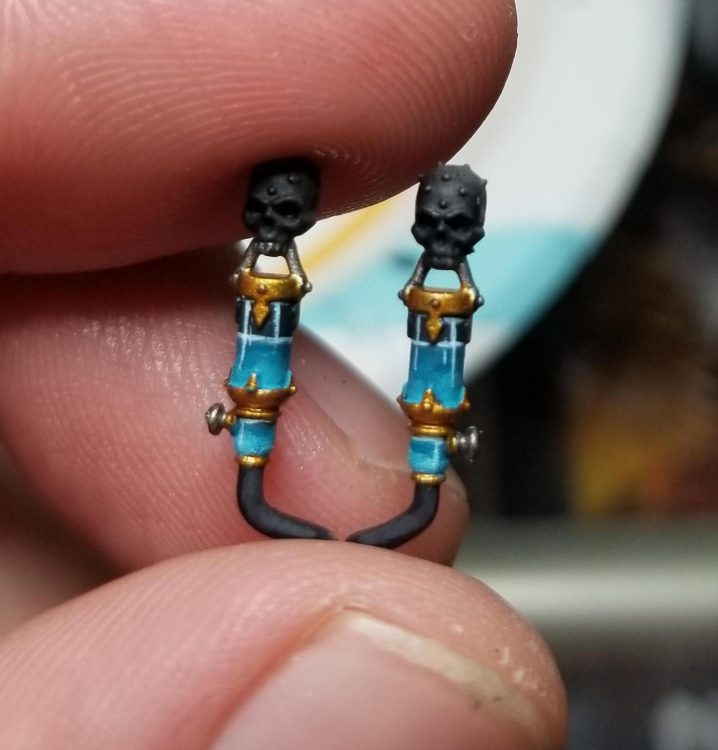
Same process on the backpack vials, with the only difference being that the lower vials are already full, so they start with a full coat of Sotek Green and work up from there.
Step 8: The Fabulous Arms, Again
Back to the arms. I paint them separately but not necessary completely, before gluing them on. I also base the model before the arms go on, to ensure that I don’t accidentally paint the Rod of Torment when I’m drybrushing the base. The base is just Astrogranite texture paint washed with Nuln Oil and drybrushed with Celestra Grey. I also paint the inside/under rims on the shoulder pads before they get glued on, to make it less of a pain in the ass to get them on.
Step 9: The Backpack
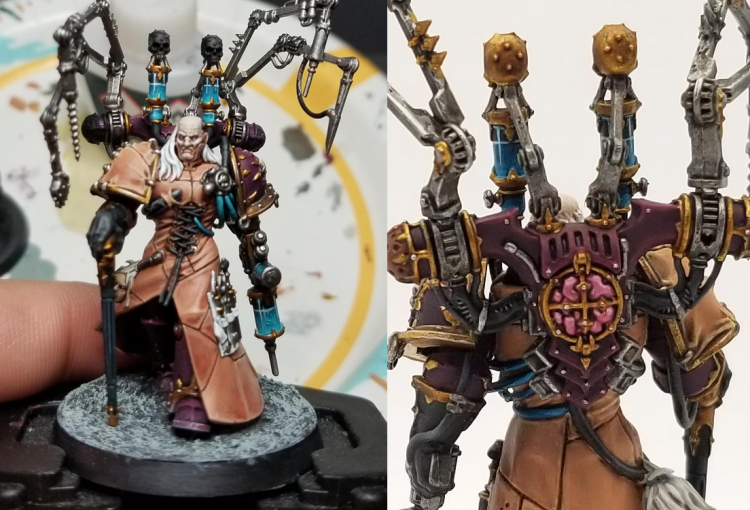
I don’t need to paint the whole backpack before gluing it on, just the parts that are going to face Bile because those will naturally be a pain in the ass to reach with a brush once I’ve glued the thing on. That means doing the edge highlights on the purple armor, hitting the cabling, and getting the gold rims on the supports for the backpack vials.
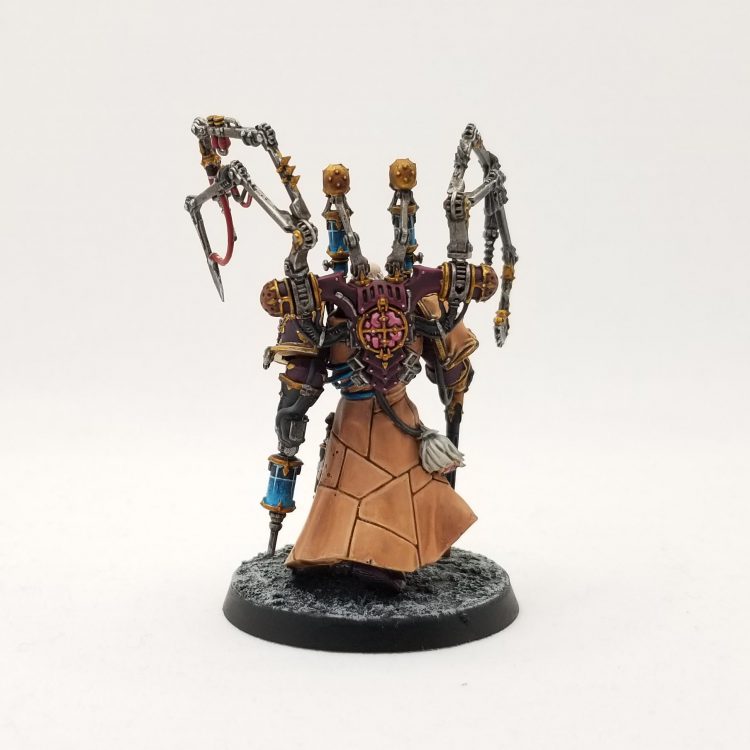
OK, now the backpack goes on and I can finish it off by doing the last vial and coloring a lot of the remaining details. Most of these are cables, but there’s some gold trim and black/dark gray spots. The only notable thing left is the brain for the Chirurgeon backpack; I paint this with Emperor’s Children Pink, then wash it with Carroburg Crimson before re-highlighting it with Emperor’s Children and a mix of EC and Pure White. Then it gets a gloss coat of ‘Ardcoat to make it look like wet brains.
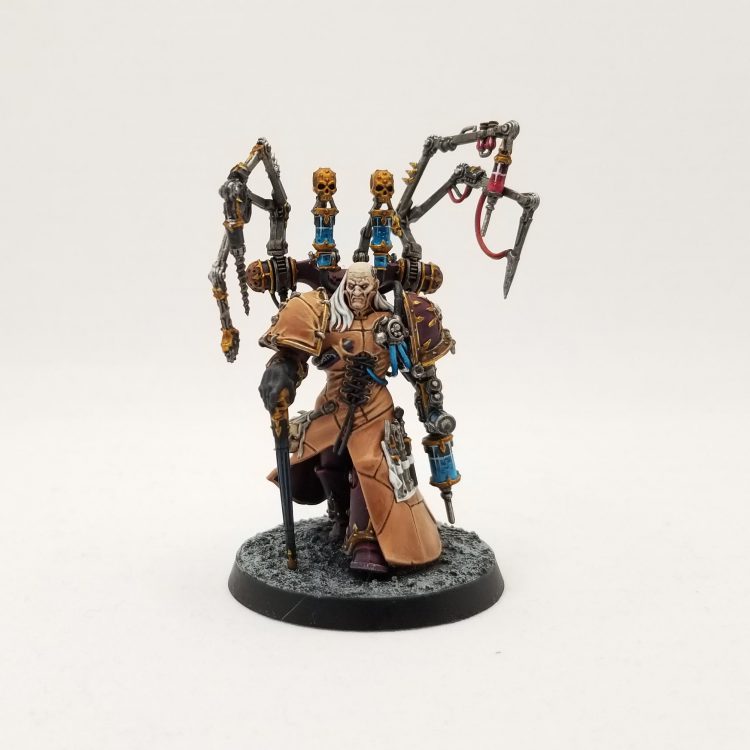
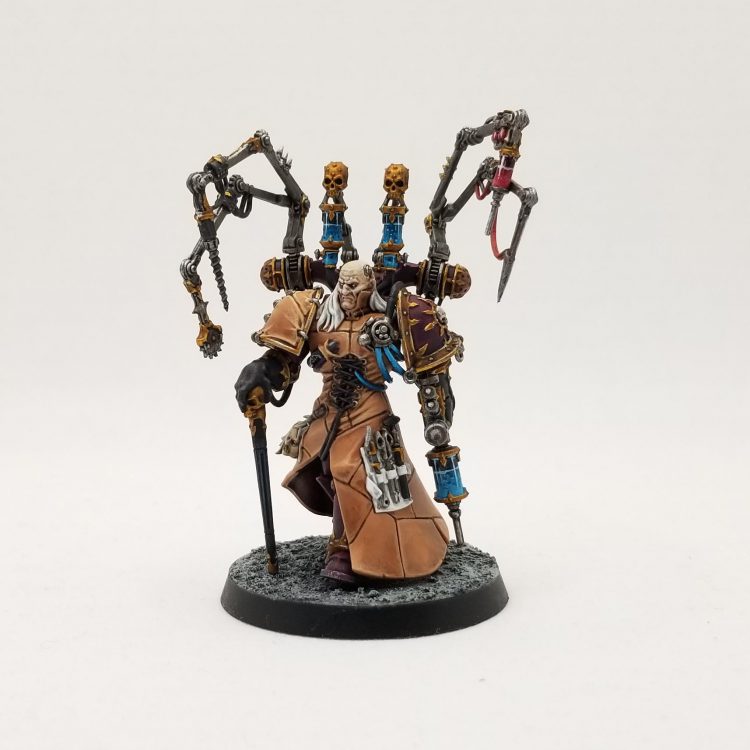
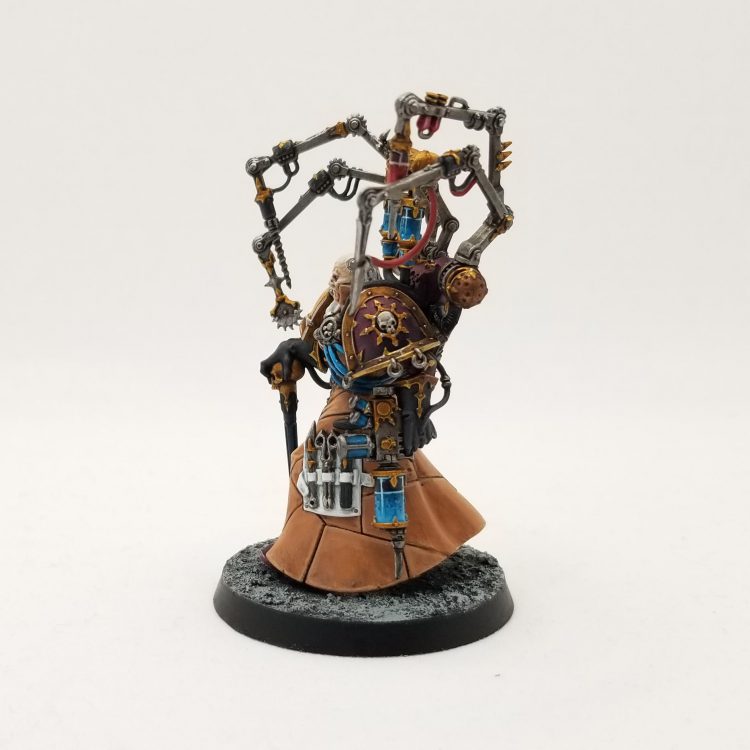
And that’s it – a finished Fabius Bile! I’m very happy with how he turned out. It’s a great model to work with and there were a lot of challenging parts. Hopefully this guide has been helpful for painting your own.
Have any questions or feedback? Drop us a note in the comments below or email us at contact@goonhammer.com.
